

22 Halloween Crafts for Elementary Kids That Skip the Template Entirely
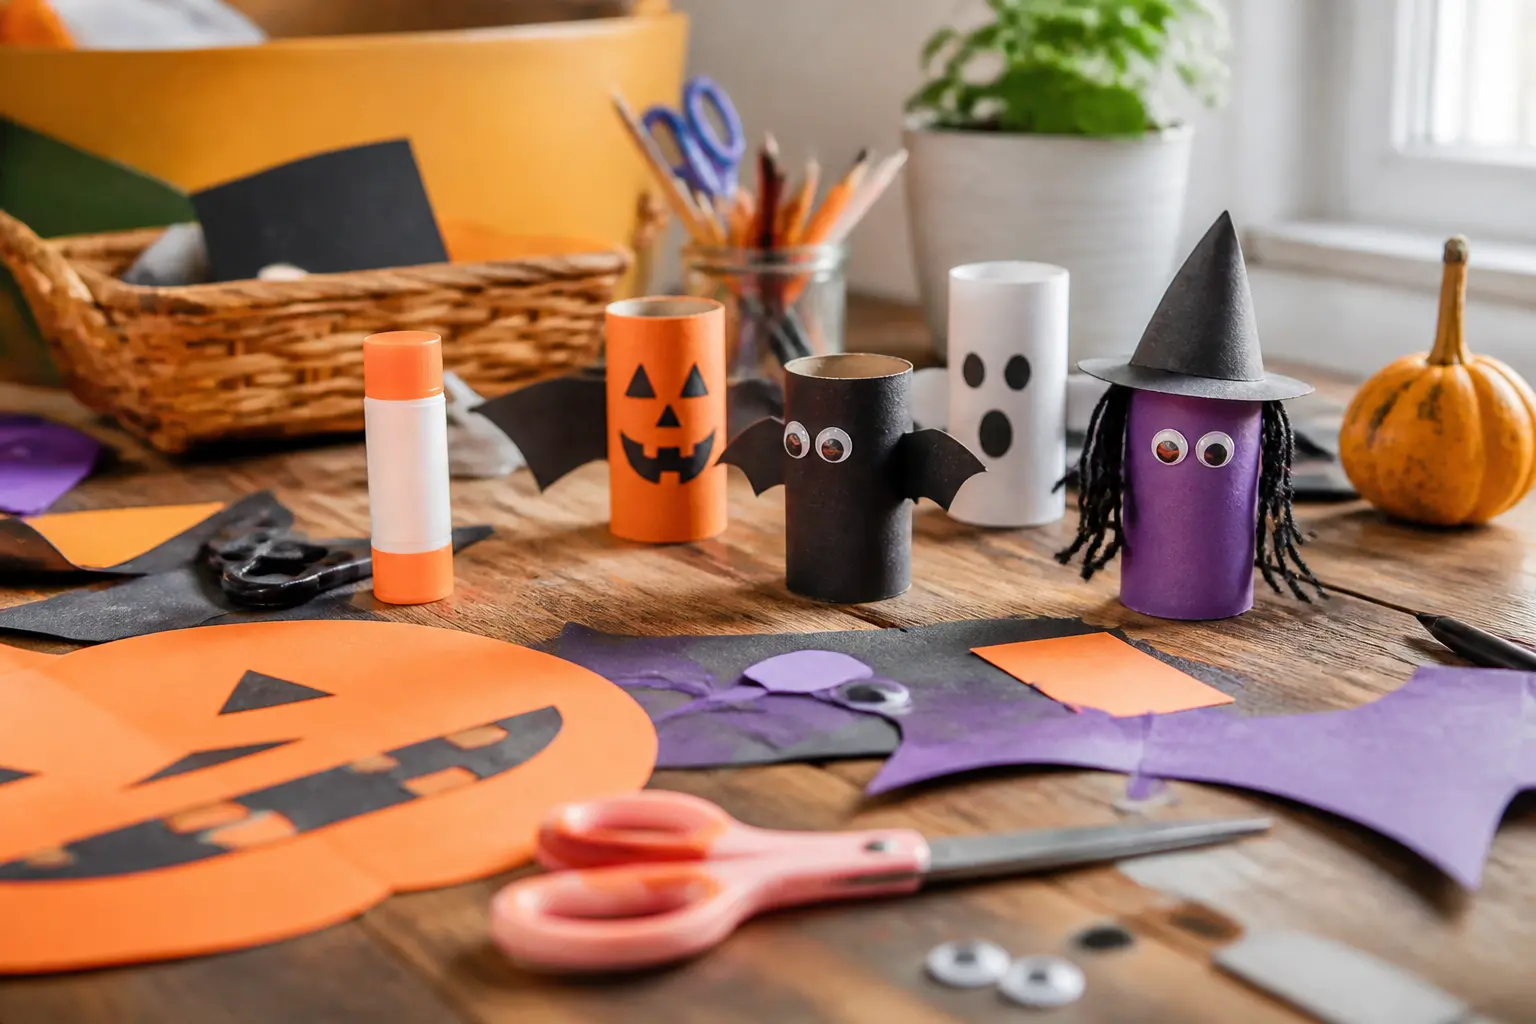
The best halloween crafts for kids elementary age are the ones that look genuinely impressive on a classroom wall without requiring a photocopied template or a parent who secretly finishes them at midnight.
Every craft here uses a real technique, a material list you can buy in one trip, and a method that produces the same pleasing result whether there are four children at a kitchen table or twenty-four in a classroom.
For the younger end of the age ranges listed, an adult handles cutting and hot glue; the child owns everything else.
If you need something to keep the group busy once the making is done, the 25 Not-Too-Scary Halloween Party Games for Kids round-up pairs perfectly with this one. And if the group skews younger, the 15 Halloween Crafts for Preschool That Work at a Table of Twenty is worth a look too.
This post contains affiliate links. If you buy through them, I may earn a small commission at no extra cost to you.
- Bubble-Print Cauldron Collage
- Paper-Plate Witch Hat With Stars
- Paper-Plate Spider Web With Card Spiders
- Paper-Plate Monster Face With Yarn Hair
- Cheesecloth Ghost On a Polystyrene Ball
- Torn-Paper Pumpkin on Black Card
- Salt-Painted Black Cat on Watercolour Wash
- Egg-Carton Bat Mobile
- Marble-Roll Haunted House
- Cardboard-Tube Mummy Pencil Holder
- Sponge-Print Frankenstein Card
- Accordion-Fold Paper Bat
- Cork-Stamp Skull Gift Tags
- Glitter-Resist Skeleton Hand
- Yarn-Wrapped Twig Spiderweb
- Painted Rock Monsters
- Paper-Bag Pumpkin Luminaries
- Fingerprint Ghost Bunting
- Cupcake-Liner Owl
- Black Silhouette Lantern From a Jar
- Straw-Blown Ink Spider Web
- Tissue-Paper Stained Glass Window
- Frequently Asked Questions
Bubble-Print Cauldron Collage
This one ends up looking like something from a gallery wall, which is a nice surprise for a craft that costs almost nothing.
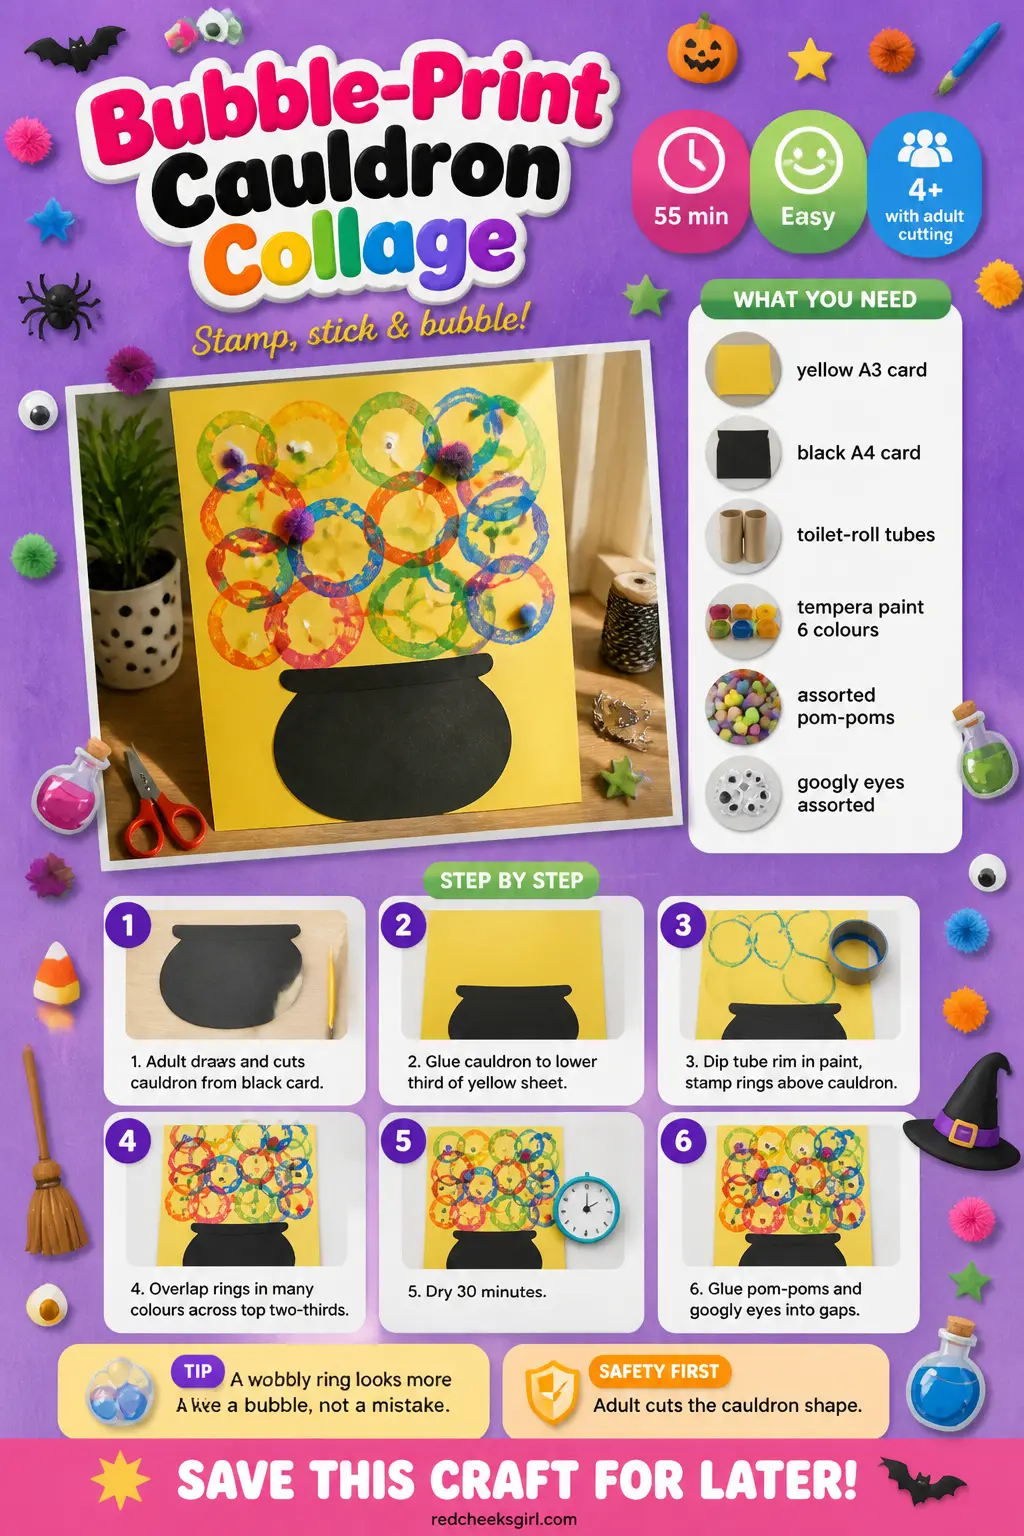
A black paper cauldron sits at the bottom of a yellow sheet, and above it rises a cloud of ring-printed bubbles in every colour of the neon spectrum, scattered with googly eyes and pom-poms.
The rings come from the bottom of a toilet-roll tube dipped in paint, so every bubble is perfectly round without any tracing. Pin it to a wall or store it flat in a folder between two sheets of paper.
Bubble-Print Cauldron Collage
What You Need
- 1 sheet yellow card, A3, 160 gsm
- 1 sheet black card, A4, 160 gsm
- 4 to 6 toilet-roll tubes
- Tempera or washable paint in orange, green, purple, red, blue, pink
- Small paint trays or jar lids for dipping
- 12 to 15 assorted pom-poms, 2 to 4 cm
- 10 to 12 googly eyes, assorted sizes 10 to 20 mm
- PVA glue
- Pencil and child scissors (adult cuts cauldron)
How to Make It
- An adult draws and cuts a cauldron shape from the black A4 card: a wide belly, a narrower neck and two small handles on the sides. The cauldron should fill about the lower third of the yellow sheet. Glue it in place and let it sit for five minutes.
- Pour a thin puddle of each paint colour into its own lid or tray. Dip the end of a toilet-roll tube into one colour so the rim is lightly coated, then press it firmly onto the yellow card above the cauldron opening. Lift straight up. You should see a clean ring with a hollow centre.
- Keep printing rings in overlapping clusters, switching colours freely and letting them overlap. Cover roughly the top two-thirds of the yellow sheet. The rings do not need to be tidy; a slightly wobbly or partial ring looks like a proper bubble. Let everything dry completely, about 30 minutes.
- Once the paint is dry, squeeze small dots of PVA glue onto the collage and press pom-poms and googly eyes into the gaps between rings. A googly eye inside a ring reads as a monster bubble, which children find enormously satisfying. Leave the glue to set for 10 minutes before moving.
Good to Know
Paper-Plate Witch Hat With Stars
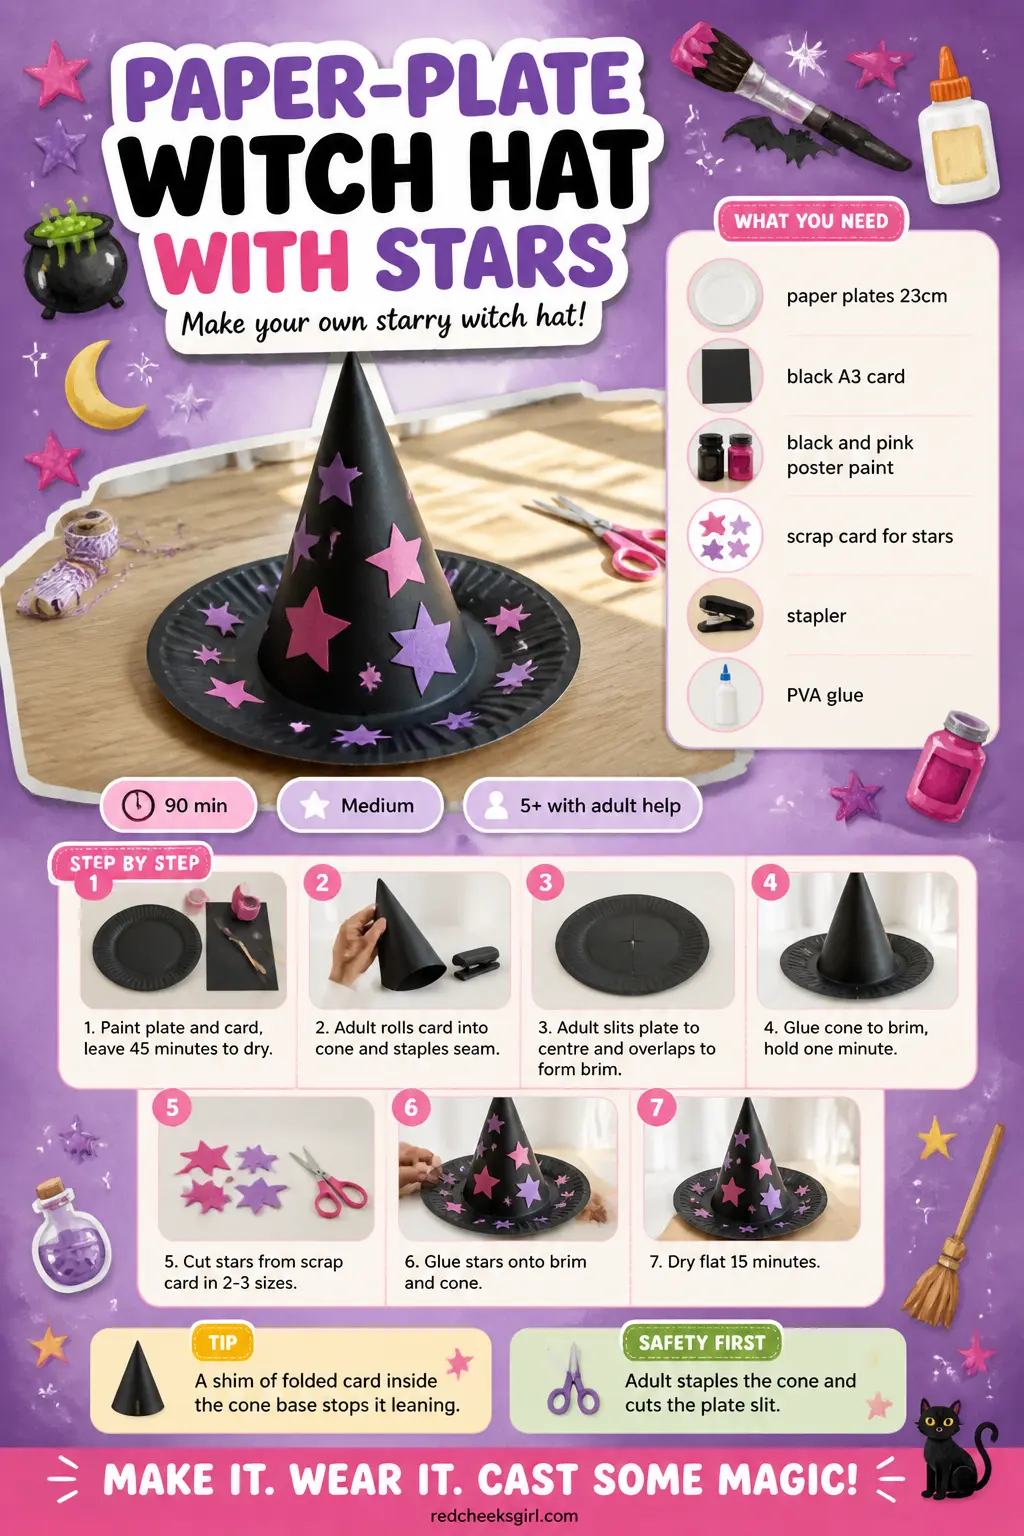
A paper plate becomes the brim of a witch hat, and a cone of painted card becomes the crown.
The results look genuinely stylish: the palette here is black with pink or lavender, and cut-paper stars in contrasting colours sit on the brim and crown like applique.
Line a row of them along a mantelpiece or hang them from a string by a small hole punched through the brim tip.
Paper-Plate Witch Hat With Stars
What You Need
- 1 white paper plate, 23 cm diameter, per child
- 1 sheet black card, A3, 160 gsm, per child
- Black and pink or lavender acrylic or poster paint
- Scrap card in pink, lavender and copper for stars
- Pencil, ruler, child scissors (adult scissors for cone slit)
- Stapler (adult use)
- PVA glue or glue stick
- Paintbrush, medium flat
How to Make It
- Paint the paper plate black or pink on its top side (the eating side faces up). Use a flat brush and work quickly so the paint does not pill on the surface. Leave it to dry completely, about 45 minutes. While it dries, paint the A3 card on one side in black or pink to match or contrast.
- An adult rolls the painted A3 card into a tall cone roughly 22 cm high at the tip, checks that the open base is wide enough to sit on the plate without flopping over, then staples the seam in two places and trims the base straight with scissors so the cone stands flat.
- An adult cuts a straight slit from the edge of the dried plate to the centre. Overlap the two cut edges slightly to cup the plate into a shallow brim shape, and staple or glue the overlap. The brim should now angle upward at the front like a real witch hat.
- Glue the base of the cone to the centre top of the brim. Hold it firmly for one minute. Once released, it should stand without wobbling. If it leans, tuck a small fold of card inside the base as a shim before the glue sets.
- Cut stars from the scrap card in two or three sizes: roughly 4 cm, 6 cm and 8 cm across. Children can draw and cut their own stars if they are confident; an adult can pre-cut a stack for a class. Glue stars onto the brim and cone in clusters or scattered, mixing colours.
- Let the whole hat dry flat for 15 minutes before displaying.
Good to Know
🛍 Shopping guide
Paper-Plate Spider Web With Card Spiders
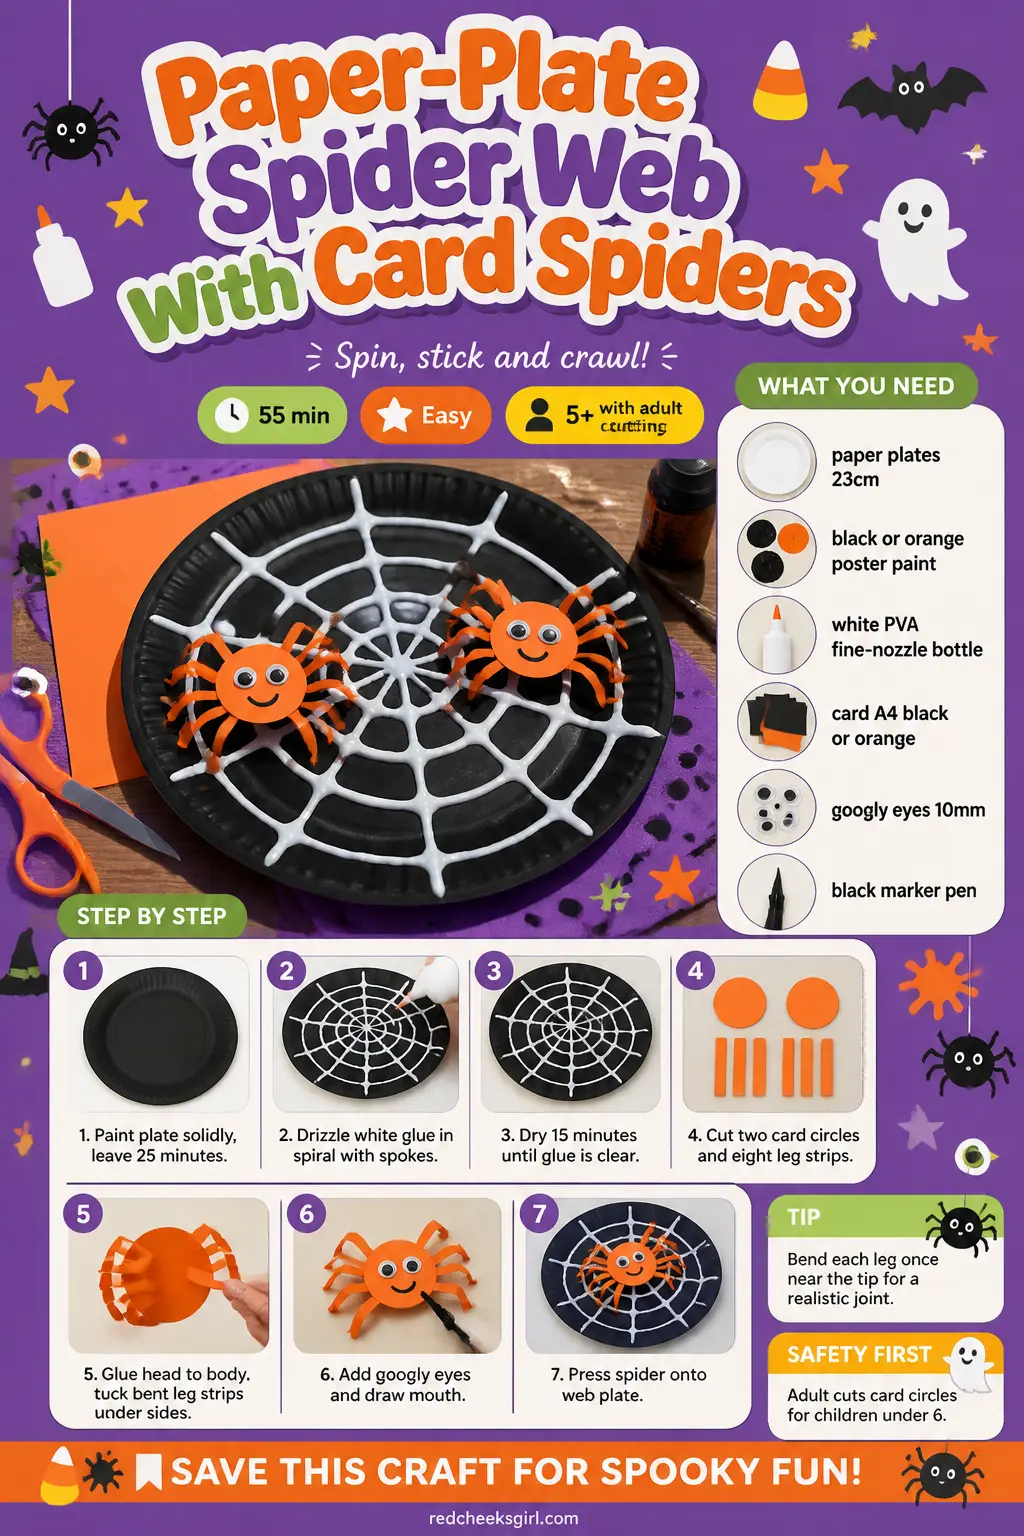
One painted paper plate, a loose tangle of white yarn and two small card spiders: the finished piece is graphic and bold, and it takes under 40 minutes from start to finish once the paint dries.
The web is drawn with a squeeze of white glue straight from a fine-tip nozzle, so there is no weaving or threading, and the spiders are cut from card circles with snipped-strip legs.
Stack them in a pile to transport; the yarn glues flat so nothing tangles in storage.
Paper-Plate Spider Web With Card Spiders
What You Need
- 1 white paper plate, 23 cm, per child
- Black or orange poster paint
- White PVA glue in a fine-nozzle bottle, or a standard bottle with a piping tip inserted
- 1 sheet orange or black card, A4, per child, for spiders
- 4 googly eyes per child, 10 mm
- Black marker pen
- Child scissors (adult pre-cuts circles for under-6s)
- Paintbrush
How to Make It
- Paint the top surface of the paper plate solidly in black or orange. Cover the rim too. Leave to dry fully, about 25 minutes: if you add the glue web while the paint is tacky, the white will tint grey.
- Once dry, drizzle the white glue straight from the nozzle in a loose spiral from the centre outward, then add four or five straight lines crossing the spiral like spokes. The lines do not need to be perfectly straight; a slightly wandering line looks more like a real web than a ruler-drawn one. Leave this to dry for 15 minutes until the glue is clear and firm.
- While the web dries, cut two circles from the card per child: one about 5 cm across for the body and one about 3 cm for the head. Cut eight short strips, about 1 cm wide and 4 cm long, for legs. An adult should do this for children under six.
- Glue the head circle onto the body circle, overlapping slightly. Tuck four leg strips under each side of the body, fanning them out slightly, and glue them down. Bend each leg strip once near the tip so the leg crooks at a knee joint. Let dry five minutes.
- Glue two googly eyes onto the head. Draw a simple mouth with the black marker (a curved line for a smile or a straight line for a serious spider). Press the finished spider onto the web plate while the web glue is still slightly tacky, or add a dot of fresh PVA to stick it down.
Good to Know
Paper-Plate Monster Face With Yarn Hair
Painted paper plates become wild monster faces, each one unique because the children choose the paint colour, the yarn colour and how much hair to give their monster.
The teeth are cut from white card, the nose is a pom-pom and the eyes are oversized googly eyes that wobble satisfyingly when the plate moves. These look spectacular lined up on a wall or a windowsill.
Store flat in a single layer or hang them by a piece of yarn looped through a small hole at the top.
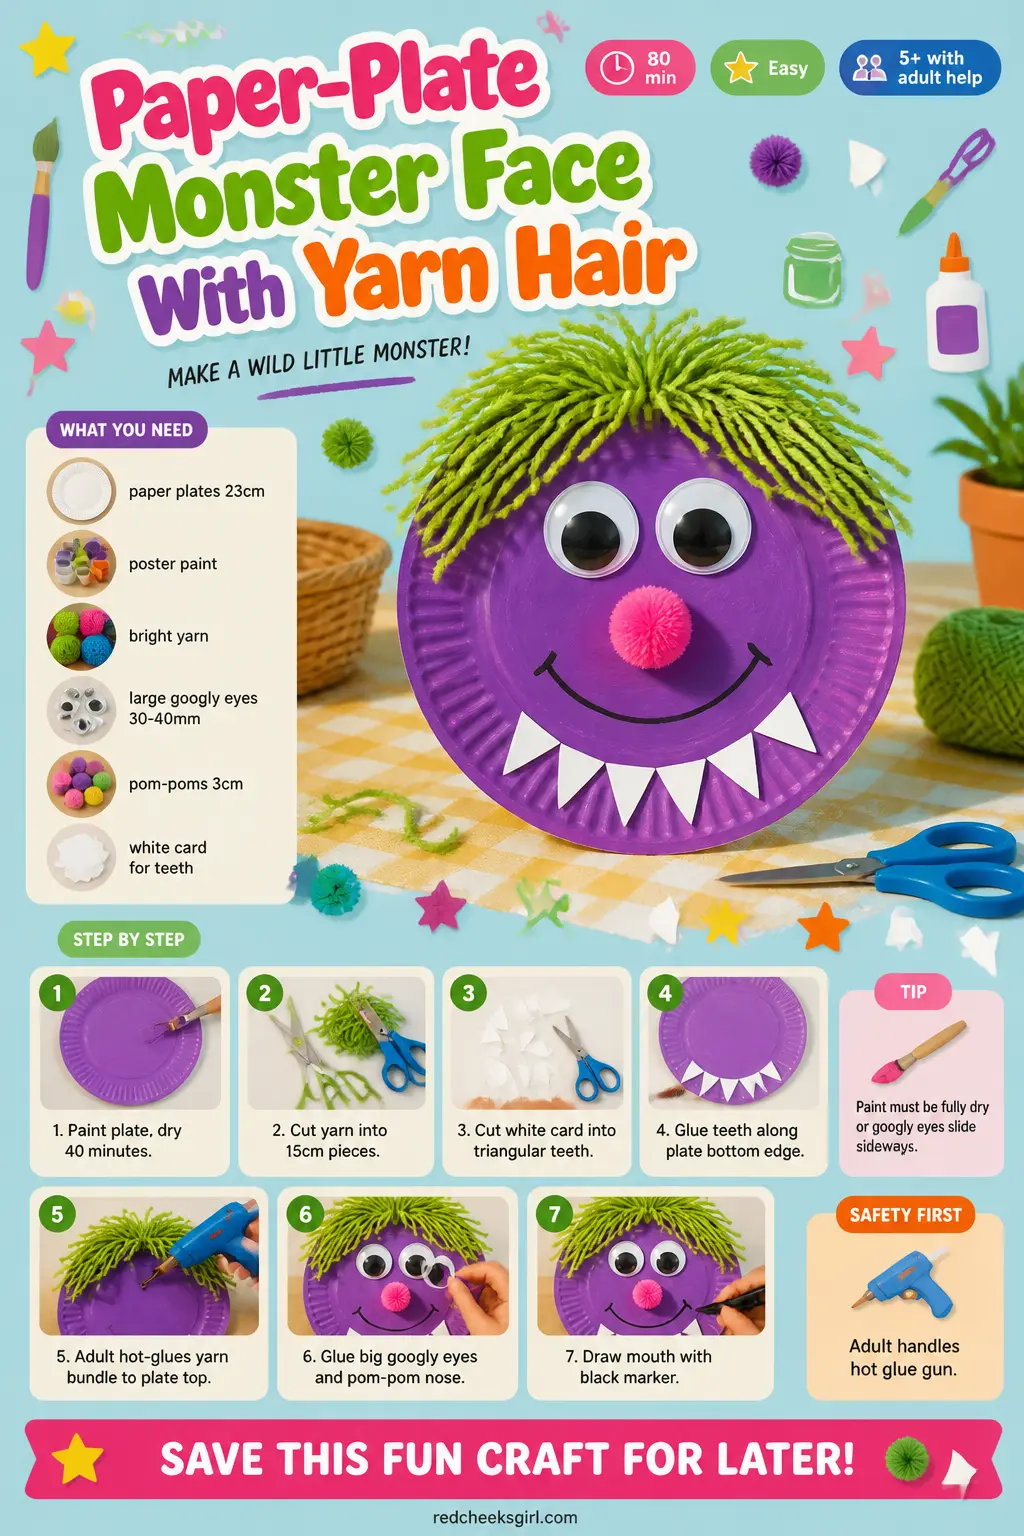
Paper-Plate Monster Face With Yarn Hair
What You Need
- 1 white paper plate, 23 cm, per child
- Poster paint in purple, green, orange, pink or black
- Yarn in bright contrasting colours, one 50 cm bundle per child
- 2 large googly eyes, 30 to 40 mm, per child
- 1 pom-pom, 3 cm, per child, for nose
- White card scraps for teeth
- PVA glue or glue gun (adult handles glue gun)
- Black marker pen
- Child scissors
- Pipe cleaners in any colour, 2 per child (optional, for horns)
How to Make It
- Paint the entire top surface of the plate in one colour. Let it dry fully before adding anything, about 40 minutes. Rushing this step is where most children go wrong: the googly eyes slide on wet paint and land sideways.
- While the plate dries, cut the yarn bundle into pieces roughly 15 cm long. Each child needs 20 to 30 pieces. Cut the white card into small rectangles and have children snip one end of each into a triangular tooth shape. Aim for three to five teeth per monster.
- Once the paint is dry, glue the teeth along the bottom edge of the plate, pointing upward into the face. Overlap a few if the monster needs fangs. Let the glue tack for two minutes.
- Arrange the yarn pieces in a bundle and glue or hot-glue the bundle to the top of the plate so the strands fan out like hair. An adult handles the hot glue gun. PVA works fine but needs 10 minutes to grip; a bulldog clip holding the yarn to the rim while it dries helps.
- Glue the two large googly eyes in the upper half of the face. Press the pom-pom nose between them. Draw a curved mouth below the nose with the black marker. Add eyebrows with the marker if the monster needs an expression.
- For horns, an adult bends two pipe cleaners into a loose spiral or a simple curve and hot-glues them behind the top edge of the plate. Leave the whole thing to dry flat for 5 minutes.
Good to Know
🛍 Shopping guide
Cheesecloth Ghost On a Polystyrene Ball
These small freestanding ghosts are made by draping starch-stiffened cheesecloth over a polystyrene ball, letting it harden overnight, then peeling it off and painting on two dark oval eyes.
Each ghost stands about 8 cm tall and holds its draped shape permanently, so it works as a table centrepiece, a window sill display or a hanging decoration with a thread looped through the top.
The overnight dry time is the only long part; the hands-on work is under 20 minutes.
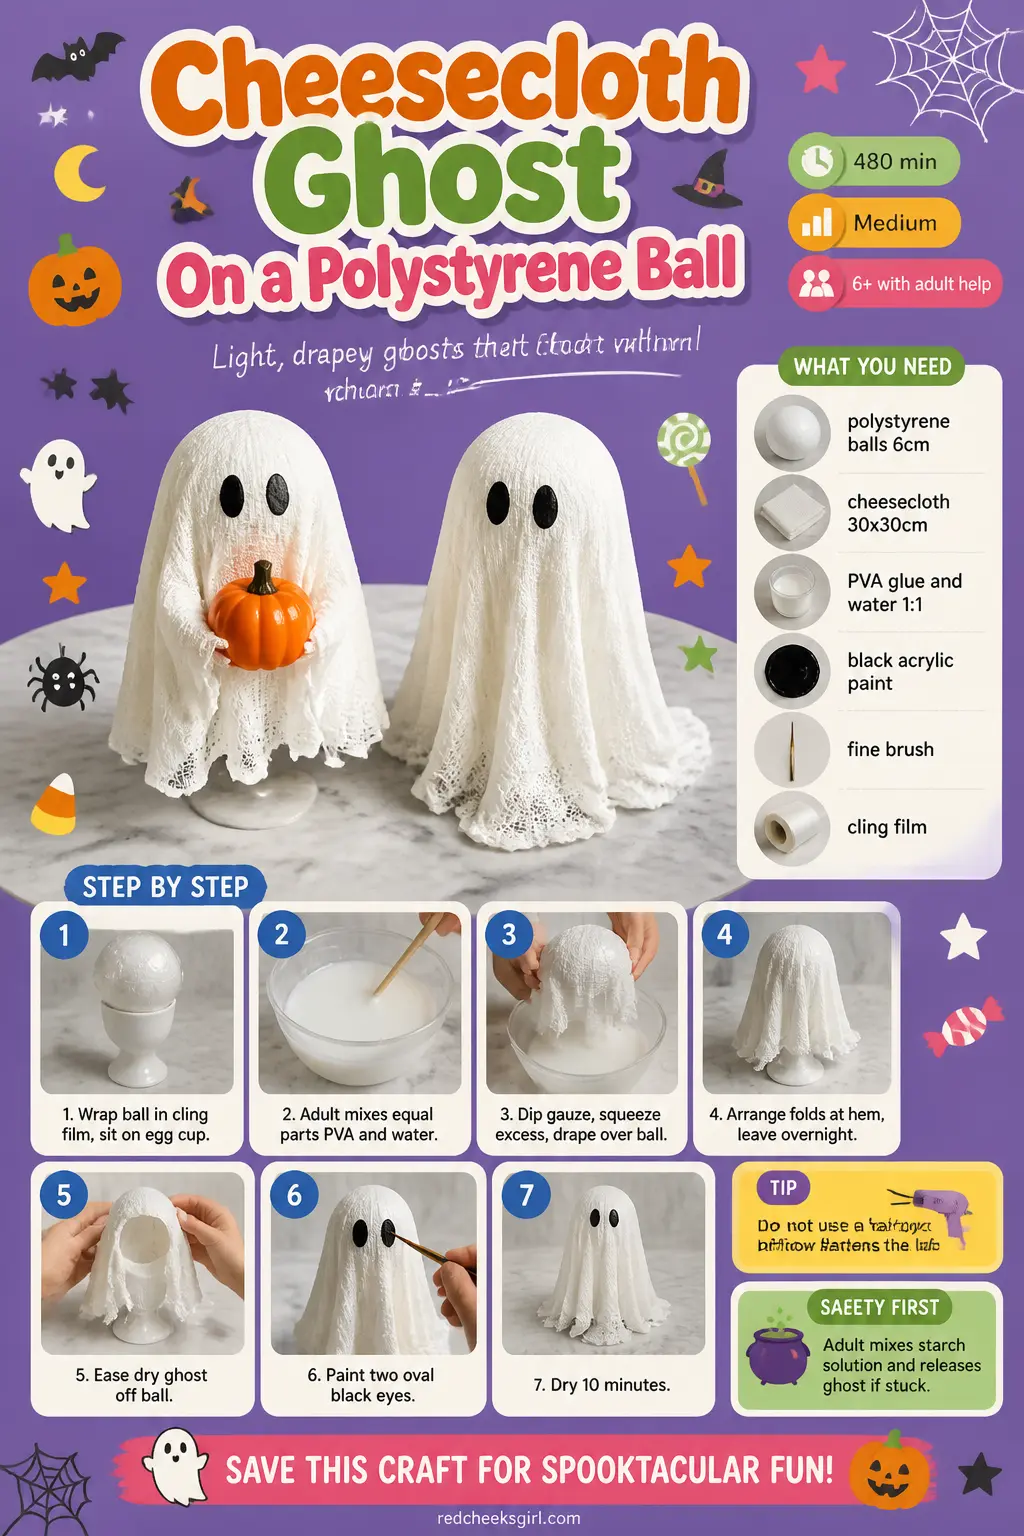
Cheesecloth Ghost On a Polystyrene Ball
What You Need
- 1 polystyrene ball, 6 cm diameter, per ghost
- 1 piece cheesecloth or medical gauze, roughly 30 x 30 cm, per ghost
- Liquid starch (laundry starch in a spray or a 1:1 mix of PVA glue and water works as a substitute)
- Black acrylic paint and a fine brush
- A small cup or egg cup to rest the ball on while it dries
- Cling film or a plastic bag (to wrap the ball so the gauze releases cleanly)
- Optional: a miniature clay or resin pumpkin to tuck into the ghost's front
How to Make It
- Wrap the polystyrene ball tightly in cling film so there are no loose folds on the top half. This is what lets you remove the gauze shell cleanly once dry. Sit the wrapped ball on an egg cup.
- An adult prepares the starch solution. Mix PVA glue and water in equal parts in a bowl if you do not have liquid starch. The mix should be the consistency of thin cream, runny enough to saturate fabric but not so watery it does not stiffen.
- Dip the cheesecloth into the starch solution and squeeze out the excess gently. You want the fabric wet and droopy but not dripping puddles. Drape it over the ball, arranging the fabric so it falls in natural folds around the base. Pull a few folds outward at the hem to suggest a floating figure.
- Leave it to dry completely overnight in a warm spot. Do not try to rush this with a hairdryer; the airflow disturbs the folds and flattens them. In the morning the gauze will be rigid and hold its shape.
- Gently ease the hardened ghost off the ball. It should pop free with a little wiggle; if it sticks, a adult can slide a blunt knife edge carefully underneath the rim to release it. The cling film stays on the ball for reuse.
- Use a fine brush and black acrylic paint to dot two oval eyes on the upper half of the ghost. Let them dry for 10 minutes. If adding a miniature pumpkin, tuck it into a fold at the front and secure with a tiny dot of glue.
Good to Know
🛍 Shopping guide
Torn-Paper Pumpkin on Black Card
No scissors on the pumpkin itself: the whole orange shape is built from strips of orange tissue paper or crepe paper torn by hand and layered onto black card with PVA.
The result has a soft, almost painterly edge that looks far more considered than a cut-out, and because every tear is different, no two pumpkins look the same. Add a green card stem cut by an adult and a hand-drawn face.
Flat storage works well here: slide it into a folder or between two sheets of paper.
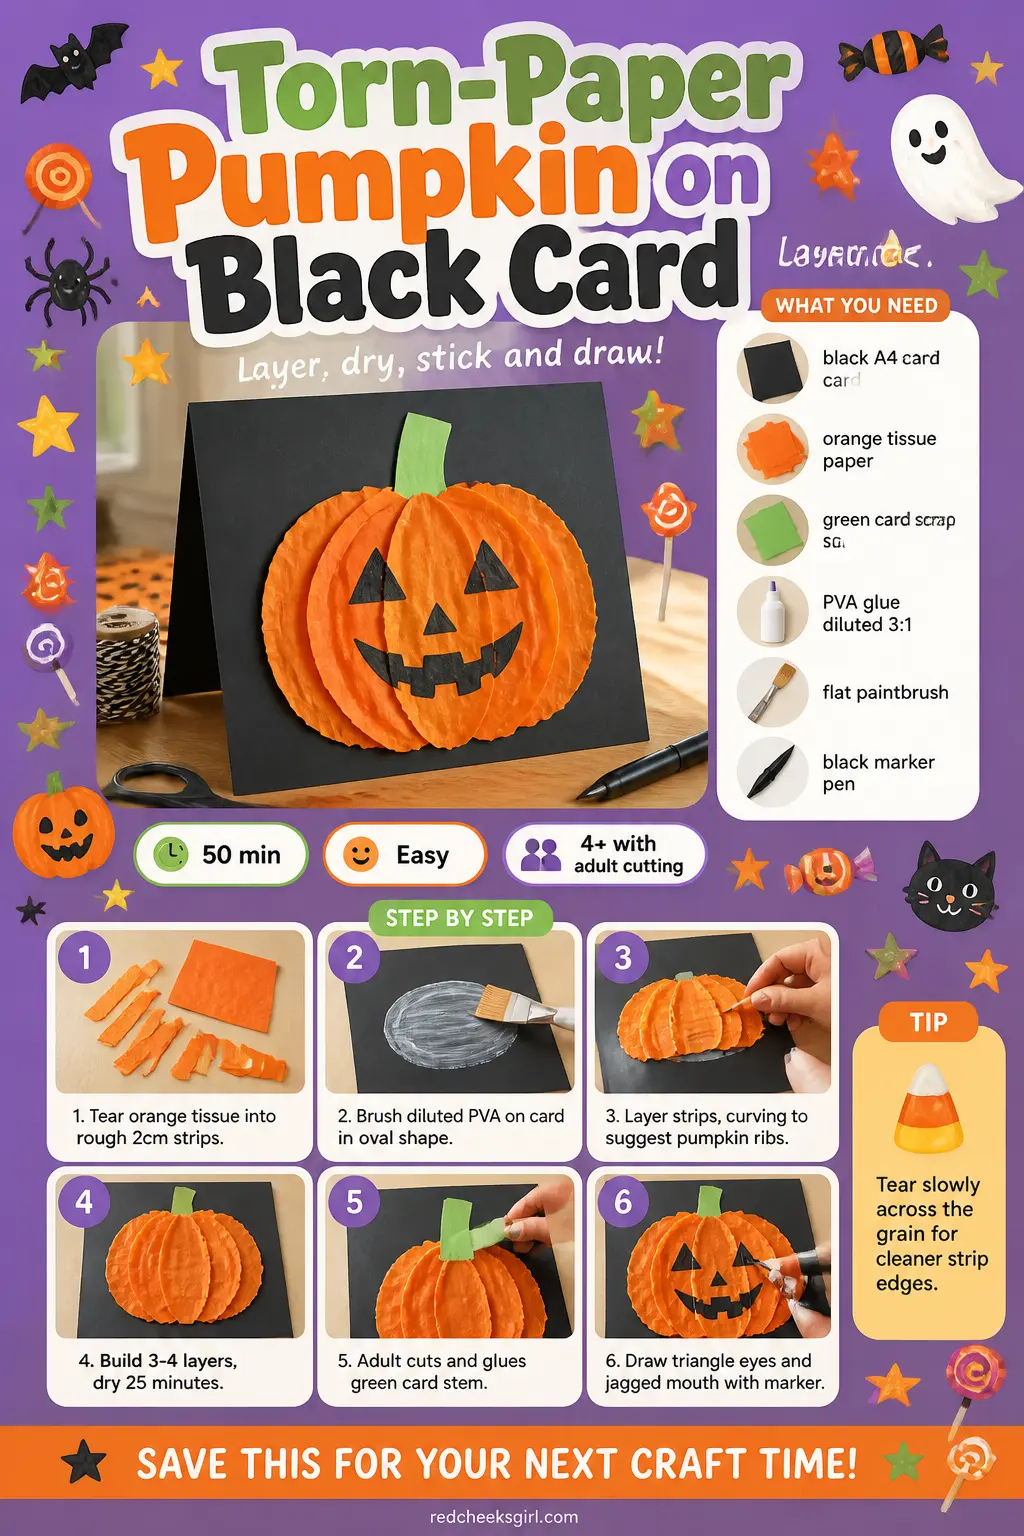
Torn-Paper Pumpkin on Black Card
What You Need
- 1 sheet black card, A4, 160 gsm
- Orange tissue paper or crepe paper, 2 to 3 sheets
- Small piece green card for the stem
- PVA glue, diluted slightly with water (3 parts glue to 1 part water)
- Paintbrush, medium flat
- Black marker pen
How to Make It
- Tear the orange tissue paper into rough strips about 2 cm wide and 5 to 10 cm long. Tearing rather than cutting gives the ragged edge that makes this craft look good; encourage children to tear slowly across the grain of the paper for cleaner strips.
- Brush a patch of diluted PVA onto the black card in a rough round or oval shape, about 15 cm across: this is where the pumpkin body will sit. Lay the first strips of orange tissue onto the wet glue, overlapping them slightly. Brush more diluted PVA over the top to seal and flatten each layer.
- Build up the pumpkin in three or four layers, letting each layer get slightly tacky before adding the next. Curve the strips as you lay them to suggest the rounded segments of a pumpkin. The black card should show slightly between some strips at the top and bottom of the circle to imply the ribs. Leave to dry for 25 minutes.
- An adult cuts a simple stem shape from the green card, about 2 cm wide and 4 cm tall. Glue it to the top of the pumpkin while the layers are still slightly damp so it bonds well, or add a fresh dab of full-strength PVA once the pumpkin is dry.
- Use the black marker to draw triangle eyes, a nose and a jagged mouth directly on top of the dried orange paper. The marker sits clearly on the tissue surface. Add a curling vine with the marker if there is space beside the stem.
Good to Know
🛍 Shopping guide
Salt-Painted Black Cat on Watercolour Wash
The background here is a wet watercolour sky in purple and blue, sprinkled with table salt while still wet: the salt pulls the pigment outward as it dries, leaving a constellation of pale starbursts that look nothing like a child deliberately made them and entirely like something worth framing.
A simple black cat silhouette, cut from card by an adult, sits in front once everything is dry. The salt technique is the part children find magical and adults find surprisingly professional.
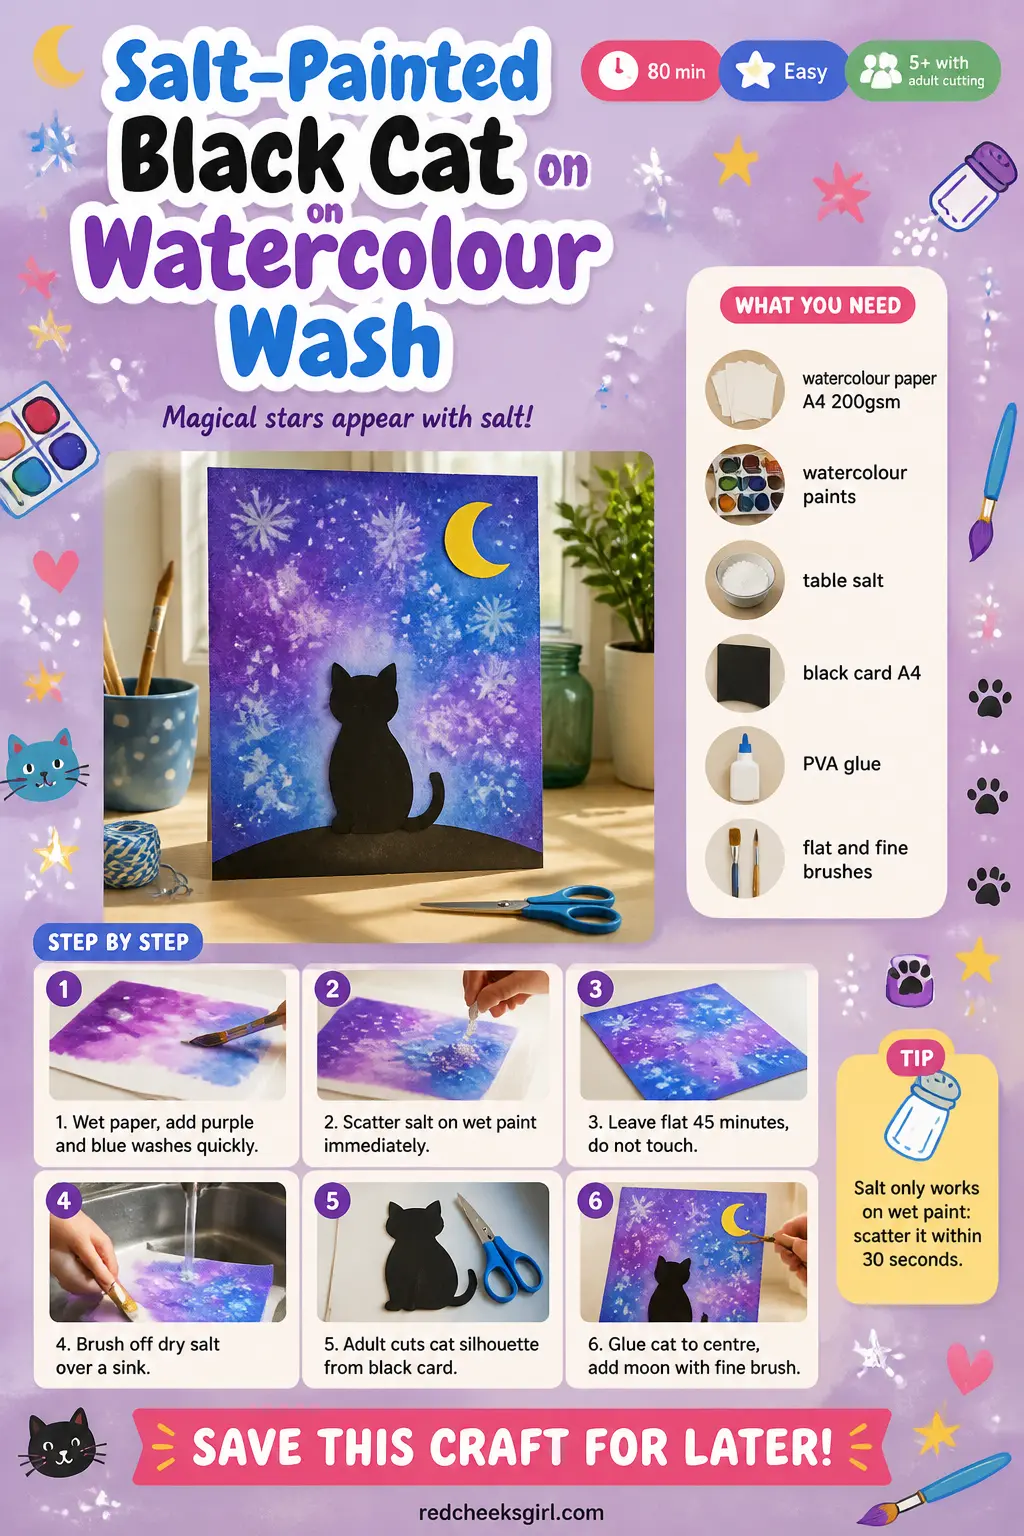
Salt-Painted Black Cat on Watercolour Wash
What You Need
- 1 sheet watercolour paper, A4, at least 200 gsm (ordinary printer paper buckles)
- Watercolour paints in purple, blue and black
- Table salt, about 2 tablespoons
- 2 paintbrushes: one large flat and one fine
- 1 sheet black card, A4, 160 gsm
- PVA glue
- Pencil (for adult to draw cat)
How to Make It
- Wet the watercolour paper all over with the large flat brush dipped in clean water. The paper should look shiny. While it is still wet, drop large washes of purple and blue paint across the whole surface, letting colours bleed into each other. Work quickly: you want the colours to flow and merge rather than sitting in separate patches.
- While the paint is still wet and shiny, scatter table salt generously over the surface. The salt immediately starts pulling pigment, creating pale spidery bursts. Children can do this step themselves; it is satisfying and low-risk. Leave the paper completely flat to dry for at least 45 minutes. Do not tilt it or touch the salt.
- Once fully dry, brush the salt off gently with your hand over a sink. The starbursts stay in the paper. If you try to brush off the salt before the paint is bone dry, the effect smears.
- An adult draws a simple sitting-cat silhouette on the black card: a rounded body, a tail curling around the base, two pointed ears and a round head. Cut it out carefully. The silhouette should be about 10 cm tall to fit neatly on the A4 background.
- Glue the cat to the lower centre of the dried watercolour background. Use the fine brush to add a tiny crescent moon in yellow or white paint in the upper right corner if there is space. Leave the glue to set for 10 minutes.
Good to Know
🛍 Shopping guide
Egg-Carton Bat Mobile
Each bat body is a single cup from a cardboard egg carton, painted black, with card wings and two white googly eyes.
A group of five or six bats threaded on black yarn at different heights makes a mobile that moves in a draught and casts small shadows on the wall.
This is a good craft for a school corridor or a bedroom ceiling, and it packs flat by threading the yarn off the stick at the end of the season.
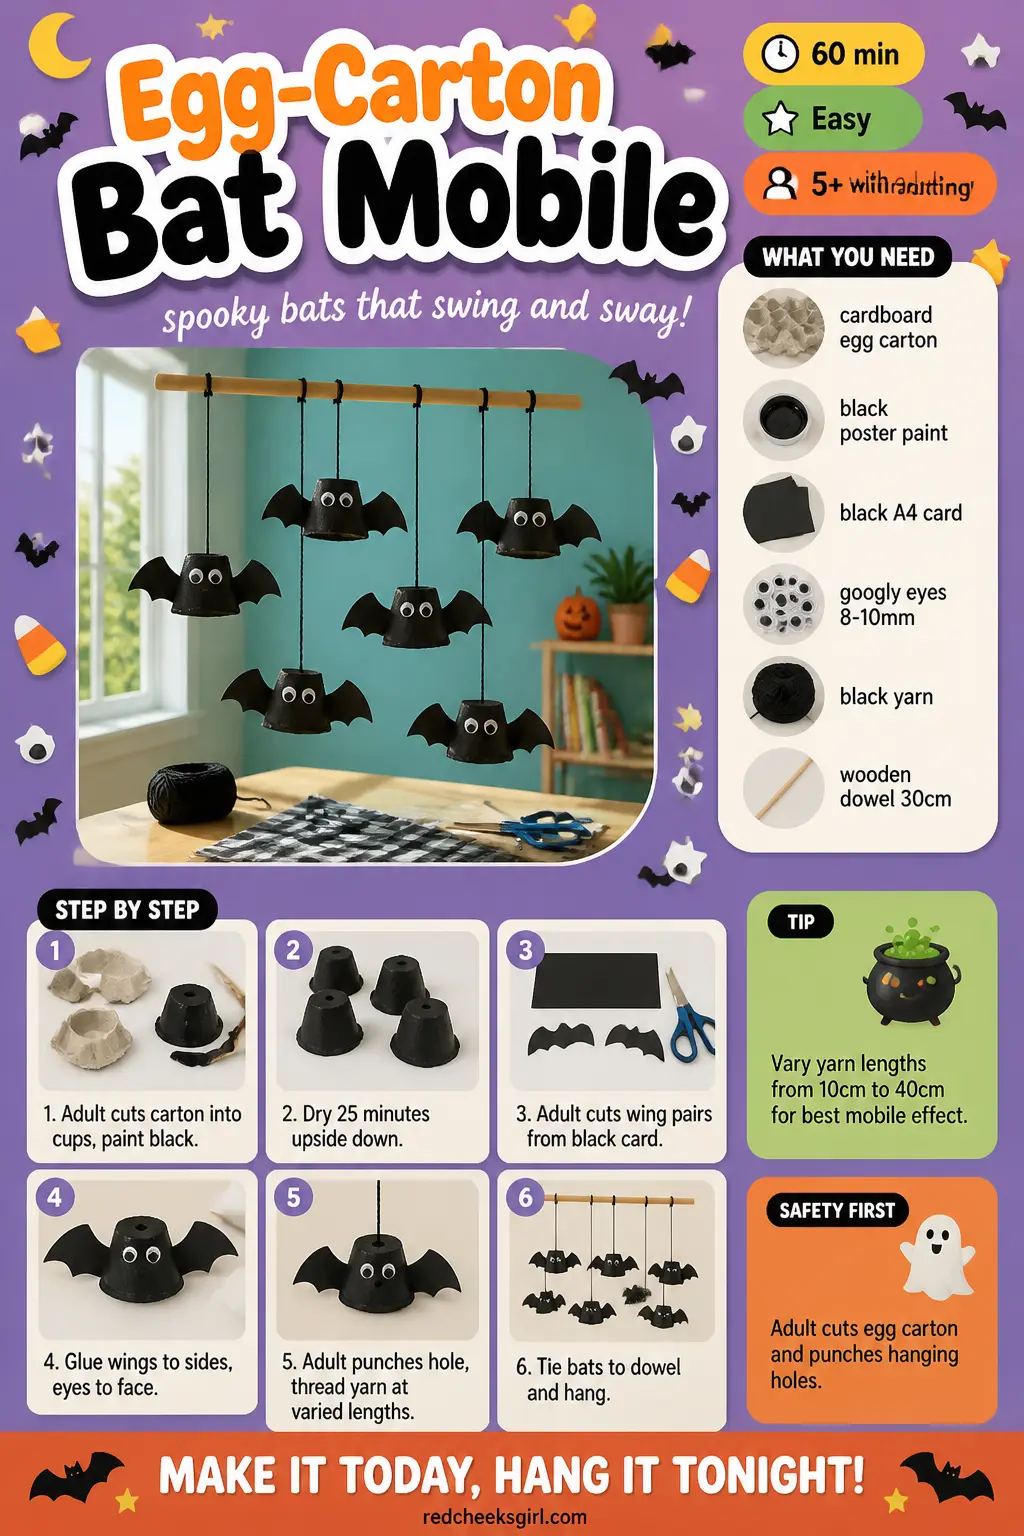
Egg-Carton Bat Mobile
What You Need
- 1 cardboard egg carton (makes 12 bats)
- Black poster paint
- Black card, A4, 160 gsm (1 sheet makes wings for 6 bats)
- 24 googly eyes, 8 to 10 mm
- Black yarn, about 2 m total
- 1 straight twig or 30 cm wooden dowel for hanging
- PVA glue
- Paintbrush
- Hole punch or sharp pencil (adult use)
How to Make It
- An adult separates the egg carton into individual cups. Paint the outside of each cup black and leave them upside down on a sheet of newspaper to dry, about 25 minutes. They should be fully matte with no white cardboard visible through the paint.
- An adult cuts bat wing pairs from the black card: each pair is a simple double-crescent shape, widest at the tips, about 8 cm across. A child can colour these in with black marker if the cutting is done ahead.
- Once the cups are dry, glue a wing pair to each side of the cup near the flat open base (which becomes the top of the bat). Hold the wings against the cup for 30 seconds each until the glue grips. Glue two googly eyes on the curved closed end of the cup, which is the bat's face.
- An adult uses a hole punch or a sharp pencil to make a small hole in the top centre of each bat. Thread a length of black yarn through the hole and tie a double knot inside the cup so it does not pull through. Cut yarn pieces at different lengths, from about 10 cm to 40 cm, so the bats hang at different heights.
- Tie the other end of each yarn piece to the twig or dowel, spacing bats evenly. Tie a loop of yarn at each end of the dowel for hanging. The mobile is complete when it balances and the bats spin freely.
Good to Know
Marble-Roll Haunted House
A marble rolled through paint inside a shoebox lid produces wild splattery streaks across white card, and once it dries a pre-cut haunted house silhouette sits in front of it as a dramatic skyline.
The painting technique is entirely child-driven and genuinely different every time, and the adult work (cutting the house and loading the marble) takes under five minutes. Pin these on a wall as a group and they look like a curated art show.
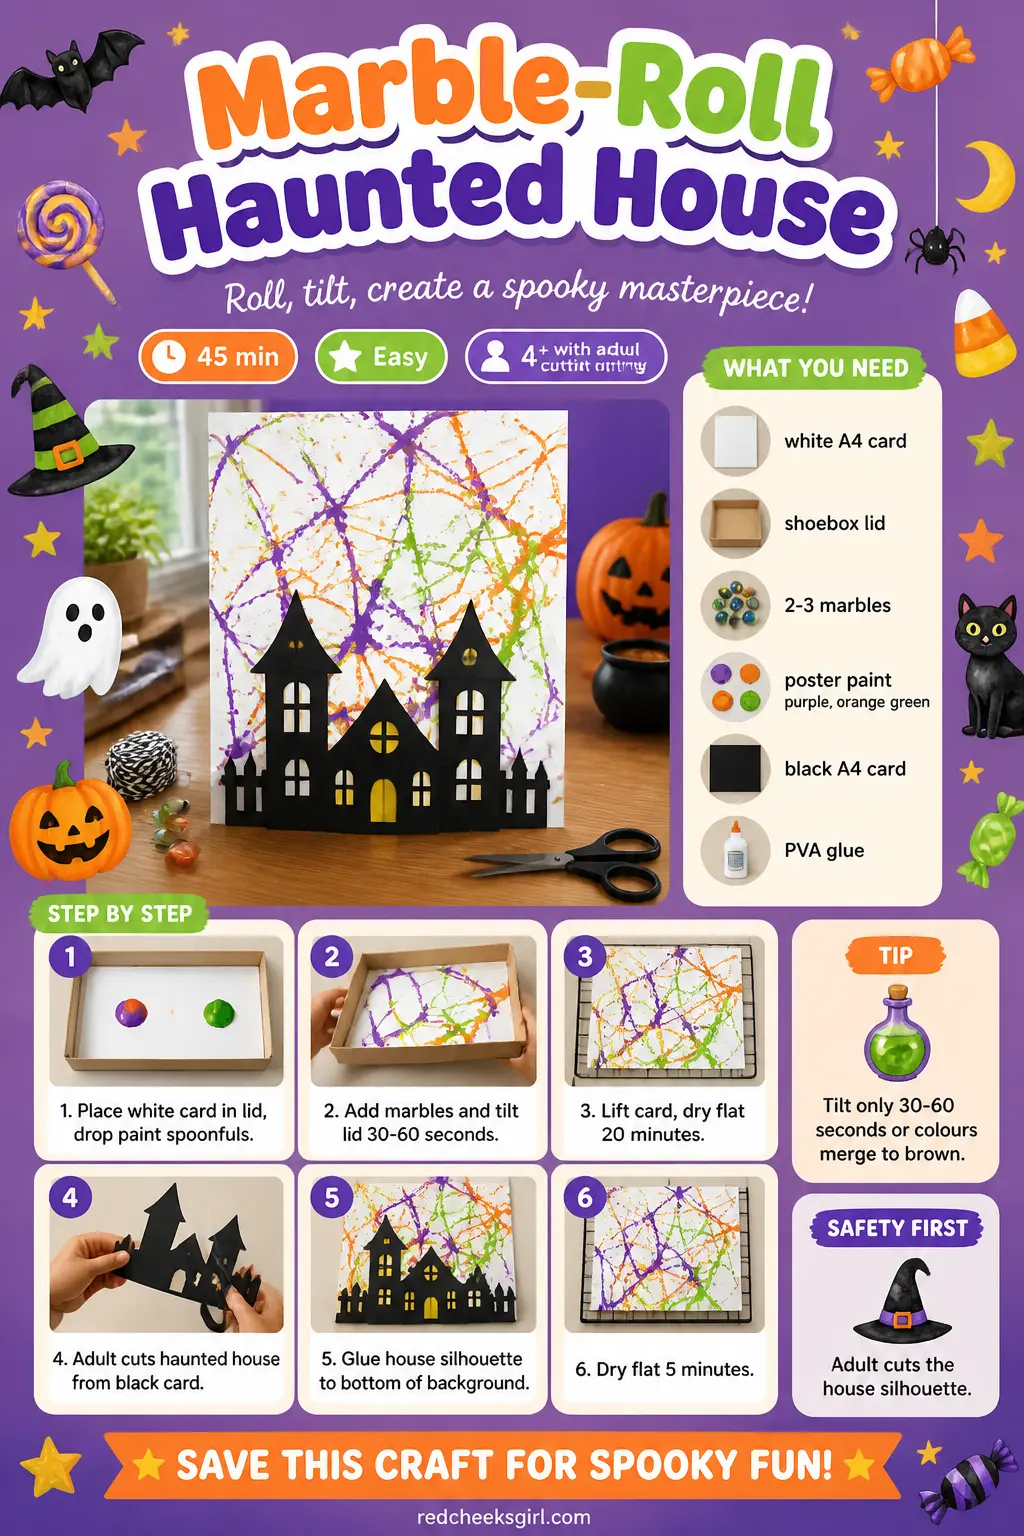
Marble-Roll Haunted House
What You Need
- 1 sheet white card, A4, 160 gsm, per child
- 1 shoebox lid or a small tray with sides
- 2 to 3 marbles
- Poster paint in purple, orange and green, about 1 teaspoon of each
- 1 sheet black card, A4, 160 gsm
- PVA glue
- Spoon for dropping paint
How to Make It
- Place the white card inside the shoebox lid. Drop small spoonfuls of two or three paint colours directly onto the card in different spots: a teaspoon of each colour is enough, as the marble spreads it quickly. Do not mix the colours at this stage.
- Drop one or two marbles into the lid and tilt it side to side. The marbles roll through the paint and leave looping coloured trails across the card. Children can tilt for 30 to 60 seconds; longer than that and the colours merge into a muddy middle ground. Lift the marbles out with a spoon when done.
- Lift the card from the lid and set it flat on newspaper to dry for about 20 minutes. The paint layer is thin so it dries quickly.
- An adult draws and cuts a haunted house silhouette from the black card: the house fills the lower third of an A4 sheet, with a pointed roof, one or two tall chimneys, a pointed turret and simple rectangular windows. It should be about 15 cm wide and 10 cm tall.
- Glue the black silhouette to the lower portion of the dried marble-roll background. The colourful streaks show above and around the house as a lurid sky. Leave to dry flat for 5 minutes. The finished piece looks best viewed from a slight distance where the marble trails read as stormy clouds.
Good to Know
🛍 Shopping guide
Cardboard-Tube Mummy Pencil Holder
A toilet roll tube wrapped in white crepe paper bandages becomes a mummy that holds pencils or a small bouquet of paper flowers on a desk. Two googly eyes peek out from between the bandage strips.
The wrapping is the craft: a young child can do it entirely without scissors once the tube base is made. The mummies stand on their own and do not need display hardware. At the end of the season, unwrap and recycle.
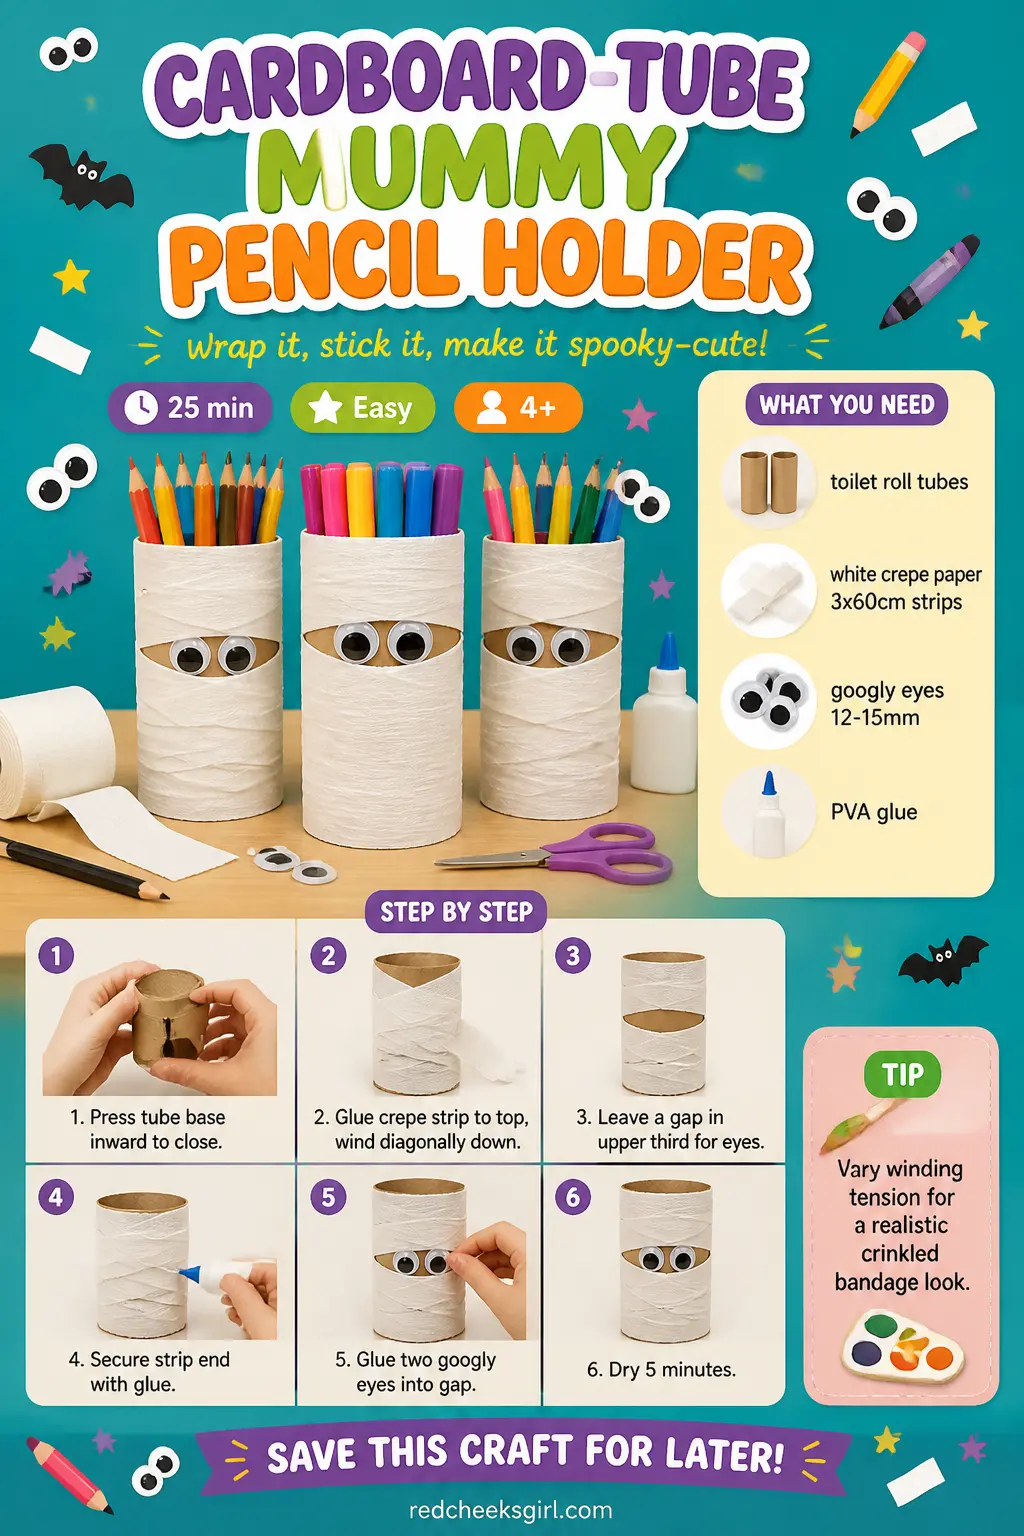
Cardboard-Tube Mummy Pencil Holder
What You Need
- 1 toilet roll tube per child
- White crepe paper, one strip about 3 cm wide and 60 cm long per tube
- 2 googly eyes, 12 to 15 mm
- PVA glue or double-sided tape
- Optional: scraps of black card for a bow tie or hat
How to Make It
- Fold the bottom edge of the toilet roll tube inward slightly all the way around to close the base so pencils do not fall through. Press it firmly: you do not need glue, just a firm crease.
- Apply a dab of PVA or a small piece of double-sided tape to one end of the crepe-paper strip and press it to the top edge of the tube. Begin winding the strip diagonally down the tube, overlapping each pass by about half the strip's width. The bandage look comes from uneven tension: pulling slightly tighter on some passes and looser on others leaves small gaps that read as crinkled wrapping.
- When you reach the bottom of the tube, secure the end of the strip with another dab of glue and press it firmly. Leave a 2 cm gap somewhere in the upper third of the tube with no paper: this is where the eyes go.
- Glue two googly eyes side by side into the gap. They should look as if the mummy is peering out from between the bandages. Leave the glue to set for 5 minutes and the mummy is ready to hold pencils.
Good to Know
🛍 Shopping guide
Sponge-Print Frankenstein Card
A piece of kitchen sponge cut into a rectangle makes the perfect Frankenstein green face: the sponge texture looks like stitched skin without any extra effort. Each child stamps a face, adds marker features and glues on card bolts.
The finished card is A5, easy to post or hand out at a class party. Stack them flat for easy storage and transport.
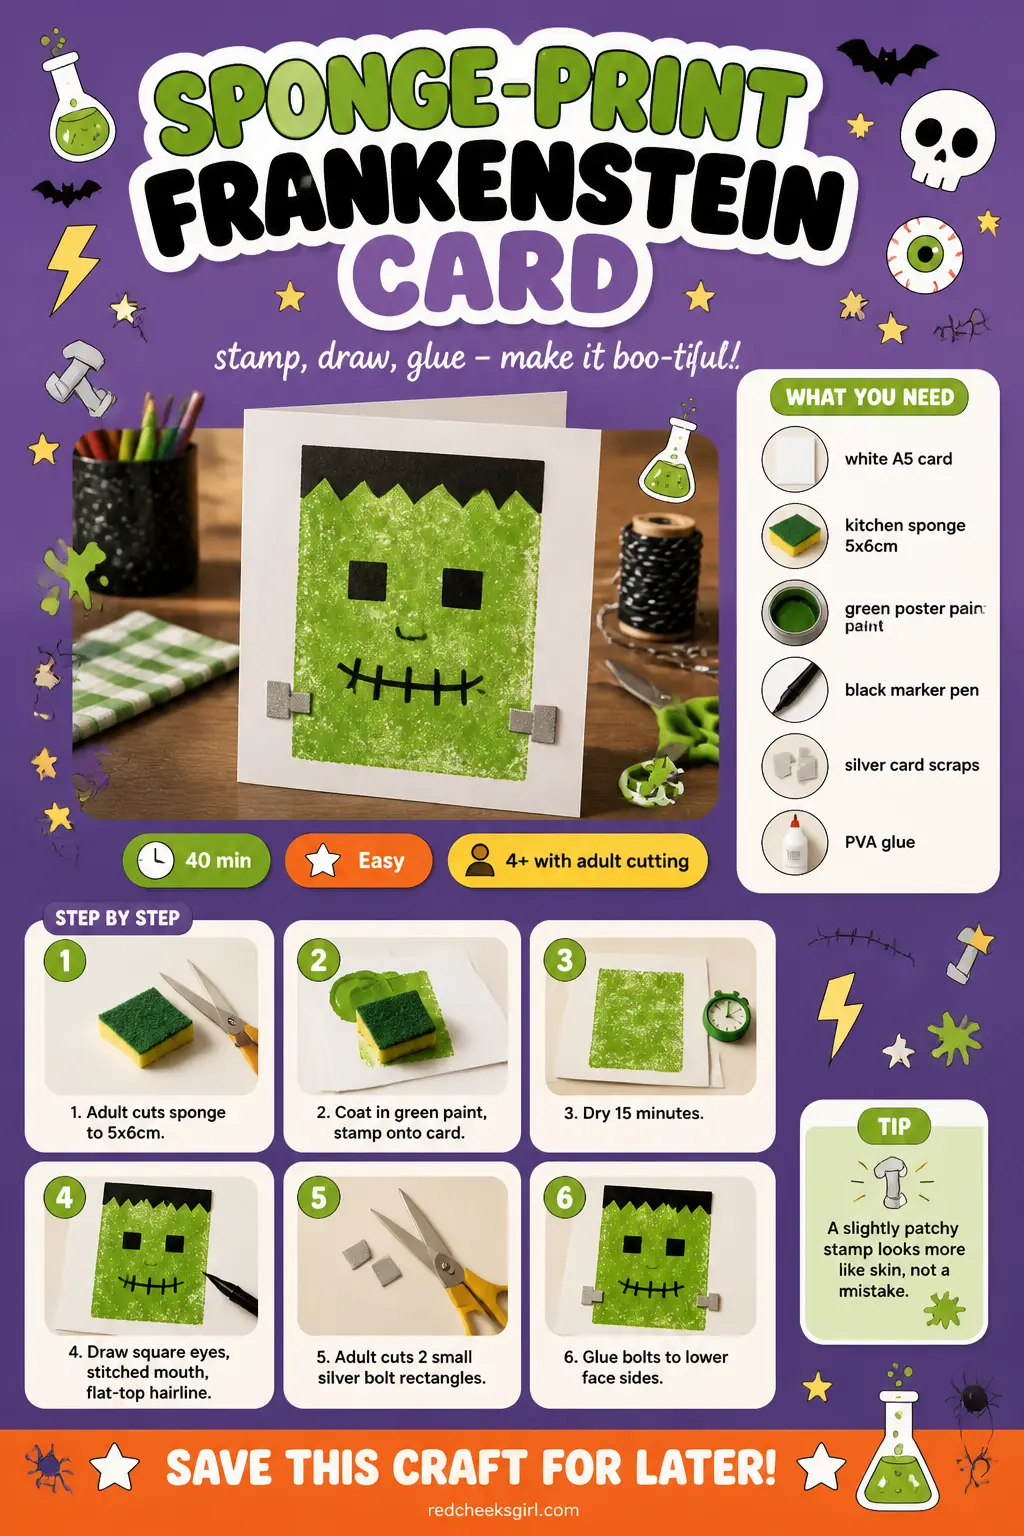
Sponge-Print Frankenstein Card
What You Need
- 1 sheet white card, A5, 160 gsm, per child
- 1 kitchen sponge, cut into a 5 x 6 cm rectangle (adult step)
- Green poster paint
- Black marker pen
- Small scraps of silver or grey card for bolts (one strip per child)
- PVA glue
How to Make It
- An adult cuts the kitchen sponge into a rectangle about 5 cm wide and 6 cm tall. This is the face stamp. Pour a thin, even layer of green paint into a flat lid or tray.
- Press the flat face of the sponge firmly into the paint, coating the whole surface evenly. Press it onto the centre of the white card and lift straight up. The sponge texture leaves a slightly mottled green rectangle: this is the Frankenstein face. If the coverage is too patchy, press a second time slightly overlapping the first.
- Leave the paint to dry for 15 minutes. While it dries, an adult cuts the silver card scrap into two small rectangles about 1 cm wide and 1.5 cm tall: these are the neck bolts.
- Once dry, use the black marker to add two square eyes near the top of the rectangle, a small nose and a straight-line mouth with stitches crossing it (short lines perpendicular to the main mouth line). Add a flat-top hairline along the top edge of the green rectangle with a few horizontal strokes to suggest a flat-top haircut.
- Glue the two silver bolt rectangles to the lower sides of the face, one on each side, as if they emerge from the neck. Dry for 5 minutes. Write a Halloween message below the face if desired.
Good to Know
🛍 Shopping guide
Accordion-Fold Paper Bat
Accordion-folded black paper becomes the wings of a bat when the pleated strip is pinched in the centre and a circle of card becomes the body.
These hang from string or sit propped on a surface, and they can be made in any size from a postcard-sized bat to one with a 40 cm wingspan depending on the paper.
Store flat by pressing the accordion closed and tucking them into an envelope.
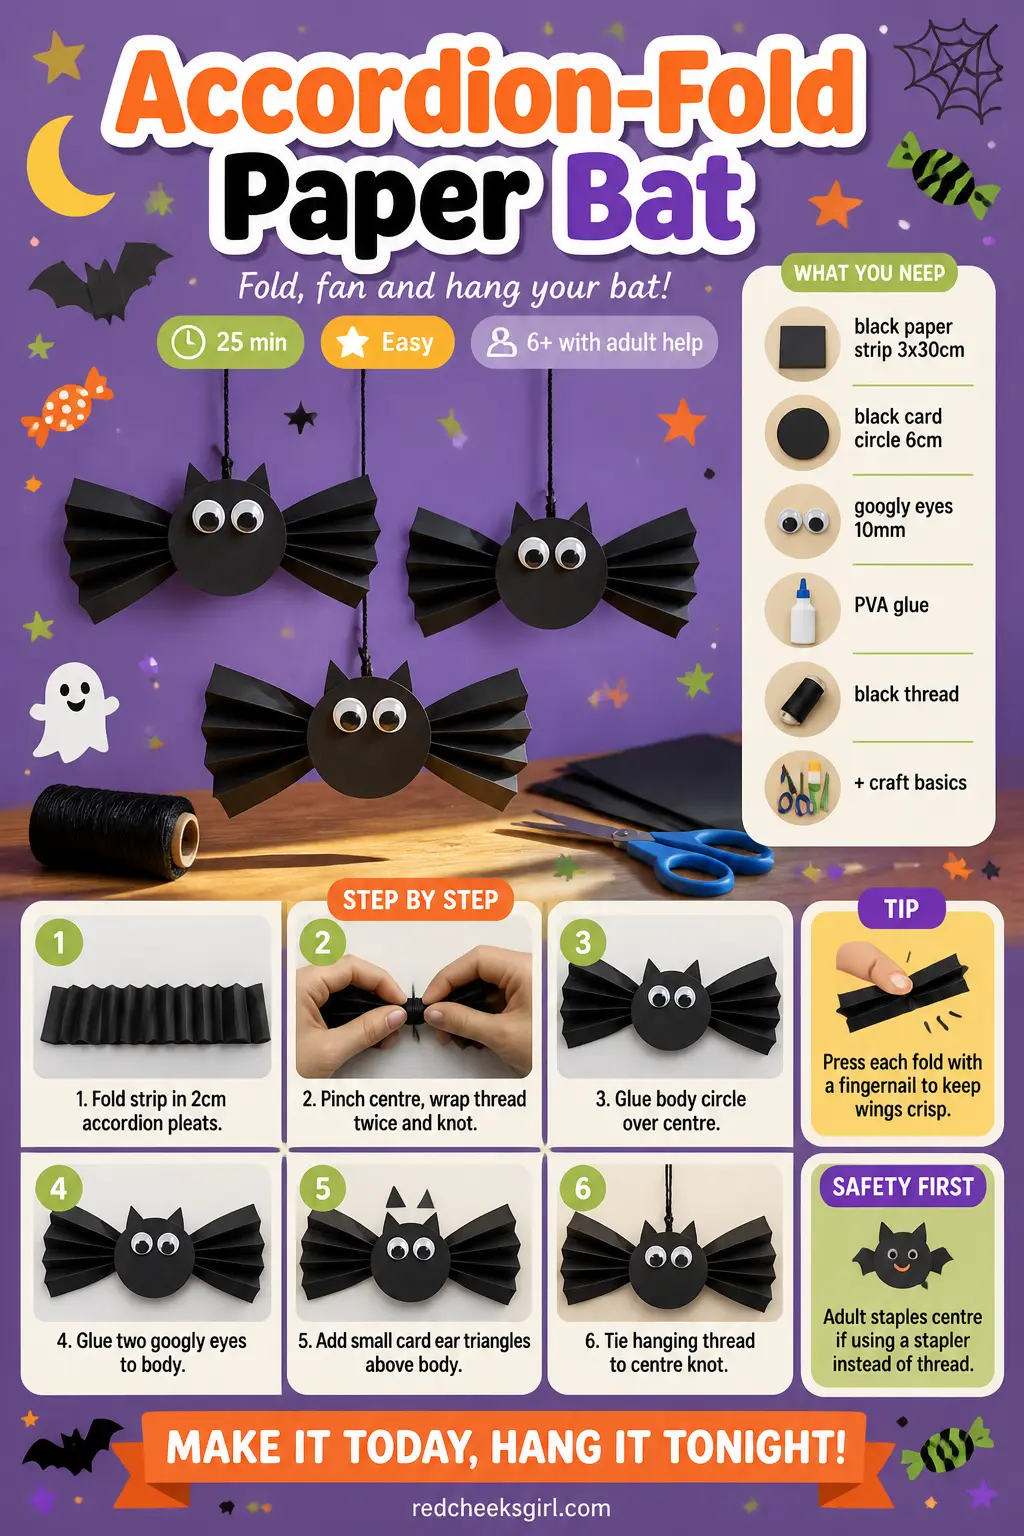
Accordion-Fold Paper Bat
What You Need
- 1 strip black paper or card, 3 cm wide and 30 cm long, per bat
- 1 circle black card, 6 cm diameter, per bat (body)
- 2 googly eyes, 10 mm
- PVA glue or a stapler (adult use)
- Black thread or thin string for hanging
- Pencil
How to Make It
- Take the 30 cm strip of black paper and fold it accordion-style: fold up 2 cm, then down 2 cm, then up 2 cm, continuing to the end of the strip. You should end up with a neat pleated stack about 2 cm wide. Press each fold firmly with a fingernail to keep it crisp.
- Pinch the accordion stack at its centre point so the two halves fan out on either side like wings. Hold it pinched while you wrap a piece of thread tightly around the centre twice and knot it firmly. Alternatively, an adult can staple through the centre. Once released, the wings should stay spread in a fan shape.
- Glue or staple the body circle to the centre of the accordion fold, covering the thread or staple. Press firmly and hold for 30 seconds.
- Glue two googly eyes onto the body circle. Add a small triangle of card for ears above the body if desired. Tie a length of black thread to the centre knot for hanging, or fold the wings flat slightly for a perched-bat look on a surface.
Good to Know
🛍 Shopping guide
Cork-Stamp Skull Gift Tags
A wine cork cut crosswise gives a perfect oval stamp, and two smaller corks or the end of a pencil-eraser add the eye sockets. Stamp a row of skulls onto kraft card, add marker features and cut into tags with a hole for ribbon.
These double as gift tags for Halloween party bags or as bunting strung on a length of twine. They take almost no time and the result is genuinely graphic.
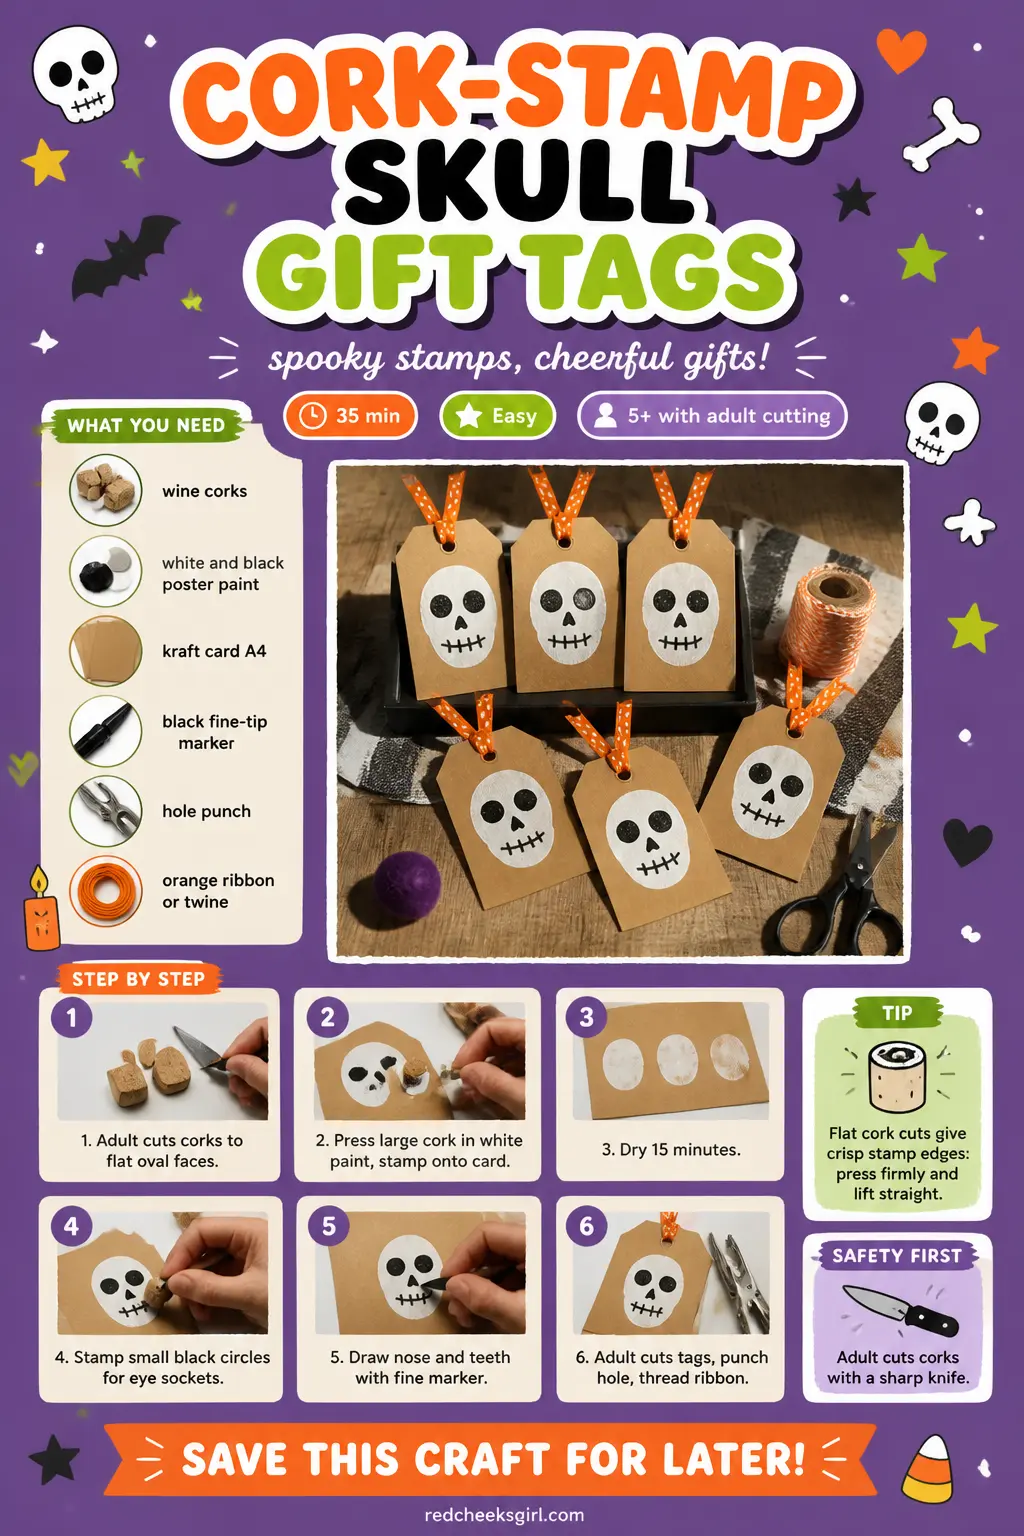
Cork-Stamp Skull Gift Tags
What You Need
- 3 to 4 wine corks
- White and black acrylic or poster paint
- Kraft card or white card, A4, 160 gsm
- Black fine-tip marker pen
- Scissors (adult for cork cutting and tag cutting)
- Hole punch
- Orange or black ribbon or twine, cut into 15 cm lengths
How to Make It
- An adult cuts two corks crosswise with a sharp knife to expose a clean oval face: one large oval about 2.5 cm across for the skull head, and two smaller rounds about 1 cm across for eye sockets. Keep the cuts clean and flat so the stamps give crisp edges.
- Pour a thin puddle of white paint into a lid. Press the large oval cork face into the paint and stamp it firmly onto the card. Lift straight up. Repeat across the card, leaving about 3 cm between skulls. Leave to dry for 15 minutes.
- Dip the small cork rounds into black paint and stamp two eye sockets onto each white skull oval, centred in the upper half. Let them dry for 5 minutes.
- Use the fine-tip marker to add a nose hole (a small upside-down heart or two dots) and a row of teeth along the bottom of each skull. A simple rectangle divided into squares with short lines gives a convincing jawline.
- An adult cuts the card into individual tag rectangles around each skull, about 5 x 7 cm, and punches a hole in the top corner of each. Thread a 15 cm length of ribbon or twine through the hole and tie it. The tags are ready.
Good to Know
Glitter-Resist Skeleton Hand
Each child traces their own hand onto black card, then draws the bone shapes on top in white oil pastel or white crayon.
Diluted white or silver paint washed over the whole thing slides off the pastel and clings to the black card around it, creating a faint glow around each bone. It is the same wax-resist technique used in Easter egg dyeing, translated into something genuinely spooky.
Mount on white card for contrast or display as is.
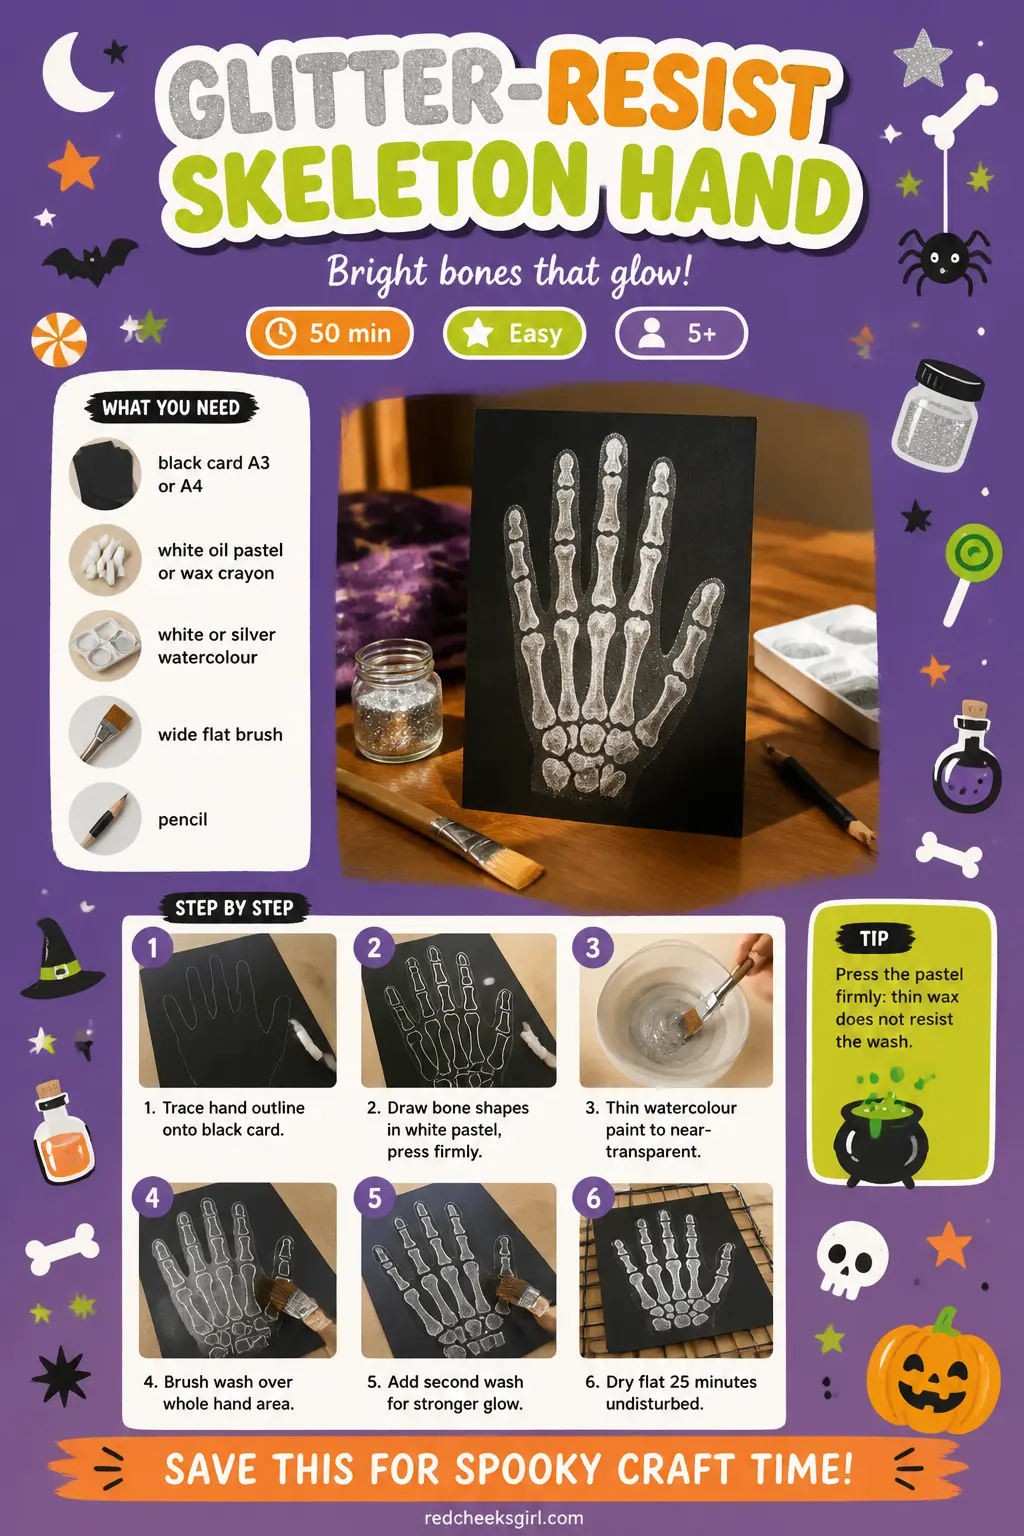
Glitter-Resist Skeleton Hand
What You Need
- 1 sheet black card, A3 or A4, 160 gsm, per child
- White oil pastel or thick white wax crayon
- White or silver watercolour paint, diluted to a thin wash
- Wide flat paintbrush
- Pencil
How to Make It
- Each child lightly traces around their own hand and wrist on the black card with a pencil. The pencil lines will not show on black card but leave a faint impression to draw over.
- Using the white oil pastel or wax crayon, draw the skeleton bones directly on top of the hand outline. Use simple shapes: long rectangles for the finger bones, rounded ovals for the knuckle joints, a wider rectangle for the palm, and a branching structure for the wrist. Press firmly so the pastel sits thick on the card surface.
- Dilute the white or silver watercolour paint with plenty of water: it should be almost transparent, like very thin milk. Brush it generously over the entire hand area in one smooth pass. The wax immediately resists the paint and the bone shapes glow through the wash while the dark card around them takes on a subtle silvery sheen. Add a second wash if the effect looks too pale.
- Leave to dry flat for 25 minutes. Do not touch the surface while drying or the wash smears. Once dry, the bones look almost luminous against the dark card.
Good to Know
🛍 Shopping guide
Yarn-Wrapped Twig Spiderweb
Three straight twigs bound at the centre form a six-pointed frame, and white or cream yarn wound between them creates a spiderweb pattern. A small card spider glued at the centre or hanging from a thread completes it.
These look beautiful in a window where the light comes through the web. At the end of the season, unwind the yarn and compost the twigs.
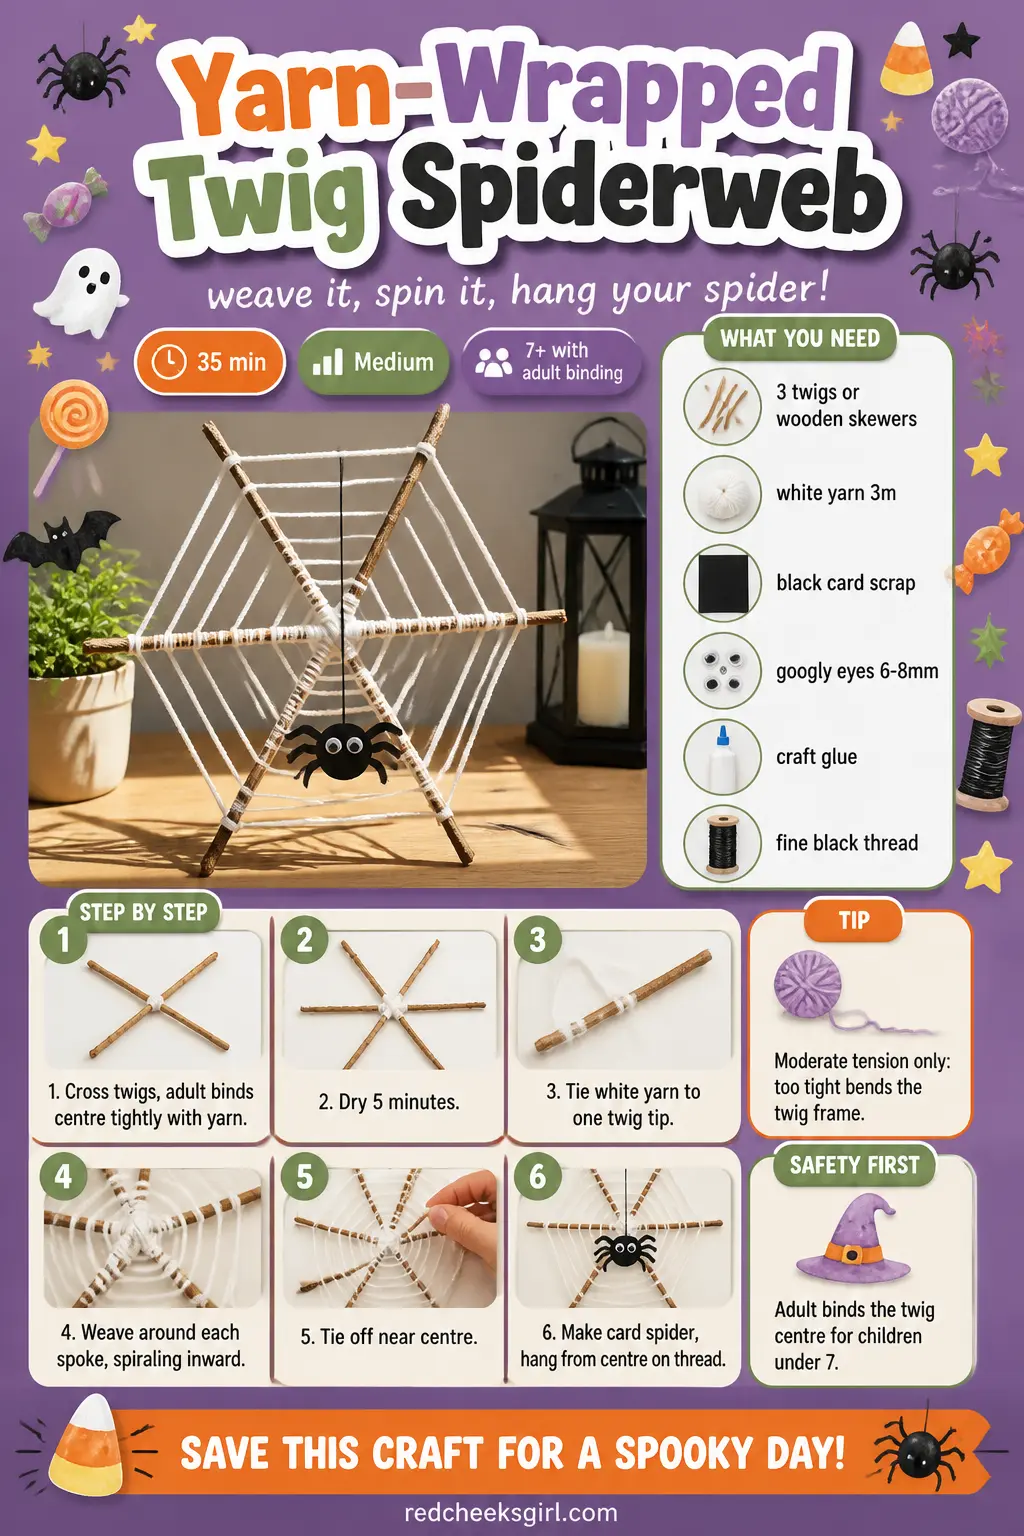
Yarn-Wrapped Twig Spiderweb
What You Need
- 3 straight twigs or 3 wooden skewers, each 25 to 30 cm long
- White or cream yarn, about 3 m per web
- Strong craft glue or a short piece of yarn for binding the centre
- Black card scrap for a small spider
- 2 small googly eyes, 6 to 8 mm
- Fine black thread for hanging the spider
How to Make It
- Cross the three twigs or skewers at their midpoints to form a six-pointed star shape. An adult should hold them in place and bind tightly with a short length of yarn, wrapping it around all three in an X pattern several times before tying off. Add a drop of craft glue over the binding and leave it to dry for 5 minutes so the frame is rigid.
- Tie the end of the white yarn to one of the twig tips and begin weaving across the frame: take the yarn from the first twig tip to the next, wrap once around it, continue to the next tip, wrap once, and so on, working your way inward toward the centre. Pull each pass moderately taut: too tight and the frame bends, too loose and the web sags.
- After two or three rounds the web pattern becomes clear. Continue spiraling inward, wrapping once around each spoke as you pass it, until you reach about 4 cm from the centre. Tie off the yarn with a double knot around the nearest spoke.
- Cut a small spider body from black card: a circle about 2 cm across. Cut eight thin strips about 1 cm wide and 3 cm long for legs. Glue four legs to each side of the body and bend each one once near the tip. Glue on two small googly eyes. Tie a 10 cm length of fine black thread to the body and tie the other end to the centre binding of the web so the spider hangs in the middle.
Good to Know
Painted Rock Monsters
Smooth river rocks or craft stones painted in neon colours and decorated with googly eyes, paint pens and tiny pom-pom noses become a set of pocket-sized monsters. These travel well, store in a jar between seasons and make excellent party favours.
Each one takes about 10 minutes of hands-on work; the drying takes longer. A clear varnish coat at the end seals the paint and makes them feel almost professional.
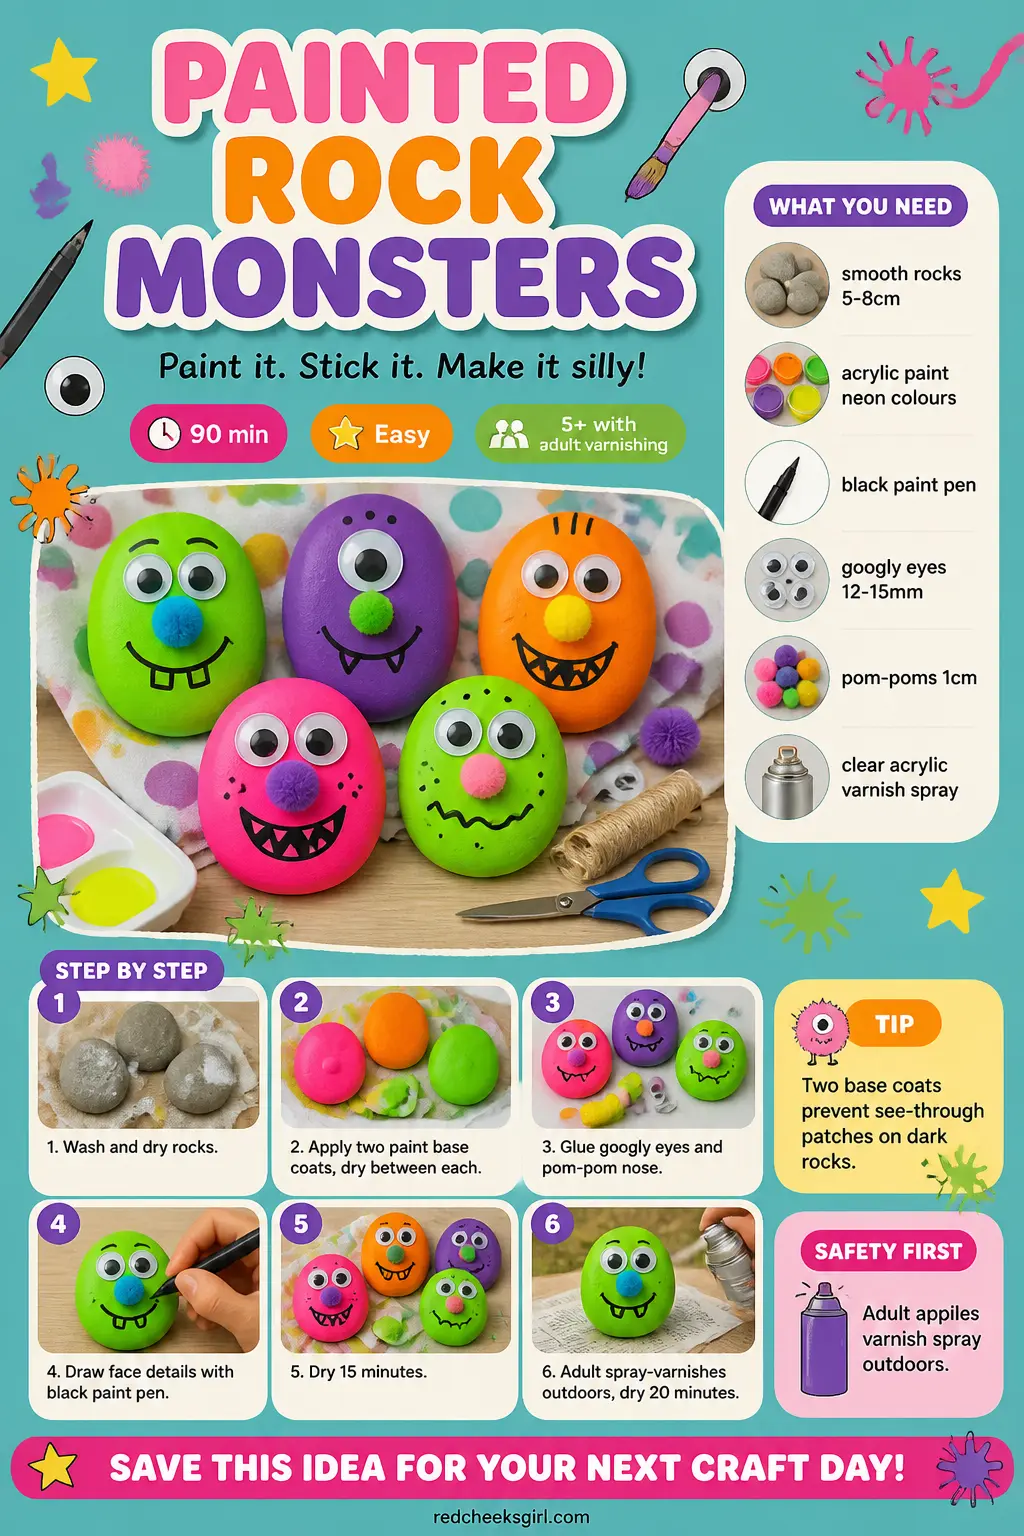
Painted Rock Monsters
What You Need
- Smooth rocks or flat craft pebbles, 5 to 8 cm across, one per child
- Acrylic craft paint in green, purple, orange, pink
- Black and white paint pens or fine marker
- Googly eyes, 12 to 15 mm, 2 per rock
- Small pom-poms, 1 cm, for noses
- PVA or craft glue
- Clear acrylic varnish spray (adult step)
- Paintbrush, medium round
How to Make It
- Wash and dry the rocks completely before painting. Any grit or moisture prevents paint from bonding. Apply one coat of acrylic paint all over the rock in a chosen monster colour and leave it to dry for 30 minutes. Apply a second coat for solid coverage and dry again, about 20 minutes. The painted surface should look even with no rock texture showing through.
- Once the base coat is dry, glue two googly eyes onto the upper half of the rock and press a small pom-pom between or below them as a nose. Hold each piece for 20 seconds until the glue grips.
- Use a black paint pen or fine marker to add a mouth: jagged teeth, a row of dots, a wavy smile. Add eyebrows, small horns drawn in lines above the eyes, or spots of contrasting colour for extra character. A white paint pen can add a highlight dot to each googly eye to make them look more alive.
- Leave the finished face to dry for 15 minutes. An adult then takes the rocks outside and applies a light coat of clear acrylic varnish spray. This step seals everything and stops the googly eyes peeling off later. Allow the varnish to dry for at least 20 minutes before handling.
Good to Know
🛍 Shopping guide
Paper-Bag Pumpkin Luminaries
A standard brown paper lunch bag, filled with a little sand and a battery-operated tea light, becomes a glowing pumpkin luminary when the face is cut out by an adult and the bag is painted orange.
A row of six on a windowsill or along a path looks genuinely lovely at dusk. Never use a real flame inside a paper bag; battery tea lights are the only option here.
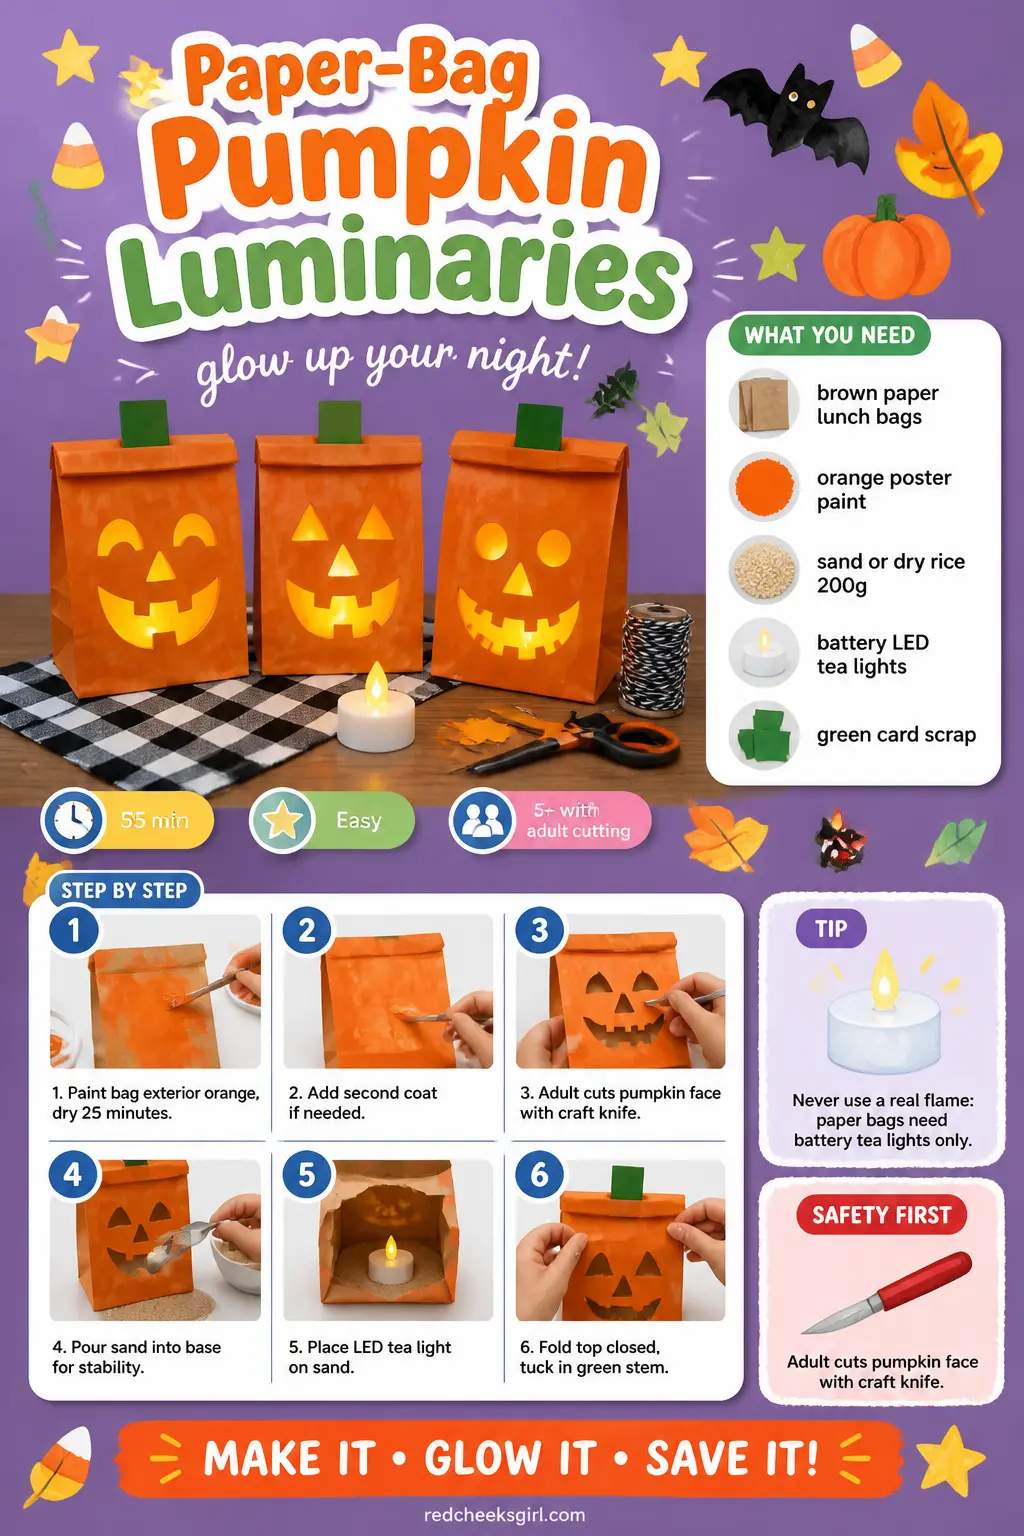
Paper-Bag Pumpkin Luminaries
What You Need
- Brown paper lunch bags, one per child
- Orange poster paint
- Pencil and craft knife (adult only) or small sharp scissors
- About 200 g sand or dry rice per bag (to weight it)
- 1 battery-operated LED tea light per bag
- Green card scrap for stem (optional)
- Paintbrush
How to Make It
- Open the bag fully and paint the outside orange, including the sides. The paint soaks into the paper slightly, which is fine: it gives a slightly translucent quality that glows well. Leave to dry flat, opened out, for 25 minutes. Once the paint is dry, paint a second coat if the orange looks too pale or patchy.
- Lay the flat dry bag on a cutting mat. An adult draws a simple pumpkin face on one flat face of the bag: two triangle eyes, a small triangle nose and a jagged rectangular mouth. Cut the shapes out cleanly with a craft knife or small sharp scissors. The cut-out sections become the windows that glow when lit.
- Refold the bag and pour about 200 g of sand or dry rice into the bottom to give the bag stability: a light bag tips over. Place the LED tea light on top of the sand and close the top of the bag by folding it over twice. Do not seal it permanently, as the battery will need replacing eventually.
- Optional: cut a small stem shape from green card and tuck it into the folded top of the bag before the final fold, so it pokes upward like a real pumpkin stem. Turn on the tea light and the pumpkin face glows orange through the cut-out features.
Good to Know
🛍 Shopping guide
Fingerprint Ghost Bunting
White fingerprint ghosts printed on black card triangles, strung on a length of twine, make the quickest bunting imaginable. Each ghost is three fingerprints: one large one for the body pressed on its side, two smaller ones for the arms, and a drawn-on face.
An adult pre-cuts the triangles and punches holes; children do all the printing. A string of ten flags takes a class of twenty about 25 minutes to complete together.
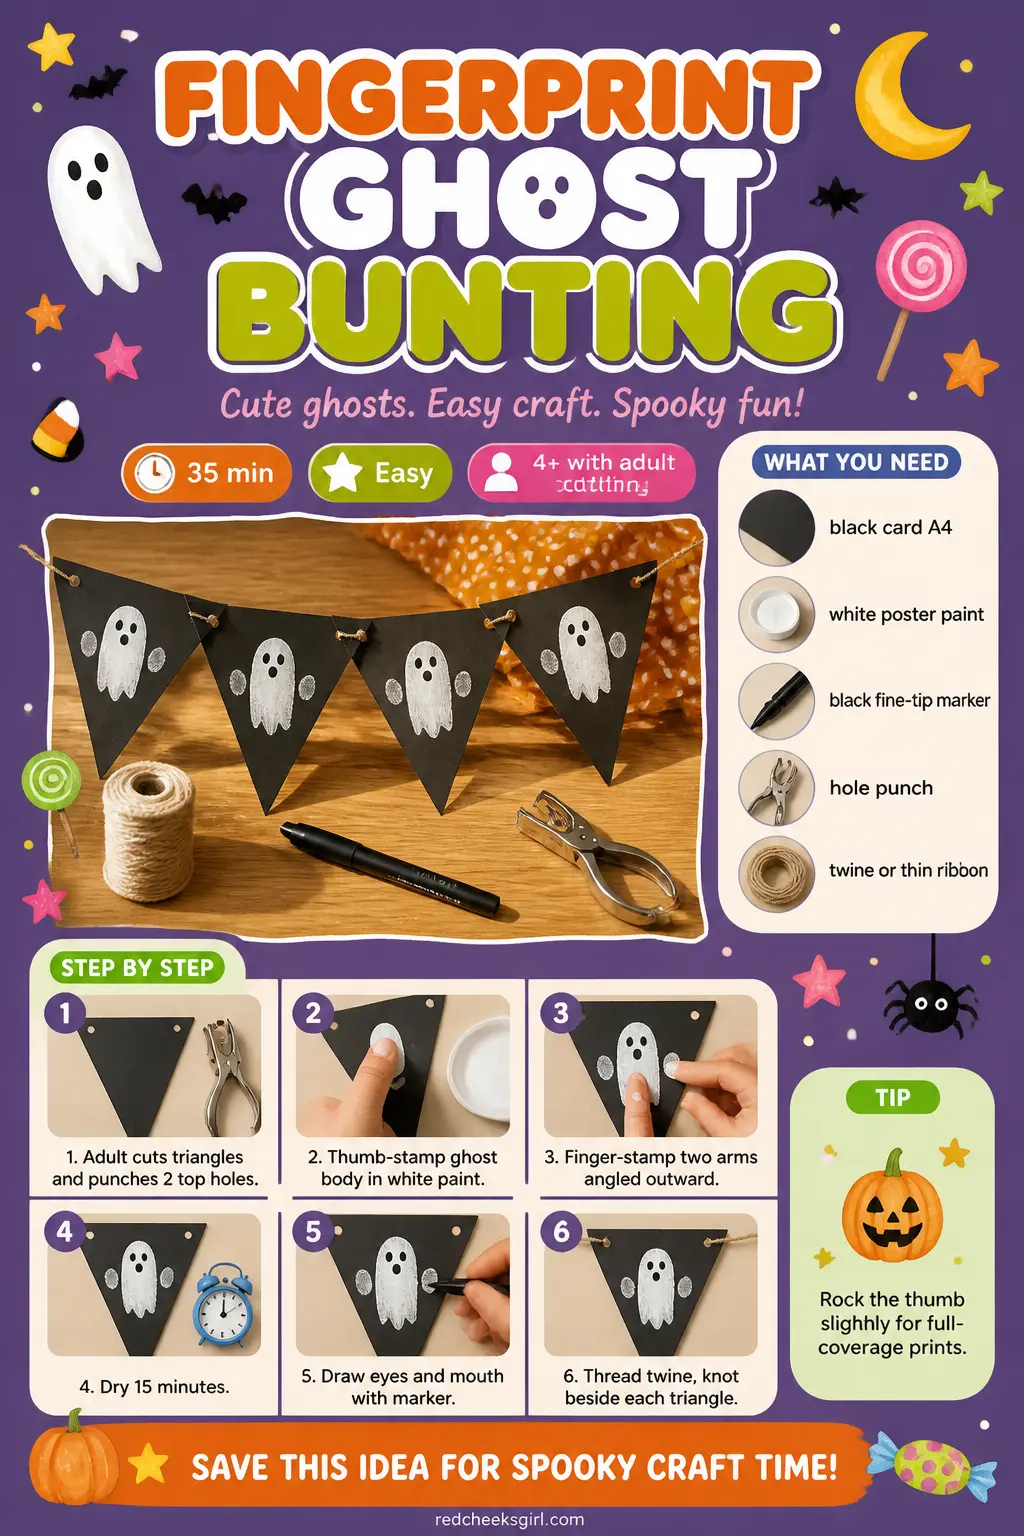
Fingerprint Ghost Bunting
What You Need
- Black card, A4, 160 gsm (each A4 sheet makes 4 bunting triangles)
- White poster paint in a shallow tray
- Black fine-tip marker pen
- Hole punch
- Twine or thin ribbon, measured to the desired length plus 30 cm at each end
- Damp cloth for hand-cleaning between children
How to Make It
- An adult cuts the black card into isoceles triangles about 10 cm wide at the base and 14 cm tall. Punch a hole in each of the two top corners. A batch of ten triangles from three A4 sheets makes a good length of bunting.
- Pour white paint into a flat tray or jar lid. Each child presses their thumb into the paint and stamps it firmly onto the centre of a triangle, pressing and rocking slightly for full coverage. This is the ghost body. Wipe the thumb on the damp cloth before the next step.
- Use a fingertip (index or little finger) to stamp two smaller prints, one on each side of the thumb print, angled slightly outward: these are the ghost arms, giving a raised-hands silhouette that reads immediately as a Halloween ghost.
- Leave the prints to dry for 15 minutes. Use the black marker to add two small oval eyes and a little round mouth to each ghost. Children can do this themselves once the paint is dry.
- Thread the twine through the holes in each triangle, spacing them about 2 cm apart along the twine. Knot the twine just outside each hole to keep the triangles from sliding. Hang by the excess twine at each end.
Good to Know
Cupcake-Liner Owl
Two cupcake liners, stacked and slightly offset, become the feathered body of an owl when glued onto coloured card. Button eyes, a tiny triangle beak and card wings complete a bird that looks almost geometric and very satisfying.
These work as cards, as wall art or as a classroom display. They are almost entirely scissor-free for the child: the adult cuts the wing shapes.
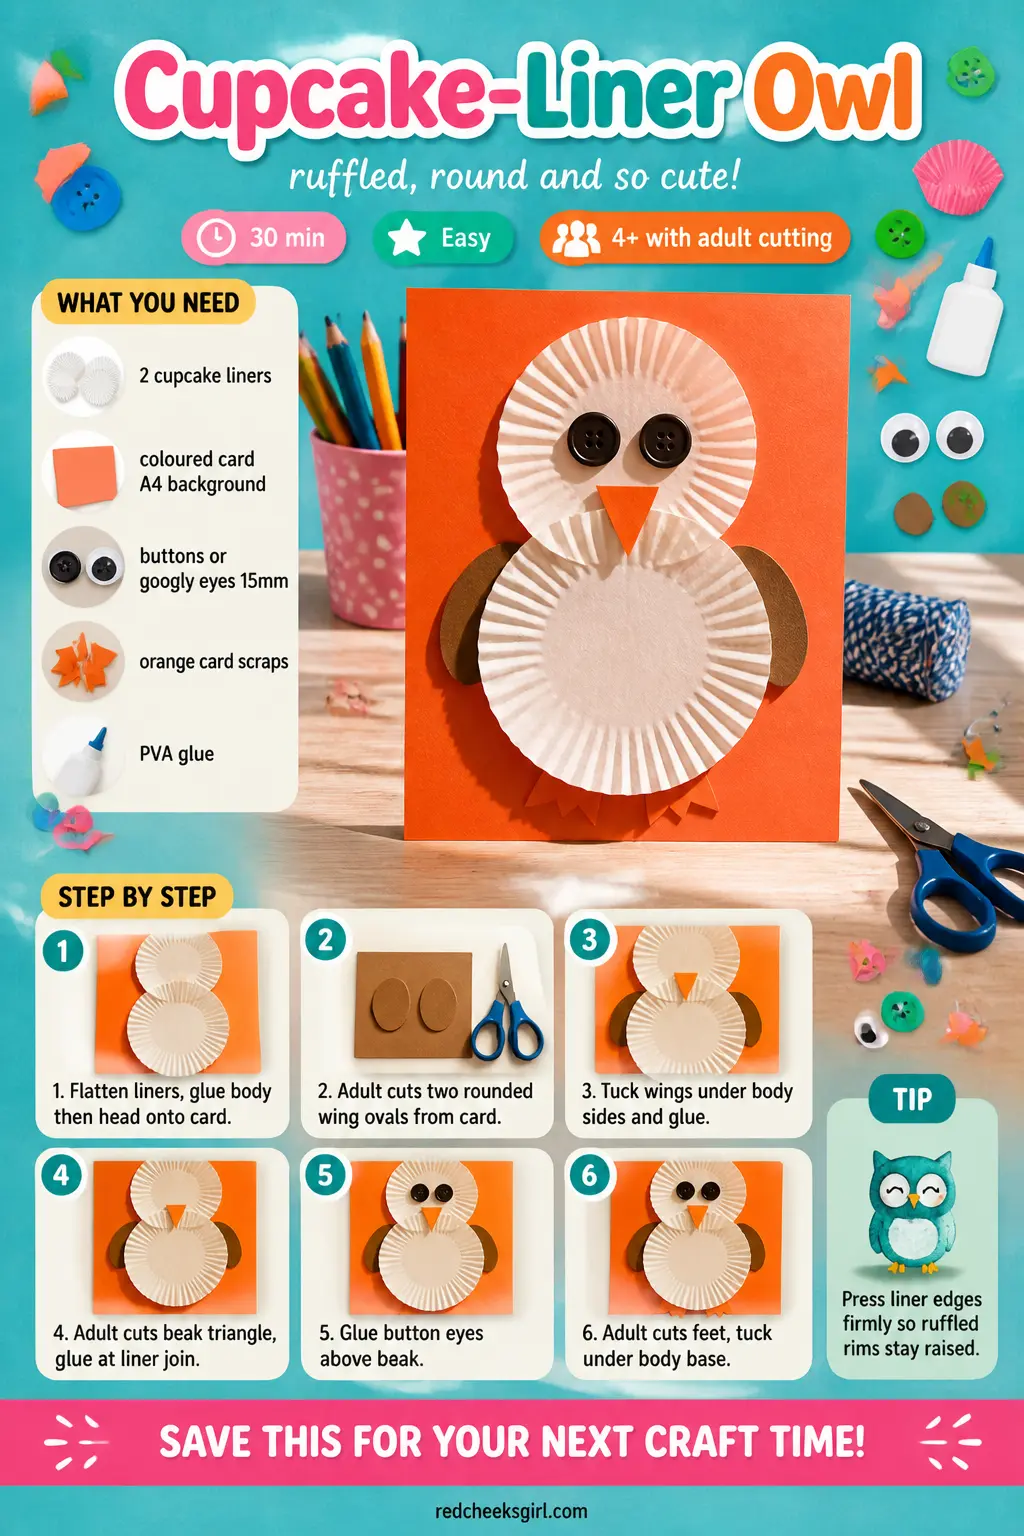
Cupcake-Liner Owl
What You Need
- 2 white or brown cupcake liners per owl
- 1 sheet orange, purple or yellow card, A4, for background
- 2 buttons, about 15 mm, for eyes (or googly eyes)
- Small scrap of orange card for beak and feet
- PVA glue
- Brown or dark orange watercolour paint and a brush (optional, for tinting the liners)
- Pencil, child scissors for beak, adult scissors for wings
How to Make It
- Optional: brush each cupcake liner very lightly with diluted brown watercolour to give it a feathery warmth. Let them dry flat for 10 minutes. Skip this step if the white liner colour works for your owl.
- Flatten each cupcake liner into a rough disc shape. Place the larger liner near the bottom centre of the background card and the slightly smaller one above it, overlapping by about 2 cm so the top liner becomes the head and the bottom one the body. Glue both down, pressing firmly around the edges so the ruffled rims stay raised and give a feather texture.
- An adult cuts two small wing shapes from brown or orange card scraps: simple rounded ovals about 5 cm long. Tuck one under each side of the body liner and glue them so they appear to emerge from behind the body.
- An adult cuts a tiny triangle from orange card for the beak, about 1.5 cm wide and 1 cm tall. Glue it at the centre join between the two liners, pointing downward. Glue the two button eyes or googly eyes above the beak on the upper liner, close together.
- An adult cuts two simple feet from orange card: a strip with three short snips at the bottom to make toes. Tuck and glue the feet under the bottom edge of the body liner. Leave everything to dry for 5 minutes.
Good to Know
🛍 Shopping guide
Black Silhouette Lantern From a Jar
A clean glass jar wrapped in orange tissue paper and topped with a black card silhouette cut-out glows warmly with a battery tea light inside.
The tissue paper diffuses the light beautifully, the silhouette sits as a collar around the jar top and casts a subtle shadow pattern on nearby surfaces.
This one suits ages 8 and up because it involves some precision; younger children can do the tissue paper step while an adult handles the silhouette.
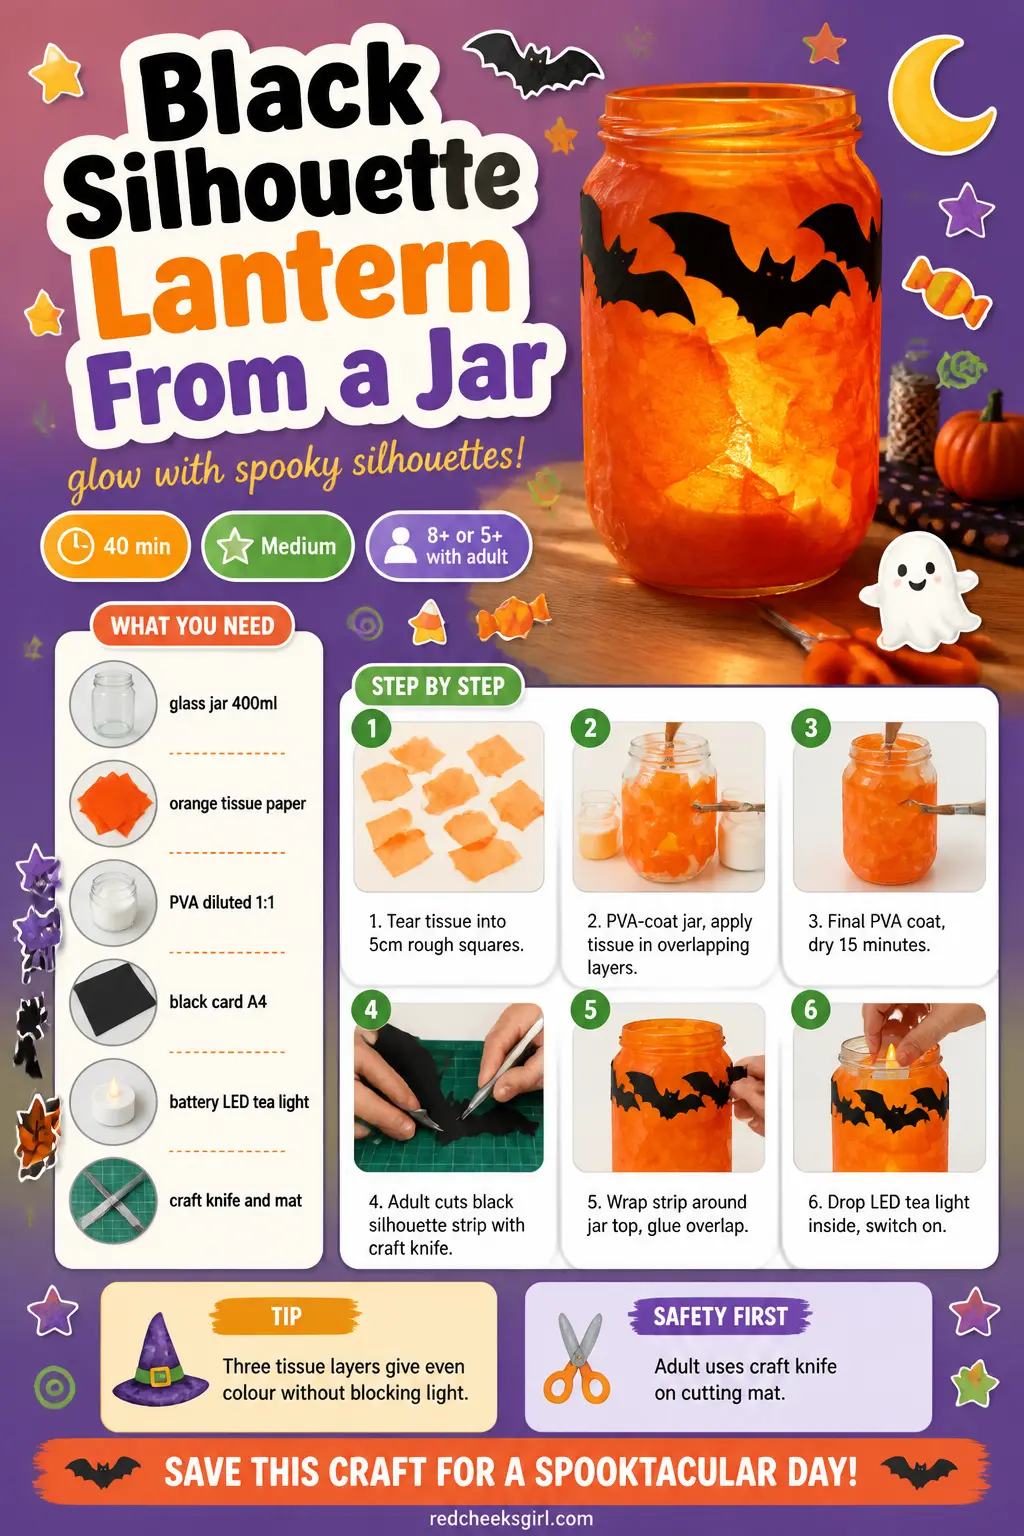
Black Silhouette Lantern From a Jar
What You Need
- 1 clean glass jar, about 400 ml (a standard jam jar works perfectly)
- Orange tissue paper, 3 to 4 sheets
- PVA glue diluted 1:1 with water
- Black card, A4, 160 gsm
- Pencil, craft knife and cutting mat (adult only)
- 1 battery-operated LED tea light
- Foam brush or wide flat brush
How to Make It
- Tear the tissue paper into rough squares about 5 cm across. Brush the outside of the jar with the diluted PVA and apply tissue paper squares one at a time, overlapping them and smoothing out bubbles with the brush. Cover the sides completely in two or three overlapping layers but leave the base uncovered so the jar sits flat. Brush a final coat of diluted PVA over the top to seal. Leave to dry for at least 15 minutes: the jar should feel smooth and firm, not sticky.
- While the jar dries, an adult draws a silhouette design on the black card: a row of bats, a line of bare trees, a witch on a broomstick, or a row of cats. The design should be about 4 cm tall and long enough to wrap around the top of the jar with a 1 cm overlap. An adult cuts this out with a craft knife on a cutting mat.
- Once the jar is dry, wrap the black silhouette strip around the top of the jar and glue the overlap in place. It should sit like a collar just below the rim. Drop the LED tea light inside the jar and switch it on. The orange glow through the tissue paper and the black silhouette shadow make this look genuinely atmospheric.
Good to Know
🛍 Shopping guide
Straw-Blown Ink Spider Web
A blob of diluted black ink or very runny black paint dropped onto white card and blown through a straw branches into natural web-like tendrils that look nothing like a child’s drawing and everything like a real web.
Add a card spider, a few white pen dots for dewdrops and the result is striking enough to frame. The technique is genuinely unpredictable: every web is completely different, which is the whole point.
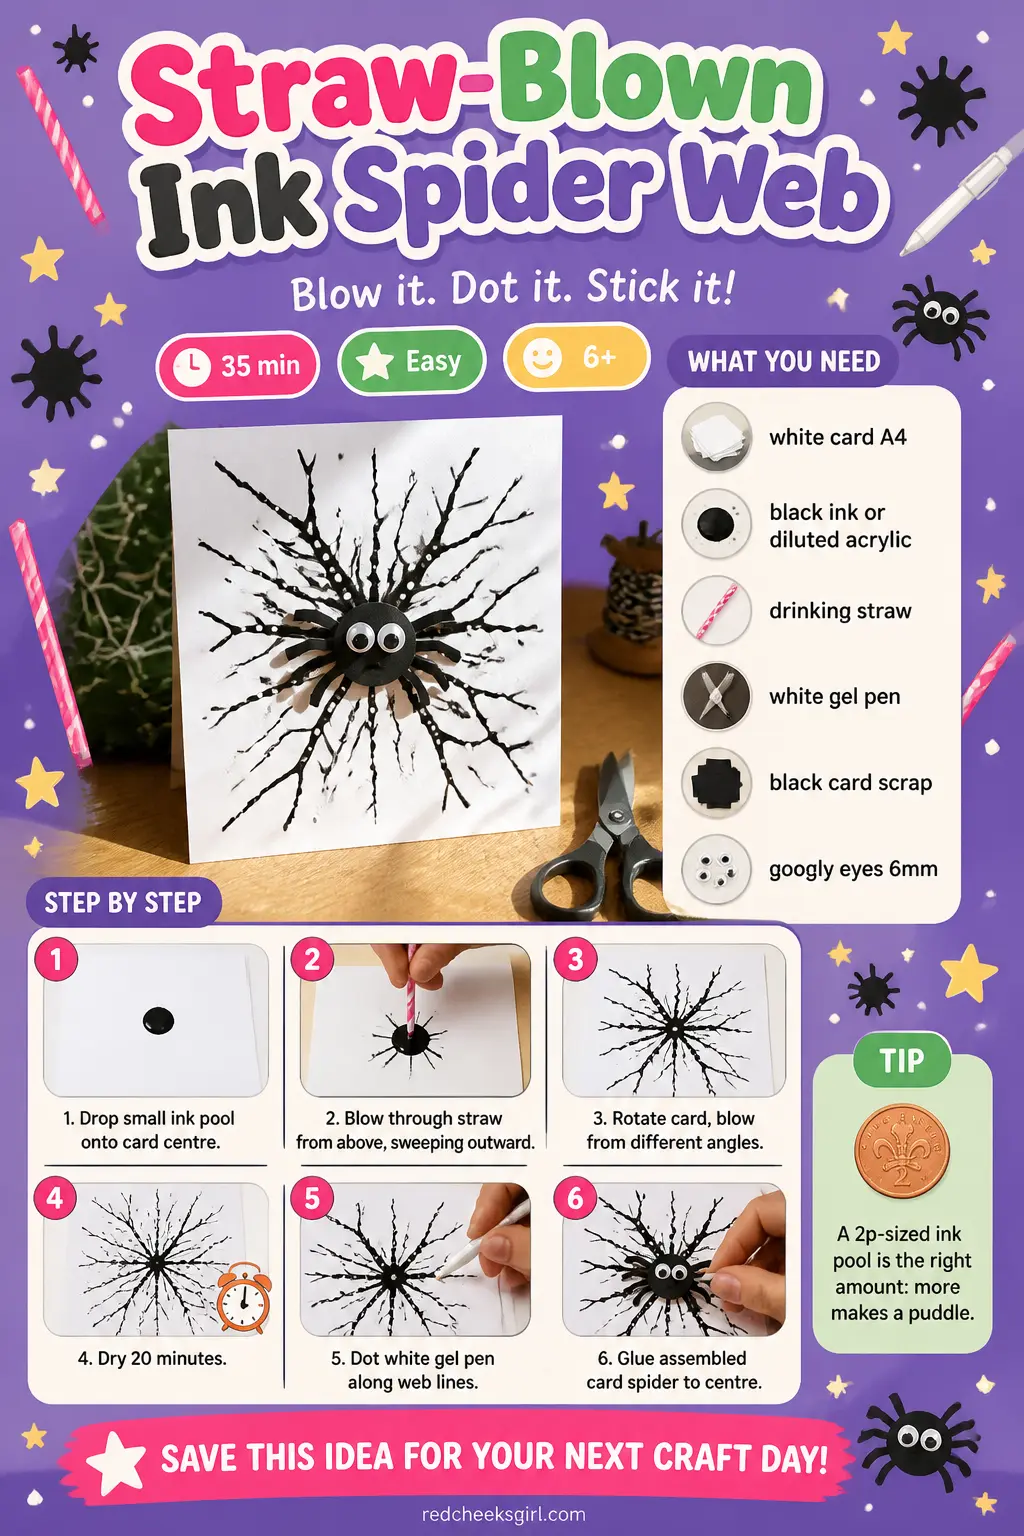
Straw-Blown Ink Spider Web
What You Need
- 1 sheet white card, A4 or A5, 160 gsm
- Black Indian ink or very diluted black acrylic paint (consistency of water)
- A pipette or teaspoon for dropping ink
- Drinking straws, one per child
- White gel pen or white paint pen
- Black card scrap for spider body
- Googly eyes 6 mm, 2 per spider
- PVA glue
How to Make It
- Drop a small pool of ink or very diluted black paint onto the card, about the size of a 2 pence coin, near the centre. Too much ink makes a puddle that spreads uncontrollably; too little produces only a few spindly lines.
- Hold the straw a few centimetres above the ink pool and blow gently downward and then outward in a sweeping motion. The ink branches in the direction of the airflow, creating thin spidery lines radiating from the centre. Blow from different angles to send branches in multiple directions. Work quickly before the ink dries.
- Leave the blown web to dry completely, about 20 minutes. While it dries, cut a small spider body circle from black card, about 2 cm across, and eight leg strips each about 1 cm wide and 3 cm long. Assemble and glue as described in the Paper-Plate Spider Web craft above.
- Once the web is dry, use the white gel pen to dot small circles along the web lines to suggest dewdrops. Glue the finished spider onto the centre of the web. Leave for 5 minutes to set.
Good to Know
Tissue-Paper Stained Glass Window
Black card with shapes cut out by an adult, backed with torn squares of coloured tissue paper and taped to a window, lets the daylight shine through like stained glass. Use classic Halloween shapes: bats, moons, pumpkins, stars.
The tissue paper step is entirely child-led and the finish looks genuinely beautiful in any size. Tape it down with clear tape or removable adhesive putty; it peels off clean at the end of October.
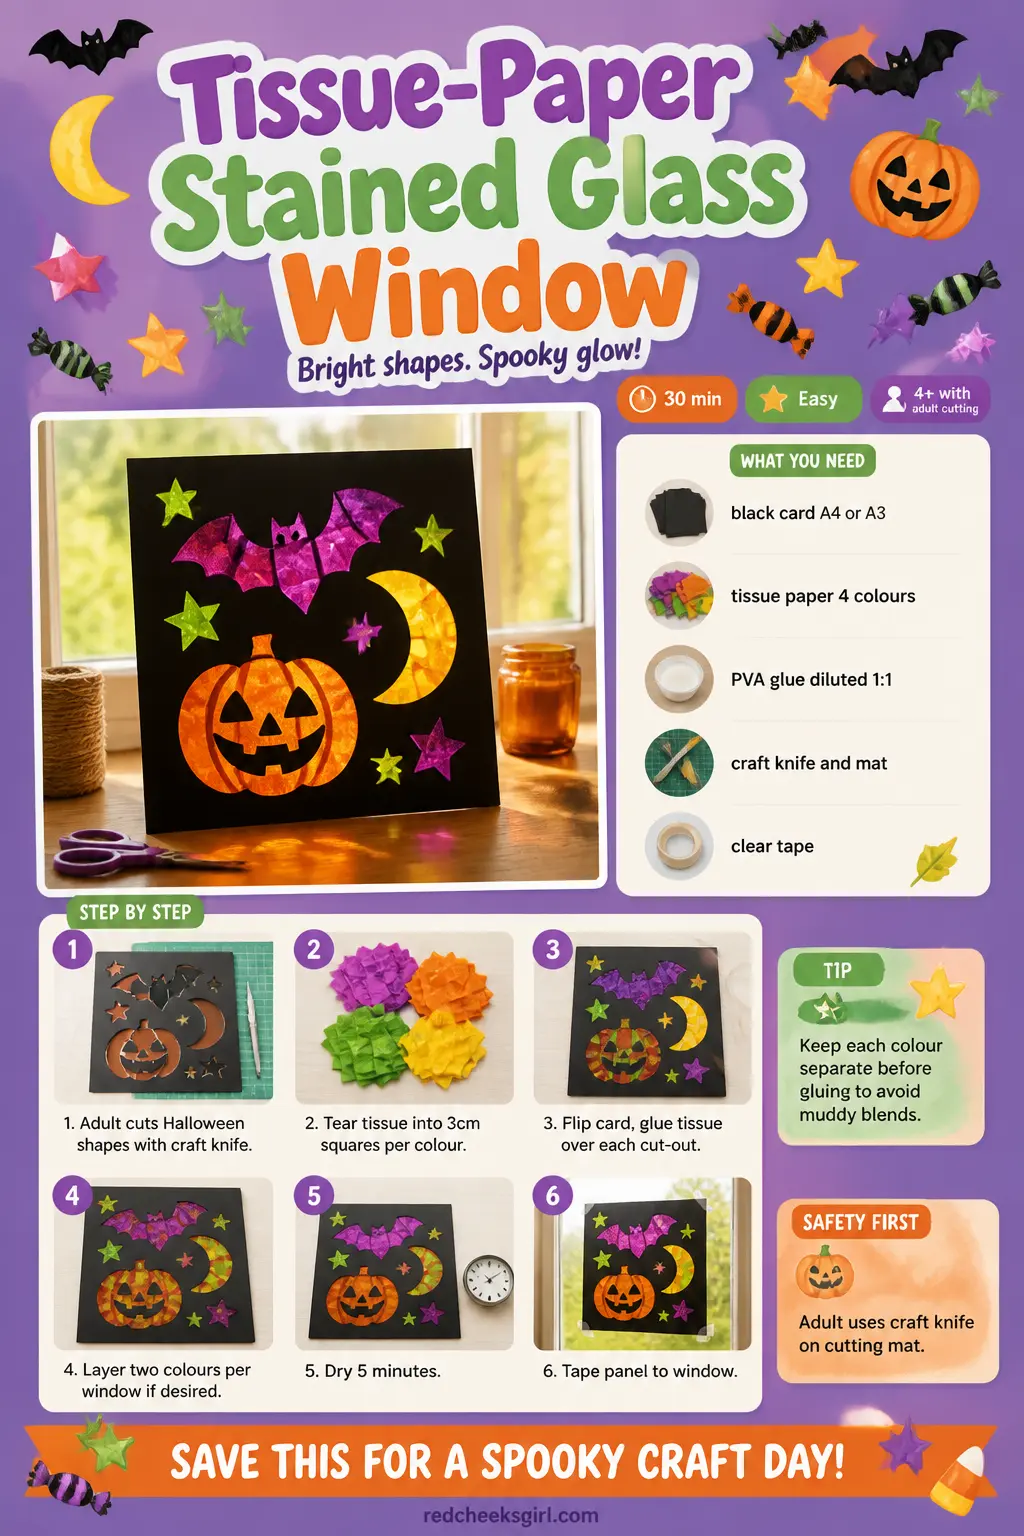
Tissue-Paper Stained Glass Window
What You Need
- 1 sheet black card, A4 or A3, 160 gsm
- Tissue paper in orange, yellow, green and purple, 2 sheets of each
- Clear adhesive tape or removable adhesive putty
- Craft knife and cutting mat (adult only)
- PVA glue diluted 1:1 or a glue stick
- Paintbrush if using diluted PVA
How to Make It
- An adult draws and cuts Halloween shapes from the black card using a craft knife on a cutting mat: a bat in flight, a crescent moon, a pumpkin outline, a star. The cut-out areas should be generously sized, at least 4 cm across, so the tissue paper colours show up clearly when backlit. Leave a solid border of black card around each shape of at least 1.5 cm.
- Tear the tissue paper into small rough squares, about 3 cm across. Have each colour in a separate pile: mixing them before gluing leads to muddy colours.
- Turn the black card face down on the table. Brush diluted PVA or apply glue stick over the back of one cut-out window. Press tissue paper squares over it, overlapping them and covering the full opening. Use a single colour per shape or layer two colours for a richer effect: orange over yellow gives a warm amber. Repeat for each cut-out shape.
- Leave the glue to dry for 5 minutes. Tape the finished panel to a window using clear tape at the corners or removable putty. When backlit, the tissue paper glows through the black card in bright jewel colours.
Good to Know
🛍 Shopping guide
Frequently Asked Questions
What halloween crafts for kids elementary age work best in a classroom of 20 or more?
The fingerprint ghost bunting, torn-paper pumpkin and sponge-print Frankenstein card all scale to large groups with minimal preparation.
All three require very little drying wait time between steps and need only one or two adult-cut components prepared in advance, so a single teacher can run them comfortably.
For more ideas scaled to a full class, the 15 Halloween Crafts for Preschool round-up at redcheeksgirl.com covers techniques that also work at a primary school table.
Which of these halloween crafts for kids elementary take less than 30 minutes start to finish?
The cardboard-tube mummy pencil holder (25 minutes), the accordion-fold paper bat (25 minutes), the tissue-paper stained glass window (30 minutes) and the cupcake-liner owl (30 minutes) all fall under or right at the 30-minute mark, active time and drying included. The fingerprint ghost bunting comes in at 35 minutes if you count the 15-minute drying wait.
Can younger children do these halloween crafts without adult help?
Most crafts here suit ages 4 to 5 with an adult handling cutting, hot glue and any craft knife work. The child owns the painting, stamping, gluing and decorating steps in every craft.
The cheesecloth ghost and the yarn-wrapped twig spiderweb suit slightly older children, from ages 6 to 7, because they involve fiddlier techniques like draping stiffened fabric or winding yarn evenly around spokes.
How do you store these halloween crafts after the season?
Flat crafts like the bunting, the haunted house, the skeleton hand and the stained glass window stack between sheets of paper in a folder or a flat box.
Three-dimensional pieces, such as the rock monsters, the cheesecloth ghosts and the mummy pencil holder, store in a single layer in a shallow lidded box. The bat mobile threads off the dowel for flat storage.
The paper-bag luminaries store flat with the sand tipped out and the tea light removed.
What halloween party games go well with a craft session like this?
Once the making is done, a round of themed party games keeps the energy up without requiring any extra preparation.
The 25 Not-Too-Scary Halloween Party Games for Kids at redcheeksgirl.com and the 16 Halloween Games and Activities for Kids at the same site both pair naturally with a crafting afternoon and need no equipment beyond what is already on the table.
31 wickedly fun Halloween party games for every age — from trending 2026 formats to beloved classi
18 halloween birthday party games that are actually fun — active, printable & spooky quiet games f
31 easy Halloween decorations that need no ladder, no tools, and no helper. Put the whole house toge
Leave a Reply