

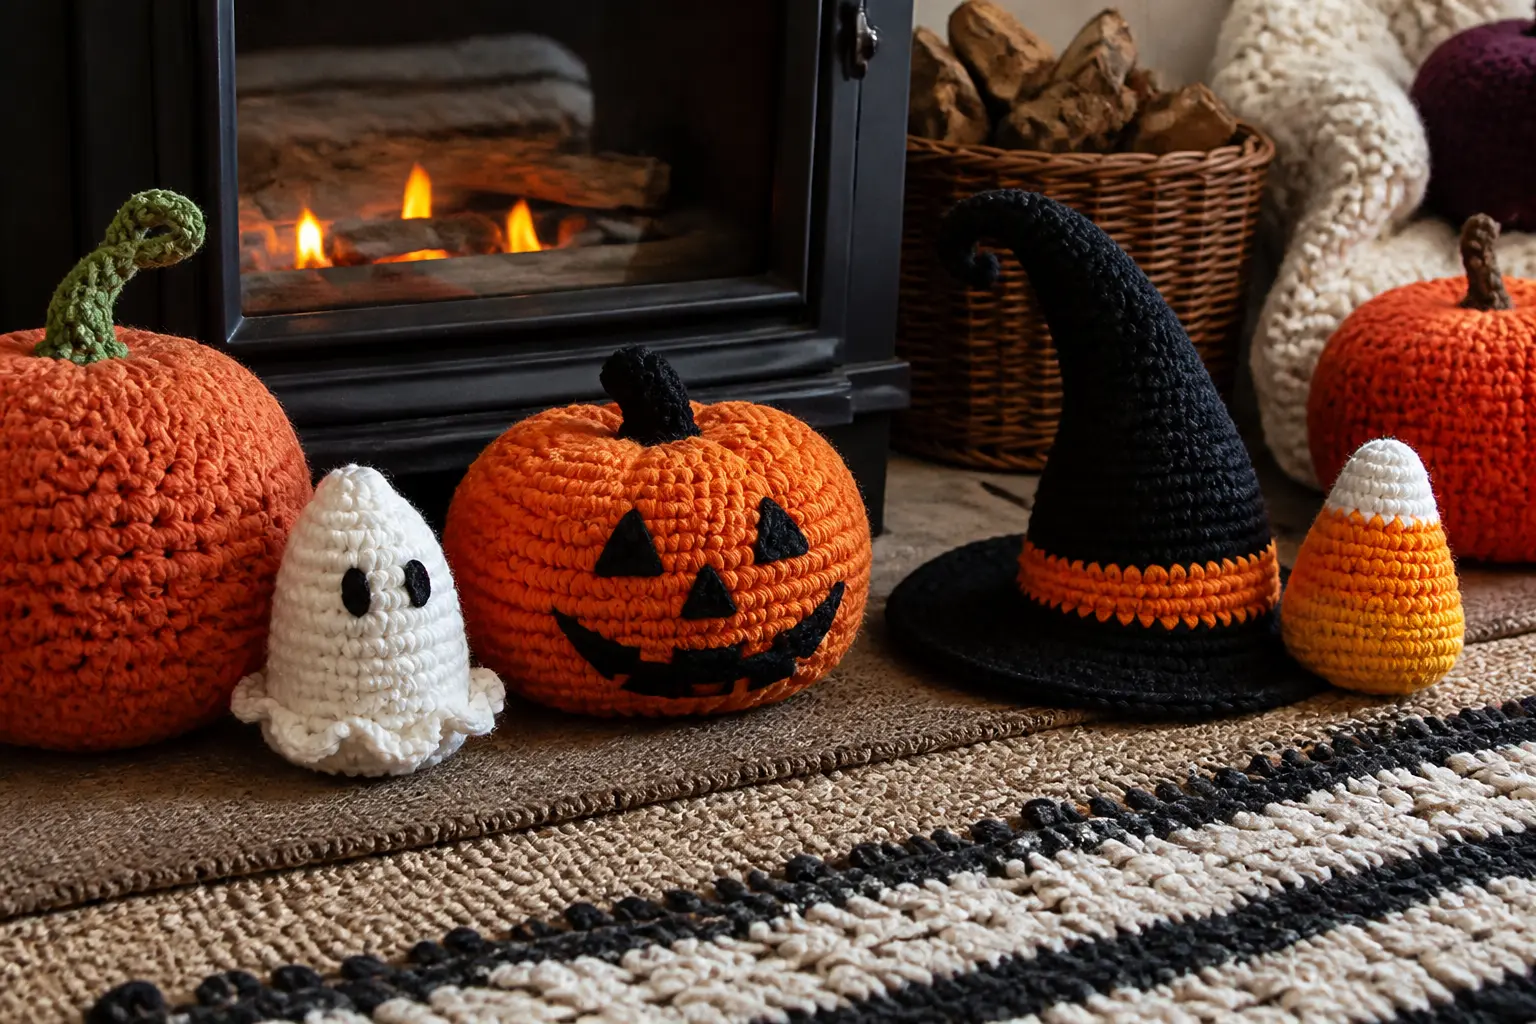
Leftover yarn from summer projects is exactly the right size for a crochet Halloween decoration. These 19 makes run from a ten-minute bag charm to an afternoon pumpkin, and every single one fits in your hand when it is done, which means they store flat in a ziplock bag and come out looking perfect next season.
The patterns below use US crochet terms throughout. If you are reading this in the UK, note that a US single crochet is a UK double crochet.
A magic ring (MR) starts every amigurumi body; if that technique is new to you, a slip-knot loop works as a substitute, just pull it tight before the first round.
Stitch counts appear in brackets at the end of each round so you can catch a mistake before it compounds.
Most of these crafts suit confident beginners. A few of the assembly steps, specifically inserting safety eyes and closing the final round around stuffing, are fiddly the first time, so the relevant step says so.
Everything else is straightforward single crochet in the round, which is exactly as repetitive and meditative as it sounds.
For more ideas on dressing the whole house, 31 Easy Halloween Decorations You Can Put Up in an Afternoon covers the non-yarn end of the room, and 34 Halloween Table Decorations That Survive a Dinner Party is worth a look if these pieces are heading for the dining table.
This post contains affiliate links. If you buy through them, I may earn a small commission at no extra cost to you.
- Crochet Ghost Bag Charm
- Crochet Candy Corn Ornament
- Crochet Halloween Pumpkin Amigurumi
- Crochet Pocket Acorn Keychain
- Crochet Bat Ornament
- Crochet Skull Garland
- Crochet Spider Web Bowl
- Crochet Black Cat Doorstop
- Crochet Witch Hat Table Topper
- Crochet Frankenstein Monster Mug Cosy
- Crochet Cauldron Basket
- Crochet Moon and Stars Hanging
- Crochet Eyeball Scatter Cushion Cover
- Crochet Tiny Coffin Ornament
- Crochet Mummy Wrapping Bottle Cover
- Crochet Spiderweb Place Mat
- Crochet Mini Pumpkin Patch Garland
- Crochet Raven Amigurumi
- Crochet Potion Bottle Label Set
- Frequently Asked Questions
Crochet Ghost Bag Charm
This little ghost clips to a tote, a zipper pull, or a Halloween treat bag and stays put all season. Finished at roughly 7 cm tall, it is light enough that it will not drag on a bag strap.
The body is crocheted in the round in pale cream or white yarn, stuffed firmly so the base sits flat, and closed into a gently pointed head.
Black yarn embroidered in a small curved line makes the mouth; two 8 mm safety eyes give it that over-wide, slightly alarmed expression that makes the whole thing look alive.
Store it after the season by clipping it to a keyring hook inside a small fabric pouch so the eyes do not scratch anything.

Crochet Ghost Bag Charm
What You Need
- White or cream worsted-weight yarn, approximately 15 g
- Small amount of black yarn for embroidery
- 3 mm crochet hook
- 2 x 8 mm black safety eyes
- Polyester fiberfill stuffing, small handful
- Stitch marker
- Yarn needle
- Lobster-clasp keyring or bag charm ring, 1
How to Make It
- Make a magic ring and work 6 single crochet (sc) into it. Pull the tail tight. Place a stitch marker in the first stitch of every round so you always know where you are. [6]
- Round 2: increase in every stitch (2 sc in each st). [12]. Round 3: (sc, increase) repeat 6 times. [18]. Rounds 4 to 6: sc in every stitch, no shaping. [18]. The piece looks like a shallow bowl at this point.
- Round 7: (sc, decrease) repeat 6 times. [12]. This is when the ghost starts to look like a ghost rather than a disc. Before the next round, push the safety eyes through the fabric between rounds 4 and 5, positioning them about 5 stitches apart. Snap the washers on from the inside. This step must be done before the opening closes too much to get your fingers in.
- Stuff the body firmly with fiberfill so the finished ghost sits upright rather than flopping. Pack it right up into the head.
- Round 8: decrease around. [6]. Thread your yarn needle with the working yarn, run it through the front loop of each remaining stitch, pull tight, and fasten off, leaving a 15 cm tail to weave in.
- Thread the black yarn onto the yarn needle and embroider a small curved smile between the eyes. Three or four straight stitches in a gentle arc look best. Weave all tails in on the inside.
- Attach the lobster-clasp ring through the top stitch of the head before weaving the last tail: loop the yarn tail through the ring twice, then weave it in so the ring is anchored.
🛍 Shopping guide
Crochet Candy Corn Ornament
Three colours, one shape, fifteen rounds. The candy corn is worked top-down in white, then orange, then yellow, stuffed firmly so the triangular cone holds its point, and finished with a long tail for sewing closed.
A cluster of three on a small dish makes a bowl accent; a single one on a length of jute twine becomes the simplest garland bead you have ever made.
Use cotton thread and a 1.5 mm hook for a tiny ornament around 4 cm tall, or worsted yarn and a 3.5 mm hook for a chunky 8 cm version that is quicker to work and easier on the hands.

Crochet Candy Corn Ornament
What You Need
- White yarn or thread, approximately 5 g
- Orange yarn or thread, approximately 8 g
- Yellow yarn or thread, approximately 10 g
- 3.5 mm crochet hook (for worsted) or 1.5 mm (for thread)
- Polyester fiberfill stuffing, small handful
- Yarn needle
- Stitch marker
How to Make It
- With white yarn, make a magic ring and work 6 sc into it. [6]. Round 2: increase in every stitch. [12]. Round 3: (sc, increase) 6 times. [18]. These three rounds form the pointed tip.
- Drop white and join orange with a standing sc. Round 4: (2 sc, increase) 6 times. [24]. Round 5: (3 sc, increase) 6 times. [30]. Round 6: (4 sc, increase) 6 times. [36]. Round 7: (5 sc, increase) 6 times. [42]. The orange section now looks like a wide, flat disc. That is correct.
- Drop orange and join yellow with a standing sc. Rounds 8 and 9: sc around. [42]. No shaping yet.
- Begin decreasing for the base. Round 10: (5 sc, decrease) 6 times. [36]. Round 11: (4 sc, decrease) 6 times. [30]. Round 12: (3 sc, decrease) 6 times. [24]. Round 13: (2 sc, decrease) 6 times. [18].
- Before the opening closes further, stuff the piece firmly so the white tip stays pointed. Round 14: (sc, decrease) 6 times. [12]. Round 15: decrease around. [6].
- Fasten off, leaving a 20 cm tail. Thread through the front loops of the remaining 6 stitches, pull tight, and weave the tail in to hide it. The flat yellow base should sit level so the candy corn stands upright.
Crochet Halloween Pumpkin Amigurumi
The pumpkin sits between 8 and 10 cm tall depending on yarn weight and how firmly it is stuffed, and it is stable enough to stand on a mantel without a base.
The ribbed surface that reads as pumpkin grooves is made after crocheting, not during: a yarn needle threaded with the working colour passes through the front loops of round 6 and pulled firm divides the body into sections, which is deeply satisfying and takes about three minutes.
A black witch hat crocheted in two flat circles, a coiled green vine, and a short brown stem finish the piece. The smile is embroidered in black yarn.
After the season, store it unwrapped in a shoebox so the hat does not get squashed. These pack and unpack without any re-shaping.

Crochet Halloween Pumpkin Amigurumi
What You Need
- Orange worsted-weight yarn, approximately 30 g
- Black worsted-weight yarn, approximately 10 g
- Brown yarn, small scrap (stem)
- Green yarn, small scrap (vine and leaf)
- Pink yarn or felt, small scrap (blush)
- 2.5 mm or 3 mm crochet hook
- 2 x 10 mm black safety eyes
- Polyester fiberfill stuffing, generous handful
- Stitch marker
- Yarn needle
How to Make It
- Pumpkin body: with orange yarn, magic ring, 6 sc. [6]. Round 2: increase every stitch. [12]. Round 3: (sc, increase) 6 times. [18]. Round 4: (2 sc, increase) 6 times. [24]. Round 5: (3 sc, increase) 6 times. [30]. Round 6: (4 sc, increase) 6 times. [36]. Place your marker here on round 6 as a reference for the groove step later.
- Rounds 7 to 12: sc around with no shaping. [36]. Round 13: (4 sc, decrease) 6 times. [30]. Round 14: (3 sc, decrease) 6 times. [24]. Round 15: (2 sc, decrease) 6 times. [18]. Insert safety eyes between rounds 8 and 9, about 6 stitches apart. This is the last chance before the body closes. Snap the washers firmly from the inside.
- Stuff the pumpkin generously. Round 16: (sc, decrease) 6 times. [12]. Round 17: decrease around. [6]. Fasten off and pull shut, leaving a 30 cm tail to use for the groove step.
- Grooves: thread the long orange tail onto the yarn needle. Push the needle down through the centre top of the pumpkin, out through the bottom, back up to the top, and pull firmly. This creates one vertical indent. Repeat, spacing 6 indents evenly around the body. Secure the tail inside the pumpkin.
- Hat: with black yarn, make 2 flat circles. Circle 1 (brim): magic ring, 6 sc, increase every stitch to 12, (sc, increase) 6 times to 18, sc around to 18. Circle 2 (cone): magic ring, 6 sc, increase every stitch to 12, (sc, increase) 6 times to 18, (2 sc, increase) 6 times to 24, sc around to 24, then decrease 6 times in the next round (18), and again (12), and again (6), then pull shut. Sew the cone to the centre of the brim circle.
- Stem: with brown yarn, chain 6, sc in the 2nd chain from hook and across (5 sc). Fasten off. Roll the strip between your fingers to form a small nub and sew it to the top centre of the pumpkin.
- Vine: with green yarn, chain 20, slip stitch across to curl it, then fasten off. Sew the vine alongside the stem. Add a small flat leaf by chaining 5, turning, and slip-stitching back for a pointed oval shape.
- Embroider a curved smile with black yarn using 4 straight stitches. Add two small French knots or felt circles in pink for the blush. Sew the hat to the top of the pumpkin at a slight angle.
Crochet Pocket Acorn Keychain
The acorn is two separate pieces, a round tan nut body and a textured dark-brown cap, joined after stuffing. The cap is worked in back loops only, which creates a horizontal ridged texture that reads immediately as acorn cap.
Both pieces are small enough to finish in under an hour, which makes this a good commute project. Clip the finished acorn to a backpack, a house key, or a gift bag for a wrapping touch that costs almost nothing.

Crochet Pocket Acorn Keychain
What You Need
- Tan or light brown worsted-weight yarn, approximately 12 g (nut body)
- Dark brown worsted-weight yarn, approximately 8 g (cap)
- 3.5 mm crochet hook
- 2 x 6 mm black safety eyes
- Polyester fiberfill stuffing, small handful
- Black embroidery floss, small length
- Pink yarn or felt, tiny scrap (blush)
- Keychain ring with chain, 1
- Yarn needle
How to Make It
- Nut body (tan yarn): magic ring, 6 sc. [6]. Round 2: increase every stitch. [12]. Round 3: (sc, increase) 6 times. [18]. Round 4: (2 sc, increase) 6 times. [24]. Round 5: (3 sc, increase) 6 times. [30]. Rounds 6 to 9: sc around. [30]. Round 10: (3 sc, decrease) 6 times. [24]. Round 11: (2 sc, decrease) 6 times. [18]. Round 12: (sc, decrease) 6 times. [12]. Insert safety eyes between rounds 7 and 8, about 6 stitches apart, and snap washers on. Stuff the nut body firmly. Round 13: decrease around. [6]. Fasten off, pull shut, weave tail in.
- Cap (dark brown yarn, worked in back loops only): magic ring, 6 sc. [6]. Round 2: increase every stitch. [12]. Round 3: (sc, increase) 6 times. [18]. Round 4: (2 sc, increase) 6 times. [24]. Round 5: (3 sc, increase) 6 times. [30]. Round 6: (4 sc, increase) 6 times. [36]. Round 7: BLO sc around. [36]. Round 8: slip stitch around to even the edge. Fasten off, leaving a long tail for sewing.
- Stem (dark brown yarn): chain 4. Starting in the 2nd chain from hook, sc, sc, sl st. Fasten off with a long tail. Roll the little strip between your fingers to round it slightly.
- Sew the cap to the top of the nut body using the long tail, working around the edge so the join is hidden inside the cap rim. Sew the stem to the centre top of the cap.
- Embroider a small curved smile with black embroidery floss and add tiny pink felt circles or yarn knots for blush. Thread the keychain ring through the stem before sewing it closed so the ring is anchored.
🛍 Shopping guide
Crochet Bat Ornament
The bat is one of the flattest, quickest makes in this collection. The body is a small oval worked in black yarn, the wings are two flat crescent shapes sewn on either side, and two tiny white yarn straight stitches make fangs.
Hang it from a suction-cup hook on a window or loop a cluster of three at different heights from a curtain rod. They weigh almost nothing and swing slightly in any draught, which is exactly the effect you want.

Crochet Bat Ornament
What You Need
- Black worsted-weight yarn, approximately 15 g
- White yarn, tiny scrap (fangs)
- 2 x 6 mm red or orange safety eyes
- 3 mm crochet hook
- Polyester fiberfill stuffing, small amount
- Yarn needle
- Monofilament thread or thin black ribbon, 30 cm, for hanging
How to Make It
- Body: magic ring, 6 sc. [6]. Round 2: increase every stitch. [12]. Round 3: (sc, increase) 6 times. [18]. Rounds 4 and 5: sc around. [18]. Insert the red or orange safety eyes between rounds 3 and 4, about 4 stitches apart, and snap the washers on from the inside. Round 6: (sc, decrease) 6 times. [12]. Stuff lightly: the body should be slightly flat, not a full ball. Round 7: decrease around. [6]. Fasten off and pull shut.
- Wings (make 2): chain 12. Row 1: sc in the 2nd chain from hook, sc across. [11]. Row 2: chain 1, turn, sc in each stitch across. Rows 3 to 5: chain 1, turn, decrease at the beginning and end of each row so the wing tapers. [5 stitches at the end of row 5]. Fasten off, leaving a 25 cm tail for sewing. The wing looks like a blunt triangle at this point. Pinch the straight edge into a slight curve before sewing to give the crescent shape.
- Sew one wing to each side of the body at the widest point, straight edge along the side, curving outward and slightly downward. The wings should look like outstretched arms when viewed from the front.
- Embroider two small white straight stitches below the eyes for fangs, each about 4 mm long and angled slightly outward.
- Thread monofilament or thin ribbon through the top of the head and knot it to create a hanging loop.
🛍 Shopping guide
Crochet Skull Garland
Ten small skulls joined by a length of crocheted chain make a garland that drapes well across a mantel, a bookshelf, or the back of a chair. Each skull is two rounds of oval shaping plus a flat row for the jaw.
The eye sockets are simple holes left in the fabric by a yarn-over-skip combination. No safety eyes, no embroidery: the hole is the feature, which also makes this one of the few crafts here with no small parts at all.

Crochet Skull Garland
What You Need
- White or cream worsted-weight yarn, approximately 60 g total (for 10 skulls and chain)
- 3 mm crochet hook
- Polyester fiberfill stuffing, small amounts per skull
- Yarn needle
- Stitch marker
How to Make It
- Make one skull at a time. Magic ring, 6 sc. [6]. Round 2: increase every stitch. [12]. Round 3: (sc, increase) 6 times. [18]. Round 4: sc 5, chain 2, skip 2 (eye socket left), sc 4, chain 2, skip 2 (eye socket right), sc 5. [18, with 2 chain spaces]. Round 5: sc around, working 2 sc into each chain space. [18]. Round 6: (sc, decrease) 6 times. [12]. Stuff lightly. Round 7: decrease around. [6]. Fasten off, pull shut, weave in tail.
- Jaw: with white yarn, join to the base of the skull and chain 7. Turn, sc back across 6, then sc into the skull to anchor. Add a second row if you want the jaw more prominent. Fasten off and weave in.
- Repeat steps 1 and 2 until you have 10 skulls.
- Chain: with white yarn, crochet a chain long enough to span your target space, typically 60 to 80 chains for a 50 cm mantel section. Every 6 chains, slip stitch the chain to the top of one skull. Work across all 10 skulls, adding a few extra chains at each end for tying.
- Tie the garland at each end, adjust the skulls so they hang level, and weave in the remaining tails. The garland holds its shape without stiffening and rolls up flat for storage.
🛍 Shopping guide
Crochet Spider Web Bowl
A crocheted lace bowl made from cotton twine stiffened with fabric stiffener dries into a rigid dish that holds candy, small ornaments, or a battery tea light.
The spider web pattern is built into the mesh: chain spaces between single crochets in the later rounds read as web holes once the bowl is stiffened and shaped over a round mould. When Halloween is done, the bowl stores flat-ish inside a larger bowl.

Crochet Spider Web Bowl
What You Need
- Black cotton macrame cord or thick cotton thread, approximately 50 m
- 3.5 mm crochet hook
- Fabric stiffener spray or liquid (PVA glue diluted 1:1 with water works as a substitute)
- A round bowl, approximately 15 cm diameter, wrapped in cling film as a mould
- Yarn needle
How to Make It
- Magic ring, 6 sc. [6]. Round 2: increase every stitch. [12]. Round 3: (sc, increase) 6 times. [18]. Round 4: (2 sc, increase) 6 times. [24]. Rounds 1 to 4 form the flat base.
- Begin the web mesh. Round 5: (chain 3, skip 1, sc in next st) repeat around, ending with a slip stitch to join. Round 6: (chain 3, sc in next chain space) repeat around. Rounds 7 to 10: repeat round 6. The piece looks like a flat lace doily at this point.
- Final edge: sc around the last round of chain spaces to create a firm rim. Fasten off and weave in the tail.
- Saturate the piece in fabric stiffener or diluted PVA. Squeeze out the excess. Turn the mould bowl upside down, stretch the crocheted piece over it so the base sits at the top of the mould, and press the sides down to form the bowl shape. Leave to dry completely, at least 2 hours, before removing from the mould. The bowl will feel stiff and hold its shape when dry.
- Place the finished bowl on the table right-side up and fill it. If the stiffener smell lingers, leave the bowl in a ventilated spot for an extra hour before using.
Crochet Black Cat Doorstop
A cat-shaped doorstop needs to be heavy enough to actually hold a door, so the base is a crocheted sleeve pulled over a standard house brick (or a large smooth stone) and sewn shut underneath.
The cat face, ears, and tail are crocheted separately and sewn on. The sleeve itself uses a simple rectangle in moss stitch, which gives enough texture to look considered without requiring any counting beyond a chain multiple of two.
The finished piece stands about 10 cm tall on the brick and weighs enough to hold a standard interior door open on a draught.

Crochet Black Cat Doorstop
What You Need
- Black chunky or bulky yarn, approximately 100 g
- 4.5 mm or 5 mm crochet hook
- 1 standard house brick (approximately 21 x 10 x 7 cm) or equivalent heavy stone
- 2 x 15 mm amber or yellow safety eyes
- Orange or yellow yarn scrap (nose)
- White yarn scrap (whisker embroidery)
- Polyester fiberfill, small amount (head only)
- Yarn needle
How to Make It
- Sleeve: chain 46 (or enough to wrap the long dimension of your brick with 2 cm ease). Work moss stitch (sc, chain 1, skip 1, alternate each row) until the piece is tall enough to wrap the brick's short dimension plus 5 cm for tucking. Fasten off, leaving a long tail.
- Wrap the brick in the sleeve like a jacket. Sew the open short ends together under the brick, pulling the yarn firmly so the sleeve does not slip. The brick is now completely enclosed.
- Head: with black yarn, magic ring, 6 sc. [6]. Increase rounds to 30 stitches over 5 rounds. Work 3 plain rounds. Insert the amber safety eyes between rounds 4 and 5, about 6 stitches apart. Decrease back to 6 over 5 rounds, stuffing the head firmly before closing. Fasten off.
- Ears (make 2): chain 4. Row 1: sc across 3. Row 2: decrease once, sc 1. Row 3: sc2tog to close. Fasten off with a long tail. The ear looks like a small triangle.
- Tail: chain 25, sl st back across to create a rope. Coil or curve it before sewing to the back side of the brick sleeve.
- Sew the head to the top front of the brick sleeve, ears to the top of the head, and tail to the back. Embroider white straight stitches for whiskers and a small orange or yellow nose knot above the mouth line. The safety eyes should face forward.
Crochet Witch Hat Table Topper
Worked in black yarn from the tip down in increasing rounds, this hat measures roughly 12 cm tall and 18 cm across the brim.
It sits as a standalone table decoration, covers a battery-powered tea light so the light glows orange through the mesh brim, or perches on top of a pumpkin amigurumi.
The brim is finished with a narrow orange or purple band crocheted in a contrasting colour and a single flat chain loop for the buckle detail.

Crochet Witch Hat Table Topper
What You Need
- Black worsted-weight yarn, approximately 40 g
- Orange or purple worsted-weight yarn, approximately 5 g (band)
- Yellow yarn, tiny scrap (buckle)
- 3.5 mm crochet hook
- Yarn needle
- Stitch marker
How to Make It
- Tip of hat: with black yarn, magic ring, 6 sc. [6]. Rounds 2 to 8: increase every 6th stitch on each round, adding 6 stitches per round. By round 8 you have 48 stitches. The piece is a cone at this point.
- Brim: round 9: (4 sc, increase) 6 times. [54]. Round 10: (5 sc, increase) 6 times. [60]. Round 11: (6 sc, increase) 6 times. [66]. Round 12: sc around. [66]. This wide, flat outer ring forms the brim.
- Slip stitch around the outer edge of round 12 to give the brim a firm, neat finish. Fasten off black yarn.
- Band: join orange or purple yarn at the point where the cone meets the brim (between rounds 8 and 9). Sc around that row. [48]. Fasten off with a short tail.
- Buckle: with yellow yarn, chain 8, slip stitch to form a small square loop, then chain 4 across the centre of the loop and slip stitch to anchor. Sew the buckle onto the centre front of the band.
- The hat is self-supporting when placed on a flat surface. To place it on a tea light, ensure the tea light is battery-powered and the hat is not touching any heat source.
Crochet Frankenstein Monster Mug Cosy
A mug cosy is one of those crafts that starts as decoration and ends up staying in the kitchen all year.
This one is worked as a flat rectangle, seamed at the back, and features a green face with black yarn bolt detail, simple embroidered eyes, and a jagged slip-stitch hairline worked into the top edge. It fits a standard 350 ml mug.
The back seam is invisible once the cosy is on the mug.

Crochet Frankenstein Monster Mug Cosy
What You Need
- Green worsted-weight yarn, approximately 25 g
- Black yarn, small scrap (hair detail, stitches)
- White yarn, small scrap (eyes)
- 3.5 mm crochet hook
- Stitch marker
- Yarn needle
- 1 button, 2 cm diameter (or a length of elastic, 20 cm, as handle opening alternative)
How to Make It
- Measure the circumference of your mug and its height. A standard 350 ml mug is roughly 28 cm around and 9 cm tall. Chain enough stitches to match the circumference minus 3 cm (the cosy will stretch). For a 28 cm mug, chain 44.
- Work in rows of sc until the piece is as tall as the mug. For a 9 cm mug, you need approximately 10 rows at worsted tension. The rectangle should be firm and not floppy.
- Hairline: join black yarn to the top edge. Work sl st across the first 6 stitches, then (ch 3, sl st into the 2nd and 3rd chain to create a point, sl st into the next stitch on the cosy) repeat 4 times, then sl st across the remaining stitches. This gives a jagged hairline silhouette.
- Embroider the face: two white yarn loops or felt circles for eyes, then a black cross stitch over each white circle for the classic Frankenstein pupil. Four straight black stitches in a square on the lower right cheek area make the neck bolt detail.
- Seam the short ends together at the back with a whip stitch, leaving a 3 cm gap about 4 cm from the base for the handle. Sew a button to the front if desired and leave a chain loop at the same height on the back seam as a fastening. Alternatively, simply leave the seam partially open and rely on the stretch to hold the cosy on.
🛍 Shopping guide
Crochet Cauldron Basket
This small open-top basket is 10 cm across and 8 cm deep, large enough to hold a handful of wrapped sweets, a small candle, or a cluster of tiny amigurumi figures.
It is worked in black cotton yarn in rounds of single crochet, increasing at the base to create the rounded cauldron shape, then worked straight for the sides.
Three small orange yarn flames are sewn around the outer rim at equal intervals to sell the cauldron idea completely. The cotton holds its shape without any stiffening.

Crochet Cauldron Basket
What You Need
- Black cotton dk or light worsted yarn, approximately 50 g
- Orange cotton yarn, approximately 5 g (flames)
- 3.5 mm crochet hook
- Stitch marker
- Yarn needle
How to Make It
- Base: magic ring, 6 sc. [6]. Round 2: increase every stitch. [12]. Round 3: (sc, increase) 6 times. [18]. Round 4: (2 sc, increase) 6 times. [24]. Round 5: (3 sc, increase) 6 times. [30]. Round 6: (4 sc, increase) 6 times. [36]. The base is a flat circle approximately 7 cm across.
- Sides: round 7: BLO sc around (this creates a sharp right-angle turn at the base of the walls, which is exactly what you want). Rounds 8 to 14: sc around in both loops. [36]. The basket should stand upright and hold its shape at this point.
- Rim: round 15: (4 sc, increase) 6 times. [42]. Round 16: (5 sc, increase) 6 times. [48]. Round 17: sc around. [48]. Slip stitch to join and fasten off. The rim flares slightly outward, the classic cauldron silhouette.
- Flames (make 3): with orange yarn, chain 8. Row 1: sc in 2nd chain from hook, sc 3, hdc 2, dc in last. [7 stitches]. Row 2: chain 1, turn, skip 1, dc 2, hdc 2, sc 2. Fasten off, leaving a 15 cm tail. Pinch the flame at the base to give it a point. Sew one flame to the outside of the basket at the base of the rim, spacing the three flames equally around the circumference.
🛍 Shopping guide
Crochet Moon and Stars Hanging
A crescent moon and three five-pointed stars worked flat, blocked gently, and strung on a length of dark cord make a wall hanging or window decoration that looks intentional rather than crafted-in-a-hurry. The moon is worked in mustard yellow cotton; the stars in cream.
Blocking the flat pieces under a damp cloth for ten minutes makes an enormous difference to how neat the points look, and it takes almost no effort.

Crochet Moon and Stars Hanging
What You Need
- Mustard yellow cotton dk yarn, approximately 20 g (moon)
- Cream cotton dk yarn, approximately 15 g (stars)
- 3 mm crochet hook
- Dark brown or black cord, 60 cm
- Yarn needle
- Blocking mat and pins (or a folded towel and damp cloth)
How to Make It
- Moon: chain 20. Working in rows: sc across, increasing at each end every other row until the piece is 8 cm wide at its widest point, about 6 rows. Then decrease at one end only (the inner curve of the crescent) for 4 rows while continuing straight on the outer edge. The crescent shape is fiddly to describe but obvious when you do it: the outer edge stays wide and the inner edge curves in. Fasten off and weave in tails.
- Stars (make 3): chain 4, slip stitch to form a ring. Round 1: 10 sc into the ring. [10]. Round 2: (sc, chain 3, skip 1) 5 times, slip stitch to join. [5 chain-3 points]. Round 3: into each chain-3 space work (sc, hdc, dc, hdc, sc) to create 5 filled points. Slip stitch to join. Fasten off.
- Block all pieces: pin the moon flat on the blocking mat, stretching the outer curve gently. Pin the star points out. Lay a damp cloth over everything and press lightly with a warm iron on the cotton setting, or simply leave the damp cloth on for 20 minutes without heat. Let dry completely.
- Thread the cord through the top of the moon and two stars. Tie the third star as a pendant below the moon on a short 10 cm length of cord. Knot the main cord at each end for hanging loops.
Crochet Eyeball Scatter Cushion Cover
A standard 40 cm cushion insert gets a Halloween overhaul with a black crocheted cover featuring a single large applique eyeball worked in white, red, and black and sewn to the centre front.
The cover is worked in two flat squares seamed on three sides, with a button-and-loop closure on the fourth so it comes off for washing. The eyeball itself is a flat circle in three concentric colour rounds.
It sounds graphic; it looks more like pop art.

Crochet Eyeball Scatter Cushion Cover
What You Need
- Black bulky yarn, approximately 150 g (cover)
- White yarn, approximately 10 g (eyeball white)
- Red yarn, small scrap (iris ring)
- Black yarn, small scrap (pupil)
- 5 mm crochet hook
- 40 cm square cushion insert
- 3 x large buttons (2.5 cm diameter)
- Yarn needle
How to Make It
- Front panel: chain 44 with black yarn and work in rows of sc, 42 stitches wide, until the piece measures 40 cm square. Fasten off. Repeat for the back panel.
- Eyeball applique: with white yarn, magic ring, 6 sc. Increase to 12, then to 18, then to 24, then to 30. [5 rounds total]. Join red yarn and sc one round. [30]. Join black yarn and sc one round. [30]. Fasten off, leaving a 40 cm tail. The eyeball disc is approximately 9 cm across.
- Position the eyeball disc at the centre of the front panel and sew around the entire perimeter with the black tail using a whip stitch. Work slowly around the red and black rings so each colour section lies flat.
- Seam: place both panels wrong sides together. Single crochet through both layers around three sides of the cushion, working 3 sc into each corner stitch for a neat turn. The fourth side stays open.
- Closure: evenly space 3 button loops (chain 5, skip 1, sl st) along the open edge of the back panel. Sew 3 buttons to the matching positions on the front panel. Insert the cushion insert and fasten the buttons.
Crochet Tiny Coffin Ornament
The coffin shape is a flat hexagon worked in rows with two extra corner chains at the shoulder to create the traditional tapered-top silhouette. Work one in black for a classic look, or in deep purple for something slightly less expected.
Each coffin measures about 8 cm tall. Thread a loop of ribbon through the top and hang it from a branch display or a wreath.

Crochet Tiny Coffin Ornament
What You Need
- Black or deep purple worsted-weight yarn, approximately 10 g per ornament
- 3 mm crochet hook
- White or silver yarn, small scrap (cross embroidery)
- Ribbon or thin cord, 20 cm per ornament (hanging loop)
- Yarn needle
- Optional: tiny dried flower or a scrap of red felt for the lid detail
How to Make It
- Make the front and back panels identically. Chain 8. Row 1: sc across. [7]. Rows 2 to 4: sc across. [7]. These rows form the lower body of the coffin. At the end of row 4, chain 2 at each end to widen the shoulders: on row 5, sc across 7, sc into the 2 chains at the end. Turn and add 2 chains at the other end too. Work row 6 across all 11 stitches. [11].
- The shoulder is now the widest point. Rows 7 to 9: sc across. [11]. This is the upper body section. Row 10: decrease once at each end. [9]. Row 11: decrease once at each end. [7]. Row 12: decrease once at each end, sc across. [5]. The top of the coffin now tapers. Fasten off.
- Make two identical panels. Hold them wrong sides together and sc through both layers around the entire perimeter, working 2 sc into each corner point. Slip stitch to join at the starting point and fasten off.
- Embroider a small cross on the front panel with white or silver yarn, centring it in the upper body section.
- Thread ribbon through the top corner stitch to create a hanging loop and knot it securely.
Crochet Mummy Wrapping Bottle Cover
A glass bottle (wine, olive oil, or a plain water bottle) wrapped in a cream yarn bandage cover with two googly eyes glued on becomes a mummy, and the transformation takes about forty minutes.
The cover is a simple tube of hdc worked in the round to fit the bottle, then cut vertical strips of cream felt added loosely around the outside to suggest bandage wrapping.
This is the most beginner-friendly make in the collection because tension barely matters: the whole look is deliberately irregular.

Crochet Mummy Wrapping Bottle Cover
What You Need
- Cream or off-white worsted-weight yarn, approximately 30 g
- Cream felt sheet, A4, 1 mm thick
- 4 mm crochet hook
- 2 x 15 mm googly eyes (craft-shop type, with flat backs)
- Strong craft glue or a low-temperature glue gun
- A glass bottle approximately 25 cm tall and 8 cm in diameter
- Yarn needle
How to Make It
- Measure the circumference of your bottle. Chain enough stitches to give a tube that is 2 cm narrower than the circumference (the yarn will stretch). For an 8 cm diameter bottle (about 25 cm circumference), chain 32.
- Join the chain into a ring with a slip stitch. Work hdc in the round, placing a stitch marker at the join, until the tube is 20 cm tall. Fasten off and weave in the tails. The tube should slide snugly onto the bottle.
- Cut the felt sheet into strips approximately 1.5 cm wide and 20 cm long, varying the lengths slightly. You need about 12 strips.
- Tuck one end of each felt strip under the yarn tube at the base and drape it upward and across the bottle at a slight diagonal, tucking the other end under the yarn at the top. The strips should overlap and cross each other at irregular angles. A small amount of craft glue at each tuck keeps them in place while you work. Allow 20 minutes drying time. Using a glue gun for this step speeds things up significantly; if you use one, an adult should handle it.
- Glue the two googly eyes to the upper front of the bottle cover with strong craft glue. Press firmly and let dry for 30 minutes before displaying upright.
🛍 Shopping guide
Crochet Spiderweb Place Mat
A flat 30 cm disc in black cotton thread worked in a mesh pattern holds a plate, a mug, or a candle jar and makes the dinner table look put-together rather than decorated.
The web structure is simply a combination of chain spaces and single crochets in a spiral; no special lace techniques are needed. Cotton holds its shape on the table without stiffening.
Six of these stacked flat in a ziplock bag for next year, and they emerge wrinkle-free.

Crochet Spiderweb Place Mat
What You Need
- Black cotton dk yarn, approximately 30 g per mat
- 3 mm crochet hook
- Yarn needle
- Stitch marker
How to Make It
- Magic ring, 8 sc. [8]. Round 2: (sc, chain 2) 8 times, slip stitch to join. [8 spokes begun]. Round 3: into each chain-2 space work (sc, chain 3). [8 chain-3 arches].
- Continue the web outward: each subsequent round works (sc into the chain space from the previous round, then chains 1 more than the previous round). So round 4 uses chain-4 spaces, round 5 uses chain-5 spaces, and so on. The web expands naturally and the open spaces get larger as you move outward, which is exactly the effect you want.
- Continue until the mat measures 30 cm across. The number of rounds depends on your yarn thickness and hook size; at dk cotton and a 3 mm hook, expect 12 to 14 rounds.
- Final round: sc around all the outer chain spaces to create a firm outer edge. Slip stitch to join. Fasten off and weave in all tails. Press the mat flat under a heavy book for 15 minutes if it domes slightly in the centre.
🛍 Shopping guide
Crochet Mini Pumpkin Patch Garland
Eight small pumpkins in graduating shades from pale cream through peach to deep burnt orange, strung on a length of natural jute twine with green leaf appliques between each one, make a garland that works equally well over a window, along a stair rail, or draped on a bookshelf.
Each pumpkin takes about 20 minutes; the full garland is an afternoon project. The look is botanical rather than spooky, which means it can go up earlier in autumn and come down later without looking out of place.
For more ways to use pieces like these across the whole house, 30 Fall Front Porch Decor Ideas Built Around the Front Door has strong garland placement ideas.

Crochet Mini Pumpkin Patch Garland
What You Need
- Worsted-weight yarn in 3 to 4 shades: cream, peach, rust, burnt orange, approximately 15 g each
- Green yarn, approximately 10 g (leaves and stems)
- Brown yarn, tiny scrap (stems)
- 3 mm crochet hook
- Polyester fiberfill stuffing
- Natural jute twine, 150 cm
- Yarn needle
- Stitch marker
How to Make It
- Each pumpkin (make 8): magic ring, 6 sc. Increase to 18 over 3 rounds. Work 3 plain rounds. Decrease back to 6 over 3 rounds, stuffing before closing. Fasten off, leaving a 20 cm tail for the groove step. Pull the tail through the centre top to the base 4 times to create simple grooves, then secure. Make the pumpkins in different colours, arranging them from lightest to darkest when you string them.
- Stems (make 8): with brown yarn, chain 5, sc back across 4, fasten off. Sew one stem to the top of each pumpkin.
- Leaves (make 7 or 8): with green yarn, chain 8. Row 1: sc in 2nd chain from hook, sc across. [7]. Row 2: chain 1, turn, decrease, sc 3, decrease. [5]. Row 3: chain 1, turn, decrease, sc 1, decrease. [3]. Sl st the 3 stitches together. Fasten off, leaving a tail for attachment. The leaf looks like a pointed oval.
- Lay the jute twine flat and knot a small loop at each end for hanging. Position the pumpkins and leaves along the twine in your preferred colour order, leaving about 15 cm between each pumpkin. Sew each pumpkin to the twine by wrapping the yarn tail around the twine twice and knotting it. Sew the leaves at the points between the pumpkins, angling them slightly for a natural look.
Crochet Raven Amigurumi
A small black raven with a bright yellow beak and glossy safety eyes is the kind of decoration that earns a comment from every person who notices it.
The body is worked in the round in black yarn; the wings are two flat teardrop shapes sewn flush to the sides so the bird stands on a flat base.
The tail feathers are a row of graduated chains sewn in a fan at the back. At about 12 cm tall it is big enough to be noticed on a shelf but small enough to nestle between books.

Crochet Raven Amigurumi
What You Need
- Black worsted-weight yarn, approximately 35 g
- Yellow yarn, small scrap (beak)
- 2 x 9 mm amber or black safety eyes
- 3 mm crochet hook
- Polyester fiberfill stuffing, generous amount
- Yarn needle
- Stitch marker
How to Make It
- Body: magic ring, 6 sc. [6]. Increase to 12, then to 18, then to 24, then to 30. [5 rounds]. Rounds 6 to 10: sc around. [30]. Insert safety eyes between rounds 6 and 7, about 6 stitches apart. Decrease to 24, then to 18 (stuffing as you go), then to 12, then to 6. Pull shut, fasten off.
- Head: magic ring, 6 sc. [6]. Increase to 12, then to 18. [3 rounds]. Rounds 4 to 6: sc around. [18]. Decrease to 12, stuff, decrease to 6, pull shut. Sew the head to the top of the body, slightly forward so the raven appears to be looking ahead rather than straight up.
- Wings (make 2): chain 10. Row 1: sc across. [9]. Rows 2 to 5: decrease at one end only, so the wing tapers to a point. [5 stitches at row 5]. Fasten off with a long tail. The wing is a long narrow teardrop. Sew one flush to each side of the body.
- Beak: with yellow yarn, chain 5. Sl st back across 3 chains, leaving the tip pointed. Roll into a small cone and sew to the front of the head, below and between the eyes.
- Tail feathers: cut 6 lengths of black yarn, each about 10 cm. Loop each through the base of the body at the back, knotting to secure, and trim to graduated lengths so the longest feather is at the centre. Brush the ends lightly with a fine-tooth comb to separate the fibres if the yarn allows.
🛍 Shopping guide
Crochet Potion Bottle Label Set
Three small crocheted patches worked in contrasting colours, each with an embroidered skull, moon, or spider motif, sewn to glass bottles or jars make a Halloween apothecary display out of almost nothing.
Each label is a simple rectangle worked in cream or tan cotton, embroidered with black yarn, and attached to a bottle with a length of thin twine. The bottles themselves can be anything: rinsed jam jars, spice bottles, bud vases.
If you have 16 Homemade Halloween Decorations From Things Already in the House open in another tab, the apothecary display from that article pairs perfectly with these labels.

Crochet Potion Bottle Label Set
What You Need
- Cream or tan cotton dk yarn, approximately 20 g
- Black yarn, small scrap (embroidery)
- 3 mm crochet hook
- Thin natural twine, approximately 90 cm (for 3 labels, 30 cm each)
- Yarn needle
- 3 glass bottles or jars of varying heights
How to Make It
- Each label: chain 14. Work in rows of sc, 12 stitches wide, for 8 rows. Fasten off, leaving a 20 cm tail for attachment. The label is a small rectangle approximately 5 cm x 3.5 cm.
- Embroider one motif on each label using black yarn. Skull: a circle of chain stitches for the head, two small French knots for eye sockets, and a short horizontal straight stitch for the jaw. Moon: a crescent of short straight stitches, thicker on the outer curve and fading to nothing on the inner. Spider: an oval of chain for the body, 8 short straight-stitch legs radiating out. None of these needs to be precise; the rustic quality is the point.
- Thread thin twine through the top two corners of each label (use the yarn needle to open a gap between stitches). Tie the label around the neck of a bottle with the twine, adjusting until the label sits flat and centred on the front.
- Arrange the bottles in a cluster of three at different heights. Fill them with coloured water, dried herbs, or sand for visual interest.
Frequently Asked Questions
What yarn weight works best for crochet Halloween decorations?
Worsted weight (medium, category 4) is the most forgiving choice for amigurumi and small decorations: it works up quickly, holds its shape without stiffening, and is widely available in seasonal colours.
Cotton dk gives a crisper result for flat items like place mats and bowl shapes. Avoid fluffy or textured yarn for anything with embroidered detail because the fuzz hides the stitches.
Do I need to block crochet Halloween decorations?
Most amigurumi pieces do not need blocking because they are stuffed and three-dimensional. Flat pieces like the moon and stars hanging or the place mat benefit from a quick block under a damp cloth, especially when worked in cotton, because it opens out the stitches and evens the edges. Ten to twenty minutes is usually enough.
How do I store crochet decorations after Halloween?
Small amigurumi pieces store well in a large ziplock bag or a fabric pouch. Keep pieces with safety eyes away from anything that could scratch them. Flat pieces like the garland and the place mat can fold gently or roll without damage.
The spider web bowl is rigid once stiffened and needs its own small box to avoid the rim breaking. Everything else is flexible enough to pack flat.
Are these crochet Halloween decorations safe for children to help make?
The main hazards are safety eyes (small parts, require an adult to insert and snap), glue guns (burns), and scissors. Adults should handle all three. The actual crochet stitches, once set up, are safe for older children and teens to work.
The ghost bag charm, the candy corn, and the witch hat are the most accessible for confident beginners working alongside an adult.
How long does a beginner take to finish one of these projects?
The quickest makes in this collection, the candy corn, the coffin ornament, and the ghost bag charm, each take under an hour of active crochet. The cushion cover and the black cat doorstop are the longest, running to three or four hours of work. Most pieces sit in the one-to-two-hour range, which makes them a realistic one-evening project.
Can I use acrylic yarn instead of cotton for these projects?
Yes, for almost all of them. Acrylic worsted is a perfectly good substitute for any of the stuffed amigurumi pieces. The only place where cotton makes a real difference is the spider web bowl, where cotton holds its shape after stiffening better than acrylic. For the place mat, cotton also lies flatter and behaves better with the chain-mesh pattern.
15 DIY Halloween village houses built from wood scraps, craft boards and paint, designed to look lik
34 Halloween table decorations that keep sightlines clear, candles low, and the mood genuinely spook
34 ghost painted pumpkin ideas on uncut pumpkins, sorted from toddler-friendly sweet to properly uns
Leave a Reply