

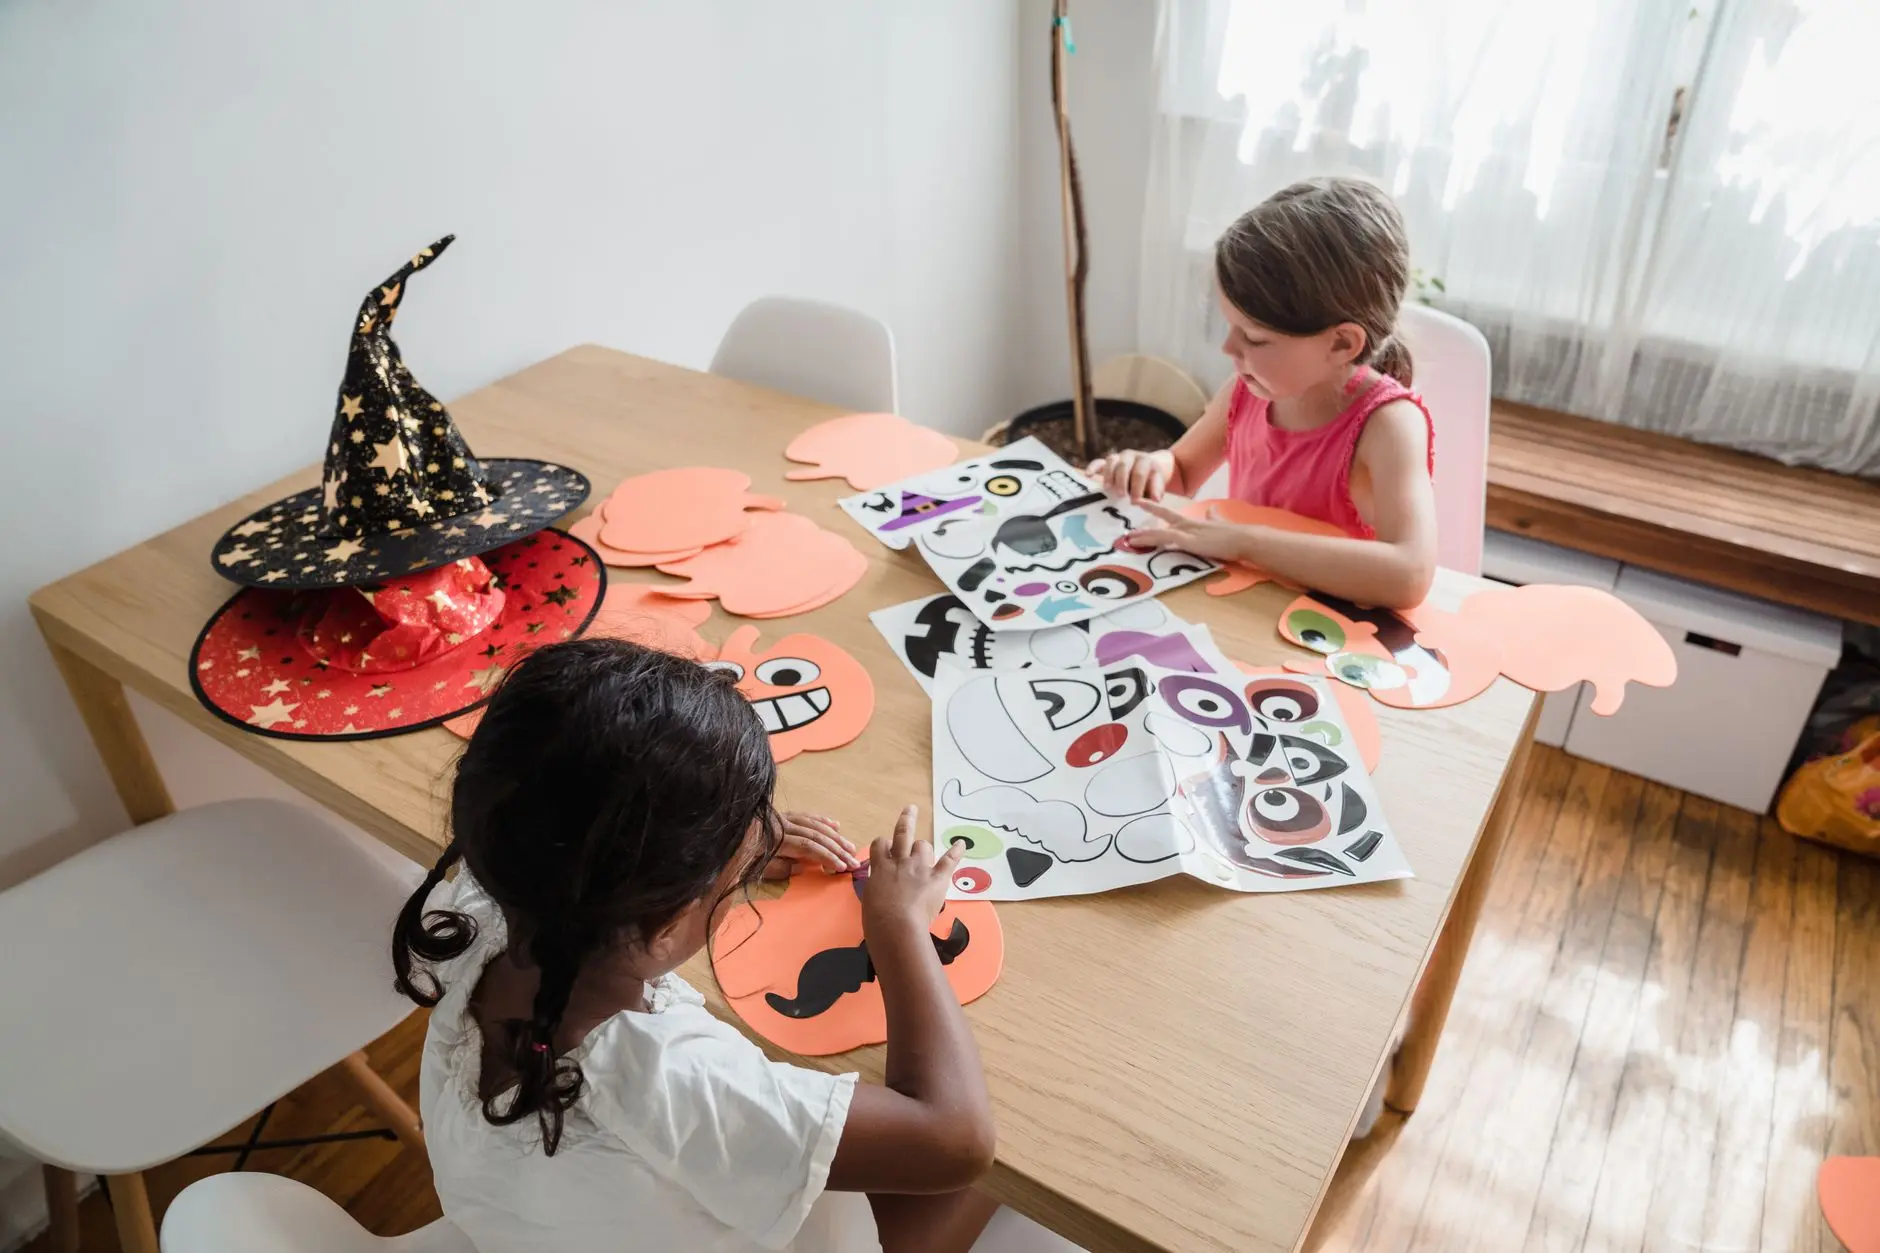
Set one long table, lay out the supplies by age group, and let every child work at their own level while the theme holds the whole session together.
The crafts below run from age two to eleven, sorted into four tiers: toddler, preschool, school age and older kids. The last entry belongs to everyone, because it is built from whatever each child made during the session.
A few notes before you start. Toddlers need an adult within arm’s reach for painting steps. School-age kids can cut and punch their own materials. Anything involving scissors, an oven or wire is flagged inside the step that needs it.
Times listed include drying, because that is the part that always surprises people. If you want games to run alongside the making, 25 Not-Too-Scary Halloween Party Games for Kids fits the same age spread.
And if you need to feed everyone afterwards, 21 Halloween Treats Ideas That Cover the Whole Party Table has the spread already planned.
This post contains affiliate links. If you buy through them, I may earn a small commission at no extra cost to you.
- Handprint Ghost
- Sponge Print Pumpkin
- Torn Paper Bat
- Big Sticker Monster
- Paper Plate Spider
- Cardboard Tube Mummy
- Cotton Ball Ghost
- Egg Carton Bats
- Ghost on a Stick
- Painted Rock Monsters
- Paper Bat Mobile
- Yarn Spider Web Plate
- Haunted House Floor Plan
- Papier Mache Pumpkin
- Four Panel Ghost Comic
- Salt Dough Skulls
- Pipe Cleaner Spiders
- Family Collage Poster
- Frequently Asked Questions
Handprint Ghost
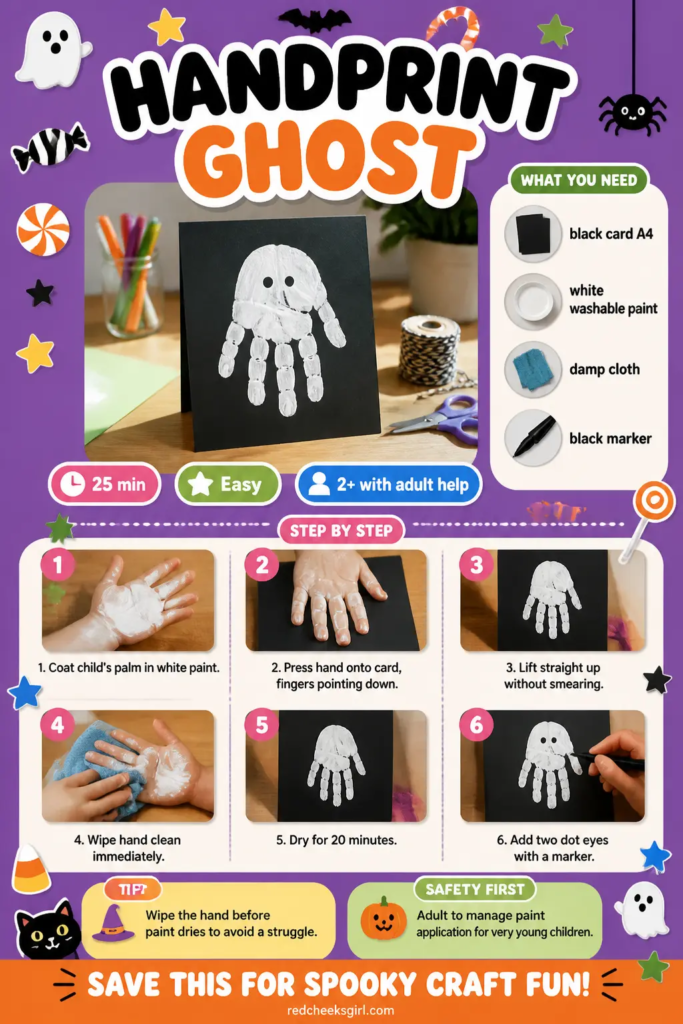
White paint on black card is one of the sharpest colour contrasts available to a two-year-old, and a handprint turned upside-down reads instantly as a ghost. Fingers become the wispy tail; the palm becomes the round head. Finished pieces look striking pinned to a dark wall or strung on a line with wooden pegs.
Keep the damp cloth within reach before the paint goes on. The most common mistake is letting the paint dry on the hand before wiping, which turns a simple clean-up into a battle. Move fast at the wiping step and you will be fine.
Handprint Ghost
What You Need
- 1 sheet of black card, A4 or larger
- White washable paint, enough to coat the palm fully
- 1 damp cloth or a small bowl of water and paper towels
- A thin black marker or black paint for the eyes (added once dry)
How to Make It
- Pour a shallow puddle of white paint onto a plate or tray. Press the child’s hand in, palm-down, fingers together, coating the whole surface evenly.
- Place the hand onto the black card with the fingers pointing downward, press gently across the whole hand, then lift straight up without smearing. The ghost head is the heel of the palm; the fingers are the trailing wisp at the bottom.
- Wipe the hand clean immediately with the damp cloth. Set the card aside to dry for at least 20 minutes. Once fully dry, add two small dots or circles near the top of the palm for eyes using a fine black marker or a dot of black paint on a cotton bud.
Good to Know
🛍 Shopping guide
Sponge Print Pumpkin
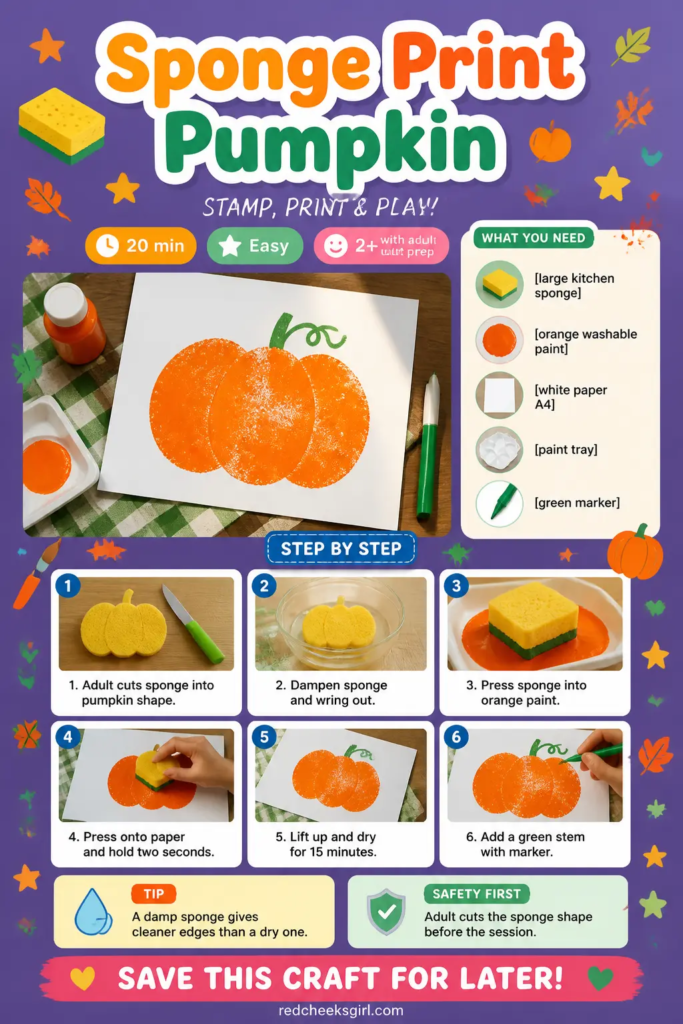
A pumpkin shape cut from a kitchen sponge gives toddlers a chunky stamp they can grip and reload without help. The finished print has the pleasingly imperfect edges that make a child’s artwork look like a child’s artwork rather than a template.
Layer a few prints across one sheet and you have a scene; keep to one big print centred on the page and you have a piece worth framing.
Cut the sponge into the pumpkin shape yourself before the session starts. An adult should always handle that step. Damp sponges hold paint beautifully; dry ones soak it up and produce patchy results, so give the sponge a quick squeeze under the tap and wring it almost dry before you begin.
Sponge Print Pumpkin
What You Need
- 1 large kitchen sponge (the bigger the better for toddler grip)
- Orange washable paint
- 1 sheet of white or cream paper, at least A4
- A small plate or tray for the paint
- A green marker or green paint for a stem (optional)
How to Make It
- An adult cuts the sponge into a rounded pumpkin shape with scissors before the session: a fat oval with two small notches at the top centre to suggest the ridges. Dampen the sponge lightly and wring it out.
- Pour a shallow layer of orange paint onto the plate. The child presses the sponge flat into the paint, then presses it firmly onto the paper and holds it for two seconds before lifting. The shape should be solid orange with a little texture from the sponge surface.
- Set the paper flat to dry, about 15 minutes. Once dry, a child can add a quick stem in green marker or with a dab of green paint on a finger.
Good to Know

🛍 Shopping guide
Torn Paper Bat
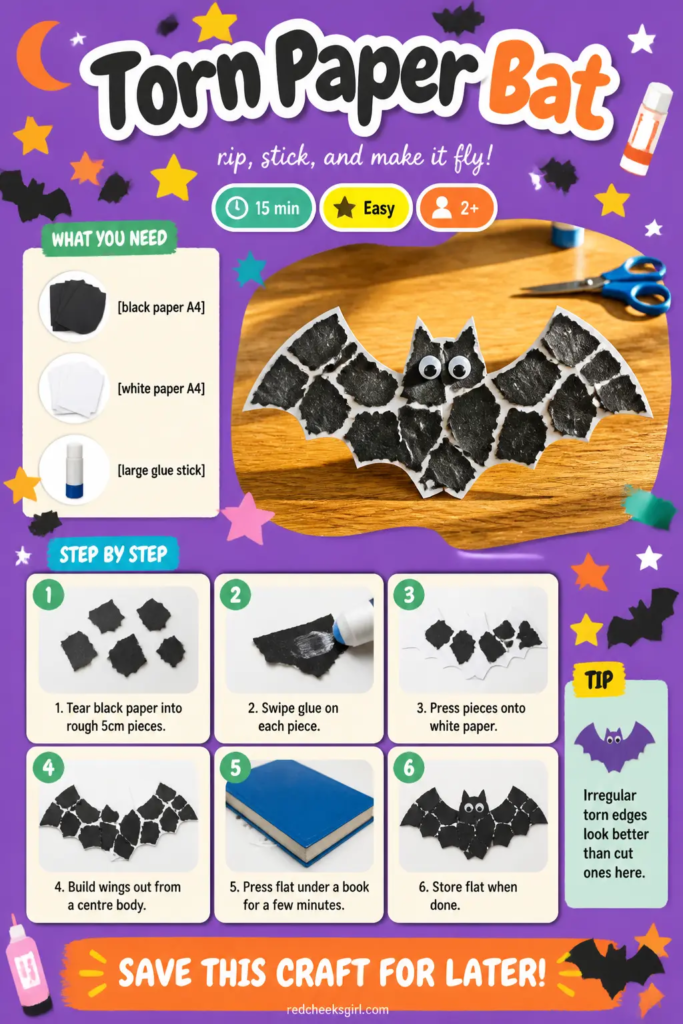
Tearing paper is a legitimate fine-motor skill for toddlers, and wrapping it in a craft session means no one notices they are practicing. The finished bat is charmingly abstract: jagged black shapes on white paper that look like a bat mid-swoop. Glue it to a window for the spooky silhouette effect, or save it flat inside a folder.
The only thing to watch: glue sticks work best on small pieces. If a child tries to glue one enormous sheet of black paper, the glue runs out before the paper is down. Torn pieces roughly 5 to 10 centimetres across are the sweet spot.
Torn Paper Bat
What You Need
- 2-3 sheets of black paper, A4
- 1 sheet of white paper, A4 or A3 for a bigger result
- 1 glue stick (large, 40g or more so it lasts)
How to Make It
- The child tears the black paper into rough pieces. No guiding needed: the irregular edges are exactly what makes this look like bat wings. Aim for pieces at least 5 centimetres across so they are easy to grip and glue.
- Swipe the glue stick generously over one piece at a time and press it onto the white sheet. Build up the shape from the centre outward: a cluster of pieces in the middle for the body, pieces splaying out to each side for wings. Press each piece down firmly for a few seconds.
- Once the whole bat shape is down, press the sheet flat under a heavy book for a few minutes. The finished piece is dry almost immediately. Store flat in a folder or roll loosely and secure with a rubber band.
Good to Know

🛍 Shopping guide
Big Sticker Monster
For the youngest children at the table, peeling and pressing is a complete craft. Large foam stickers give toddlers real satisfaction: they are chunky enough to peel independently, they stick firmly first try, and the finished monster face is genuinely funny. No cutting, no paint, no waiting for anything to dry.
Buy a pack with a good mix of shapes: circles for eyes, triangles for teeth, wiggly ones for hair. The child arranges and rearranges before committing, which is half the fun. Display the finished sheet on the fridge or slide it into a clear plastic sleeve as a mini gallery piece.
Big Sticker Monster
What You Need
- 1 sheet of white or coloured card, A4
- 1 pack of large foam stickers (mixed shapes, at least 3 cm each)
How to Make It
- Set the card flat in front of the child. Open the sticker pack and fan a selection of shapes out nearby so they can see the options.
- The child peels each sticker, which toddlers can usually manage with a little encouragement at the corner, and presses it onto the card. Start with two big circles for eyes to anchor the face, then let the child add a mouth, nose, hair, horns or whatever pleases them.
- Press each sticker down firmly so the edges do not curl. The monster is finished when the child decides it is. No drying time needed. Slide into a clear plastic sleeve or folder to keep it flat.
Good to Know

🛍 Shopping guide
Paper Plate Spider
Paper plates are the preschool crafter’s best friend: they are already round, they hold paint well, and they are stiff enough to poke pipe cleaners through. This spider ends up looking properly creepy, which is exactly what a four-year-old wants. Hang it from a doorframe on a loop of string and it spins slowly in a draught.
Paint the plate the night before if you want to skip the waiting step at the table.
The legs are the fiddly bit: poke each pipe cleaner through the plate rim from the front, bend the end at the back to hold it, then bend the front half into an L-shape to suggest a bent leg.
Four pipe cleaners, each poked through twice, gives eight legs without cutting anything.
Paper Plate Spider
What You Need
- 1 white paper plate, 23 cm diameter
- black washable paint
- 4 black pipe cleaners
- 2 large googly eyes (at least 2 cm)
- PVA glue or a glue stick for the eyes
How to Make It
- The child paints the top surface of the paper plate solid black. Two coats give better coverage than one heavy coat. Set aside to dry completely, at least 30 minutes. This is a good time for the younger children to do their handprints or sticker monsters.
- An adult uses a sharp pencil or skewer to poke eight evenly spaced holes around the plate rim, four on each side. Push one pipe cleaner through two neighbouring holes so it loops under the plate, then bend both halves on top into a gentle L-shape. Repeat with the remaining three pipe cleaners to create eight bent legs in total.
- Dab a generous spot of PVA glue onto the plate surface near the top. The child presses the two googly eyes into the glue and holds them for 20 seconds. Leave flat until the glue is set, about 5 minutes. Hang with a length of string looped through a small hole at the very top of the plate.
Good to Know

Cardboard Tube Mummy
A toilet roll tube wrapped in gauze bandage looks like a tiny mummy the moment you glue a pair of eyes into a gap in the wrapping. Stand several of them together on a windowsill and they form a small army. They store flat-ish in a cardboard box and survive from one year to the next without any fuss.
Medical gauze from a chemist is perfect and inexpensive. Cut it into strips about 30 centimetres long before the session so preschoolers are not wrestling with a whole roll. The wrapping does not need to be neat. Messy is better. A few loose ends trailing off the bottom looks exactly right.
Cardboard Tube Mummy
What You Need
- 1 cardboard tube (toilet roll size)
- 50 cm of medical gauze or white crinkle paper, cut into 30 cm strips
- PVA glue or a glue stick
- 2 small googly eyes (at least 1 cm)
How to Make It
- The child wraps a strip of gauze around the tube starting at the bottom, overlapping each round slightly as they go up. There is no right way to do this: gaps, overlaps and trailing ends all add to the mummy effect. Continue with more strips until most of the tube is covered but two small gaps near the top remain for the eyes.
- Dab glue on the loose ends and press them against the tube. Hold each one for a count of ten. If a strip unravels, add another dab of glue; it will behave itself.
- Dab a small spot of PVA glue into one of the gaps near the top and press an eye in. Repeat for the second eye. Let dry for five minutes before standing upright. The mummy is ready when the eyes hold without sliding.
Good to Know

🛍 Shopping guide
Cotton Ball Ghost
White cotton balls on black paper produce a ghost with real texture: fluffy, slightly three-dimensional, and nothing like a printed template. The silhouette shape comes from how the child applies the glue, so every ghost is different. Pin a row of them to a dark wall and the effect is genuinely ghostly.
The glue stick is the key tool here and it needs to go on generously. A thin swipe will not hold cotton balls for long. Apply in a solid oval for the head, then extend downward in a narrowing curve for the body. Cotton balls pressed on while the glue is still wet will bond within minutes.
Cotton Ball Ghost
What You Need
- 1 sheet of black card, A4
- 20-25 cotton balls
- 1 large glue stick (40g)
- Small black paper circles or a black marker for eyes
How to Make It
- The child draws the ghost outline on the black card with a white chalk pencil or simply begins gluing freehand. Swipe the glue stick thickly over a rounded head shape at the top, then drag the glue downward in a narrowing wiggly curve for the body. The trail of glue is the ghost shape.
- Press cotton balls into the glued area one at a time, packing them closely together so no black card shows through the main body. The edges will be naturally fluffy and uneven, which is exactly right.
- Cut two small circles from black paper (or use a hole punch) and glue them onto the cotton surface for eyes. Press firmly. Leave flat for five minutes until set. The ghost is ready when the cotton balls resist a gentle tug.
Good to Know

🛍 Shopping guide
Egg Carton Bats
One egg carton gives you twelve bat bodies and costs nothing. Each cup, once painted black and fitted with paper wings, sits on its own or hangs from a thread. The wings are the part that makes these look polished rather than just painted rubbish, so spend a moment cutting a good wing shape from black paper before the session.
This craft suits preschoolers who can handle a paintbrush but benefit from having the cutting done for them. Let the paint dry completely before gluing wings. Tacky, half-dry paint causes wings to slip off, which is frustrating and avoidable.
Egg Carton Bats
What You Need
- 1 egg carton, cardboard (gives 12 cups)
- black washable paint
- Black paper for wings, 1 small sheet per bat
- PVA glue
- 2 small googly eyes per bat (at least 1 cm)
How to Make It
- An adult cuts the egg carton into individual cups and cuts wing shapes from black paper: two curved triangles joined at the centre, roughly 8 centimetres wide total. Each child takes one cup and paints it black all over, including inside if they like. Set cups upside-down to dry for at least 30 minutes.
- Once dry, the child runs a line of PVA glue along the straight edge of the wing piece and presses it against the flat back of the cup, holding for 30 seconds. The wing should extend evenly either side of the cup when viewed from the front.
- Dab two spots of glue on the front of the cup and press googly eyes in place. Hold for 20 seconds. Once set, thread a short piece of string through a small hole poked in the top of the cup by an adult and knot it to hang the bat.
Good to Know

🛍 Shopping guide
Ghost on a Stick
A round cotton pad glued to a craft stick and given a little face is about as quick as a Halloween craft gets, but the result is genuinely cute rather than thrown-together.
Hold one in each hand, wave them about, and a preschooler has a puppet show. They dry in minutes and take up almost no space to store: band a dozen together with an elastic band.
Cotton pads are perfectly round and flat-white, which means zero prep. The marker step is one place to be precise: a very light hand keeps the face from bleeding into the cotton fibres. Test on a spare pad first if the child is using a marker for the first time.
Ghost on a Stick
What You Need
- 1 flat round cotton pad (standard 55mm diameter)
- 1 large craft stick (15 cm long)
- PVA glue
- 1 black fine-tip marker
How to Make It
- Squeeze a pea-sized dot of PVA glue onto one end of the craft stick. Centre the cotton pad on top, flat side down, and press gently. Hold for 30 seconds. Prop the stick upright in a cup to dry for five minutes.
- Once the cotton pad is firmly attached, the child uses the black marker to draw two small oval eyes and a round open mouth onto the centre of the pad. Press lightly: the marker tip will bleed if pressed hard into the fibres, giving the eyes a blurry edge. Small and light is better here.
- Let the marker dry for two minutes before waving the puppet around. The ghost is finished when the eyes are dry and the pad does not wobble on the stick.
Good to Know

🛍 Shopping guide
Painted Rock Monsters
Smooth river rocks make the best base because the paint sits on them rather than soaking in. Each child picks one rock and one base colour: neon green, bright purple, electric orange.
The mismatched googly eyes are what make these, so go generous with the pack and let children choose wildly different sizes for each socket. Finished rock monsters live on a windowsill, a bookshelf, or as a doorstop if the rock is large enough.
Acrylic paint dries fast on rock, usually within 20 minutes, but a second coat always looks better than one thick coat that cracks. A paint pen is the neatest tool for adding details like teeth, claws or spots. Rocks with a flat base sit without wobbling; test yours before painting.
Painted Rock Monsters
What You Need
- 1 smooth rock per child (at least 6 cm across)
- Acrylic paint in bright colours
- A paint pen in black or white for details
- Googly eyes, mixed sizes (at least 1 cm, assorted up to 3 cm)
- PVA glue or strong craft glue for the eyes
How to Make It
- The child paints the whole rock in their chosen base colour using a medium brush. Two thin coats give better coverage than one thick one. Wait 20 minutes between coats. The rock should be one solid colour with no original stone showing through before moving on.
- Choose two googly eyes of deliberately different sizes for a lopsided, comic-book monster effect. Dab a good amount of craft glue on the flat back of each eye and press firmly onto the rock. Hold for 30 seconds each. Leave flat for 10 minutes until the eyes are fully set and do not slide.
- Use the paint pen to add teeth, a mouth, spots, claws, eyebrows or whatever the child wants. The paint pen tip gives a clean line that a brush would not. Let the ink dry for five minutes before handling. The monster is finished when you can pick it up without the eyes rattling loose.
Good to Know

🛍 Shopping guide
Paper Bat Mobile
Black card bats in three different sizes hanging at different heights from a coat hanger make a mobile that looks properly designed rather than just strung up.
The size variation is what does the work: small, medium and large bats on the same hanger read as a little family mid-flight. Hang it in a window or from a curtain rod where it can turn slowly.
A bat template on scrap paper is worth making once and tracing around multiple times. The school-age children can handle their own cutting with scissors; the adult handles anything involving the coat hanger hook end. Tie the strings at different lengths before attaching to the hanger, and balance as you go by spacing them evenly.
Paper Bat Mobile
What You Need
- 2 sheets of black cardstock, A4 (200 gsm or heavier holds its shape better)
- White thread or thin black string, about 1.5 m
- 1 wire coat hanger
- Scissors
- A pencil for tracing
How to Make It
- The child draws three bat shapes freehand or traces around a scrap paper template: one large (about 15 cm wingspan), one medium (about 10 cm) and one small (about 6 cm). Cut all three out carefully. A good bat silhouette has two curved wings, a slightly pointed head in the centre and two small ear triangles at the top.
- Cut three lengths of string: 30 cm, 20 cm and 12 cm. Make a small hole near the centre of each bat’s back using a sharp pencil tip pushed through the card, then thread the string through and tie a knot on the underside so it cannot pull through. Tie the large bat to the long string, the medium to the mid-length, and the small to the shortest.
- An adult stretches the coat hanger into a rough diamond shape and ties each bat string along the bottom wire, spacing them evenly. Tie the loop end to something sturdy. Adjust the bat positions so the mobile hangs level. Store by sliding the bats off their strings and flattening them in a folder.
Good to Know

🛍 Shopping guide
Yarn Spider Web Plate
Weaving yarn across a punched paper plate produces a spider web that actually looks like a web, not a mess of string, because the plate rim holds everything taut.
The plastic spider sitting in the centre is the finishing touch that makes every child at the table jealous they did not make one.
Hang it on a door or prop it against a wall as a seasonal decoration that will last the whole of October.
The hole punch is the key tool and the one step that needs a certain amount of hand strength. School-age kids from about seven upward can usually manage it; younger ones may need an adult to punch the holes in advance. Weaving is entirely within a six-year-old’s ability once the holes are ready.
Yarn Spider Web Plate
What You Need
- 1 white paper plate, 23 cm diameter
- A standard hole punch
- White yarn, about 3 m per web
- 1 small plastic spider (at least 3 cm)
- PVA glue or a dab of craft glue for the spider
How to Make It
- Punch holes evenly around the plate rim, spacing them about 2 cm apart. Aim for an even number, around 16 to 20 holes, which makes the crossing pattern more symmetrical. Thread the end of the yarn through any hole and knot it so it does not pull through.
- Weave the yarn across the plate from hole to hole, pulling each length taut before pushing through the next hole. Aim to cross the centre of the plate on most passes: the web takes shape when threads intersect near the middle. Keep going until the plate feels well-covered and the pattern has a genuine web feel.
- Knot the yarn at the last hole and trim any loose end. Dab craft glue at the centre of the web and press the plastic spider firmly onto it. Hold for 30 seconds. Let the glue set for five minutes before hanging. If the spider is on the light side, a small piece of double-sided tape works just as well as glue here.
Good to Know

Haunted House Floor Plan
This is the craft that quietly keeps a school-age child occupied for a very long time.
Give them a large sheet of card, a ruler and a set of markers, and ask them to design the floor plan of a haunted house: every room named and populated with whatever horror they choose.
It reads as architecture and as storytelling at the same time, which is why it suits children who are past purely tactile making but still love drawing.
There is no wrong way to do it. Some children rule a neat grid; others draw sprawling asymmetric rooms that spread across the sheet. The labelling step is where older kids show off their handwriting, and where younger school-age children find the challenge. Display it pinned to the wall or rolled up and stored in a cardboard tube.
Haunted House Floor Plan
What You Need
- 1 sheet of large card or heavy paper, at least A3 (300 gsm works well and takes marker without bleeding)
- A 30 cm ruler
- Black marker, medium tip, for walls
- Coloured markers for details and labels
How to Make It
- The child uses the ruler and the black marker to draw the outer walls of the house as a large rectangle or L-shape across the sheet. Then divide the inside into rooms by ruling internal walls, leaving gaps for doorways. Five to eight rooms gives plenty of detail without crowding the sheet.
- In each room, draw what lives there in small, detailed illustration: a coffin in the basement, a cauldron in the kitchen, a ghost hovering in the attic. There is no need to fill every centimetre; some rooms can be mostly empty to suggest an abandoned feel.
- Label every room in clear hand-lettering using a coloured marker. Add a compass rose, a title banner across the top reading “Haunted House” and, if time allows, a small legend in one corner explaining any symbols used. Roll the finished map and store in a cardboard tube to keep it flat.
Good to Know

🛍 Shopping guide
Papier Mache Pumpkin
This is the slow-burn craft for older children who can manage a multi-session project. The balloon sets the shape with zero effort; the papier mache strips build up a rigid shell.
Painted orange with a green stem, the finished pumpkin looks three-dimensional and genuinely impressive on a mantelpiece. It will last several years if stored in a box with a little tissue paper for padding.
Flour paste is simply plain flour stirred into water until it is the thickness of single cream. Mix it fresh each session; it will sour if left overnight. The drying time is the long part: each layer needs at least two hours, and three layers is the minimum for a shell firm enough to survive the balloon being popped.
Papier Mache Pumpkin
What You Need
- 1 round balloon, inflated to about 20 cm diameter
- A broadsheet newspaper, torn into strips roughly 3 cm wide and 15 cm long
- Flour paste: 3 tablespoons plain flour stirred into 250 ml warm water
- Orange acrylic paint
- Green acrylic paint or a green pipe cleaner for the stem
- A paintbrush, medium size
How to Make It
- Rest the inflated balloon in a bowl or cup so it does not roll. Dip each newspaper strip into the flour paste, run it between two fingers to remove excess, and lay it over the balloon. Cover the whole balloon except for a small circle at the knotted end (this becomes the base). Apply three layers in total, letting each dry for at least two hours before adding the next. The shell is ready when it feels rigid and does not give when gently pressed.
- Pop the balloon by snipping the knot at the base opening. Pull it out carefully. The shell should hold its shape without the balloon inside. If any area feels soft, add one more paste layer to that spot and dry again before painting.
- Paint the whole shell orange using two coats of acrylic paint, drying between coats. Once dry, paint a short fat green stem at the top, or glue a coiled green pipe cleaner in place. Add vertical ridges in a slightly darker orange with a dry brush if the child wants the extra detail. Store inside a box with tissue paper to prevent denting.
Good to Know

Four Panel Ghost Comic
A blank sheet of paper becomes a four-panel comic about a ghost, and the older child runs the whole project from story idea to inked final. The pencil-then-ink method is the one professional cartoonists actually use: plan without commitment first, commit with ink second.
The finished strip looks polished and is worth keeping flat in a clear plastic sleeve or scanning as a keepsake.
The fiddly part is keeping the panel borders straight without using a full set square. A ruler and a steady hand are enough. The best strips are usually the ones with the least text: two or three words per panel and one clear action in the drawing. Encourage restraint.
Four Panel Ghost Comic
What You Need
- 1 sheet of white cartridge paper or smooth card, A4 (at least 120 gsm so the ink does not bleed)
- A 30 cm ruler
- HB pencil
- Fine black marker (0.5 mm tip)
- Eraser
How to Make It
- Using the ruler and pencil, divide the A4 sheet into four equal panels in a two-by-two grid. Rule the borders firmly so they will show clearly under ink. Leave a margin of about 1 cm around the outside edge of the sheet. Each panel should be roughly 9 cm wide and 12 cm tall.
- Plan the story in pencil first. Keep it simple: the ghost appears in panel one, causes a problem in panel two, makes things worse in panel three, and resolves it (or not) in panel four. Pencil in the characters and any speech or thought bubbles. The whole strip should make visual sense even without reading the text.
- Once the pencil layout looks right, go over every line with the fine black marker: borders first, then characters, then speech bubbles, then lettering. Let the ink dry for two minutes, then erase all pencil lines with the eraser. The final strip should have clean black lines on white paper with no grey pencil showing through.
Good to Know

🛍 Shopping guide
Salt Dough Skulls
Salt dough is one of the most satisfying materials for older children because it behaves like real clay but costs almost nothing. A skull cutter gives a crisp silhouette, and once baked the result is rock-hard and paintable.
Finished skulls make table decorations, gift tags or chunky hanging ornaments with a loop of twine through a hole made before baking. They will last for years in a dry box.
The recipe is strictly one cup of plain flour to half a cup of table salt to half a cup of water. Too much water makes the dough sticky and the baked result puffs and cracks. Roll to about 5 mm thickness for a skull that is sturdy without taking forever to bake.
Salt Dough Skulls
What You Need
- 1 cup plain flour (about 120 g)
- Half a cup of table salt (about 140 g)
- Half a cup of water
- a rolling pin
- A skull-shaped cookie cutter (at least 6 cm tall)
- White and black acrylic paint for finishing once cool
How to Make It
- Mix the flour and salt together in a bowl, then add the water a little at a time, stirring until a firm dough forms. Knead for two minutes until smooth. The dough should not stick to your hands; if it does, add a little more flour. Roll out on a lightly floured surface to 5 mm thickness.
- Press the skull cutter firmly through the dough and lift cleanly. Peel away the surrounding dough and repeat. If you want to hang the skull, use a drinking straw to press a clean 5 mm hole near the top of each skull before baking. Place skulls on a baking tray lined with baking paper.
- An adult bakes the skulls at 100 degrees Celsius (fan) for 2 to 2.5 hours until completely hard. Remove and cool fully on a wire rack, at least 30 minutes. Once cool, the child paints them white with acrylic paint, adds black detail for eye sockets and a nose gap, and lets dry for 20 minutes. Thread twine through the hole to hang.
Good to Know

Pipe Cleaner Spiders
Four black pipe cleaners twisted together at the centre and splayed into eight legs, then topped with a pom-pom body and two googly eyes: this is the craft that takes twelve minutes and produces something that genuinely looks like a spider rather than a craft project.
The legs can be bent into positions: crouching, rearing up, mid-scuttle. Display a cluster of them on a bookshelf or drop them into a bowl of sweets at the front door.
The only technique that matters here is the central twist. Take all four pipe cleaners and twist them together at their exact midpoints, two full rotations, so the twist is tight and the legs splay symmetrically. A loose twist and the whole spider falls apart when you try to pose the legs.
Pipe Cleaner Spiders
What You Need
- 4 black pipe cleaners per spider (30 cm length)
- 1 large black pom-pom per spider (at least 4 cm diameter)
- 2 googly eyes per spider (at least 1 cm)
- PVA glue or craft glue
How to Make It
- Stack all four pipe cleaners on top of each other and find the midpoint. Twist all four together tightly at that midpoint, turning two full rotations. Fan the eight resulting ends outward into two groups of four on either side, like a flat asterisk. Each of those eight ends is a leg.
- Bend each leg at roughly the halfway point to create a knee, then bend the last centimetre upward to create a foot that lets the spider grip a surface. Adjust all eight legs until the spider sits level and looks balanced. This is the most satisfying and fiddly part; the first bend is always the hardest.
- Dab a generous amount of craft glue on the flat underside of the pom-pom and press it firmly onto the central twist. Hold for 30 seconds. Dab two spots of glue on top of the pom-pom and press the googly eyes in place. Leave flat to set for five minutes. Once set, bend the spider into its final pose.
Good to Know

🛍 Shopping guide
Family Collage Poster
This one belongs to the whole table. Every child contributes one element cut or torn from whatever they made during the session: a ghost handprint, a spare bat wing, a square of salt dough packaging, a test panel from the comic strip.
Glued onto one large poster sheet, the result is a record of the afternoon that is more interesting than any single craft on its own.
Lay the poster flat in the centre of the table and let each child choose where their piece goes. The arrangement does not need to be neat.
Write the year in large block letters across the top in marker before anyone adds their piece, so the lettering sits behind everything else as a banner.
For links to everything you might want alongside the crafts, 16 Halloween Games and Activities for Kids runs on the same age spread, and 20 Halloween Arts and Crafts to Fill a Whole October gives you the next four Saturdays already planned.
Family Collage Poster
What You Need
- 1 sheet of poster paper, at least A2 (plain white or cream)
- 1 large glue stick per child, or a bottle of PVA and a brush shared between the table
- Offcuts and spare pieces from every craft made during the session
- A thick black marker for the lettering
How to Make It
- Lay the poster sheet flat in the centre of the table before children finish their individual crafts. Write the year in large block letters across the top with the thick black marker, leaving the rest of the sheet open. This takes about one minute and anchors the composition before anything is glued.
- Each child selects one piece or offcut from their own craft: a ghost handprint, a test bat, a scrap of gauze from the mummy, a spare skull shape. They decide where on the poster it should go, apply glue to the back, and press it down. Let everyone add their contribution before anyone moves anything.
- Fill any large empty gaps with extra offcuts, turning scraps sideways or overlapping pieces until the sheet looks full rather than sparse. Press the whole poster flat under heavy books for ten minutes. Display pinned to a wall or roll it and store in a cardboard tube. It will look better every year you bring it back out.
Good to Know

🛍 Shopping guide
Frequently Asked Questions
What is the easiest Halloween craft for toddlers?
The Big Sticker Monster requires no paint and no drying time: a toddler peels large foam stickers and presses them onto card to build a monster face. It suits children from age two upward and takes about ten minutes from start to finish.
Which of these Halloween kids crafts can siblings of different ages do at the same table?
All eighteen crafts in this collection share a Halloween theme but are sorted by age tier, so a toddler can do a handprint ghost while a seven-year-old weaves a yarn spider web plate and a ten-year-old draws a four-panel comic. The Family Collage Poster at the end brings every age together into one shared piece.
How do you make salt dough skulls at home?
Mix one cup of plain flour with half a cup of table salt, then add half a cup of water a little at a time until a firm dough forms.
Roll to 5 mm thickness, cut with a skull-shaped cookie cutter and bake at 100 degrees Celsius fan for two to two and a half hours until rock hard. An adult must handle the oven step.
Once cool, paint white with acrylic paint and add black details.
What Halloween crafts are good for a group of mixed ages?
Set up one long table with supplies sorted by tier. Toddlers work on handprint ghosts and sticker monsters. Preschoolers make paper plate spiders and cardboard tube mummies. School-age children cut bat mobiles and weave spider web plates. Older children build papier mache pumpkins or draw ghost comics. At the end, everyone contributes one piece to the shared Family Collage Poster.
How do you make a papier mache pumpkin with kids?
Inflate a round balloon to about 20 cm across and rest it in a bowl. Tear newspaper into strips, dip each in flour paste (three tablespoons of plain flour stirred into 250 ml of warm water) and layer over the balloon.
Apply three layers, drying for two hours between each. Once the shell is firm, pop the balloon, remove it from the base hole, and paint the shell orange with acrylic paint. Add a green stem at the top. This suits children aged nine and older.
29 printable Halloween cards ready to cut and send tonight. One pack covers every recipient, from ne
39 Halloween door decorations for classroom doors built entirely from paper, organized by theme so t
31 girly painted pumpkin ideas finished with bows, pearls, ribbon, lace and lettering. Every pumpkin
Leave a Reply