

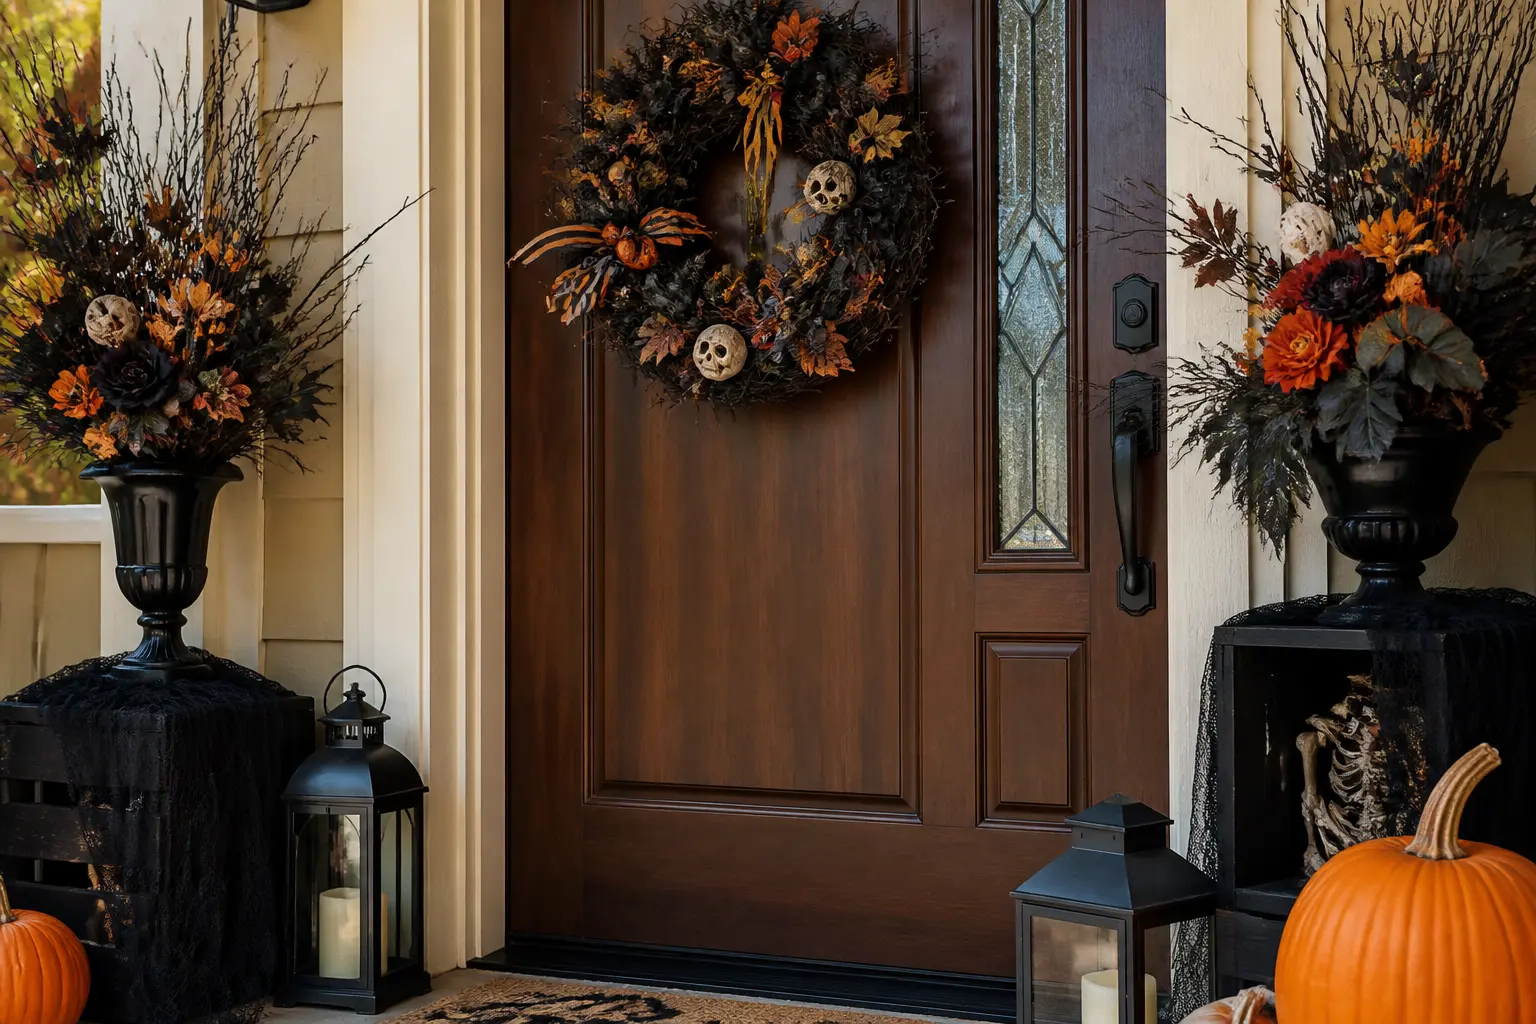
A door decorating contest has exactly one rule that matters: the whole door is the canvas. Not a banner at the top, not a wreath on the handle. The whole door, floor to frame, one unified illustration built from paper.
Every idea here treats the door that way. Each one is a complete scene you can execute with construction paper, a craft knife, tape, and whatever the supply closet has left.
No licensed characters, no gore, nothing that blocks the swing or hides a fire exit sign. Just thirty-nine ways to make your door the one the judges stop in front of.
If you want activities to go with the look once the door is up, 22 Classroom Halloween Activities With Free Printables pairs neatly with this list.
The ideas are grouped by the kind of scene they create: creature faces that use the door as a body, spooky architecture, nature and night sky, creature swarms, class-community walls, and a final run of storybook and adventure scenes. Pick the group that matches your energy, then pick the door.
This post contains affiliate links. If you buy through them, I may earn a small commission at no extra cost to you.
Creature Faces: The Door Is the Body
These ideas treat the door as one large animal or monster torso. The handle lands at mouth or belly height, which makes every person who reaches for it part of the joke. Cut big, keep the lines loose, and let the scale do the work.
The frame matters as much as the door here. Ears above the top edge, paws at the sides, bolts at the corners: the trim is what sells the illusion that something is standing inside the wall looking out.
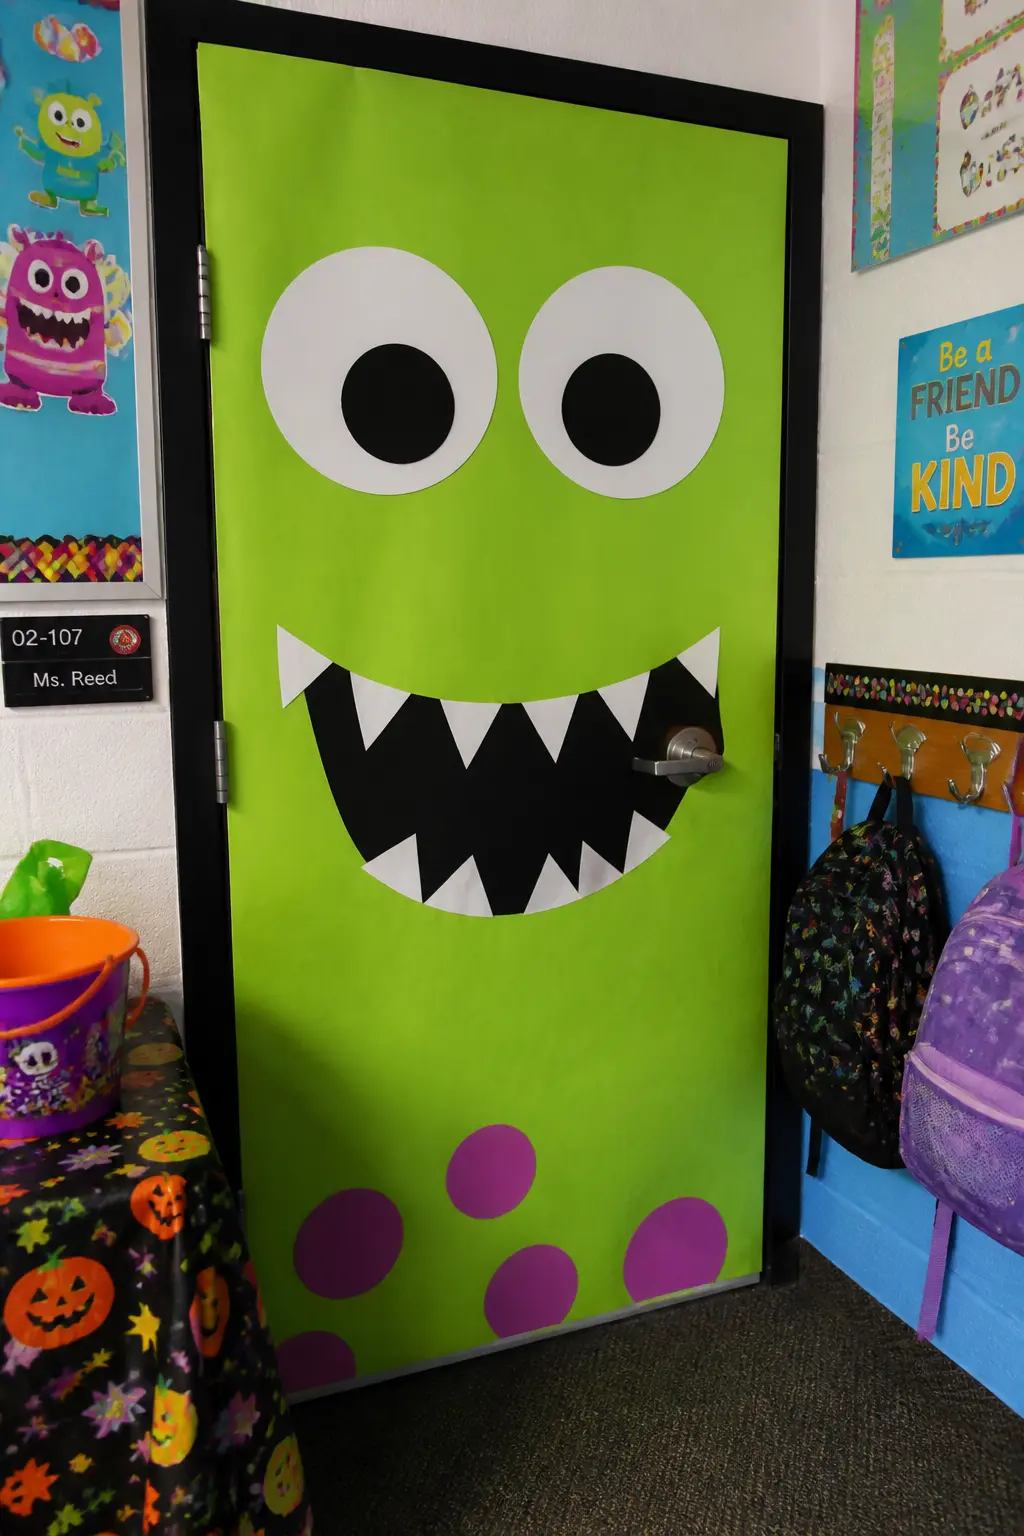
Monster Face Door
Cover the door in a single color: lime green, sickly yellow, or the specific muddy purple that says “monster” without saying “Frankenstein.” The mouth lands right at handle height, cut from red or black paper with jagged paper teeth along the upper and lower lips.
Two large paper eyes go in the upper third of the door. Irises cut from a contrasting circle, a black paper pupil, and a small white highlight square: that is all it takes.
Eyebrows cut from black paper strips, angled inward, do the emotional heavy lifting. The frame becomes the edge of the monster’s face, so run a thin paper border around it in the same base color.
🛍 Shopping guide
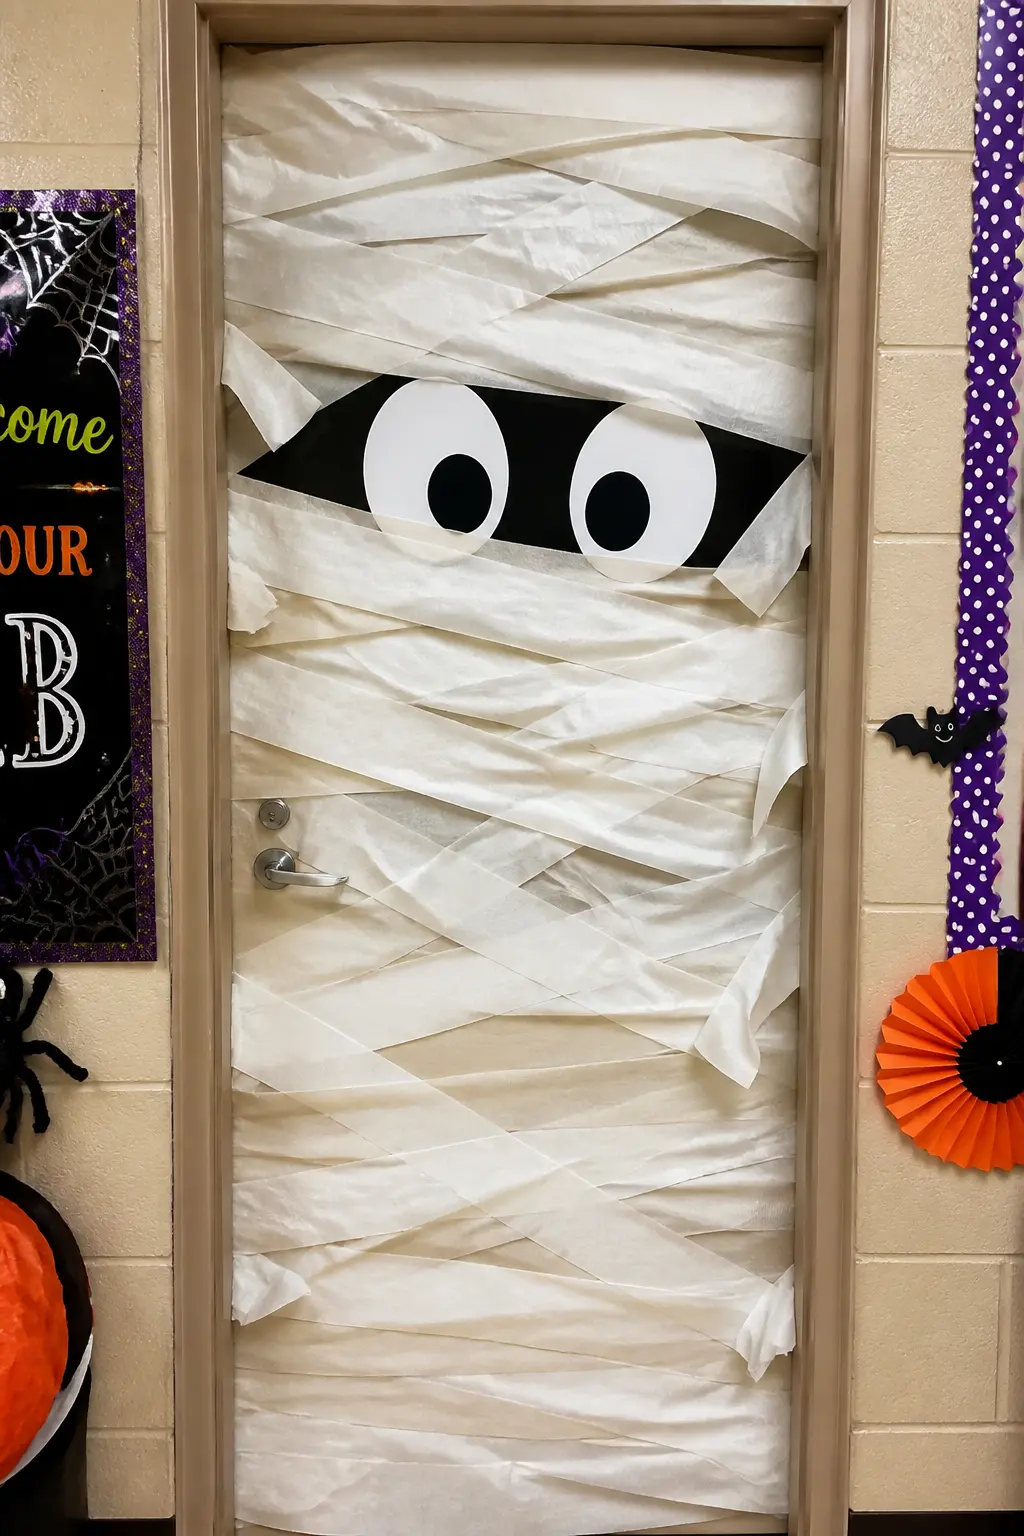
Mummy Wrap Door
Cover the door entirely in white paper, then apply strips of cream or off-white paper horizontally at slight angles across the whole panel, overlapping unevenly, some short and some running the full width. The strips do not need to be perfectly spaced: ragged is more convincing.
Two large oval eyes in the upper quarter of the door: white paper outer oval, black paper inner oval, a small white highlight dot. Leave a gap in the wrapping around the eyes so they appear to peer through.
Scuff the strip edges slightly with your finger after taping to roughen them. The handle disappears under the wrapping, which is the point.
🛍 Shopping guide
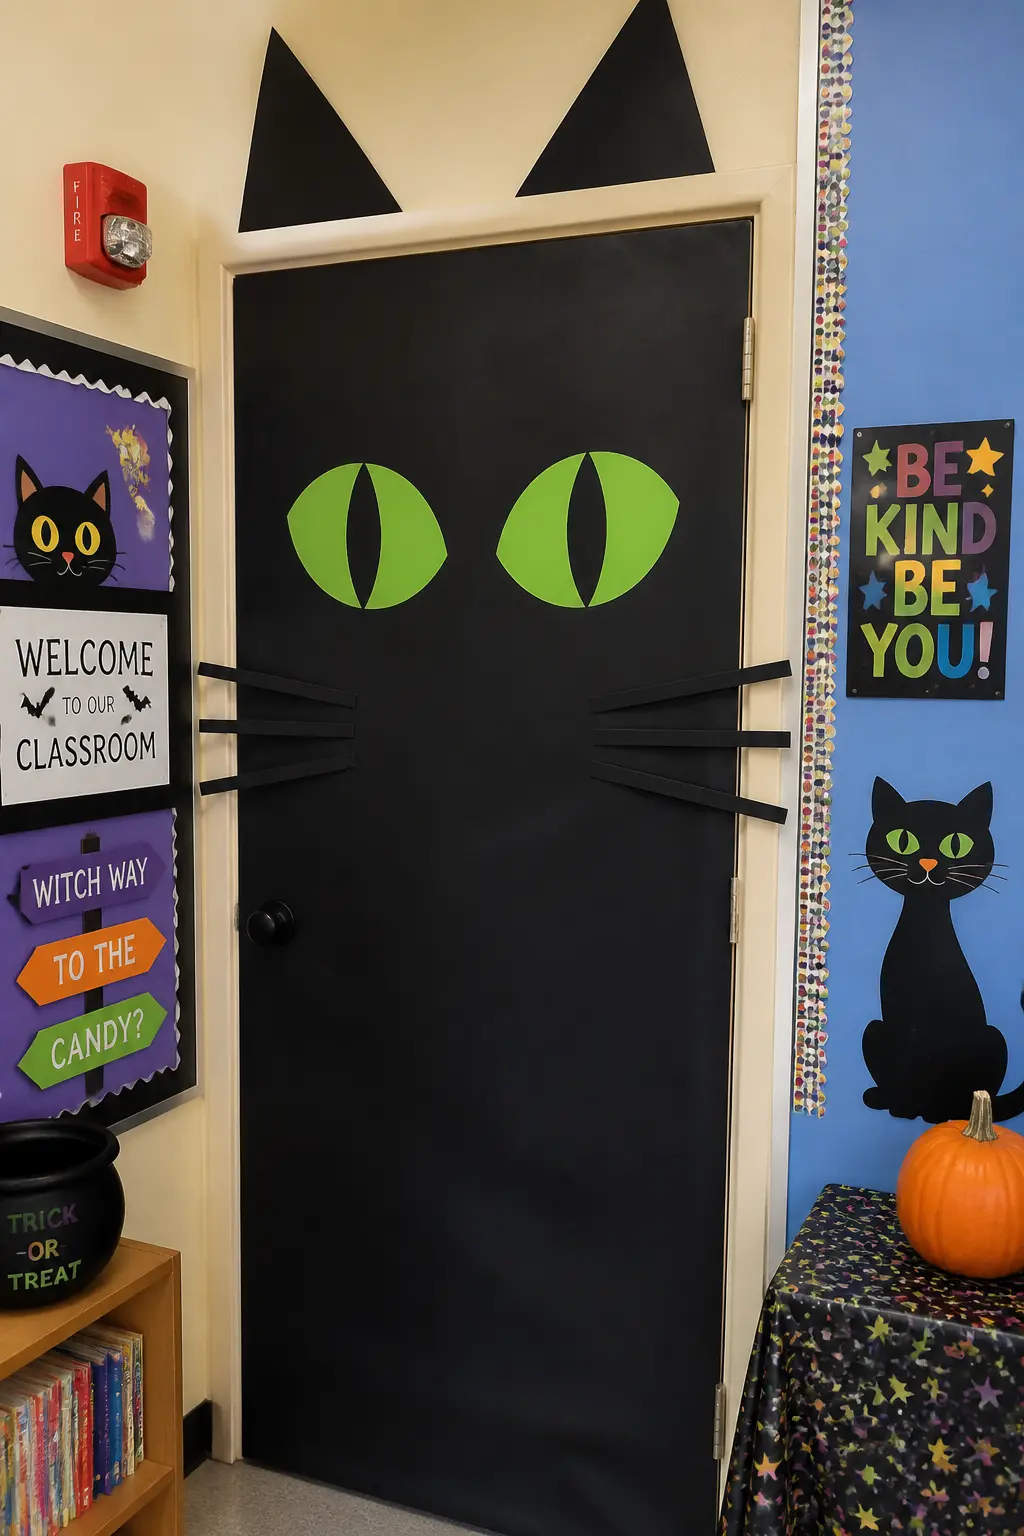
Black Cat Door
Cover the door in solid black paper. Two large triangular ears go above the top frame, points up, cut from black poster board stiff enough to stand. A paper face in the upper third of the door: two green or yellow almond-shaped eyes, a small pink triangle nose, and white paper whisker strips radiating from the nose area.
A long curving tail runs up one side of the door and curls at the top corner, cut from black paper in a thick strip. Front paws in black paper sit at the very bottom of the door panel.
The door is the cat’s body, the frame is its outline, and the ears break above the frame into the wall. Simple and very readable from a distance.
🛍 Shopping guide
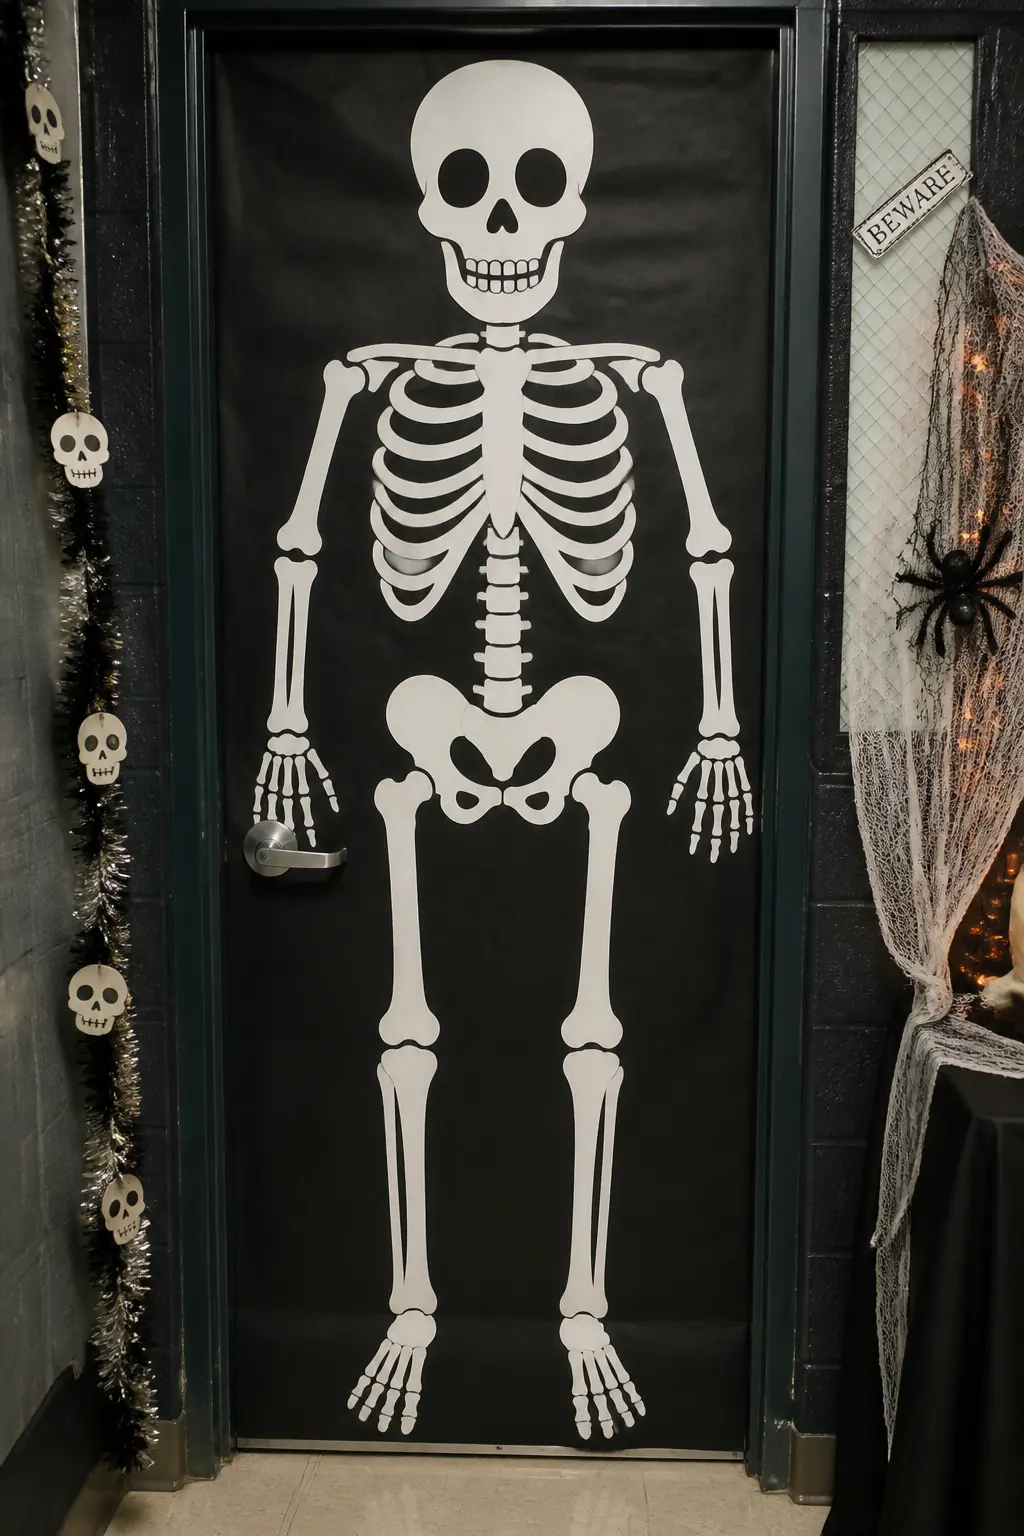
Full-Height Skeleton Door
Lay out a skeleton from the skull at the top of the door to the feet at the bottom, centered on the panel. The skull goes at the very top: a white oval with black eye sockets and a row of paper teeth.
Stack the spine down the center, vertebrae cut as small white rectangles. Rib pairs arc out from the spine on both sides.
Arm bones run down the sides of the door toward the handle, and leg bones fill the lower half. The feet land near the bottom edge.
Everything is cut from white construction paper on a black door background, and the bones do not need to be anatomically precise: legible is enough.
The skeleton is full-length because the door is full-length, and that scale is what makes it funny and impressive at the same time.
🛍 Shopping guide
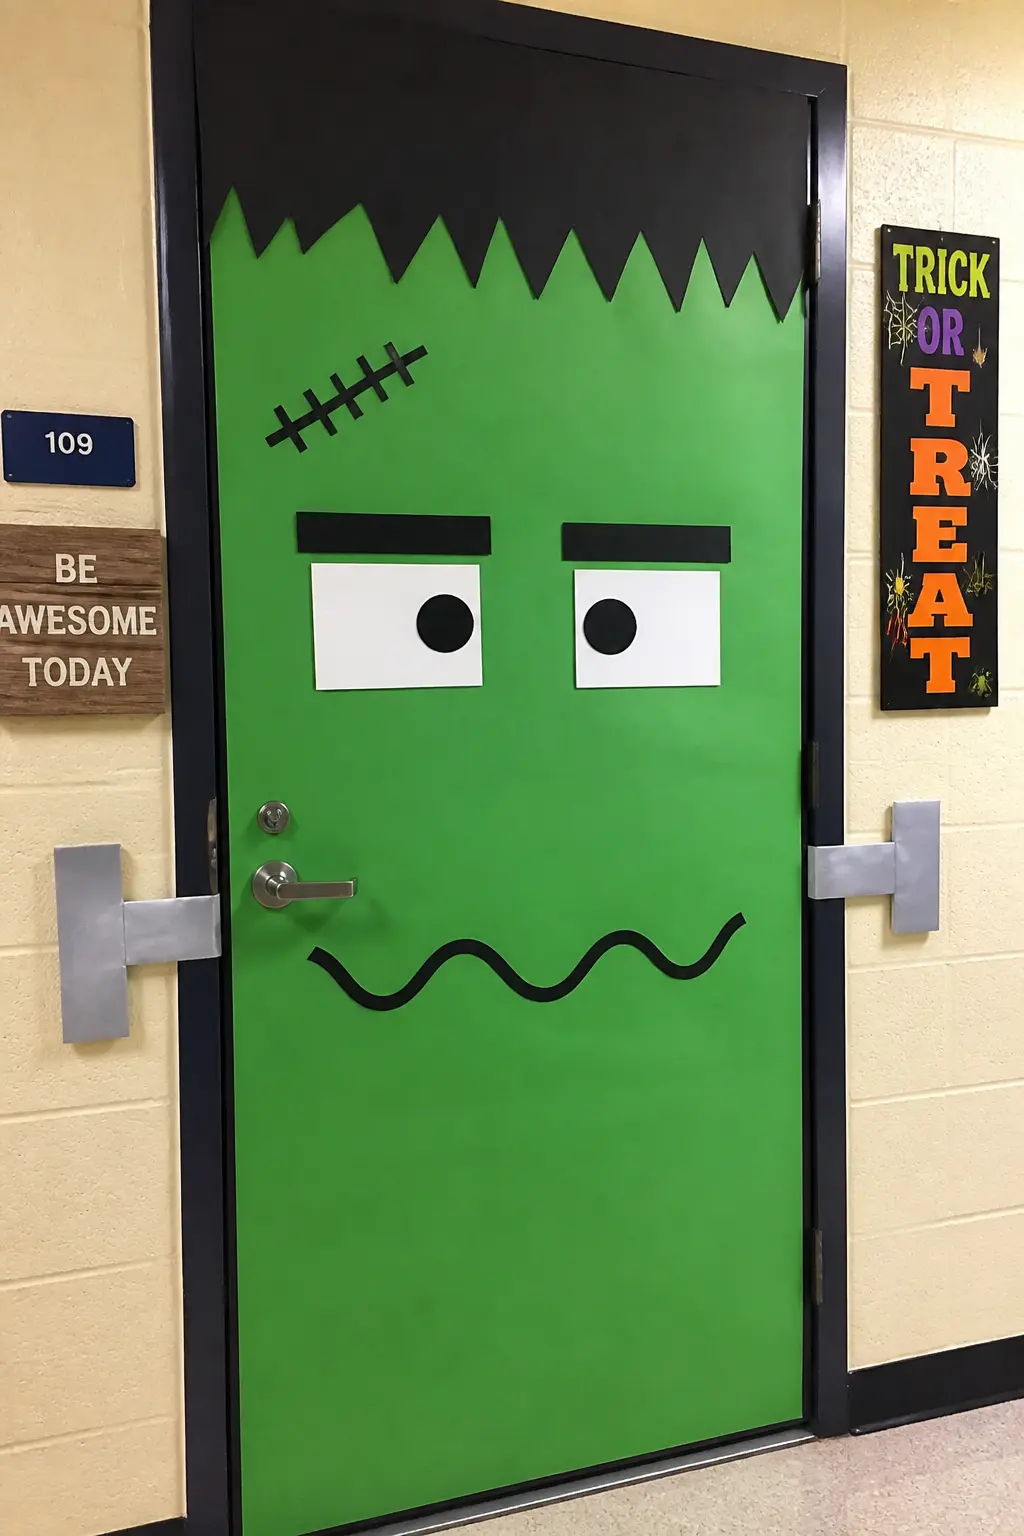
Frankenstein Face Door
Cover the door in green paper, the specific flat green of classic monster makeup. The face occupies the full panel: a wide flat-top head shape, which means cutting the green paper with a straight edge across the top rather than a rounded one, giving the familiar flat-skull silhouette.
Black paper hair covers the top quarter and droops at the sides. Two white rectangle eyes with black pupils and heavy black brow strips angled to a scowl.
A wide paper mouth with visible stitches: cut a straight line across the paper and mark stitch marks with black marker. Bolts at the frame edges just below the mid-point of the door, cut from gray or silver paper. The whole door is the face.
🛍 Shopping guide
Spooky Architecture: Facades and Structures
Haunted houses, castles, clock towers and cauldrons all have something in common: they give you a grid to work from. Lay out the major horizontal bands first, then add the detail layers on top. Even a shaky hand looks confident when the architecture is symmetrical.
These doors read well from the end of a hallway, which matters in a contest. Bold shapes and high contrast between black and one accent color carry the distance.
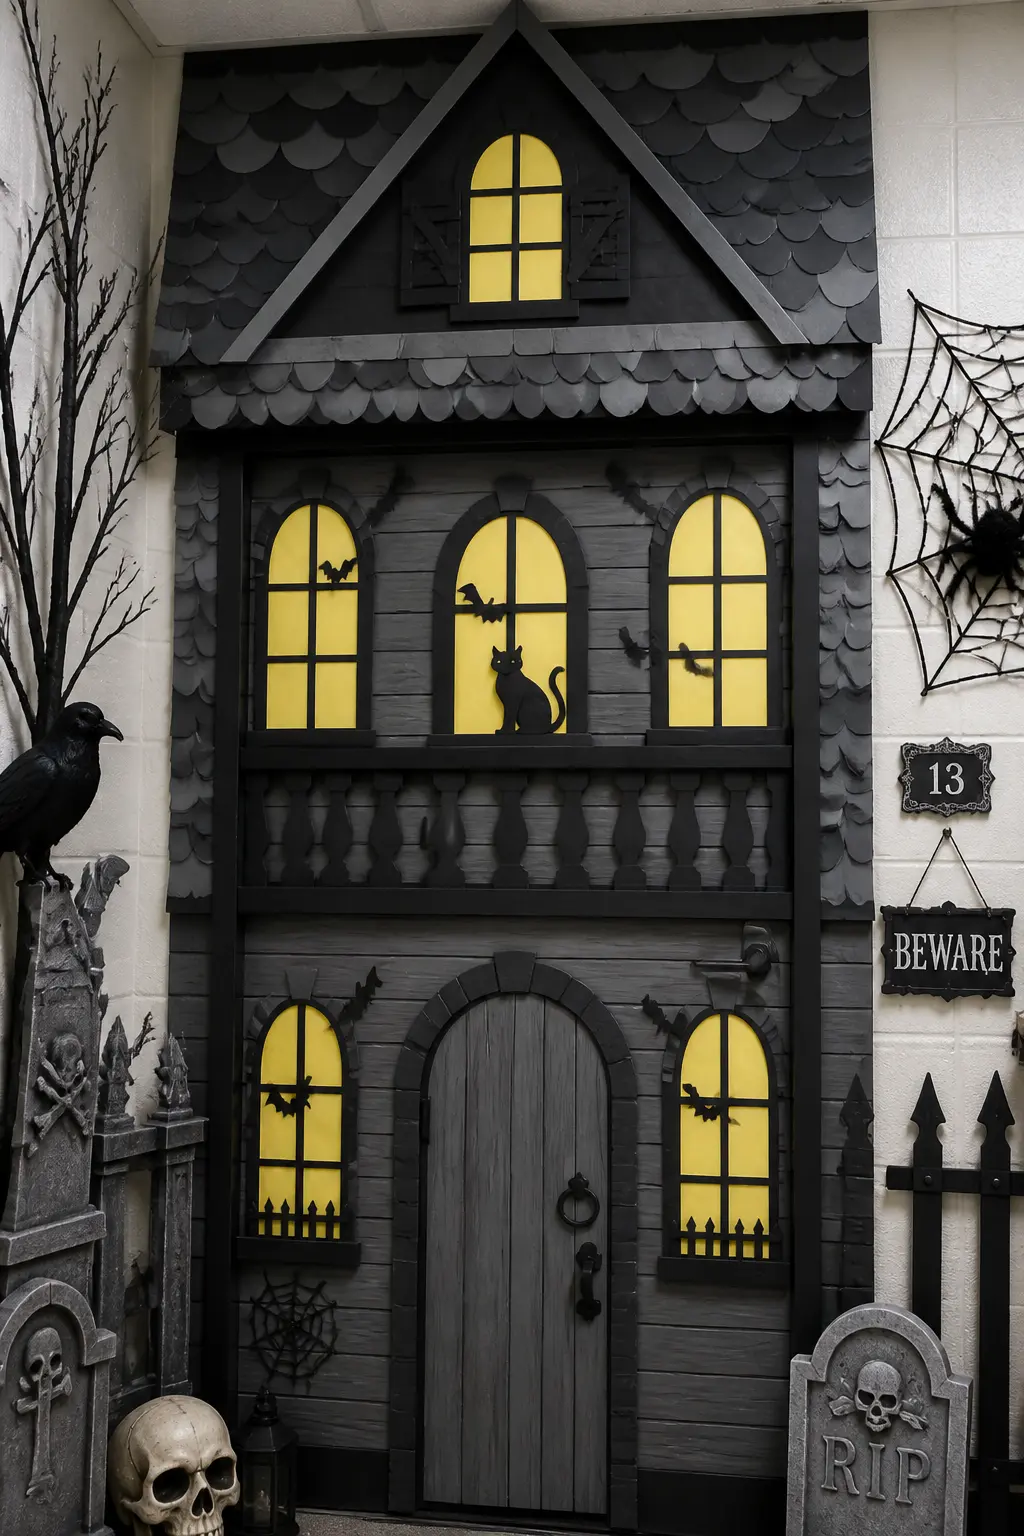
Haunted House Facade
Divide the door into three horizontal zones: a roofline above the door frame cut from black paper with a jagged peak in the center, a middle zone of siding (gray paper strips running horizontally), and a ground-floor zone with a paper front door smaller than the actual door centered on the lower panel.
Paper windows with X-pane mullions go in the middle zone, one on each side of center. Cut yellow or orange paper to glow behind the window frames. A small paper bat or two silhouette above the peak. Keep everything symmetrical and the door reads as a complete house from twenty feet away.
🛍 Shopping guide
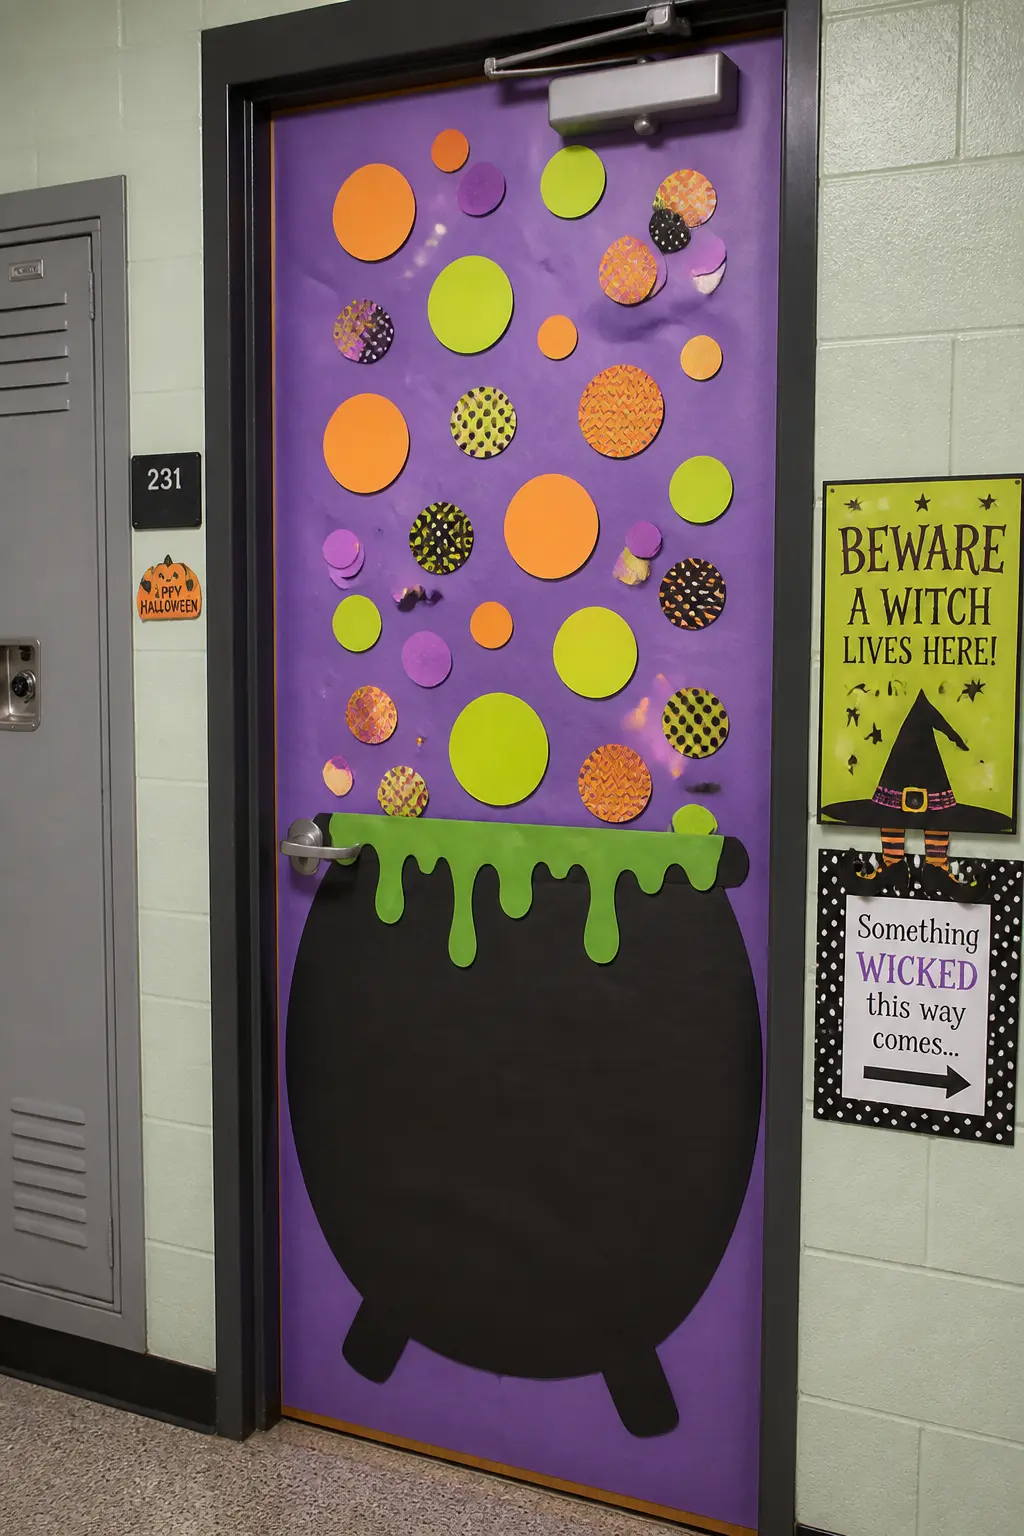
Witch’s Cauldron Door
In the lower half of the door, build a large black cauldron: a wide oval base tapering slightly at the bottom, with a rim strip across the top and two small handle arcs on the sides. Green paper fills the cauldron opening at the rim, textured by crumpling and uncrumpling the sheet before cutting.
Paper bubbles rise from the cauldron mouth up the full height of the door: circles in green, teal, and purple, getting smaller and more scattered as they reach the top. Some bubbles overlap. The top third of the door is dark sky with a few small paper stars. The handle sits right below the cauldron rim, which looks intentional.
🛍 Shopping guide
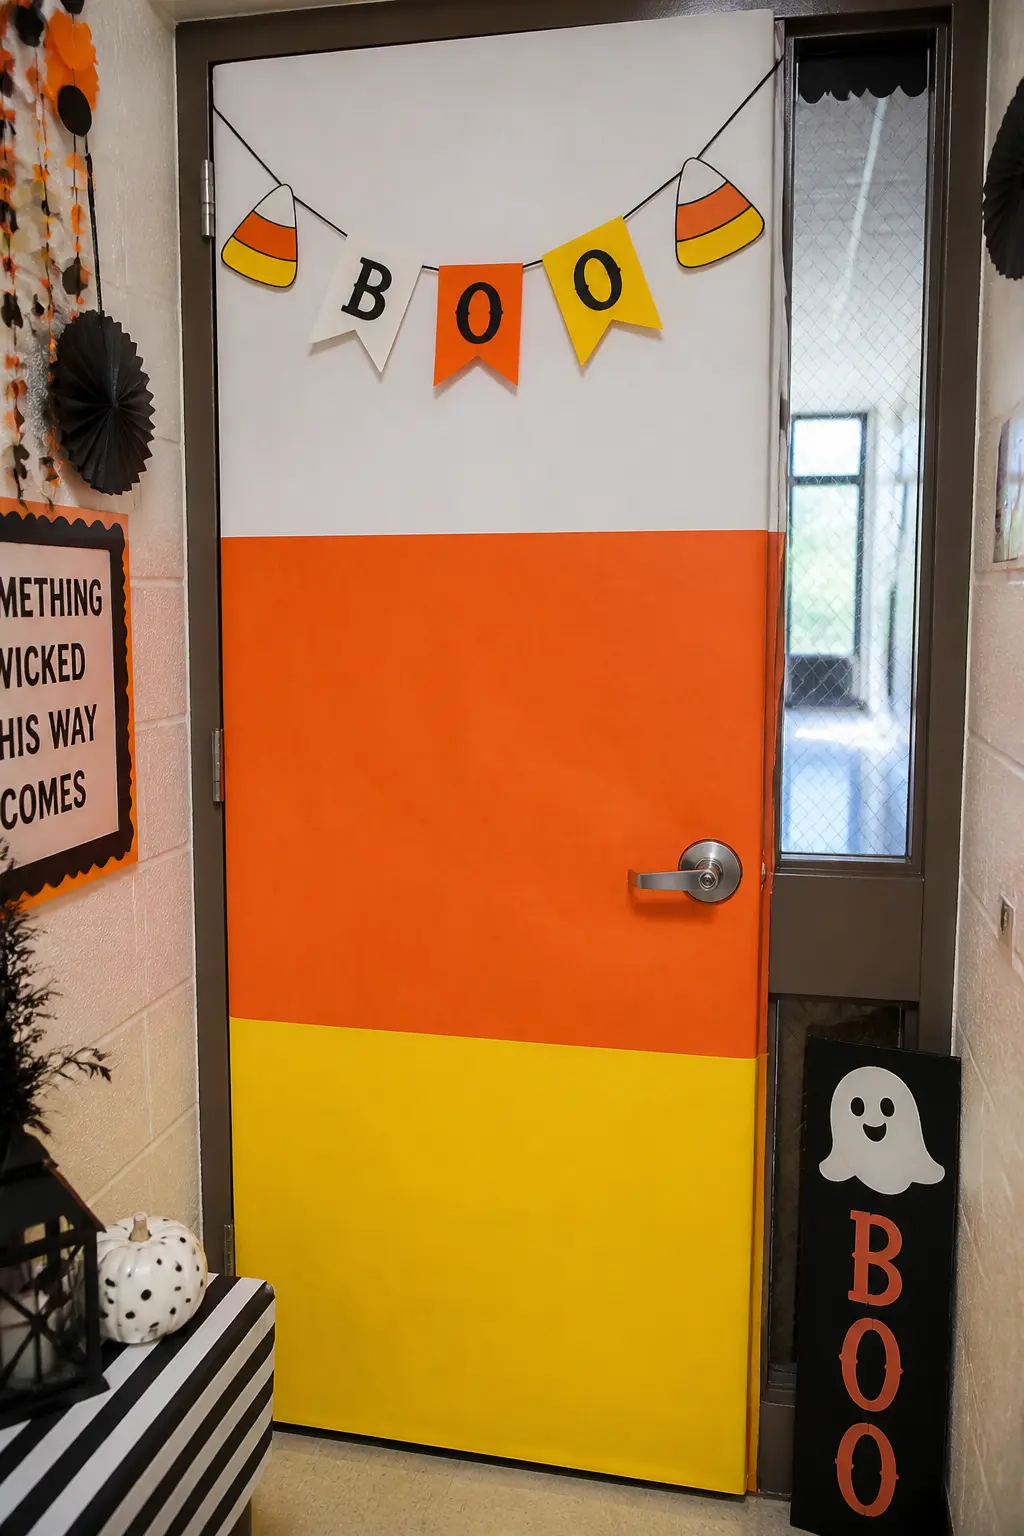
Candy Corn Stripes Door
Run three full-height vertical panels of paper down the door from top to bottom: white on one side, orange in the center, and yellow on the other.
The proportions of candy corn are roughly one-fifth white at the tip, three-fifths orange in the middle, and one-fifth yellow at the base, so if the door is standard height the white panel is the narrowest.
Horizontal bands rather than vertical stripes also work if you prefer: white at the top quarter, orange in the middle half, yellow at the bottom quarter. Either way the entire door reads as one giant candy corn from the hallway, which is the joke.
A small paper banner at the top reading “Sweet Class” or the room number completes it without overcomplicating.
🛍 Shopping guide
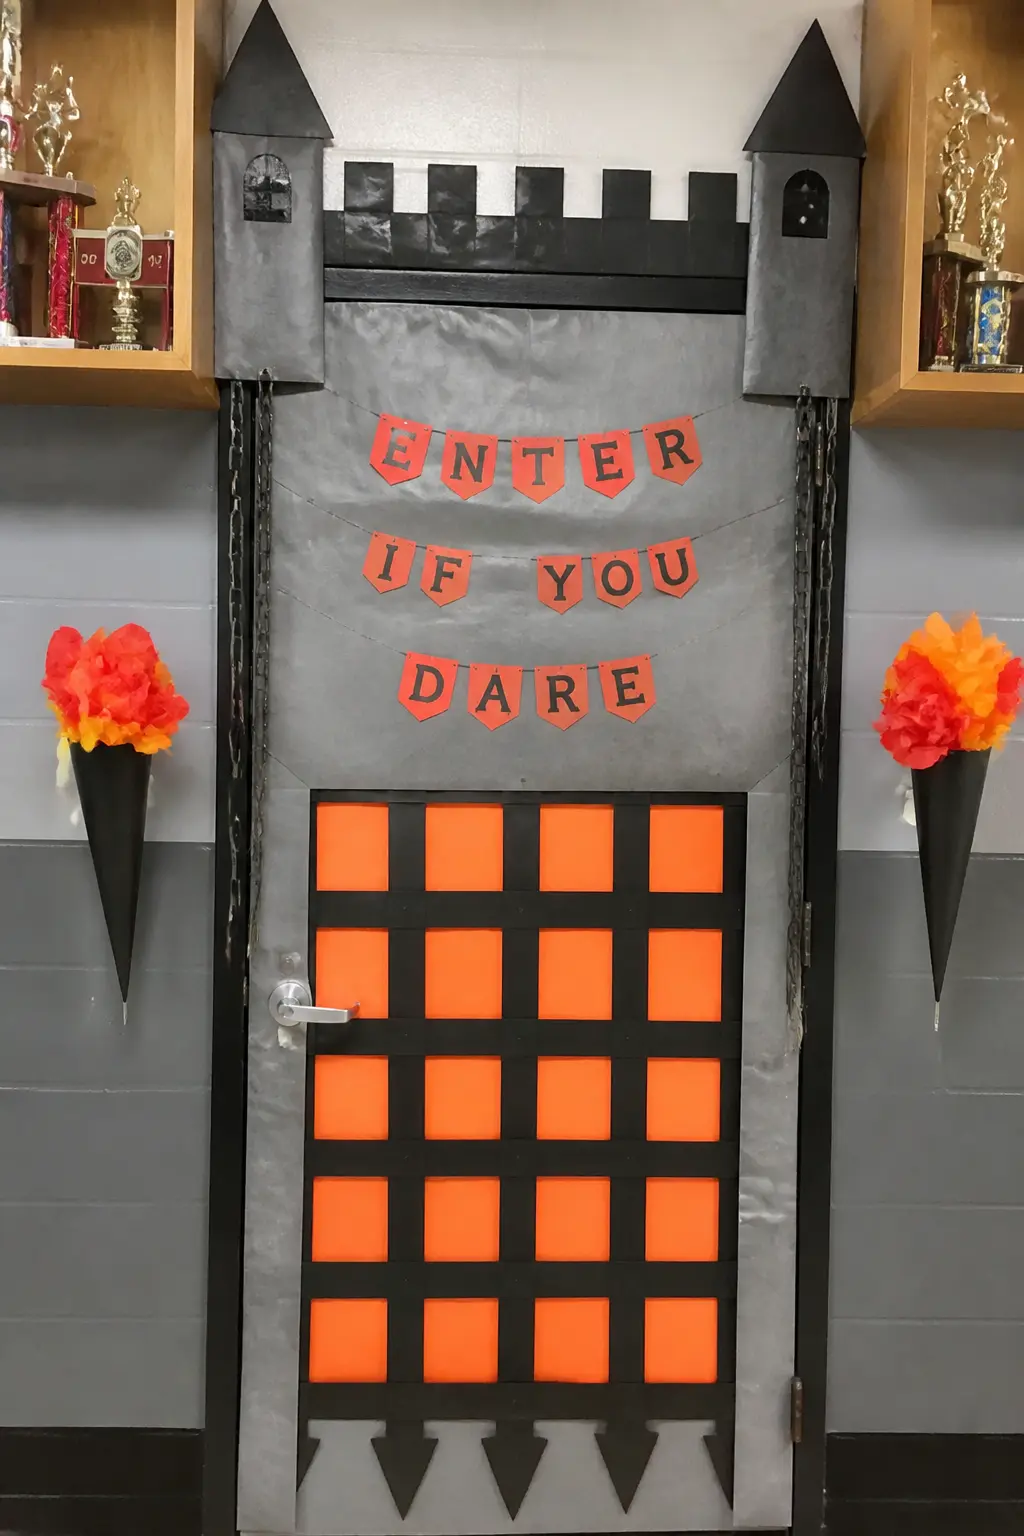
Spooky Castle Facade Door
Build a castle front on the door with gray paper panels for the stone wall and black paper battlements cut in a crenellated strip along the very top, extending above the frame. Two tower turrets rise above the frame at each corner, narrow and taller than the battlements.
A paper portcullis, the metal grid gate of a castle entrance, fills the lower half of the door: black vertical and horizontal strips crossing in a grid with pointed bottoms on the vertical bars.
Behind the portcullis, orange or red paper glows as if firelight burns inside. Paper window slits appear in the tower turrets. The whole door reads as a castle wall you are standing before.
🛍 Shopping guide
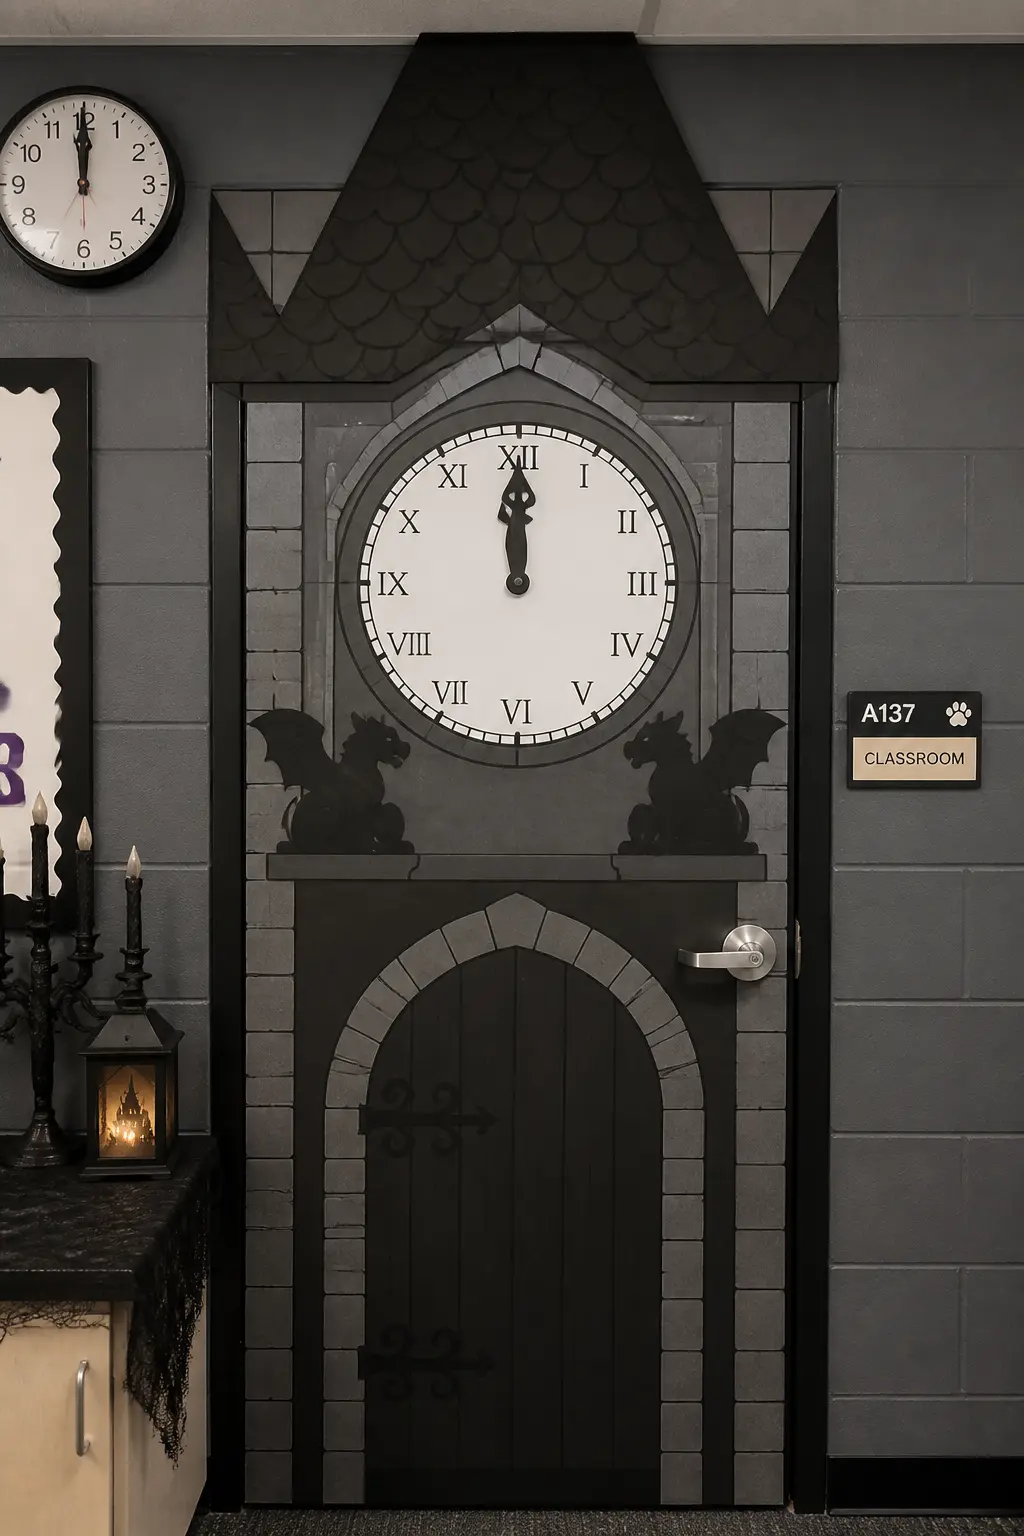
Paper Clock Tower at Midnight Door
A clock tower facade covers the door: a stone-look base in gray paper, a tower body narrowing slightly as it rises, and a clock face in the upper third with hands pointing to midnight.
Above the clock, a peaked tower cap extends above the door frame. The clock face is white paper with a black ring border and black hands cut as slim triangles pointing straight up and straight up: twelve o’clock exactly.
Roman numerals around the clock face in black marker. Gargoyle silhouettes, two of them, sit on the clock tower ledge just below the frame on each side, cut from black paper. The background behind the tower is dark sky.
Bats, three or four small ones, circle the tower top in the upper corners. The whole door reads as the moment before something happens.
🛍 Shopping guide
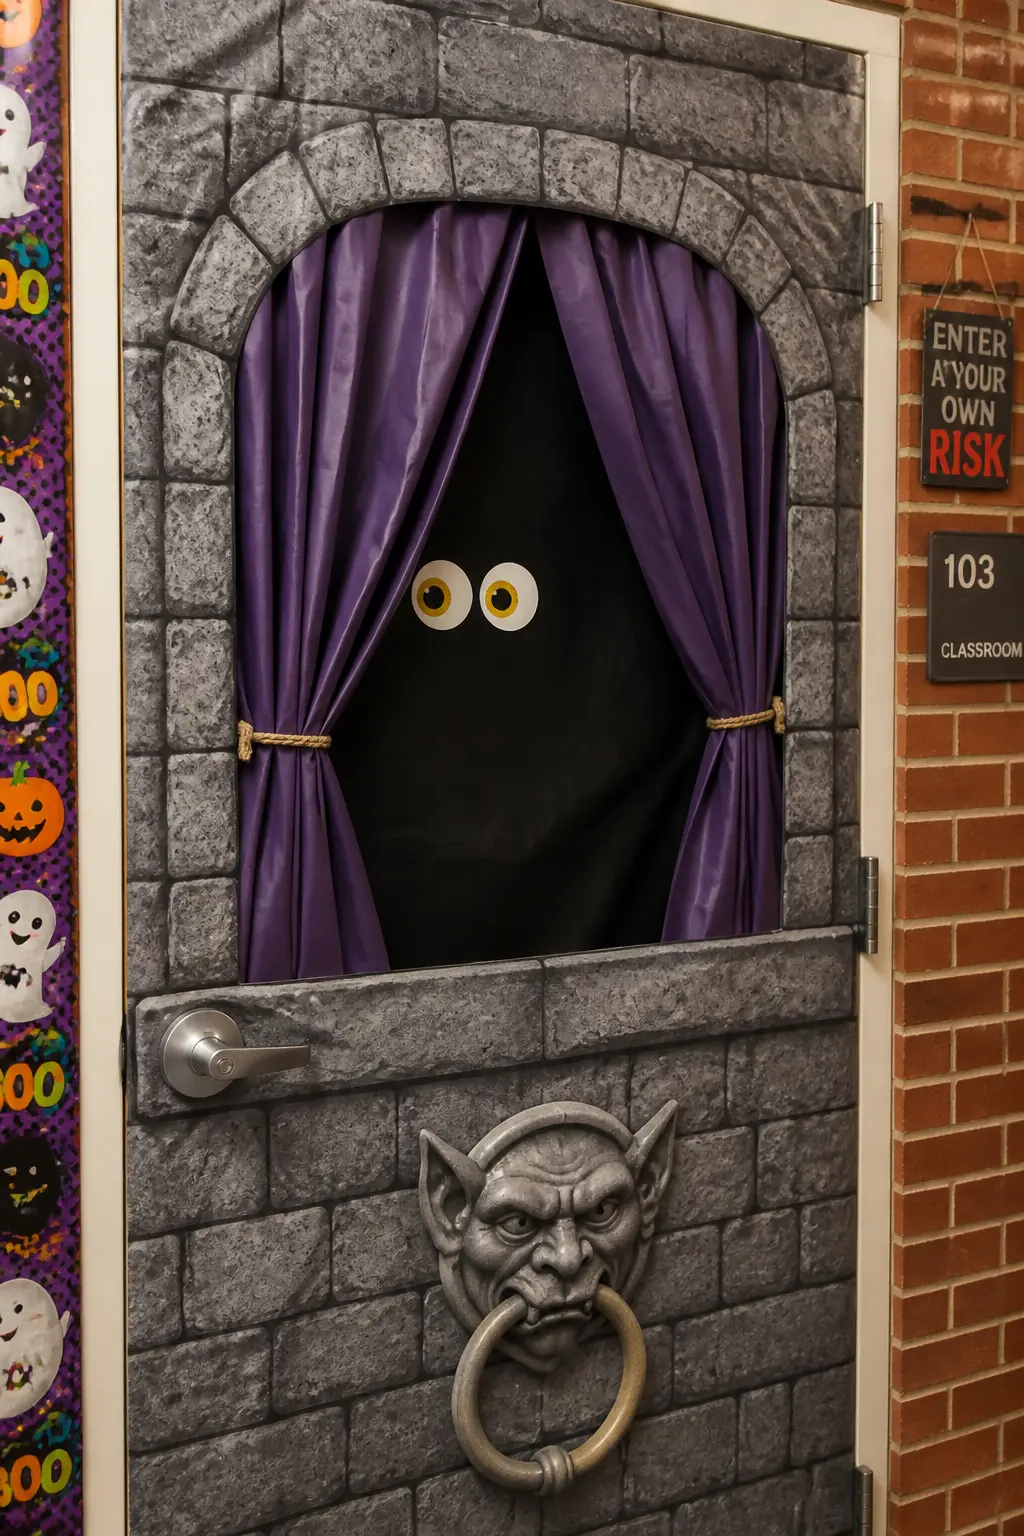
Paper Window With Curtains and Face Door
The door becomes a window in a stone or brick wall. Build the window frame from brown or gray paper, with the frame taking up most of the door panel. Inside the frame, a dark paper background suggesting the room within.
Paper curtains hang on each side of the window: heavy fabric suggested by vertical folds cut into the curtain shape and slight shading with marker along the folds.
Peering from behind one curtain, or from the center of the window, a paper face: just eyes and perhaps a nose, partially obscured. Keep the face ambiguous, not gory: it is the suggestion of someone watching that does the work.
The door handle sits below the window frame, making the whole door read as a building facade with a face at the window.
🛍 Shopping guide
Creature Swarms and Single Creatures
A single giant creature or a swarm of smaller ones: both strategies work because they give the eye one clear focus point. Spider webs, bat caves, and ghost silhouettes all live here. The trick is letting negative space be part of the design rather than filling every inch.
For swarms, cut the units in batches using a paper-folding shortcut: stack six sheets, draw one bat, cut through all six at once. Thirty bats in fifteen minutes, and the slight variation between cuts makes them look more alive.
Spider Web Door
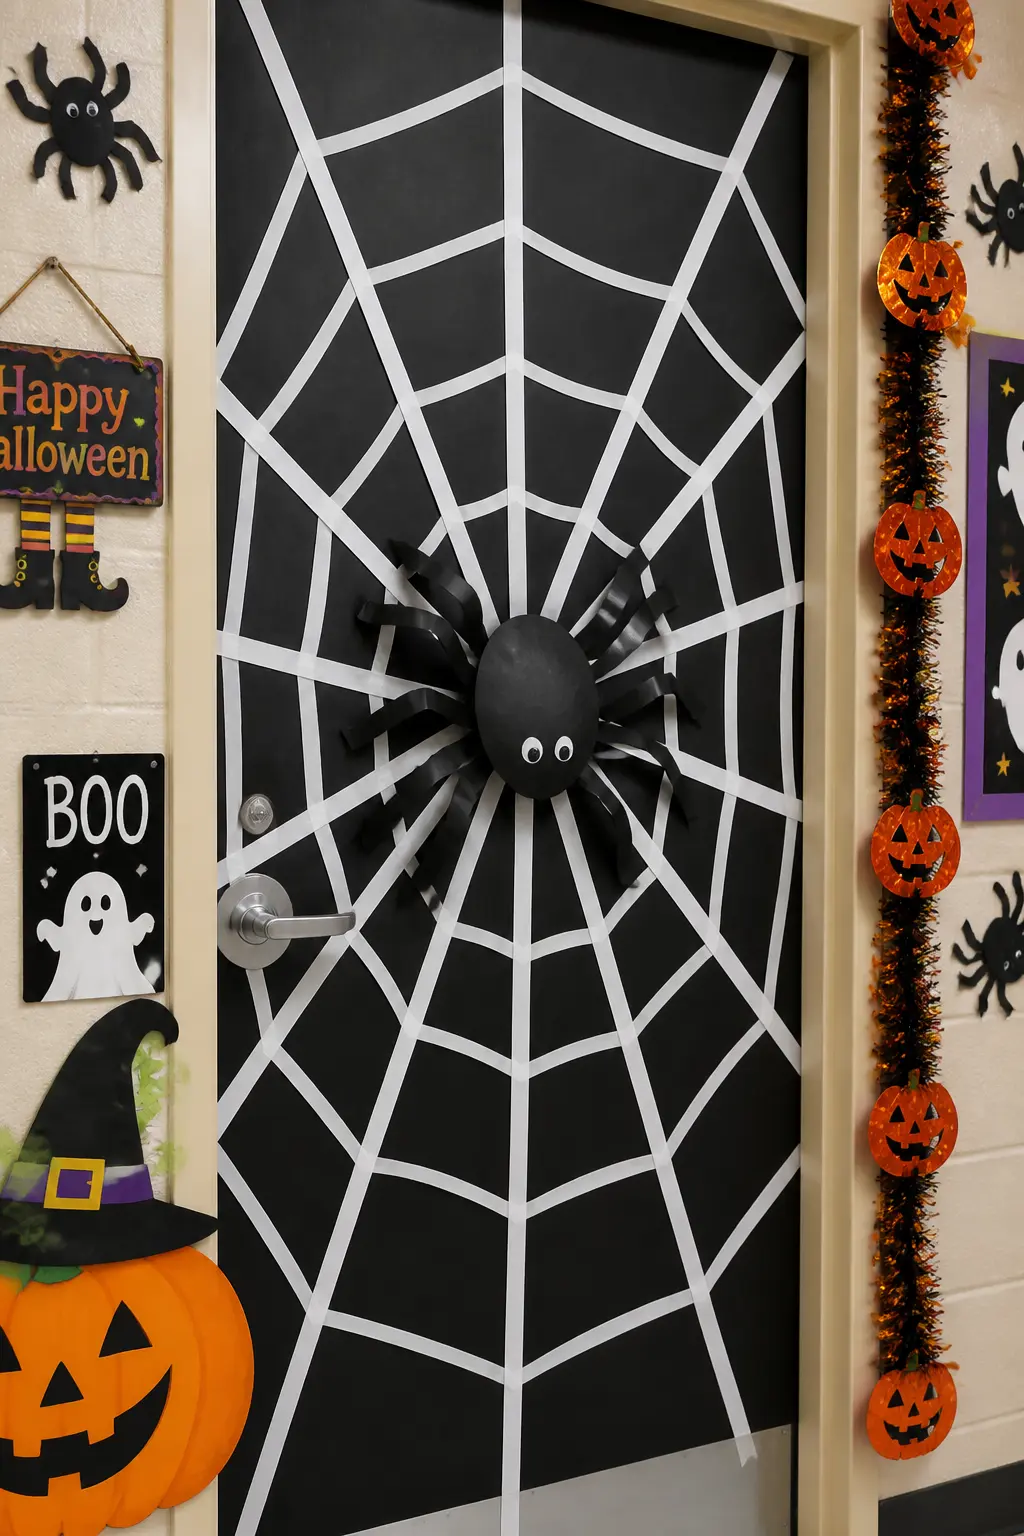
Start with a black door panel and run white paper strips from the center outward in eight directions, like spokes. Then add curved connector strips between the spokes at three or four distances from the center, each curve slight rather than perfectly circular, because real webs sag.
The spider sits dead center: a large black paper oval body, a slightly smaller oval head, and eight legs cut from thick black paper strips, curled at the tips over a pencil. Two white dot eyes.
Size it so the body spans about a quarter of the door width. The web radiates behind it and the handle sits inside the web like a caught insect.
🛍 Shopping guide
Bat Cave Door
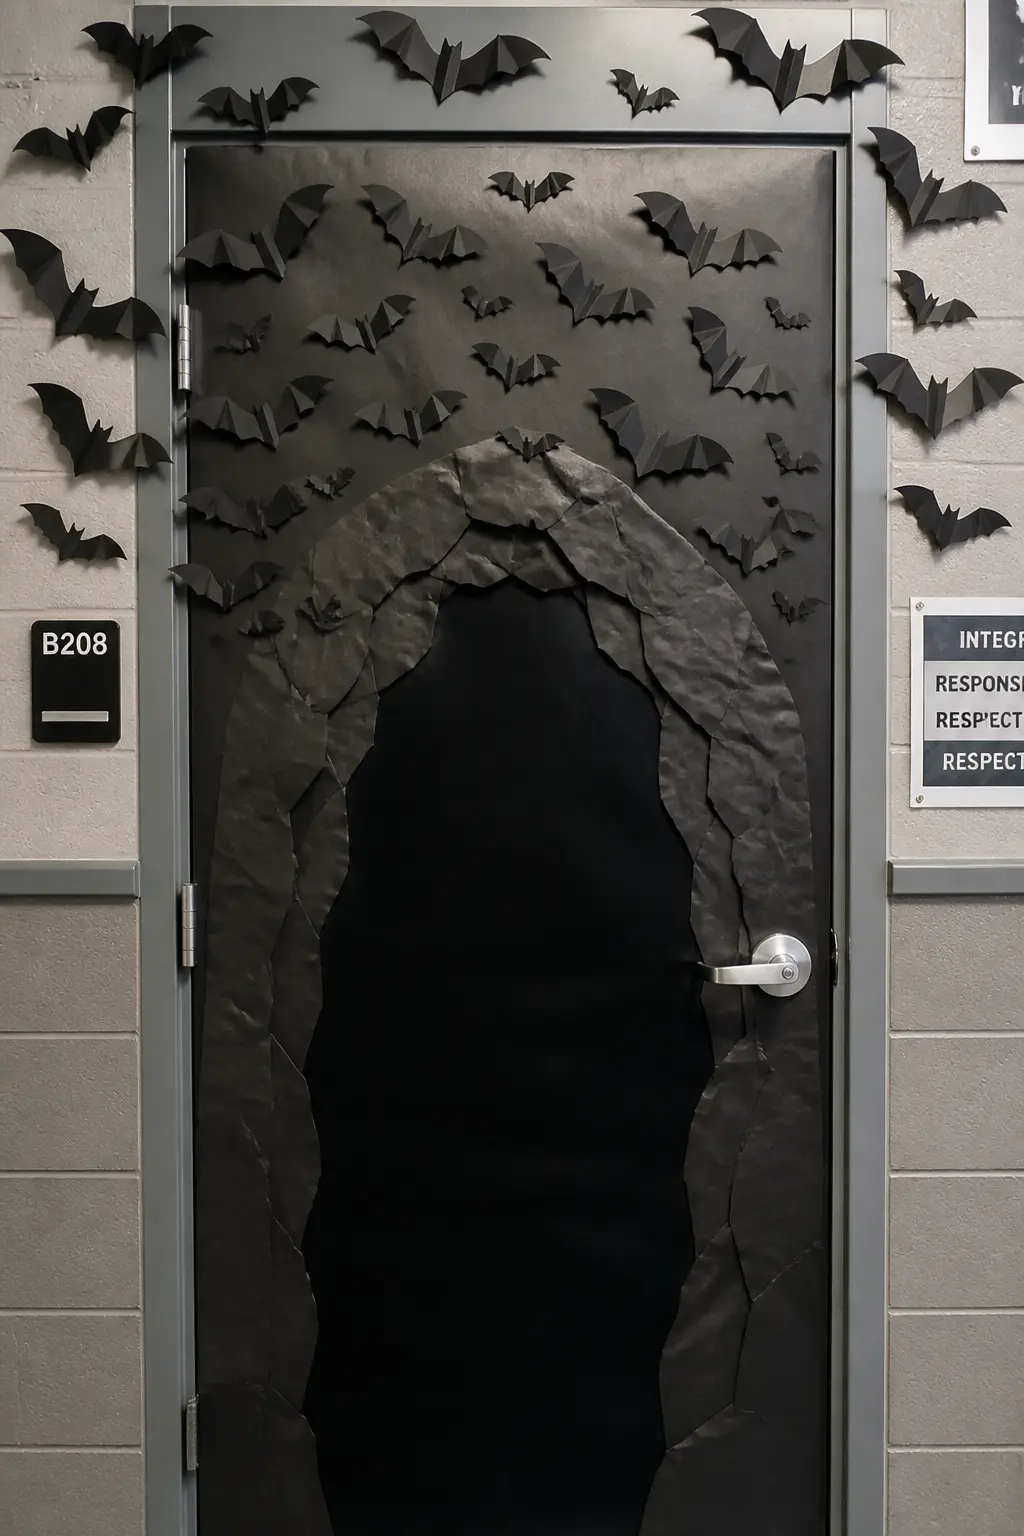
Cover the door in dark gray or charcoal paper. Cut a large cave mouth arch from black paper and position it in the lower two-thirds of the door: the arch top curves up to mid-door, and the sides run to the door edges. The inside of the cave is black paper.
Paper bats swarm from the top of the arch upward: densest near the cave mouth, spreading and thinning toward the top of the door and onto the frame.
Fold black paper rectangles in half and cut a bat wing silhouette through both layers to produce symmetrical wings fast. Vary the sizes. A couple of bats angle onto the side of the frame for depth.
🛍 Shopping guide
Ghost Door
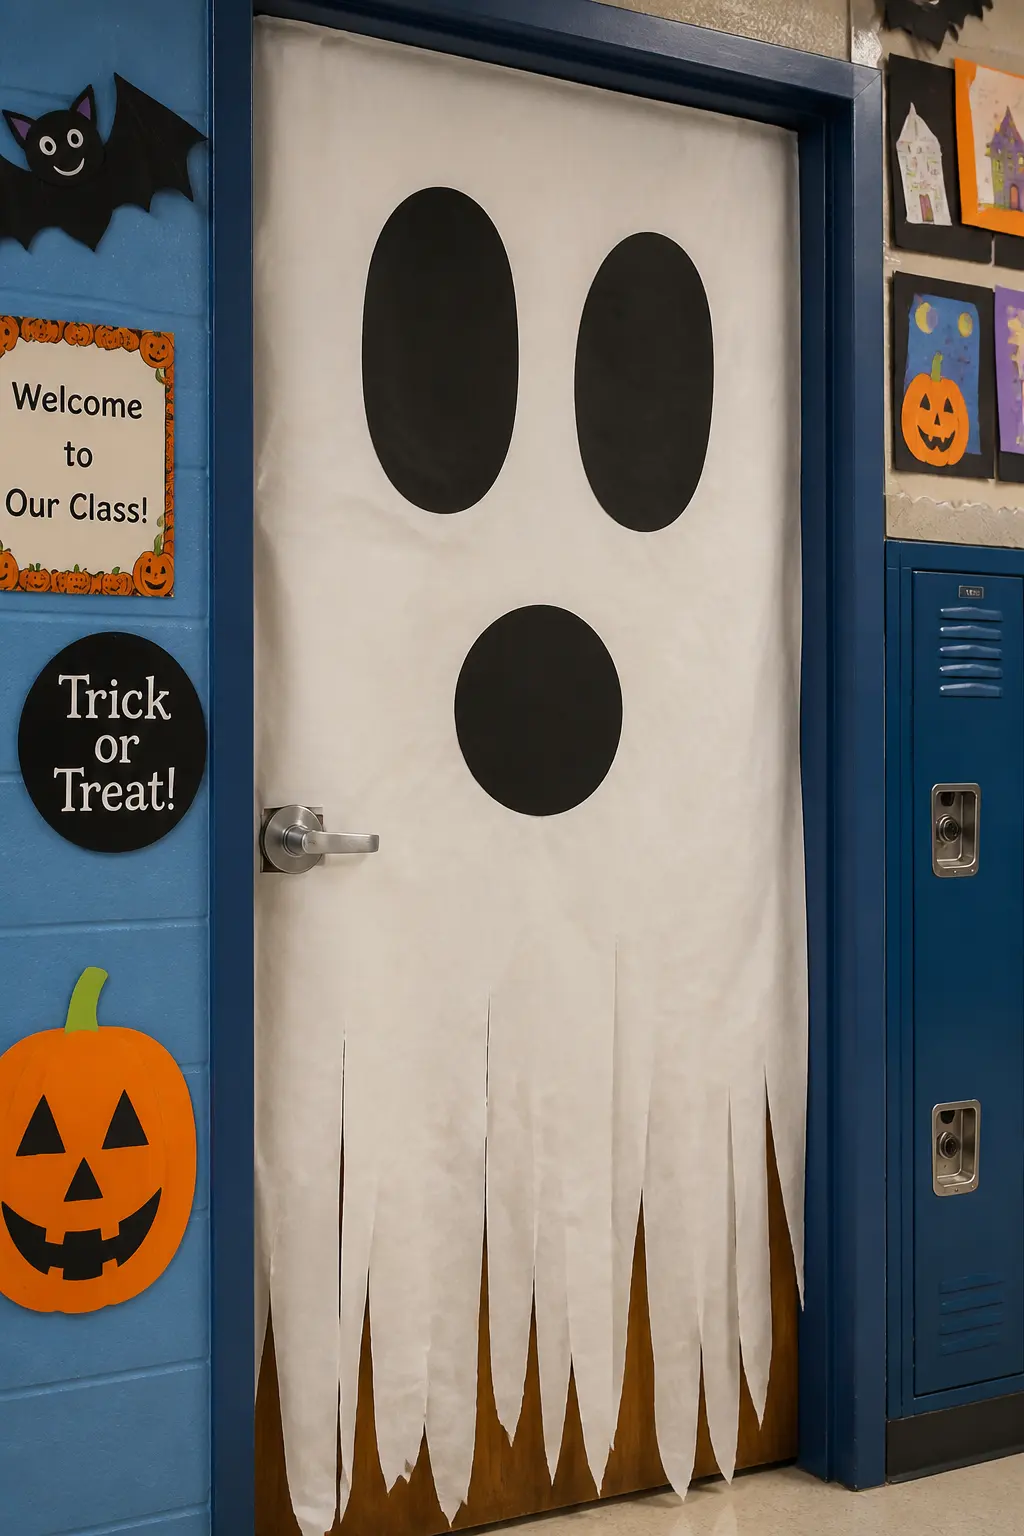
Cover the door in white paper, then cut the bottom edge of the covering into a ragged wavy fringe: irregular curves that suggest a ghost’s trailing edge. Black paper oval eyes in the upper third, a wide black paper oval mouth forming an O of surprise or a gaping cry.
The white paper extends slightly above the frame if the wall allows it, adding a few inches of ghost shape above the door. Along the bottom, the torn fringe curls slightly away from the door.
Nothing about this design is fussy, which is why it works: a ghost is already a simple form, and the door’s rectangle makes it look monumental.
🛍 Shopping guide
Giant Paper Spider Descending Door
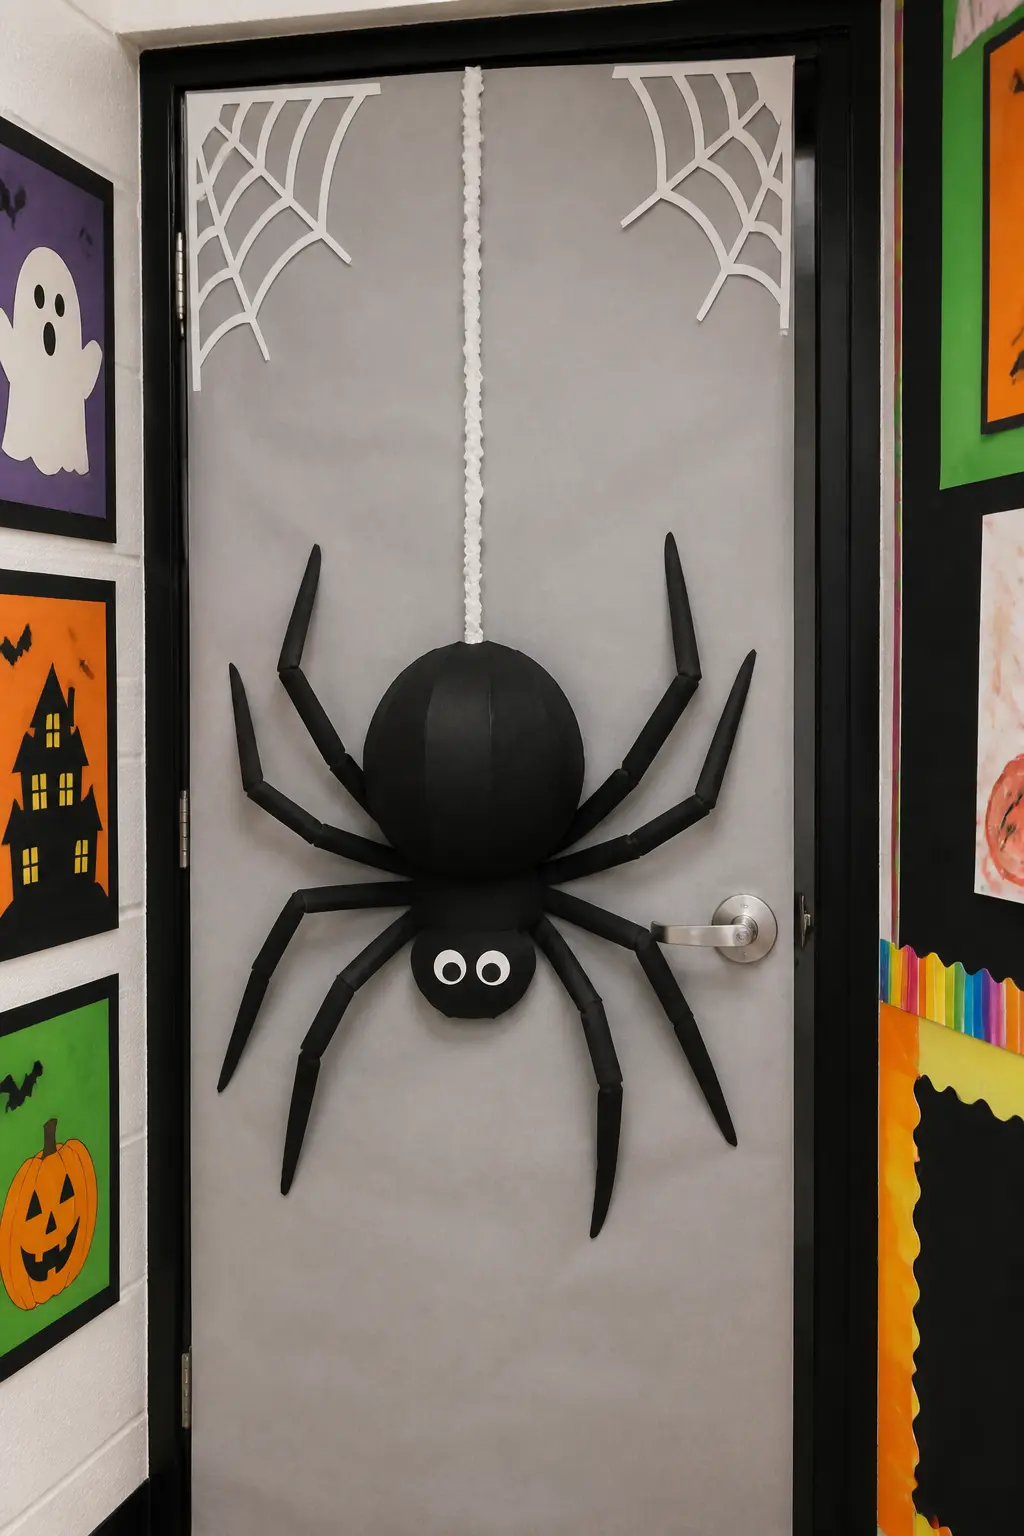
A single enormous paper spider hangs at the center of the door as if it has just lowered itself on a thread from the top.
The thread: a single strip of white paper or a length of white yarn running from the very top of the door to the spider’s body.
The spider is large, occupying a third of the door height: a black oval body, a slightly smaller oval head, and eight legs cut from thick black paper strips curled at the tips.
The door background is white or pale gray so the spider reads with maximum contrast. A few fine web threads radiate from the point where the main thread meets the top of the door, spreading into the upper corners. Nothing else: the spider’s scale is the statement.
🛍 Shopping guide
Night Sky and Nature Scenes
A midnight blue background transforms a door into a window onto another world. Moon and witch, paper forest, glowing eyes in leaves: the common thread is darkness that feels atmospheric rather than alarming, which keeps these appropriate for every grade level.
Use a deep navy or black base layer cut to fit the door panel, then build forward in layers. Closer objects get brighter paper; background shapes stay dark and slightly transparent where you can manage it with tissue paper over construction paper.
Owl in a Tree Door
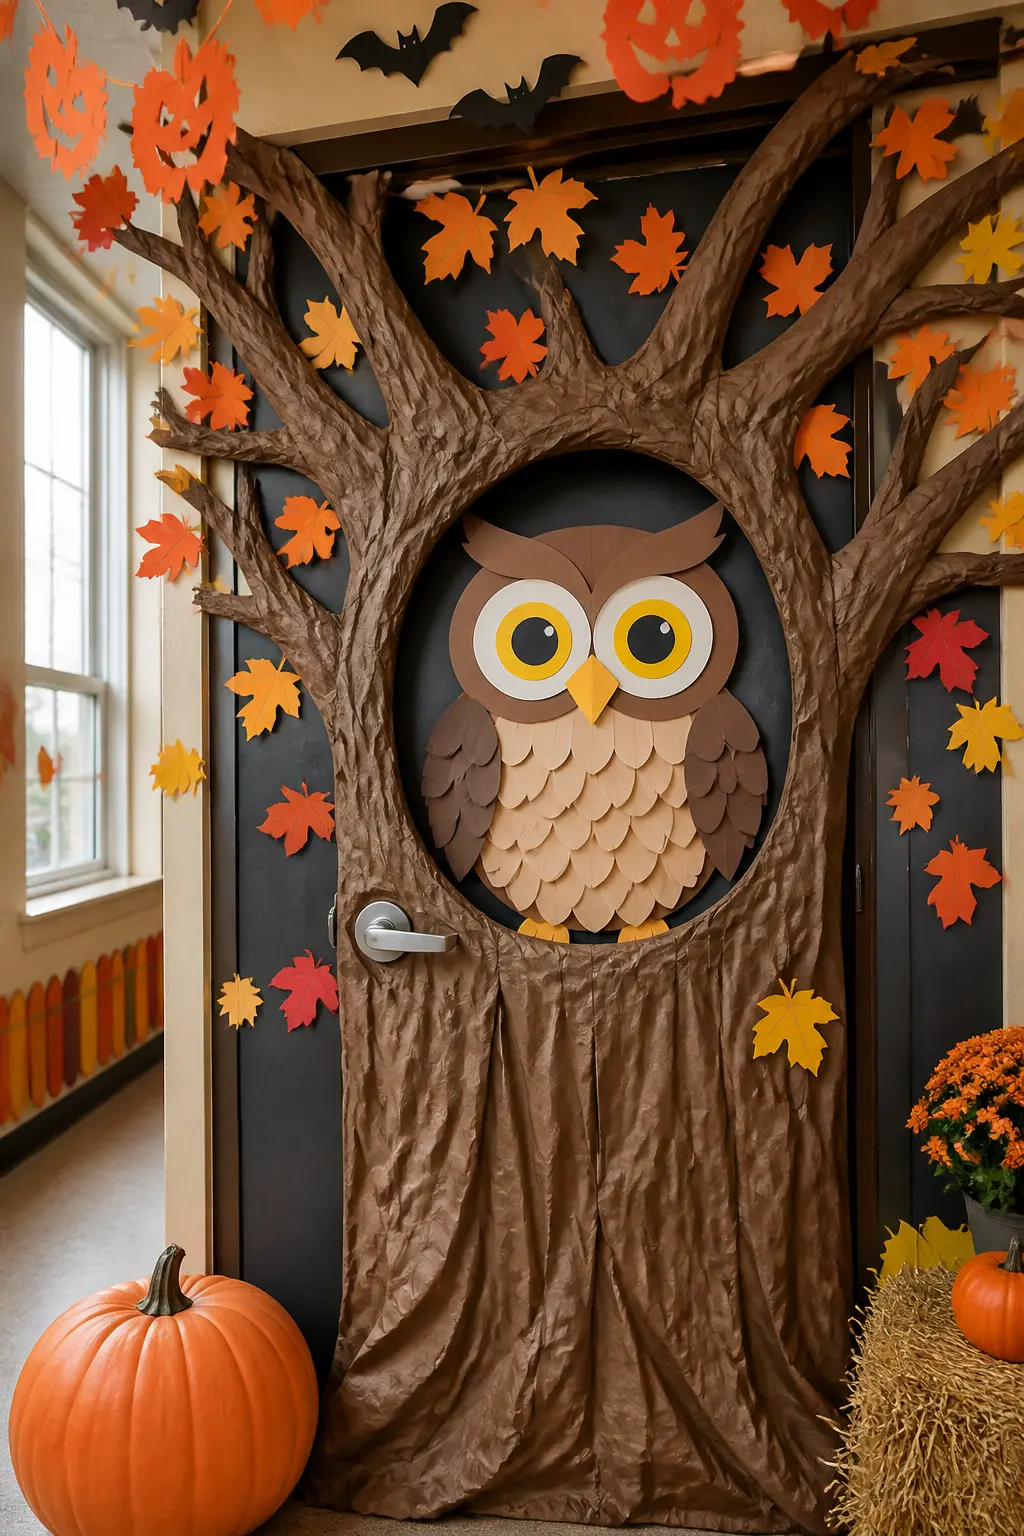
A large owl sits at the center of the door: a round paper head, two large paper eyes with concentric rings (white, yellow, black from outside in), a small beak triangle, and a body of layered paper feathers cut in overlapping U-shapes. Wings fold slightly out to the sides.
Behind the owl, a tree trunk runs the full height of the door, its branches spreading outward and curving over the frame onto the wall. Paper leaves in fall oranges, yellows, and browns fill the branches and scatter down the lower half of the door.
A few cut-paper feathers drift from the owl. The tree makes the door feel like a forest window.
🛍 Shopping guide
Paper Garden of Glowing Eyes Door
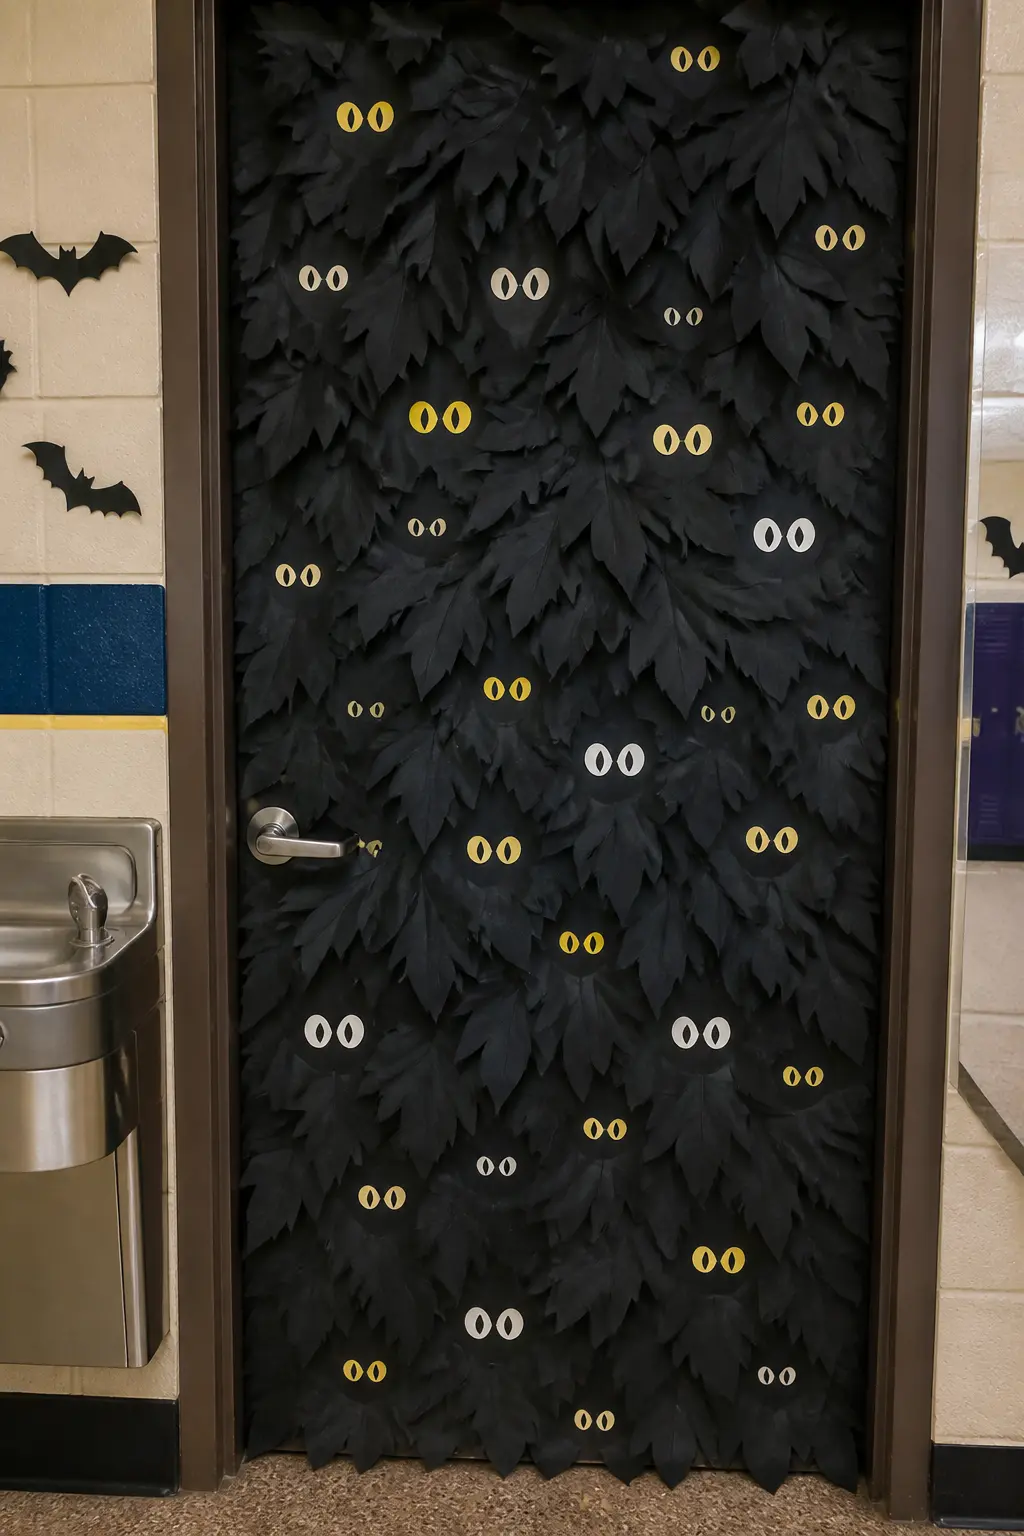
Cover the door in black paper. Cut large, simple leaf shapes from black paper and layer them across the full door, creating a dense paper foliage that has depth through overlapping. Behind and between the leaves, place pairs of eyes: two small circles or ovals cut from yellow, green, or white paper, each pair slightly different in size and spacing.
Position eyes at varying heights so some peer from low in the leaves and some from near the top. The effect is a dark garden wall hiding something watching. No faces, no bodies: just eyes. It is the restraint that makes it unsettling in a fun rather than frightening way.
🛍 Shopping guide
Paper Forest Door
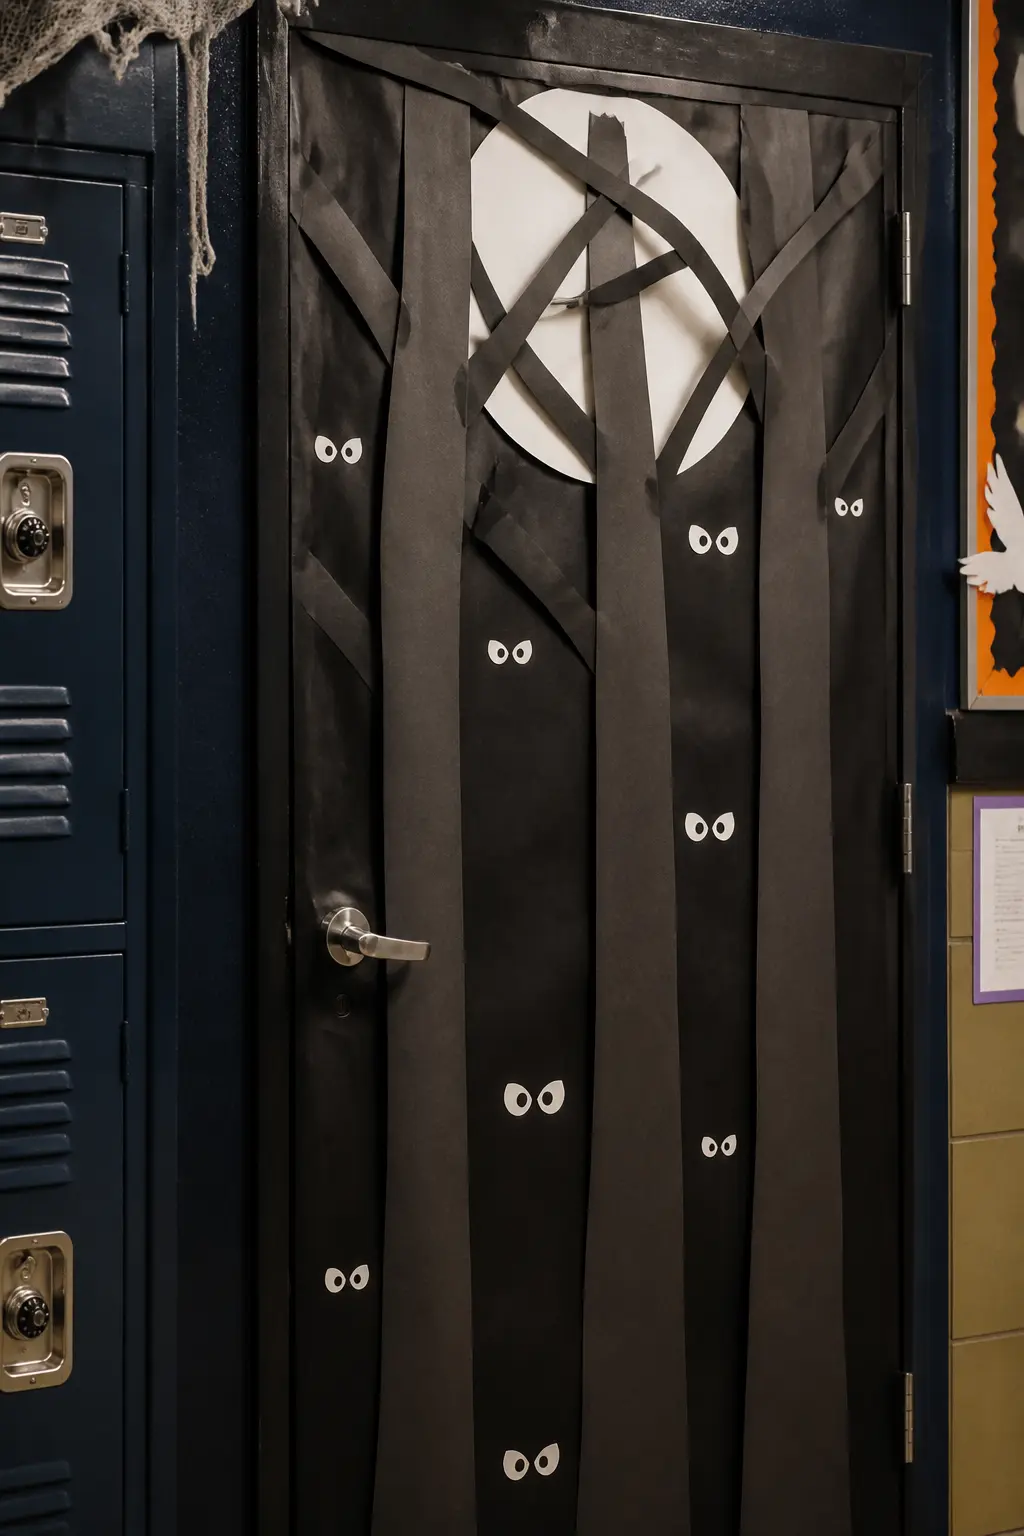
Cover the door in deep navy or black. Cut tall, narrow tree trunks from dark brown or dark gray paper and run them the full height of the door from bottom to frame, spaced at varying distances. Bare branches angle off each trunk, reaching toward each other across the upper portion of the door.
Between the trunks, at varying heights, pairs of yellow or white paper eyes gleam: tiny circles that suggest something in the dark between the trees. The moon, a large white circle, sits behind the branches in the upper third. Keep the trees simple and tall: their height is what sells the illusion of depth in a forest.
🛍 Shopping guide
Paper Moon With Witch Silhouette Door
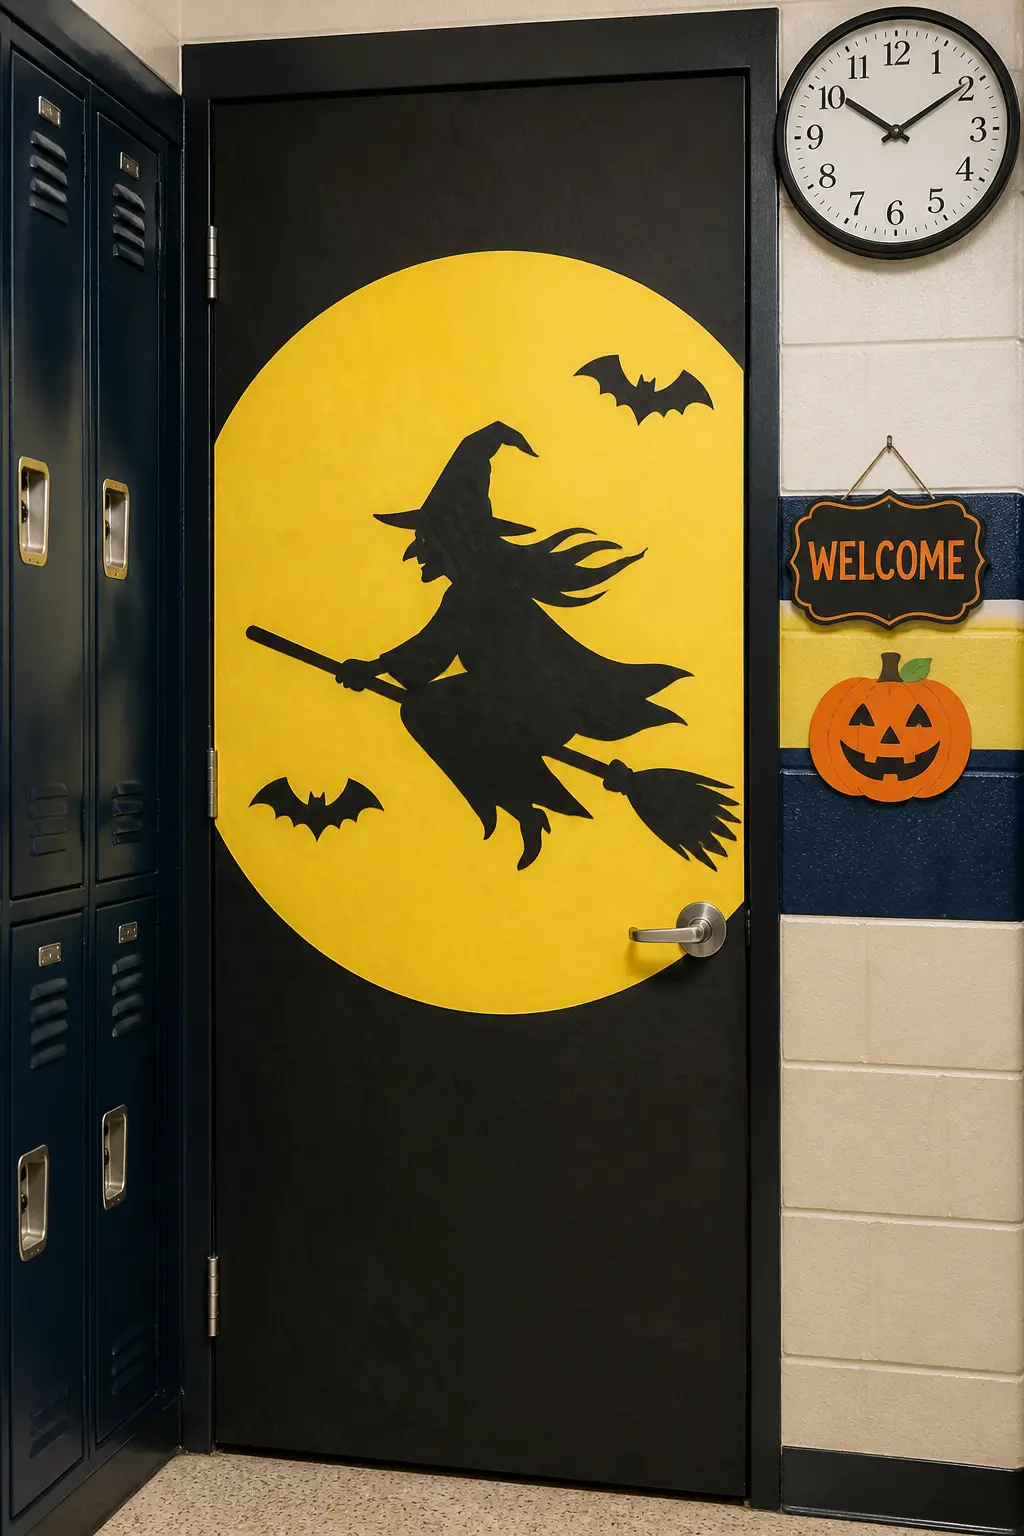
A full moon occupies most of the door: a large yellow or cream paper circle centered on a black paper background. The moon circle should be close in size to the door width so its edges nearly reach the sides of the panel, making it feel enormous rather than decorative.
Across the face of the moon, a witch silhouette flies: cut from black paper, broom extended, hat pointed, robes trailing. One or two black paper bat silhouettes fly near the witch. The frame and background stay black. The moon glow is the only light in the scene. Simple, graphic, and completely readable in three seconds from across a hallway.
🛍 Shopping guide
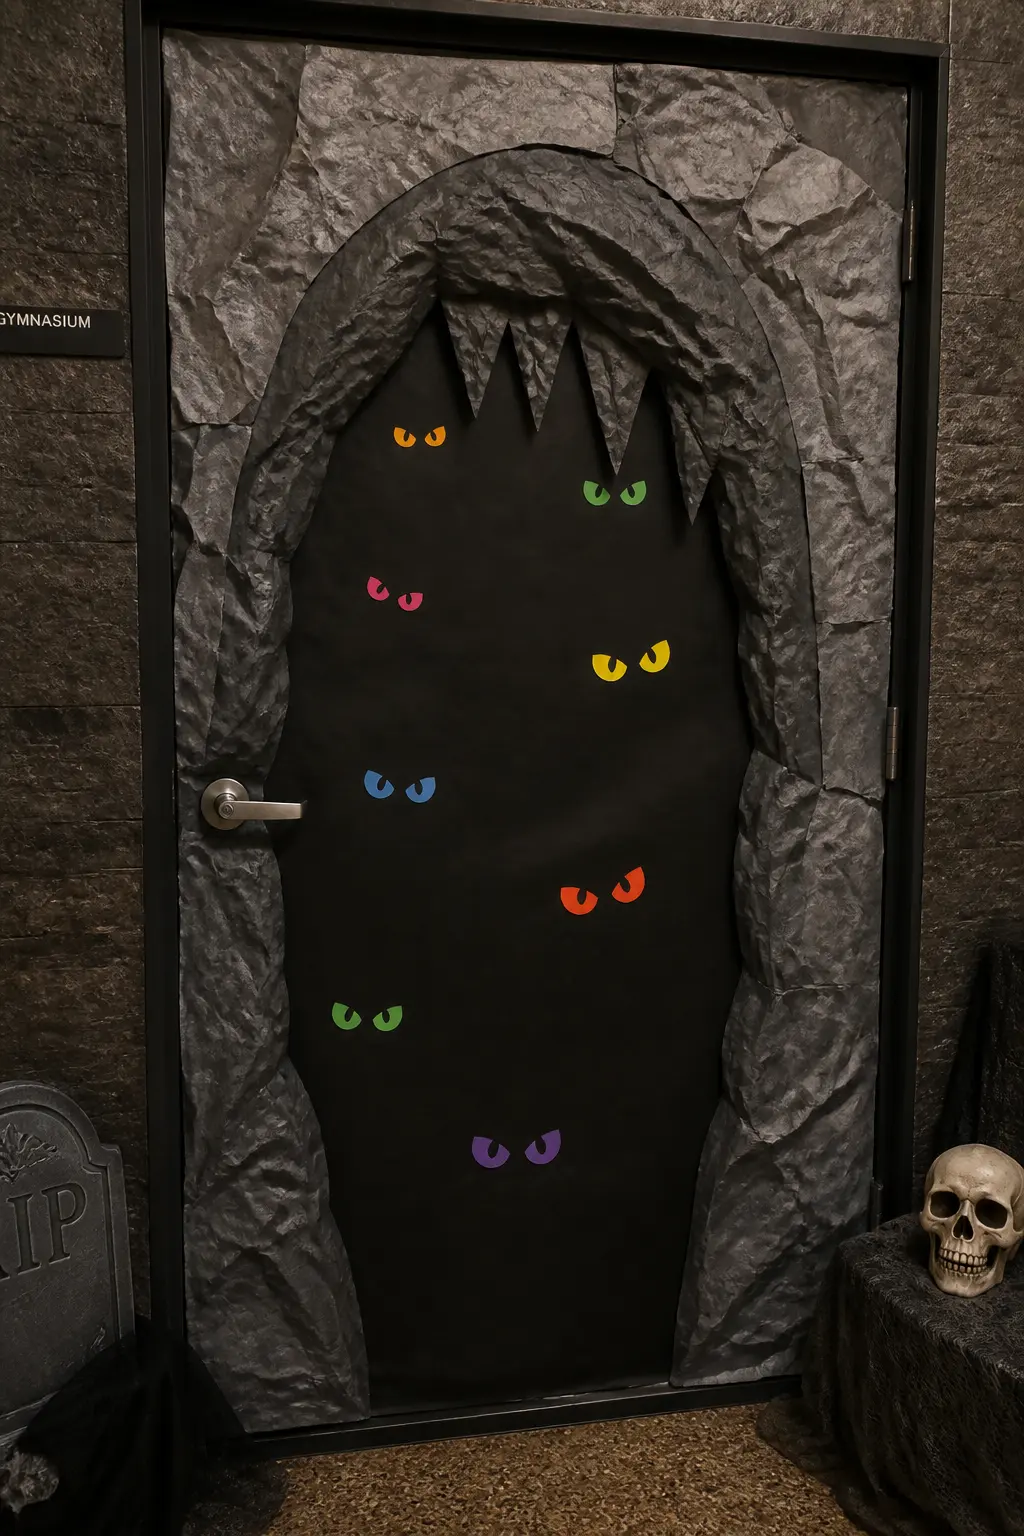
Paper Cave Mouth Door
The door becomes a cave entrance. Cover the panel in dark gray or brown paper and cut a large cave mouth arch from black paper, its top edge ragged and rocky. The arch fills most of the door panel, leaving a rocky border all around it. Inside the cave mouth, pure black paper.
Within the black interior, cluster pairs of glowing eyes: various sizes, various colors, yellow, green, and amber, positioned at different heights as if a whole community of things lives just inside. The viewer is standing at the cave mouth looking in.
Stalactites in gray paper hang from the top of the arch. The door handle disappears into the darkness of the interior, which is the finishing touch.
🛍 Shopping guide
Class Community Walls
These ideas make students part of the decoration itself. A pumpkin per child, a star per name, a train carriage per student: the door becomes a roster and a celebration at the same time. Parents notice these. Judges notice these.
Keep the individual units simple so thirty of them still look cohesive. One template per student, traced and cut, with the name written in one consistent hand or in each child’s own writing depending on the age group. Consistency in the unit makes the variety in the names feel intentional.
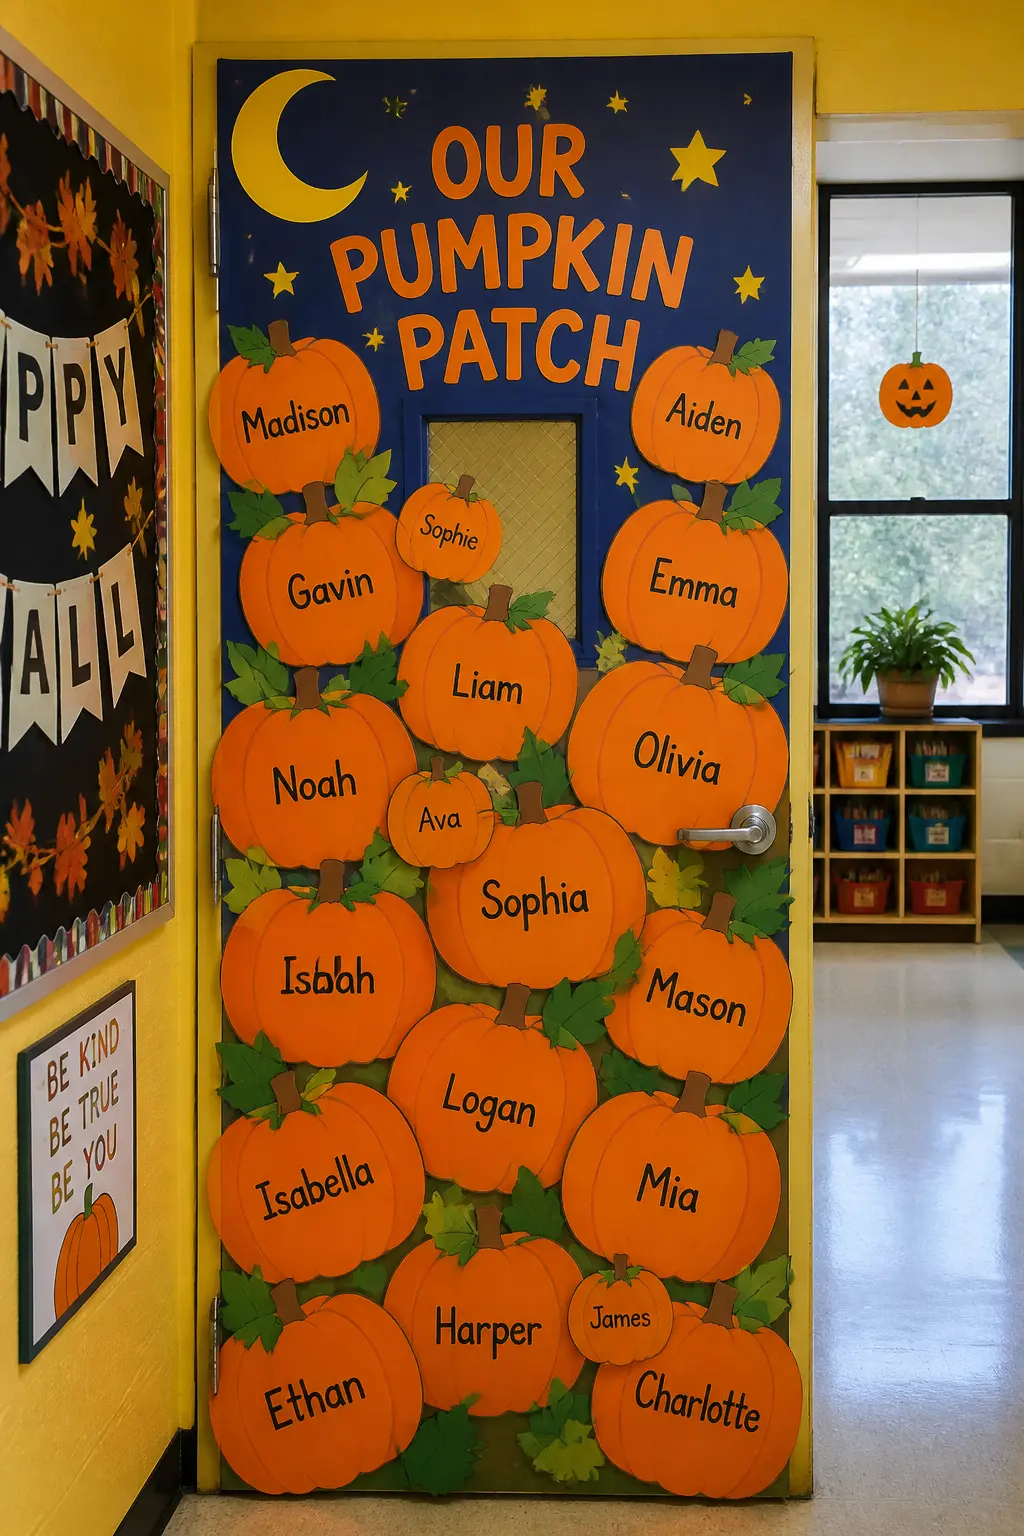
Pumpkin Patch Door
Cut one orange paper pumpkin per student from a single template: a squarish oval with two curved vertical lines scored down the front to suggest panels. Each child writes their name across the front. Green paper stems and a small curling tendril cut from a strip wound around a pencil finish each pumpkin.
Arrange the pumpkins across the door in rows, varying the sizes slightly so some students get a large pumpkin and some get a small one rather than a rigid grid. Cover the gaps with green paper vine strips and paper leaves. A paper sky in dark blue above, grass strip in green below: the door becomes a field at dusk.
🛍 Shopping guide
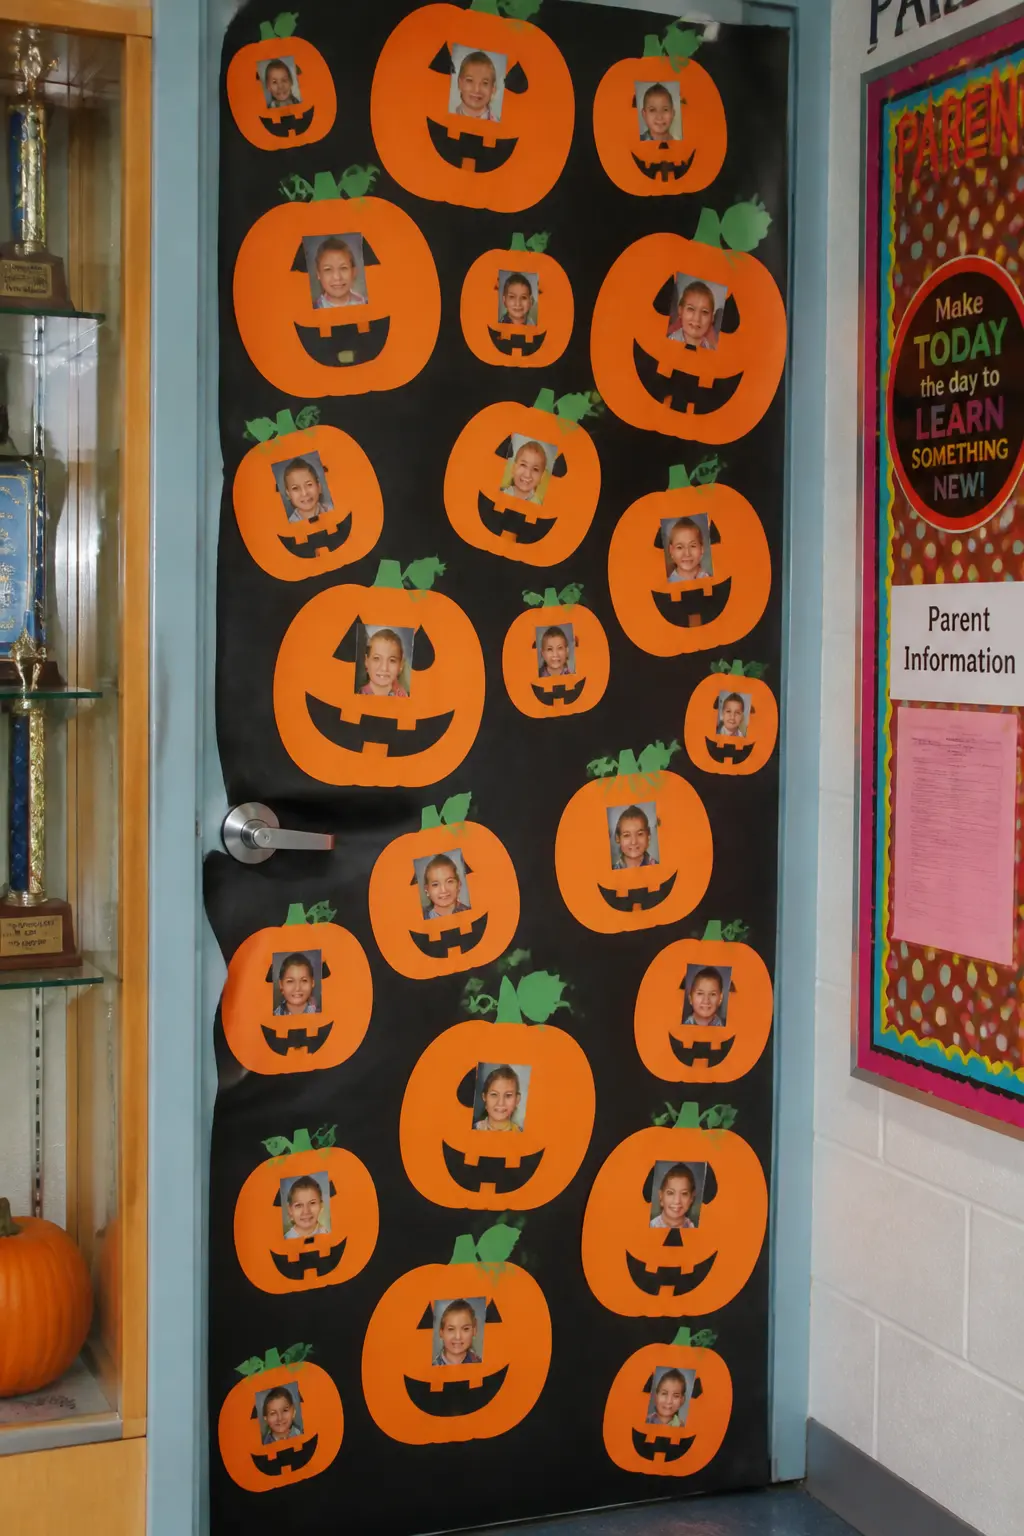
Class Photo Pumpkin Patch Door
Same construction as the pumpkin patch door above, but each pumpkin carries a small photo of the student rather than just a name. Print a 2×2 inch square photo of each child and center it on the pumpkin face, adding paper eyes, nose, and a smile cut from paper around the photo to turn the portrait into a jack-o’-lantern face.
The resulting door is a class portrait and a Halloween decoration simultaneously. It draws parents down the hallway to find their child’s pumpkin, which means the door gets looked at long and closely, which matters in a contest judged by walk-through vote.
🛍 Shopping guide
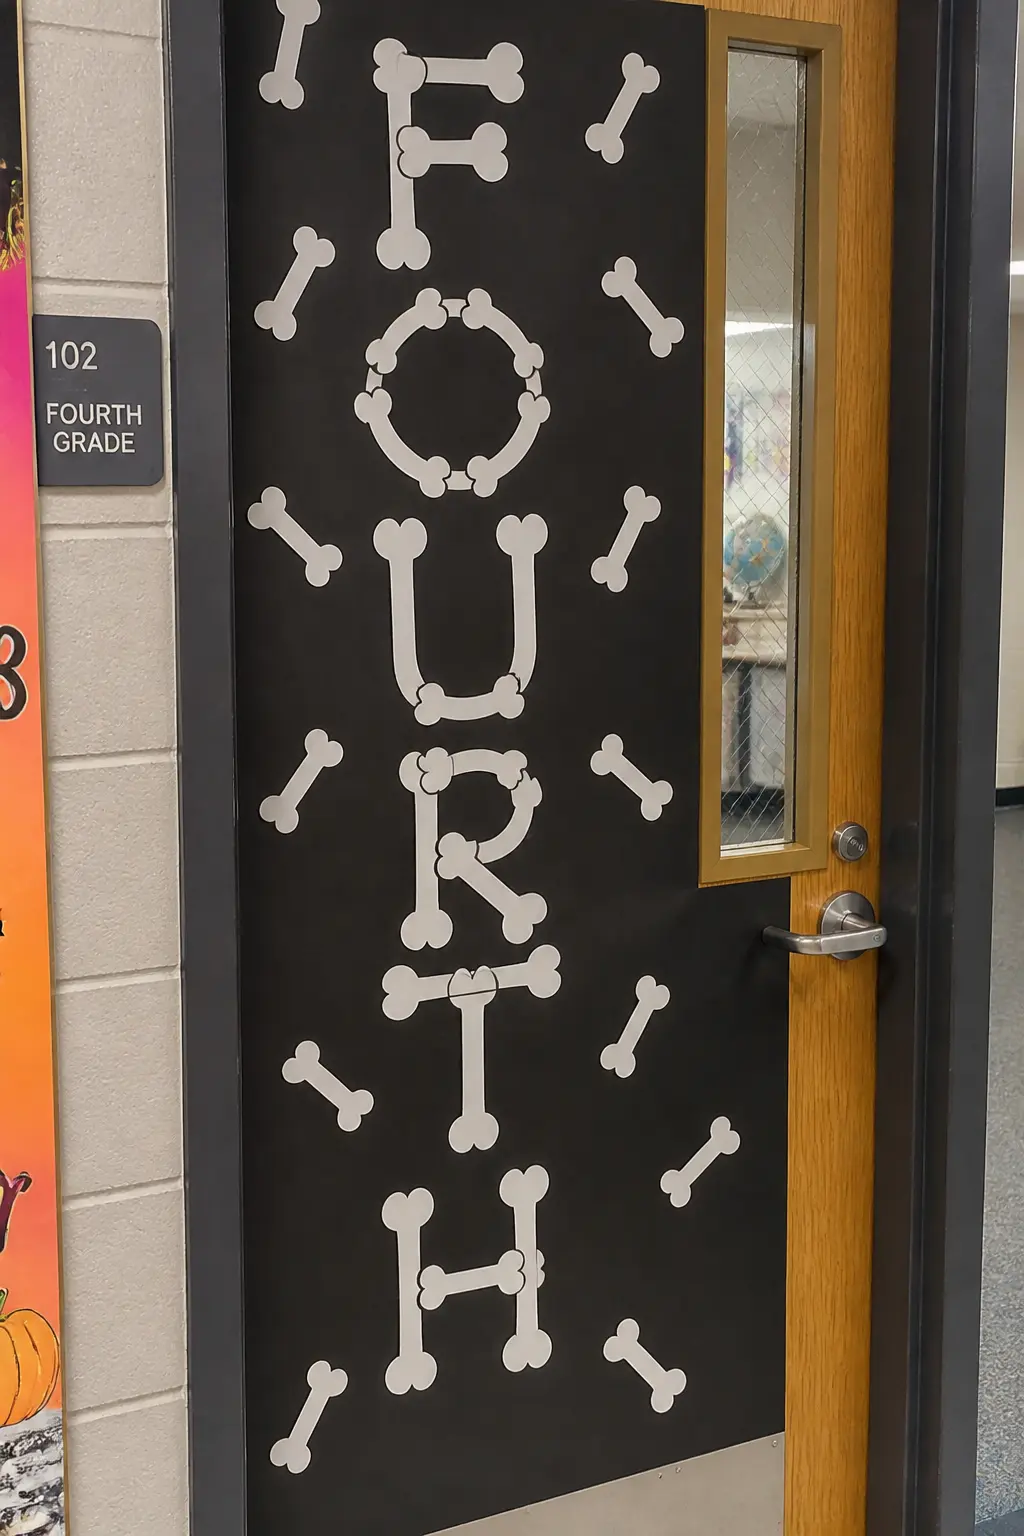
Class Name in Paper Bones Door
Spell out the class name, room number, or teacher name in large letters down the center of the door, each letter built from paper bone shapes: long rectangular bones with round knobbed ends, assembled into the strokes of each letter. The technique works for block letters where each stroke is replaced by a bone.
Black paper background, white paper bones. Space the letters vertically down the door so each letter occupies its own zone from top to bottom. Fill the gaps between letters with small scattered bone shapes or a few paper skulls. It is graphic, readable from the far end of a hallway, and takes one afternoon to construct.
🛍 Shopping guide
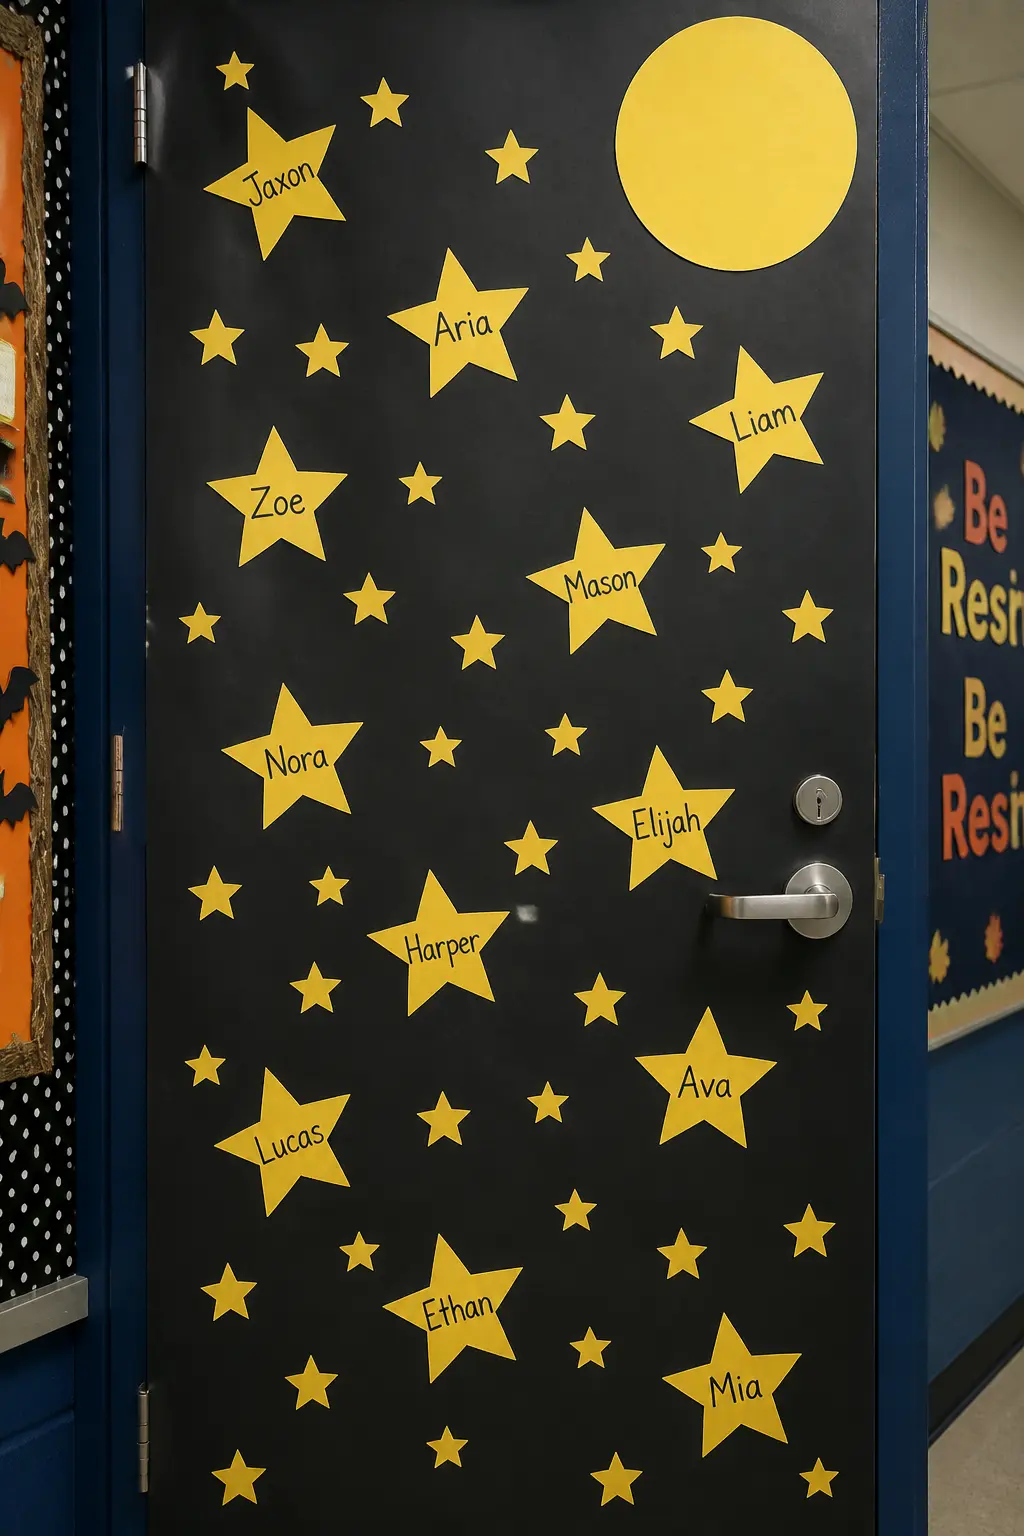
Paper Night Sky With Student Names on Stars Door
Black or deep navy background, full panel. Stars cut from white or yellow paper in two sizes: large five-point stars for student names and small four-point stars for texture scattered between them. Each large star carries one student’s name in black marker, centered.
Arrange the named stars at varying heights and slight angles so the distribution looks like a real star field rather than a grid. Add a large paper moon in one upper corner.
A small paper title reads “[Room Number] Shines Bright” or the class motto in the remaining upper space. The door is a class roster disguised as astronomy, and it has the warmth that wins a community-vote contest.
🛍 Shopping guide
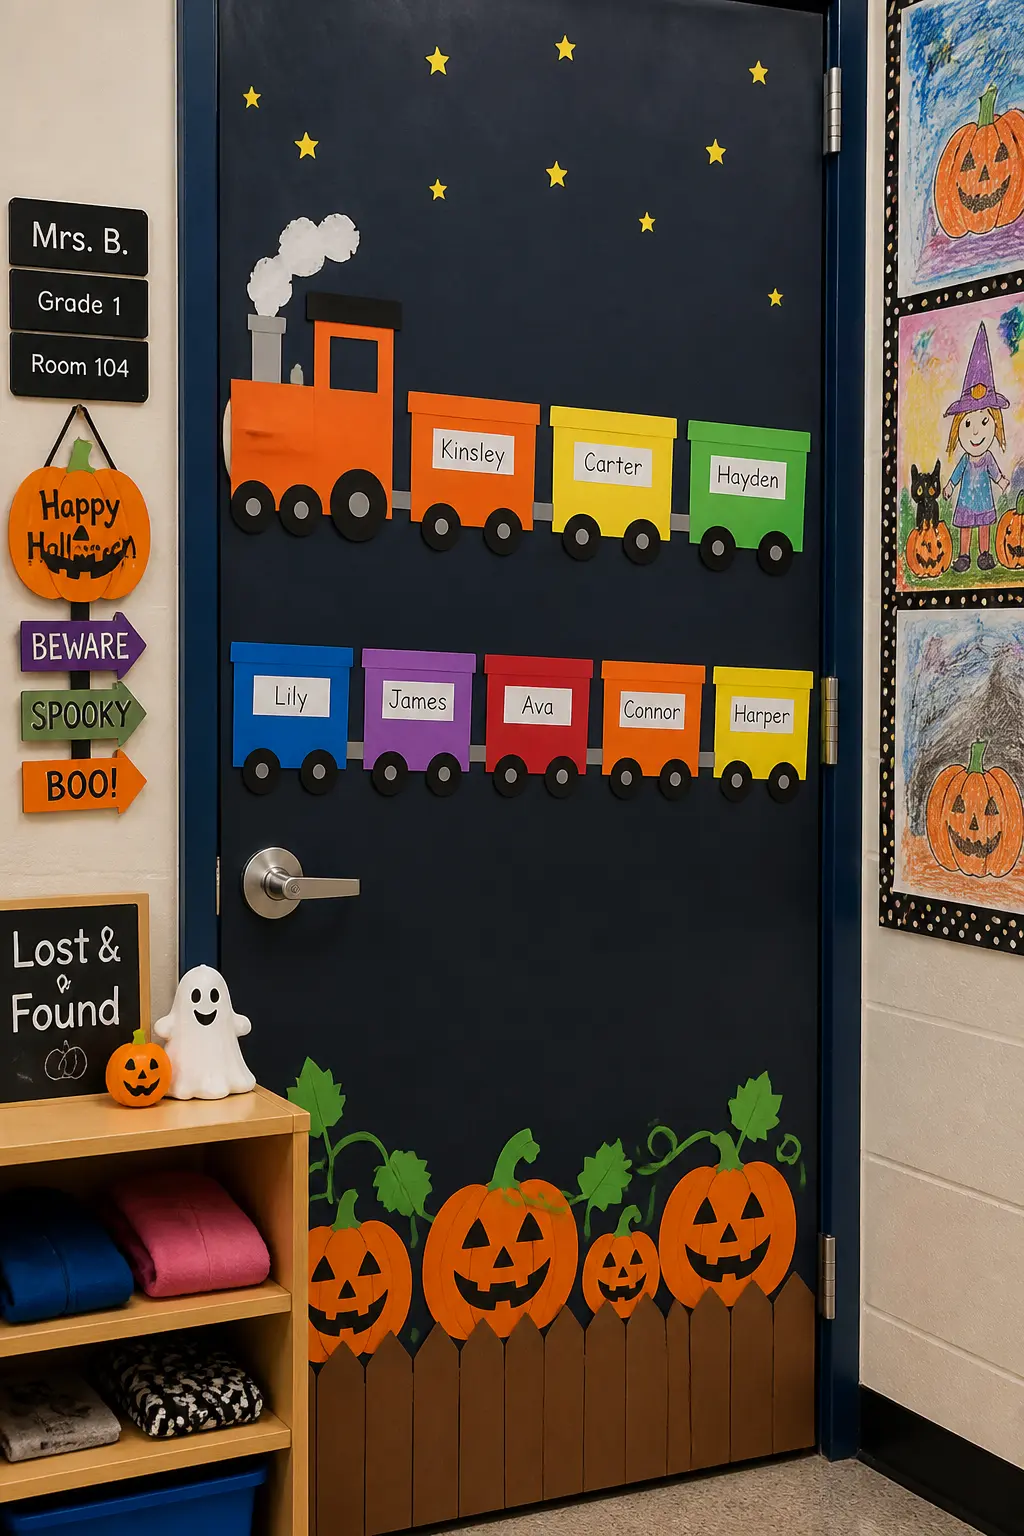
Paper Train With One Carriage Per Student Door
A train runs horizontally across the door in two or three rows, each row being one section of the train. The engine goes in the upper left and the caboose in the lower right. Between them, one carriage per student, each carriage a simple rectangle with two circular wheels, a window, and the student’s name on the side.
Connect the carriages with paper coupler links between each one. The background can be a landscape: brown tracks at the bottom of each row, a sky strip at the top.
Halloween version: the engine is a pumpkin-orange locomotive, the sky is dark, and small paper bats fly above. The door is a roster in motion, which makes it more interesting than a static list.
🛍 Shopping guide
Books, Potions, and Classroom In-Jokes
These ideas nod to what actually happens in the room behind the door. Bookshelves with student names on the spines, potion bottles labeled with subject-area vocabulary, a reading-themed banner: they make the door a billboard for the classroom culture, not just a seasonal decoration.
They also age up gracefully for middle and high school doors where a purely spooky aesthetic can feel a little young. The wit is in the labels and the titles, and that is something only the teacher in that room can write.
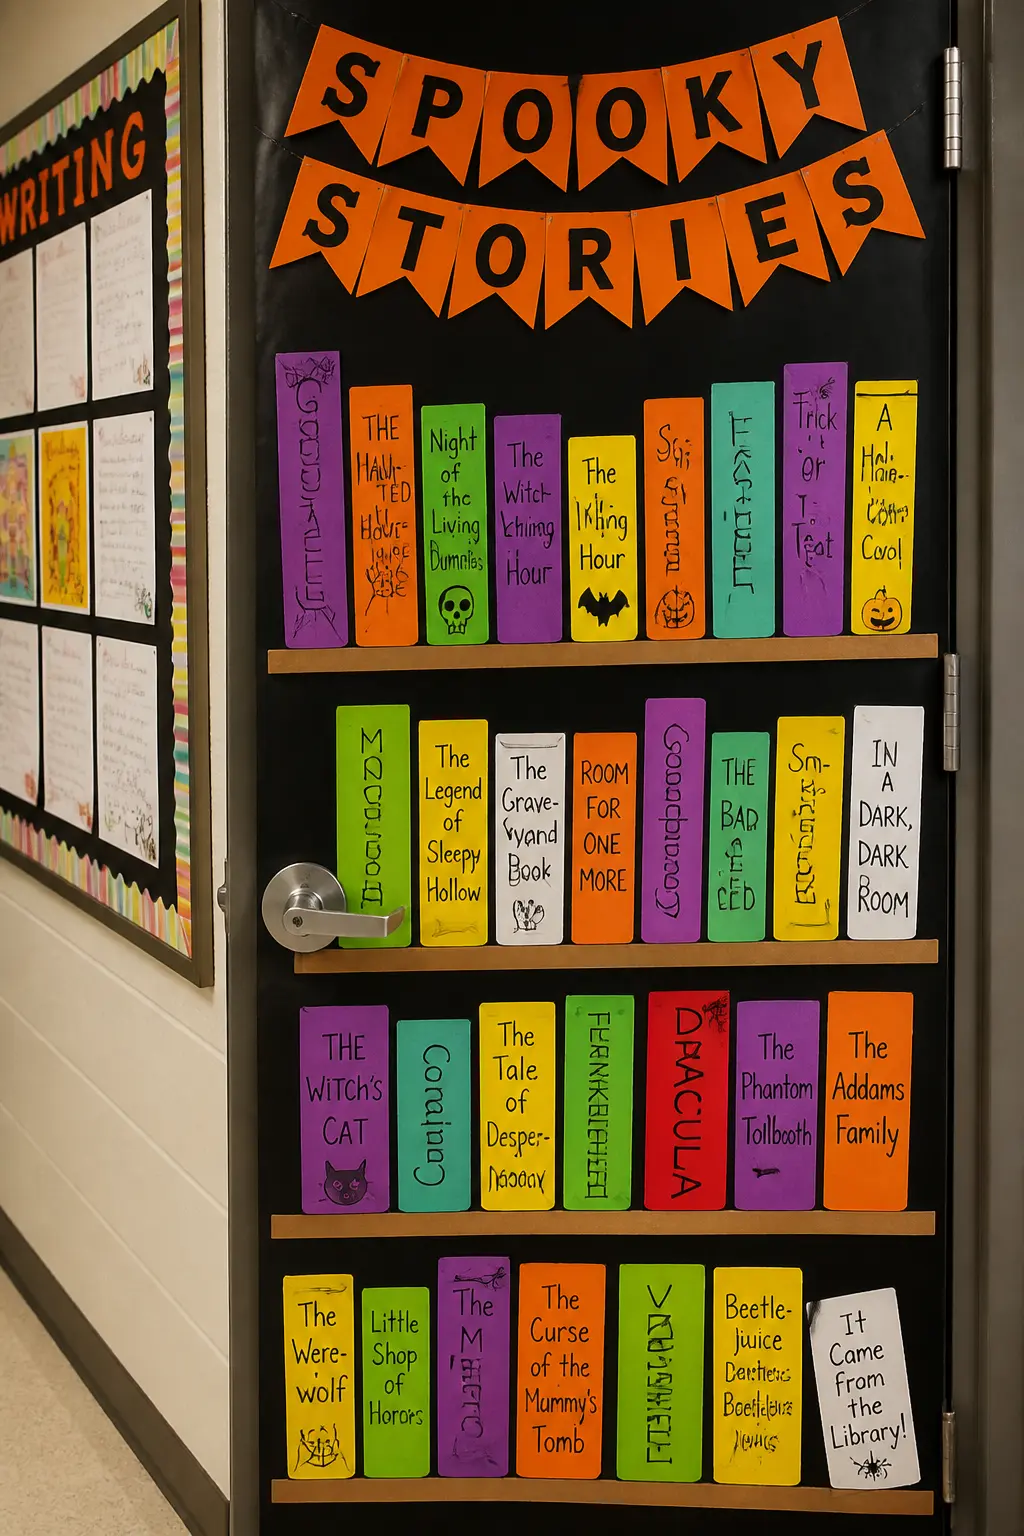
Reading-Themed Halloween Door With Banner
Stack paper books across the door at various angles, each one a different color with a Halloween-themed title on the spine or cover: “Ghosts of Grammar Past,” “A Witch’s Guide to Long Division,” something that belongs to the subject you teach. Cut each book as a simple rectangle with a narrow spine strip in a slightly darker shade.
A paper banner runs across the top of the door in Halloween orange or black with the class motto or the teacher’s name in paper letters. The books fill from the bottom up to just below the banner, stacked and slightly tumbled. A small paper ghost or spider peeks from between two books somewhere in the middle.
🛍 Shopping guide
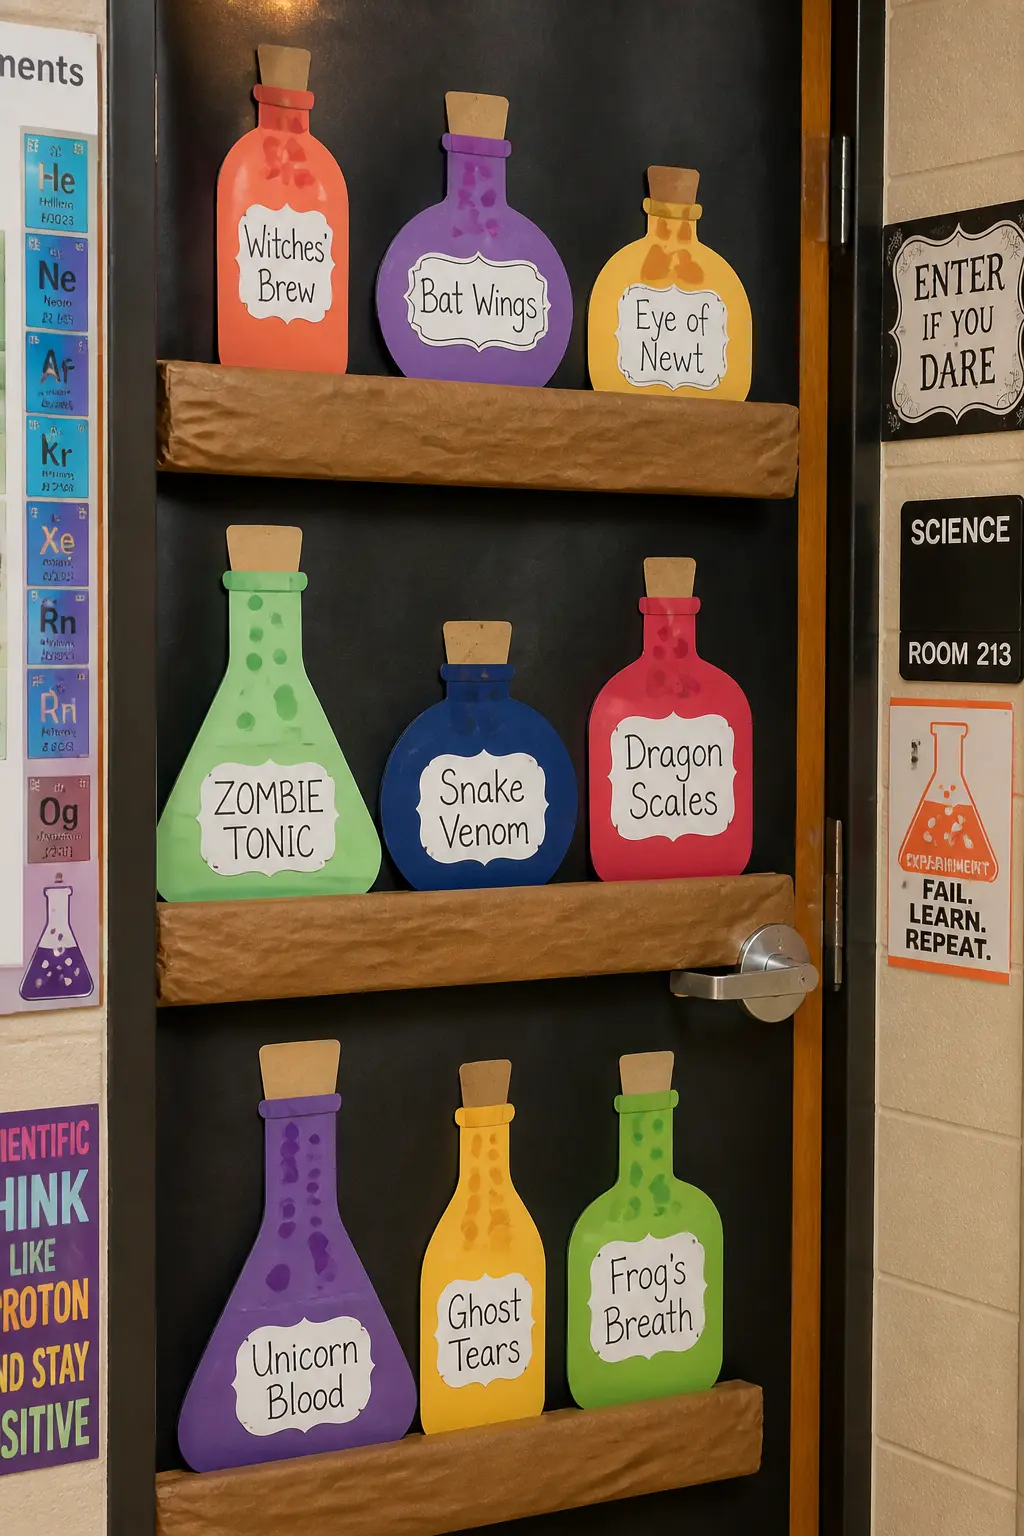
Paper Shelf of Potion Bottles Door
Divide the door into three or four horizontal shelves using brown paper strips running the full width. On each shelf, arrange paper potion bottles: various silhouettes cut from colored paper, each with a paper label. The labels carry subject-area vocabulary, classroom rules reworded as potions, or student-chosen names.
Bottle silhouettes can be round-bottomed flasks, tall narrow vials, squat round jars: cut each shape from a different color and add a slightly darker strip for the label rectangle. A paper stopper or cork sits at each bottle neck.
The door reads like an apothecary shelf, and the text on the labels rewards close reading, which keeps parents standing at your door.
🛍 Shopping guide
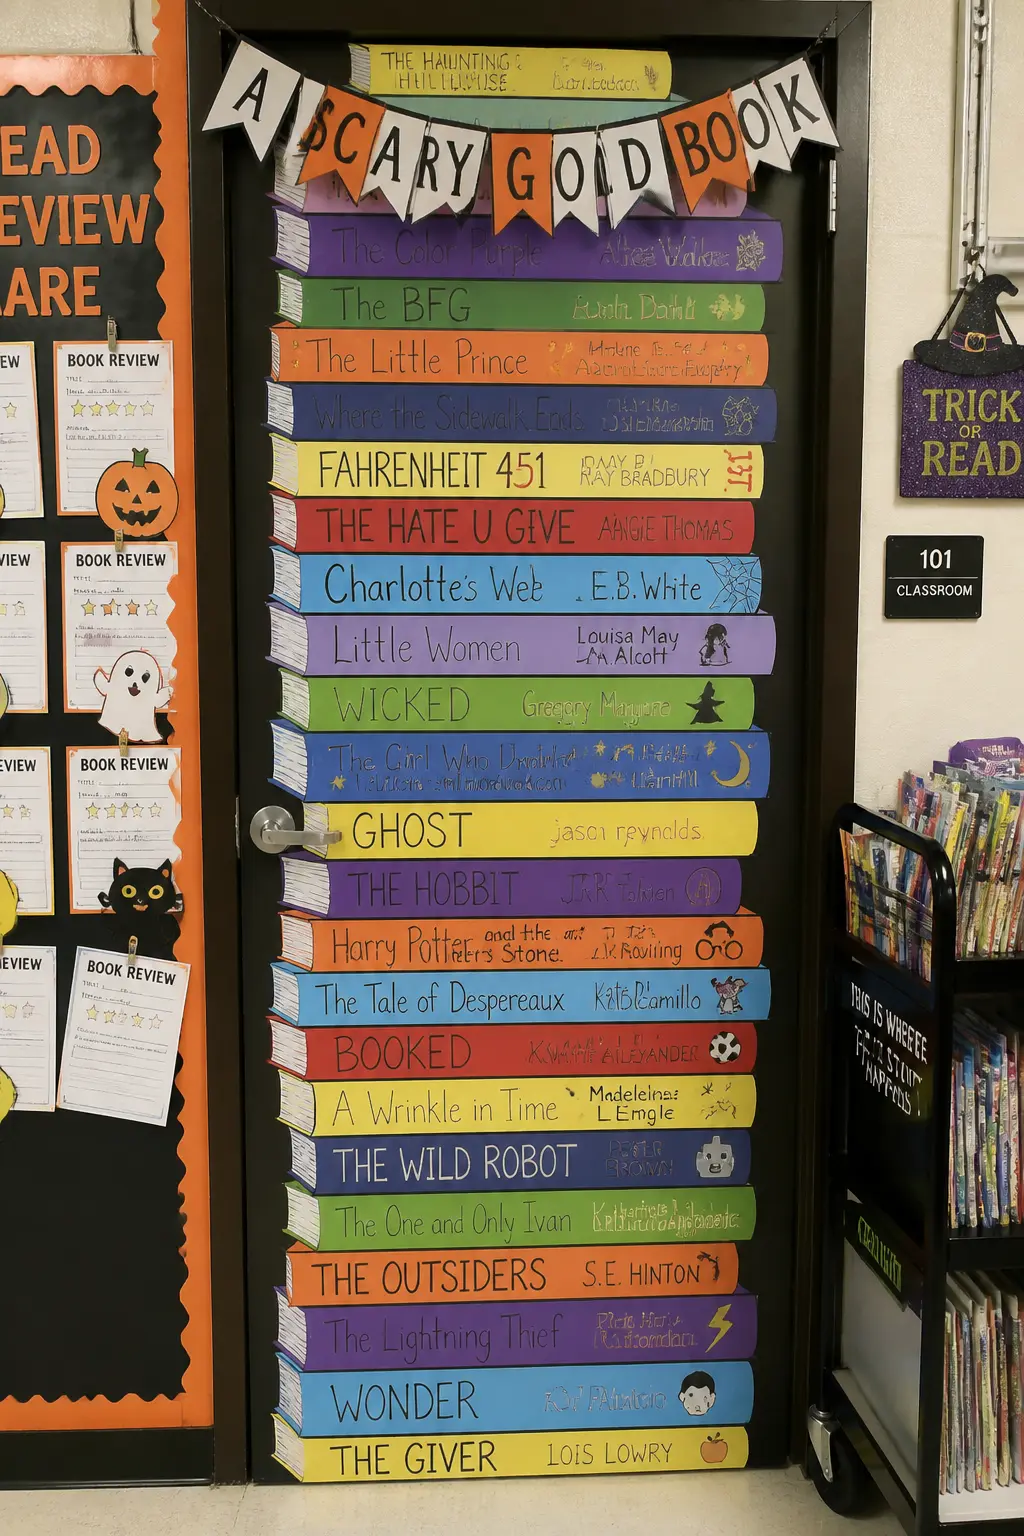
Reading-Themed Door: Books Stacked Floor to Top
Stack paper books from the very bottom of the door to the top frame in a single towering pile: a physical impossibility that only works in paper, which is the joke. Each book is a different color and a different height, some narrow, some wide, all stacked at very slight offsets so the pile looks precarious.
A paper title banner runs across the top: “This Class is on Another Level” or “Read Yourself Spooky” or anything that fits the grade. On the spine of each book, write a Halloween-adjacent title or a student’s favorite book title with a Halloween subtitle added.
The door reads from the hallway as a wall of color and from up close as a conversation.
🛍 Shopping guide
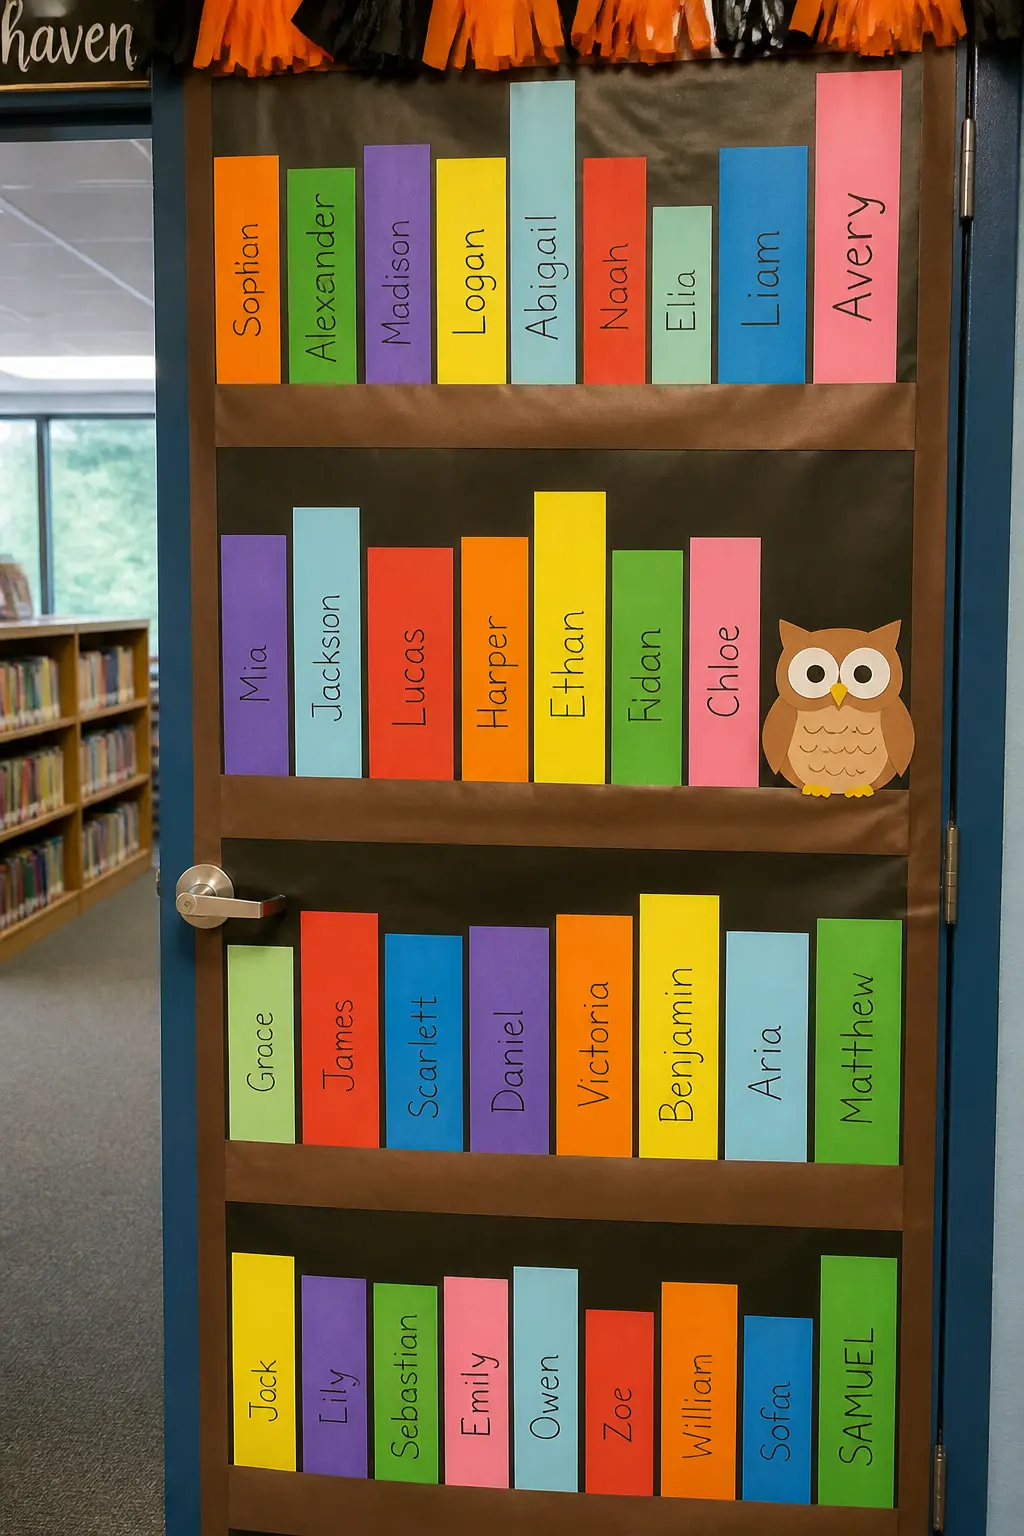
Paper Bookshelf With Student Name Spines Door
Build a floor-to-ceiling bookshelf on the door using brown or dark wood-tone paper horizontal shelves at equal intervals. On each shelf, fill in paper book spines of varying widths and heights, each one a different color. The spine of each book carries one student’s name in black or white marker.
This differs from the stacked book door because the books stand upright like a real shelf rather than lying in a pile: the spines face out, the books lean slightly, and some are shorter than others creating an uneven top line.
A few paper bookends, a small paper plant, and a paper owl or skull for a Halloween prop complete the shelf. The door is a library and a class roster in one design.
🛍 Shopping guide
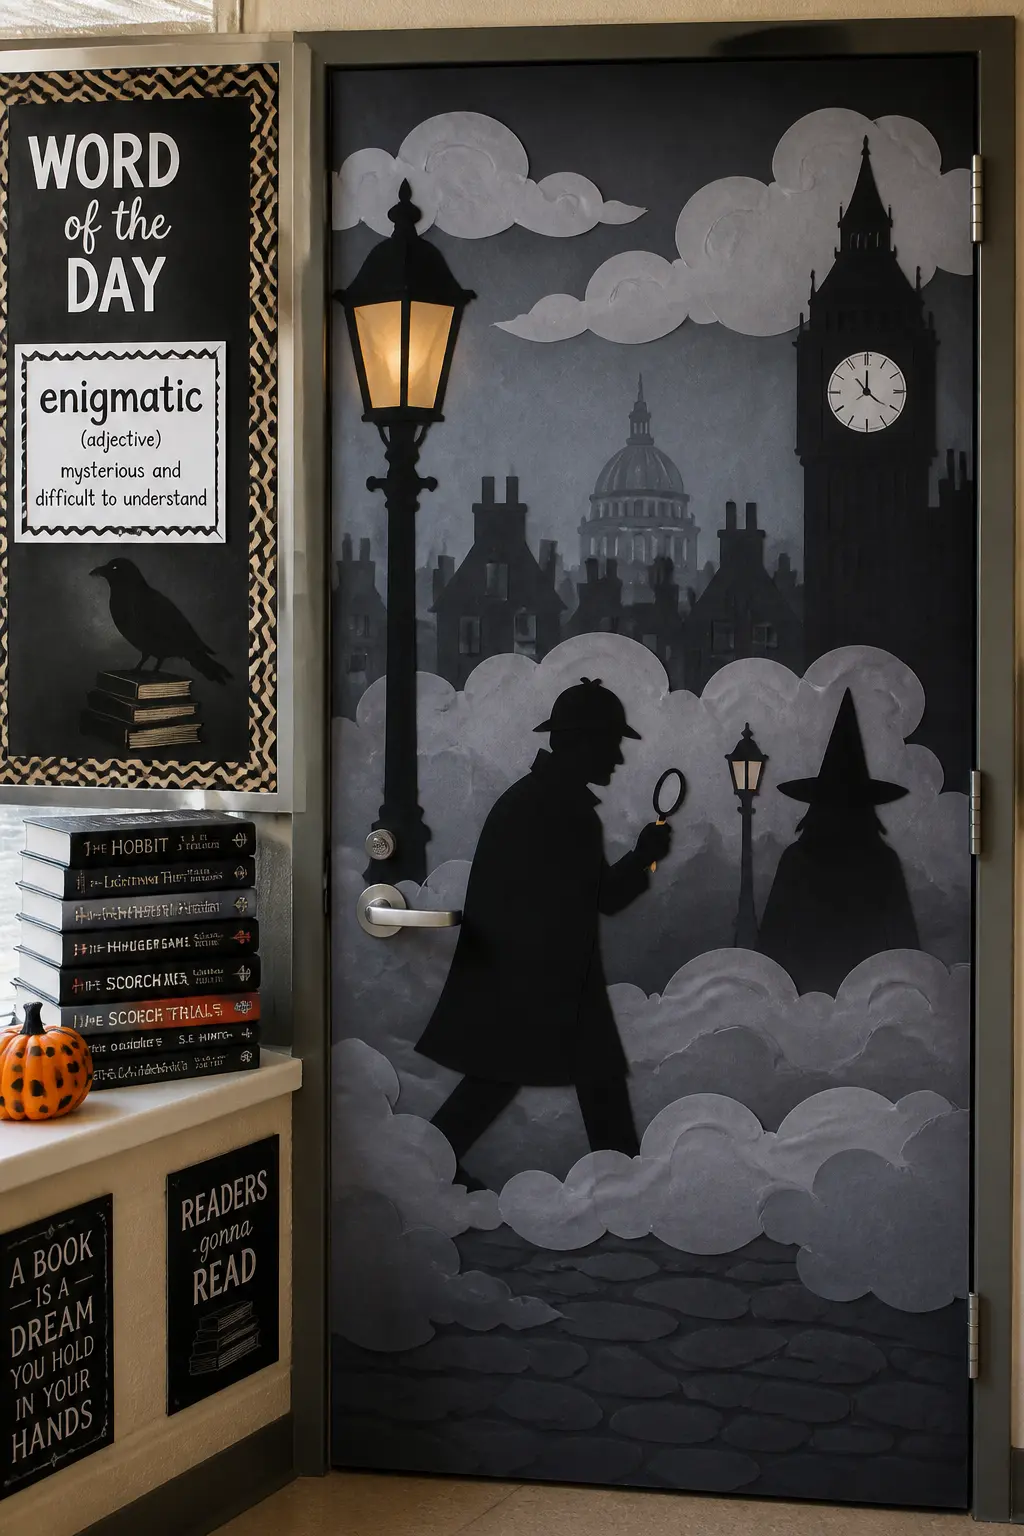
Book Character Theme With Halloween Twist Door
Take a book the class is currently reading or a genre the room teaches and reimagine it with Halloween paper elements. A mystery novel setting becomes a foggy paper street scene with a paper detective silhouette.
A fairy tale unit becomes a paper forest with witch hat visible behind a tree. A poetry unit becomes paper scroll shapes with spooky first lines written in marker.
The key is specificity to the classroom. The teacher chooses the book or genre, and the door becomes a billboard for what is happening inside the room. Students who have read the book will recognize references in the paper details, which makes the door interactive without any moving parts. Judges and administrators notice when a door reflects curriculum.
🛍 Shopping guide
Adventure and Storybook Scenes
Lighthouses, hot air balloons, treehouses, mountain paths: these are the doors that make a child slow down on the way to the water fountain. They feel like an invitation rather than a haunting, which suits younger grades or teachers who want Halloween energy without Halloween darkness.
Build depth by layering. A treehouse door with a ladder running down the frame, a mountain door with a path that winds back and forth up the panel: the eye travels and finds new things, and that is what a judge remembers.
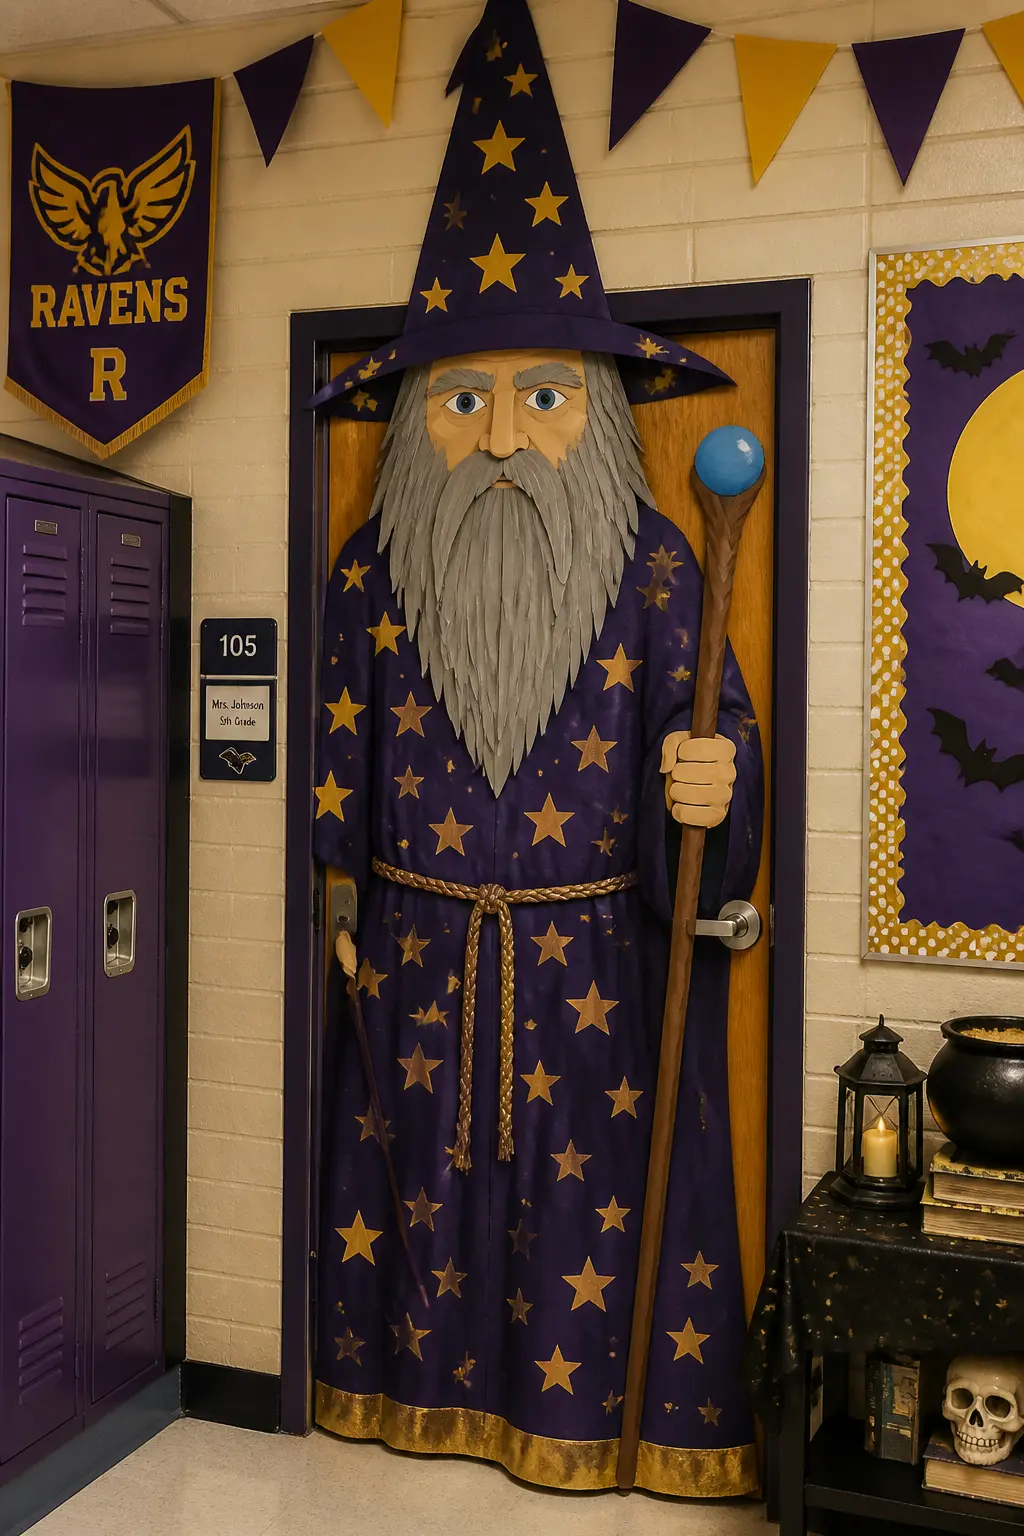
Full-Height Wizard Door
A wizard stands full height on the door: a tall pointed hat above the frame, a long robe that fills the entire door panel, and two paper hands visible near the lower half holding a paper staff or a glowing paper orb.
The robe can be purple, deep blue, or dark green, decorated with paper stars and crescent moons cut in a lighter shade and applied across the fabric area.
The face sits just below the top of the door frame: a paper oval with a long gray paper beard running down the robe center, paper eyebrows, and deep-set eyes.
The hat point rises six to eight inches above the frame into the wall above the door. This door fills vertically in a way that makes it seem taller than it is.
🛍 Shopping guide
Paper Campfire Scene Door
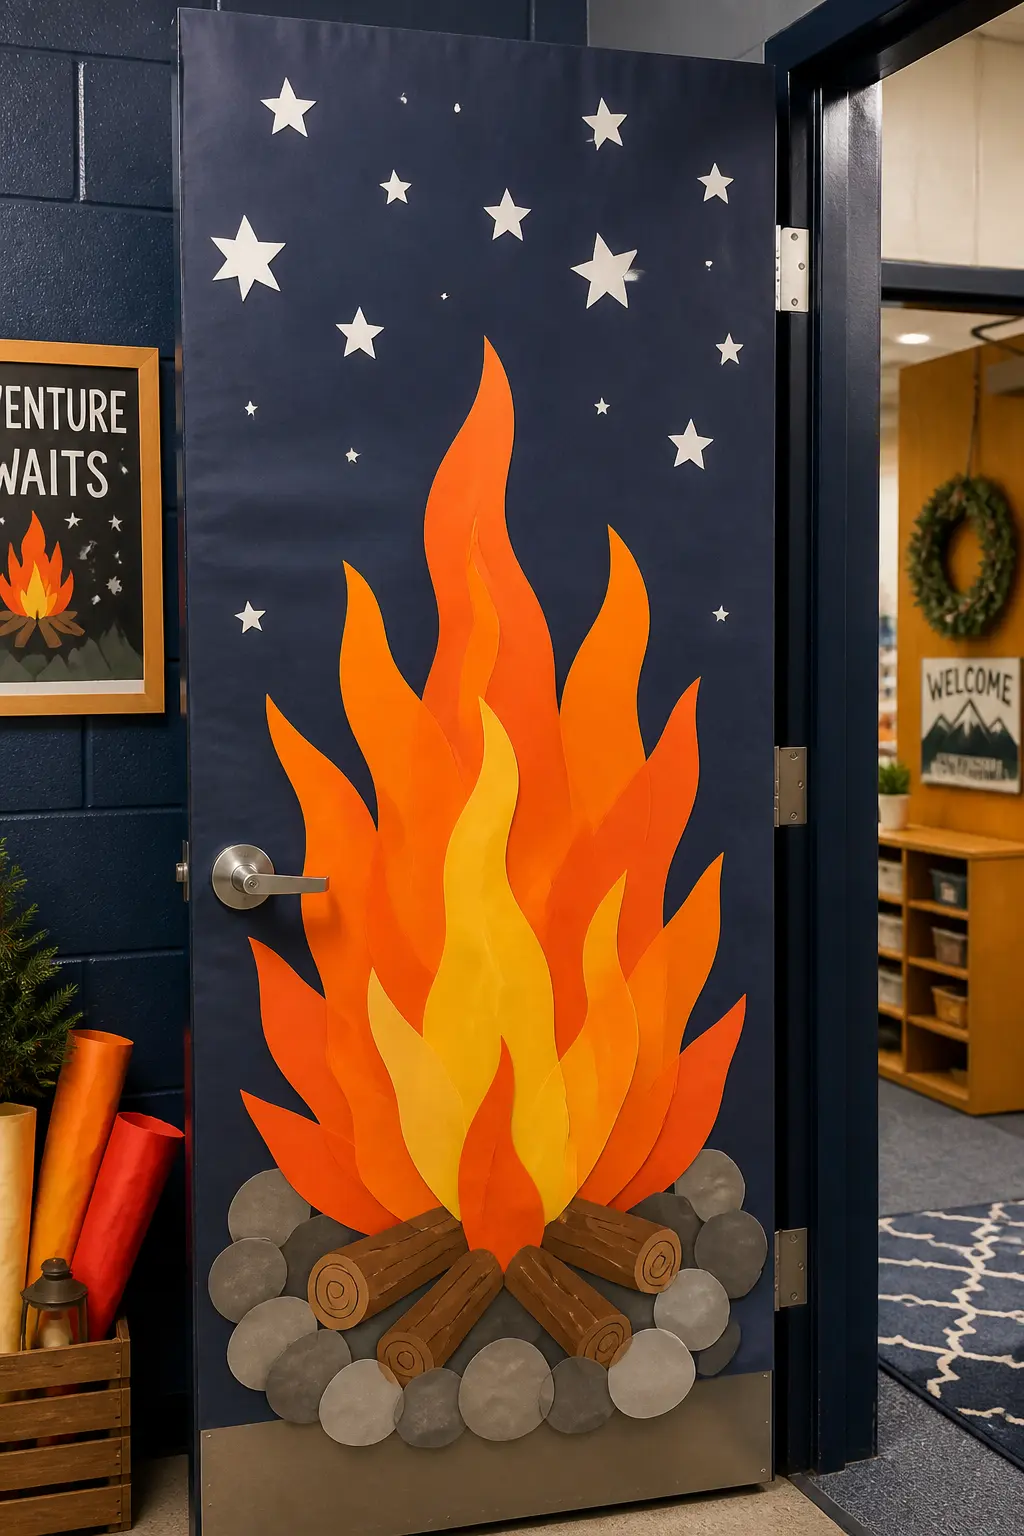
In the lower quarter of the door, a campfire: a ring of gray and brown paper stone shapes, crossed paper log sticks, and tall paper flames rising from the logs in layered orange, yellow, and red strips, each strip slightly narrower than the one behind it, all curling gently at the tips.
The flames travel upward and grow as they climb, reaching toward the top of the door and slightly beyond the frame. The background above the fire is midnight blue or black, the night sky. A few white paper stars appear in the upper third.
The glow of the fire is implied by graduating the background from darkest black at the top to dark navy near the flame zone. It is warm, slightly eerie, and visually unlike everything else in this list.
🛍 Shopping guide
Paper Aquarium with Sea Monster Door
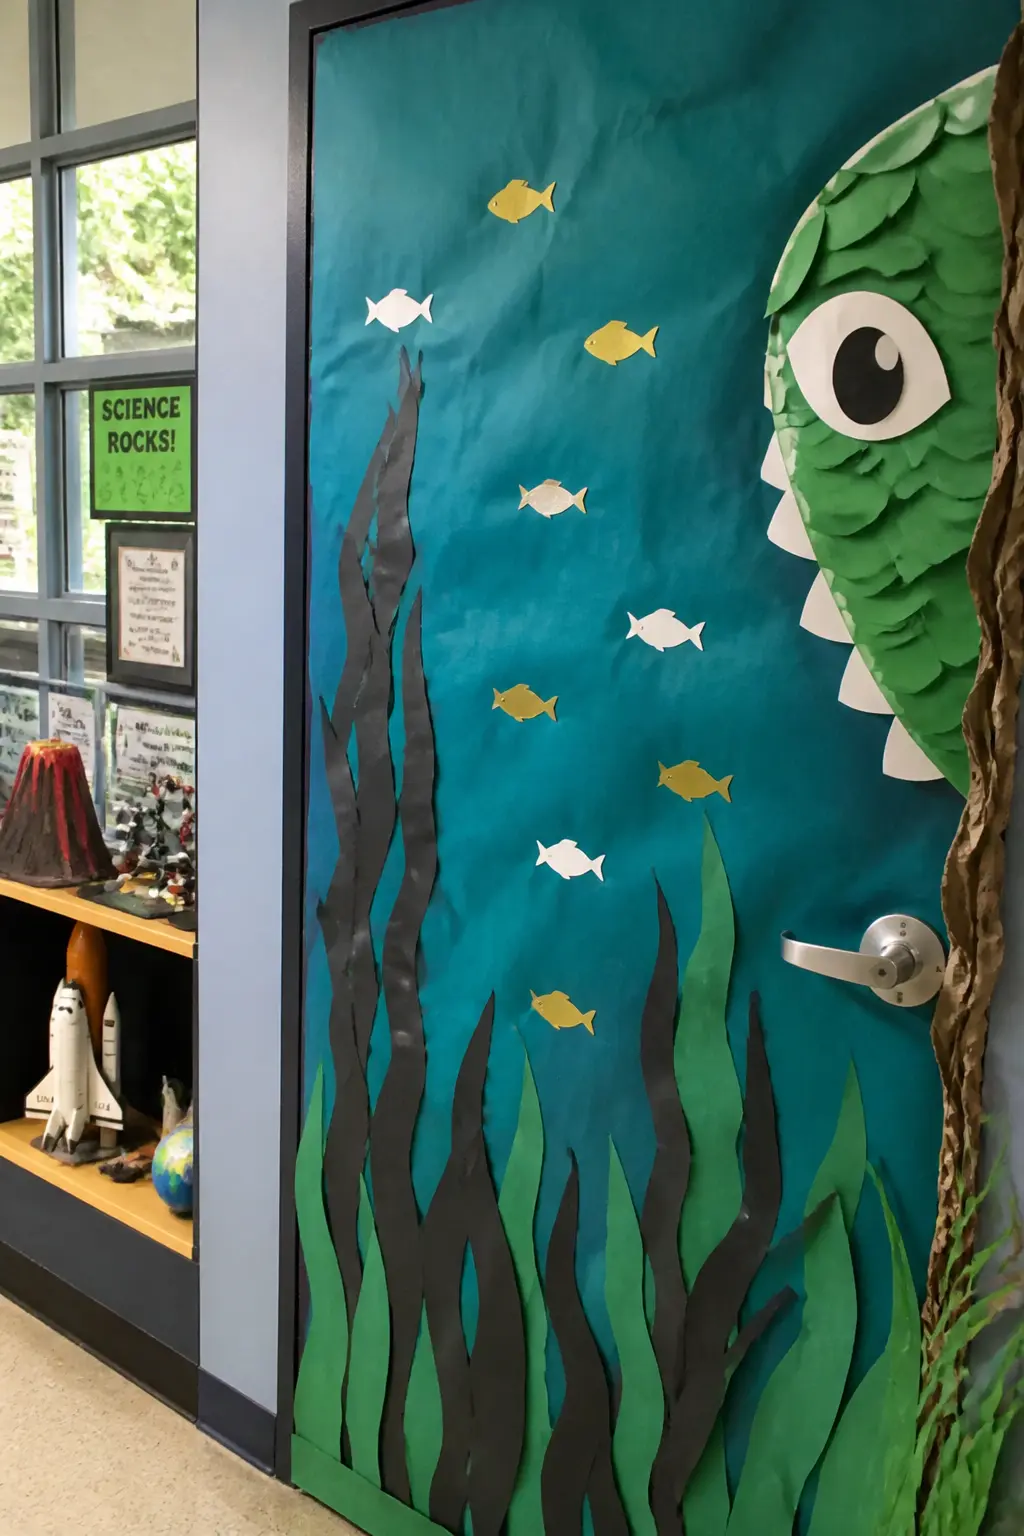
Cover the door in deep teal or aquamarine paper, the color of water at depth. In the upper third, a surface line in slightly lighter blue separates water from a narrow strip of dark sky at the very top. Paper seaweed strips in dark green run up from the bottom in gentle curves, bending toward each other.
A paper sea monster peers from the right side of the door: a long-necked creature with a small head, one large round eye, and a body implied by a curving neck that disappears behind the seaweed.
Fish silhouettes in gold and white scatter through the mid-zone.
The handle sits in the center of the water zone, which becomes a treasure chest or a large bubble when you add a small paper square around it with rounded corners and paper circle bubbles trailing upward from it.
🛍 Shopping guide
Paper Treehouse Door
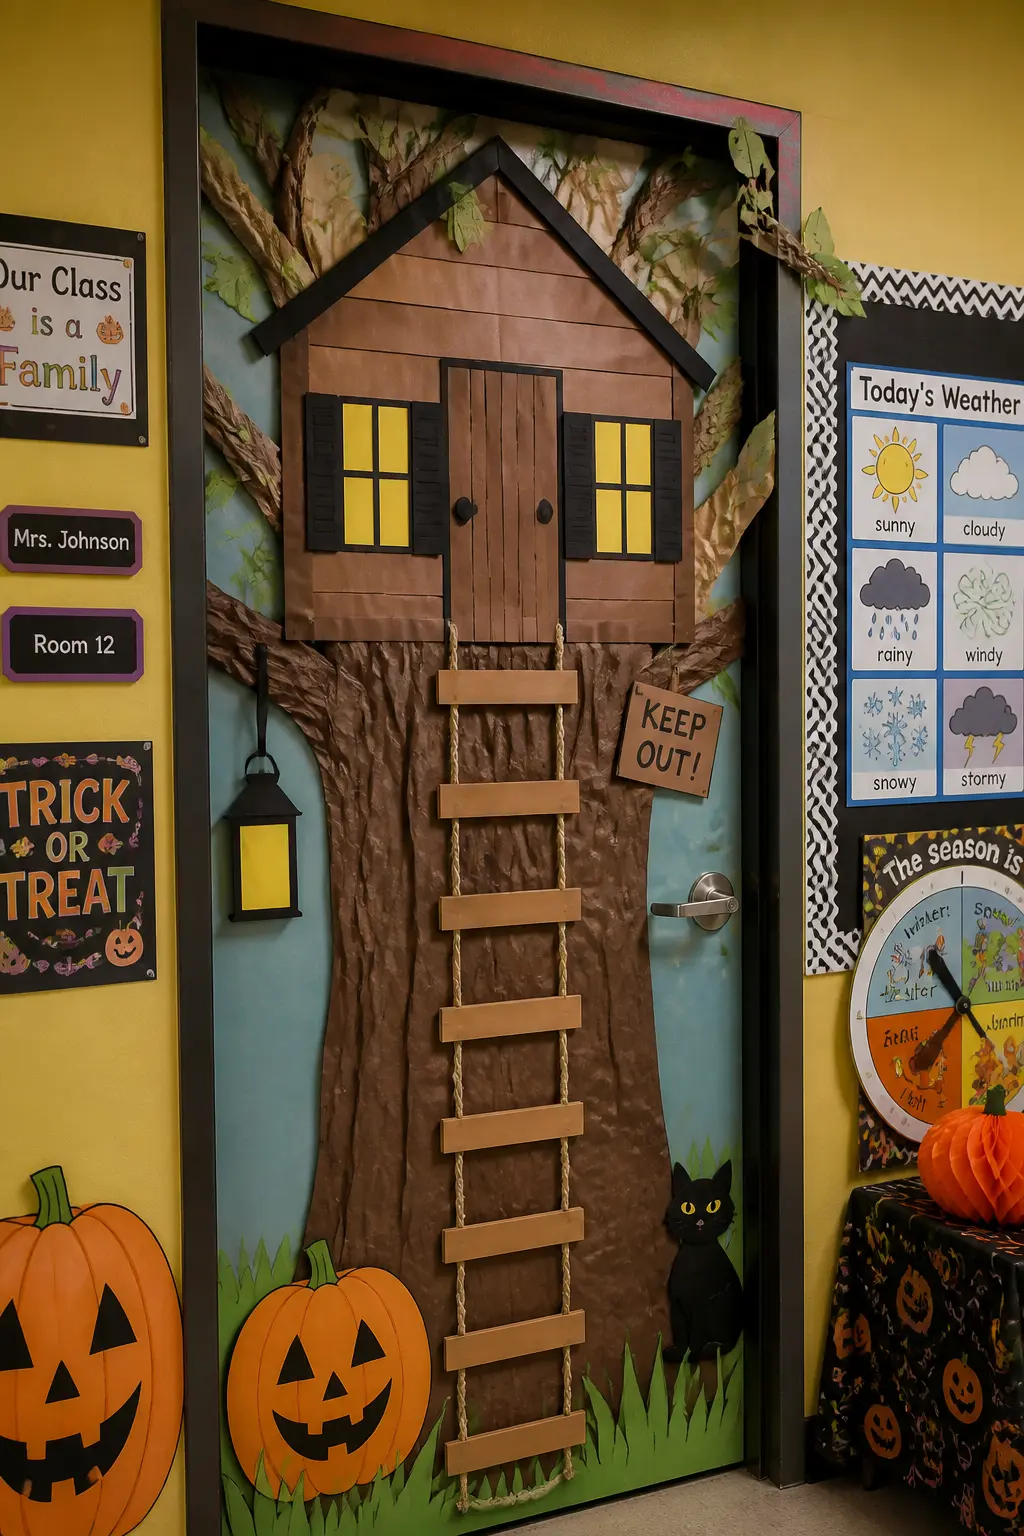
A treehouse sits in the upper half of the door: a small wooden-plank-look structure in brown paper with a triangular roof in dark gray. A rope ladder made from horizontal paper rungs and two vertical paper ropes runs from the treehouse floor down to the very bottom of the door. Windows with paper shutters appear on the treehouse walls.
The tree trunk that supports the treehouse runs behind the structure, branching outward and extending onto the wall above the frame. Leaves in fall orange and gold fill the branches. The door handle sits about halfway down the ladder, which makes it look like a rung. A paper banner on the treehouse reads “No Monsters Allowed” or the class motto.
🛍 Shopping guide
Paper Hot Air Balloon Door
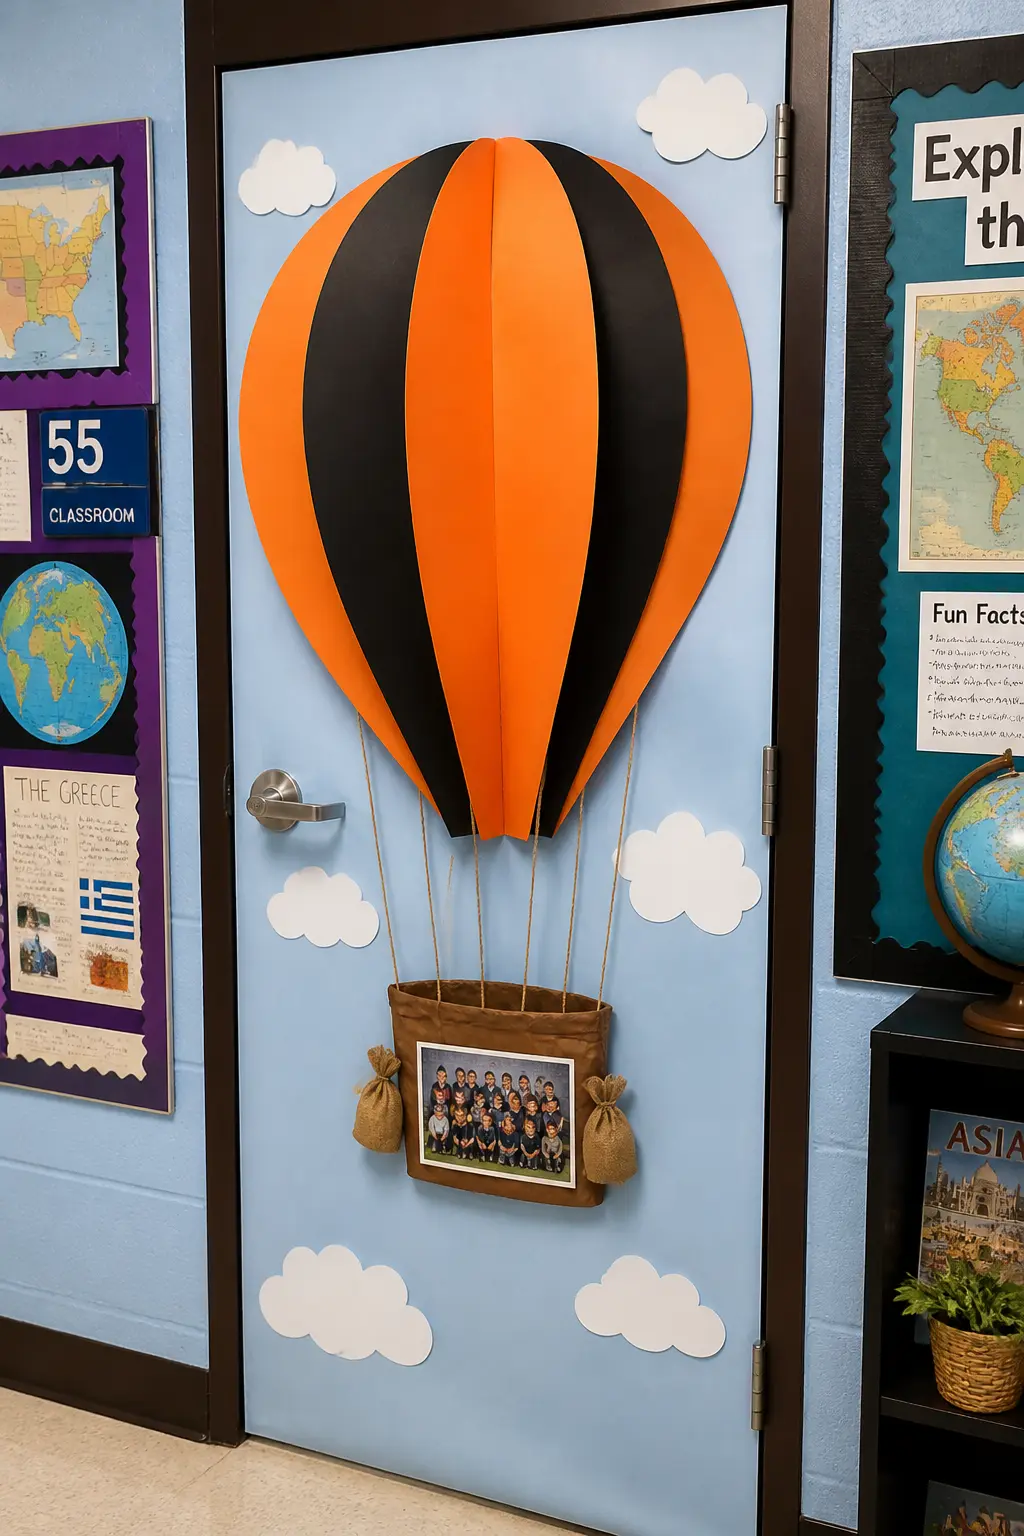
A large hot air balloon fills the upper two-thirds of the door: the envelope in bold vertical panels of alternating color, rounded at the top and tapering to the base.
Thin rope lines run from the base of the envelope to a paper basket in the lower third of the door. In the basket, a class photo printed and trimmed, or paper silhouettes of the class.
The background is a pale blue sky for daytime or a sunset gradient layered from orange at the base to lavender at the top. A few paper clouds flank the balloon.
The door handle sits at the basket level, which makes whoever opens it look like they are steering. A Halloween twist: the balloon panels are orange and black, or the clouds are shaped like small ghosts.
🛍 Shopping guide
Paper Lighthouse Door
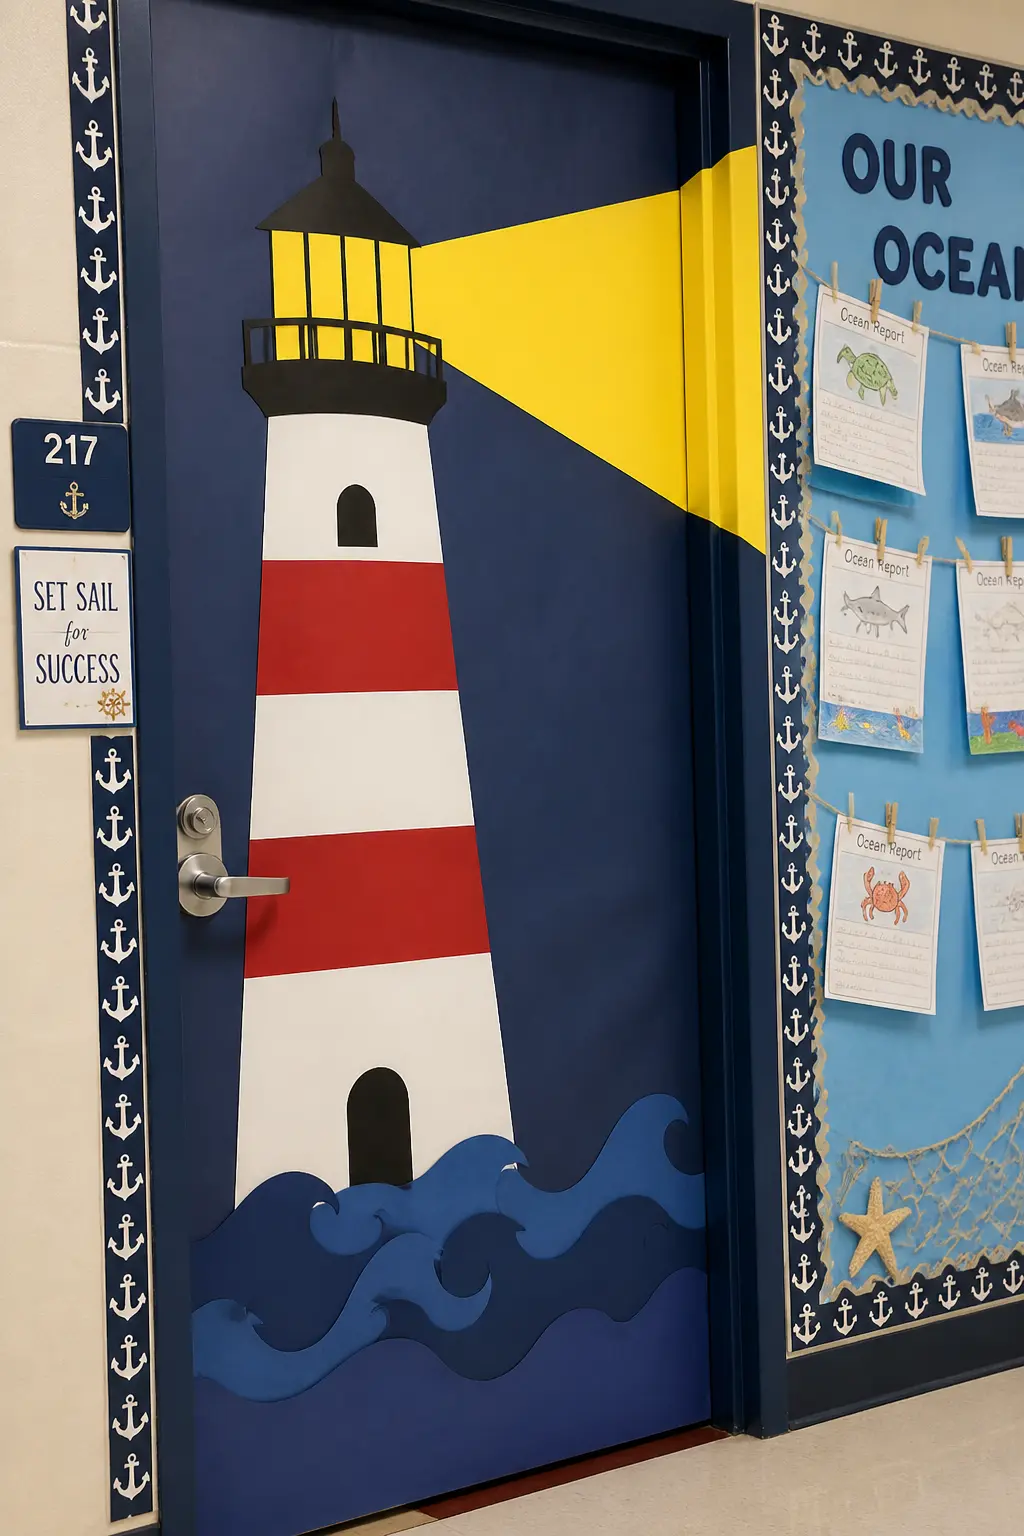
A lighthouse stands centered on the door: a tall white cylinder with a lantern room at the top just below the frame edge, and above the frame, a paper light housing with a pointed cap. Red horizontal band strips circle the tower at regular intervals.
A paper lantern room with a bright yellow or orange interior sits at the top of the tower.
A beam of light radiates from the lantern room diagonally across the door and onto the frame: cut from yellow or white translucent paper at a wide triangular angle. Below the lighthouse, dark blue water in layered paper waves.
Rocks in gray paper at the base. The beam makes the door feel dynamic, as if the light is sweeping the hallway.
🛍 Shopping guide
Paper Garden Gate Door
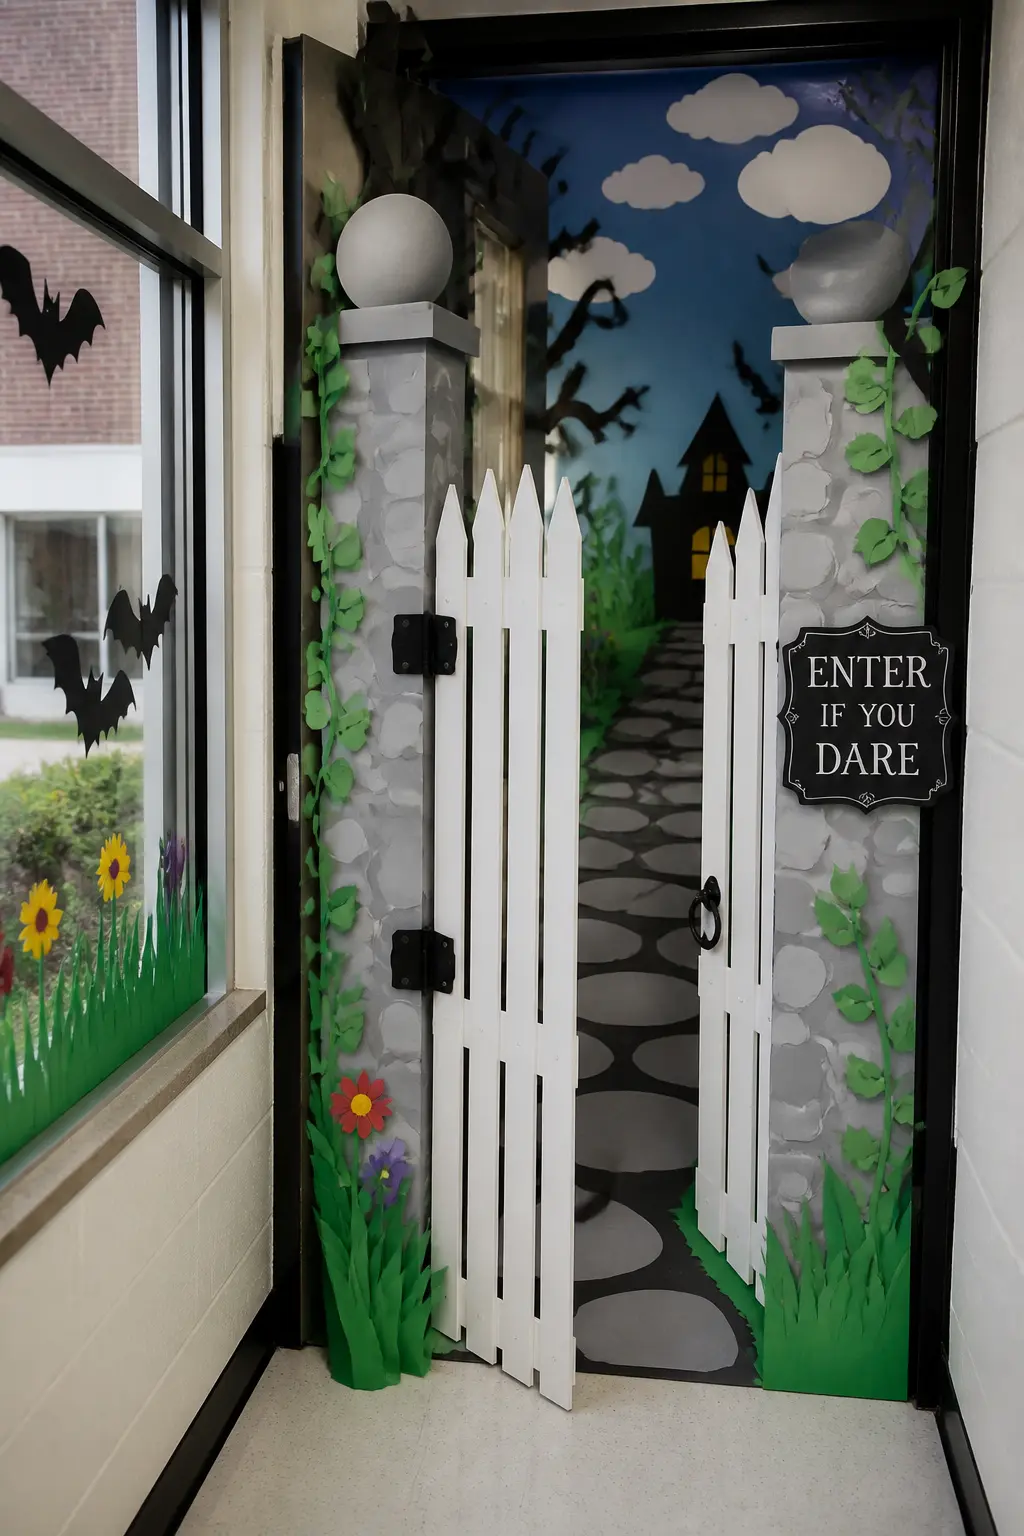
The door becomes a garden gate: two tall paper fence posts run the full height of the panel on each side, connected by horizontal rails and vertical pickets across the mid-section. The gate should look slightly ajar, which means offsetting one side of the gate structure slightly as if it swings open.
Beyond the gate, visible through the pickets, a paper garden path leads away into the distance, drawn in forced perspective: wide at the bottom of the door and narrowing as it rises.
Paper topiaries in dark green flank the path, and at the far end, a paper house or a glowing paper lantern. Halloween version: the garden is overgrown and the topiaries are skull-shaped, and the house at the end has one lit window.
🛍 Shopping guide
Paper Mountain With Winding Path Door
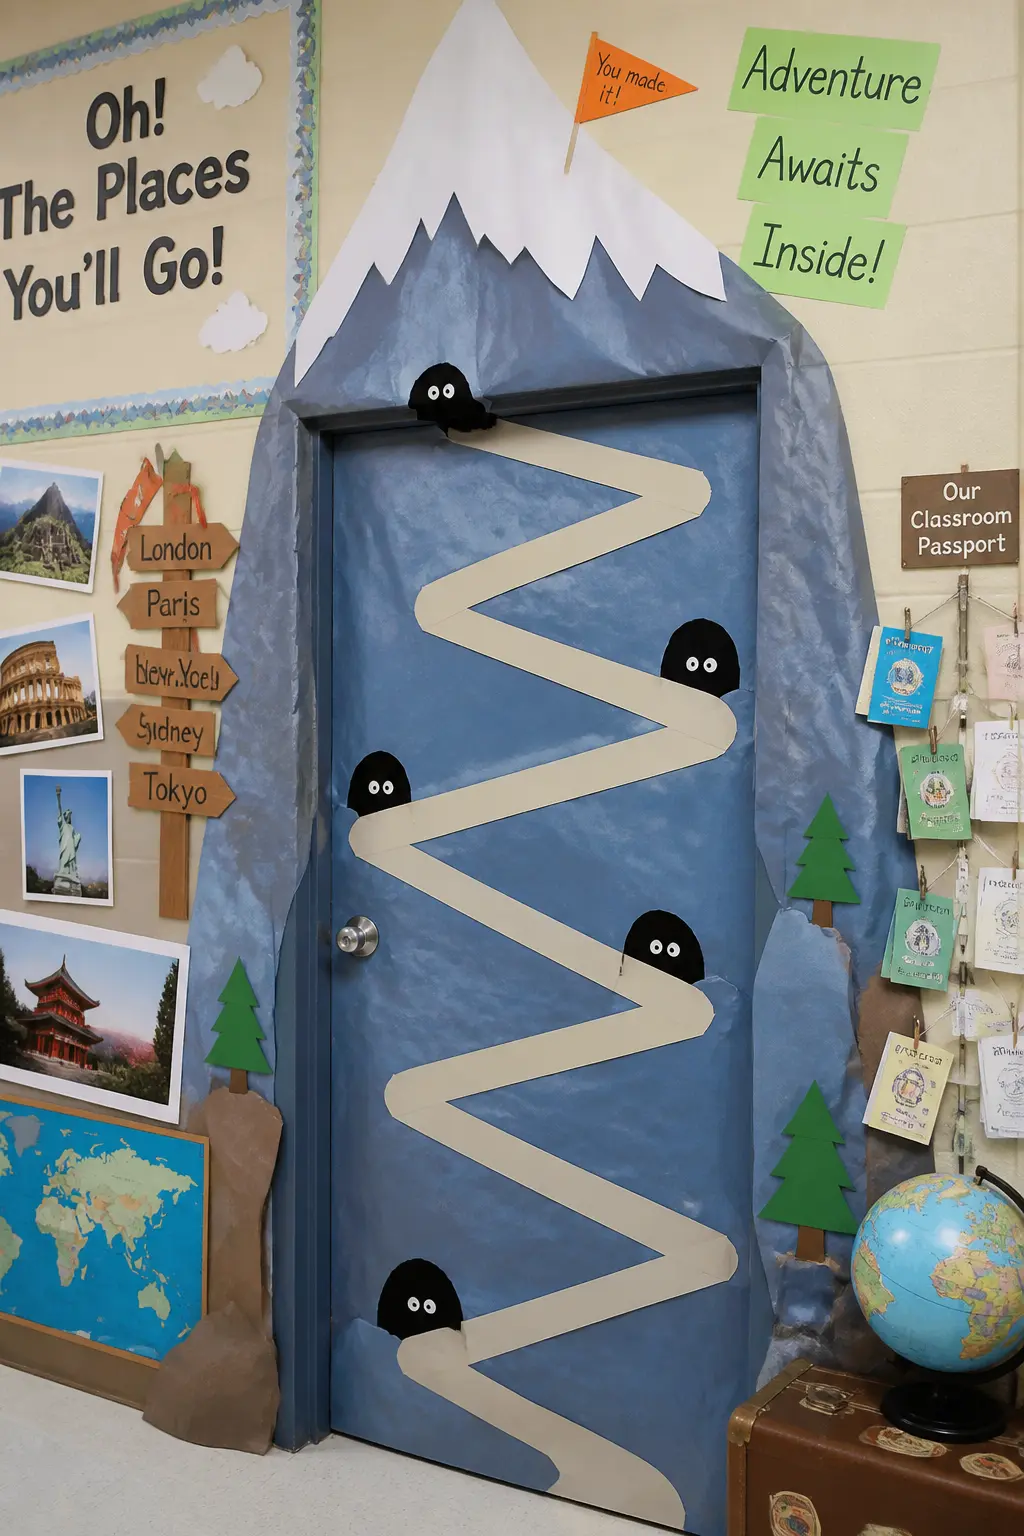
A mountain fills the door panel: a large triangular peak in blue-gray or purple paper with a snow cap in white at the very top, extending slightly above the frame. The mountain sides fill the lower three-quarters of the door, with the peak taking the upper quarter and the frame area above.
A path winds up the mountain face in a series of back-and-forth switchbacks from the bottom of the door to the summit: cut from a slightly lighter or warmer tone than the mountain paper so it reads clearly.
Halloween additions: small glowing eyes peer from paper cave openings along the path, and a paper figure or class name sits at the summit. The path from bottom to top gives the design movement and makes the eye travel the whole door.
🛍 Shopping guide
Paper Aquarium Revisited: Deep Sea Window Door
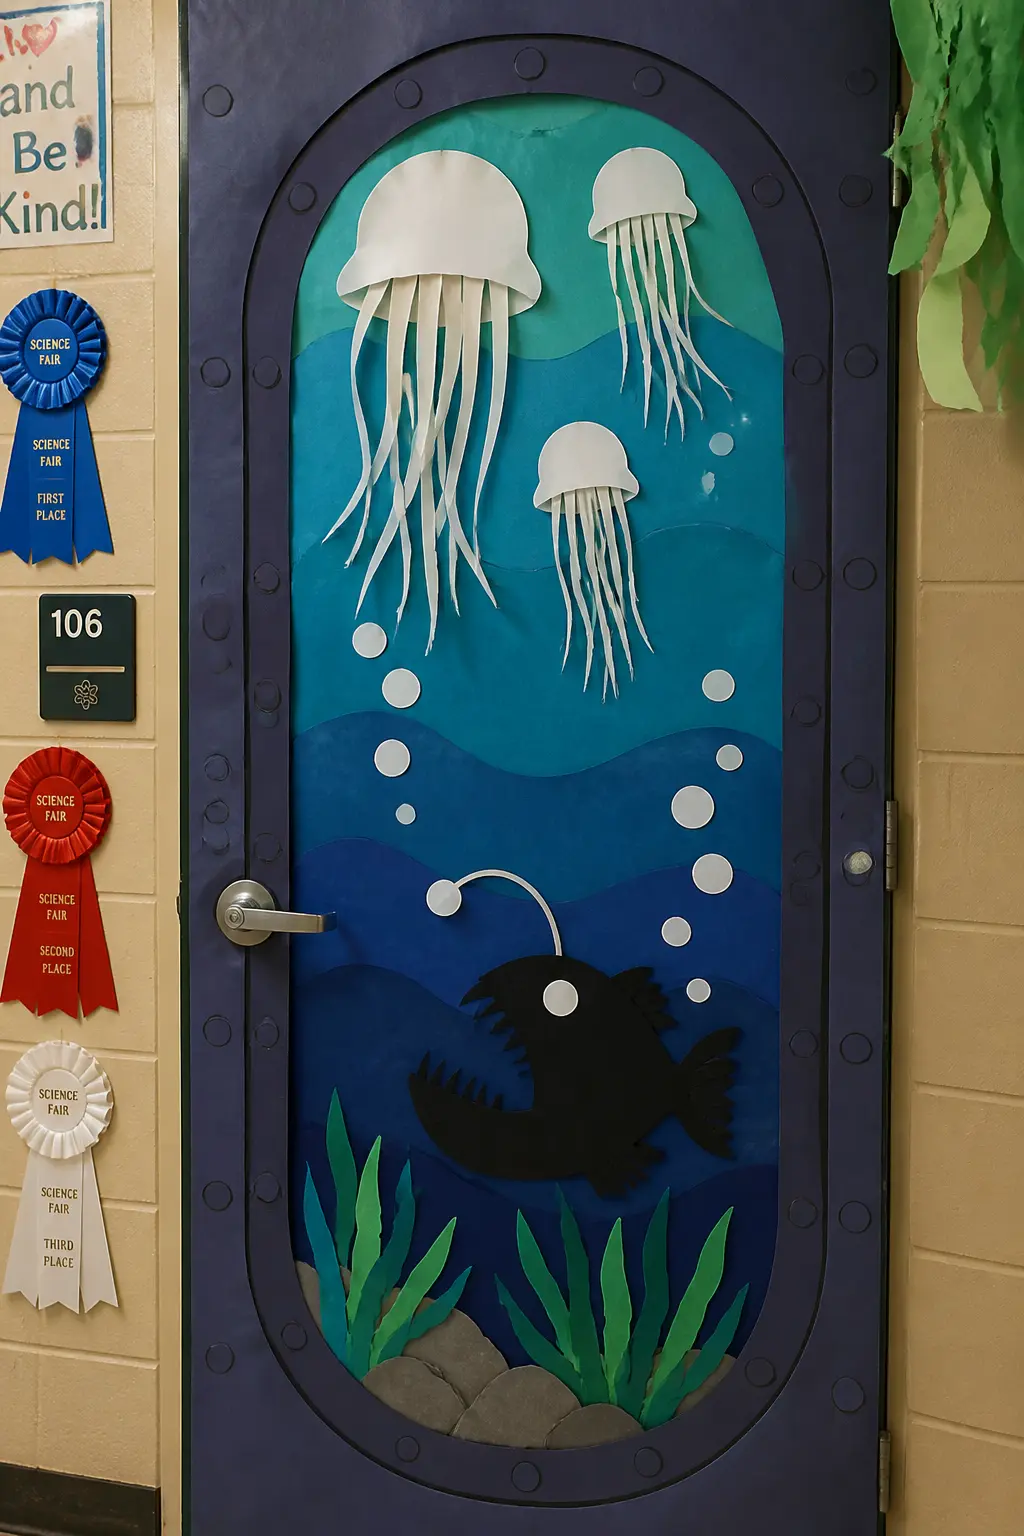
Frame the door as a porthole or a rectangular aquarium viewing window with a thick paper border in dark gray or silver. Behind the frame, the entire door panel is deep ocean: layered blues and greens from teal at the mid-level to near-black at the bottom and a slightly lighter blue near the top surface.
Creatures inhabit the water at various depths: paper jellyfish with trailing tentacle strips near the top, a paper anglerfish with a glowing paper lure in the lower depths, and scattered paper bubbles of various sizes rising.
No sea monster here: this door is about depth and wonder rather than fright, which suits a wider age range and gives the design a different emotional register from the sea monster version.
🛍 Shopping guide
Tips for Contest Day
Photograph the door the morning it goes up, before hallway traffic scuffs it. Use your phone in portrait orientation from about eight feet back so the whole door fits the frame. That photo is your entry form image, your classroom newsletter image, and your personal record.
Tape is the hidden variable. Painter’s tape behind every layer on the door panel, double-sided tape between paper layers, and a strip of clear tape along any edge that will catch a backpack. Paper is fragile for about three weeks. Tape is not.
If you are genuinely in a contest, check whether the judging criteria weight community involvement. If they do, a class community wall from the fifth section of this list beats every solo design on sheer point accumulation.
Frequently Asked Questions
What materials work best for classroom door decorations that need to last three weeks?
Cardstock holds better than construction paper, which fades and curls at the edges within a week. Use painter’s tape behind each layer on the door panel itself, and double-sided tape between paper layers.
Run a strip of clear tape along any long horizontal edge that will catch passing backpacks. A paper trimmer gives you straighter cuts than scissors, which means edges lie flatter and tape holds better along them.
How do you attach paper to a door without damaging the paint?
Painter’s tape is the standard choice and removes without pulling paint on most school door finishes. Apply it to the back of the paper, not directly to the door, so the door surface only touches tape, never adhesive paper backing.
For a full-panel background layer, run painter’s tape along all four edges and a few horizontal strips across the back. Check with your school’s facilities guidelines before using any spray adhesive.
Can these classroom door ideas work for a door decorating contest judged by student vote?
Yes, and the class community walls in this list are specifically strong for student-vote contests.
A pumpkin per student, a star per name, a train carriage per student, or a class photo pumpkin patch all give every child a reason to point their own door out to others, which drives votes.
Judges who are students respond to seeing themselves in the decoration.
How long does it take to build one of these paper door illustrations?
Simple high-contrast designs like the ghost, the mummy, or the candy corn stripes take under an hour. Mid-complexity designs like the skeleton, the moon and witch, or the cauldron take two to three hours.
The class community designs take longer because of the per-student units, but much of that time can be done with student help during a class period.
The most complex architectural scenes, the haunted house, the castle, the clock tower, take a full evening of focused cutting.
What is a safe way to extend a decoration above the door frame?
Cut the above-frame element from poster board rather than construction paper: poster board is stiff enough to stand unsupported when the base is taped firmly to the top of the frame.
Tape the base of the above-frame piece to both the door and the wall above the frame using painter’s tape. Keep the extension under twelve inches: beyond that, the weight causes the piece to bow forward.
Do not attach anything to ceiling tiles or sprinkler systems.
Are any of these designs suitable for high school classrooms?
Yes. The potion shelf with subject-area labels, the bookshelf with student name spines, the book character theme with a Halloween twist, the constellation map, and the paper village skyline all work for secondary grades because they rely on wit and craft rather than childlike imagery.
The clock tower at midnight and the cave mouth with glowing eyes also scale up well visually. Avoid the train and the pumpkin patch for high school: they read young.
Where can you find more ideas to use alongside the door decoration?
Once the door is up, you will want activities to match the energy inside the room. The 22 Classroom Halloween Activities With Free Printables list gives you lesson-length ideas that fit the same aesthetic. For a class party to go with the decoration, 72 Halloween This or That Pairs works as a quick no-prep activity that suits every grade level.

15 Halloween team-building games for work that actually build teamwork — relays, deduction, trivia

33 pink painted pumpkin ideas sorted by shade, from barely-there blush to hot pink, with every finis
34 ghost painted pumpkin ideas on uncut pumpkins, sorted from toddler-friendly sweet to properly uns
Leave a Reply