

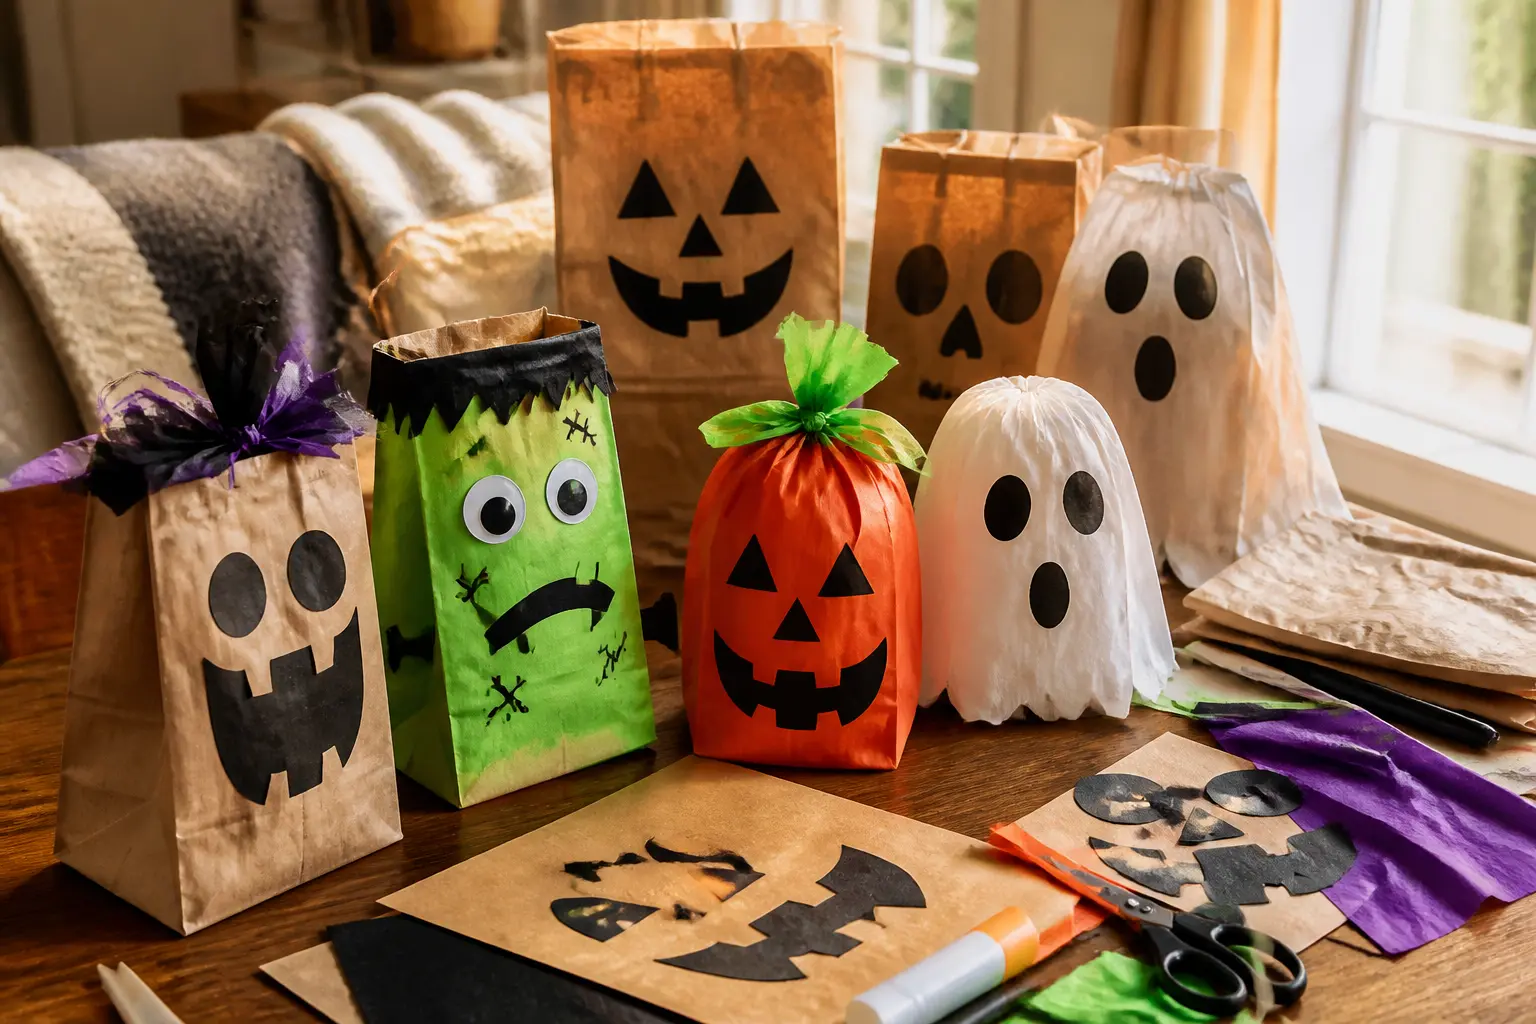
Kraft paper bags are the most underrated supply in the Halloween cupboard. They are cheap, flat-pack, sturdy enough to hold candy and take paint, card, crepe paper and ribbon without buckling.
The crafts here cover the whole October calendar: class party favours, trick-or-treat bags a child will actually want to carry, table centrepieces that come together in under an hour, and hand puppets that keep kids busy for the whole party.
Every craft below lists exactly what you need and walks through the method in order.
Active time is always separated from drying time, because the wait is sometimes the longest part, and that matters when you are making twenty of something the night before a party.
A few of these suit children working alongside an adult; where cutting or hot glue is involved, the step says so. Difficulty ratings are honest.
This post contains affiliate links. If you buy through them, I may earn a small commission at no extra cost to you.
- One-Eyed Monster Treat Bags
- Witch-Legs Favour Bag
- Witch Broom Treat Bag
- Hand-Painted Personalised Trick-or-Treat Bag
- Paper Bag Frankenstein Puppet
- Mummy Treat Bag
- Black Cat Paper Bag Puppet
- Spider Web Tissue-Paper Luminaria
- Vampire Cape Treat Bag
- Pumpkin Paper Bag Luminary
- Ghost Paper Bag Puppet
- Crepe Paper Tassel Treat Bag
- Spider Paper Bag with Pipe Cleaner Legs
- Cauldron Treat Bag with Foam Sticker Brew
- Haunted House Silhouette Bag
- Skull and Crossbones Paper Bag
- Bat Hanging Decoration from Paper Bags
- Washi Tape Stripe Trick-or-Treat Bag
- Skeleton Paper Bag with Bone Stamps
- Potion Bottle Label Bag
- Scarecrow Brown Bag Puppet
- Frequently Asked Questions
One-Eyed Monster Treat Bags
These are the bags that stop a kid mid-stride. A single enormous eye stares out from the folded flap, and a jagged row of white teeth lines the opening so the bag looks like it is mid-bite.
Finished bags stand upright on a table or hang in a row from a washing line strung across the party room. After the party, flatten them and slide them back into the original bag stack for next year.

One-Eyed Monster Treat Bags
What You Need
- 6 kraft paper lunch bags, approximately 18 x 10 cm
- A4 white card, 200 gsm, 1 sheet per bag
- A4 coloured card in pink, orange or lime, 200 gsm, 1 sheet per bag
- A4 black card, 200 gsm, 1 sheet for every 3 bags
- Craft glue stick, 1 per person
- Scissors (adult use for teeth cutting)
- Black marker, medium tip
How to Make It
- Fold down the top of each paper bag by about 4 cm to create a firm flap. Press the fold flat.
- Cut a large oval from white card, roughly 8 cm tall. Cut a slightly larger oval from coloured card. Cut a circle of black card about 4 cm across for the pupil. An adult should do the cutting for children under seven.
- Layer the circles: coloured oval at the back, white oval centred on top, black circle centred on the white. Glue each layer with the glue stick and press for ten seconds.
- Glue the finished eye to the centre of the folded flap. The eye should sit right on the fold line so it is visible from the front when the bag is closed.
- Cut a strip of white card about 10 cm wide and 4 cm tall. An adult cuts a zigzag along one long edge to make the teeth: each point should be roughly 1.5 cm wide at the base and 3 cm tall. Aim for five or six teeth per strip.
- Slide the flat edge of the tooth strip inside the bag opening so the teeth point downward and show below the flap. Glue the flat edge to the inside front of the bag. When the flap is closed the teeth jut out like a grin.
- Add a dot of black marker on the white oval for a highlight and the monster looks alert. Fill the bag with sweets before the party.
Good to Know
🛍 Shopping guide
Witch-Legs Favour Bag
This one leans into the classic Halloween image of a witch stuck headfirst in a cauldron, legs waving in the air.
Striped orange-and-black legs with curly-toed boots are glued to the front of a kraft bag, and a ruffle of black crepe paper runs across the middle like a skirt hem. The result is theatrical for a classroom party or a neighbour treat drop.
Store flat with the crepe ruffle tucked inside.

Witch-Legs Favour Bag
What You Need
- 1 kraft paper lunch bag per favour
- A4 orange card, 200 gsm, 1 sheet makes 2 bags
- A4 black card, 200 gsm, 1 sheet makes 2 bags
- Black crepe paper roll, 5 cm wide strip per bag
- Orange and green baker's twine, 30 cm per bag
- Hot glue gun and glue sticks (adult use only)
- White paint pen or white gel pen
- Ruler, pencil, scissors
How to Make It
- Draw two leg shapes on orange card: each leg is a narrow rectangle about 10 cm tall and 2 cm wide. At the bottom, round the shape into a simple boot with a curled-up toe. Cut out both legs. An adult should assist younger crafters with the curved cutting.
- Cut two narrow strips of black card, 1 cm wide and 10 cm long, for the stockings. Glue one strip over the lower half of each orange leg so it looks like a striped stocking meeting a boot. Press flat and let dry for five minutes.
- Use the white paint pen to add a few small dots to the boot area for decoration. Let dry.
- Position the two legs side by side on the lower half of the bag front and hot glue them in place. An adult must use the hot glue gun. The boot tips should point outward slightly so the legs look mid-kick.
- Cut a 5 cm wide strip of black crepe paper about 30 cm long. Gather it gently along one edge with your fingers to create a ruffle. Hot glue the gathered edge across the bag front, just above where the legs begin, so the ruffle acts as a skirt hem. Adult handles the glue gun.
- Fold down the top of the bag by 3 cm. Wrap the baker's twine twice around the folded top and tie a bow at the front. Fill the bag before tying.
- Write or stamp a short message on the upper bag front before filling if you want to personalise it.
Good to Know
🛍 Shopping guide
Witch Broom Treat Bag
The top of the bag gets fringed and fanned upward so it becomes the bristle end of a broom, and a wooden dowel poked through the gathered waist becomes the handle. Tied with Halloween ribbon, the whole thing reads as a tiny flying broom.
A dozen of these clustered in a jug on the party table look like a prop from a witches’ supply shop. Pull the dowels out after the party and the bags collapse flat for storage.

Witch Broom Treat Bag
What You Need
- 1 kraft paper lunch bag per broom
- 1 wooden dowel, 30 cm long and 6 mm diameter, per broom (a chopstick works as a substitute)
- 60 cm Halloween ribbon per broom (mix two or three colours: purple, orange, black)
- Scissors
How to Make It
- Open the bag fully and fill it with sweets, wrapped candy or small toys until it is about half full. Do not overfill or the fringe will not fan properly.
- Gather the top of the bag tightly in your fist, about 10 cm above the filling, so the bag pinches into a narrow neck.
- An adult cuts a series of vertical slits from the very top of the bag down to about 1 cm above the gathered neck. Each slit should be about 1.5 cm apart. These become the bristles.
- Fan the cut strips outward and upward with your fingers so they spread like a broom head. The more you separate and slightly curl individual strips (run them over the edge of a ruler), the fuller the broom looks.
- Push the dowel or chopstick up through the gathered neck from below, so about 20 cm of handle extends below the bag. Hold the neck firmly around the dowel.
- Wrap the ribbon around the gathered neck several times, covering about 5 cm, then tie a bow at the front. The ribbon holds the neck closed around the dowel and finishes the join between handle and bristles.
Good to Know
🛍 Shopping guide
Hand-Painted Personalised Trick-or-Treat Bag
A kraft gift bag with handles becomes a proper trick-or-treat bag when you paint a ghost, pumpkin or spider-web scene on the front and write the child’s name in bold letters.
Acrylic paint on kraft paper dries opaque and stays put through a full night of candy collection. The bag is sturdy enough to be reused for years. Store it flat inside a larger bag at the end of the season.

Hand-Painted Personalised Trick-or-Treat Bag
What You Need
- 1 kraft paper gift bag with handles, at least 25 x 20 cm
- Acrylic paint in white, orange, black
- Flat and round paintbrushes, sizes 6 and 2
- Black paint marker or Posca pen, medium tip
- White paint marker or Posca pen, medium tip
- Pencil for sketching
- Scrap paper for palette
How to Make It
- Stuff the bag loosely with crumpled newspaper so the front panel is flat and firm to paint on. This prevents paint bleeding through to the back.
- Lightly pencil in your design. A large ghost or pumpkin centred on the bag, with the child's name in block letters along the bottom, is the clearest layout. Keep shapes bold: fine detail is hard to read on kraft brown.
- Paint the main shapes first using the size 6 brush. White for a ghost needs two coats because kraft is dark: let the first coat dry for twenty minutes before applying the second. Orange pumpkins usually cover in one coat.
- Once the base colours are fully dry (allow at least forty minutes), use the size 2 brush and black paint to add facial features, outlines and details. A steady hand helps here; rest your wrist on the bag edge.
- Let the black details dry for twenty minutes. Then use the black marker to strengthen any outlines that look thin, and the white marker to add highlights, dots or the child's name in white over black areas.
- Remove the newspaper stuffing and leave the bag open to air for a final thirty minutes before filling with sweets or gifts.
Good to Know
🛍 Shopping guide
Paper Bag Frankenstein Puppet
A flat-bottomed paper bag makes an ideal hand puppet: the fold at the base becomes the jaw, and fingers slide into the flap to work the mouth. Frankenstein’s green face, bolts and stitched forehead translate perfectly to the boxy shape of a small bag.
This is the craft that keeps a party table occupied for a solid forty minutes, and the puppets end up as the afternoon’s entertainment. Store them flat in a stack.

Paper Bag Frankenstein Puppet
What You Need
- 1 small kraft paper lunch bag per puppet
- Green acrylic or poster paint
- Black, white and red acrylic or poster paint
- Size 6 flat brush
- Grey or silver card, A4, 200 gsm, 1 sheet for every 4 puppets
- Black marker, thick tip
- Craft glue or glue stick
- Scissors
How to Make It
- Keep the bag flat. Paint the entire outside surface of the bag green, including the base flap. Two coats give a solid colour on kraft: let the first dry for fifteen minutes before adding the second. The bag should look evenly covered with no brown showing through.
- While the second coat dries (about fifteen minutes), cut two small rectangular bolt shapes from grey card, each about 1.5 cm wide and 2 cm tall. An adult should do this cutting. Round the top corners of each bolt slightly.
- Once the green paint is dry, draw Frankenstein's face with the black marker. The base flap is the top of the head: draw the hairline there, with short stiff spikes. The mouth goes right along the fold line so it opens when fingers go inside the flap.
- Paint white rectangles for the eyes on the upper bag face, then add black pupils once the white is dry. Add red-painted stitching lines across the forehead using the thin end of a brush handle dipped in red paint, or a fine marker.
- Glue one bolt to each side of the bag, level with the lower jaw area. Press firmly and let dry for twenty minutes.
- To use as a puppet, flatten the bag and slide your hand in so four fingers sit inside the upper flap (the head) and the thumb sits in the lower pocket (the jaw). Opening and closing your hand works the mouth.
Good to Know
🛍 Shopping guide
Mummy Treat Bag
White crepe paper bandages wind around a standard lunch bag in overlapping strips, leaving two googly eyes peering out from the gaps.
It is quick enough to make in a batch of twenty, and the slightly irregular wrapping is part of the look rather than a flaw. Line a row of these along a windowsill or use them as individual favour bags at each place setting.
The crepe peels off easily afterward if you want to reuse the bags.

Mummy Treat Bag
What You Need
- 1 kraft lunch bag per mummy
- White crepe paper, 5 cm wide, about 80 cm per bag
- 2 googly eyes, 20 mm, per bag
- Craft glue or a thin line of glue stick
- Black marker
How to Make It
- Fill the bag with sweets first and fold the top down twice to close it. The filling keeps the bag rigid while you wrap, which makes the whole process much easier.
- Start at the base of the bag. Apply a thin line of glue along the back lower edge and press the start of the crepe strip to it. Let it tack for thirty seconds.
- Wind the crepe strip around the bag in overlapping diagonal strips, applying a dot of glue every two or three wraps to anchor it. Leave two small gaps near the upper third of the bag front for the eyes. The wrapping does not need to be neat: slight overlaps and slight angles look more mummy-like than perfectly even rows.
- When the crepe reaches the top, tuck the end behind a previous layer and secure with a dot of glue. Let the glue set for ten minutes before handling.
- Glue the two googly eyes into the gaps you left. If the eyes are larger than the gap, simply glue them on top of a layer of crepe. Let dry.
- Draw a small zigzag mouth below the eyes with the black marker for extra character, or leave the face minimal for a more eerie look.
Good to Know
🛍 Shopping guide
Black Cat Paper Bag Puppet
The bag’s flat bottom becomes the cat’s forehead, and a pair of pointed card ears glued to the corners give the whole shape immediately.
Pipe cleaner whiskers, a pink felt nose and narrowed yellow eyes finish a face that is genuinely cute rather than scary, which suits younger party guests perfectly.
Keep these for a Halloween craft station: children decorate their own, then perform a five-minute puppet show before the cake comes out.

Black Cat Paper Bag Puppet
What You Need
- 1 small kraft lunch bag per cat
- Black acrylic or poster paint
- Yellow and pink card, A4, 200 gsm, 1 sheet each for every 6 puppets
- 3 black pipe cleaners per puppet
- Small pink felt square, about 5 x 5 cm, per puppet
- White paint or white marker
- craft glue
- Scissors (adult for ear cutting)
How to Make It
- Paint the entire outside of the bag black. Apply two coats if the kraft shows through, drying for fifteen minutes between coats. The bag should be an even, matte black from base to opening.
- Cut two ear triangles from black card while the paint dries: each about 5 cm tall and 4 cm at the base. Cut two smaller inner-ear triangles from pink card, about 3 cm tall. An adult should cut these. Glue a pink triangle centred on each black triangle.
- Once the bag is dry, glue the ears to the top two corners of the bag base (the flat bottom), one at each corner. They should angle slightly outward. Hold each ear for twenty seconds while the glue grips.
- Cut a small teardrop or oval from pink felt for the nose. Glue it to the centre of the bag front, about one-third of the way down from the base.
- Draw two large almond-shaped eyes above the nose in white paint or white marker. Once dry, add yellow paint inside each eye shape, then a vertical black pupil. The eyes should look narrow and watchful.
- Cut each black pipe cleaner in half. Poke three half-pipe-cleaners through the front panel of the bag on each side of the nose and bend them outward for whiskers. A drop of glue on the inside of each hole keeps them from slipping.
- To use, flatten and slide your hand inside as for any bag puppet: four fingers in the upper flap, thumb in the lower.
Good to Know
🛍 Shopping guide
Spider Web Tissue-Paper Luminaria
A paper lunch bag becomes a glowing lantern when a white tissue paper web is glued inside and a battery tea light dropped into the base.
The light shines through the tissue and the kraft paper turns warm amber around it, which looks genuinely good lined up along a path or mantelpiece. This is a stationary craft: never use real candles inside paper bags.
Battery tea lights are the safe and easy answer, and they last all evening on one set of batteries.

Spider Web Tissue-Paper Luminaria
What You Need
- 1 kraft lunch bag per lantern
- White tissue paper, 1 sheet per lantern
- Black card, A4, 200 gsm, 1 sheet for every 3 lanterns
- Craft knife and cutting mat (adult use only)
- Craft glue or glue stick
- 1 battery-operated tea light per lantern
- Sand or dried rice, about 3 tablespoons per lantern, for ballast
How to Make It
- Pour the sand or dried rice into the base of the bag. This keeps the bag upright and weighted. Three tablespoons is enough to stabilise most lunch bags.
- Draw a spider-web pattern on the front panel of the bag lightly in pencil. A web radiates from one corner with five or six concentric arcs crossing the spokes. Keep it simple.
- An adult uses the craft knife on a cutting mat to cut away the spaces between the web lines, leaving only the web frame in place on the bag. Take your time: the cuts are small and fiddly, and tearing the bag at a join means starting again with a fresh one. Cut toward you and replace the blade if it starts dragging.
- Cut a square of white tissue paper slightly larger than the cut-out area and glue it to the inside of the bag front, covering all the cut-out spaces. Smooth it flat so there are no wrinkles over the openings. When lit, the tissue glows and the kraft web reads as a dark silhouette against it.
- Cut a small spider from black card, about 3 cm across with eight legs, and glue it somewhere on the tissue patch. Even a rough spider shape reads clearly when backlit.
- Drop the battery tea light into the base of the bag among the sand. Switch it on before placing the lantern, as the inside is hard to reach once the bag is positioned.
Good to Know
Vampire Cape Treat Bag
The bag itself stays plain kraft, but a black paper cape glued around the back transforms it into a mini Dracula complete with a red-lined collar.
Two tiny fangs cut from white card hang below the bag opening and a pair of red dot eyes finish the face. Make a batch for a class Halloween party: they are fast, graphic and need nothing more than card and glue.
Flatten after the party and save the capes separately for next year.

Vampire Cape Treat Bag
What You Need
- 1 kraft lunch bag per vampire
- Black card, A4, 200 gsm, 1 sheet per bag
- Red card, A4, 200 gsm, 1 sheet for every 4 bags
- White card scrap for fangs
- Red marker or red paint
- Craft glue or strong glue stick
- Scissors (adult for cape cutting)
How to Make It
- Cut the black card into a cape shape: a rectangle slightly wider than the bag, with two curved shoulders at the top and a slightly scalloped hem at the bottom. An adult should cut this. The cape should be about 18 cm tall so it wraps around the bag from behind.
- Cut a red card collar: a curved band about 3 cm wide and the same width as the cape top. This is the red lining visible above the cape neckline. Glue it along the top edge of the black cape on the front side, curling it slightly so it stands up like a collar when the cape is on the bag.
- Apply glue to the back of the cape and press it to the back of the bag, wrapping the top corners to the front so the collar peeks above the bag opening. Hold for thirty seconds. The bag should now look like it is wearing a cape.
- Cut two small fang shapes from white card: narrow triangles about 2 cm long. Glue them below the bag opening at the front, pointing downward and slightly apart. Let dry.
- Draw or paint two red dot eyes on the upper front of the bag, above where the fangs sit. Add two small dot pupils in black marker on each red dot. The face is deliberately minimal.
- Fill the bag with sweets before closing. The fangs sit at the front opening so the bag looks like it is biting anyone who reaches for a treat.
Good to Know
🛍 Shopping guide
Pumpkin Paper Bag Luminary
Orange paint and a black jack-o-lantern face turn a standard bag into a glowing pumpkin lantern. The kraft paper takes orange paint readily and the colour is rich when lit from inside.
A scrunched square of green tissue paper stuffed into the top suggests the pumpkin stem. Line a windowsill with five or six of these and they look more like a styled vignette than a craft project.
Always use battery tea lights: this is a paper bag and an open flame is never appropriate.

Pumpkin Paper Bag Luminary
What You Need
- 1 kraft lunch bag per pumpkin
- Orange acrylic paint
- Black acrylic paint
- Size 6 flat brush
- Black marker, medium tip
- Green tissue paper, one small square about 15 x 15 cm per lantern
- Battery-operated tea light, 1 per lantern
- Sand or dried rice, 3 tablespoons per lantern
- Pencil
How to Make It
- Pour sand into the bag base and place the (switched-off) tea light on top of the sand so it sits centred. This positions the light correctly and keeps the bag from tipping.
- Paint the outside of the bag orange with the size 6 brush. Apply two coats for even coverage on the kraft, letting the first dry for twenty minutes. Leave the painted bag open and standing to dry.
- Once fully dry, lightly pencil a jack-o-lantern face on the front panel: triangle eyes, a triangle nose and a wide grin with two or three square teeth.
- Fill the face outlines with black paint using the brush, taking care around the corners of each shape. Let dry for twenty minutes. When dry, sharpen any edges with the black marker.
- Scrunch the green tissue paper loosely into a rough leaf-and-stem shape and tuck it into the top of the bag so it spills out above the opening. This reads as the pumpkin's stalk and leaves.
- Switch the tea light on before setting the bag in position. The face will glow amber and black, and the orange sides of the bag will pick up warm light.
Good to Know
🛍 Shopping guide
Ghost Paper Bag Puppet
White paint, a black oval mouth and two large eyes are the whole recipe.
The charm of this puppet is in how expressive the face can be: a startled O mouth and wide round eyes reads as frightened ghost, while a grinning mouth and squinting eyes goes friendly.
Make a set of six with different expressions for a puppet-show kit that keeps children busy for the whole second half of a party. If you are hosting a preschool group, these Halloween crafts for toddlers have a few simpler puppets in the same spirit.

Ghost Paper Bag Puppet
What You Need
- 1 small kraft lunch bag per ghost
- White acrylic or poster paint
- Black acrylic or poster paint
- Size 6 flat brush and size 2 round brush
- Black marker, medium tip
How to Make It
- Paint the entire outside of the bag white. Kraft is dark so two coats are necessary: let the first dry for fifteen minutes before the second. The bag should look bright white with no brown showing.
- Once dry, paint the ghost's face on the bag front. Position the eyes in the upper third of the bag (above the fold, on the base flap). Use the size 6 brush to paint two large white oval eye whites, then the size 2 brush to add black pupils once the white is dry.
- Paint the mouth below the fold line using the size 2 brush and black paint. Placing the mouth here means it appears to open when the puppet is operated. A wide O shape looks startled; a horizontal curve looks cheerful.
- Add thin wiggly lines below the bag opening with the black marker to suggest the flowing hem of the ghost's body. Keep the lines loose and uneven for a more ghostly effect.
- Let everything dry for at least twenty minutes. Operate the puppet by flattening the bag and inserting your hand: four fingers in the upper flap, thumb in the lower, exactly as for any paper bag puppet.
Good to Know
🛍 Shopping guide
Crepe Paper Tassel Treat Bag
A kraft bag gets a full fringe of orange and black crepe paper tassels glued along the bottom edge, turning a plain favour bag into something that looks deliberately styled.
The tassels take three minutes per bag once you have the strip-cutting rhythm, and a table of thirty bags in alternating orange and black fringe looks genuinely dramatic. Tassels crush flat for storage and spring back to shape when the bag is filled.

Crepe Paper Tassel Treat Bag
What You Need
- 1 kraft lunch bag per favour
- Orange crepe paper, 8 cm wide strip about 25 cm long per bag
- Black crepe paper, 8 cm wide strip about 25 cm long per bag
- Craft glue or hot glue gun (adult for hot glue)
- Scissors
How to Make It
- Cut each crepe strip along one long edge to create fringe: make cuts every 1 cm, cutting about 6 cm deep into the strip and leaving 2 cm uncut at the top. This is fiddly and an adult should do it for children under eight. The finished strip looks like a comb.
- Apply a line of craft glue along the uncut top edge of the orange crepe strip. Press the strip along the bottom front of the bag, raw edge downward, so the tassels hang below the bag base. Hold for thirty seconds.
- Apply the black strip immediately above the orange one in the same way, overlapping the glued edges slightly. The two rows of contrasting fringe should cover the lower 4 cm of the bag front.
- Let the glue dry for ten minutes. Gently stretch each tassel slightly between thumb and forefinger to separate and fluff it: crepe paper stretches a little and the tassels will look fuller.
- Fill the bag and fold the top down once. If the fringe is on a bag that will stand upright, no closure is needed. If it is being carried, secure the top fold with a sticker or a strip of washi tape.
Good to Know
🛍 Shopping guide
Spider Paper Bag with Pipe Cleaner Legs
Eight pipe cleaner legs curl out from a round black paper bag, and two large white googly eyes stare from the top. The round shape comes from inflating the bag slightly and gathering the opening, which gives the spider a satisfying plump body.
These sit very happily in a cluster on a bookshelf or hanging from a doorway on black thread. They are fast enough to run as a drop-in station at a craft party: most children finish one in fifteen minutes.

Spider Paper Bag with Pipe Cleaner Legs
What You Need
- 1 small kraft lunch bag per spider
- Black acrylic or poster paint
- 4 black pipe cleaners per spider
- 2 googly eyes, 20 mm, per spider
- craft glue
- Black thread or yarn, 30 cm per spider, for hanging
How to Make It
- Paint the bag black on the outside. Two coats for full coverage, fifteen minutes between coats. Stand the bag open to dry.
- Once dry, fill the bag loosely with crumpled newspaper or tissue paper until it puffs out into a rounded ball shape. Do not overfill: the body should be plump but the opening still gatherable.
- Gather the bag opening tightly and twist it closed, then wrap a pipe cleaner around the twist several times to hold it. This forms the spider's neck and keeps the body inflated.
- Bend each remaining pipe cleaner in half to form a V. An adult pokes each V through the bag body, one at each of four evenly spaced points around the lower half, so four legs emerge from each side. Gentle pressure is enough: do not rip the bag.
- Bend the legs outward and down at a joint halfway along each one so they bow like real spider legs. The spider should now stand on its own legs.
- Glue the googly eyes near the top of the round body. Let dry for five minutes.
- To hang, tie one end of the black thread to the twist at the top and loop the other end over a doorframe, curtain rail or ceiling hook.
Good to Know
🛍 Shopping guide
Cauldron Treat Bag with Foam Sticker Brew
A round black paper bag becomes a bubbling cauldron when you add a ring of green foam bubble stickers along the top edge and a handle made from a black pipe cleaner threaded through two punched holes.
Children can fill these themselves at a treat station and carry them by the handle. After the party, remove the pipe cleaner handle, flatten the bag and stack it. The foam stickers stay put through an evening of handling.

Cauldron Treat Bag with Foam Sticker Brew
What You Need
- 1 black kraft paper bag, small, per cauldron (or paint a white bag black before starting)
- Green foam stickers in circle or irregular shapes, about 8-10 per bag
- 1 black pipe cleaner per bag
- Hole punch
- Green acrylic paint and a cotton swab, optional for extra bubbles
How to Make It
- If using a plain kraft bag, paint it black first and let it dry completely before continuing (twenty minutes). A pre-coloured black bag skips this step.
- Punch one hole on each side of the bag near the top, about 2 cm from the edge and 2 cm in from the side fold. The holes should align across from each other.
- Thread one end of the pipe cleaner through the left hole from outside to inside. Bend the end over by about 3 cm inside the bag to lock it in place. Thread the other end through the right hole the same way and bend it over. The pipe cleaner forms a looping handle above the bag.
- Press green foam stickers along the inside top edge of the bag, slightly overlapping the rim, so they appear to bubble up out of the cauldron. Cluster a few stickers in groups of two or three for a more irregular, bubbling look.
- If you have a cotton swab and green paint, dab a few extra bubble dots on the bag front in slightly different green shades. This adds depth but is entirely optional.
- Fill the bag with sweets and the handle makes it easy to carry or hang from a display.
Good to Know
Haunted House Silhouette Bag
A black paper silhouette of a haunted house with a crooked chimney, a jagged roofline and a yellow moon is glued to the front of a plain kraft bag.
It takes more cutting precision than the other bags in this list, but the result is a graphic, almost architectural treat bag that looks as if it came from a boutique stationery shop.
Make the silhouettes in a batch using a simple template traced once onto card. More Halloween paper cutting ideas are worth a look if you enjoy this style.

Haunted House Silhouette Bag
What You Need
- 1 kraft lunch bag per bag
- Black card, A4, 200 gsm, 1 sheet for every 2 bags
- Yellow card, A4, 200 gsm, 1 sheet for every 8 bags
- Craft knife and cutting mat (adult use)
- Craft glue or strong glue stick
- White gel pen, optional, for stars
- Pencil and ruler
How to Make It
- Sketch the haunted house template on black card in pencil. The house should fit within a 10 x 12 cm rectangle: a main rectangle body, a triangular roof with a crooked chimney at one end, two small window squares and an arched door. Keep all shapes chunky: thin details snap when cut.
- An adult cuts the silhouette with the craft knife on the cutting mat. Cut the outer profile first, then cut out the window and door openings from inside the silhouette. Go slowly at the chimney: it is the trickiest part.
- Cut a circle from yellow card, about 5 cm in diameter, for the moon. This is the only element that needs scissors and is suitable for children.
- Glue the yellow moon circle to the bag front, slightly off-centre and toward the upper right. Let it dry for a minute before placing the house on top.
- Glue the black house silhouette centred over the lower two-thirds of the bag front, overlapping the moon so the moon appears to sit behind the roofline. Press firmly and let dry for ten minutes.
- Use the white gel pen to dot a few stars in the upper corners of the bag front around the moon, if you want. Very simple, very effective.
Good to Know
🛍 Shopping guide
Skull and Crossbones Paper Bag
A classic skull face in white on a black or kraft bag, with two white crossbones below it, is one of those designs that takes less time than you expect and never looks cheap.
White paint on black bag reads as stark and graphic: bold enough to stack on a Halloween table without any further decoration around it.
This works equally well as a favour bag or as a wrapper for a small gift bottle of hand lotion or nail polish.

Skull and Crossbones Paper Bag
What You Need
- 1 kraft or black paper bag per skull bag
- White acrylic paint
- Black acrylic paint (for kraft bags only, to darken the background)
- Size 4 round brush
- White paint marker or Posca pen, medium tip
- Black marker, medium tip
- Pencil
How to Make It
- If using a kraft bag, paint the front panel black first with the size 4 brush. One coat is usually enough for a background. Let dry for twenty minutes.
- Lightly pencil a skull shape on the dark panel: a large oval for the cranium, a slightly narrower lower section for the jaw, two large oval eye sockets and a small triangular nose cavity. The skull should fill about two-thirds of the panel height.
- Paint the skull shape in white, using the size 4 brush for the large areas and its tip for the edges. Apply two coats, drying between, because a single coat of white over black tends to look grey.
- Paint the eye sockets and nose cavity in black once the white base is dry. Keep the eye sockets large and round: that is what makes a skull face read from a distance.
- Paint two narrow bone shapes crossing in an X below the skull jaw in white. Each bone has a small oval at each end. Let dry.
- Use the black marker to outline the skull and bones, sharpening any edges that look soft. The white paint marker adds a small highlight dot to each eye socket for a more graphic finish.
Good to Know
🛍 Shopping guide
Bat Hanging Decoration from Paper Bags
Flatten a black paper bag, cut a bat wing profile through all layers and open it out to find a fully symmetrical bat ready to hang. No paint, no glue: just one cut and a length of string.
Make twenty in the time it takes to watch a half-hour programme, then hang them at varying heights from the ceiling for an instant Halloween canopy. After the party, fold them flat and store in a folder for next year with no damage.

Bat Hanging Decoration from Paper Bags
What You Need
- 1 small black paper bag per bat
- Scissors or craft knife (adult use)
- Black thread or monofilament, 40 cm per bat
- White gel pen for eyes, optional
- Pencil
How to Make It
- Flatten the bag completely with the seam side down. Fold it in half from left to right so the two open-bag sides are aligned: you now have four layers of black paper in a roughly square block.
- On the top layer, draw one bat wing profile with a pencil: a curved top edge with two or three points, and a curved lower edge sweeping down and inward to a central point that will become the body. The body centre sits at the fold line.
- An adult cuts through all four layers at once along the drawn line. Do not cut along the fold. When you open out the folded cut piece, you have a symmetrical double-winged bat.
- The bag lining gives the bat a natural body thickness. Press it flat and fold the wing tips slightly upward for a more three-dimensional look.
- Add two small white gel-pen dots for eyes near the top centre of the body if you want. They are tiny but make the bat look alive rather than flat.
- Pierce a small hole at the top of the body with a pencil tip and thread the black thread through it. Tie a knot at the end to stop it pulling through. Hang at varying heights from a curtain rail, ceiling or doorframe.
Good to Know
Washi Tape Stripe Trick-or-Treat Bag
Four strips of Halloween washi tape applied vertically down a kraft bag create a candy-stripe effect in whatever combination you choose. Add a stamped or sticker label, fold the top, and the bag looks like something from a fancy gift shop.
This is the craft for the parent who wants a cohesive look across thirty favour bags without spending an afternoon cutting and gluing. Set up a tape station and children can do this themselves in under five minutes each.

Washi Tape Stripe Trick-or-Treat Bag
What You Need
- 1 kraft lunch bag per favour
- Halloween washi tape in 2-3 patterns (stripes, stars, cobwebs work well), 15mm wide
- A rubber stamp and black ink pad, or a Halloween sticker, for a label
- Bakers twine or ribbon, 30 cm per bag, for closure
How to Make It
- Open the bag and stand it upright on a flat surface. Apply the first strip of washi tape from the top fold to the bottom of the bag in one continuous vertical strip, pressing as you go. Start the tape flush with the top edge.
- Apply a second strip of a different washi pattern parallel to the first, leaving roughly 1 cm of kraft showing between them. Add a third and fourth strip in the same way, alternating patterns. Four strips across a standard lunch bag fill about half the front panel.
- If any tape overhangs the bag base, fold it neatly onto the base panel and press flat. The base is rarely visible when the bag is standing, so a slightly untidy fold there does not matter.
- Stamp or press a sticker label in the blank kraft space below or between the tape strips, or write the recipient's name in black marker.
- Fill the bag, then fold the top down twice and tie a length of baker's twine or ribbon around the fold to keep it closed.
Good to Know
🛍 Shopping guide
Skeleton Paper Bag with Bone Stamps
A simple foam stamp shaped like a bone, dipped in white paint, makes a repeating skeleton pattern across the front of a black bag in less than two minutes.
The result reads as a printed pattern rather than a handmade craft, which is very much the point. Make the stamp from a thick foam sheet cut into a simple bone dumbbell shape: one stamp makes every bag in a batch of thirty.
This is also a good rainy afternoon project for children aged seven and up, because the printing action is satisfying and forgiving. Check out the full list of Halloween crafts for adults if you want more projects with this graphic sensibility.

Skeleton Paper Bag with Bone Stamps
What You Need
- Black paper bags, 1 per skeleton bag
- Thick craft foam sheet, A4, 5 mm, 1 sheet makes multiple stamps
- White acrylic paint
- Flat plate or tray for paint
- Craft knife and cutting mat (adult use for stamp cutting)
- Scrap paper for test prints
How to Make It
- Draw a bone shape on the foam sheet in pencil: a central rectangular bar with a small circle at each of the four ends, like a classic dumbbell. The whole bone should be about 6 cm long. An adult cuts this out cleanly with the craft knife.
- Pour a thin, even layer of white paint onto the flat plate. Dip the foam stamp into the paint, covering the surface evenly. Do a test print on scrap paper: the bone should print as a solid white shape with clean edges. If it looks blobby, there is too much paint on the stamp; if patchy, add a little more.
- Print bones across the bag front in a scattered, casual arrangement. Some can angle left, some right, some horizontal. Leave roughly 1 cm between prints. The bag is black so each white bone pops immediately.
- Let the printed bag dry for twenty minutes. The paint will dry slightly raised on the bag surface, which gives a pleasingly tactile result.
- Once dry, add a simple skull face in white paint using a round brush at the top of the bag if you want a full skeleton theme. A circle with two dots for eyes and a row of small rectangles for teeth takes about three minutes.
Good to Know
Potion Bottle Label Bag
A small brown paper lunch bag becomes an apothecary potion bottle when you add a printed or handwritten label saying things like “Eye of Newt,” “Dragon Tears” or “Bat Wing Dust” and seal the top with a stopper of black tissue paper stuffed into the opening.
Line eight or ten of these on a shelf above a party table and they look like genuine witch’s pantry props. They also double as a favour bag when filled with sweets before sealing.

Potion Bottle Label Bag
What You Need
- 1 kraft lunch bag per potion
- White card or white label stickers, at least 8 x 5 cm each
- Black marker, fine and medium tip
- Black tissue paper, 1 square about 20 x 20 cm per bag
- Orange or green washi tape or baker's twine for the neck
- Ruler and pencil
How to Make It
- Fill the bag about halfway with sweets or crumpled black tissue to give it shape and weight. The bag should stand without flopping.
- Write or print your potion label on white card. Border it with a fine black marker frame, add a skull or star doodle in one corner and write the potion name in the centre in your best apothecary lettering. Aged, slightly uneven lettering looks more convincing than neat print.
- Attach the label to the front of the bag with a glue stick or peel-and-stick label backing. Centre it on the lower two-thirds of the bag front.
- Crumple the black tissue paper into a rough ball and push it into the opening of the bag so the edges fluff outward above the bag top: this becomes the cork or wax seal. Leave about 5 cm of tissue visible above the opening.
- Wrap a length of baker's twine or a strip of orange washi tape around the bag just below the tissue, at the bag neck, and tie or press it to secure. This creates the illusion of a bottleneck separating the body of the bag from the stopper.
- Set the bag upright among similar bags on a shelf. The varying label names are what make the display entertaining.
Good to Know
🛍 Shopping guide
Scarecrow Brown Bag Puppet
A scarecrow is the slightly gentler Halloween character, and its patchy, stitched-together quality is easier to achieve on a paper bag than you might expect.
Raffia or torn strip of brown paper bag sticks out of the collar and cuffs as straw stuffing, paint patches and a pointy hat cut from black card complete the look.
This makes a good companion project to the Frankenstein puppet: set up both at a party table and children can do a miniature monster-versus-scarecrow puppet show.
For more craft table ideas for a group, the Halloween crafts for preschool article has a good section on setting up multiple simultaneous projects without chaos.

Scarecrow Brown Bag Puppet
What You Need
- 1 small kraft lunch bag per scarecrow
- Orange, yellow and brown poster or acrylic paint
- Black card, A4, 200 gsm, for the hat
- Natural raffia or torn strips of brown paper, about 10 cm long, 6 strips per puppet
- Red marker or red paint for a stitched smile
- Black marker, medium tip
- craft glue
- Scissors (adult for hat cutting)
How to Make It
- Paint the bag face area in a warm yellow-orange: this is the scarecrow's cloth head. You do not need to paint the whole bag, just the front from the base flap halfway down. Let dry for fifteen minutes.
- Once dry, draw the scarecrow's face with the black marker: two large X-shaped eyes, a simple triangle nose and a stitched-line mouth. The mouth is a straight line with short perpendicular stitches crossing it at intervals, drawn in red marker or red paint.
- Cut a pointed witch-style hat from black card: a tall triangle on top of a wide brim rectangle. An adult cuts this. Glue the hat to the top of the bag base, tilted very slightly to one side for character.
- Glue bundles of raffia or torn paper strips to the sides of the bag just below the bag opening to suggest straw stuffing at the collar. Two or three strips per side is enough. Press firmly and let dry for ten minutes.
- Paint a small patch shape in brown or orange on the bag front, just below the face, and draw a few stitch lines around its edge with the black marker. One patch is enough.
- Operate the scarecrow puppet in the same hand position as any bag puppet: four fingers in the upper flap, thumb in the lower pocket.
Good to Know
Frequently Asked Questions
What kind of paper bags work best for Halloween crafts?
Flat-bottomed kraft paper lunch bags are the most versatile. They stand upright, take paint and glue readily, and the flat base doubles as a puppet jaw. For treat bags you intend to carry, use a slightly larger kraft gift bag with twisted paper handles, which is sturdier than a lunch bag when loaded with candy.
How do you get paint to stick to kraft paper bags without bubbling?
Apply thin coats and let each one dry fully before adding the next. Thick coats are the main reason paint bubbles or peels on paper: the moisture has nowhere to go.
Acrylic paint dries faster than poster paint and bonds slightly better to the kraft surface, so it is the better choice for any bag that will be handled a lot.
Are paper bag crafts suitable for a whole class of children?
Yes, and they are one of the better craft formats for groups because the bags are uniform, the materials are cheap and the steps are short enough to complete in a forty-minute session. Prepare all adult-only steps (cutting, hot glue) ahead of time so children can focus on painting and decorating.
Can these bags actually hold trick-or-treat candy?
A standard kraft lunch bag holds roughly the same volume as a medium mixing bowl, which is enough for a practical haul of wrapped sweets.
If a child plans to carry the bag for more than one street, double-bag it by placing it inside a second plain bag: the decoration stays visible through the outer bag and the handles are more reliable.
How do you store decorated paper bags after Halloween?
Let any paint or glue dry completely, then flatten the bags and stack them inside a large zip-lock bag or a flat cardboard box. Crepe paper decorations benefit from a layer of tissue paper between bags to prevent colour transfer. Most bags last two or three seasons stored this way.
What can go wrong with the bag puppet method and how do you fix it?
The most common problem is painting the mouth in the wrong place so it does not move when the puppet is operated. The mouth must sit exactly on the fold line between the bag base flap and the bag body.
If the face dries in the wrong position, paint over it and start the face again: acrylic covers well with two coats.

From classic black and orange to ghostly white and pastel-cute, these 20 Halloween balloon arch idea
14 preschool Halloween crafts ranked from zero mess to aprons-on, each with an honest clean-up time
31 wickedly fun Halloween party games for every age — from trending 2026 formats to beloved classi
Leave a Reply