

14 Halloween Charcuterie Boards for Kids Where Everything Is Finger Food
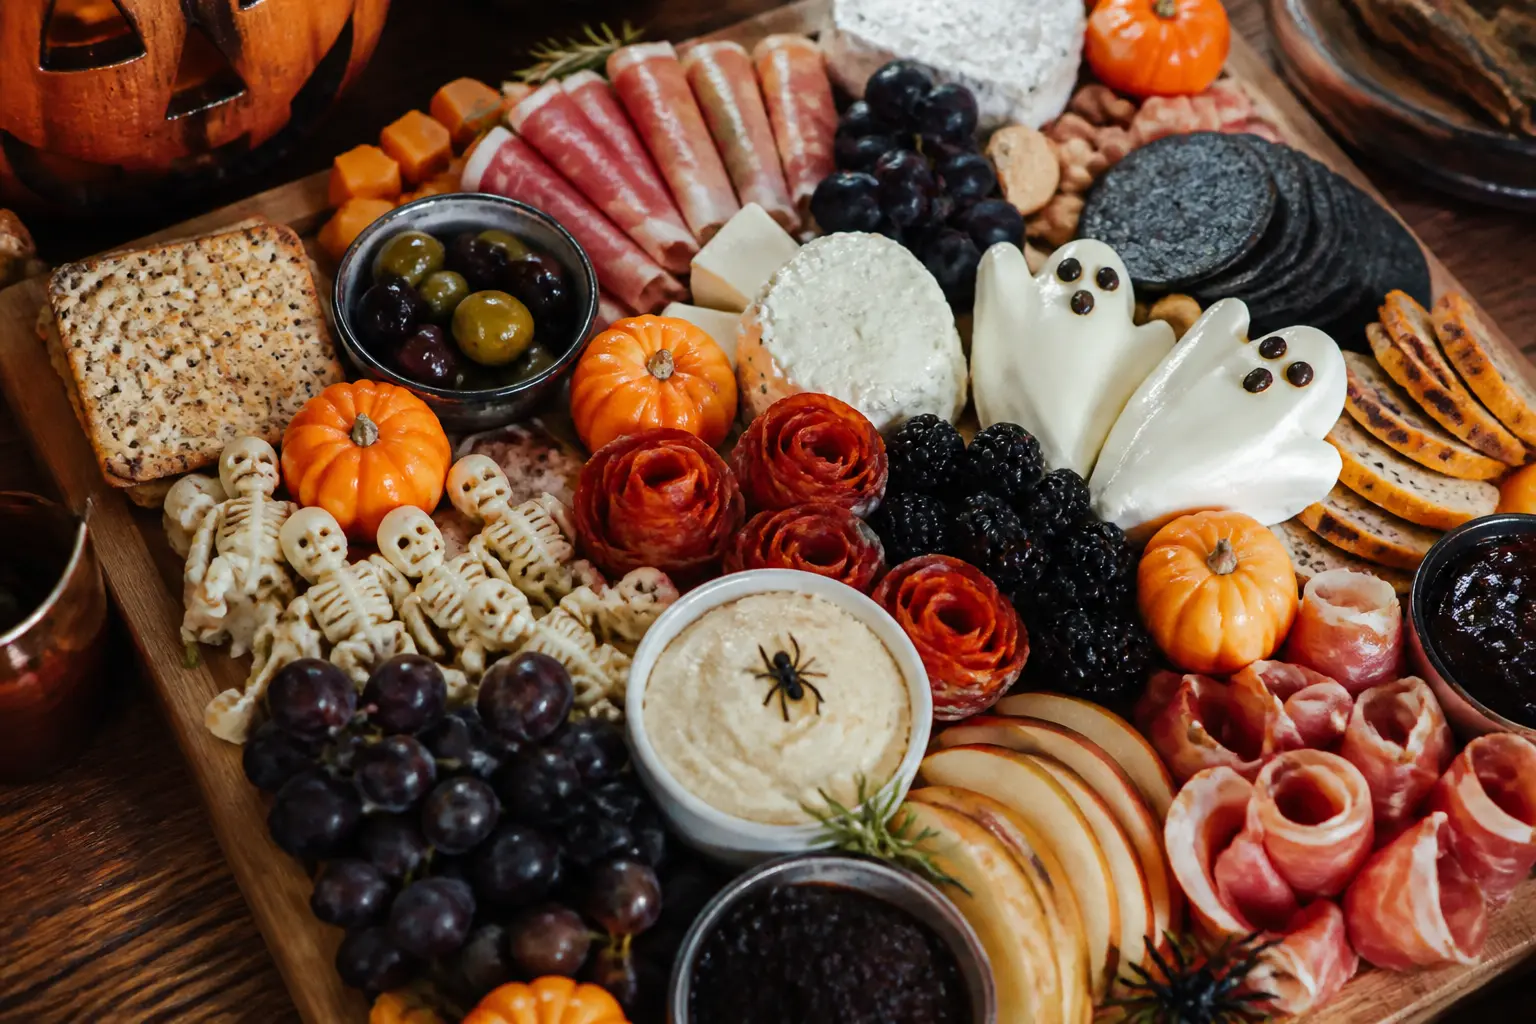
A halloween charcuterie board for kids is the one party snack that doubles as a centrepiece, requires zero cooking and disappears in ten minutes flat.
The boards below are built entirely from finger food: fruit, cheese, crackers, dips and a handful of chocolate, arranged into shapes that would make a set designer proud.
Contains dairy, tree nuts (where noted) and wheat in some boards; check the allergen line on each recipe before you build.
These are non-alcoholic, designed for a mixed-age table, and every single one can be assembled the morning of the party and kept covered in the fridge until guests arrive.
For games to run alongside the food, 25 Not-Too-Scary Halloween Party Games for Kids and 16 Halloween Games and Activities for Kids That Are Actually Fun are worth bookmarking next.
This post contains affiliate links. If you buy through them, I may earn a small commission at no extra cost to you.
- Witch Hat Fruit Board
- Black Cat Charcuterie Board
- Stacked Witch Hat Charcuterie Tower
- Pumpkin Jack-O-Lantern Fruit Platter
- Mummy Hummus Board
- Frankenstein Guacamole Board
- Spider Web Brie and Berry Board
- Graveyard Cracker and Cream Cheese Board
- Vampire Teeth Apple and Peanut Butter Board
- Monster Veggie Tray
- Ghost Pepper and Dip Board
- Cauldron Cheese Ball Board
- Bat Wing Charcuterie Board
- Candy Corn Cheese and Cracker Stack Board
- Frequently Asked Questions
Witch Hat Fruit Board
Three shades of grape plus a row of blackberries build a pointed hat that reads instantly from across the room.
The chocolate bar brim is structural as much as decorative: break a dark chocolate bar into segments and press them into a straight line across the board to separate the purple base from the green mid-section.
Use the smallest green grapes you can find so the hat keeps its triangular silhouette without gaps.
Make it ahead: wash and dry everything the night before, store in separate containers, and assemble directly on the board up to four hours before the party. Cover with cling film and refrigerate.

Witch Hat Fruit Board
Ingredients
- 400 g purple or black seedless grapes stems removed
- 300 g small green seedless grapes stems removed
- 200 g fresh blackberries
- 80 g dark chocolate bar 70% cocoa, broken into individual segments
Instructions
- Set a large rectangular wooden board (at least 35 x 50 cm) on a flat surface.
- Arrange the purple grapes in a wide, slightly curved row across the bottom third of the board to form the brim of the hat.
- Press the chocolate segments in a straight horizontal line just above the purple grapes to form the hat band, spanning roughly 30 cm.
- Pile the green grapes above the chocolate band in a widening triangle, angling the sides inward as you work upward.
- Cover the upper two-thirds of the triangle with blackberries, pressing them gently into the grapes so they sit flat.
- Use a small cluster of 8 to 10 extra blackberries to form the curled tip of the hat, setting them at a slight diagonal above the main triangle.
- Refrigerate uncovered for up to 4 hours, or serve immediately.
🛍 Shopping guide
Black Cat Charcuterie Board
A solid oval of blackberries forms the cat body, two cucumber-slice eyes sit at the centre, and thin pretzel sticks make the whiskers. The ears are sharp triangles of sliced aged cheddar pressed upright at the top of the berry oval.
Surround the cat with cubed orange cheddar, cracker rounds and dark grape clusters so the whole board reads like a Halloween still life. Contains wheat (crackers, pretzels) and dairy (cheddar). Skip the pretzel whiskers for a gluten-free table and use chive stems instead.

Black Cat Charcuterie Board
Ingredients
- 450 g fresh blackberries about 3 x 150 g punnets
- 1 medium English cucumber sliced into 5 mm rounds (about 20 slices)
- 200 g aged cheddar half cut into 1 cm cubes, half sliced into two pointed triangles for ears
- 150 g orange cheddar e.g. Colby or mild cheddar, cut into 1 cm cubes
- 80 g thin pretzel sticks for whiskers
- 150 g round crackers wheat or seed variety
- 200 g dark seedless grapes in small clusters
- 1 blueberry for the nose
Instructions
- Choose a large board (at least 40 x 55 cm). Draw an imaginary oval in the upper-centre and fill it completely with blackberries, packing them close so no board shows through.
- Place two cucumber rounds toward the upper-middle of the oval for eyes. Set one blueberry between and just below them for the nose.
- Snap 6 pretzel sticks to roughly 8 cm lengths. Press 3 on each side of the nose, angling outward, to form whiskers.
- Stand two cheddar triangles upright at the top of the blackberry oval, pressing them in gently, to form the cat ears.
- Tuck rows of cucumber slices along both sides of the blackberry oval to suggest the front paws.
- Scatter cubed orange and aged cheddar in clusters around the outside edges of the board.
- Fill the remaining gaps with cracker rounds and dark grape clusters.
- Serve immediately or cover and refrigerate for up to 3 hours.
Stacked Witch Hat Charcuterie Tower
This is the showpiece: a three-dimensional tiered hat built from rings of cheddar cubes, salami roses, olive layers and dark crackers, rising from a round wooden board. It takes patience to stack, but every element is structural and nothing needs glue or skewers.
The key is building from the widest ring upward, tamping each layer gently before adding the next. Contains dairy, wheat, soy (check cracker labels) and processed meat. Build up to two hours ahead, cover loosely with a bowl or cake dome, and refrigerate.

Stacked Witch Hat Charcuterie Tower
Ingredients
- 500 g sharp orange cheddar cut into 2 cm cubes
- 200 g Swiss or Gouda cut into thin 4 cm fingers
- 300 g sliced salami about 40 slices, rolled into roses
- 1 x 150 g bag dark black sesame or charcoal round crackers
- 80 g pimiento-stuffed green olives drained
- 80 g pitted black olives drained
- 100 g dark chocolate bar broken into segments
- 100 g glazed mini sausages or cocktail-style mini breadsticks
- 80 g cinnamon pinwheel cookies store-bought
- 1 x 100 g packet chocolate sandwich cookies e.g. chocolate wafer rounds, for the hat tip
Instructions
- Clear a large round board (at least 45 cm diameter). Arrange the dark crackers in a full circle around the outer edge, overlapping slightly.
- Inside the cracker ring, build a wide ring of orange cheddar cubes, standing them upright and pressing together, about 2 to 3 cubes high.
- Lay a ring of chocolate segments or dark crackers flat on top of the cheddar to act as a structural separator layer.
- Build the next ring inside and on top: roll each salami slice into a rose and arrange in a tight circle, tucking the edges inward to keep the tower's conical shape.
- Add another layer of cheddar cubes, this time in a slightly smaller ring, keeping the sides angled inward.
- Top the cheddar with a ring of alternating black and green olives.
- Stack the chocolate sandwich cookies in a slightly tilted column above the olives, leaning the stack at a slight angle to mimic the witch hat's curving tip. Press together firmly.
- Surround the outer crackers with mini sausages or breadsticks, then scatter pinwheel cookies and cheese fingers in the remaining spaces on the board.
- Cover with an inverted large bowl and refrigerate for up to 2 hours.
🛍 Shopping guide
Pumpkin Jack-O-Lantern Fruit Platter
Mandarin orange segments fan out from a green kiwi stem to form a pumpkin on a white platter. The jack-o-lantern face comes from triangle-cut blueberries and halved green grapes. Simple, bright and visually unmistakable.
Works well as a lighter counterpoint to a cheese-heavy table, and the whole thing is dairy-free and nut-free. Assemble up to two hours ahead and cover with cling film directly touching the fruit surface to prevent browning.

Pumpkin Jack-O-Lantern Fruit Platter
Ingredients
- 8 medium mandarins or clementines peeled and segmented (keep segments intact)
- 1 kiwi fruit peeled and cut into a short cylinder, then halved lengthways to form a stem shape
- 16 blueberries
- 10 green seedless grapes halved lengthways
- 1 tablespoon fresh lemon juice
Instructions
- Choose a large white or pale platter (at least 30 cm wide). Set the kiwi piece at the top centre to act as the pumpkin stem.
- Fan mandarin segments outward from the base of the kiwi in a rounded pumpkin shape, overlapping slightly and keeping the curve even on both sides.
- Use 6 blueberries arranged in two triangles to form the eyes of the jack-o-lantern face.
- Place 4 blueberries in a curved line below the eyes to form the nose triangle.
- Arrange the halved green grapes in a wide zigzag line below the nose to form the jagged mouth.
- Brush any cut grape or kiwi surfaces lightly with lemon juice to slow browning.
- Serve immediately or cover directly with cling film and refrigerate for up to 2 hours.
Mummy Hummus Board
A large bowl of white hummus sits in the centre of a dark slate board, piped or spooned with criss-cross lines of sour cream to create mummy bandages, and two olive halves perch on top as the eyes. Crudites, crackers and pita triangles surround it.
Children load their own crackers, which makes the snack last longer and the presentation stay neat longer than you might expect. Contains sesame (hummus) and wheat (pita, crackers); use gluten-free crackers and skip pita for a wheat-free version.

Mummy Hummus Board
Ingredients
- 400 g store-bought white hummus plain or roasted garlic
- 3 tablespoons full-fat sour cream transferred to a small piping bag or zip-lock bag with one corner snipped
- 4 black olives halved crosswise
- 150 g baby carrots
- 150 g cucumber cut into spears
- 100 g cherry tomatoes
- 150 g pita bread cut into triangles and toasted lightly
- 100 g seed or plain crackers
Instructions
- Spoon the hummus into a medium bowl (about 14 cm diameter) and smooth the top flat.
- Pipe sour cream in 5 horizontal lines across the hummus surface, then run the bag across in the opposite direction to create a criss-cross bandage pattern.
- Press two olive halves, cut side down, near the upper third of the hummus to form the mummy eyes.
- Place the bowl in the centre of a large dark slate or board.
- Arrange carrots, cucumber spears and cherry tomatoes in radiating clusters around the bowl.
- Fill the remaining gaps with pita triangles and crackers.
- Serve immediately. Hummus can sit at room temperature for up to 1 hour; refrigerate the board if assembling more than 1 hour ahead and bring it out 15 minutes before serving.
Frankenstein Guacamole Board
Fresh guacamole goes into a square white ramekin, then two grape-tomato eyes, a sliver of red pepper mouth and a strip of sliced kiwi on top become the monster face.
The green of good guacamole is the whole point here, so make it from scratch rather than buying it pre-made. The board around it fills with tortilla chips, cucumber coins and sliced bell peppers. Avocado is a tree-nut-free, dairy-free base; this board is entirely plant-based.
Press cling film directly onto the guacamole surface to prevent browning if making ahead.

Frankenstein Guacamole Board
Ingredients
- 3 ripe Hass avocados halved and pitted
- 2 tablespoons fresh lime juice
- 1/2 teaspoon fine sea salt
- 1/4 teaspoon garlic powder
- 2 grape tomatoes for eyes
- 1 small strip of red bell pepper about 3 cm x 1 cm, for the mouth
- 1 thin slice of kiwi cut into a jagged strip, for hair
- 200 g tortilla chips
- 150 g cucumber sliced into coins
- 100 g orange or yellow bell pepper sliced into strips
Instructions
- Scoop avocado flesh into a bowl. Add lime juice, salt and garlic powder, then mash with a fork until mostly smooth with a few small chunks remaining. Taste and add more salt if needed.
- Transfer the guacamole to a square white ramekin or small bowl (about 10 x 10 cm), smoothing the top flat.
- Press two grape tomatoes into the upper third of the guacamole as the eyes.
- Press the red pepper strip below the tomatoes in a slight curve to form the mouth.
- Lay the jagged kiwi strip across the very top of the guacamole to suggest bolted, messy hair.
- Set the ramekin on a large dark board and surround it with clusters of tortilla chips, cucumber coins and pepper strips.
- Serve within 30 minutes, or cover guacamole surface directly with cling film and refrigerate for up to 2 hours.
Spider Web Brie and Berry Board
A whole round of brie sits in the centre of a dark slate, drizzled with a blackberry compote web. The deep purple compote against the cream cheese and dark board looks genuinely dramatic and takes four minutes to make.
Serve with sliced baguette and water crackers surrounding the brie. Contains dairy and wheat. The compote can be made three days ahead and kept in a jar in the fridge; reheat gently before drizzling so it flows cleanly.

Spider Web Brie and Berry Board
Ingredients
- 1 wheel of brie about 250 g, at room temperature
- 150 g fresh or frozen blackberries
- 1 tablespoon caster sugar
- 1 teaspoon fresh lemon juice
- 150 g water crackers
- 1/2 baguette sliced into 1 cm rounds
- 100 g red or black seedless grapes in small clusters
Instructions
- Combine blackberries, sugar and lemon juice in a small saucepan. Cook over medium heat for 4 to 5 minutes, pressing the berries with the back of a spoon until broken down and syrupy. Remove from heat and cool for 3 minutes.
- Set the brie wheel in the centre of a large dark slate or board.
- Transfer the warm compote to a small piping bag or a zip-lock bag with a corner snipped. Pipe three concentric circles on top of the brie, spacing them about 1 cm apart.
- Draw a toothpick or skewer from the centre of the brie outward through all three circles, repeating at 8 evenly spaced points around the wheel to create the web pattern.
- Arrange water crackers and baguette slices in overlapping fans around the brie.
- Tuck grape clusters into the remaining gaps.
- Serve immediately while the brie is at room temperature.
🛍 Shopping guide
Graveyard Cracker and Cream Cheese Board
Rectangular crackers stand upright in a thick layer of whipped cream cheese to form tombstones, each one labelled with a small blob of black olive paste or a tiny triangle of sliced olive. Crumbled dark rye crackers scattered around the base look like fresh soil.
The whole board takes fifteen minutes and needs no tools beyond a butter knife. Contains wheat and dairy. Use gluten-free crackers throughout for a wheat-free version; the visual effect is identical.

Graveyard Cracker and Cream Cheese Board
Ingredients
- 250 g full-fat cream cheese at room temperature
- 2 tablespoons sour cream
- 1/4 teaspoon fine sea salt
- 20 rectangular crackers e.g. table water biscuits or flatbread crackers, for tombstones
- 60 g dark rye crackers roughly crumbled, for the soil
- 6 black olives sliced into thin rounds, for tombstone lettering
- 100 g cherry tomatoes for colour
- 80 g baby carrots
Instructions
- Beat cream cheese, sour cream and salt together with a fork until smooth and spreadable.
- Spread the cream cheese mixture in a thick, even layer (about 1.5 cm deep) across a large flat board, leaving a 2 cm border.
- Press the rectangular crackers upright into the cream cheese at irregular angles and spacing, pushing each one in about 1 cm so it stands firmly.
- Place two or three olive rounds on each cracker to suggest RIP lettering or a cross shape.
- Scatter crumbled dark rye crackers across the cream cheese between the tombstones to create the soil effect.
- Dot cherry tomatoes and baby carrots around the outer border of the board.
- Serve immediately, or cover and refrigerate for up to 2 hours.
Vampire Teeth Apple and Peanut Butter Board
Apple slices get a smear of peanut butter on one edge, then a row of miniature marshmallows pressed in to create vampire fangs.
Each completed set of teeth sits upright on the board, and the surrounding board fills with celery sticks, pretzel rods and extra peanut butter cups for dipping. This is a genuinely popular snack with primary-school-age children and doubles as a quick activity at the table.
Contains peanuts, wheat (pretzels) and tree nuts if almond butter is substituted. Use sunflower seed butter for a nut-free classroom-safe version.

Vampire Teeth Apple and Peanut Butter Board
Ingredients
- 4 large red apples each cut into 8 wedges and any browning surface rubbed with a cut lemon
- 180 g smooth peanut butter or sunflower seed butter for nut-free
- 80 g miniature marshmallows
- 100 g celery cut into 8 cm sticks
- 100 g pretzel rods
- 2 tablespoons fresh lemon juice for brushing apple surfaces
Instructions
- Brush cut apple surfaces lightly with lemon juice to slow browning.
- Spread about 1 teaspoon of peanut butter along the straight-cut edge of one apple wedge.
- Press 4 to 5 miniature marshmallows into the peanut butter in a row, spacing them to look like teeth.
- Top with a second apple wedge, pressing gently so the peanut butter acts as glue and the marshmallows are visible between the two slices.
- Repeat with remaining apple wedges to make 12 to 16 vampire teeth sets.
- Arrange the finished teeth on a large board, standing them on their curved side so the marshmallows are visible.
- Surround with celery sticks, pretzel rods and a small bowl of extra peanut butter for dipping.
- Serve within 1 hour to keep the apple slices fresh.
Monster Veggie Tray
A large oval of broccoli florets forms the monster body, baby carrots become the arms, cucumber coins are the scales, and two cherry-tomato eyes sit at the top. A shallow bowl of green goddess dip or tzatziki anchors the centre.
The whole board is plant-forward, dairy-light and easy to scale up for a larger group. No tree nuts, no wheat. Prep all vegetables the day before and store in zip-lock bags in the fridge; the dip can be made 48 hours ahead.

Monster Veggie Tray
Ingredients
- 400 g broccoli cut into small florets
- 200 g baby carrots
- 200 g cucumber sliced into 5 mm coins
- 2 cherry tomatoes for the eyes
- 1 strip yellow bell pepper about 5 cm long, for the mouth
- 250 g store-bought green goddess dressing or tzatziki for dipping
Instructions
- Pour the dip into a small bowl (about 12 cm diameter) and set it in the centre of a large flat board.
- Arrange broccoli florets in a dense oval shape around the bowl, packing them closely to form the monster body.
- Place baby carrots in two radiating lines from the upper sides of the broccoli oval to form outstretched arms.
- Lay cucumber coins in overlapping rows along the lower portion of the oval and along the arm lines to look like scales or texture.
- Set two cherry tomatoes above the bowl, pressing them into the broccoli, for the eyes.
- Curve the yellow pepper strip below the tomatoes into a grinning mouth shape, tucking it between the broccoli florets to hold it in place.
- Serve immediately or refrigerate the assembled board, uncovered, for up to 2 hours.
Ghost Pepper and Dip Board
White bell pepper halves, with their natural oval shape, become ghostly faces when two small olive-round eyes are pressed into the flesh.
Line up five or six ghosts on a long board, surround them with black bean dip, corn chips and dark grapes, and the colour contrast does all the theatrical work. Entirely plant-based, no wheat, no dairy.
The bean dip can be homemade or store-bought; either works. If using store-bought, tip it into a black bowl for maximum contrast.

Ghost Pepper and Dip Board
Ingredients
- 3 large white or pale yellow bell peppers halved lengthways and seeds removed
- 12 black olive rounds about 2 mm thick, for eyes and mouths
- 250 g black bean dip store-bought or homemade
- 200 g corn chips or tortilla chips
- 150 g dark seedless grapes in clusters
Instructions
- Lay each pepper half cut side up on a board. Press two olive rounds into the upper third of each half for eyes, pushing lightly so they hold.
- Press one olive round, slightly lower, in an oval or open-circle shape to suggest a surprised ghost mouth.
- Pour the black bean dip into a small black bowl and place it at one end of a long rectangular board.
- Arrange the ghost peppers in a row next to the dip bowl, spacing them evenly along the board.
- Fill the remaining space with corn chips and dark grape clusters.
- Serve within 2 hours. The assembled board can be refrigerated, uncovered, for up to 3 hours before serving.
Cauldron Cheese Ball Board
A black sesame-coated cheese ball sits inside a small cast-iron skillet or dark bowl to mimic a witch cauldron, and a pretzel rod handle arches across the top. The cauldron sits at the centre of a board loaded with breadsticks, crackers and sliced apples.
The cheese ball itself is cream cheese and sharp cheddar with a pinch of smoked paprika, which gives depth without any spice that would put off younger guests. Contains dairy and wheat.
Make the cheese ball up to two days ahead and coat in sesame seeds just before serving so they stay crisp.

Cauldron Cheese Ball Board
Ingredients
- 225 g full-fat cream cheese at room temperature
- 150 g sharp cheddar finely grated
- 1/2 teaspoon smoked paprika
- 1/4 teaspoon garlic powder
- 1/4 teaspoon fine sea salt
- 4 tablespoons black sesame seeds for coating
- 1 long pretzel rod for the cauldron handle
- 1 small cast-iron skillet or dark bowl about 15 cm diameter, to serve as the cauldron
- 200 g breadsticks
- 150 g assorted crackers
- 2 medium apples sliced and brushed with lemon juice
Instructions
- Beat cream cheese, cheddar, smoked paprika, garlic powder and salt together until fully combined and smooth.
- Shape the mixture into a rough ball using your hands, then wrap in cling film and refrigerate for at least 1 hour until firm enough to hold its shape.
- Spread black sesame seeds on a flat plate. Unwrap the chilled cheese ball and roll it in the seeds, pressing gently so they adhere all over.
- Set the sesame-coated ball into the cast-iron skillet or dark bowl.
- Press the pretzel rod across the top of the skillet, resting both ends on the rim, to form the cauldron handle.
- Place the cauldron in the centre of a large board and surround it with breadsticks, crackers and apple slices.
- Serve within 2 hours of coating with sesame seeds.
🛍 Shopping guide
Bat Wing Charcuterie Board
Two large fans of thinly sliced salami, each fanned into a curved wing shape, flank a central bowl of dark olive tapenade on a long rectangular board. Between the wings and the bowl, two green olive eyes complete the bat face.
The board fills out with water crackers, cubed manchego and clusters of dark grapes. The wings take about three minutes to build once the salami is laid out. Contains dairy and wheat; manchego can be swapped for a firm dairy-free cheese alternative.
Assemble up to one hour ahead and keep refrigerated.

Bat Wing Charcuterie Board
Ingredients
- 200 g thinly sliced salami about 28 slices, for the wings
- 150 g black olive tapenade
- 2 large pimiento-stuffed green olives for the bat eyes
- 150 g manchego cut into 1.5 cm cubes
- 150 g water crackers
- 200 g dark seedless grapes in clusters
Instructions
- Set a small dark bowl of tapenade in the upper-centre of a long rectangular board.
- Fan 14 salami slices in a wide arc to the left of the bowl, overlapping each slice by half and curving the row downward and outward to form the left bat wing. The wing should span about 20 cm.
- Mirror the same arc on the right side with the remaining 14 slices to form the right wing.
- Place two green olives just below the tapenade bowl, side by side, to form the bat eyes.
- Arrange manchego cubes in clusters along the lower portion of the board, between and beneath the wings.
- Fill the remaining spaces with water crackers and dark grape clusters.
- Cover and refrigerate for up to 1 hour before serving.
Candy Corn Cheese and Cracker Stack Board
A tall triangular stack built from three distinct layers, white at the top, orange in the middle and yellow at the base, recreates the candy corn palette using white cheddar fingers, orange cheddar cubes and yellow bell pepper strips.
No dye, no candy, all real food. The layers sit on a round board surrounded by pretzel nuggets and sliced cucumber. Straightforward enough that an older child can help build it. Contains dairy and wheat.
Orange cheddar can be swapped for carrot sticks to make a dairy-free version of the middle layer.

Candy Corn Cheese and Cracker Stack Board
Ingredients
- 150 g white cheddar or fresh mozzarella cut into thin 5 cm fingers, for the top layer
- 200 g orange cheddar mild, cut into 1.5 cm cubes, for the middle layer
- 2 large yellow bell peppers cut into 1 cm wide strips, for the base layer
- 150 g pretzel nuggets
- 150 g cucumber sliced into coins
Instructions
- Choose a large round board (at least 40 cm diameter).
- Arrange the yellow pepper strips across the wide bottom third of the board in overlapping rows, forming the base of the triangle and keeping the line roughly horizontal.
- Stack orange cheddar cubes in a band above the pepper strips, slightly narrower than the pepper layer, to form the middle section of the candy corn.
- Lay white cheddar fingers in a small tight cluster at the very top of the triangle, forming the pointed white tip.
- Step back and adjust any pieces to sharpen the triangular silhouette.
- Surround the outside of the triangle with pretzel nuggets and cucumber coins.
- Serve within 2 hours.
Frequently Asked Questions
How far ahead can a halloween charcuterie board for kids be assembled?
Most boards can be assembled up to four hours ahead. Fruit boards and veggie boards hold well refrigerated and covered with cling film pressed directly onto the surface.
Boards with crackers are best built no more than one hour before serving to keep them from going soft. Cheese balls and the cauldron board can be prepared up to two days ahead; just add the coating or any cracker elements at the last minute.
What are good nut-free swaps for a classroom halloween party?
Replace peanut butter with sunflower seed butter in the vampire teeth board. Skip any nut-based cheese alternatives and use hummus or bean dip as the central dip. All the fruit boards, veggie trays and the ghost pepper board are naturally nut-free.
How do I keep fruit from browning on a halloween board?
Brush cut apple, pear and kiwi surfaces with fresh lemon or lime juice as soon as you slice them. For assembled boards, press cling film directly onto the fruit surface (rather than tenting it) and refrigerate. Serve within two to four hours of assembling for the best appearance.
What size board do I need for a halloween charcuterie board that serves 12?
A rectangular board of at least 35 x 50 cm or a round board of at least 40 cm diameter works for 10 to 14 guests. The stacked witch hat tower needs a round board of at least 45 cm to accommodate the surrounding snacks.
For smaller groups, a 30 x 40 cm board is sufficient for the simpler flat designs like the pumpkin fruit platter or ghost pepper board.
Can halloween charcuterie boards include meat for kids?
Yes. Salami is a popular choice and appears in the bat wing board and the stacked tower. Choose a mild variety with no added heat. Mini cocktail sausages are another crowd-pleaser. Always check labels for allergens and sodium content if serving to very young children.
What is the easiest halloween charcuterie board for a beginner?
The witch hat fruit board, the pumpkin jack-o-lantern platter and the ghost pepper and dip board are all rated Easy and require no cooking, no special tools and no structural assembly. All three take under 20 minutes and hold well in the fridge.
Printable Halloween cards ready to send: 14 painted, friendly designs for every person on your list.
12 DIY Halloween wine glasses ideas for your adult party: painted, stamped, charmed and etched, all
31 blue and orange fall decor ideas that swap beige for something with actual personality: velvet, c
Leave a Reply