


A seven foot spruce is lovely until you live somewhere a seven foot spruce simply does not fit. A wall Christmas tree solves that without making the room look like you gave up on Christmas. It hangs flat, it needs no stand, no watering and no vacuuming up needles every morning, and it still gives you something to hang the good ornaments on.
What follows are fourteen genuinely different ways to build one: tape, lights, real branches, ribbon, cards, timber, even chalkboard paint. Each one names the exact materials, says how long it takes and tells you which bit needs an adult. If you still want ideas for a tree that stands on the floor, the 24 DIY Christmas Tree Ideas round-up has plenty built from things that were not trees yesterday.
This post contains affiliate links. If you buy through them, I may earn a small commission at no extra cost to you.
- Washi Tape Triangle Tree
- Fairy Light Zigzag Wall Tree
- Fresh Pine Branch Wall Tree
- Ribbon Wall Tree
- Christmas Card Keepsake Tree
- Garland Zigzag Statement Wall Tree
- Framed Art Gallery Tree
- Ornament-Only Wall Tree
- Tissue Paper Honeycomb Tree
- Reclaimed Pallet Wood Tree
- Yarn and Nail String Art Tree
- Copper Pipe Outline Tree
- Felt Advent Pocket Tree
- Chalkboard Paint Silhouette Tree
- Frequently Asked Questions
Washi Tape Triangle Tree
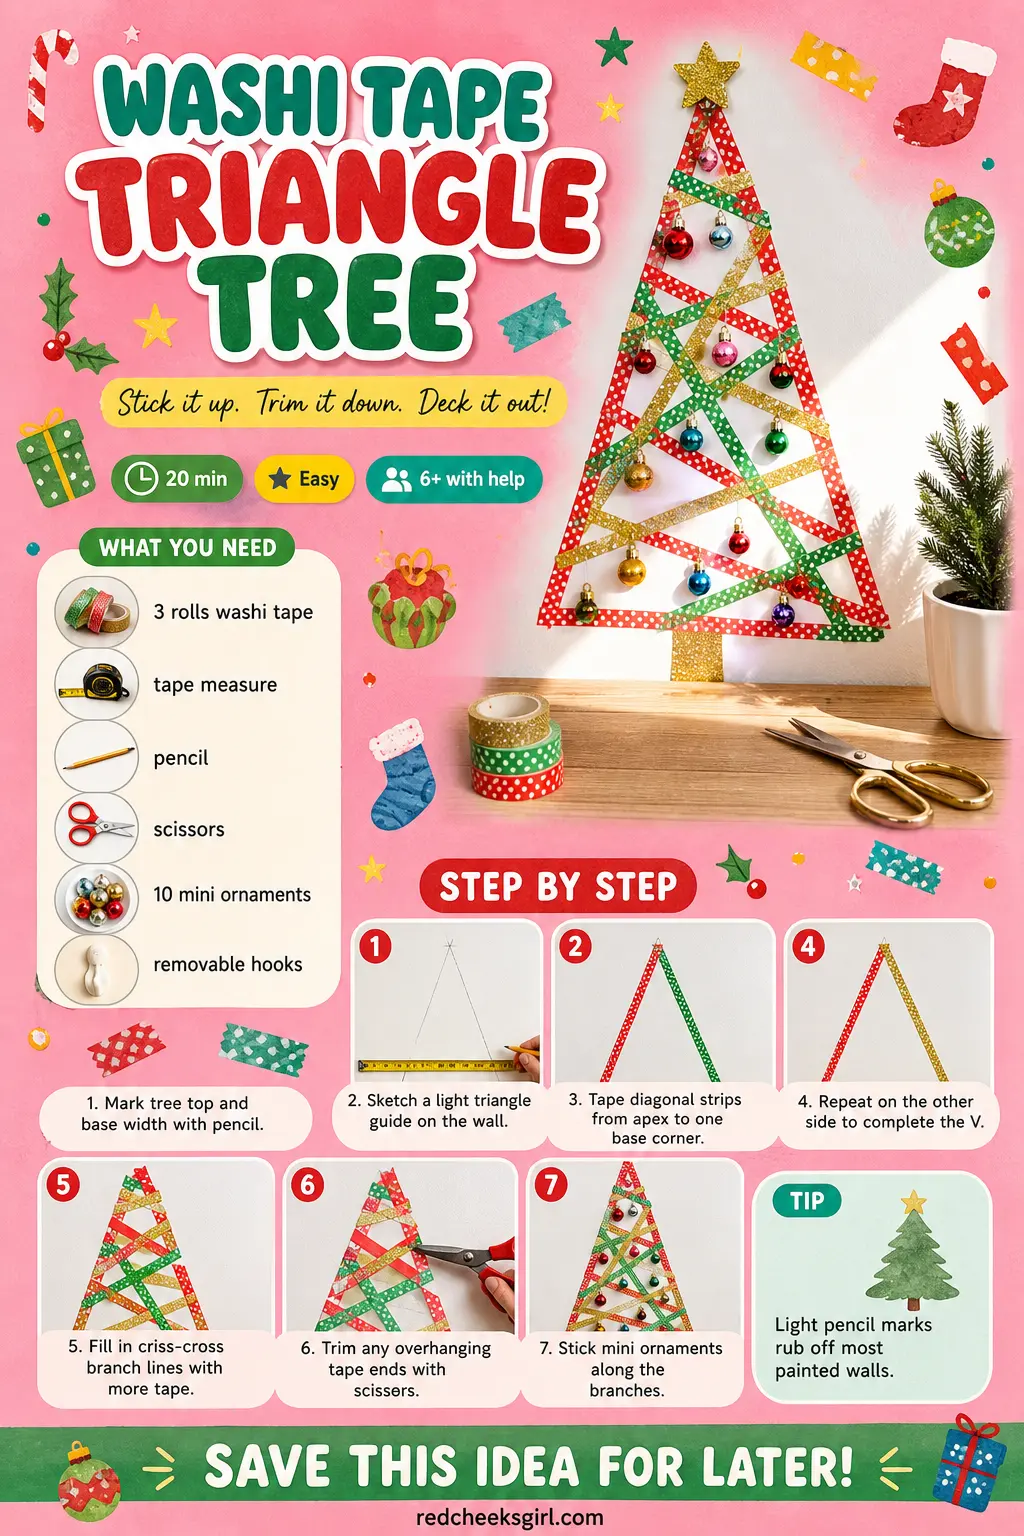
This is the one for a rental or a dorm wall, because nothing involves a nail. Finished, it reads as a clean graphic triangle in whatever pattern of tape you picked, with a scatter of tiny ornaments clipped along the lines. It comes down in one piece at the end of January and leaves no mark behind.
What You Need
- 3 rolls washi tape, 15mm wide, in two or three patterns
- Tape measure
- Pencil
- Scissors
- 10 mini ornaments or paper shapes
- Removable adhesive hooks (optional, for ornaments)
How to Make It
- Decide how tall the tree should be and mark the top point lightly in pencil, then mark how wide the base should sit below it.
- Sketch a faint triangle between those marks so you have a guide. It should look balanced, not lopsided, before any tape goes on.
- Starting at the top point, run a strip of tape diagonally down to one bottom corner, pressing it flat as you go.
- Repeat on the other side so you have a clean V shape meeting at the top.
- Fill the inside with shorter diagonal strips criss-crossing like branches, leaving the odd gap so it does not look solid.
- Trim any tape that overhangs the wall edge or skirting with scissors.
- Stick on the mini ornaments using small sticky dots or removable hooks, heavier pieces lower down where the tape overlaps most.
🛍 Shopping guide
Fairy Light Zigzag Wall Tree
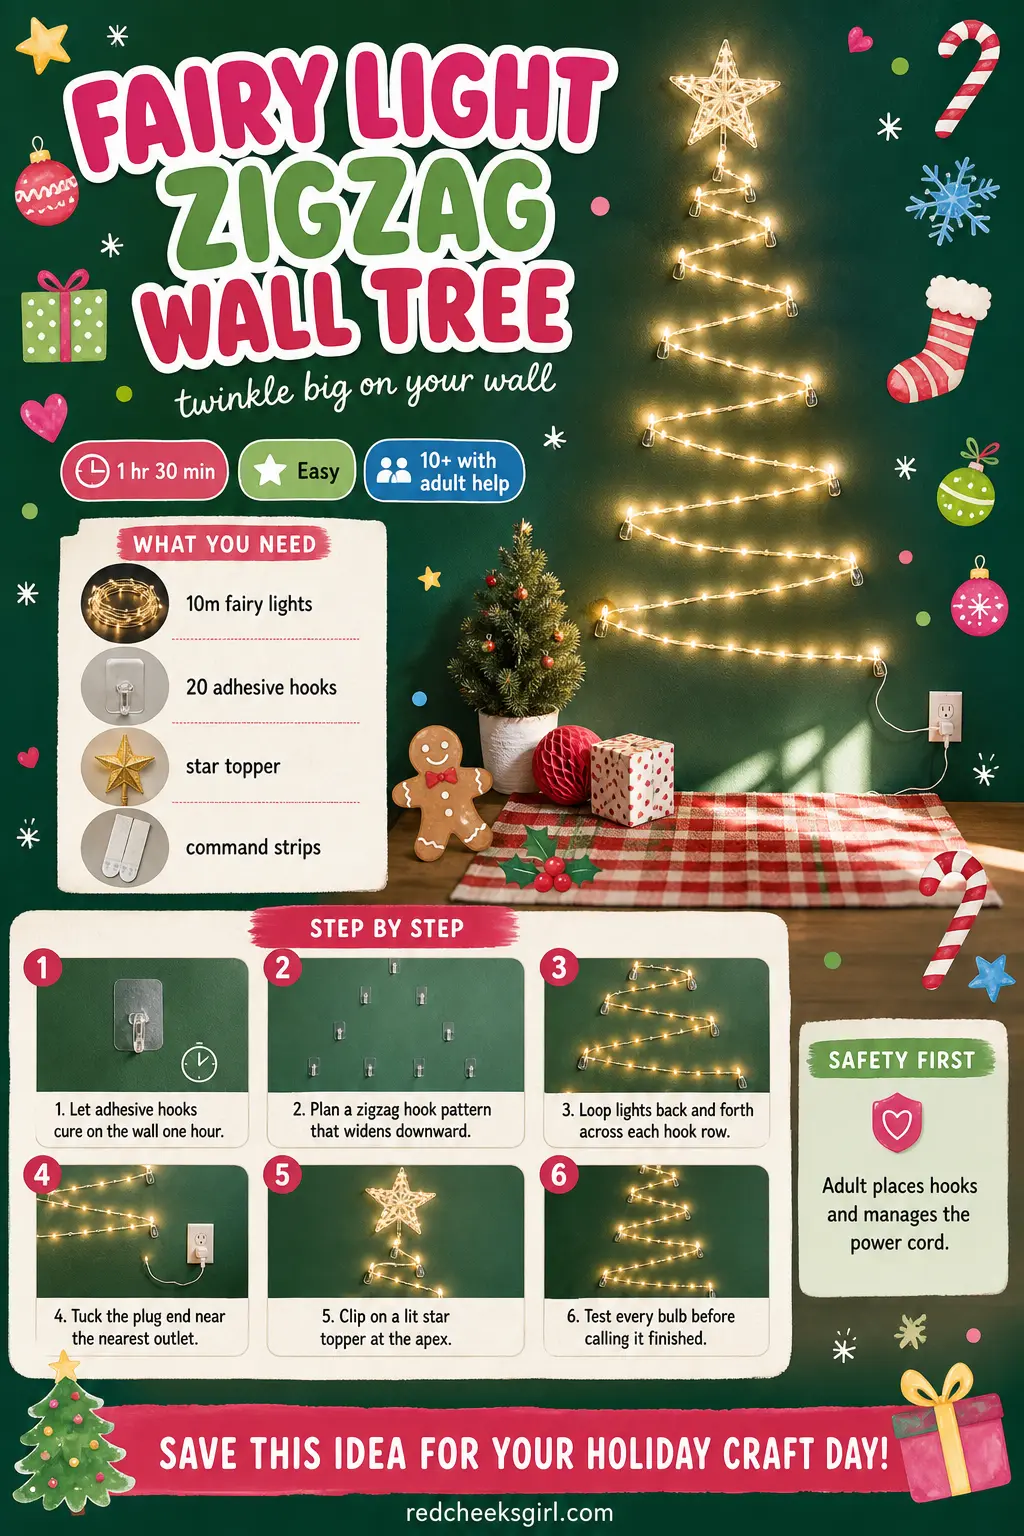
Switch off the lamps and this one is the whole point: a glowing triangle that works in a hallway, a bay window or behind the sofa where a real tree would block the path. Done well it reads as a tree even from the street. Done badly it reads as a string of lights someone forgot to tidy, so the trick is planning the zigzag before you stick anything down.
What You Need
- 1 string battery or plug-in fairy lights, 10m, warm white
- 20 removable adhesive hooks, heavy duty
- Lit star topper, small
- Extra command strips for the cord run to the outlet
How to Make It
- Press the adhesive hooks onto the wall in a zigzag pattern that starts narrow at the top and widens with each row down to the floor, then leave them to cure for a full hour before hanging anything on them.
- Starting at the top hook, loop the light string down to the first side hook, back across to the matching hook on the other side, and keep zigzagging down the pattern.
- Tuck any slack cord behind the lowest row so the shape stays crisp rather than baggy.
- Run the plug end along the skirting to the nearest outlet and secure it flat with a strip of tape so nobody catches a foot on it.
- Clip the lit star to the top hook.
- Plug in and check every bulb lights before you call it finished.
🛍 Shopping guide
Fresh Pine Branch Wall Tree
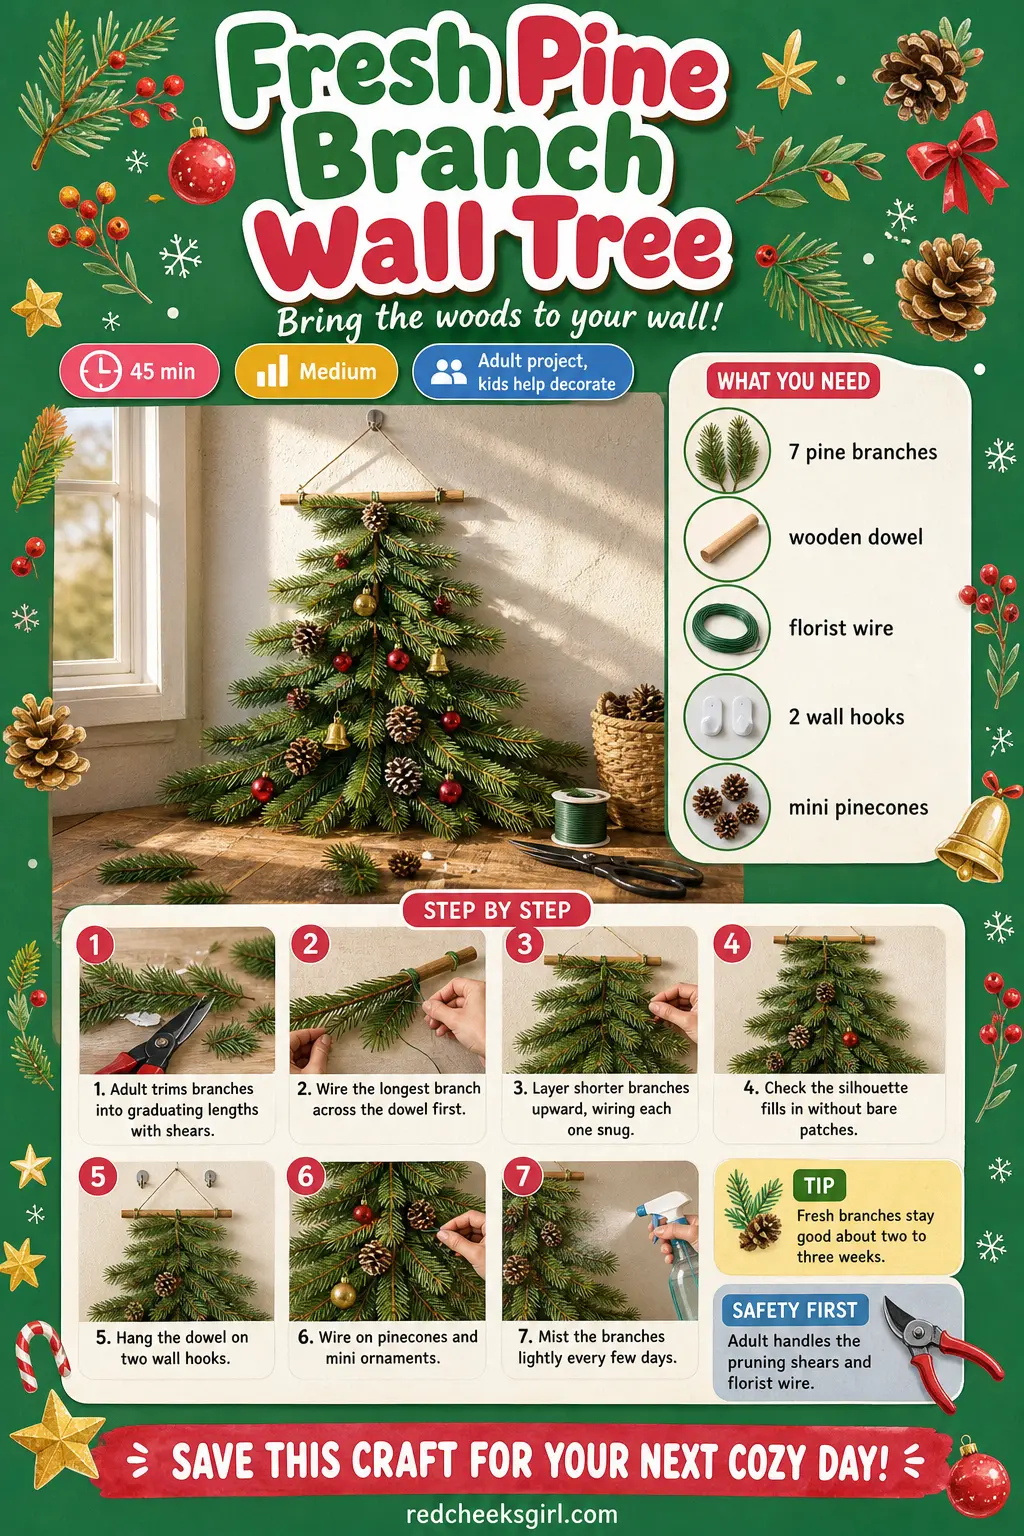
If the whole appeal of a tree is the smell, this keeps it without the needles underfoot. Real branches wired onto a dowel in a graduating triangle look rustic rather than sparse, and the pine scent does the rest. It suits an entryway or a kitchen wall where you walk past it daily and want the hit of smell each time.
What You Need
- 7 fresh pine or fir branches, 30cm to 90cm long
- 1 wooden dowel, 60cm
- Florist wire, 1 spool
- 2 wall hooks rated for the weight
- Mini pinecones and small ornaments with wire hangers
How to Make It
- An adult trims the branches with pruning shears into a graduating set, the longest around 90cm, shortest around 30cm.
- Lay the dowel flat and wire the longest branch across its base, winding florist wire tightly so it will not slip once hung vertically.
- Work upward, wiring progressively shorter branches above the last, overlapping each one so there are no bare gaps in the silhouette.
- Stand back and check the shape fills in evenly from a few steps away before hanging.
- Mount the two wall hooks and hang the dowel so the tree sits flat against the wall.
- Wire on pinecones and small ornaments, heavier at the base.
- Mist the branches lightly every few days to keep them fresh for the full run.
🛍 Shopping guide
Ribbon Wall Tree
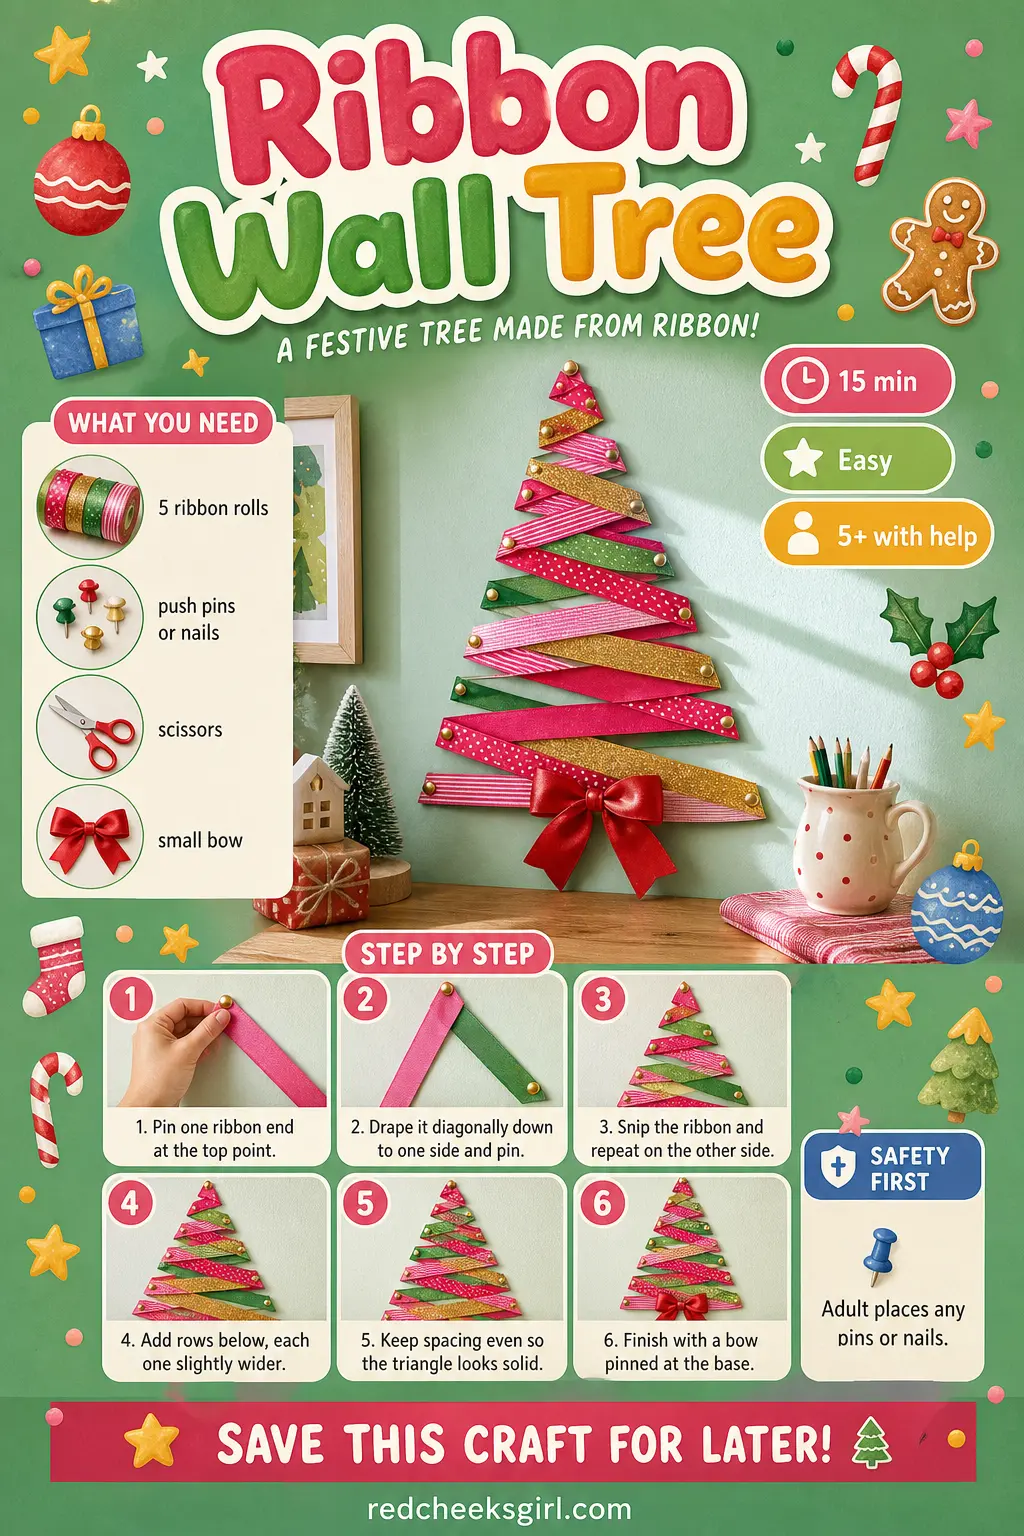
Ribbon gives you color and shine without the bulk, and because it pins rather than glues, a child can genuinely help with this one. Finished it looks like loose diagonal garland strokes in a tidy triangle, with a bow standing in for the trunk. It suits a nursery or a kid’s bedroom where a real tree is one knock away from disaster.
What You Need
- 5 rolls grosgrain ribbon, 10mm wide, 2m each, in varied shades
- Push pins or small nails
- Scissors
- 1 small bow for the base
How to Make It
- An adult pins one ribbon end at the top point you want for the tree.
- Drape it diagonally down to one side and pin it there, then snip the excess with scissors.
- Repeat on the opposite side so the first row forms a narrow V.
- Add a second, slightly wider row below it, and keep going until the base is as wide as you want the tree to be.
- Keep the spacing between rows even, that is the one place this goes wrong, uneven gaps read as messy rather than relaxed.
- Pin a small bow at the base to mark the trunk and finish the look.
🛍 Shopping guide
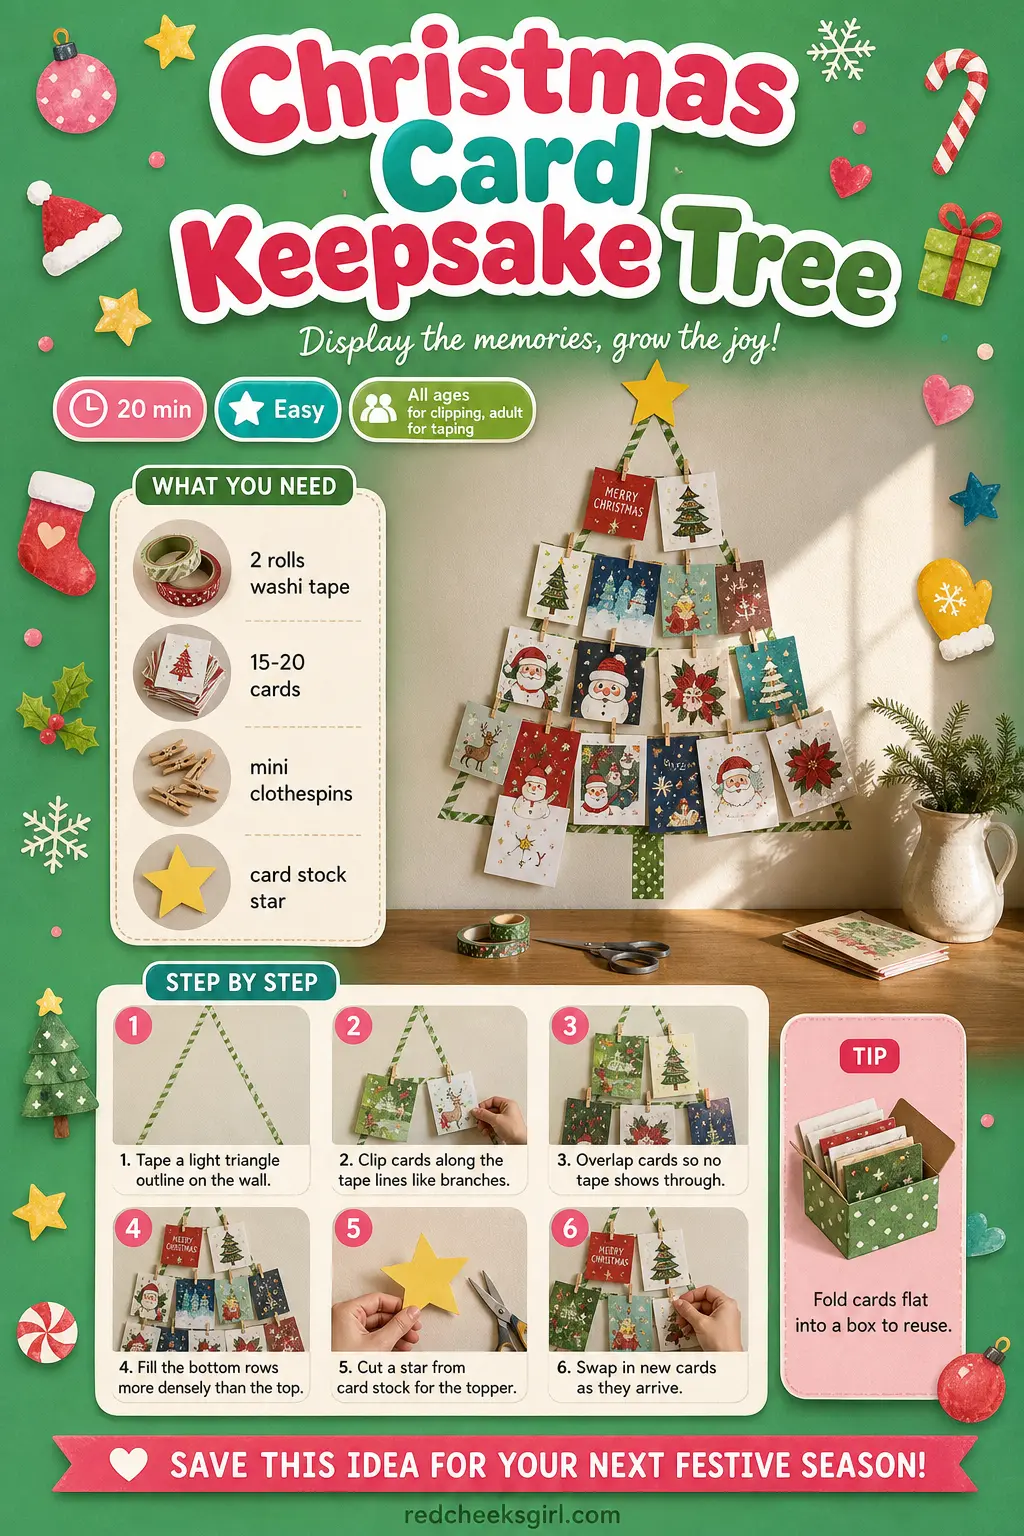
Christmas Card Keepsake Tree
Every card that lands on the mat through December has a job here instead of sitting in a drawer. Pinned along a tape outline they build a tree that genuinely grows through the month, and it keeps every card visible instead of lost on a mantel. It suits a hallway or stairwell, somewhere you pass daily and will actually look at the senders’ names. For a similar idea sized specifically to a wall, the DIY Christmas Banner Ideas are worth a look too, and if the whole mood you are chasing is nostalgic rather than modern, the Vintage Christmas Tree Ideas lean the same way.
What You Need
- 2 rolls washi tape
- 15 to 20 Christmas cards (collect as they arrive)
- Mini wooden clothespins
- Card stock star for the topper
How to Make It
- Tape a light triangle outline on the wall, just like the washi tape tree but without filling in the middle yet.
- Clip the first cards along the two diagonal lines so they overlap like branches, the folded edge toward the tape.
- Fill the bottom rows more densely than the top, which keeps the proportions looking like a real tree rather than a pile.
- Keep clipping new cards along the lines as they arrive through the month, working from the base upward.
- Cut a simple star from card stock and clip it to the top point.
- At the end of the season, fold the cards flat into a box so next year’s tree starts with a head start.
🛍 Shopping guide
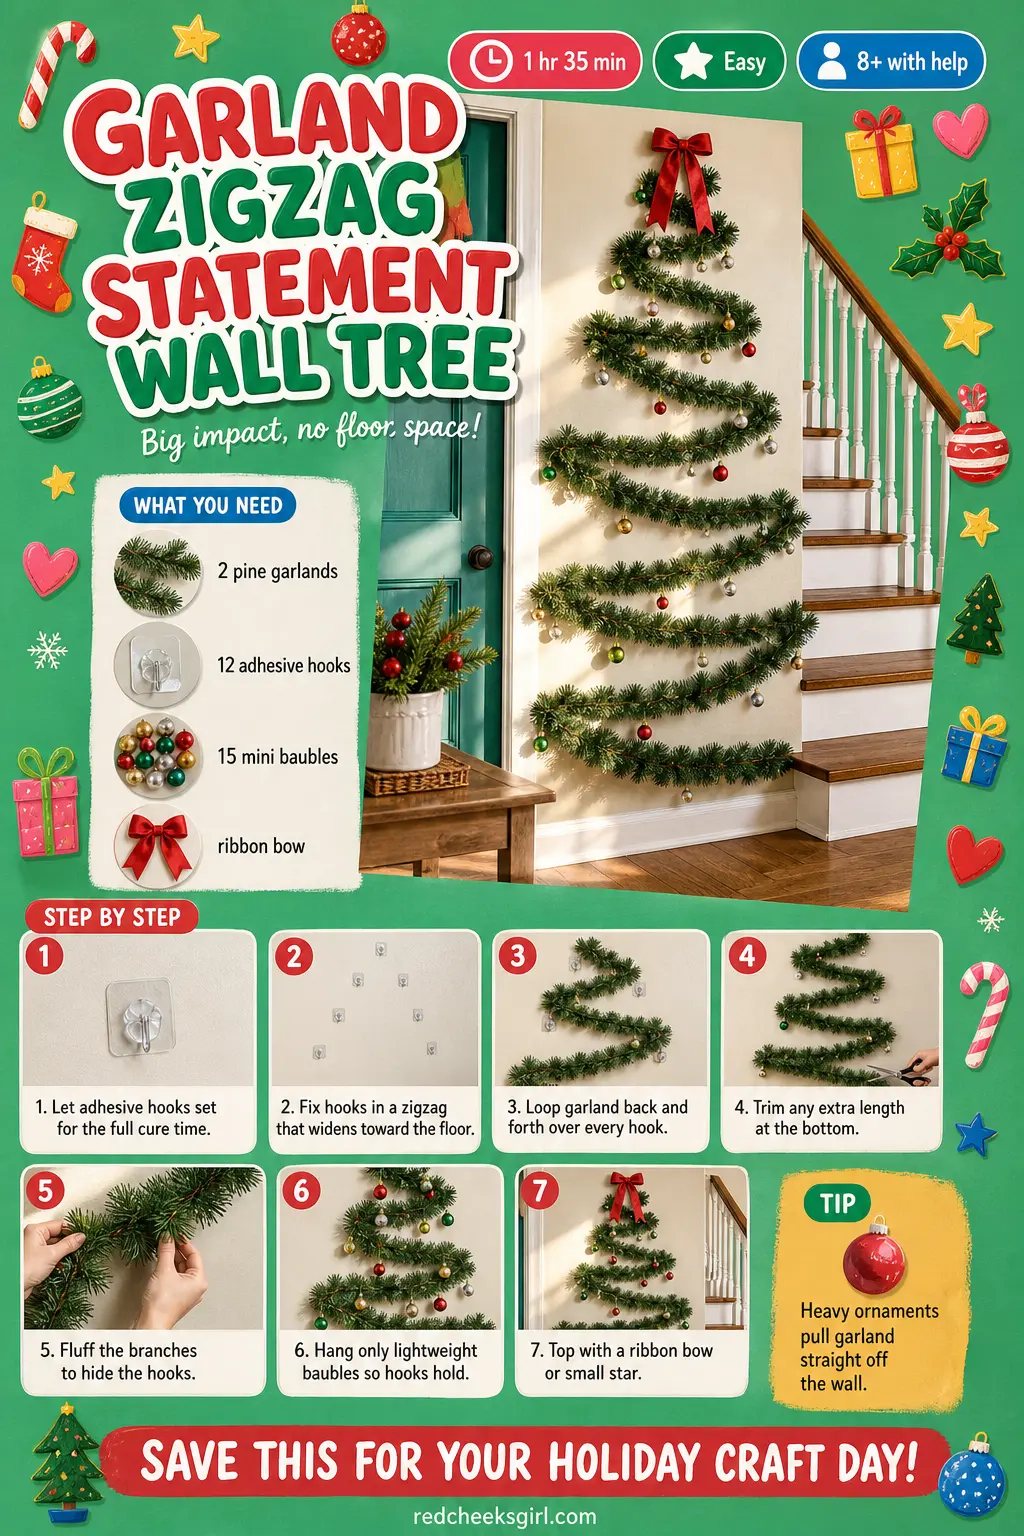
Garland Zigzag Statement Wall Tree
This is the one for a stairwell or a double height wall, somewhere a small tape tree would look lost. Faux pine garland looped back and forth over a widening row of hooks gives real volume and reads as a tree from across the room, not just up close. The one genuine catch: hang anything heavy off it and the hooks will not hold, so keep the ornaments light.
What You Need
- 2 faux pine garlands, 270cm each
- 12 adhesive hooks, heavy duty
- 15 mini baubles, lightweight
- Ribbon bow or small star for the top
How to Make It
- Press the hooks onto the wall in a zigzag that starts tight at the top and widens toward the floor, then leave them a full hour to cure.
- Starting at the top hook, loop the garland down to the first side hook, across to the matching one, and keep zigzagging to the bottom.
- Join the second garland in where the first runs out, overlapping the ends so the join does not show.
- Trim any excess length at the floor so the tree has a clean base.
- Fluff the branches outward to hide the hooks underneath.
- Hang only the lightweight baubles. Heavier ornaments really do pull a garland tree off the wall over a few days.
- Finish with a bow or small star pinned at the top.
🛍 Shopping guide
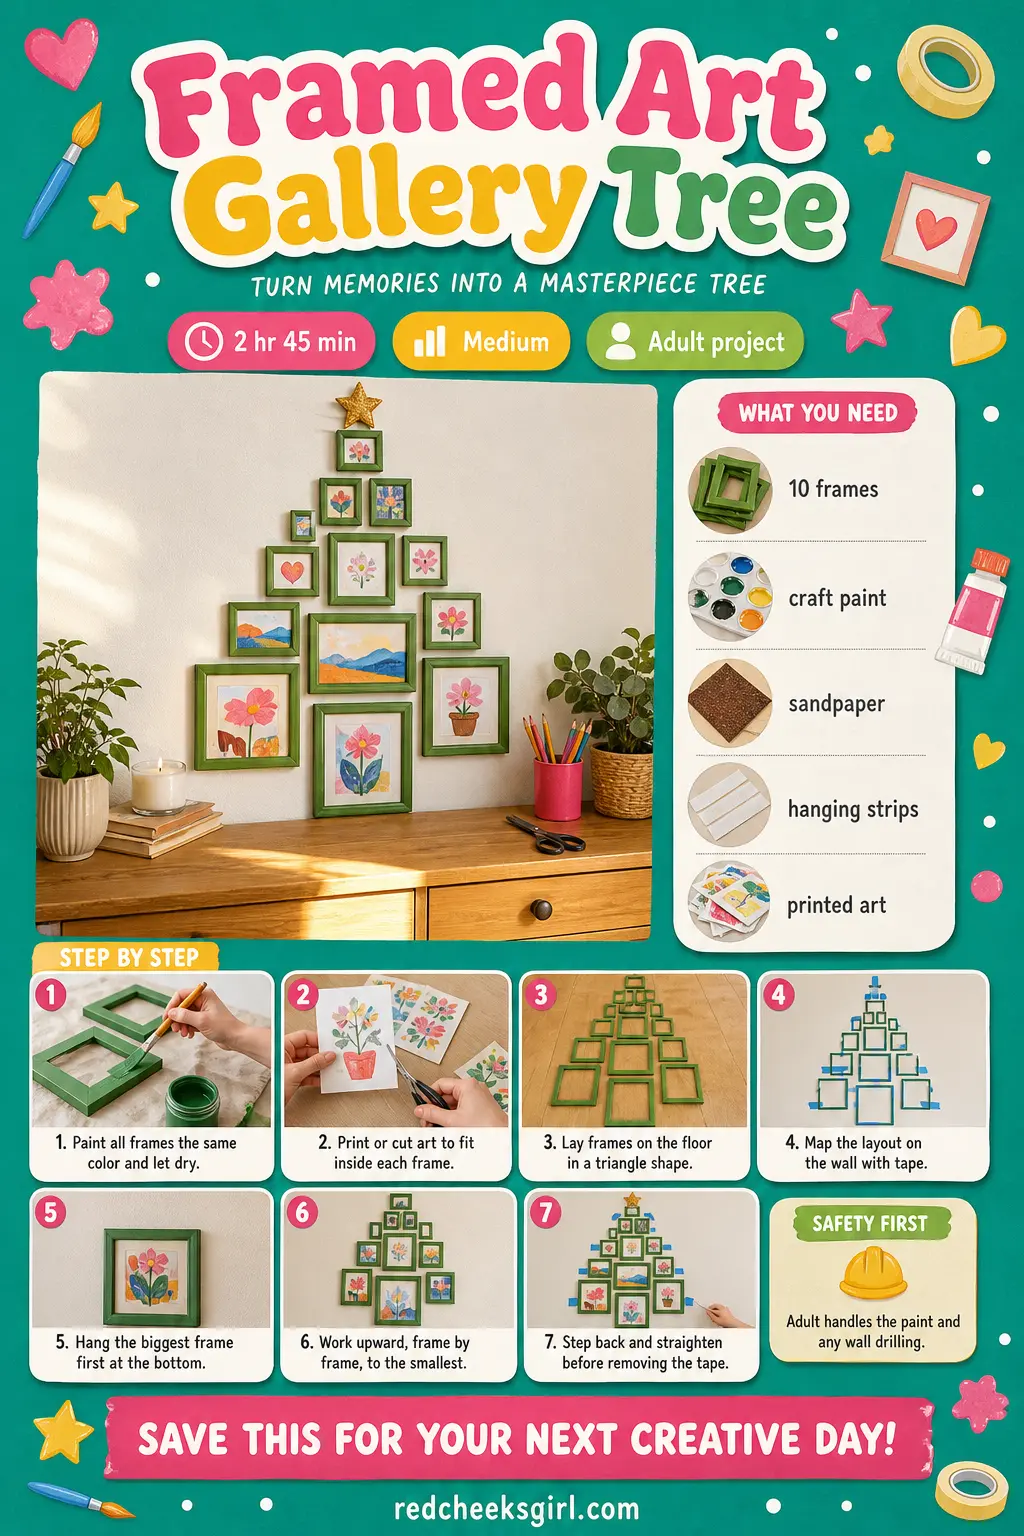
Framed Art Gallery Tree
For a wall that needs to look considered rather than crafty, a cluster of painted frames arranged into a triangle does the job and doubles as art the rest of the year once Christmas comes down. It suits a home office or a stairwell gallery wall, and it reads closer to the Elegant Christmas Tree Decorations look than anything with tinsel in it.
What You Need
- 10 dollar store picture frames, assorted sizes from 10x15cm to 20x25cm
- Craft paint, 1 pot, gold or white
- Fine sandpaper
- Picture hanging strips
- Printed art, photos or holiday prints cut to fit each frame
How to Make It
- An adult paints every frame the same color and leaves them to dry for around 2 hours; a light sand afterward knocks back any shine for a worn, considered look.
- While that dries, print or cut artwork to fit inside each frame, mixing photos, holiday motifs and plain color blocks.
- Once dry, lay the frames on the floor arranged into a triangle, largest frames at the base, smallest near the top.
- Map the layout onto the wall first using strips of painter’s tape as placeholders, this is the fiddly part, and it is much easier to move tape than to patch extra nail holes.
- Hang the bottom row first using the hanging strips, then work upward frame by frame.
- Step back, check the spacing reads as even, and adjust before the tape placeholders come off.
🛍 Shopping guide
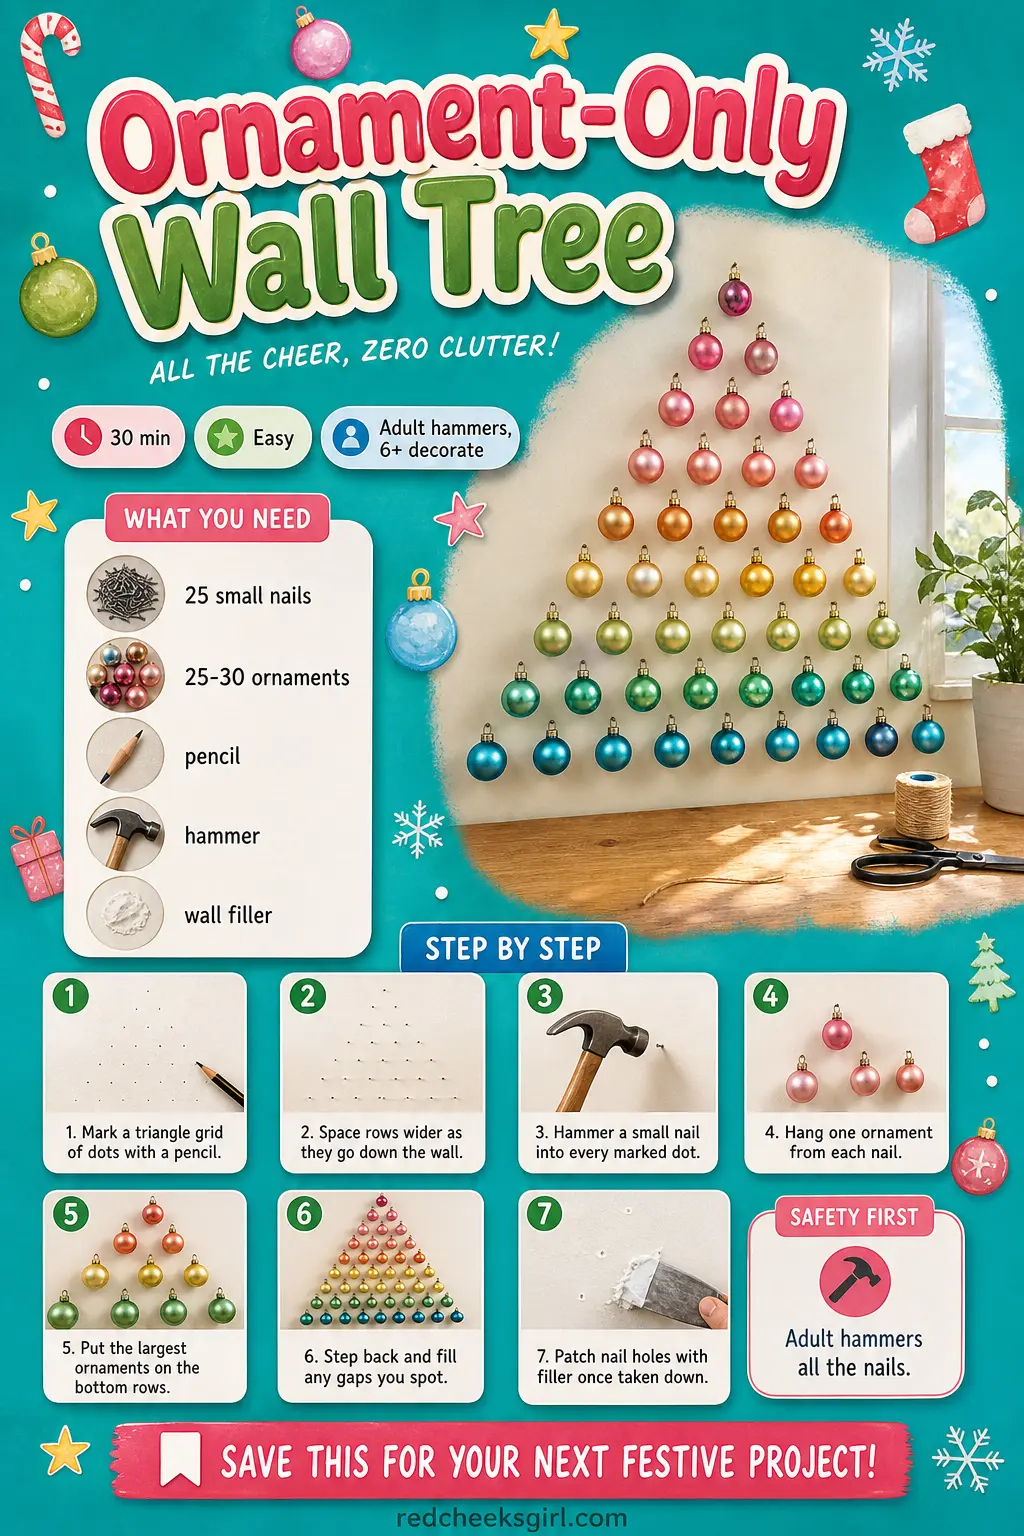
Ornament-Only Wall Tree
No backbone of tape, lights or branches here, just the baubles themselves spaced directly on the wall so the eye fills in the triangle. It is the most minimal entry on this list and the easiest to get genuinely wrong if the spacing is uneven, so the grid step matters more than it looks like it should. It suits a dining nook or a feature wall where you want color without clutter.
What You Need
- 25 small nails or picture pins
- 25-30 ornaments, graduated in two sizes or an ombre color run
- Pencil
- Hammer
- Wall filler, for when it comes down
How to Make It
- Mark a triangle grid of evenly spaced dots in pencil, rows widening as they go down the wall, more dots per row the lower you get.
- An adult hammers a small nail into each dot. Keep them shallow, just enough to hold an ornament hook.
- Hang one ornament from each nail, largest and darkest colors on the bottom rows, smallest and lightest near the top.
- Step back from across the room, this is the only way to spot gaps, and add an extra nail if a patch looks thin.
- Leave it up as long as you like, there is nothing to wilt or sag.
- When it comes down, patch every nail hole with a dab of wall filler before repainting.
🛍 Shopping guide
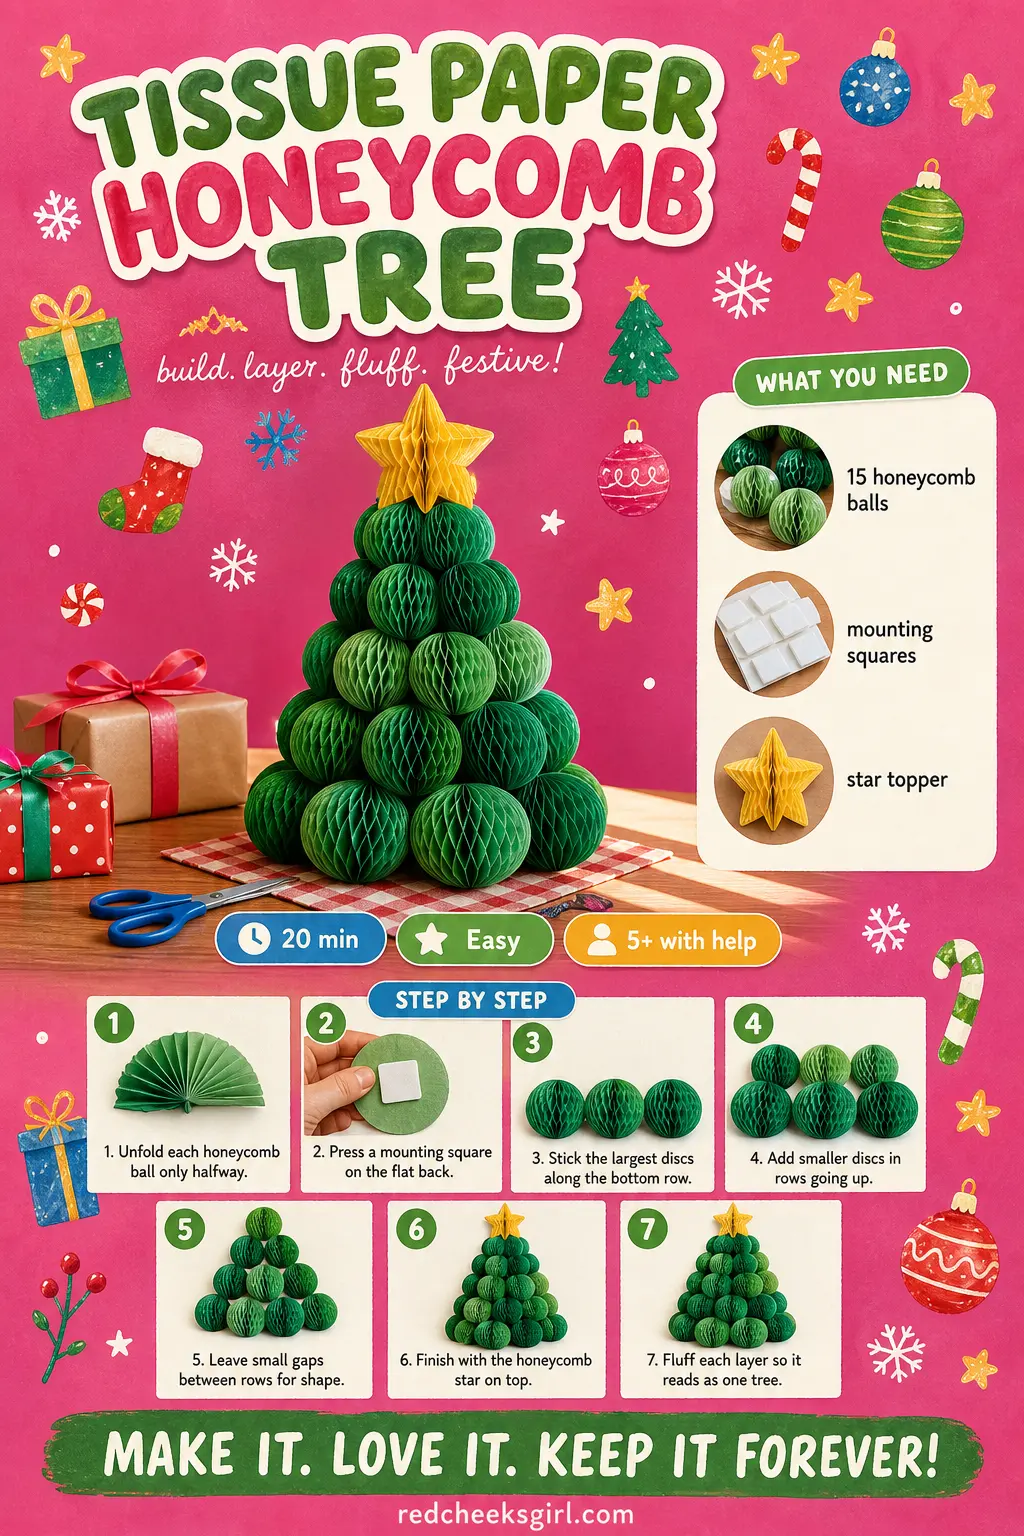
Tissue Paper Honeycomb Tree
Party decor doing double duty: honeycomb tissue balls, unfolded only halfway, stack into discs that read as a layered, slightly whimsical tree. It is bright, it is forgiving of imperfect spacing because the texture hides small gaps, and it suits a kids’ room or a party wall far better than anything that needs to look restrained.
What You Need
- 15 honeycomb tissue balls, assorted 10cm to 20cm, in green shades
- Removable mounting squares
- Honeycomb star topper, 1
How to Make It
- Unfold each honeycomb ball only halfway so it forms a flat, fan-shaped disc rather than a full sphere. Going too far here is the main way this goes wrong, so stop as soon as it looks like half a dinner plate.
- Press a mounting square onto the flat back of each disc.
- Stick the largest discs along the bottom row of your planned triangle.
- Add a row of medium discs above, overlapping the bottom row slightly.
- Keep going with smaller discs toward the top, leaving tiny gaps between rows so each one reads as a separate branch layer.
- Finish with the honeycomb star pressed at the very top point.
- Fluff every layer gently so the whole thing reads as one tree rather than a pile of circles.
🛍 Shopping guide
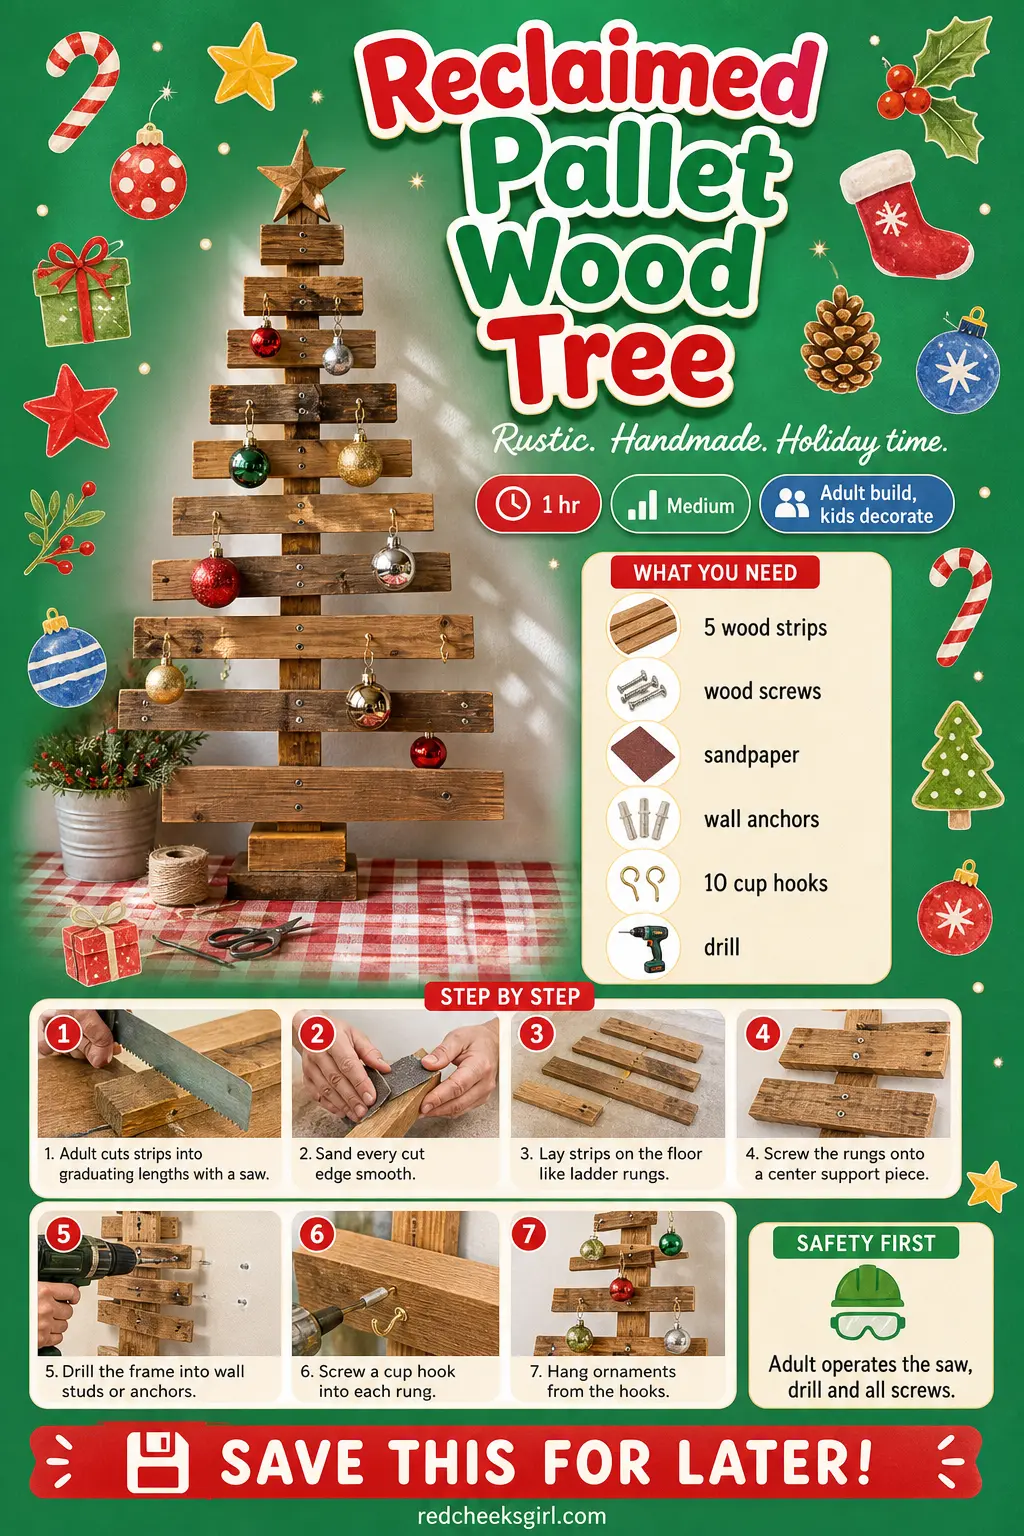
Reclaimed Pallet Wood Tree
This is the sturdiest, most permanent entry here, a real built object rather than a stuck-on decoration, and it suits a mudroom, garage or farmhouse-style living room that can take something with a bit of weight to it. Once built, it stays up year after year; only the ornaments change.
What You Need
- 5 wood strips, pallet wood or furring strip, 2.5cm square, cut to lengths from 20cm to 90cm
- Wood screws
- Sandpaper
- Wall anchors rated for the weight
- 10 small brass cup hooks
- Drill
How to Make It
- An adult cuts the strips into graduating lengths using a saw, shortest at 20cm for the top, longest at 90cm for the base.
- Sand every cut edge smooth so nobody catches a splinter on it later.
- Lay the strips on the floor like ladder rungs, shortest at the top, to check the spacing looks like a tree silhouette before fixing anything.
- Screw each rung onto a vertical center support strip running behind them, which becomes the hidden spine holding the whole shape together.
- Drill the finished frame into wall studs or rated wall anchors so it can genuinely bear weight.
- Screw a cup hook into the front of each rung.
- Hang ornaments from the hooks, done.
🛍 Shopping guide
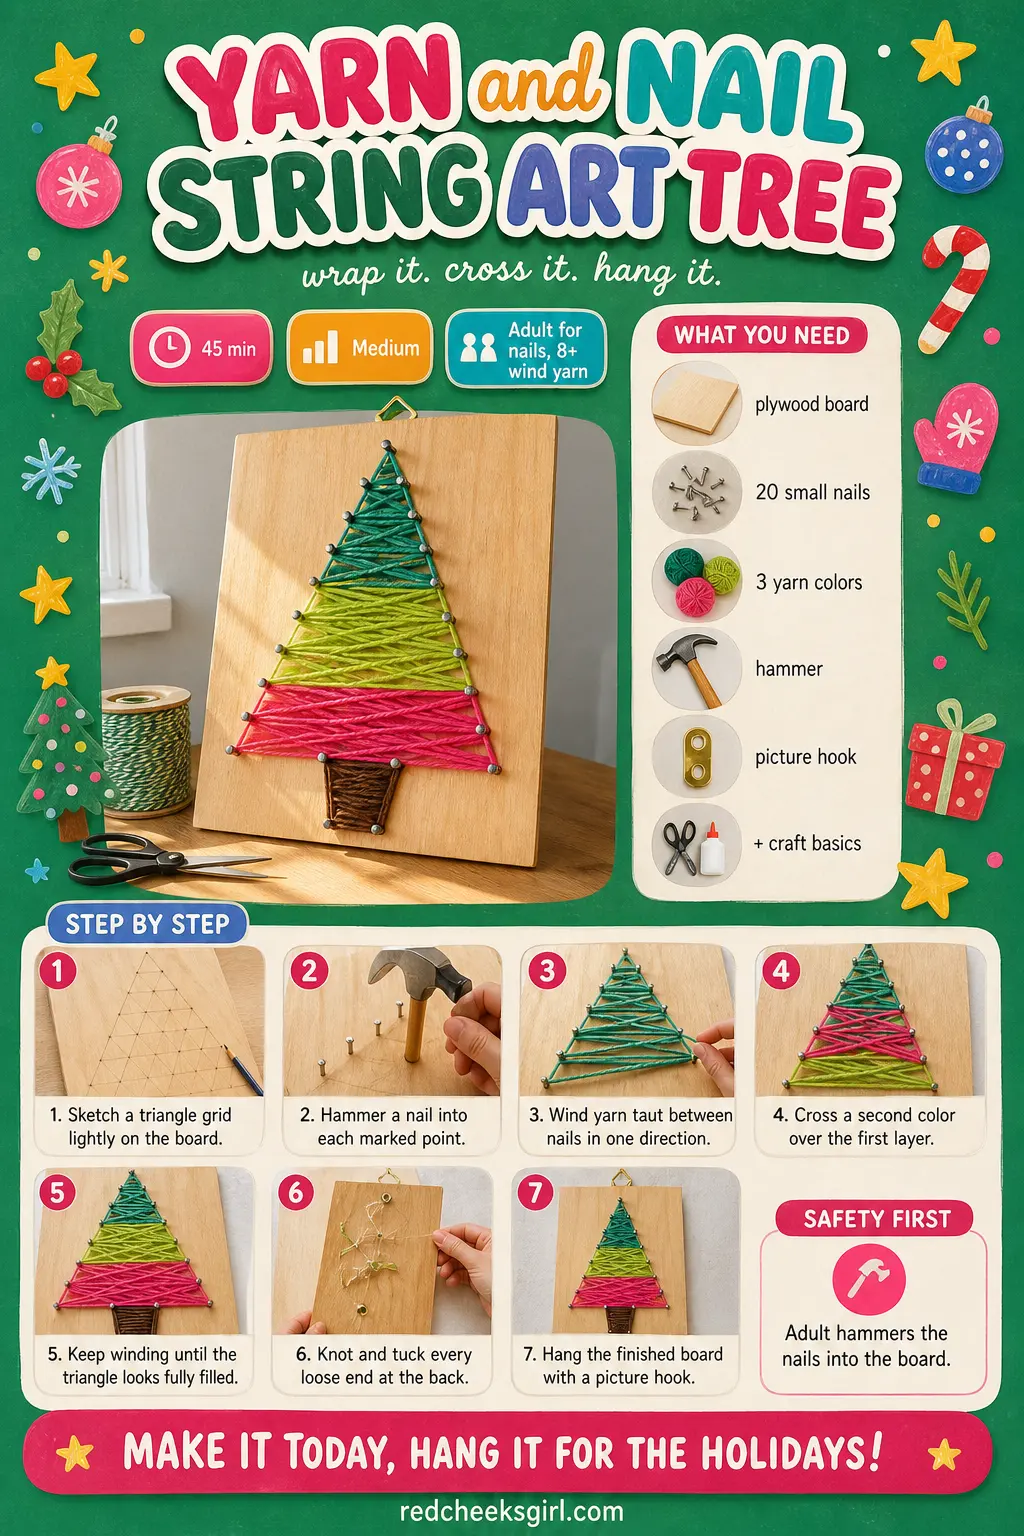
Yarn and Nail String Art Tree
A craft room or office project rather than a living room centerpiece, this builds a geometric tree out of nails and tightly wound yarn on a backing board, so it hangs and stores like any other piece of art. It is fiddly in the middle, winding yarn cleanly around that many nails takes patience, but the result looks deliberately modern rather than homemade.
What You Need
- Plywood board, 40cm x 60cm
- 20 small nails
- Embroidery yarn, 3 colors, 20m each
- Hammer
- Pencil
- Picture hook, for hanging the finished board
How to Make It
- Sketch a triangle grid of evenly spaced points onto the board in pencil.
- An adult hammers a nail partway into each marked point, leaving enough sticking out to wind yarn around.
- Starting with the first color, wind yarn taut between nails, crossing back and forth in one direction to build a base layer across the whole triangle.
- Switch to a second color and cross over the first layer in a different direction, building up texture and depth.
- Keep winding until the shape looks fully filled with no bare gaps between the threads.
- Knot off every loose end at the back of the board and trim neatly.
- Screw a picture hook to the back and hang the finished board on the wall.
🛍 Shopping guide
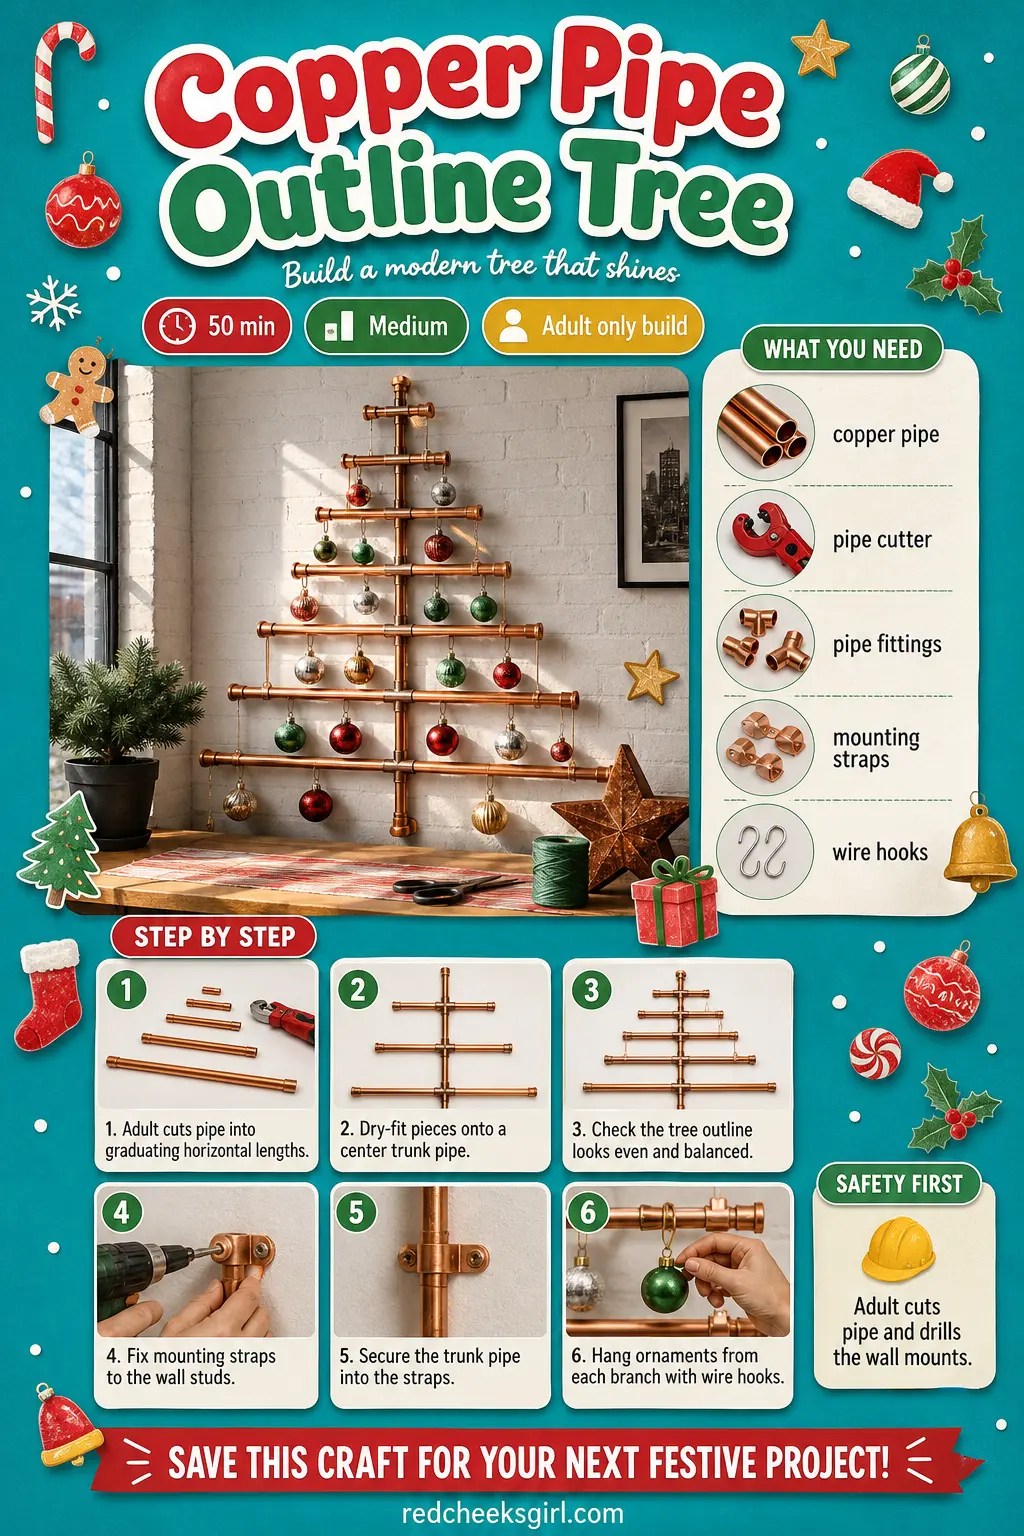
Copper Pipe Outline Tree
For a loft or a minimalist living room, an open triangular frame built from copper pipe reads as sculpture more than decoration, with ornaments hung off the tiers rather than crammed in branches. It is genuinely more plumbing project than craft project, which is exactly why it suits someone who wants the one tree on this list nobody else’s living room has.
What You Need
- Copper pipe, half inch diameter, 3m total length
- Pipe cutter tool
- 4 to 6 pipe fittings, T-joints and elbows
- Pipe mounting straps, rated for wall fixing
- Wire ornament hooks
How to Make It
- An adult cuts the pipe into graduating horizontal lengths with the pipe cutter, shortest near the top, longest at the base, to act as the tree’s branch tiers.
- Dry-fit the horizontal pieces onto a single vertical trunk pipe using the T-joint fittings, without gluing anything yet.
- Step back and check the outline reads as an even, balanced tree shape, adjusting tier spacing before anything is fixed permanently.
- Fix the mounting straps into wall studs so the frame has real support.
- Secure the trunk pipe into the straps so the whole assembly sits flush against the wall.
- Hang ornaments off each branch tier using wire hooks looped over the pipe.
🛍 Shopping guide
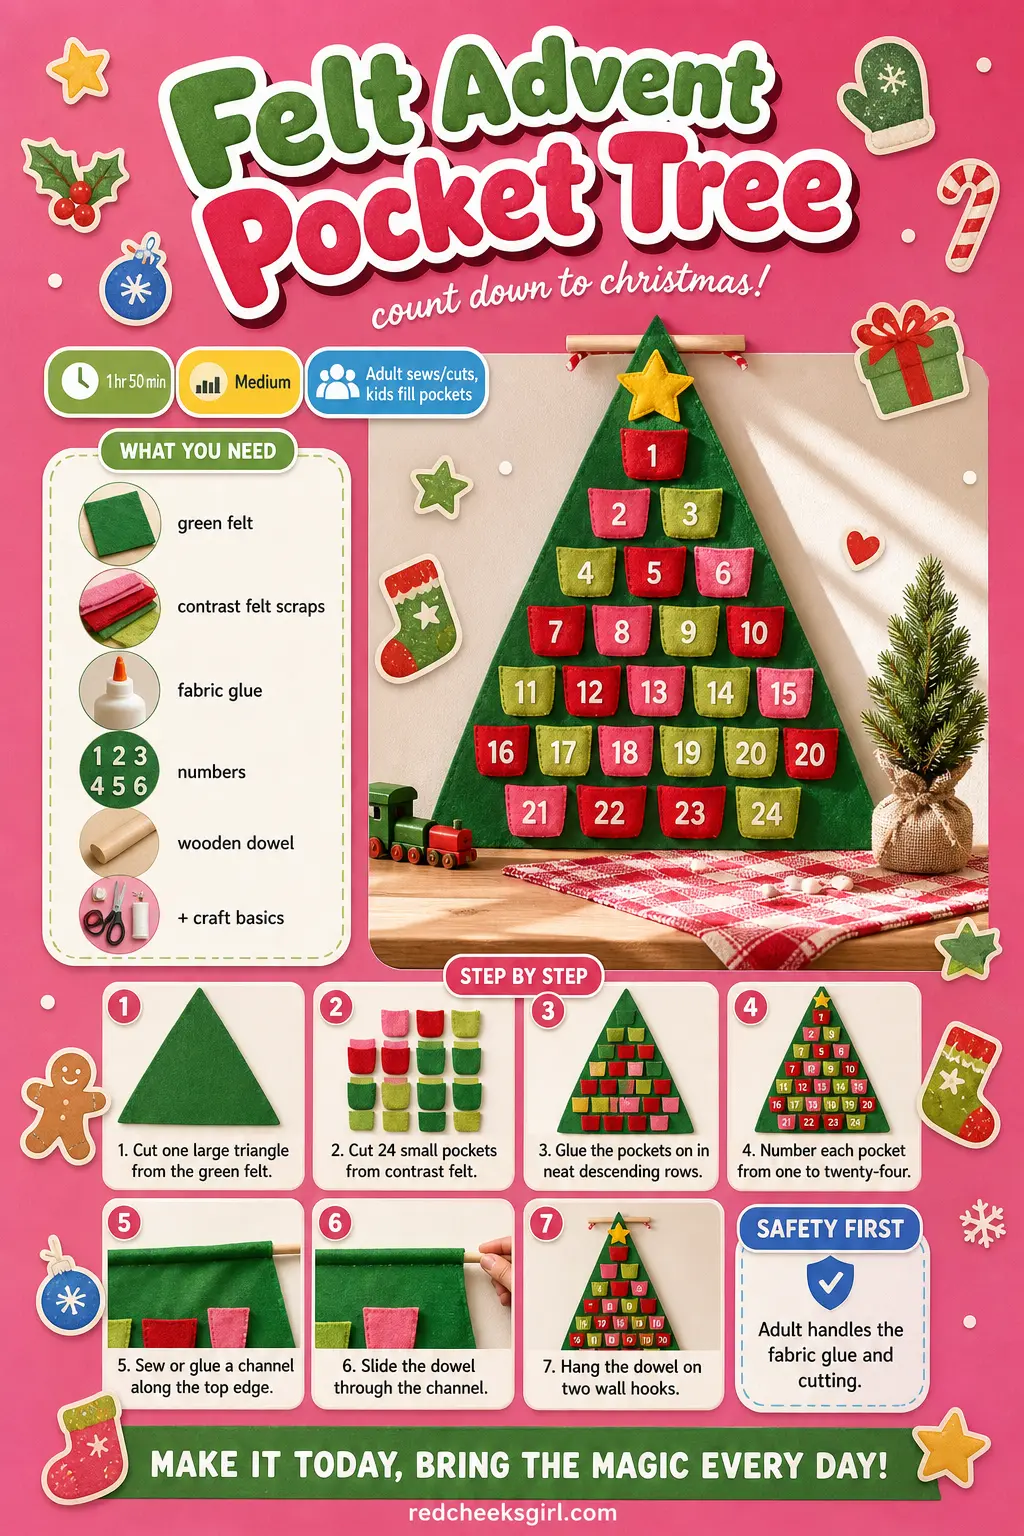
Felt Advent Pocket Tree
Part decoration, part countdown calendar, this turns a big felt triangle into a wall tree with 24 numbered pockets for treats or notes. It suits a playroom or a shared family space, since it is genuinely interactive rather than just something to look at, and felt rolls up small for storage once January arrives.
What You Need
- Green felt, 1.5m x 1m, 3mm thick
- Contrast felt scraps, enough for 24 small pockets
- Fabric glue (or a sewing machine, if you prefer stitched seams)
- Iron-on or fabric marker numbers, 1 to 24
- Wooden dowel, 50cm, for hanging
- 2 wall hooks
How to Make It
- An adult cuts one large triangle from the green felt, as tall as you want the finished tree to stand.
- Cut 24 small rectangles from the contrast felt to act as pockets, roughly palm sized.
- Glue each pocket onto the triangle in neat descending rows, sides and bottom glued down, top left open.
- Leave the glue to set for a full hour before handling the pockets, otherwise they peel straight back off.
- Number each pocket from 1 to 24 using the marker or iron-on numbers.
- Fold and glue or sew a channel along the top edge of the felt, wide enough to thread the dowel through.
- Slide the dowel through the channel and hang it on two wall hooks, then fill the pockets ready for the countdown.
🛍 Shopping guide
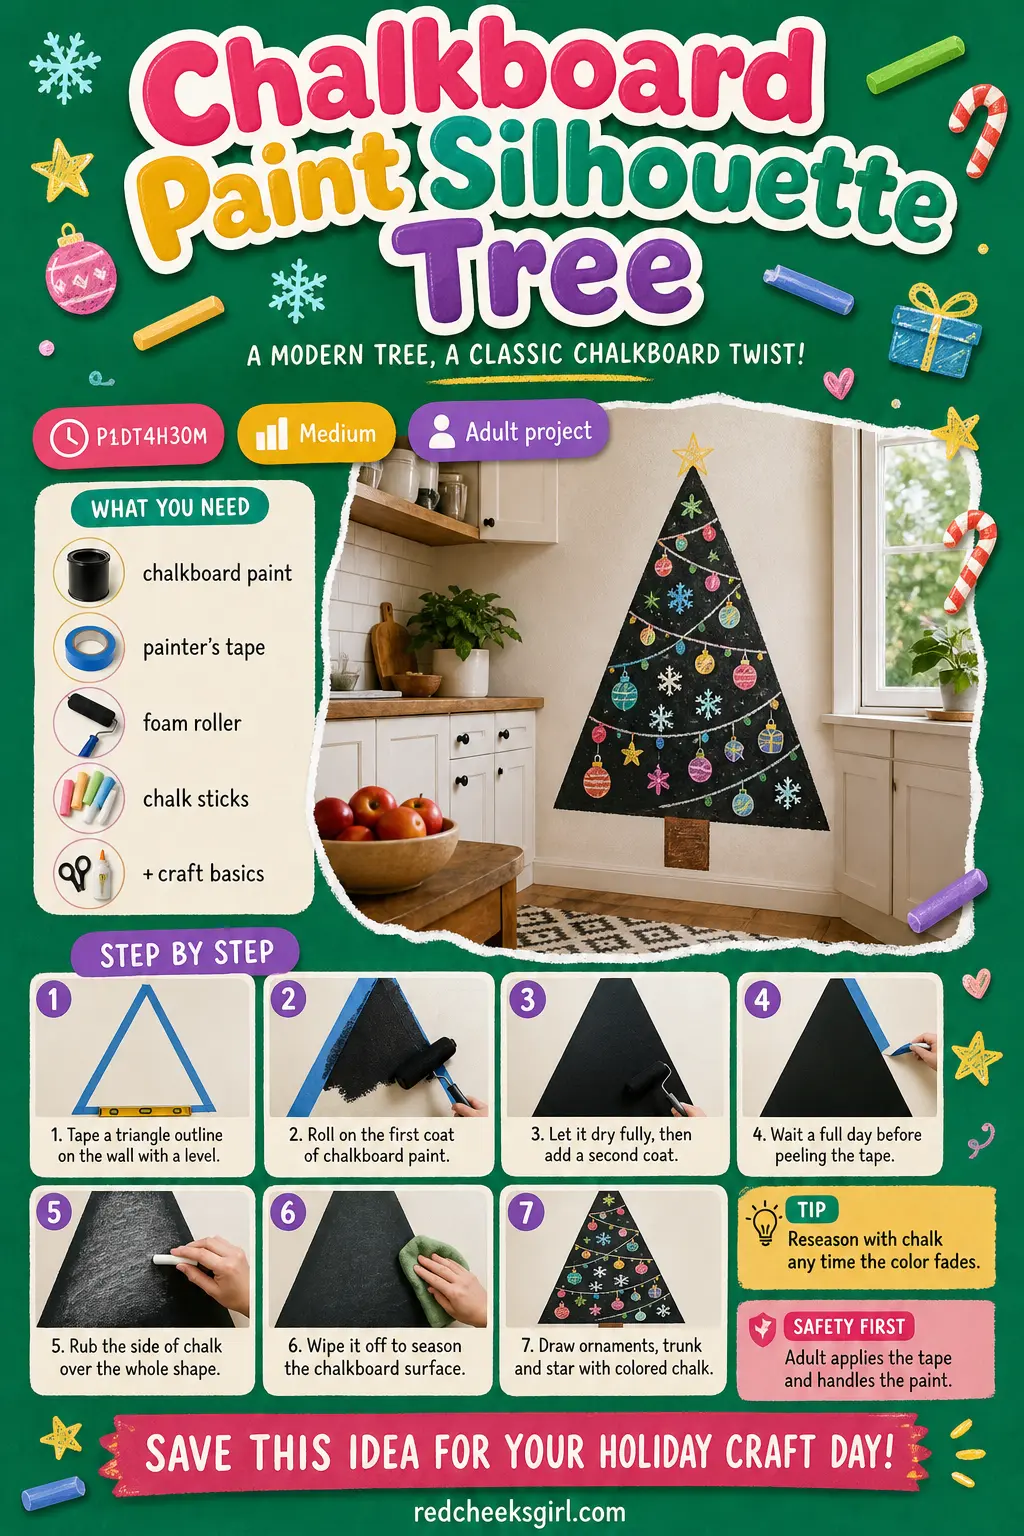
Chalkboard Paint Silhouette Tree
The only entry here that is genuinely permanent, since once the paint is on the wall it stays there year round, waiting to be reseasoned and redrawn every December. It suits a kitchen pantry door or a playroom wall where a chalkboard earns its keep the rest of the year too, and it is the lowest-mess option once the painting itself is done.
What You Need
- Chalkboard paint, 1 pint
- Painter’s tape, wide roll
- Foam roller
- Spirit level
- White and colored chalk sticks
How to Make It
- An adult tapes a clean triangle outline on the wall using the level to keep the sides straight, pressing the tape edges down firmly so paint cannot bleed underneath.
- Roll on the first coat of chalkboard paint inside the taped triangle and let it dry fully, roughly 2 hours.
- Add a second coat for full coverage and leave it to dry again.
- Wait a full day before peeling the tape away, pulling it back on itself slowly for the crispest edge.
- Season the new chalkboard by rubbing the flat side of a piece of chalk over the entire surface, then wiping it off with a dry cloth. Skip this and the first drawing will leave a permanent ghost mark.
- Draw on ornaments, a trunk and a star with colored chalk, and simply wipe and redraw whenever you want a refresh through the season.
🛍 Shopping guide
Frequently Asked Questions
How do you make a Christmas tree on the wall?
The simplest route is to hang garlands, sticks or branches directly on the wall in a tree-shaped outline: just hang some garlands, sticks or branches on the wall in the shape of a tree, and let yourself get as inventive as you like with what fills the shape. Tape, ribbon, lights and ornament-only grids all build the same triangle without that first step changing.
What can I use instead of a Christmas tree on the wall?
A wall version swaps the floor tree for whatever you already have in a drawer. You can make wall Christmas trees out of a string of lights, garland, a large piece of felt or even Washi tape, which is why the ideas above range from craft tape to real pine branches depending on what suits the wall and the budget.
Will ornaments pull the garland or tape off the wall?
Heavier baubles are the main way a garland tree fails, since the weight pulls adhesive hooks loose over a few days. Stick smaller or lightweight ornaments on your garland wall tree to prevent them from pulling the garland off of the wall, and reserve anything heavier for the ornament-only or pallet wood trees that are nailed rather than stuck.
Is there a ready-made wall Christmas tree you can buy?
Yes, IKEA sells a wooden version that pulls flat against the wall. It features 24 hooks for adding decorations and measures 14.25 x 2.25 x 35.25 inches, which makes it a fast option if you would rather buy than build, though every craft in this list can be made for less with things most people already own.
How do you store a wall Christmas tree after the holidays?
Most of these come down easily because nothing involves a tree stand or loose needles. A wall Christmas tree is also easy to assemble, take down, and store for next year, and flat pieces like felt, tape outlines and ribbon roll up small enough to fit in a shoebox.
How much wall space do I need for a wall Christmas tree?
Less than you think. A flat wall design tucks against a wall, requiring 50% less room than a full-size tree, so even the larger pallet wood or garland trees on this list still clear floor space that a real spruce never would.

20 christmas party games for adults — clever, competitive & a little cheeky. No kiddie stuff, just

Explore christmas traditions around the world with 28 ready-to-play classroom activities, printable

30 christmas baubles ideas that borrow techniques from nail art, pottery, paper marbling and furnitu
Leave a Reply