

15 Toddler Christmas Ornaments DIY Ideas Little Ones Can Really Make Themselves
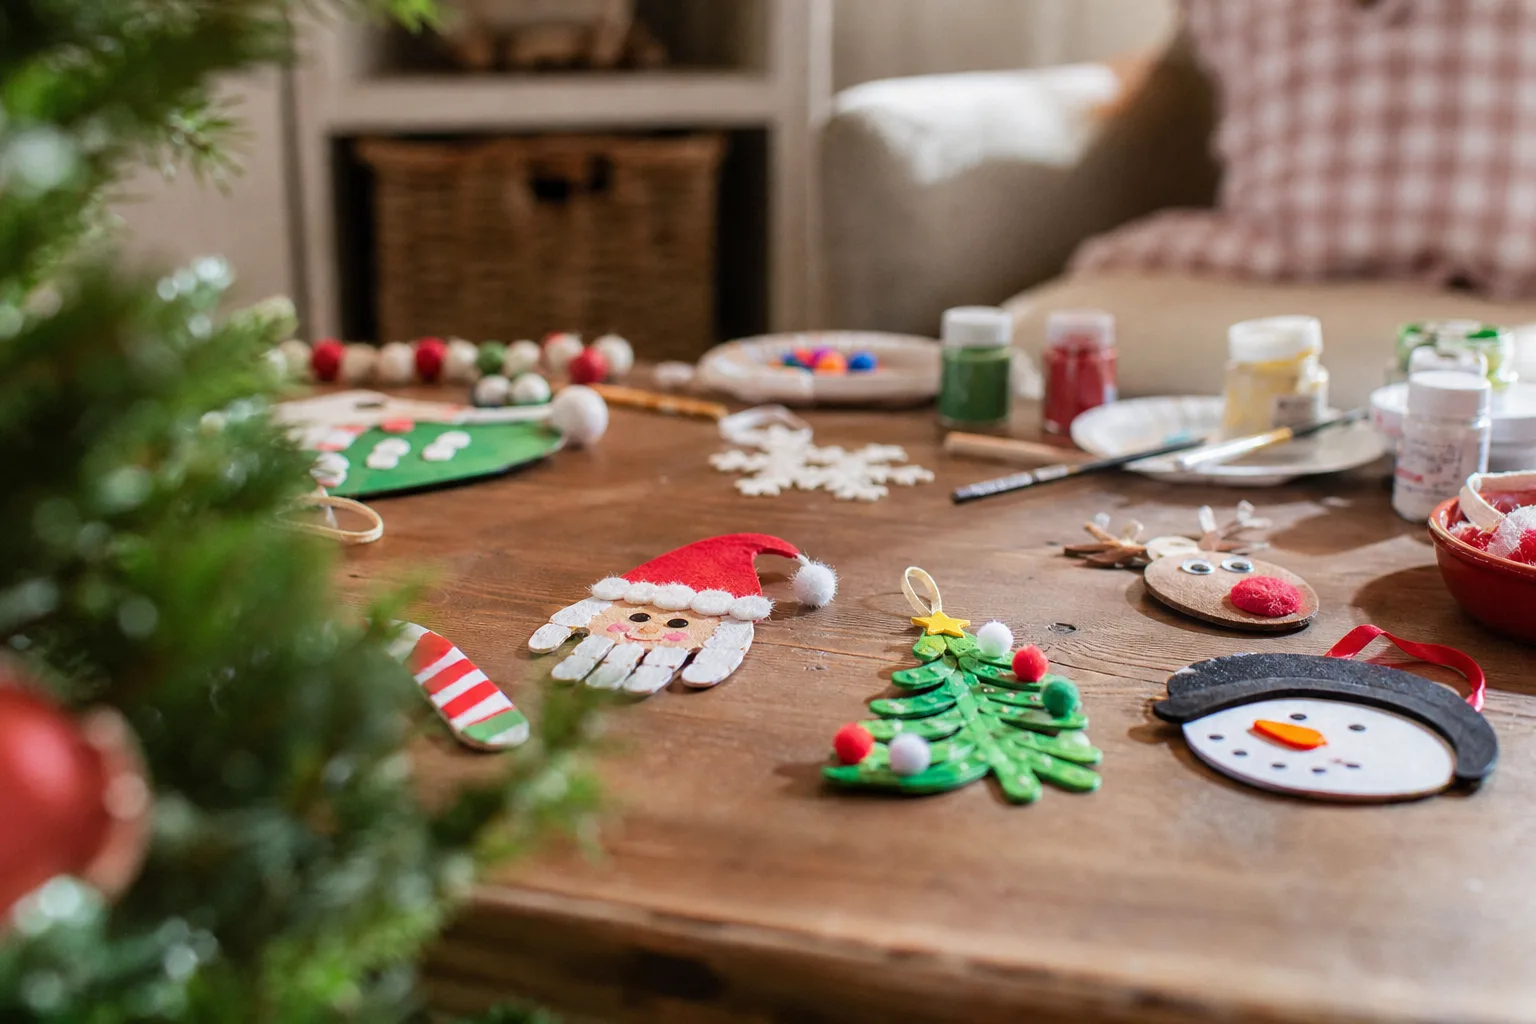
Nobody needs a tree that looks like it came from a catalogue when there is a toddler in the house who wants a say in it. The ornaments below ask for almost nothing you do not already own, they survive sticky fingers, and every single one ends with something she can actually hang, gift or keep in a shoebox marked with the date. Pick two or three rather than all fifteen in one sitting: a toddler’s attention span and a jar of glitter both run out faster than you think.
This post contains affiliate links. If you buy through them, I may earn a small commission at no extra cost to you.
- Handprint Reindeer Ornament
- Footprint Santa Ornament
- Salt Dough Star Ornaments
- Cinnamon Applesauce Ornaments
- Pom-Pom Wreath Ornament
- Pipe Cleaner Bead Snowflake
- Button Christmas Tree Ornament
- Wooden Peg Reindeer Ornament
- Paper Plate Snowflake Ornament
- Melted Crayon Shaving Bauble
- Fingerprint Christmas Tree Card Ornament
- Puffy Paint Snowman Bauble
- Confetti-Stuffed Clear Ornament
- Popsicle Stick Star Ornament
- Glitter Pine Cone Ornament
- Frequently Asked Questions
Handprint Reindeer Ornament
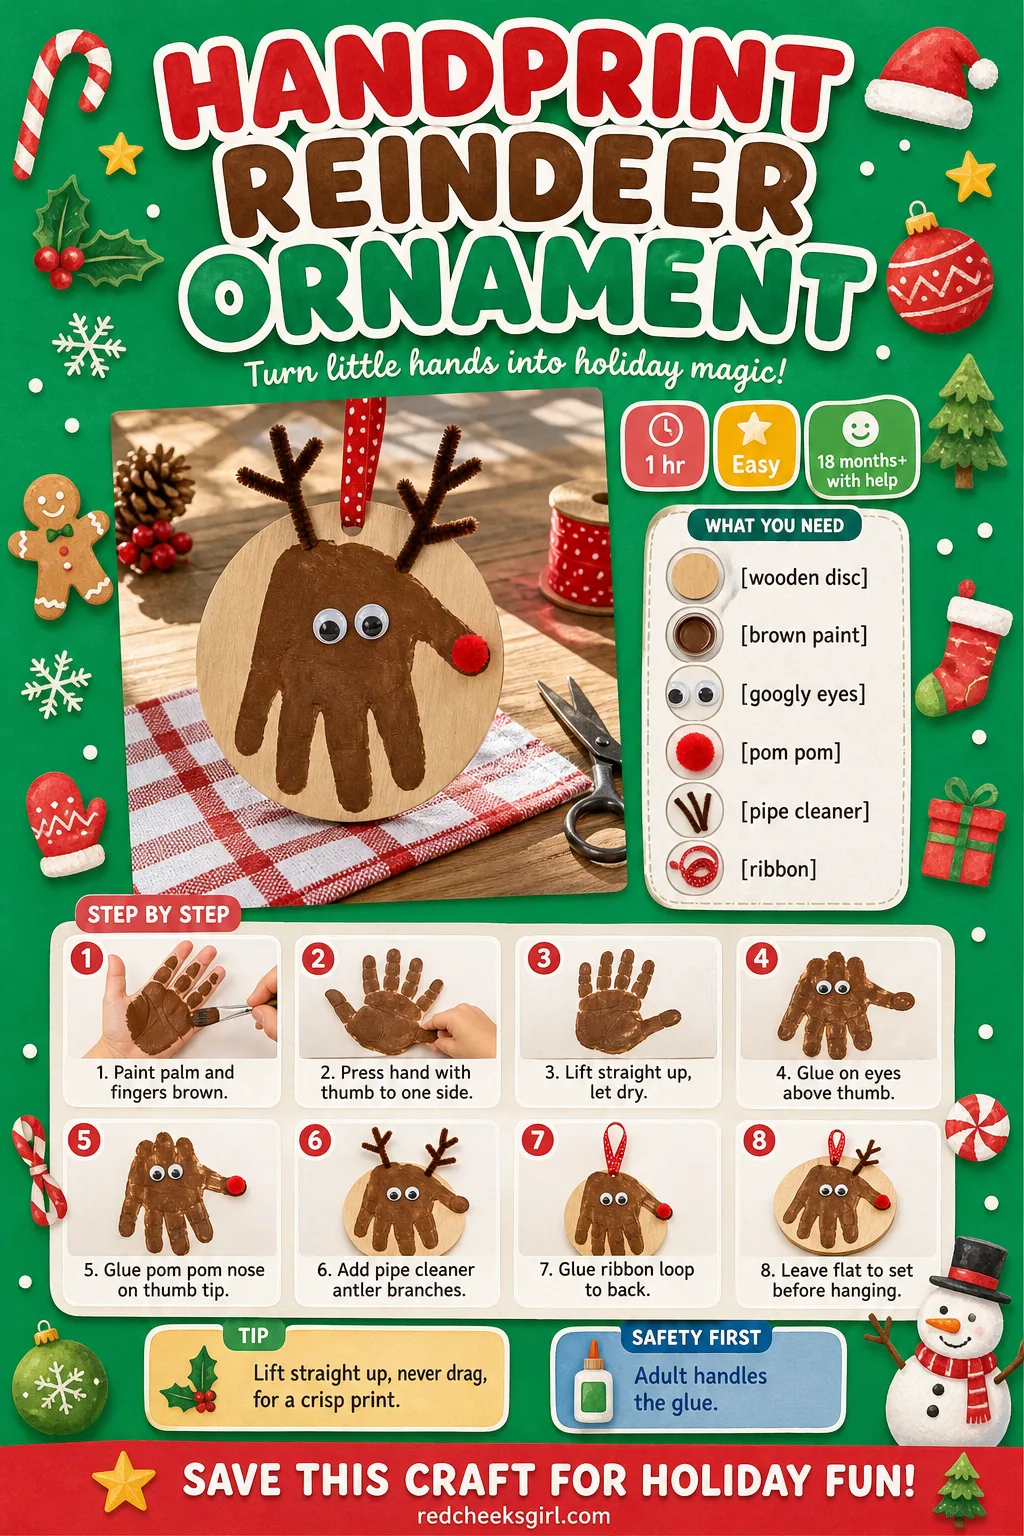
Nothing on this list ages better than a handprint, and this one turns a small palm into a reindeer without you touching a stencil. Hang it on the tree at toddler height, where she can find it herself every single day between now and the new year.
What You Need
- 1 wooden craft disc, 8cm across (or a heavy cardstock circle)
- Brown acrylic paint, about 2 tablespoons
- 1 foam paintbrush
- 2 googly eyes, 10mm
- 1 red pom pom, 1.5cm, for the nose
- 1 brown pipe cleaner, cut in half, for antlers
- Craft glue and a 15cm ribbon loop
How to Make It
- Paint the toddler’s palm and fingers brown, keeping the fingers spread wide.
- Press the hand onto the disc with the fingers pointing up and the thumb tucked to one side, so the palm sits at the bottom and the spread fingers become the antlers.
- Lift straight up without dragging, then let the paint dry for 20 minutes.
- An adult glues on the googly eyes above the thumb and the pom pom nose at the tip of the thumb.
- Bend each pipe cleaner half into a soft V shape and glue one behind each outer finger for extra antler branches.
- Glue the ribbon loop to the back and leave it flat for 30 minutes before hanging.
🛍 Shopping guide
Footprint Santa Ornament
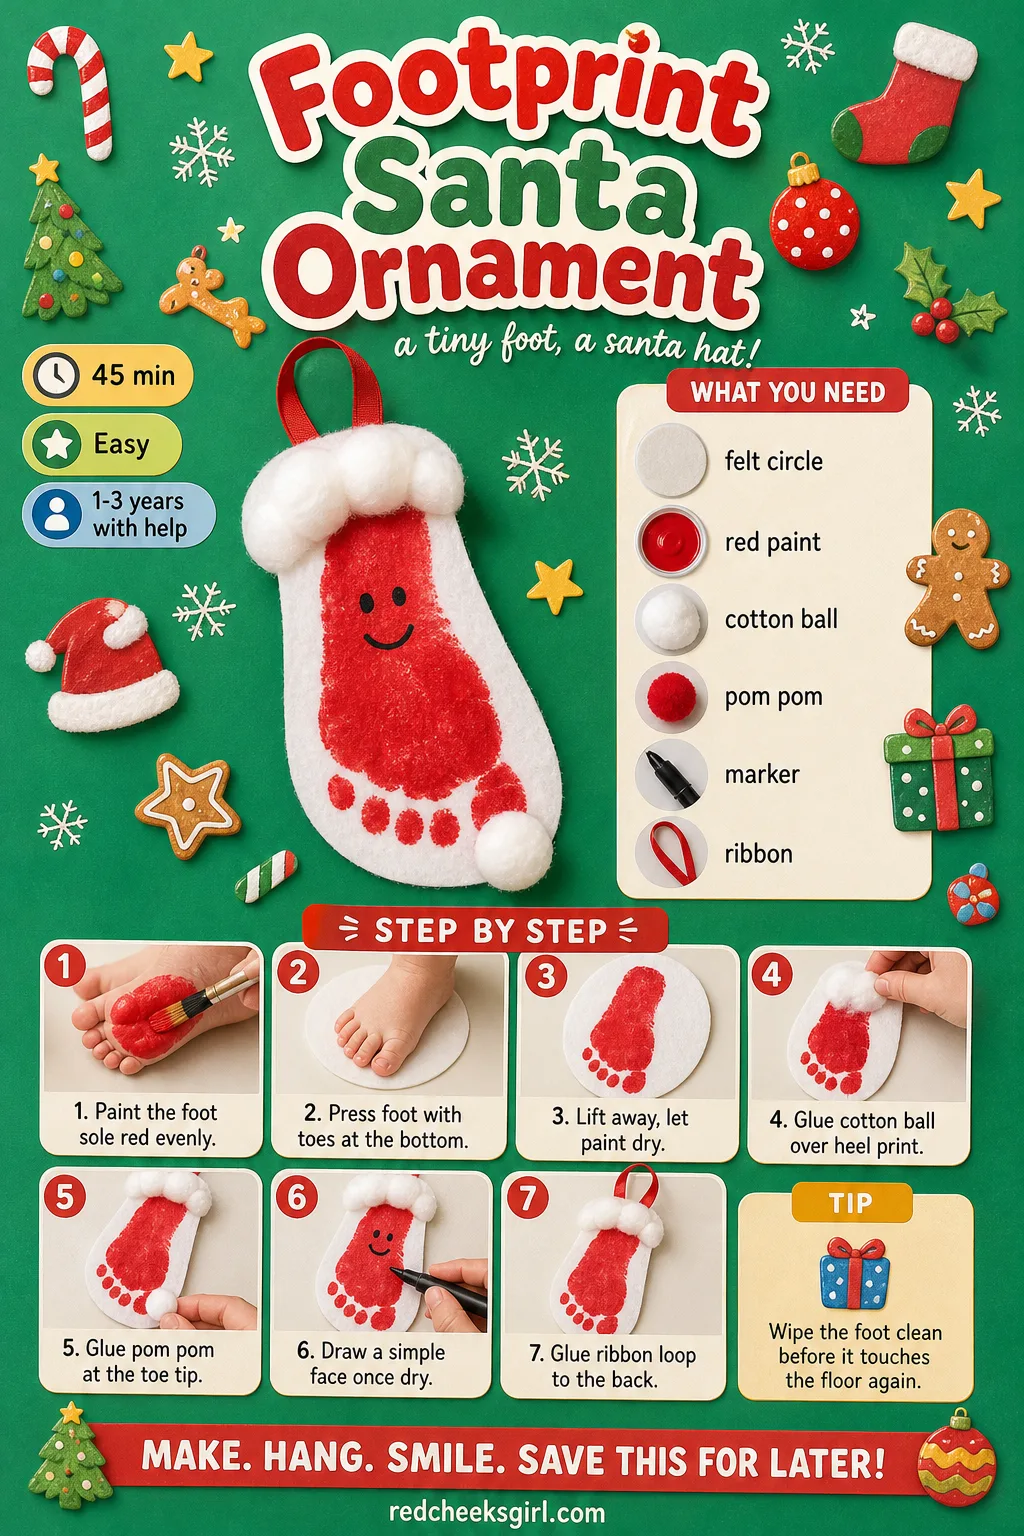
This is the one that turns a wriggly foot into Santa’s hat, and it works even on a toddler who will not hold still for a handprint. Tuck it inside a card for grandparents or clip it straight to the tree: either way it reads as Christmas from across the room.
What You Need
- 1 white felt circle, 10cm across
- Red acrylic paint, about 2 tablespoons
- 1 cotton ball
- 1 small red pom pom, 1.5cm
- Black fine-tip marker
- 15cm ribbon loop
How to Make It
- Paint the sole of the toddler’s foot red, covering it evenly but not thickly.
- Press the foot onto the felt circle with the toes pointing toward the bottom edge, so the heel sits near the top: the shape left behind is Santa’s hat.
- Lift away and let the paint dry for 20 minutes.
- Glue the cotton ball over the heel print as the hat’s brim and glue the pom pom at the very tip of the toes as the bobble.
- Once dry, an adult draws a small face in the gap below the footprint: two dots and a smile is plenty.
- Glue the ribbon loop to the back and let it set for 15 minutes.
🛍 Shopping guide
Salt Dough Star Ornaments
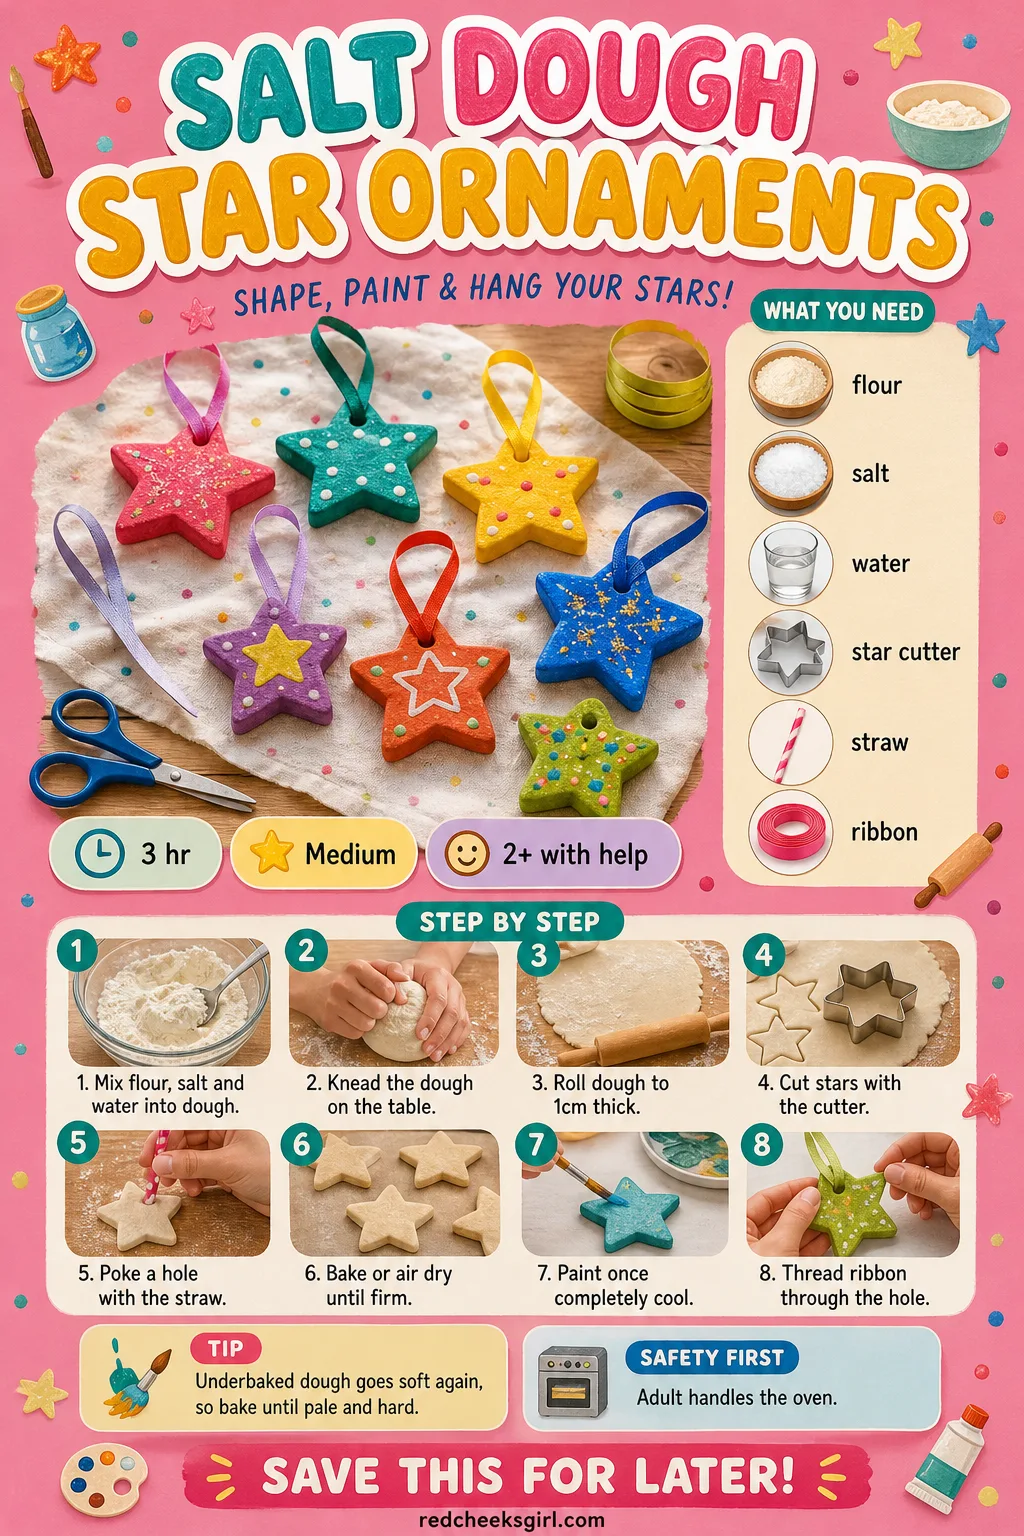
If she has ever rolled biscuit dough with you, she already has the skill for this one, and the dough is three pantry staples deep. Thread a handful onto the tree and the rest become plain gift tags, since a star looks festive whatever string hangs off it.
What You Need
- 2 cups plain flour
- 1 cup table salt
- 3/4 cup warm water
- 1 rolling pin
- 1 star cookie cutter, 7cm
- 1 drinking straw
- 15cm ribbon per star
How to Make It
- Mix the flour and salt, then add the water a little at a time until the dough holds together without cracking.
- Let the toddler knead it on the table for a minute or two: this is the messiest part and the best bit for small hands.
- Roll the dough out to about 1cm thick and cut stars with the cutter.
- Use the straw to poke a hanging hole near one point of each star.
- An adult bakes the stars at 150C (300F) for about 2 hours until firm and pale, or leaves them to air dry for 2 days if the oven is busy with other things.
- Once fully cool, let the toddler paint them and thread the ribbon through the hole once the paint is dry.
🛍 Shopping guide
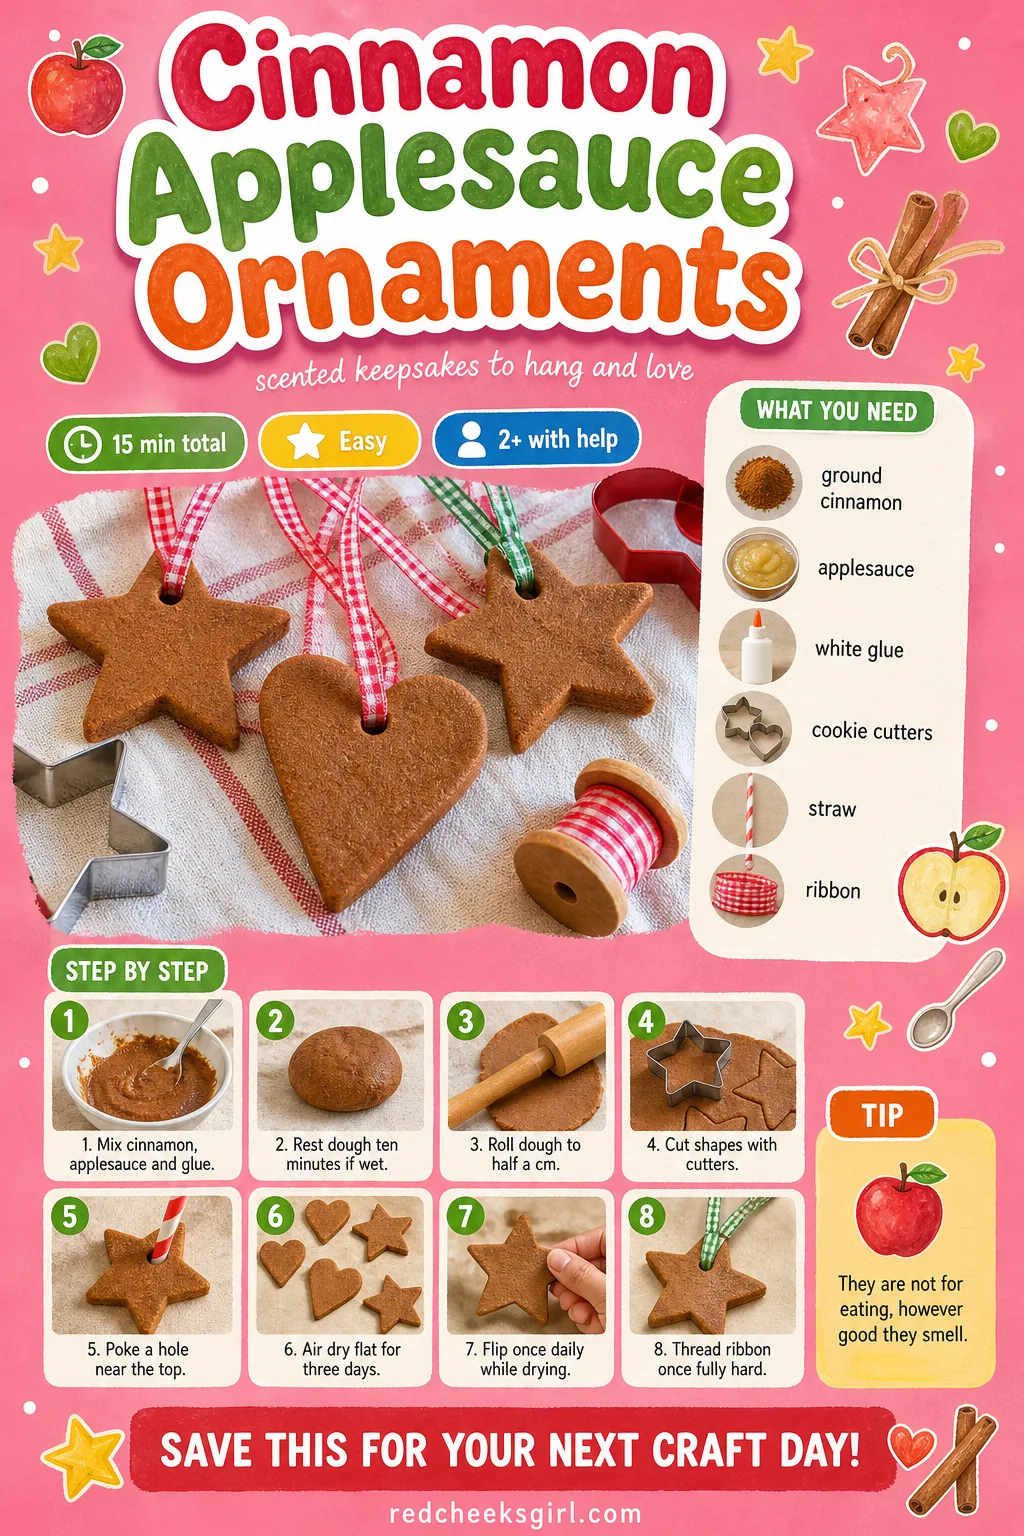
Cinnamon Applesauce Ornaments
The dough itself smells like the whole holiday before a single thing gets painted, and this one needs no oven at all. Hang a few near the front door instead of the tree: every time someone brushes past, the cinnamon lifts off again.
What You Need
- 1 cup ground cinnamon
- 3/4 cup applesauce
- 2 tablespoons white craft glue
- 1 rolling pin
- Cookie cutters, 6cm, a few shapes
- 1 drinking straw
- 15cm ribbon per ornament
How to Make It
- Mix the cinnamon, applesauce and glue in a bowl until it forms a stiff, slightly sticky dough.
- Let it rest for 10 minutes if it feels too wet to roll.
- Roll the dough to about 0.5cm thick on a sheet of baking paper and cut shapes with the cutters.
- Poke a hanging hole near the top of each shape with the straw.
- Lay the shapes flat on baking paper and let them air dry for 2 to 3 days, flipping them once a day so they dry evenly.
- Once hard all the way through, thread the ribbon and tie a loop.
🛍 Shopping guide
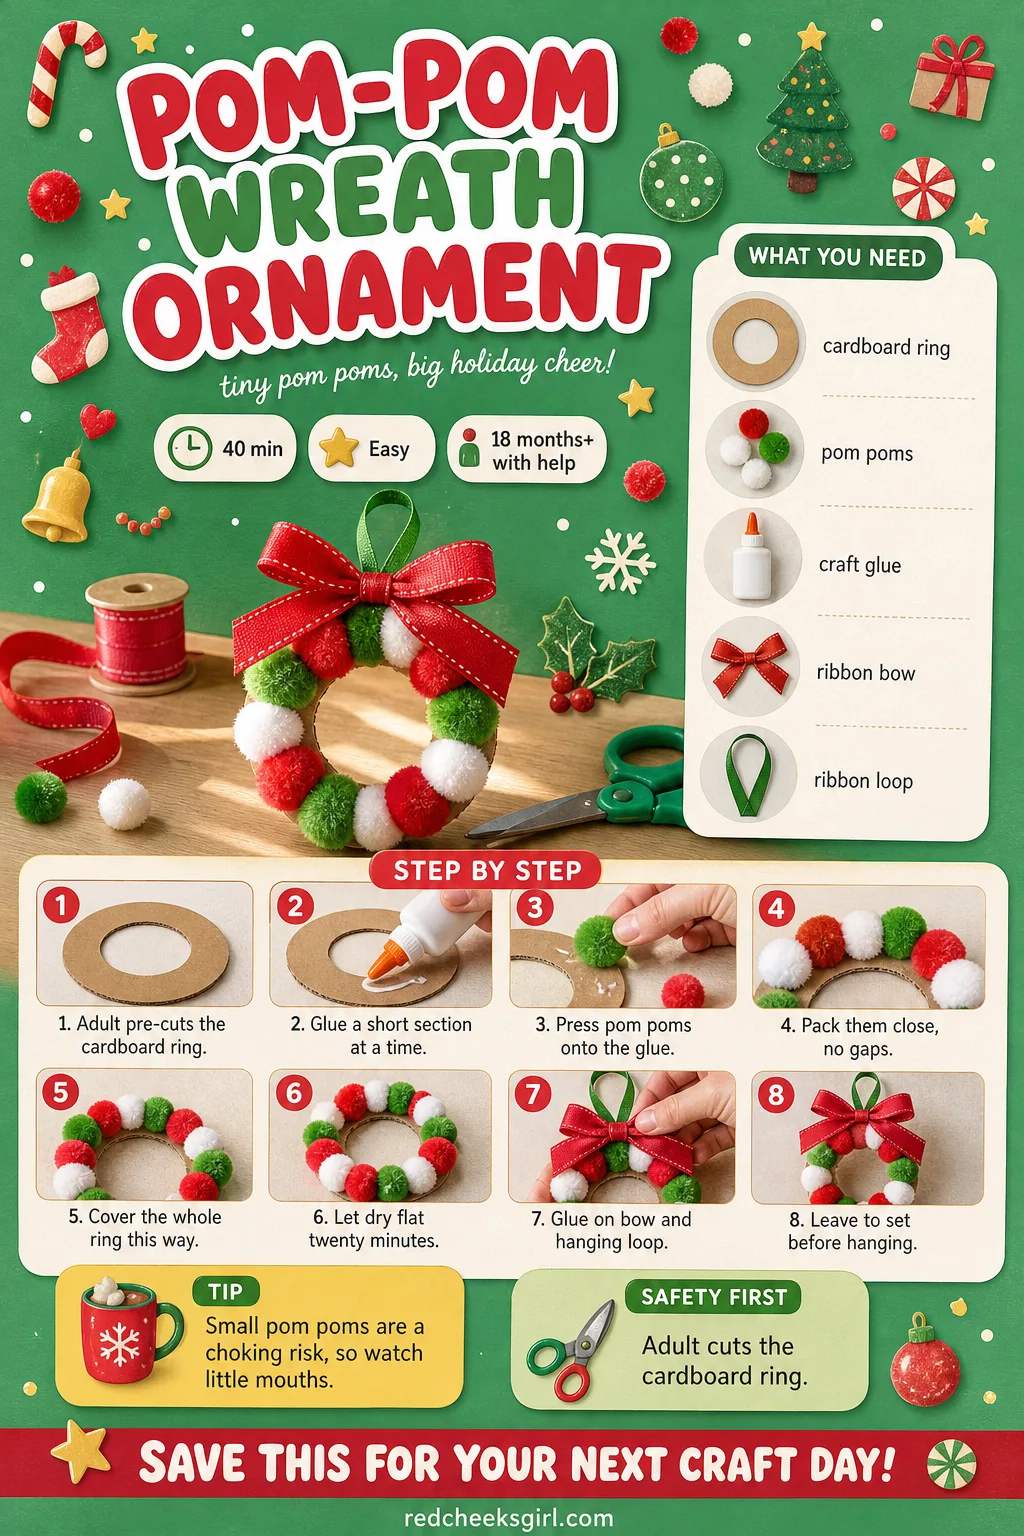
Pom-Pom Wreath Ornament
If the tree already has enough fragile things on it, give her a wreath she cannot break: just a ring of pom poms with nothing sharp anywhere near it. It hangs just as well on a bedroom door handle as it does on a branch.
What You Need
- 1 cardboard ring, 8cm outer and 5cm inner (cut from a cereal box)
- 20 pom poms, 2cm, mixed red, green and white
- Craft glue
- 1 ribbon bow, pre-tied, 6cm wide
- 15cm ribbon loop for hanging
How to Make It
- An adult cuts the cardboard ring in advance, since this is the only step that needs scissors on stiff card.
- Squeeze a line of glue onto a short section of the ring at a time, so it stays tacky while the toddler works.
- Press pom poms onto the glued section, packing them close enough that no cardboard shows through.
- Keep gluing and pressing around the ring until it is fully covered.
- Let it dry flat for 20 minutes, then glue the bow to the bottom and the ribbon loop to the back.
- Leave it undisturbed for a final 20 minutes before hanging.
🛍 Shopping guide
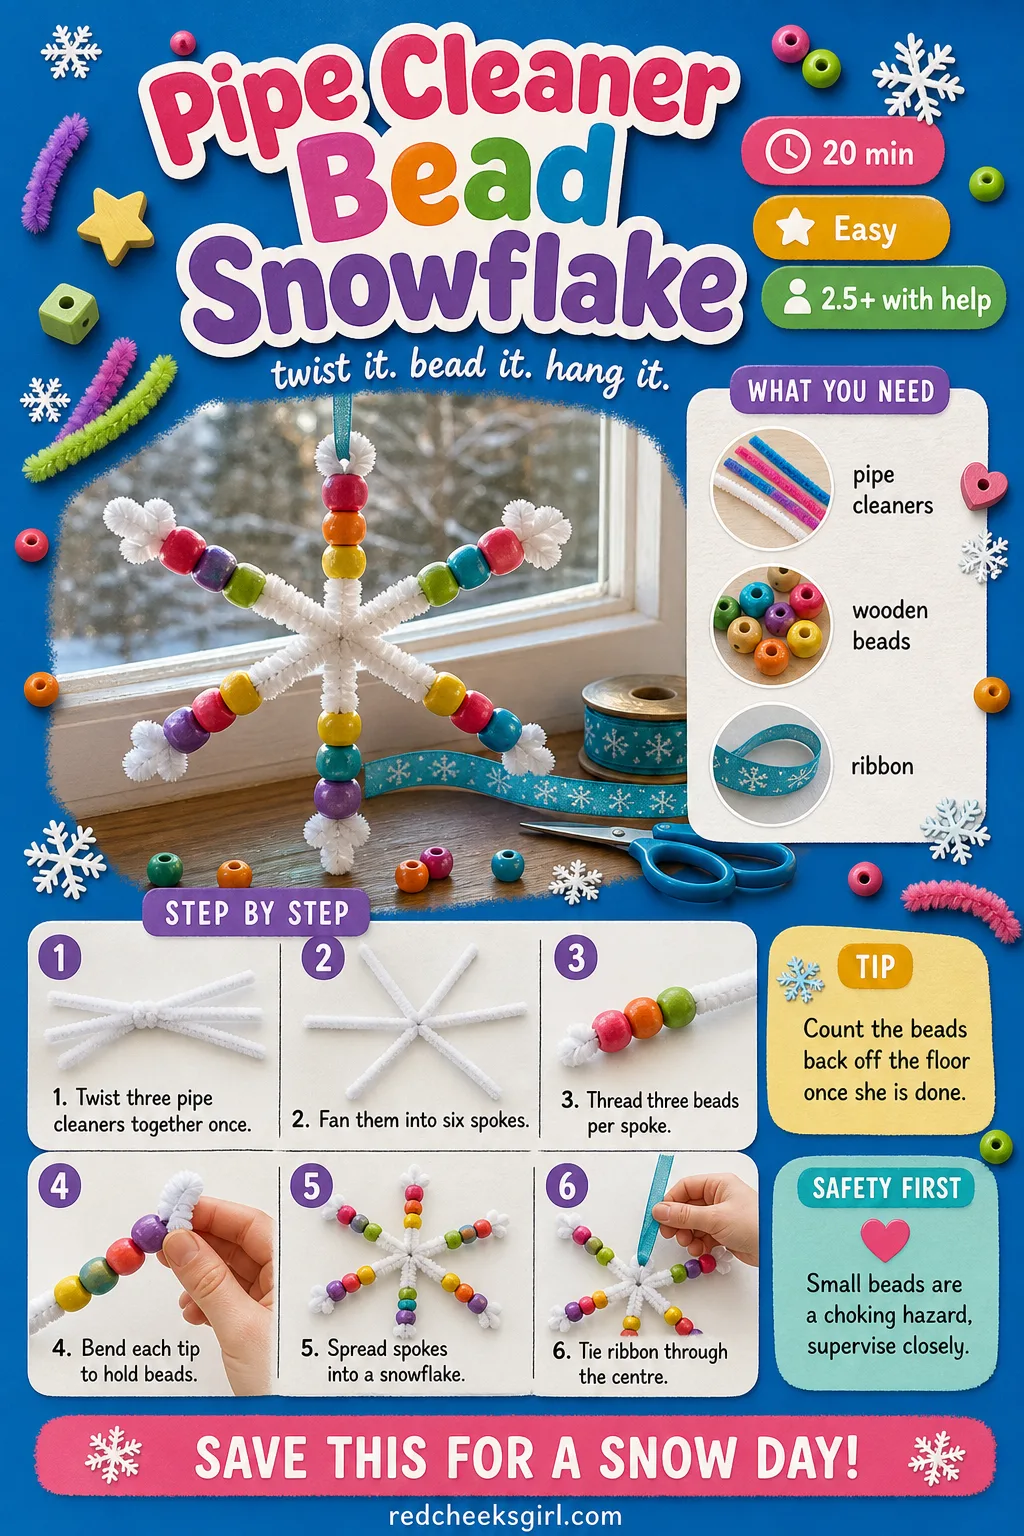
Pipe Cleaner Bead Snowflake
Threading is the one skill toddlers practise without ever calling it practice, and this snowflake hides it inside something pretty enough for the window. Hang it against the glass where the light actually comes through the beads, rather than lost among branches.
What You Need
- 3 white pipe cleaners, 30cm
- 18 wooden beads, 10mm, assorted colors
- 10cm ribbon for hanging
How to Make It
- Lay the three pipe cleaners on top of each other and twist them together once in the middle, so they fan out into six spokes like an asterisk.
- Help the toddler thread 3 beads onto the end of each spoke.
- Bend the very tip of each spoke back on itself after the beads, so nothing slides off.
- Gently spread the six spokes into an even snowflake shape.
- Tie the ribbon through the twisted centre to make a hanging loop.
🛍 Shopping guide
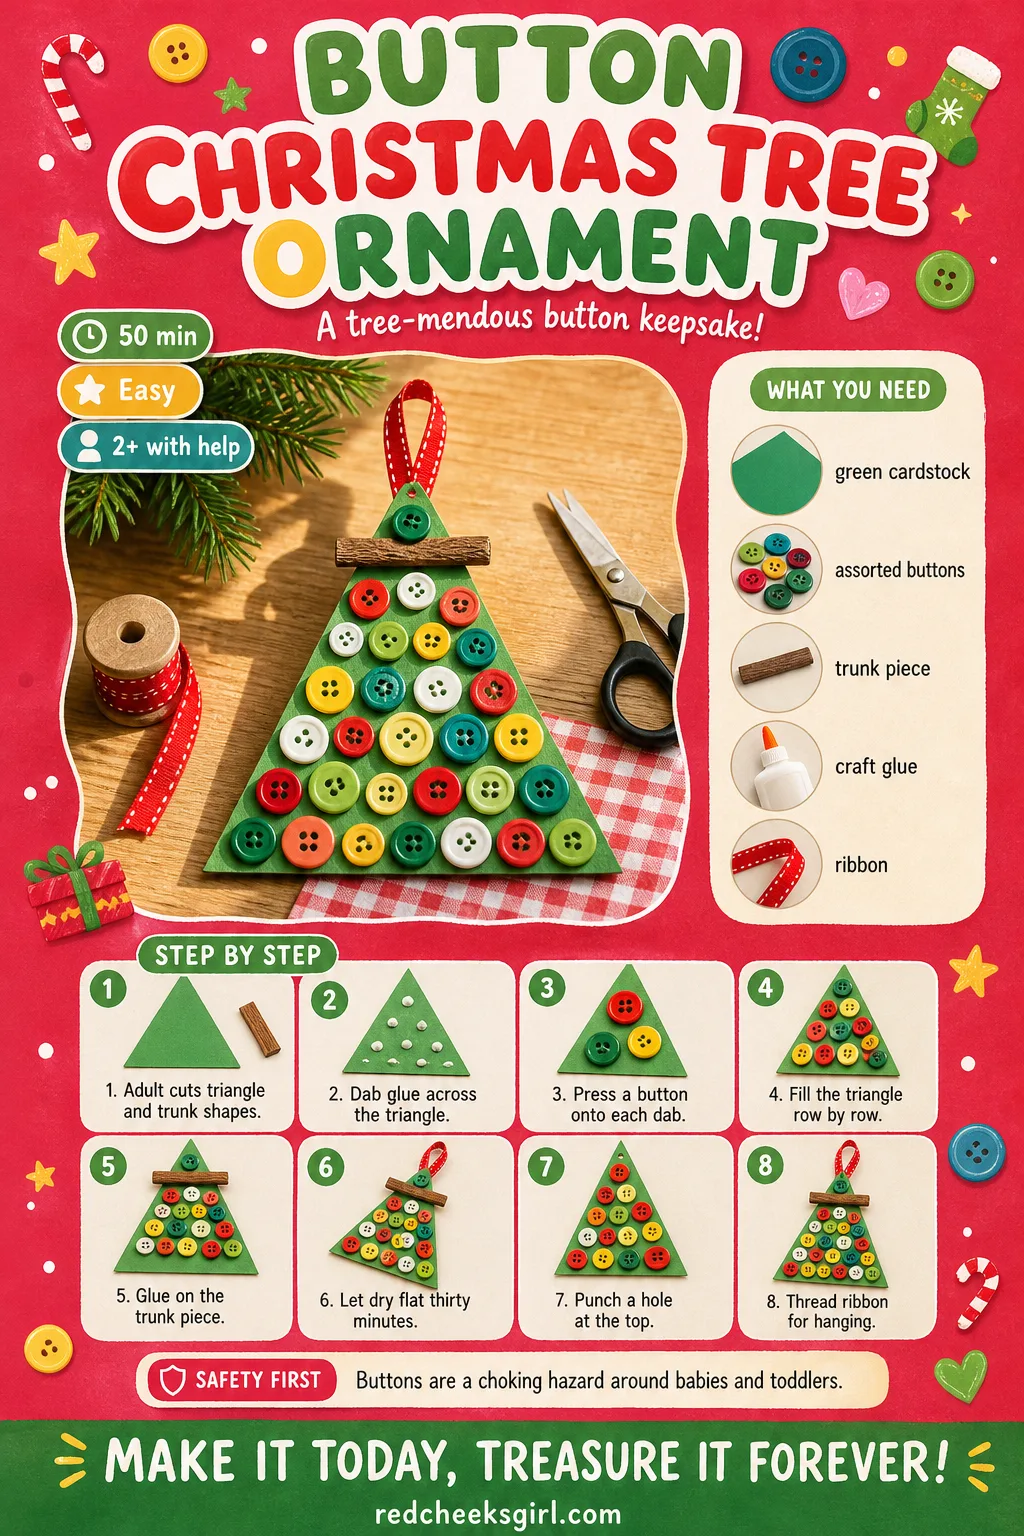
Button Christmas Tree Ornament
Buttons are the thing in the sewing tin that nobody minds a toddler raiding, and sorting them by size is half the fun before any glue comes out. This one looks neat enough to clip to a gift ribbon as well as hang on the branch.
What You Need
- 1 green cardstock triangle, 10cm base
- 15 assorted buttons, 1 to 2cm
- 1 brown rectangle cardstock, 2cm, for the trunk
- Craft glue
- 10cm ribbon
How to Make It
- An adult cuts the triangle and trunk shapes from cardstock ahead of time.
- Squeeze small dabs of glue across the triangle, working from the bottom row up.
- Let the toddler press a button onto each dab, mixing sizes and colours as they go.
- Keep adding buttons row by row until the whole triangle is covered.
- Glue the trunk piece to the bottom point and let everything dry flat for 30 minutes.
- Punch a small hole at the top and thread the ribbon through for hanging.
🛍 Shopping guide
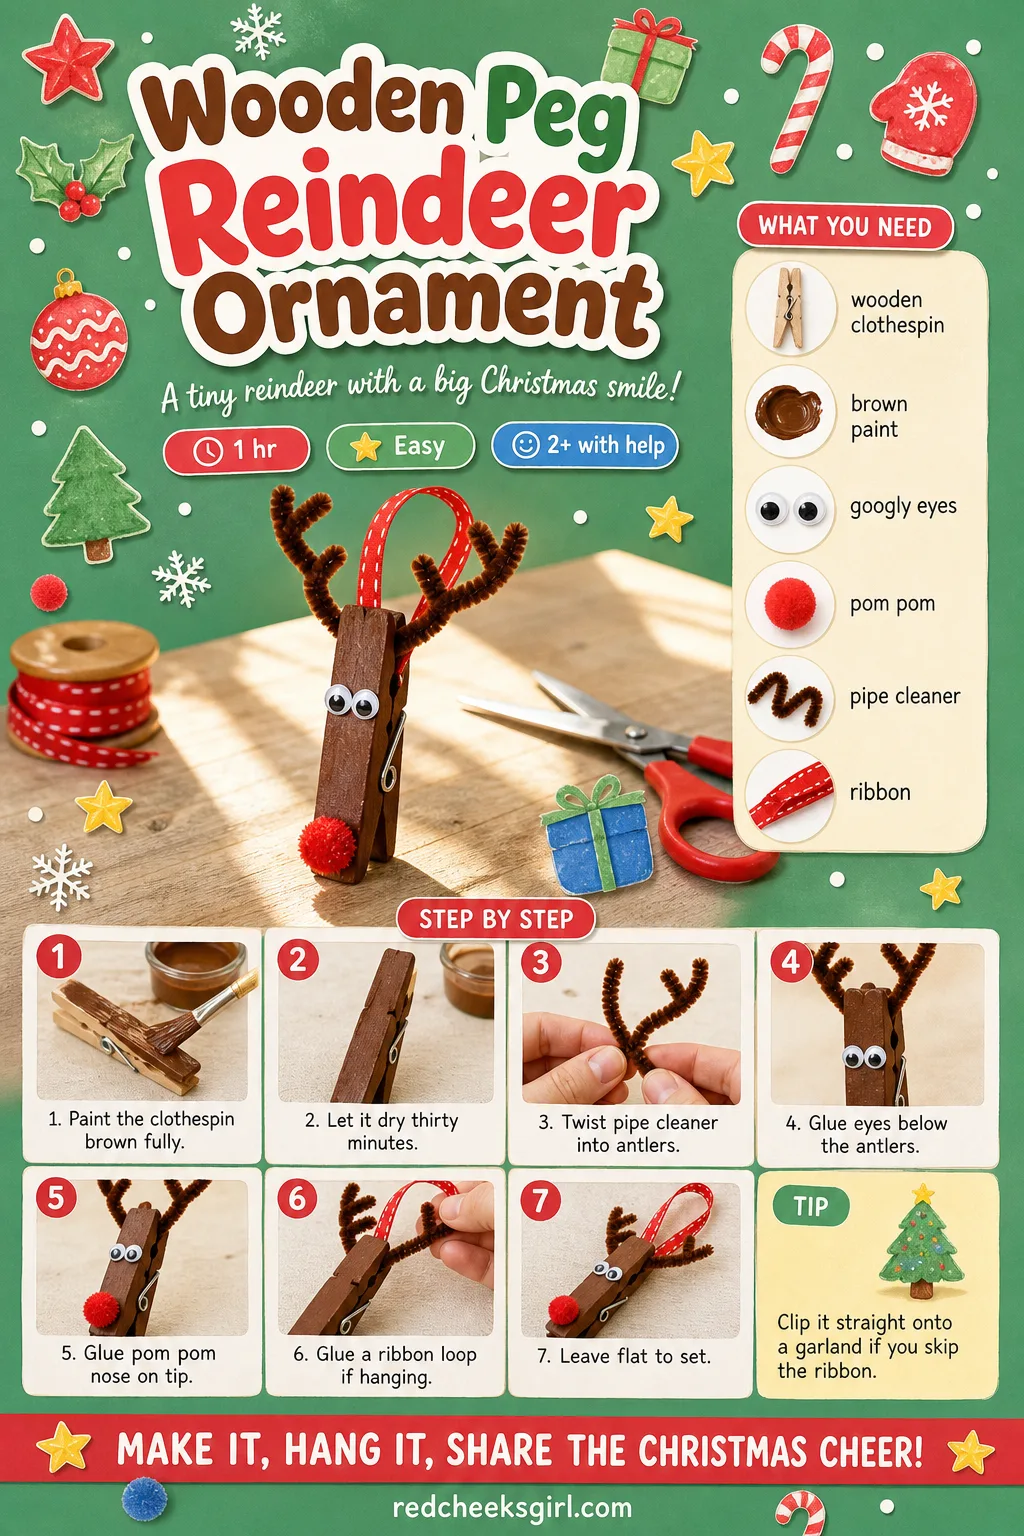
Wooden Peg Reindeer Ornament
A plain wooden clothespin takes paint better than almost anything else on this list, and turns into a reindeer in about four moves. Clip a few along a mantel garland instead of hanging them: the little spring grip does the work.
What You Need
- 1 wooden clothespin per reindeer
- Brown acrylic paint
- 2 googly eyes, 8mm
- 1 red pom pom, 1cm
- 1 brown pipe cleaner, 10cm
- Craft glue and a 10cm ribbon loop
How to Make It
- Let the toddler paint the whole clothespin brown and set it aside to dry for 30 minutes.
- An adult wraps the pipe cleaner around the top prongs, twisting the two ends up into antler branches.
- Glue the googly eyes just below the antlers and the pom pom nose at the very tip of the peg.
- Glue the ribbon loop to the back if the reindeer is meant to hang rather than clip.
- Leave everything flat for 20 minutes before handling.
🛍 Shopping guide
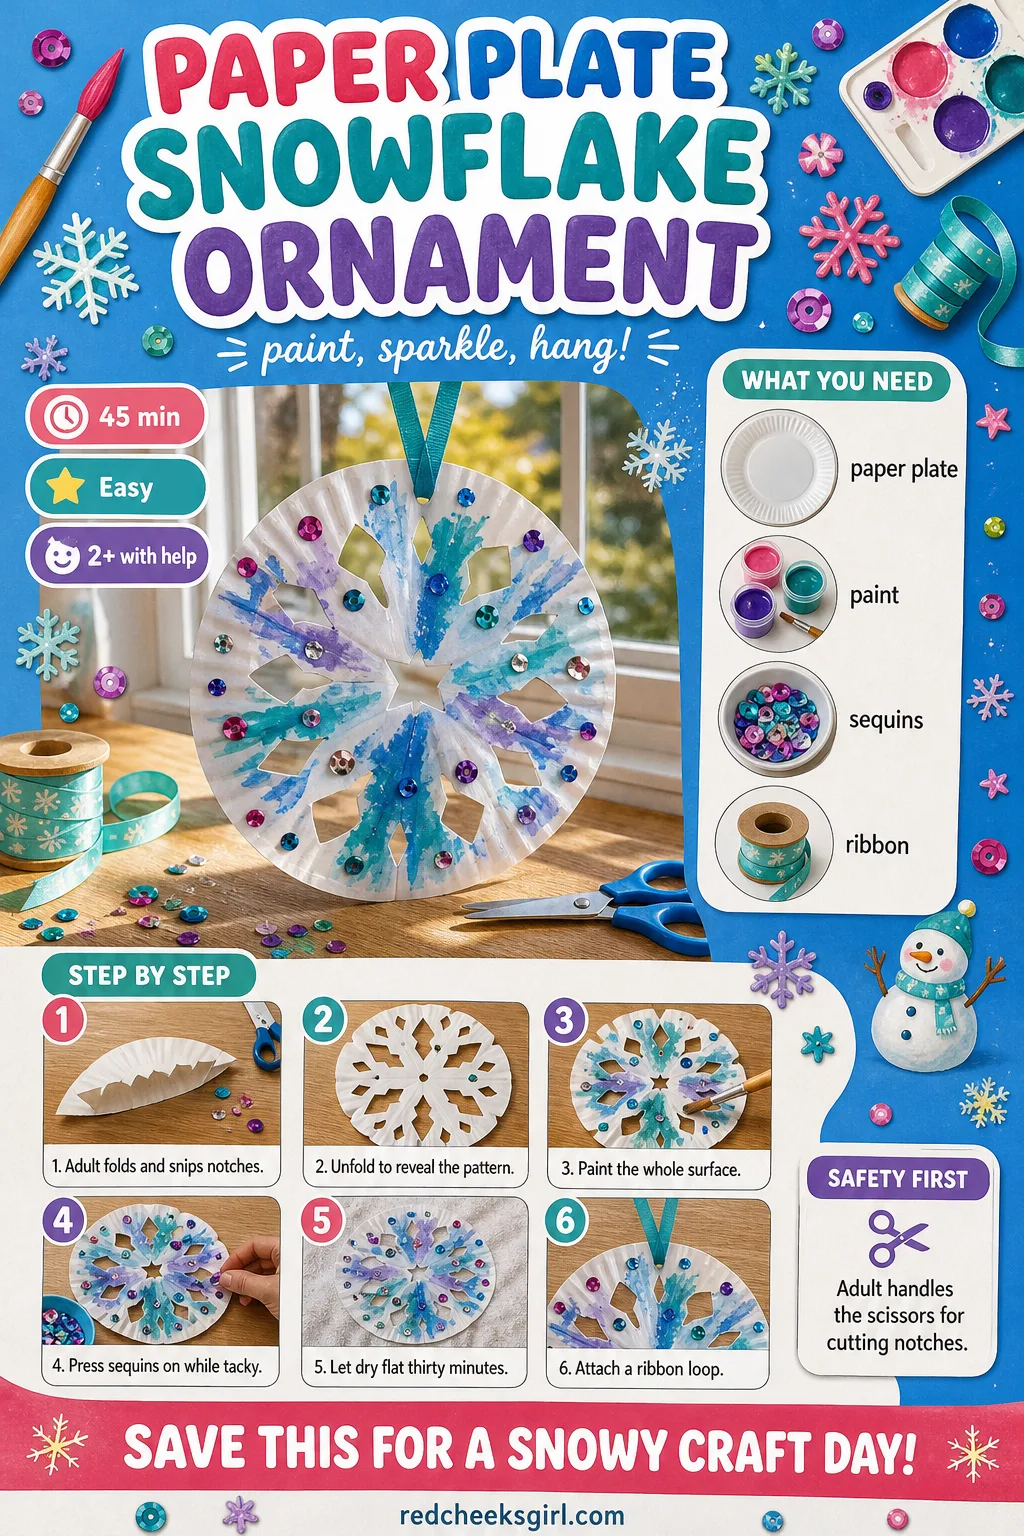
Paper Plate Snowflake Ornament
This is the craft for the afternoon when you have one small paper plate, a leftover tub of paint and nothing left to lose. It hangs beautifully in a window where the light shows up the cut edges, and costs almost nothing if it goes wrong.
What You Need
- 1 small paper plate, 18cm
- White or pale blue paint
- 10 large sequins or foam stickers
- 10cm ribbon loop
How to Make It
- An adult folds the plate in half, then in half again, and snips small triangle notches along the folded edges with sharp scissors.
- Unfold the plate: a rough snowflake pattern of holes should already be visible.
- Let the toddler paint over the whole surface, front and back if the paint is thin enough to dry quickly.
- While the paint is still slightly tacky, press sequins or stickers onto the raised sections between the cut holes.
- Let it dry flat for 30 minutes, then glue or staple a ribbon loop to one point for hanging.
🛍 Shopping guide
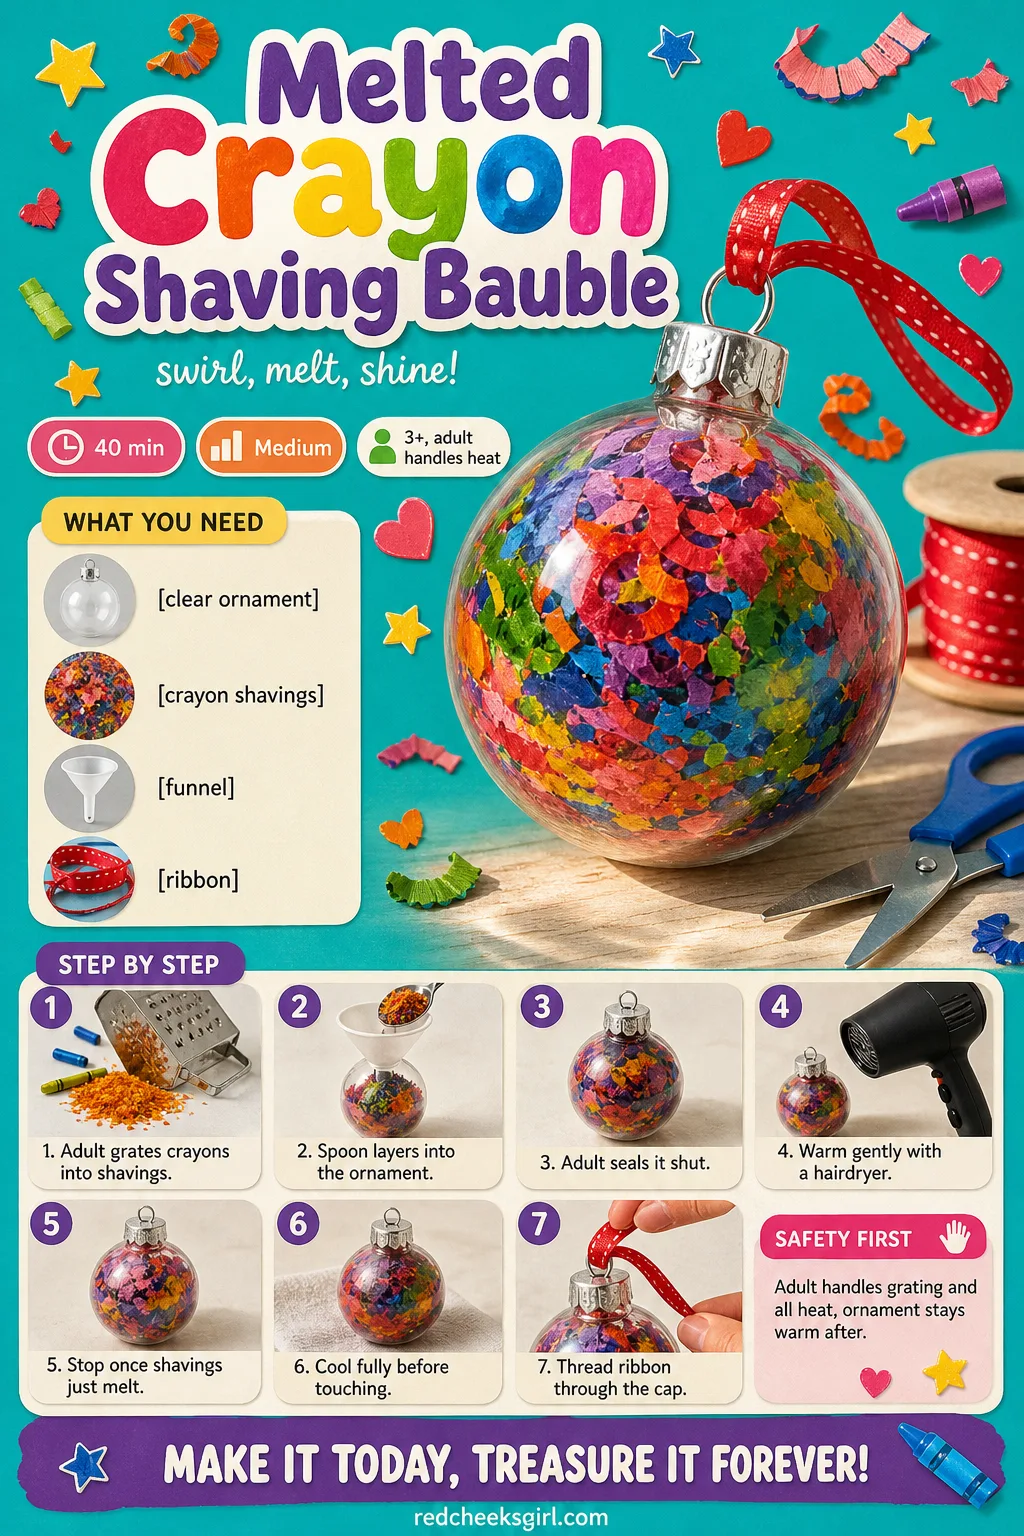
Melted Crayon Shaving Bauble
Old broken crayons finally earn their keep in this one, swirling into something that looks like stained glass once it catches the light. Keep it on a lower branch where the colours show, and know that the only fiddly part belongs entirely to you, not her.
What You Need
- 1 clear fillable plastic ornament, 7cm
- 2 tablespoons crayon shavings, assorted colors (adult grates old crayons)
- 1 small funnel
- 10cm ribbon
How to Make It
- An adult grates a few old crayons with a cheese grater or vegetable peeler to make fine shavings: this is the step that keeps fingers away from the blade.
- Let the toddler spoon layers of different coloured shavings into the ornament through the funnel.
- An adult seals the ornament and, holding it well away from little hands, runs a hairdryer on low heat over it for a few seconds at a time until the shavings just start to melt and swirl.
- Stop as soon as you see movement: overdoing it turns the colours to mud.
- Set the ornament down to cool completely for 30 minutes before anyone touches it, since the inside stays warm longer than it looks.
- Thread the ribbon through the cap once cool.
🛍 Shopping guide
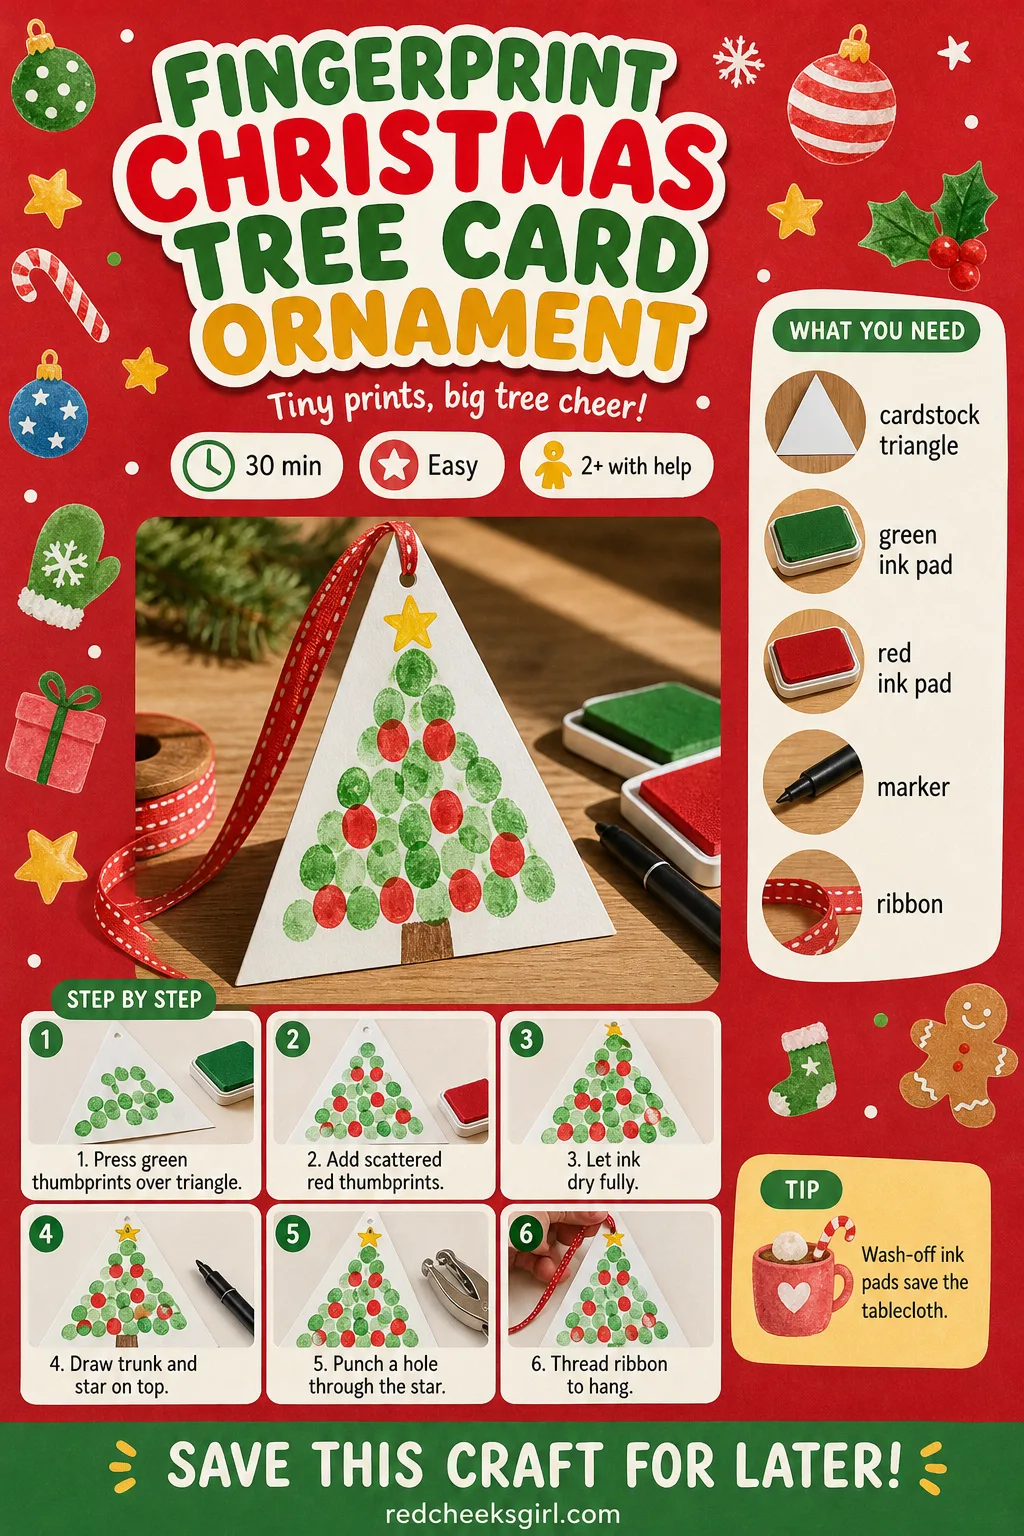
Fingerprint Christmas Tree Card Ornament
Thumbprints are smaller and slower than whole handprints, which makes this the one for a toddler who has just learned to press rather than smear. The finished tree works equally well flat as a gift tag or punched and hung as a proper ornament.
What You Need
- 1 cardstock triangle, 10cm base, precut
- Green and red ink pads
- Fine black marker
- 10cm ribbon
How to Make It
- Press the toddler’s thumb onto the green ink pad, then onto the triangle, repeating to cover it with overlapping green prints like foliage.
- Add a handful of red thumbprints scattered across the green as baubles.
- Let the ink dry fully for about 20 minutes before anyone draws on top.
- An adult draws a small trunk below the triangle and a star at the top point with the marker.
- Punch a hole through the star and thread the ribbon to hang.
🛍 Shopping guide
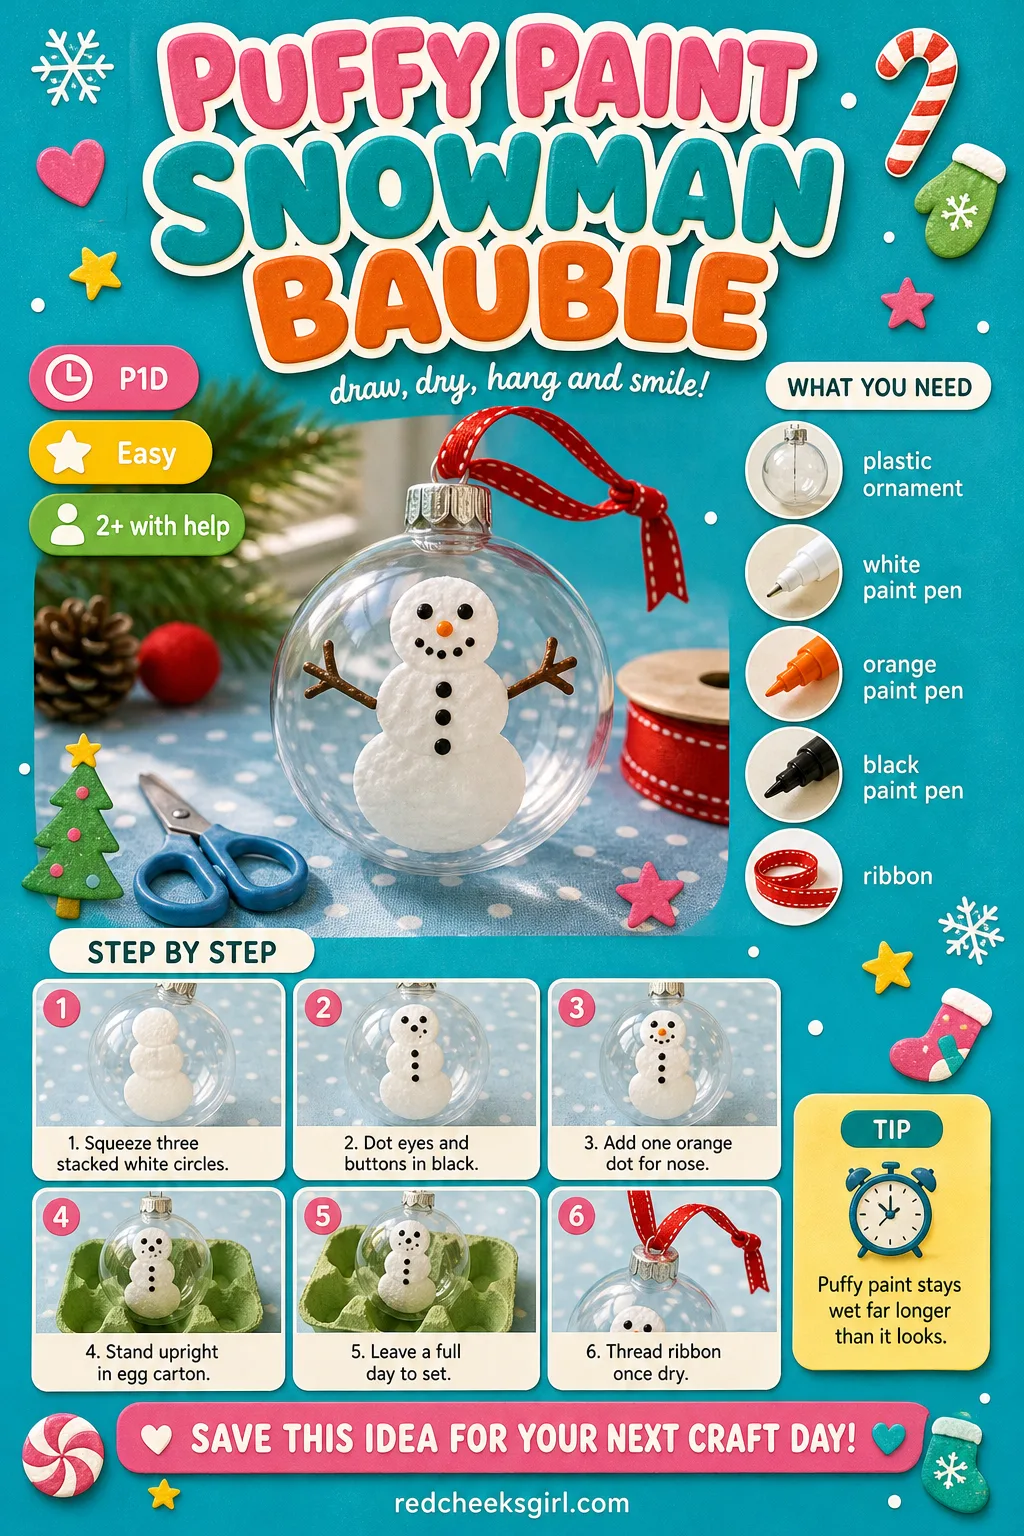
Puffy Paint Snowman Bauble
If handprints feel like one too many baby wipes this year, hand her a paint pen instead: no mess on the hands at all, just raised squiggly lines on a plain bauble. It looks hand-drawn in the best way and sits happily on a low branch where little eyes can admire it.
What You Need
- 1 white or clear plastic ornament ball, 7cm
- 3 dimensional fabric paint pens: white, orange, black
- 10cm ribbon
How to Make It
- Guide the toddler’s hand as needed to squeeze three stacked white circles down the ornament, largest at the bottom, for the snowman’s body.
- Dot two small black eyes and a row of buttons down the middle circle.
- Add one small orange dot for the carrot nose.
- Set the ornament upright in an egg carton so the wet paint does not touch anything, and leave it a full 24 hours, since puffy paint stays raised and takes longer than regular paint to set hard.
- Thread the ribbon through the cap once completely dry.
🛍 Shopping guide
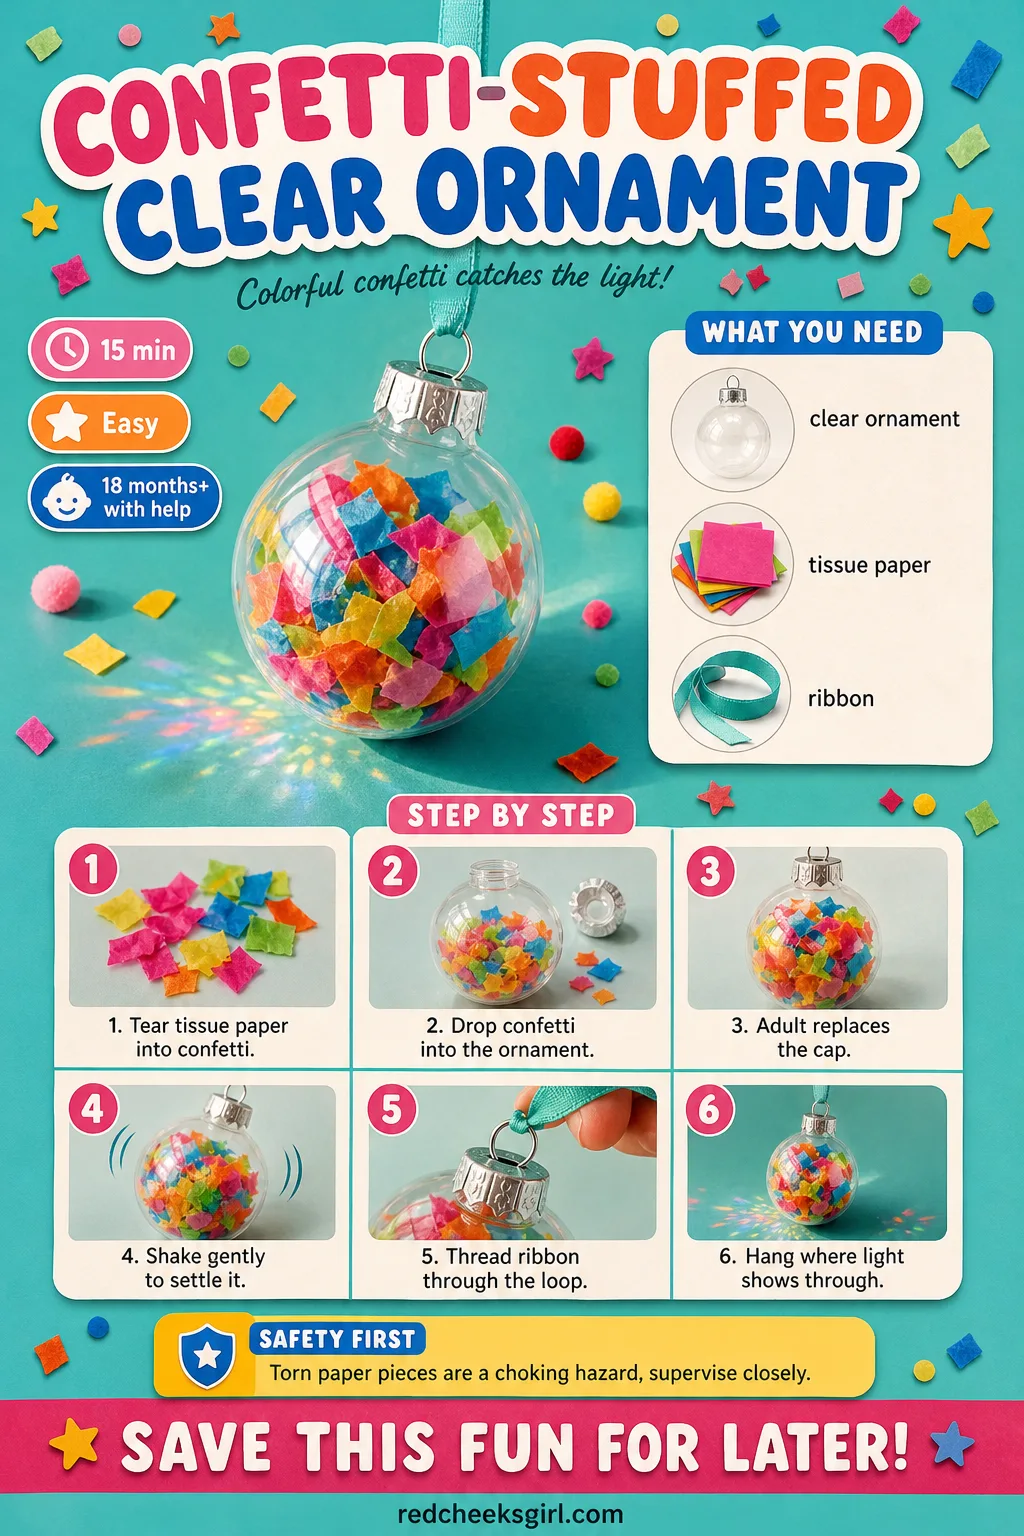
Confetti-Stuffed Clear Ornament
Some days the win is a craft with no glue, no paint and nothing that dries overnight, and this is that craft. A toddler who loves tearing paper gets to do exactly that, and the ornament catches real light once it hangs against a window.
What You Need
- 1 clear fillable plastic ornament, 8cm
- 2 tablespoons tissue paper, torn into confetti, mixed colors
- 10cm ribbon
How to Make It
- Let the toddler tear or hole-punch tissue paper into small confetti pieces over a tray, so stray bits are easy to gather up after.
- Open the ornament and drop handfuls of confetti in through the top, a little at a time so it does not jam.
- An adult replaces the cap once it is as full as she wants it.
- Give it a gentle shake to settle and spread the colours evenly.
- Thread the ribbon through the cap loop and hang it somewhere the light passes through.
🛍 Shopping guide
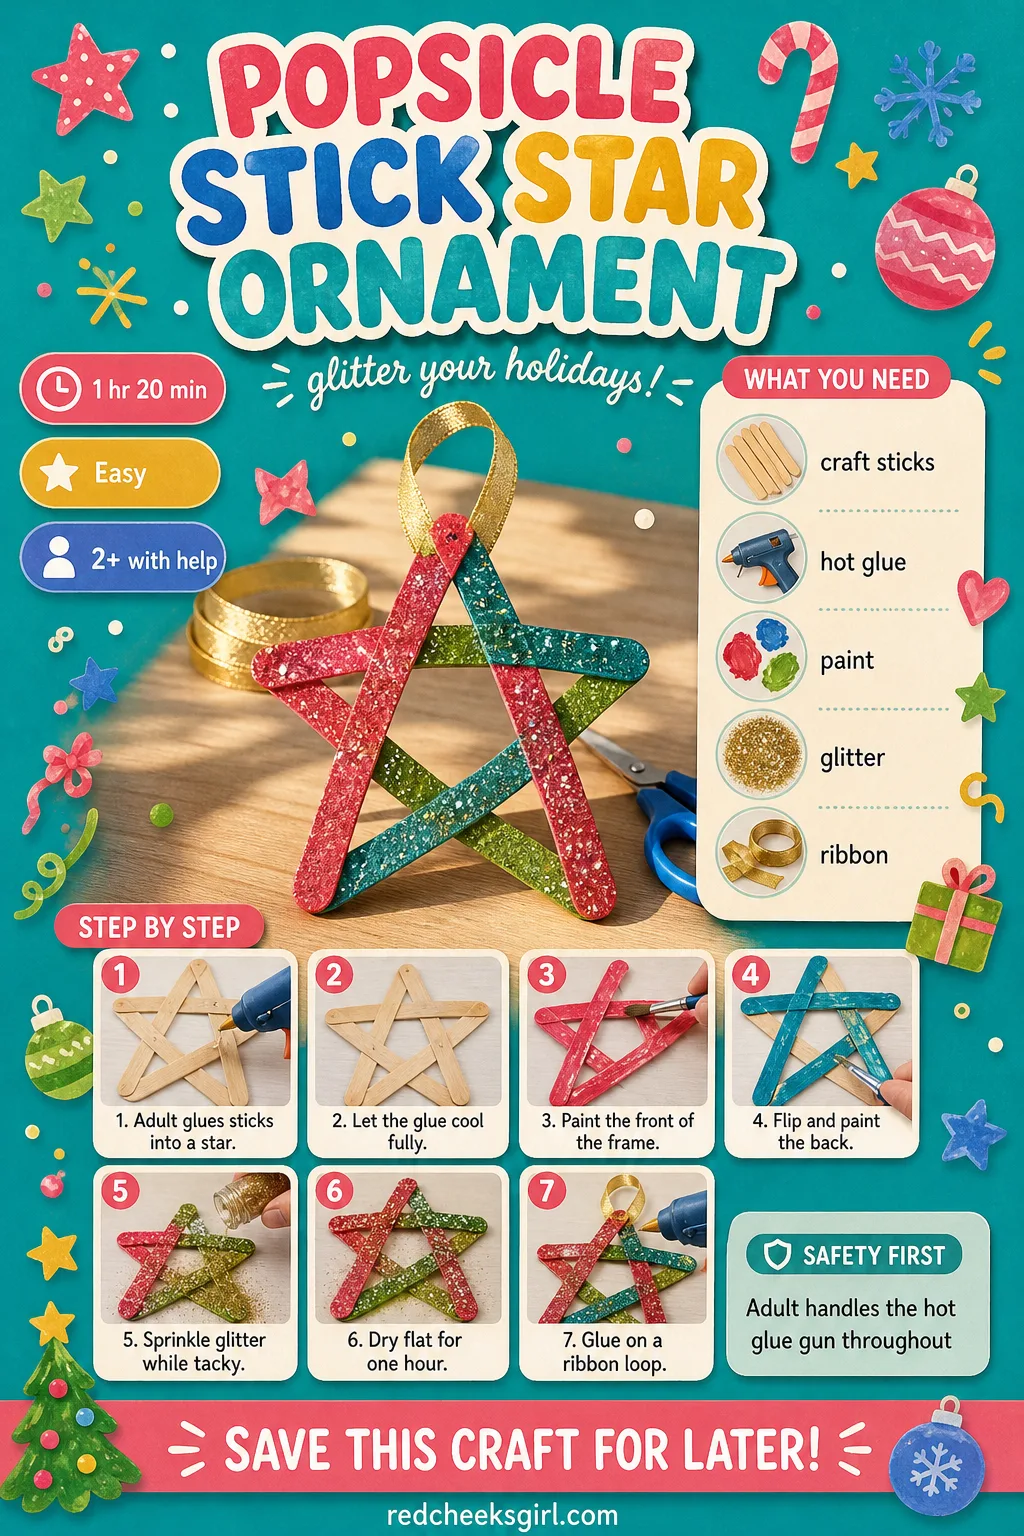
Popsicle Stick Star Ornament
Five sticks and a dab of glue turn into a proper frame she can paint all over, no cutting needed on her end at all. It hangs flat against the tree in a way that round baubles never do, so it reads from further back in a photo too.
What You Need
- 5 jumbo craft sticks, 15cm, per star
- Hot glue (adult use only)
- Paint, any colour
- 1 teaspoon glitter, optional
- 10cm ribbon
How to Make It
- An adult overlaps the five sticks into a star or pentagon frame and hot glues each join: let this cool before handing it over.
- Let the toddler paint the whole frame, front first, then flip once dry to do the back.
- While the first coat is still a little tacky, sprinkle on glitter if using, then tip off the extra.
- Lay the star flat to dry for about an hour.
- Glue a ribbon loop to the back of one point once fully dry.
🛍 Shopping guide
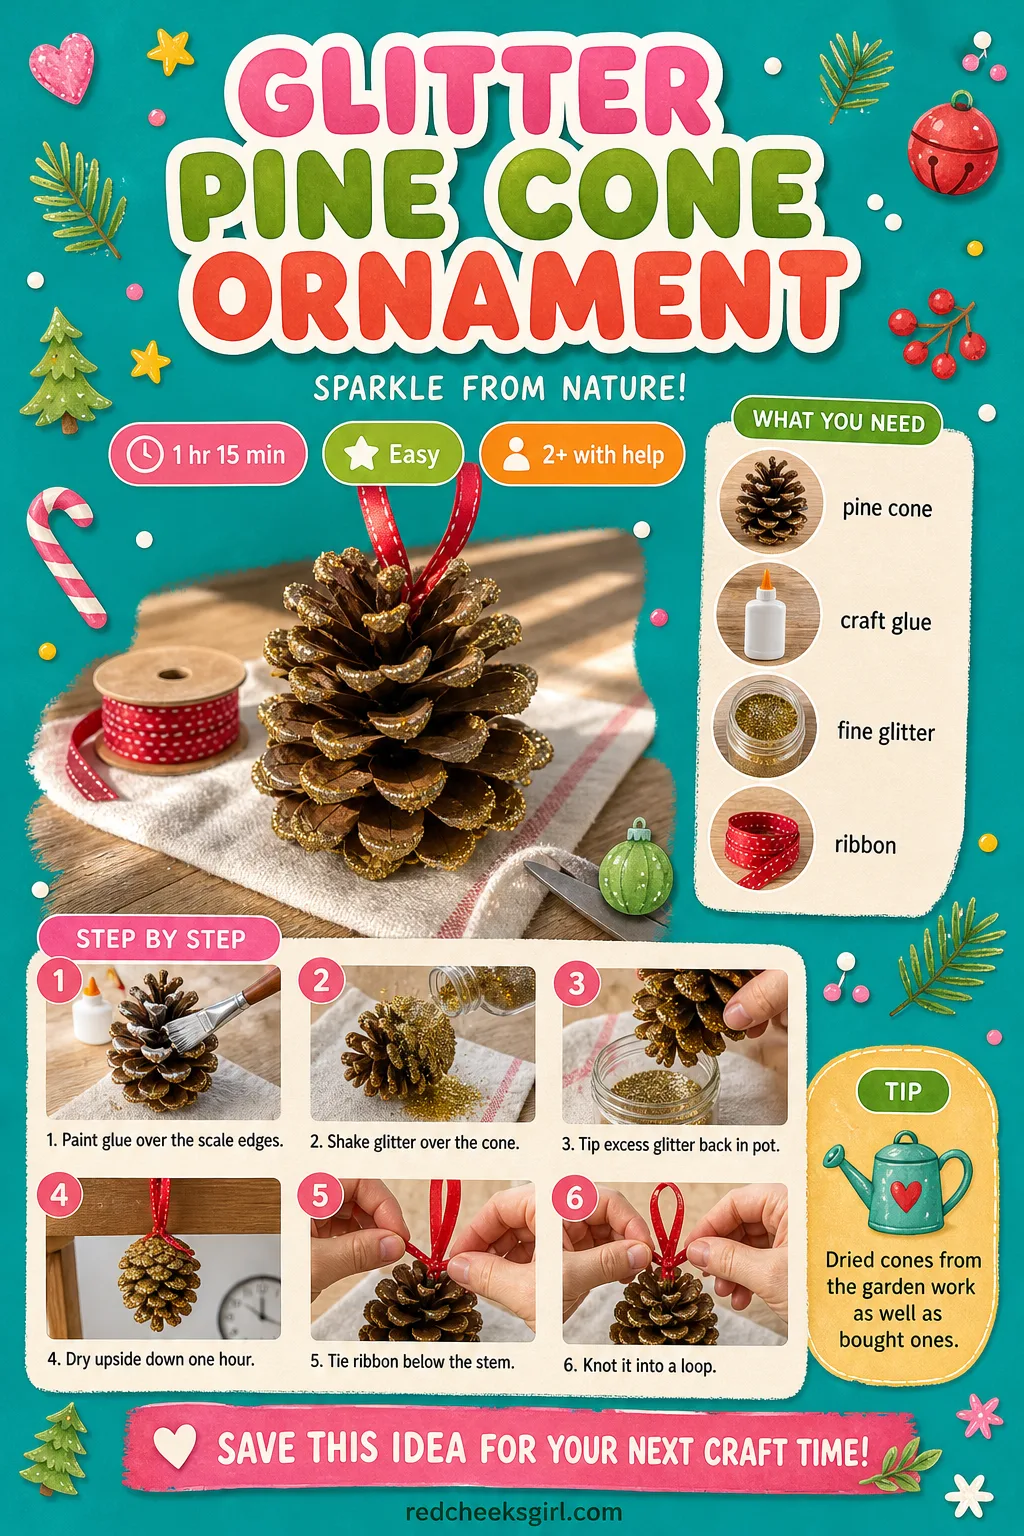
Glitter Pine Cone Ornament
Send her outside for five minutes to find a pine cone and the whole craft is basically free, which feels like a small win in December. It looks completely at home on a mantel or a window ledge, not just the tree, so it earns its spot past New Year if you let it.
What You Need
- 1 dried pine cone, 8 to 10cm
- Craft glue
- 2 teaspoons fine glitter
- 20cm ribbon
- 1 small bowl for catching excess glitter
How to Make It
- Hold the pine cone over the bowl while the toddler paints glue over the outer edges of the scales with a brush.
- Shake glitter generously over the glued cone, still holding it over the bowl, then tip the leftover glitter back into its pot.
- Set the cone upside down on baking paper and let it dry for about 1 hour.
- Tie the ribbon firmly around the top of the cone, just below the stem, and knot it to form a hanging loop.
🛍 Shopping guide
Frequently Asked Questions
What is the easiest Christmas ornament for a toddler to make?
A handprint or footprint ornament wins on ease, since the toddler only has to hold still for a few seconds while an adult does the pressing and the rest of the decorating. A confetti-stuffed clear ornament comes close, since there is no paint and nothing to dry at all.
How do you get a clean handprint on an ornament?
Paint the hand evenly with a foam brush rather than dipping it in a tray, then press once and lift straight up without dragging or rocking the hand. If the print smudges, wipe it off with a baby wipe and try again rather than trying to fix it afterward.
What age can toddlers start making Christmas ornaments?
Handprint, footprint and confetti-stuffed ornaments work from around 18 months, since the toddler’s part is small and short. Anything with rolling, threading beads or using scissors suits closer to 2 to 3 years, always alongside an adult.
How long does salt dough actually take to dry or bake?
Baked at a low oven temperature, salt dough stars take about 2 hours to go firm and pale all the way through. Left to air dry instead, the same shapes need roughly 2 days, longer in a damp house, and should feel completely hard before painting.
Should toddlers use plastic or glass ornaments?
Plastic fillable ornaments are the safer and more practical choice for toddler crafts, since they survive drops, reopen for a second attempt, and cost little enough that a failed one is not a disaster. Save glass for ornaments an adult paints and keeps out of small hands until finished.
How do you preserve a toddler’s ornament as a keepsake?
Once fully dry, a coat of clear varnish or craft sealant protects paint and salt dough from chipping year after year. Store it wrapped in tissue paper inside a labelled box, since a name and the approximate age written on the back settles any argument in future years about who made what.
14 Harry Potter Christmas tree ideas by house, Great Hall candlelight, Diagon Alley charm and Quiddi

15 genuinely reindeer-themed games for a Christmas party kids will love — active, printable & quie
27 christmas crafts that start as something ordinary and end as something people photograph. Every m
Leave a Reply