

Rain on the window, three small people looking at you, and nothing planned. These fall crafts for preschoolers are the answer, and they were chosen with one rule: the finished thing has to be worth keeping.
Every single one becomes a toy, a game, a puppet or a garland that goes on the wall and stays there. Making it is only the first half of the afternoon.
All seventeen crafts use safety scissors and glue sticks. Nothing involves hot glue, an oven, wire or any piece smaller than four centimetres.
Quantities and sizes are listed so you can pull everything out before anyone sits down, which is, honestly, the difference between a calm session and a chaotic one.
A few crafts need a moment of adult help at one specific step, and that step says so. The rest the children can run themselves.
If the afternoon stretches on, 20 Indoor Games for Family That Save a Rainy Day picks up exactly where crafting leaves off. And once autumn tips toward November, 14 Preschool Thanksgiving Crafts That Survive a Class of 20 keeps the season going without repeating a single technique used here.
This post contains affiliate links. If you buy through them, I may earn a small commission at no extra cost to you.
- Hedgehog Feeding Pocket
- Leaf Fall Jar
- Paper Plate Sunflower
- Season Wheel
- Pinecone Creatures
- Cardboard Tube Owl
- Paper Strip Pumpkin Rattle
- Leaf Person Collage
- Apple Stamp Wrapping Paper
- Pinecone Bird Feeder
- Paper Bag Scarecrow Puppet
- Coffee Filter Leaf
- Egg Carton Caterpillar
- Nature Paint Brushes
- Salt Dough Leaf Prints
- Paper Chain Garland
- Cardboard Box Forest
- Frequently Asked Questions
Hedgehog Feeding Pocket
This one earns its place because it becomes a game the moment it is finished. The pocket sits on a table and the child feeds their hedgehog paper apples all afternoon. The straw spines along the top give it personality, and even a three-year-old recognises the silhouette immediately.
Fold a sheet of brown A4 paper (80 gsm or heavier) in half widthways so you have a landscape rectangle.
Fold the bottom edge up about six centimetres to form the pocket, then fold in both side edges one centimetre each and glue them down firmly. Press for thirty seconds, then stand it up: it should hold its shape like an envelope.
Run a line of glue stick along the top edge of the front panel and press short straw pieces (cut to about five centimetres each by an adult beforehand) onto it, pointing upward and slightly outward. Fifteen to twenty straws gives a satisfying hedgehog silhouette.
While that dries, cut small apple shapes from red or green scrap paper, roughly five centimetres wide. The child then feeds the apples into the pocket one by one and tips them back out.
What You Need
- 1 sheet brown A4 paper, 80 gsm minimum
- 20 paper drinking straws, each cut to 5 cm by an adult
- 1 glue stick
- 2 sheets red or green scrap paper for the apples
- Safety scissors
How to Make It
- Fold the brown paper in half widthways, then fold the bottom edge up six centimetres to form a deep pocket. Fold the side edges in one centimetre each and glue them down. Press firmly and hold for thirty seconds.
- Run a line of glue along the top edge of the front panel and press the pre-cut straw pieces into it at slight outward angles. Twenty straws across the top makes a convincing hedgehog back.
- Cut five-centimetre apple shapes from the scrap paper and feed them into the pocket to play.

🛍 Shopping guide
Leaf Fall Jar
Shake it, watch the leaves drift down, shake it again. This is a snow globe for autumn, and it takes about ten minutes to make. The finished jar lives on a windowsill or travels in a bag, and it is virtually indestructible once the lid is taped.
Cut ten to fifteen leaf shapes from coloured paper (red, orange, yellow) so each leaf is at least five centimetres long. Laminating them makes them last longer in water, but plain paper leaves also work and simply turn semi-transparent, which is quietly beautiful.
Drop the leaves into a clean clear plastic bottle, 500 ml is an ideal size. Fill the bottle with water to about two centimetres from the top, leaving an air gap so the leaves have room to swirl.
Screw the lid on tightly, then wrap a strip of waterproof tape (electrical tape or packing tape) around the join three times. Hold it up to the light: you should be able to see the leaves floating inside before you even shake it.
One shake sends them spiralling to the bottom like a proper autumn storm in miniature.
What You Need
- 1 clear plastic bottle, 500 ml, clean and dry
- Water, enough to fill the bottle to 2 cm below the top
- 10-15 paper leaf shapes, at least 5 cm long each, cut from red, orange or yellow paper
- Waterproof tape (electrical or packing tape), 30 cm strip
- Safety scissors
How to Make It
- Cut ten to fifteen leaf shapes from coloured paper, each at least five centimetres long, and drop them into the empty bottle.
- Fill the bottle with water to two centimetres below the top, leaving an air pocket so the leaves can swirl freely.
- Screw the lid on tightly and wrap a strip of waterproof tape around the lid join three times. Shake and watch.

🛍 Shopping guide
Paper Plate Sunflower
A paper plate sunflower is the kind of craft that ends up pinned to the fridge for weeks, but what makes this version different is that the petals are cut by the child and no two look the same. The result is pleasingly wild and very genuinely theirs.
Start with the centre. Squeeze a thick puddle of brown paint into the middle of the paper plate, give the child a stubby brush and let them work it outward. They should cover roughly the inner half of the plate.
Set it aside to dry, which takes about fifteen minutes in a warm room.
While it dries, fold a sheet of yellow A4 paper in half lengthways three times so you have a long strip, then cut across it to make petal shapes roughly seven to eight centimetres long: teardrop or pointed, it does not matter.
Unfolding gives a stack of identical petals with no measuring required. Once the brown centre is dry and not tacky to the touch, run glue around the white rim of the plate and press the petals on, points facing inward, overlapping slightly.
The finished sunflower can hang on a wall using a strip of tape on the back.
What You Need
- 1 white paper plate, 23 cm diameter
- 1 sheet yellow A4 paper, 80 gsm
- Brown paint, 1 tablespoon
- 1 glue stick
- 1 paintbrush, at least 1 cm wide
- Safety scissors
How to Make It
- Brush brown paint across the inner half of the paper plate and leave it to dry for fifteen minutes until it is no longer tacky.
- Fold the yellow paper in half lengthways three times to make a strip, then cut across it into petal shapes roughly seven centimetres long.
- Run glue around the white rim and press the petals on with points facing inward, overlapping them slightly.

🛍 Shopping guide
Season Wheel
This one teaches while it entertains. Spin the arrow to winter, talk about snow. Spin to summer, talk about ice cream. It is a conversation toy as much as a craft, and it survives the afternoon well enough to go home with the child and keep working there.
Cut a circle roughly 25 centimetres across from stiff card (a cereal box opened flat works well). Use a ruler and pencil to divide it into four quarters: draw two straight lines through the centre, making an X.
Label each quarter with a season name or let the child decide which picture goes where. Gather four small autumn-themed pictures cut from magazines, printed from the internet, or drawn on paper: a leaf pile, a bare tree, a snow scene, a blossoming flower.
Glue one into each quarter. Cut a separate arrow shape about ten centimetres long from stiff card. Push a split pin through the tip of the arrow and then through the exact centre of the circle, bending the legs flat on the back.
The arrow should spin freely. An adult should handle the split pin: the point is sharp and the legs need a firm push.
What You Need
- Stiff card circle, 25 cm diameter (cereal box card works)
- 4 small pictures, one per season, roughly 8 cm wide
- 1 glue stick
- 1 split pin (brass fastener)
- Card scrap for the arrow, 10 cm long
- Ruler and pencil
How to Make It
- Draw two lines through the centre of the card circle to divide it into four equal quarters. Glue one season picture into each quarter.
- Cut an arrow shape about ten centimetres long from scrap card.
- An adult pushes the split pin through the arrow tip and then through the centre of the wheel, bending the legs flat on the back so the arrow spins freely.

🛍 Shopping guide
Pinecone Creatures
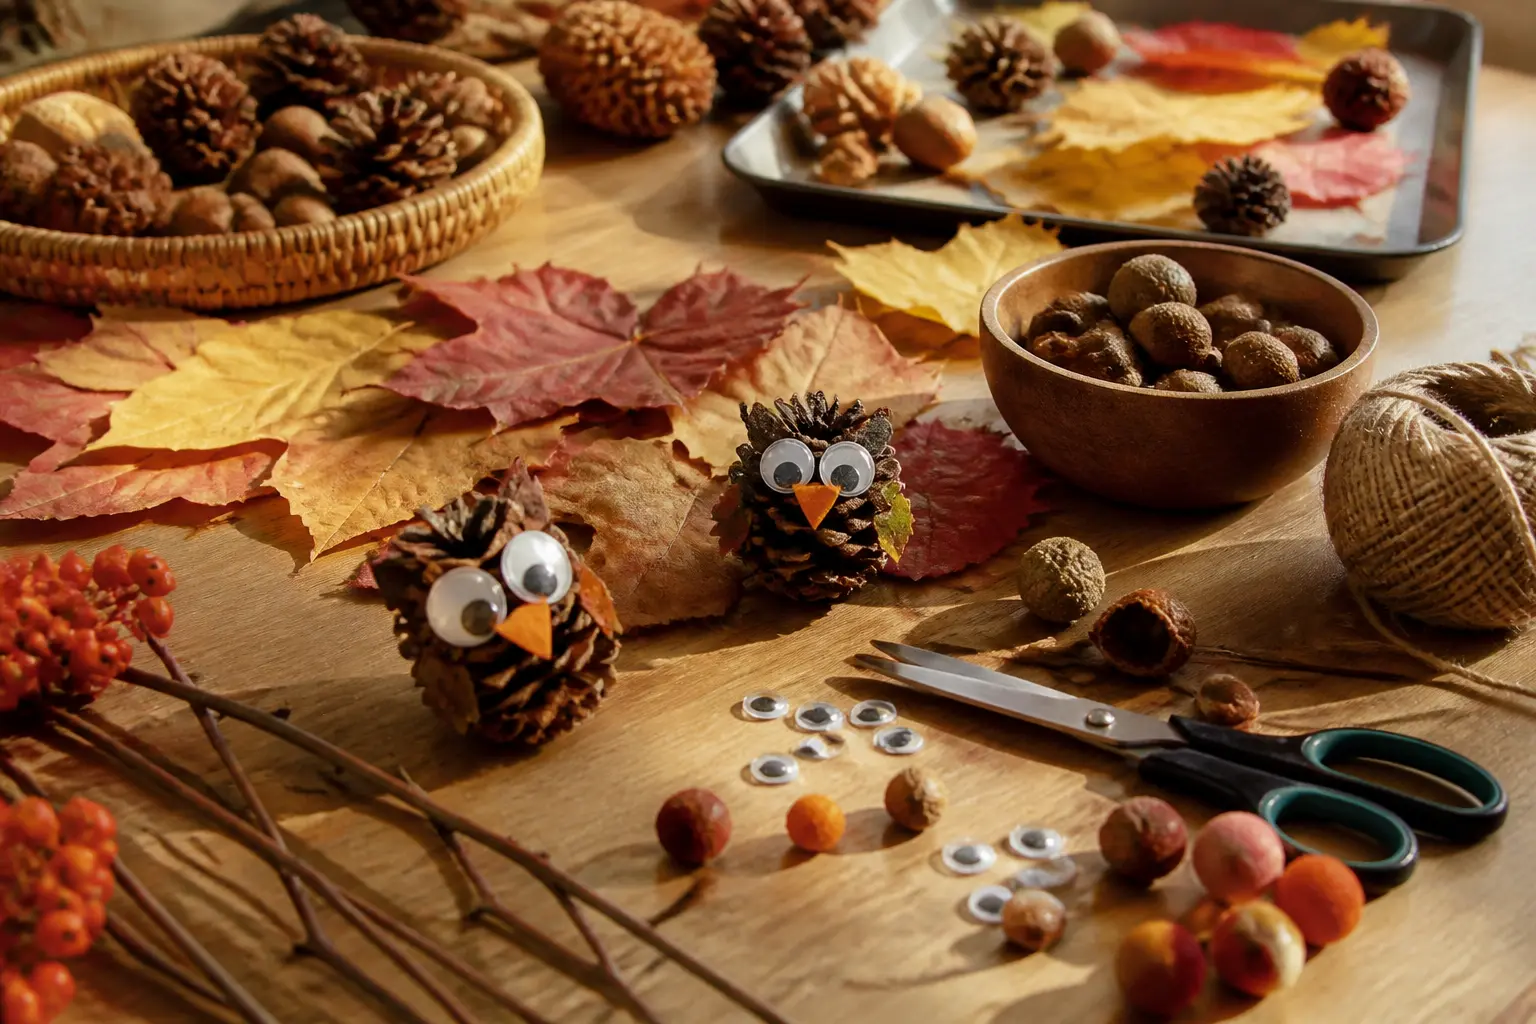
Go outside first and collect the pinecones together, which is itself ten minutes of the afternoon sorted. Back inside, each cone becomes whatever the child decides: an owl, a fox, a hedgehog, a general furry something. The felt scraps do the heavy work of personality.
Lay the pinecone on its side and decide which end is the face. Cut two ear or wing shapes from felt, each at least four centimetres wide, so they are large enough for small fingers to handle.
Glue them onto the top of the cone using a generous amount of PVA glue or a strong glue stick. Hold them in place for about a minute: the scales of the cone give the glue good grip.
Next, glue two googly eyes (at least one centimetre across) onto the face end. Let the whole thing dry flat for twenty minutes before the child plays with it. PVA needs that time to set properly on a textured surface.
The finished creature stands upright on a flat surface or perches on the edge of a shelf.
What You Need
- 1-2 pinecones per child, collected outdoors
- Felt scraps in brown, orange or cream, at least 10 x 10 cm per child
- 2 googly eyes per creature, at least 1 cm across
- PVA glue or strong glue stick
- Safety scissors
How to Make It
- Cut ear or wing shapes from the felt, each at least four centimetres wide. Four-year-olds can cut these themselves with safety scissors; younger children may need an adult to cut them.
- Glue the felt shapes onto the top of the pinecone and hold them for one minute until the glue grips the scales.
- Glue two googly eyes onto the face end and leave flat for twenty minutes to set before playing.

Cardboard Tube Owl
Every household has cardboard tubes. This owl uses one toilet-roll tube, takes about thirty minutes including drying time, and ends up as a toy that stands on a shelf and stares back. Children find this enormously satisfying.
Give the tube a coat of brown paint all over the outside. A stubby brush and a full tablespoon of paint covers it in one pass.
Set it aside upright to dry for twenty minutes: the paint needs to be completely dry before the next step or the folded ears will not hold their shape.
Once dry, pinch the very top of the tube between two fingers and fold each corner downward and inward to form two pointed ear-tufts, pressing them flat. If the card springs back, a dot of glue holds them down.
Now cut two large eye circles from white scrap paper, each about four centimetres across, and two smaller pupils from black paper. Glue the pupils onto the whites, then glue the finished eyes onto the front of the tube.
Cut a small diamond from orange paper, fold it in half to make a beak, and glue it between the eyes. The owl can perch in a row with others along a windowsill.
What You Need
- 1 cardboard toilet-roll tube per child
- Brown paint, 1 tablespoon per tube
- White and black scrap paper for eyes
- Orange scrap paper for beak
- 1 glue stick
- 1 paintbrush
How to Make It
- Paint the tube all over with brown paint and stand it upright to dry for twenty minutes until completely dry to the touch.
- Pinch both top corners of the dry tube and fold them inward and down to make two pointed ear-tufts. Press flat and add a dot of glue if they spring back.
- Cut two four-centimetre eye circles from white paper and two smaller pupils from black paper, glue the pupils on, then glue the eyes to the front of the tube. Fold a small orange diamond in half for the beak and glue it between the eyes.

🛍 Shopping guide
Paper Strip Pumpkin Rattle
This is two activities in one: shaping the pumpkin and shaking the finished rattle. The sound is deeply pleasing to a four-year-old, and the split pin in the middle means the strips splay out into a convincing round shape without any complicated folding.
Cut six strips of orange paper, each 25 centimetres long and three centimetres wide. Stack them in a neat pile. Push a split pin through one end of all six strips together: an adult should do this, as it takes a firm push.
Fan the strips out evenly so they radiate in a circle, like spokes. Now bring all the free ends together, curve the strips into an arch, and push a second split pin through all six free ends: again, adult handles the pin.
The finished pumpkin should be round and three-dimensional. Tuck a small sealed pot (a clean yoghurt pot or a tiny container with a lid) into the hollow centre, with a teaspoon of dried beans inside it. Rattle.
Add a short green paper strip curled around a pencil as a stalk, tucked between the strips at the top.
What You Need
- 6 strips orange paper, each 25 x 3 cm
- 2 split pins (brass fasteners)
- 1 small clean container with a lid, at least 5 cm wide
- 1 teaspoon dried beans or dried rice
- 1 strip green paper, 10 x 1 cm, for the stalk
How to Make It
- Stack all six orange strips and push a split pin through one end of all of them together. An adult handles the pin. Fan the strips out evenly into a circle.
- Put the teaspoon of beans into the small container and close the lid firmly. Place it in the centre of the spread strips.
- Bring the free ends of all strips together over the container, curving them into an arch, and push the second split pin through all six free ends. Curl the green strip around a pencil, tuck it in at the top as a stalk, and shake.

🛍 Shopping guide
Leaf Person Collage
Take a handful of fallen leaves back inside, and they become a whole cast of characters. This collage keeps well when pressed under a heavy book overnight, and a group of children will end up with a village of leaf people that can be arranged and rearranged on the table like a small world.
Start with a large leaf, at least twelve centimetres long, laid stem-down on a sheet of white A4 paper. This is the body. Glue it down firmly with the glue stick, pressing along the edges so it lies flat.
Choose two medium leaves for the arms (roughly six centimetres each) and glue them outward from the sides of the body leaf. Choose two smaller leaves for the legs and glue them downward from the base.
Once the shape reads as a person, draw a round face at the stem end of the body leaf with markers: eyes, nose, a wide grin. Add dots for buttons or a paper hat if the mood takes over.
The collage can be named, cut out, and played with as a character card.
What You Need
- Real fallen leaves: 1 large (12 cm+), 2 medium (6 cm), 2 small (4 cm)
- 1 sheet white A4 paper, 80 gsm
- 1 glue stick
- Markers in black and brown
How to Make It
- Glue the large leaf onto the paper, stem-down, pressing the edges flat. This is the body.
- Glue two medium leaves out from the sides as arms and two smaller leaves down from the base as legs.
- Draw a round face at the stem end with markers: two eyes, a nose and a wide smile.

🛍 Shopping guide
Apple Stamp Wrapping Paper
An apple cut in half makes a stamp that is already the right shape, already interesting in cross-section, and already free. This wrapping paper actually wraps things, which gives the making a real point. A birthday is coming up. Here is the paper for it.
Spread a large sheet of paper on the table: lining paper from a roll, brown parcel paper, or several sheets of A3 taped together. Pour red or green paint into a shallow tray or plate and spread it to about the depth of a coin.
An adult should halve the apple cleanly with a sharp knife before the session begins, so the cut surface is flat and the star pattern inside is clear.
The child presses the cut face into the paint, lifts it, and presses it firmly onto the paper. Lift straight up rather than rocking, which blurs the print. Repeat across the whole sheet, reloading with paint every two or three stamps.
Leave flat to dry for thirty minutes. Once dry, it wraps as well as any shop paper and looks considerably more interesting.
What You Need
- 1 apple, halved crossways by an adult before the session
- Red or green paint, 2 tablespoons, poured into a shallow tray
- 1 large sheet of paper, at least A2 (lining paper or brown parcel paper works well)
How to Make It
- An adult halves the apple crossways before the session. The cut face should be flat and the star-shaped core pattern visible.
- The child presses the apple face into the paint until evenly coated, lifts it, and presses firmly onto the paper. Lift straight up to keep the print clean.
- Repeat across the sheet, reloading with paint every two to three stamps. Leave flat to dry for thirty minutes before using as wrapping paper.

🛍 Shopping guide
Pinecone Bird Feeder
This one leaves the house. Once it is rolled and hung, it actually feeds the birds, which makes it the craft with the longest after-life of any in this list. Children who make it will watch the garden with a new kind of attention for the rest of the season.
Cut a length of string about thirty centimetres long. Tie it tightly around the top of the pinecone, between the top scales, using a double knot: an adult should do this, as the knot needs to be firm enough to hold weight.
Spread a generous layer of nut-free seed spread (sunflower seed butter or any nut-free alternative works well) over all the scales using a butter knife or an old spoon, working it into the gaps. It should be thick enough that it does not drip.
Roll the coated cone in a shallow tray of birdseed, pressing gently so the seeds stick to the spread on all sides.
Hang it outside from a branch or a hook the same afternoon: the spread sets slightly in cool air, which helps the seeds stay on.
What You Need
- 1 large pinecone per child
- 30 cm string or twine per cone
- 2 tablespoons nut-free seed spread (sunflower seed butter or similar)
- 4 tablespoons birdseed in a shallow tray
How to Make It
- An adult ties the string tightly between the top scales of the pinecone with a double knot.
- Spread a thick layer of nut-free seed spread over all the scales with a butter knife, working it into the gaps until the cone is fully coated.
- Roll the cone in the shallow tray of birdseed, pressing gently to coat all sides. Hang outside from a branch immediately.

🛍 Shopping guide
Paper Bag Scarecrow Puppet
A paper lunch bag becomes a puppet in twenty minutes, and a puppet becomes a play. Two children with a scarecrow each will invent a story before you can sit down. The bag fits over a hand with the flap as the moving mouth, which is the classic and satisfying design.
Lay the bag flat with the flap facing up. The flap becomes the lower jaw and the folded bottom becomes the face.
Cut a hat shape from brown or black paper, roughly ten centimetres wide and eight centimetres tall, and glue it to the top of the bag above the folded bottom.
Cut straggly strips of yellow paper about eight centimetres long and glue them under the hat brim and out from the sides as straw hair. Draw two round eyes and a big stitched smile on the face section with markers.
Cut two arm shapes from scrap paper, each about twelve centimetres long and glue one to each side of the bag. Slip a hand inside, fingers in the flap, and the scarecrow talks.
What You Need
- 1 paper lunch bag per child
- Brown or black scrap paper for the hat
- Yellow scrap paper for hair, strips 8 x 1 cm
- Scrap paper for arms, 12 x 3 cm each
- 1 glue stick
- Markers in black and orange
How to Make It
- Cut a hat shape roughly ten centimetres wide from brown or black paper and glue it to the top of the bag. Cut yellow paper strips and glue them under the hat brim and at the sides as straw hair.
- Draw two round eyes and a large stitched smile with markers on the face section of the bag.
- Cut two arm shapes from scrap paper and glue one to each side. Slip a hand inside with fingers in the flap to make the scarecrow talk.

🛍 Shopping guide
Coffee Filter Leaf
This craft produces something that looks genuinely lovely: a glowing stained-glass leaf effect that can be taped to a window and admired for weeks. The colouring part is deeply calming for small children, and the blending step feels like a small miracle to them every time.
Flatten a white coffee filter onto a piece of scrap paper (to protect the table). Use washable markers in red, orange, yellow and brown to colour sections of the filter, pressing quite firmly so the colour is dense.
It does not need to be neat: overlap the colours at the edges. This is the fiddly part to get right. Fill at least eighty percent of the filter with colour, leaving very little white, or the finished leaf looks washed out.
Now mist the coloured filter lightly with a water spray, two or three quick sprays from about twenty centimetres away. Watch the colours bleed into each other: this takes about thirty seconds.
Leave flat to dry completely, which takes about twenty minutes in a warm room. Once dry, cut a leaf shape from the stiffened filter using safety scissors. Tape it to a window and the light does the rest.
What You Need
- 1 white flat-bottom coffee filter per child
- Washable markers in red, orange, yellow and brown
- Water spray bottle
- Scrap paper to protect the table
- Safety scissors
How to Make It
- Flatten the coffee filter on scrap paper and colour it densely with markers in autumn shades, overlapping colours at the edges and covering at least eighty percent of the surface.
- Mist with two or three sprays of water from twenty centimetres away. Watch the colours blend, then leave completely flat to dry for twenty minutes.
- Cut a leaf shape from the stiffened filter and tape it to a window to catch the light.

🛍 Shopping guide
Egg Carton Caterpillar
An egg carton strip becomes a caterpillar that can inch its way along any surface, and a group of children will race them before the afternoon is out. It doubles as a finger puppet if the child pokes two fingers through the base of the front cup.
Tear or cut a strip of four connected cups from a cardboard egg carton, running lengthways. Paint the strip in autumn colours: orange, red, brown or a mix. Give each cup a different colour if you like.
Set it right-side up to dry for about twenty minutes: the thick card takes longer than paper, so this wait is the main event.
Once dry, poke two pipe cleaner antennae through the top of the first cup: an adult should start the holes with a pencil point to make it manageable for small fingers.
Thread the pipe cleaners through from inside, fold the top ends into a curl and the bottom ends flat inside the cup so they do not scratch. Draw two large eyes and a wide smile on the front cup with markers.
The caterpillar walks on its four cups along a flat surface.
What You Need
- 1 strip of 4 connected egg carton cups per child
- Autumn paint (orange, red, brown), 1 tablespoon
- 2 pipe cleaners per caterpillar
- Markers in black
- 1 paintbrush
How to Make It
- Paint the egg carton strip in autumn colours and leave it right-side up to dry for twenty minutes.
- An adult makes two small holes in the top of the first cup with a pencil point. The child threads one pipe cleaner through each hole, curls the top ends into antennae, and folds the bottom ends flat inside.
- Draw two large eyes and a smile on the front cup with markers. Walk the caterpillar along the table.

🛍 Shopping guide
Nature Paint Brushes
These brushes make marks no shop-bought brush can: a fan of leaves leaves a wide soft streak, a bunch of pine needles makes a fine scratchy line, and a cluster of grass gives a feathery edge.
Children use them to paint autumn scenes, and afterwards they invent what else to try. The making takes five minutes. The painting takes the rest of the afternoon.
Collect a handful of natural material outdoors: fallen leaves, pine needles, stiff grass, small feathers if you find them.
Back inside, hold a small bundle of one material against the end of a twig, so the natural material extends about four centimetres beyond the end of the stick.
Wrap a rubber band tightly around the join three times to hold the bundle firm: it should not wobble or slide when you press it down. Make three or four different brushes using different materials.
Pour two or three colours of autumn paint into separate trays. Dip, press, drag and stamp. These brushes also store well in a jar for the next session.
What You Need
- 4-6 straight twigs, each about 15 cm long
- Natural materials: fallen leaves, pine needles, stiff grass (bundles of 6-8 pieces each)
- 4 rubber bands
- Autumn paint in 2-3 colours, poured into shallow trays
- Large paper for painting
How to Make It
- Hold a small bundle of natural material against the end of a twig, extending four centimetres beyond it. Wrap a rubber band firmly around the join three times until the bundle is secure and does not wobble.
- Repeat with different materials (pine needles, leaves, grass) to make three or four different brushes.
- Dip each brush into paint and press, drag or stamp it onto large paper to see what marks it makes.

🛍 Shopping guide
Salt Dough Leaf Prints
Salt dough is slower than paper but it lasts for years, and a leaf print pressed into it captures every vein with surprising precision. The prints can be painted, strung as decorations, or lined up on a windowsill as a nature collection. The drying happens overnight, so make these first and they are ready the next morning.
Mix two cups of plain flour, one cup of table salt and half a cup of warm water in a bowl, stirring until it comes together into a smooth dough that does not stick to your fingers.
Add a splash more water if it crumbles, a pinch more flour if it sticks. Roll it out on a floured surface to about one centimetre thickness using a rolling pin.
Press a large leaf firmly into the surface, vein-side down, and run the rolling pin gently over the top once to deepen the impression. Peel the leaf away slowly from one corner: the print should be clean and detailed.
Cut around the shape with a blunt knife or a cookie cutter if the child wants a different outline. Set the prints flat on a tray to air dry overnight.
An adult should cut around prints and roll out the dough: these steps need firm pressure and a tool the child should not handle alone.
What You Need
- 2 cups plain flour
- 1 cup table salt
- Half a cup warm water
- Real leaves with clear veins, at least 8 cm long
- Rolling pin
- Flat baking tray for drying
How to Make It
- An adult mixes two cups of flour, one cup of salt and half a cup of warm water into a smooth dough. Roll it out to one centimetre thickness on a floured surface.
- The child places a leaf vein-side down on the dough and presses it firmly with both hands. An adult runs the rolling pin gently over the top once to deepen the impression.
- The child peels the leaf away slowly from one corner to reveal the print. An adult cuts around the shape. Set flat on a tray to air dry overnight.

🛍 Shopping guide
Paper Chain Garland
A paper chain is the oldest classroom craft and it endures because it works. This autumn version uses strips in red, orange, yellow and brown, and a group of five children can produce a garland long enough to string across a whole room inside thirty minutes. It goes up on the wall and the children point at it for weeks.
Pre-cut strips of coloured paper, each twenty centimetres long and two centimetres wide: a paper trimmer makes this quick, but safety scissors and a pencil line work fine.
Each child starts by looping one strip into a ring and gluing the end down firmly, then holding it for a count of ten so the glue sets. Thread the next strip through that ring before gluing its ends together. Repeat, alternating autumn colours.
The chain builds quickly and children at the table can each make their own section, then join the sections end to end. Hang with a strip of tape at each end.
Store by folding the chain loosely into a box, which keeps the rings from crushing.
What You Need
- Coloured paper strips in red, orange, yellow and brown, each 20 x 2 cm (at least 30 per child)
- 1 glue stick per child
How to Make It
- Loop one strip into a ring and glue the overlapping ends together, holding for a count of ten until the glue grips.
- Thread the next strip through the first ring, loop it, and glue its ends. Alternate colours as you go.
- Join each child’s section to the next and hang the finished garland with tape.

🛍 Shopping guide
Cardboard Box Forest
This is the craft that turns into the longest play of the afternoon. A shoebox becomes a forest diorama, and the toy animals the children already own move into it and do not come out until teatime.
It is worth making: the physical act of building a small world and then playing inside it is exactly what this age group needs on a wet day.
Take a shoebox or similar cardboard box and lay it on its side so the open face is at the front.
Cut paper trees from green and brown paper: trunk shapes roughly eight centimetres tall and wide treetop shapes, either triangles for pines or rounded clouds for deciduous trees.
Fold a one-centimetre tab at the base of each tree and glue the tabs to the inside base of the box so the trees stand upright. Cut a rectangle of green or brown paper to line the floor and glue it flat.
Add a paper sun or some paper leaves scattered on the floor. Bring in toy animals from around the house. The box forest is now an open stage. Store it flat in the box when the afternoon is over, with the animals inside.
What You Need
- 1 shoebox or similar cardboard box, at least 25 cm long
- Green and brown paper for trees and floor lining
- 1 glue stick
- Safety scissors
- Toy animals from around the house
How to Make It
- Lay the box on its side with the open face forward. Cut tree shapes from green and brown paper: trunk plus treetop, roughly eight centimetres tall. Fold a one-centimetre tab at the base of each tree.
- Glue the tabs to the inside base of the box so the trees stand upright. Cut a paper rectangle to line the floor and glue it flat.
- Scatter paper leaves on the floor, add toy animals from around the house, and play.

🛍 Shopping guide
Frequently Asked Questions
What fall crafts work for three-year-olds with no cutting?
The Leaf Fall Jar, Leaf Person Collage and Pinecone Bird Feeder all need no cutting at all. The child drops, glues, presses and rolls, and an adult can pre-cut any pieces before sitting down. The Apple Stamp Wrapping Paper also needs zero cutting from the child once an adult has halved the apple.
Can these fall crafts for preschoolers be done in a classroom with 20 children?
Yes, with a little prep. The Paper Chain Garland, Leaf Person Collage and Coffee Filter Leaf scale perfectly to large groups because each child works independently with the same small set of materials.
Set up a tray per child with the pre-cut pieces ready and the session runs itself. For related ideas sized for a full class, see 14 Preschool Thanksgiving Crafts That Survive a Class of 20.
How do you store fall crafts after the party or session?
Flat crafts like the Leaf Person Collage and Coffee Filter Leaf slide into a large envelope or folder. Three-dimensional crafts like the Cardboard Tube Owl and Pinecone Creatures sit in an open egg carton for safe transport home. The Paper Chain Garland folds loosely into its original box without crushing. The Cardboard Box Forest packs away with the animals inside.
What do you do if a child’s glue stick does not hold the pieces?
Press the pieces together for a full thirty seconds and then leave the craft flat rather than standing it up while the glue is still setting.
For anything that needs a firmer bond on a textured surface, like the Pinecone Creatures, swap the glue stick for PVA glue and allow twenty minutes of drying time flat before the child handles it.
Are any of these fall crafts for preschoolers allergy-safe for a group setting?
All but the Pinecone Bird Feeder are entirely food-free. The Bird Feeder uses nut-free seed spread, so it is suitable in most nut-free settings, but always check your specific school or group policy on seeds and spreads before making it with a class.
I bought my flower press at a craft fair three years ago and used it exactly once before it lived on
14 actually-cool Thanksgiving crafts for teens: hand-lettered place cards, clay ring dishes, embroid
My basil plant has died four times. Not four times total — four times this winter alone. I kep
Leave a Reply