

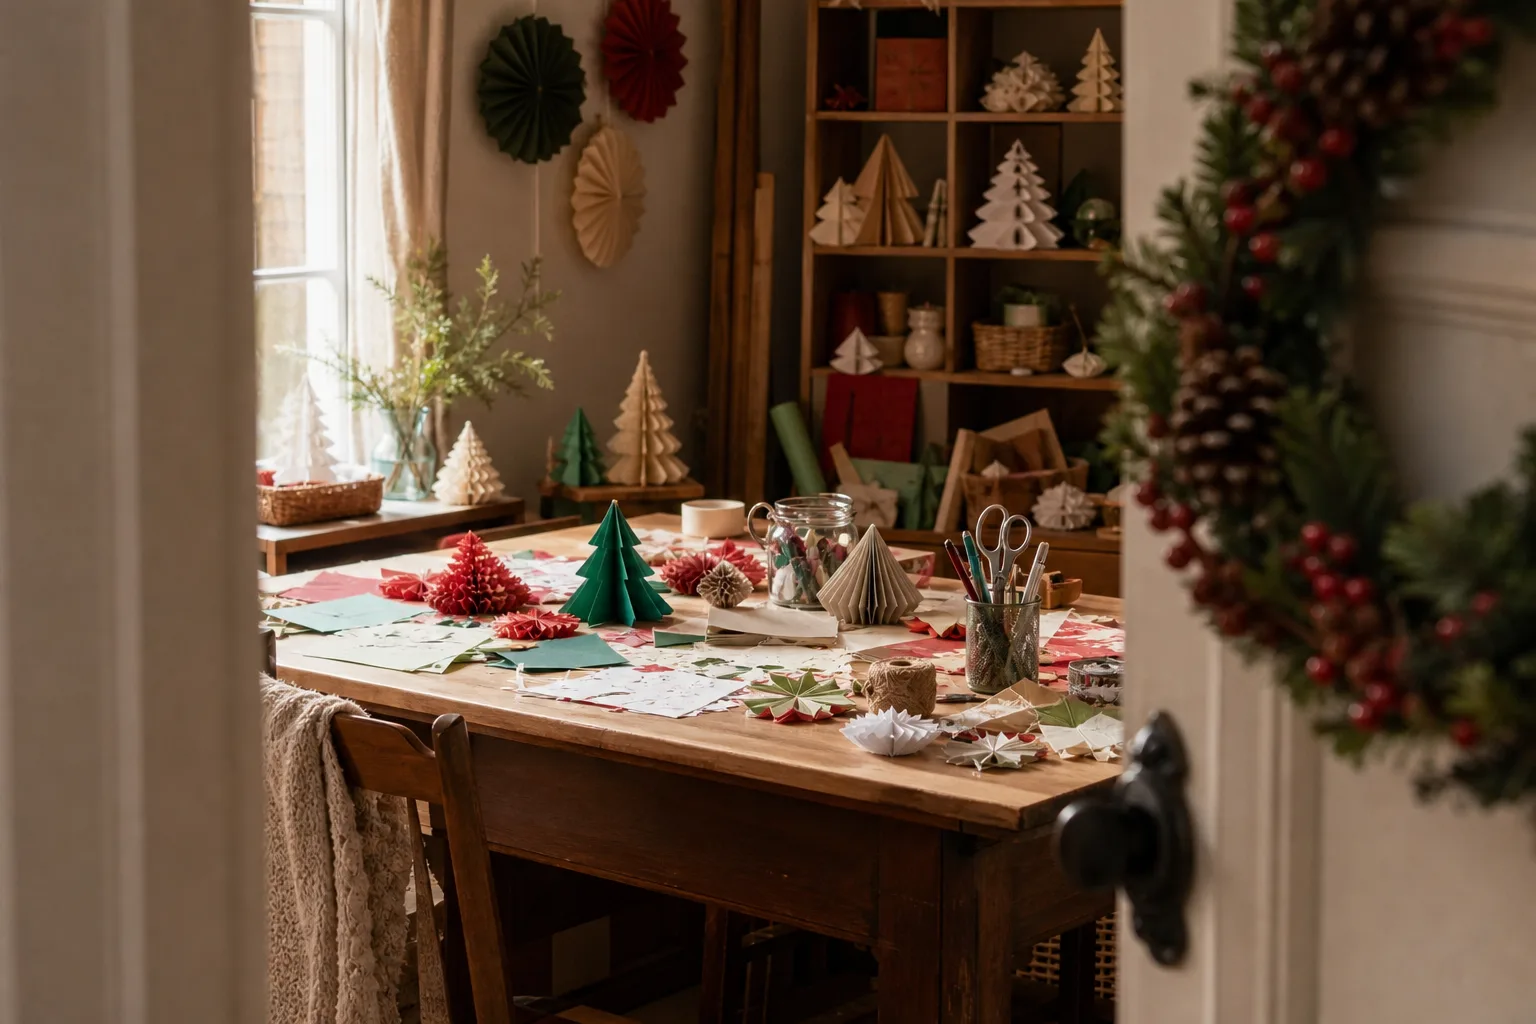
Paper is the cheapest thing in the cupboard and somehow the one that looks the most expensive once it is folded, rolled or cut properly. It does not need a workshop, a weekend, or a trip to a specialist shop: most of these twenty five crafts use cardstock, glue and scissors you already own. Some take twenty minutes before the kettle boils, others want a glue gun and a free evening, and each one says exactly which.
If small hands want in too, the Christmas crafts for kids collection is worth a second tab, and once the paper is swept up, the Christmas games to play at home round-up covers the rest of the evening.
This post contains affiliate links. If you buy through them, I may earn a small commission at no extra cost to you.
- Folded Paper Star Garland
- Accordion Paper Christmas Trees
- Quilled Paper Snowflakes
- Rolled Paper Rose Wreath
- Cut-Paper Snowflakes
- Paper Chain Advent Countdown
- Origami Paper Cranes
- Spinning Paper Pinwheels
- Tissue Paper Pom-Pom Baubles
- Doily Snowflake Garland
- Pocket Advent Calendar Envelopes
- Paper Mache Star Topper
- Cut-Paper Luminaries
- Folded Paper Fan Wreath
- Stained-Glass Tissue Paper Stars
- Paper Cone Favor Baskets
- Punched Paper Gift Tags
- Rolled Paper Bead Garland
- Giant Paper Poinsettias
- Paper-Cut Silhouette Angels
- Concertina Paper Lanterns
- Pop-Up Christmas Card
- Paper Star Mobile
- Folded Paper Gift Bows
- Confetti Paper Table Runner
- Frequently Asked Questions
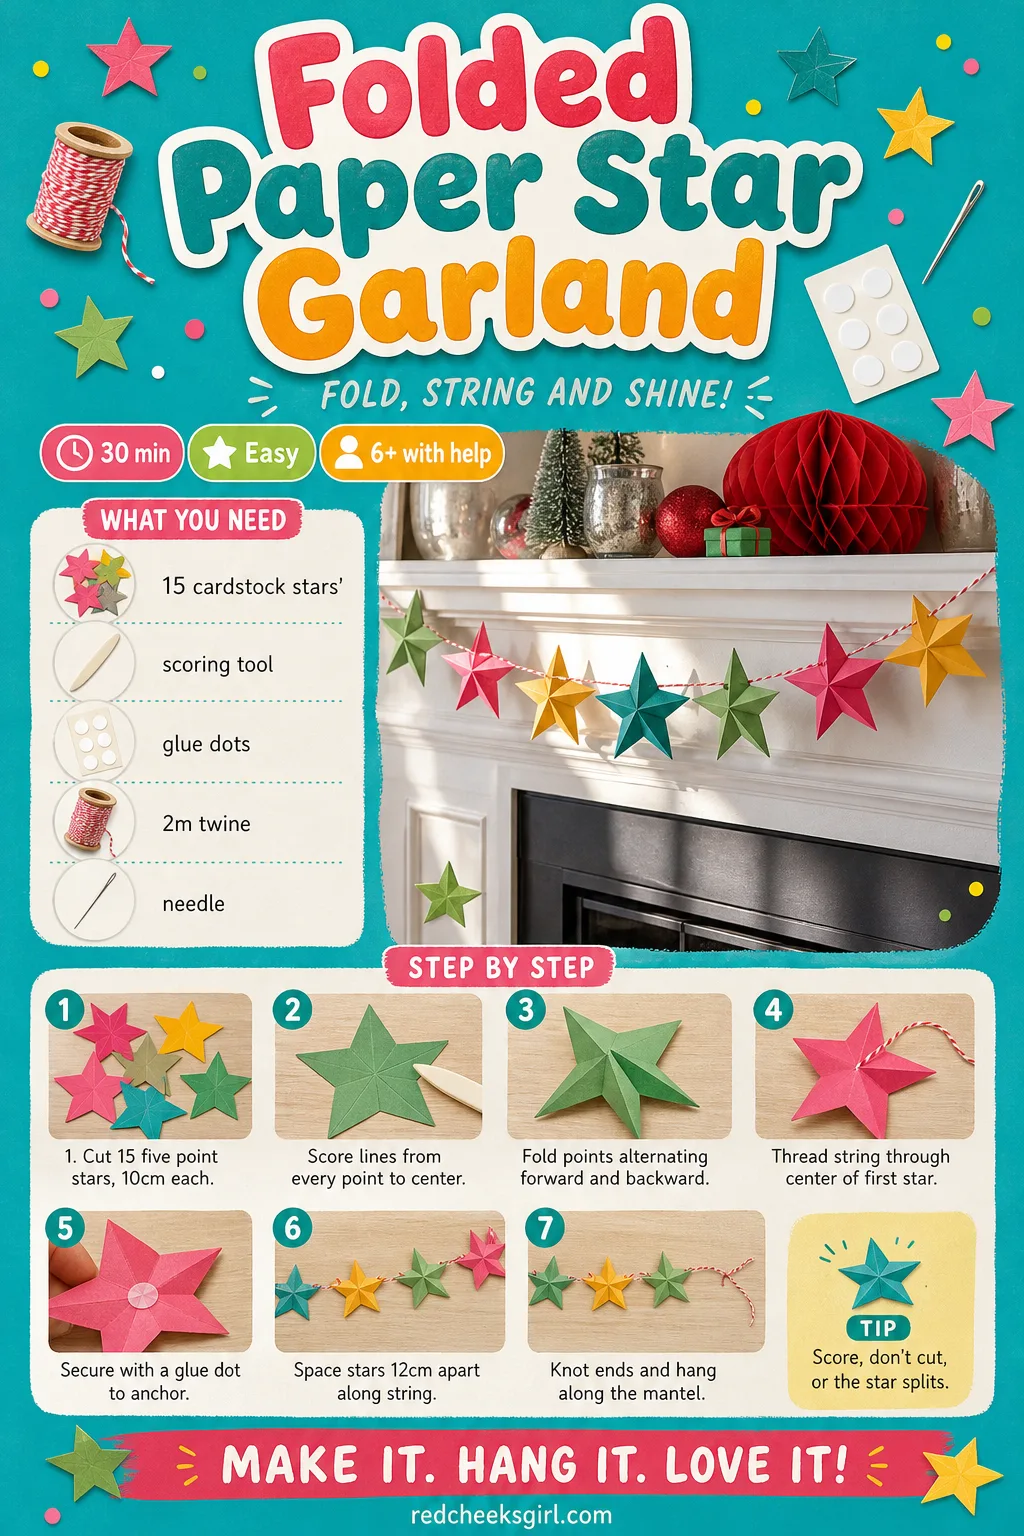
Folded Paper Star Garland
A bare mantel asks for something strung across it, and a line of stars does the job without a single dangling ornament needed. These sit slightly cupped rather than flat, so they catch the lamp light instead of just reflecting it.
What You Need
- 15 cardstock squares, 10cm, assorted colors
- 1 scoring tool or empty ballpoint pen
- 1 pack craft glue dots
- 2m cotton string or twine
- 1 large-eye needle
How to Make It
- Draw or trace a five-point star 10cm point to point onto cardstock and cut out 15 of them.
- Score a faint line from each point to the center of every star using a scoring tool or empty pen, pressing firmly but not cutting through.
- Fold each scored line, alternating one point forward and the next backward, working round the star until it sits slightly cupped rather than flat.
- Thread the needle with the string and pass it through the center of the first star from back to front, securing with a glue dot so it doesn’t slide.
- Space the stars 12cm apart along the string, repeating the glue dot anchor at each one until all 15 are hung.
- Knot both ends of the string and loop over hooks along the mantel, letting the stars hang with a little give.
🛍 Shopping guide
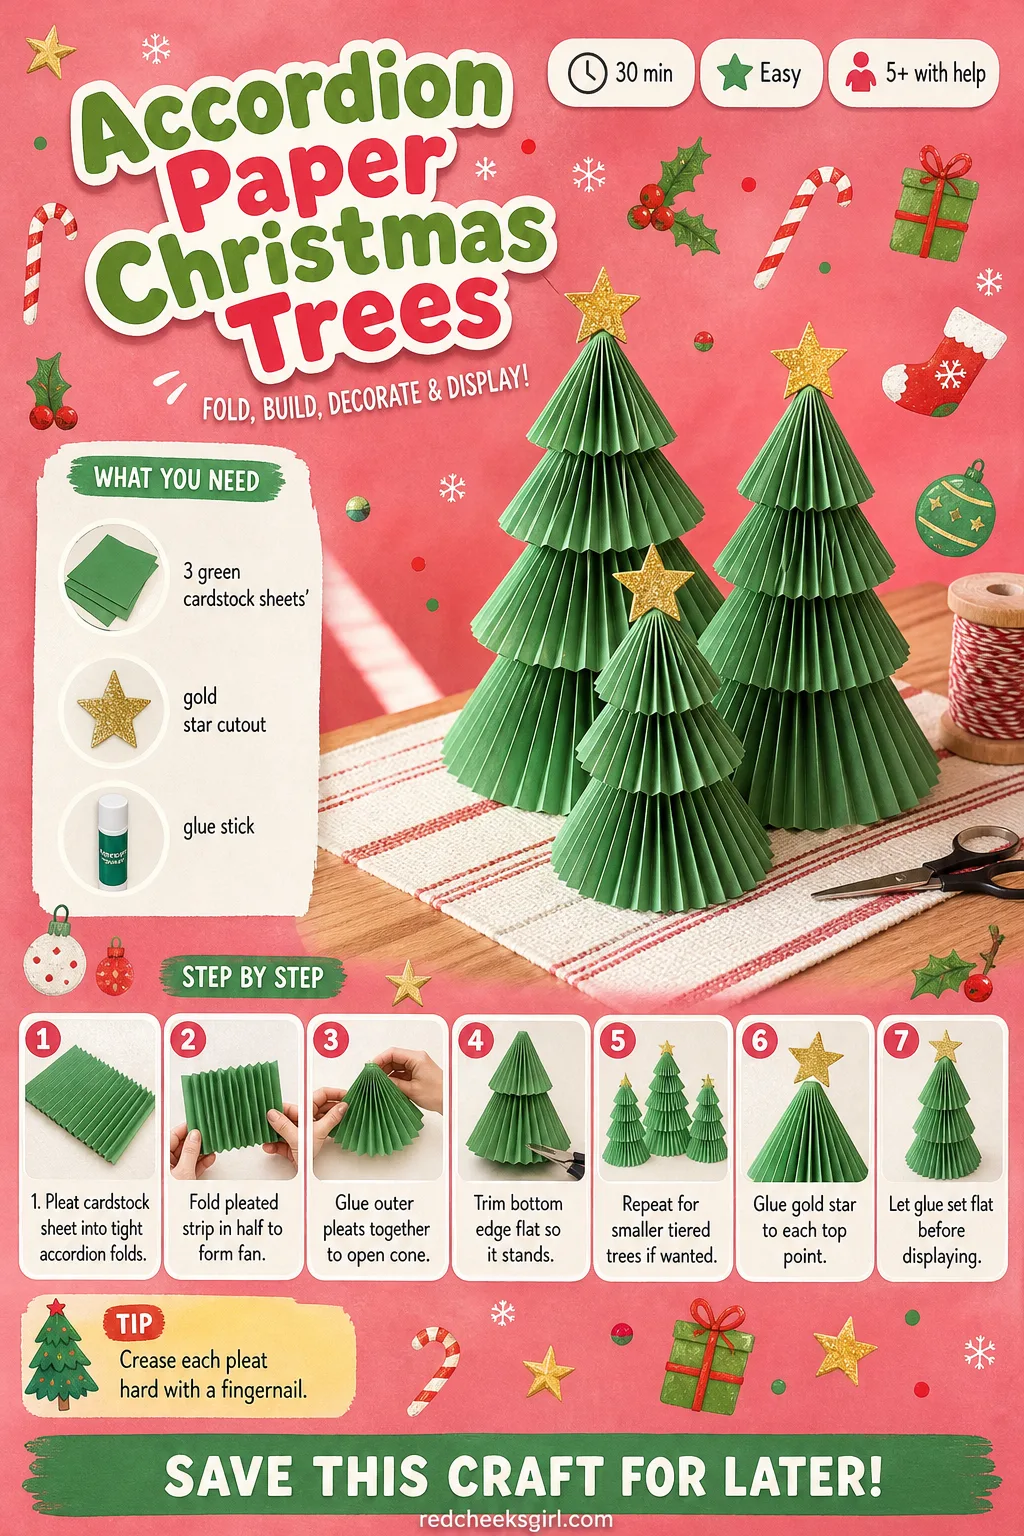
Accordion Paper Christmas Trees
No water, no needles, no vacuuming up afterwards: a tabletop forest of pleated paper trees covers a runner in minutes and stores flat in a drawer come January.
What You Need
- 3 sheets green cardstock, A4, graduating shades
- 1 small gold star cutout, 3cm, per tree
- 1 glue stick
- 1 ruler for scoring
How to Make It
- Fold one A4 sheet into accordion pleats about 1.5cm wide, working across the short side.
- Fold the whole pleated strip in half widthwise so the two ends meet, forming a fan with a flat crease down the middle.
- Run glue stick along the two outer pleats on one half and press them to the matching pleats on the other, opening the fan into a standing cone.
- Trim the bottom edge flat with scissors so the tree sits level without wobbling.
- Repeat with the remaining sheets in smaller sizes for a tiered forest, then glue a gold star to each top point.
- Let the glue set flat for ten minutes before arranging the trees along the table.
🛍 Shopping guide
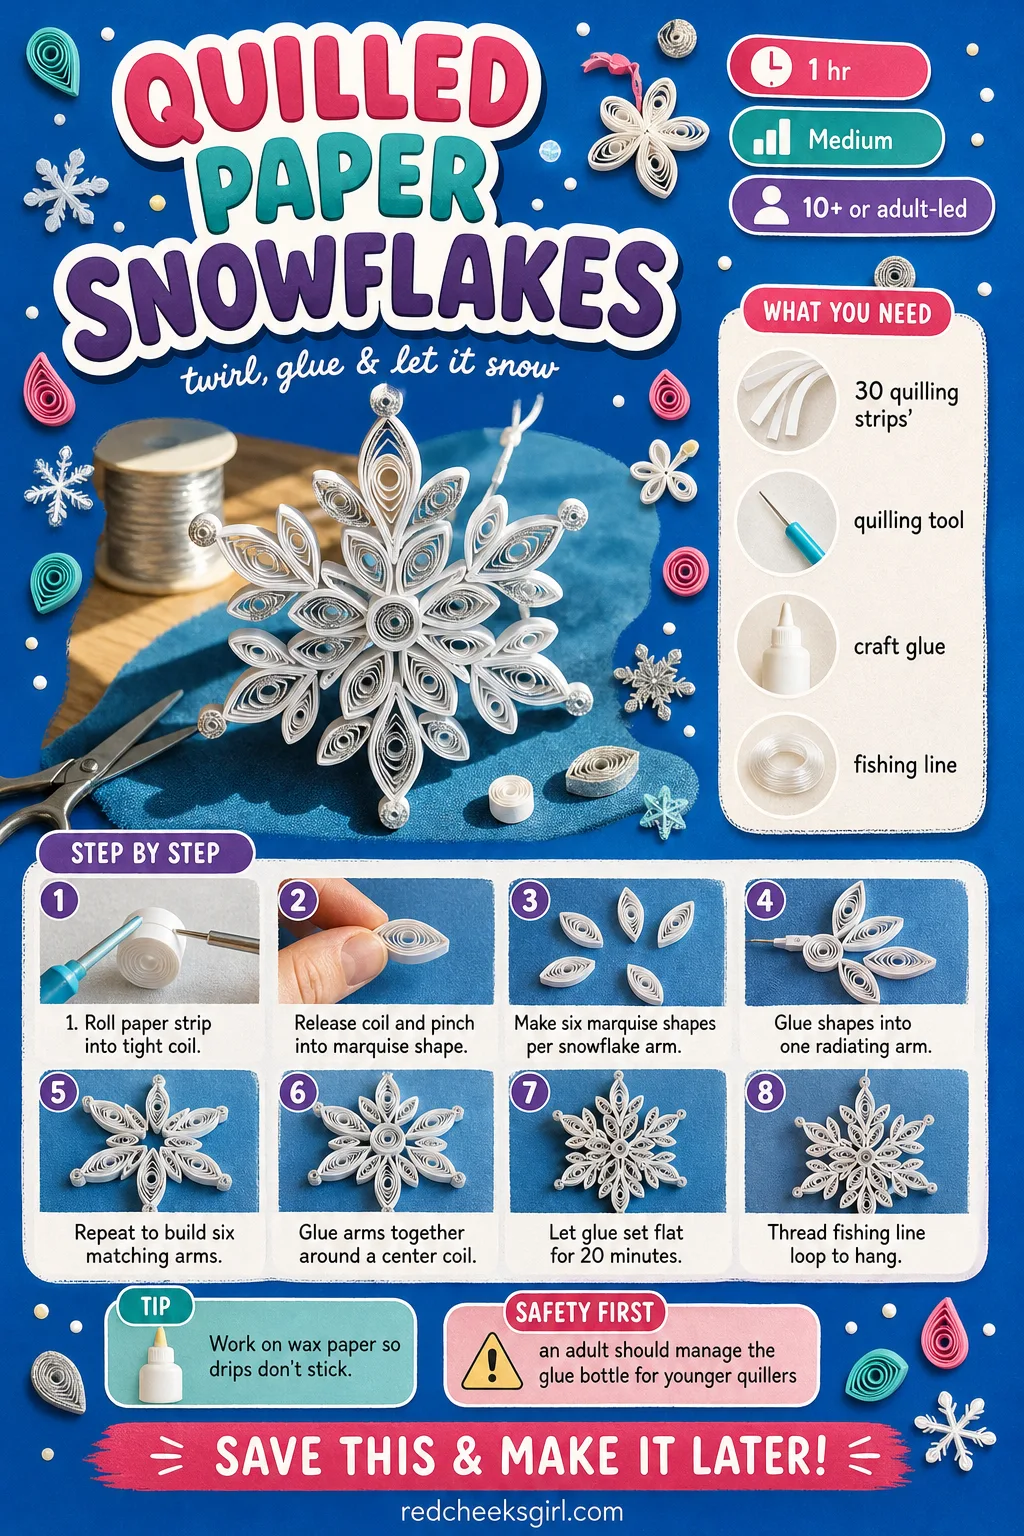
Quilled Paper Snowflakes
If you want one ornament on the tree that actually stops conversation, this is it. The coils look lacy and precise, and nobody needs to know the fiddliest part is only six shapes repeated six times.
What You Need
- 37 quilling paper strips, 5mm x 30cm, white or silver
- 1 slotted quilling tool
- 1 fine-tip bottle of craft glue
- 15cm clear fishing line per snowflake
How to Make It
- Slot one paper strip into the quilling tool and roll it tightly, then release it slightly into a loose coil about 1cm across.
- Pinch two opposite sides of the coil to shape it into a marquise shape, and make six for one snowflake arm.
- Arrange the six marquise shapes in a ring with points facing in and out alternately, dabbing glue at each join (an adult should handle the glue bottle around small children).
- Repeat to build six identical arms, then glue them together around a tiny center coil so they radiate outward.
- Leave the snowflake flat on wax paper for 20 minutes until every joint has set hard.
- Thread a loop of fishing line through one outer arm and knot it for hanging.
🛍 Shopping guide
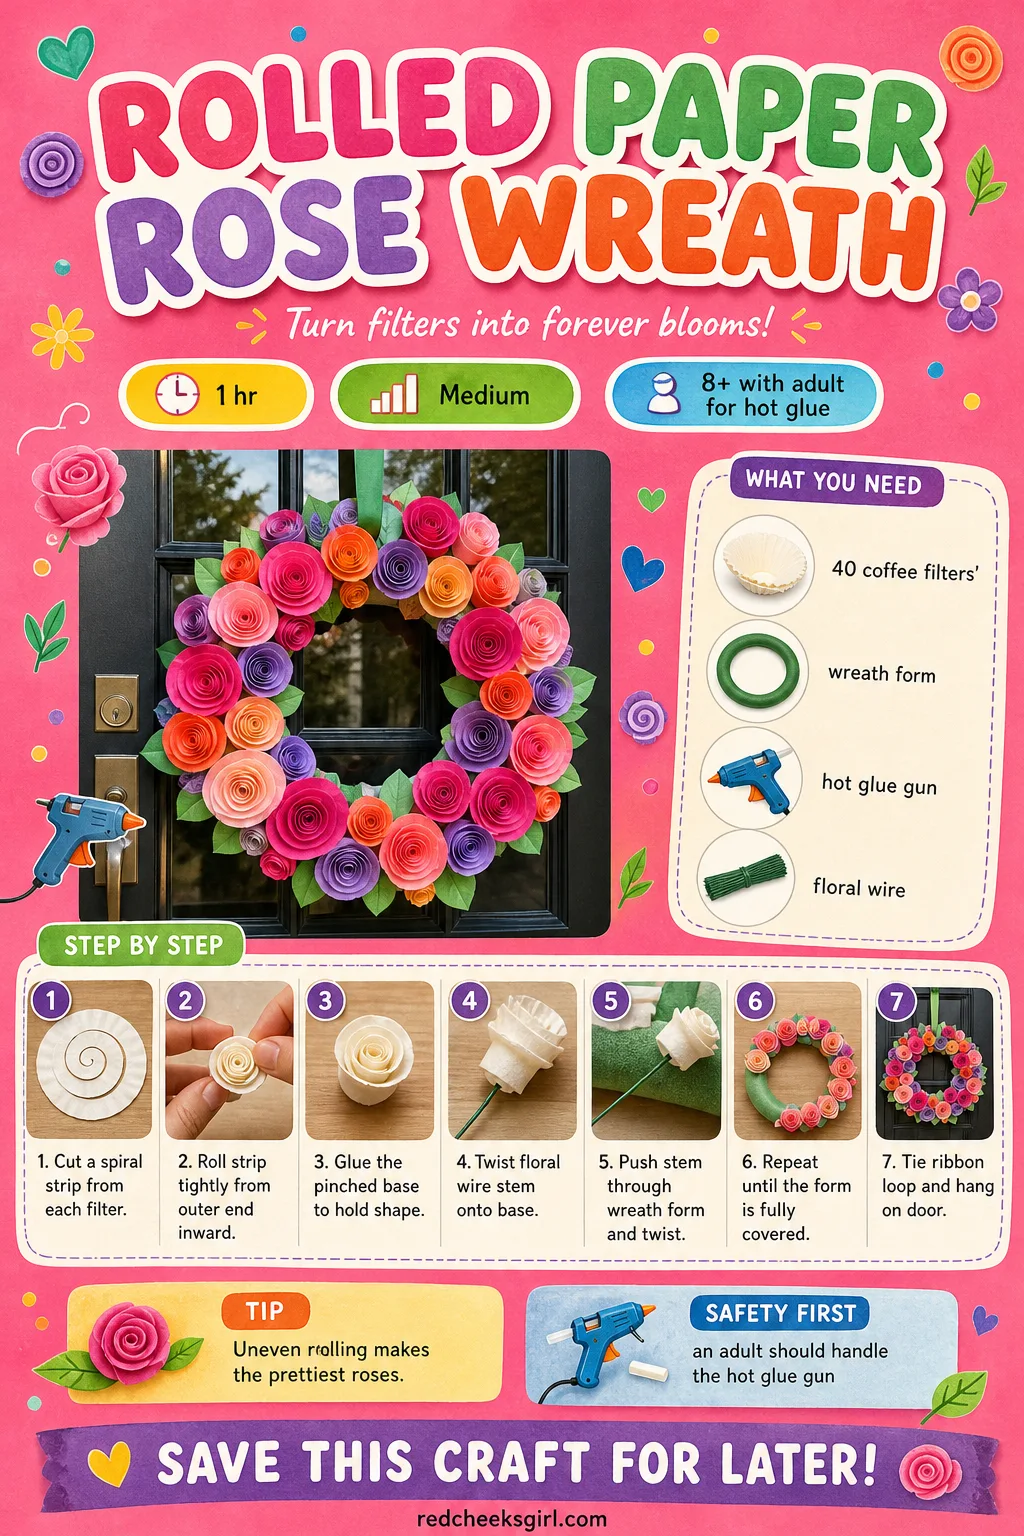
Rolled Paper Rose Wreath
A front door wreath with real flowers wilts before the party starts. This one is made entirely of curled coffee filters and still looks like it cost real money, hung at eye level where everyone arriving gets a close look.
What You Need
- 40 coffee filters (or 12cm tissue paper circles)
- 1 wire wreath form, 30cm diameter
- 1 hot glue gun and glue sticks
- 40 lengths floral wire, 30cm each
- 1m ribbon, for hanging
How to Make It
- Flatten a coffee filter and cut a rough spiral from the outer edge into the center, so you end up with one long curling strip.
- Starting at the outer end, roll the strip tightly around itself, letting the paper fan out near the base so the rose gets fuller.
- Pinch the bottom flat once rolled and dab hot glue there to hold it (an adult handles the glue gun; it stays hot longer than you’d think).
- Twist floral wire around the glued base for a stem, then trim to about 4cm.
- Push the stem through the wreath form and twist to secure, repeating until the form is generously covered with no gaps.
- Tie a ribbon loop to the back and hang, turning the densest cluster toward eye level.
🛍 Shopping guide
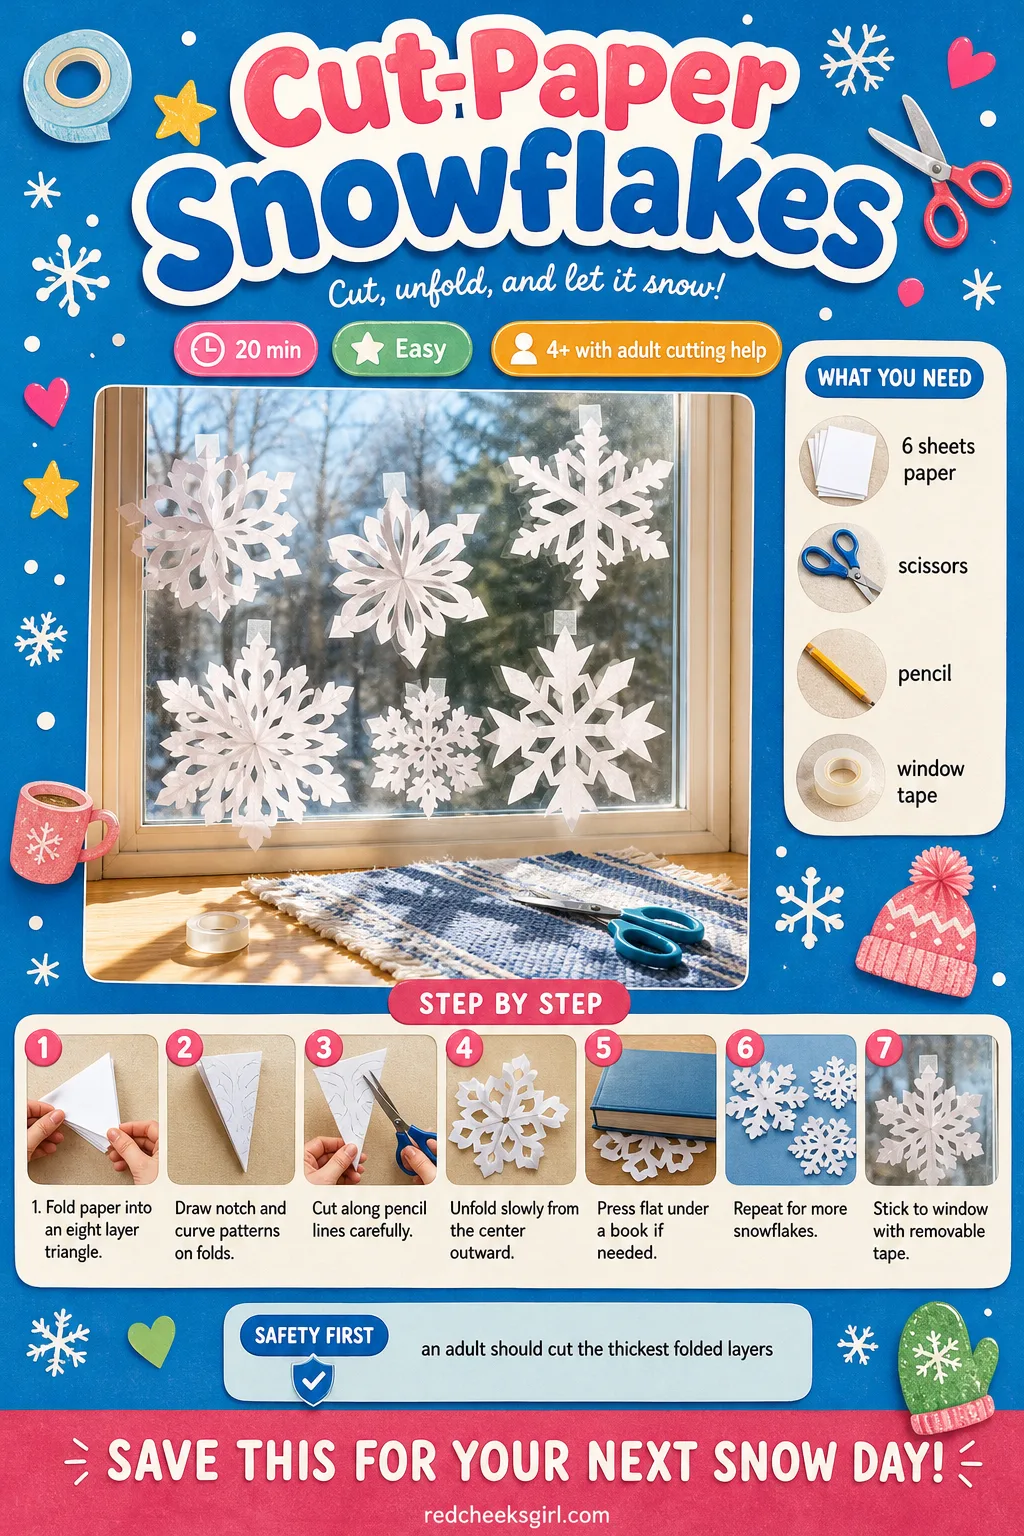
Cut-Paper Snowflakes
The one craft everyone already half-remembers how to do, and the one that still makes a window look dressed the moment the first flake goes up. No two come out the same, which is exactly the point.
What You Need
- 6 sheets white printer paper, A4
- 1 pair scissors
- 1 pencil
- removable window cling tape
How to Make It
- Fold one sheet in half, then in half again, then once more on the diagonal so you end with a tall triangle made of eight layers.
- Draw small notches, triangles and curves along the folded edges in pencil, keeping a little of the fold uncut so the pattern stays connected.
- Cut along the pencil lines (an adult should cut the thicker, many-layered sections, since eight layers resist small scissors).
- Unfold slowly from the center outward, easing out any snagged points rather than pulling.
- Press flat under a heavy book for a few minutes if the folds won’t settle.
- Repeat with the remaining sheets, then stick each snowflake to a window pane with removable tape.
🛍 Shopping guide
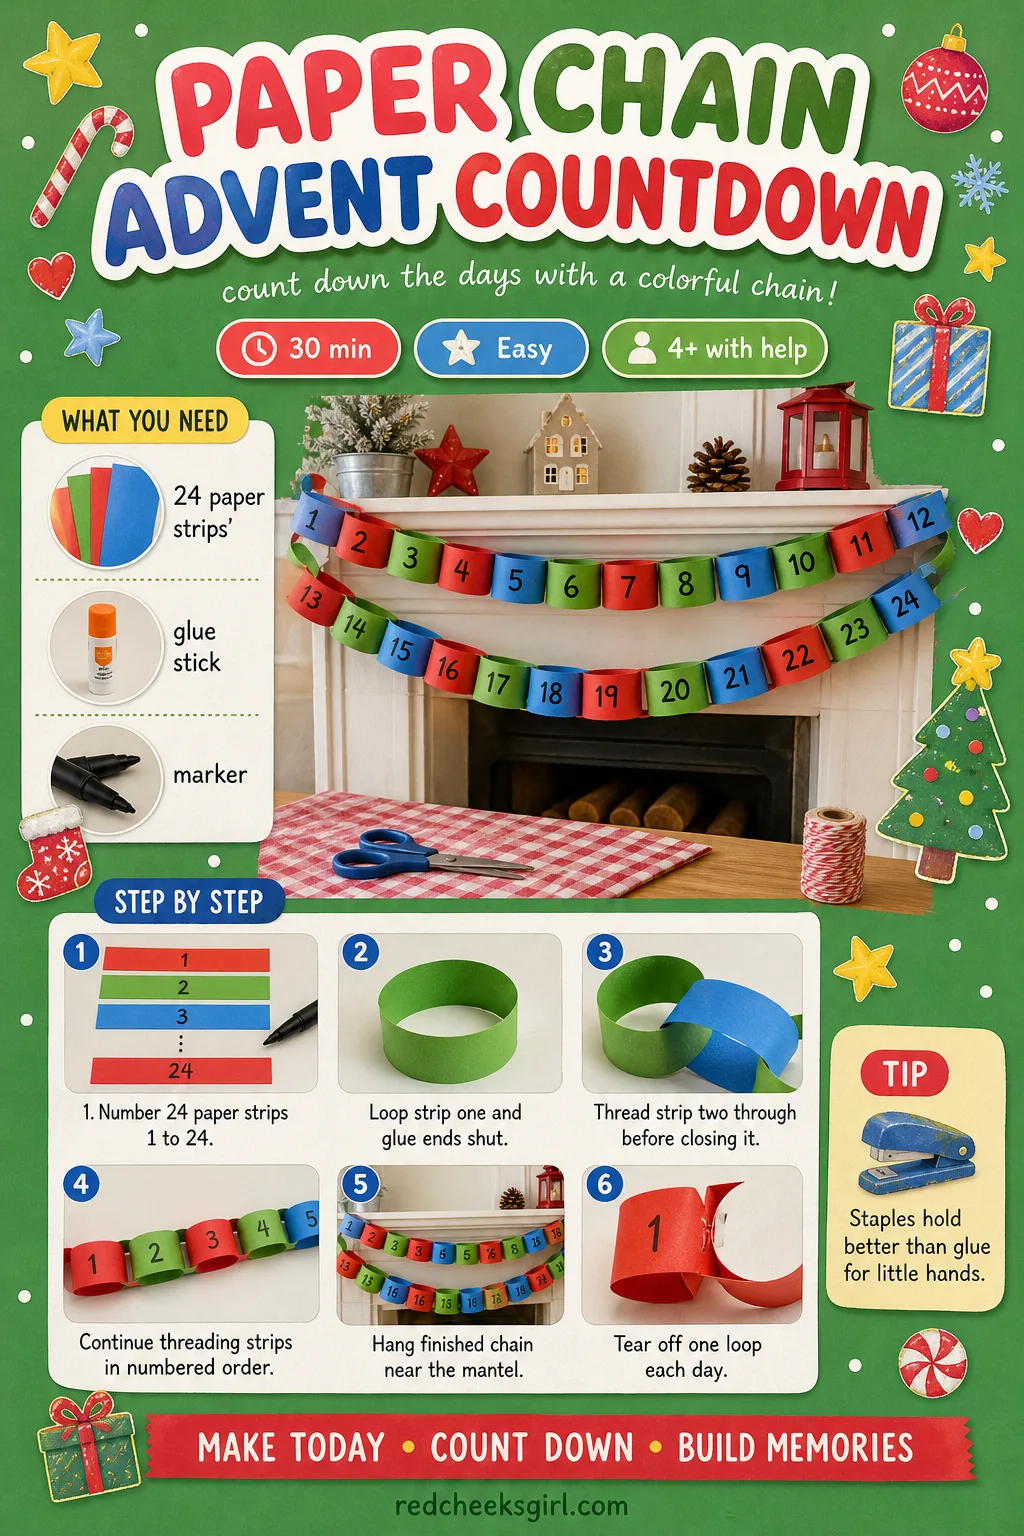
Paper Chain Advent Countdown
A plain advent calendar box feels like another thing to fill. A chain of 24 numbered loops just needs tearing off, one a day, and it hangs across the mantel looking cheerfully homemade from day one.
What You Need
- 24 paper strips, 2.5cm x 20cm, mixed colors
- 1 glue stick or stapler
- 1 black marker
- 1 hook or nail for hanging
How to Make It
- Number each strip from 1 to 24, writing boldly enough to read from across the room.
- Take strip number 1, curl it into a loop with the number facing out, and glue or staple the ends together.
- Thread strip number 2 through that loop before closing it into its own loop, so the chain locks together link by link.
- Continue threading each numbered strip through the last one, working from 1 through to 24.
- Hang the finished chain from a nail near the mantel, letting it hang loose rather than taut.
- Each day, tear off the lowest numbered loop and keep it as a little souvenir.
🛍 Shopping guide
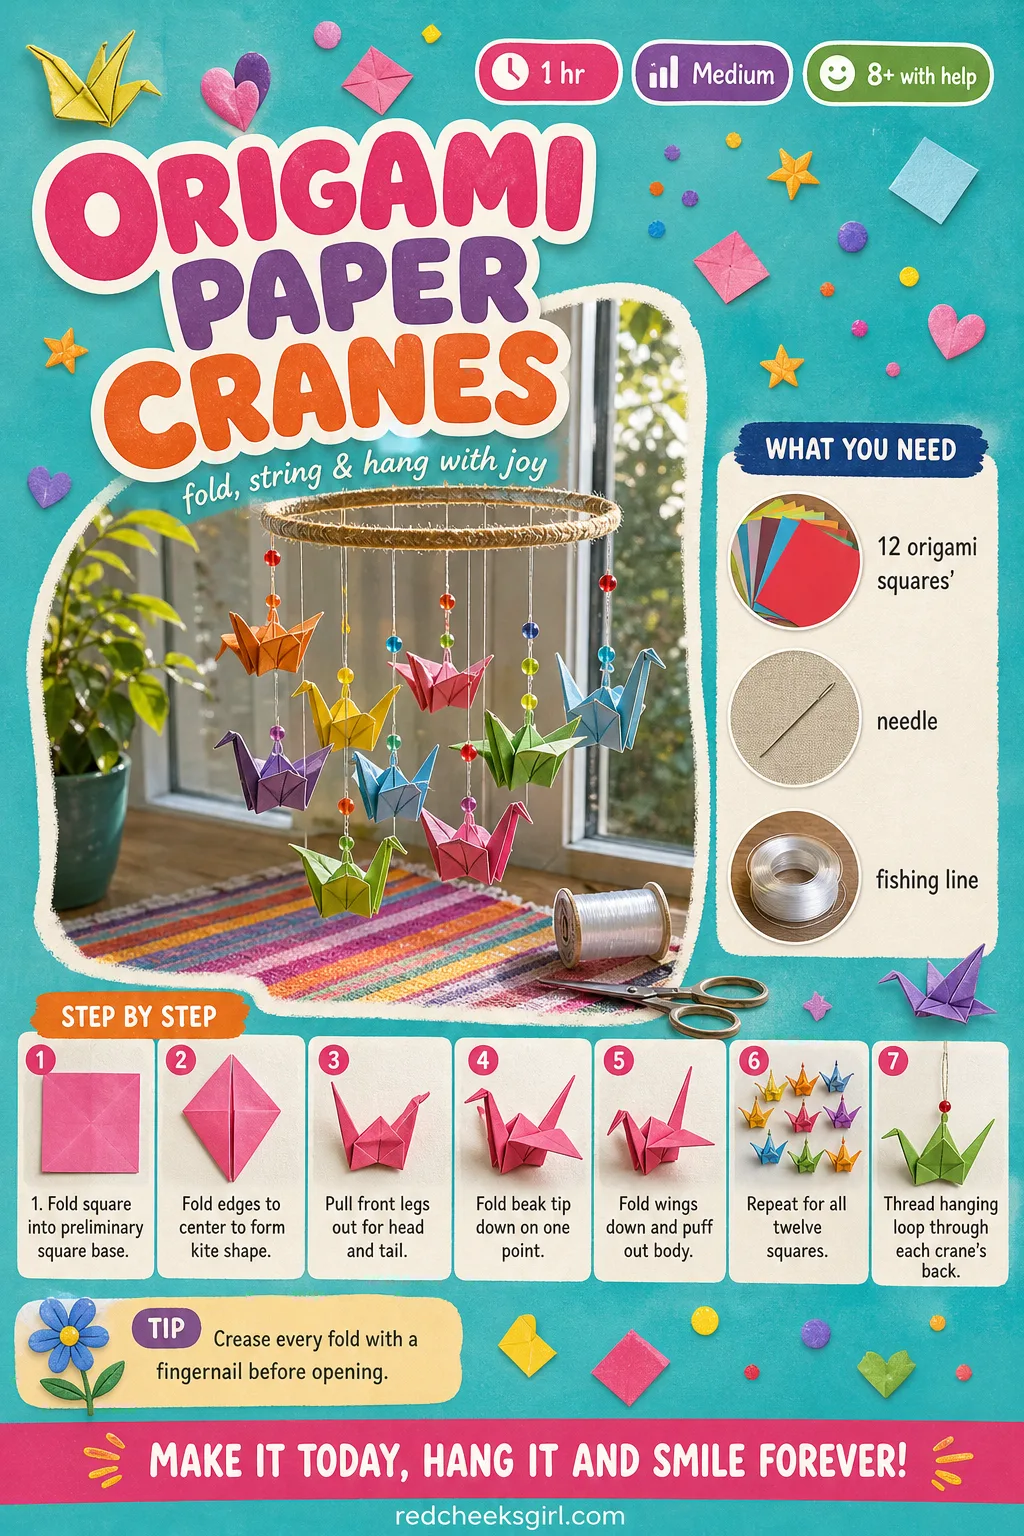
Origami Paper Cranes
A tree scattered with folded cranes instead of baubles reads as deliberate rather than sparse, and the fold is one worth having in the hand permanently: it comes up again for every paper crafting mood for the rest of the year.
What You Need
- 12 origami paper squares, 15cm
- 1m clear thread or fine fishing line
- 1 sewing needle
How to Make It
- Fold one square diagonally both ways, then in half both ways horizontally, collapsing it into the classic preliminary square base.
- Fold the open edges into the center line on both sides, then fold the top triangle down and the bottom point up into a tall kite shape, repeating on the back.
- Pull the two front legs outward and crease flat to make the head and tail points, then fold one tip down to shape the beak.
- Fold the wings down on both sides so they sit roughly horizontal, then gently pull them apart to puff out the body.
- Repeat for all 12 squares; expect the first few to look lopsided, the fold gets easier once your fingers learn the sequence.
- Thread the needle with fishing line, pass it through the center of each crane’s back, and knot a loop for hanging.
🛍 Shopping guide
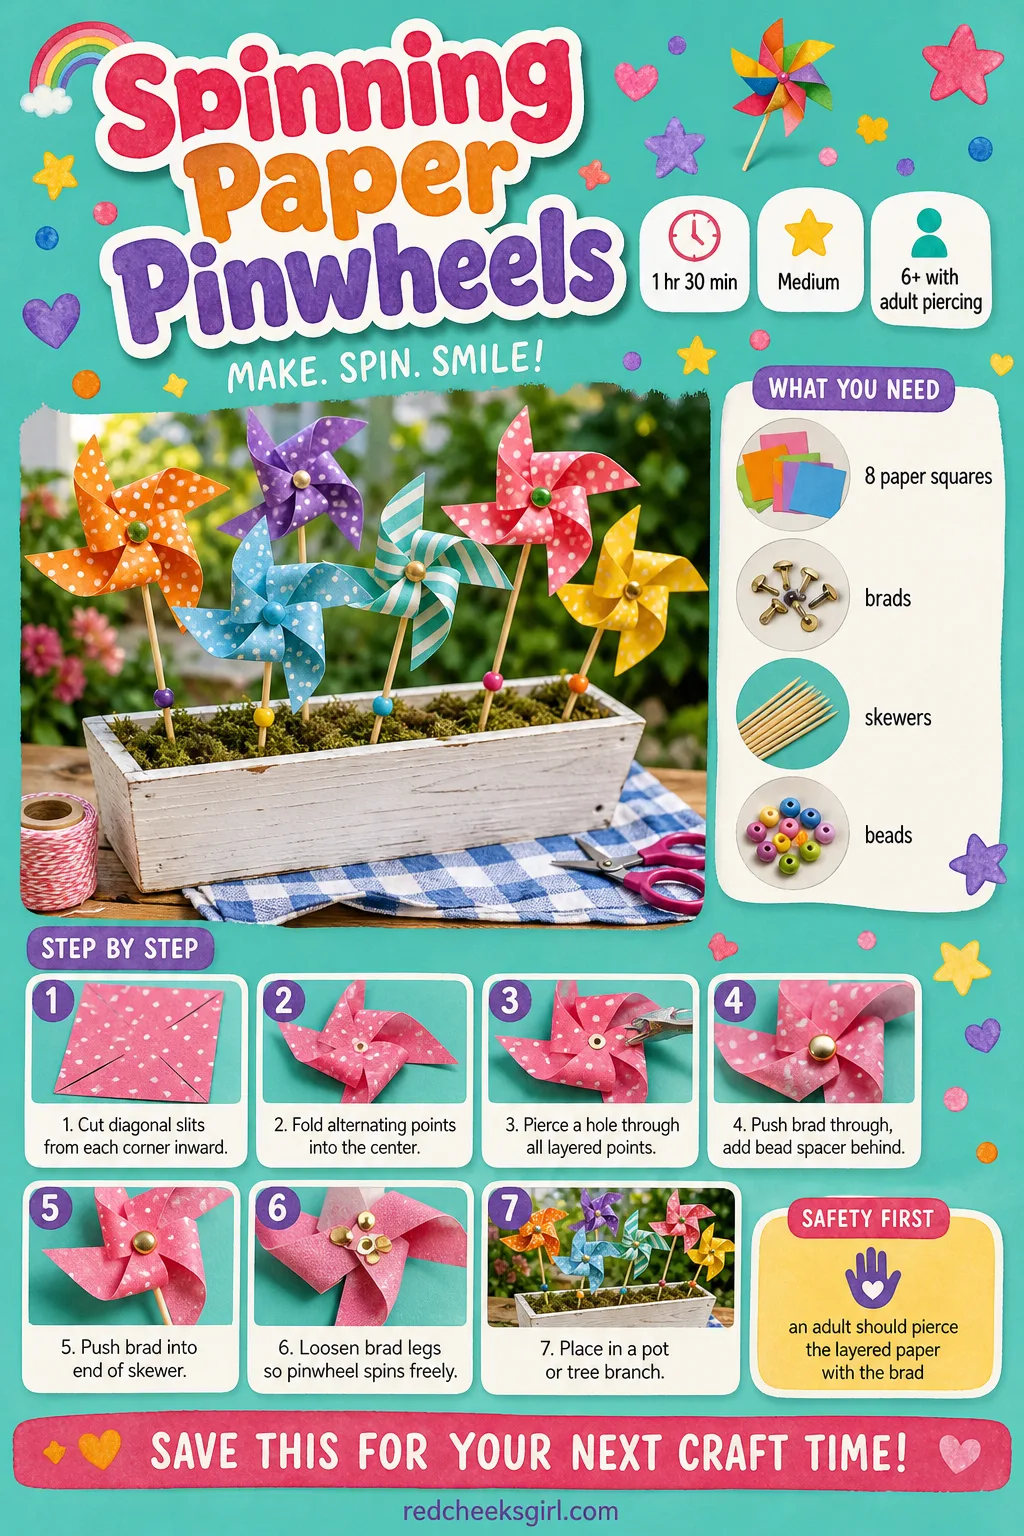
Spinning Paper Pinwheels
If the window box or the flower bed looks tired by December, a row of spinning pinwheels fixes it in an afternoon and actually moves, which plain decorations never do.
What You Need
- 8 squares patterned paper, 15cm
- 8 brass paper fasteners (brads)
- 8 wooden skewers or dowels, 20cm
- 8 small wooden beads, 8mm
How to Make It
- Cut a diagonal line from each corner of the square toward the center, stopping about 1cm short so the middle stays intact.
- Fold every other point in toward the center, leaving a four-point pinwheel with the points overlapping in the middle.
- Pierce a hole through all four overlapping points and the center in one go (an adult should do this, since brads are sharp and the layers are thick).
- Push the brad through the holes, slide a small bead onto the back as a spacer, then push the brad point into the end of the skewer.
- Open the brad’s legs slightly behind the skewer so the pinwheel can spin freely rather than binding.
- Push the skewer into a window box, pot, or tree branch, angled so a breeze sets it spinning.
🛍 Shopping guide
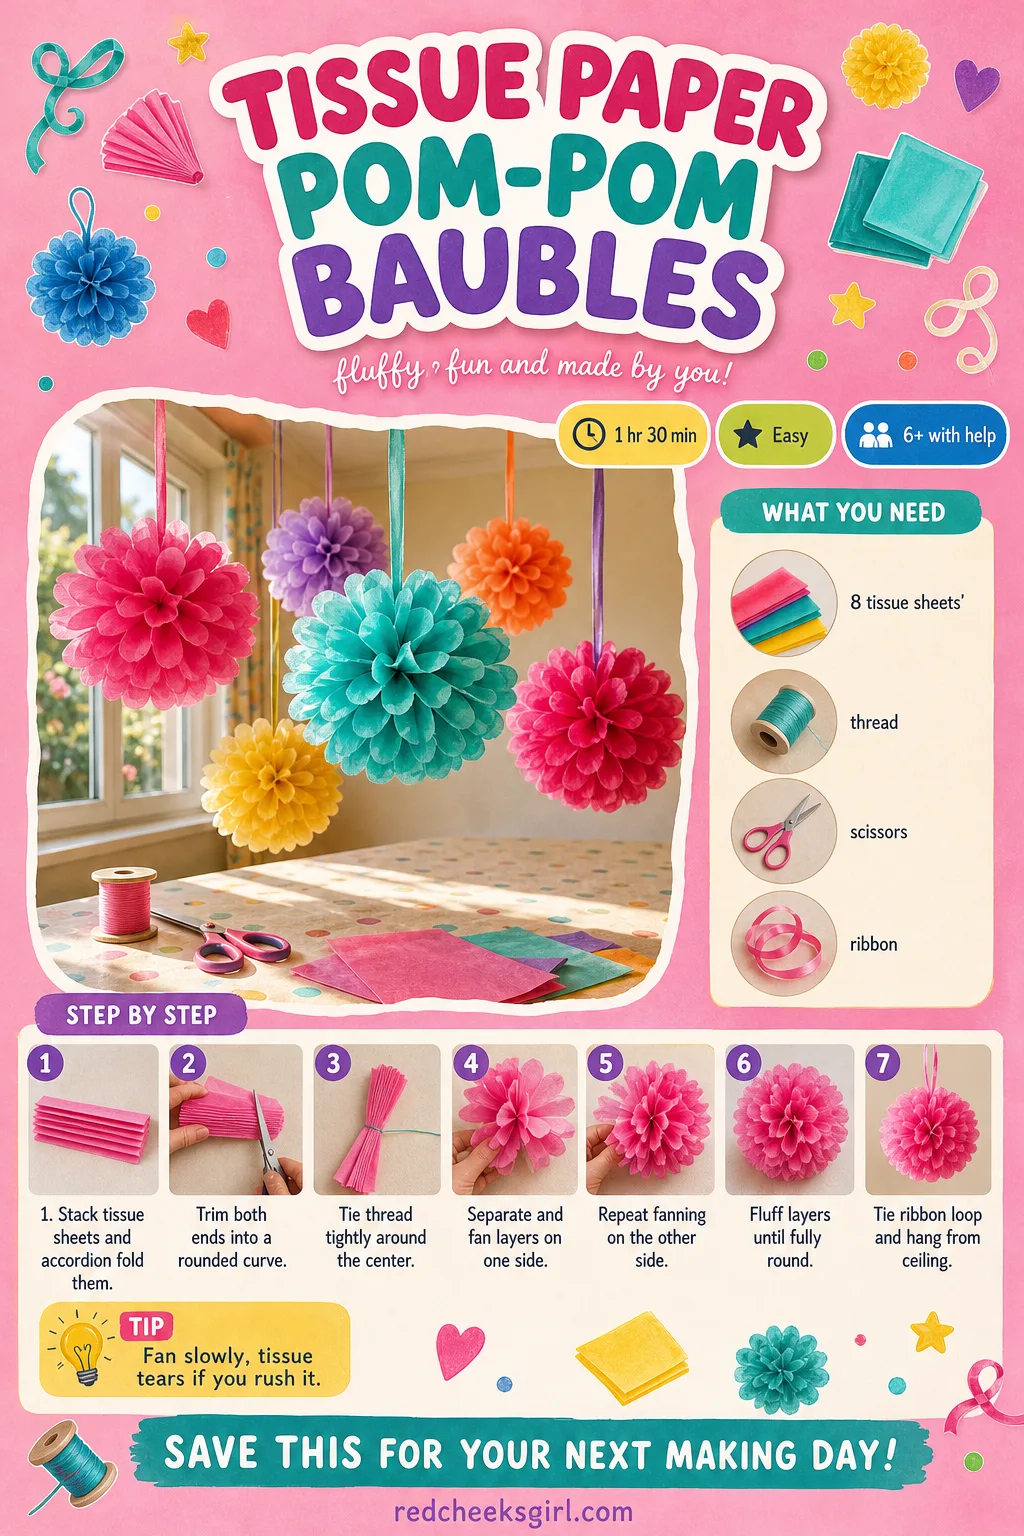
Tissue Paper Pom-Pom Baubles
A room with a plain ceiling looks unfinished the second the tree lights go on. Hang a few of these overhead instead, and the whole room reads as dressed even before anyone looks down.
What You Need
- 8 sheets tissue paper, 20cm x 30cm, per bauble
- 1 length cotton thread or thin wire, 15cm
- 1 pair scissors
- 20cm ribbon, for hanging
How to Make It
- Stack eight sheets of tissue paper and fold the whole stack into accordion pleats about 2cm wide.
- Trim both ends of the pleated stack into a rounded curve, so when it opens it forms a ball rather than a flat fan.
- Tie thread or thin wire tightly around the exact center of the pleated strip.
- Gently separate and fan out the layers on one side, pulling each sheet toward the middle, then repeat on the other side.
- Fluff the layers evenly until the shape rounds out into a full sphere with no flat patches.
- Tie a ribbon loop through the center thread and hang from the ceiling, spacing several at different heights.
🛍 Shopping guide
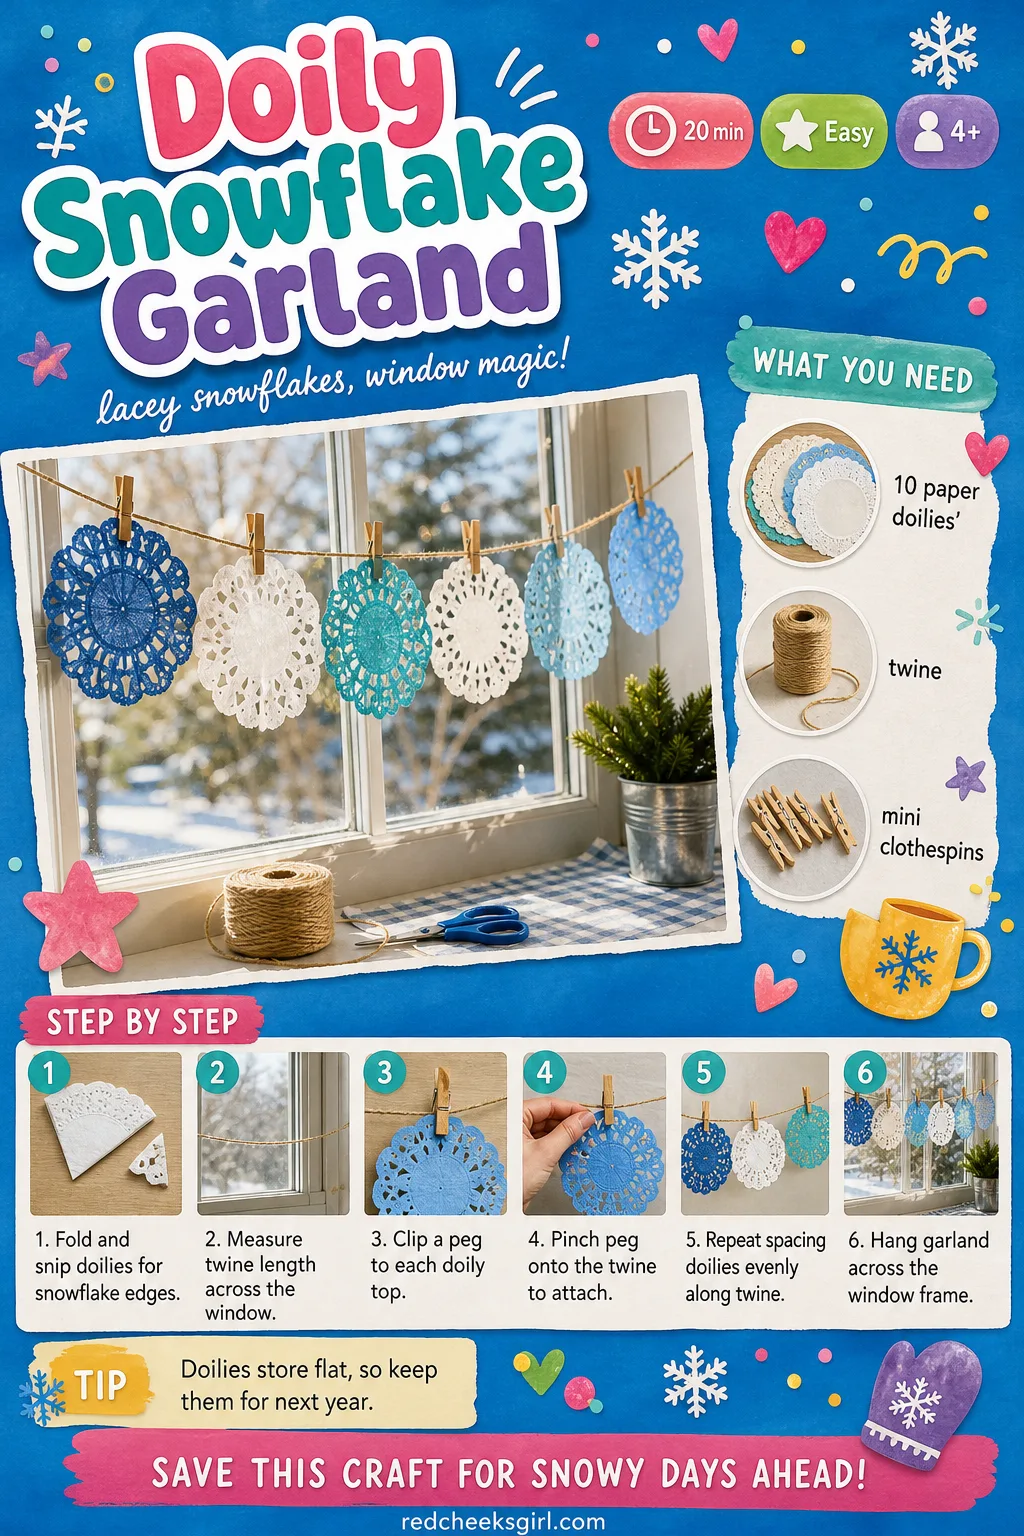
Doily Snowflake Garland
Paper doilies look old-fashioned sitting flat under a cake, but pegged along a string across a window they read as lace snowflakes instead, and they pack flat into a folder when the season ends.
What You Need
- 10 round paper doilies, 15cm diameter
- 1.5m cotton twine
- 10 mini wooden clothespins
- 1 pair scissors, optional
How to Make It
- If you want more of a snowflake look than a plain circle, fold each doily in quarters and snip small notches along the folded edges before opening flat again.
- Lay the twine along a table to judge spacing, about 15cm between doilies.
- Clip a mini peg to the top edge of the first doily, then pinch the same peg onto the twine.
- Repeat along the twine, alternating sizes or patterns if you have them, until the garland feels full but not crowded.
- Hang the finished garland across a window frame using small nails or removable hooks at each end.
- Unclip each peg after the season and store the doilies flat for next year.
🛍 Shopping guide
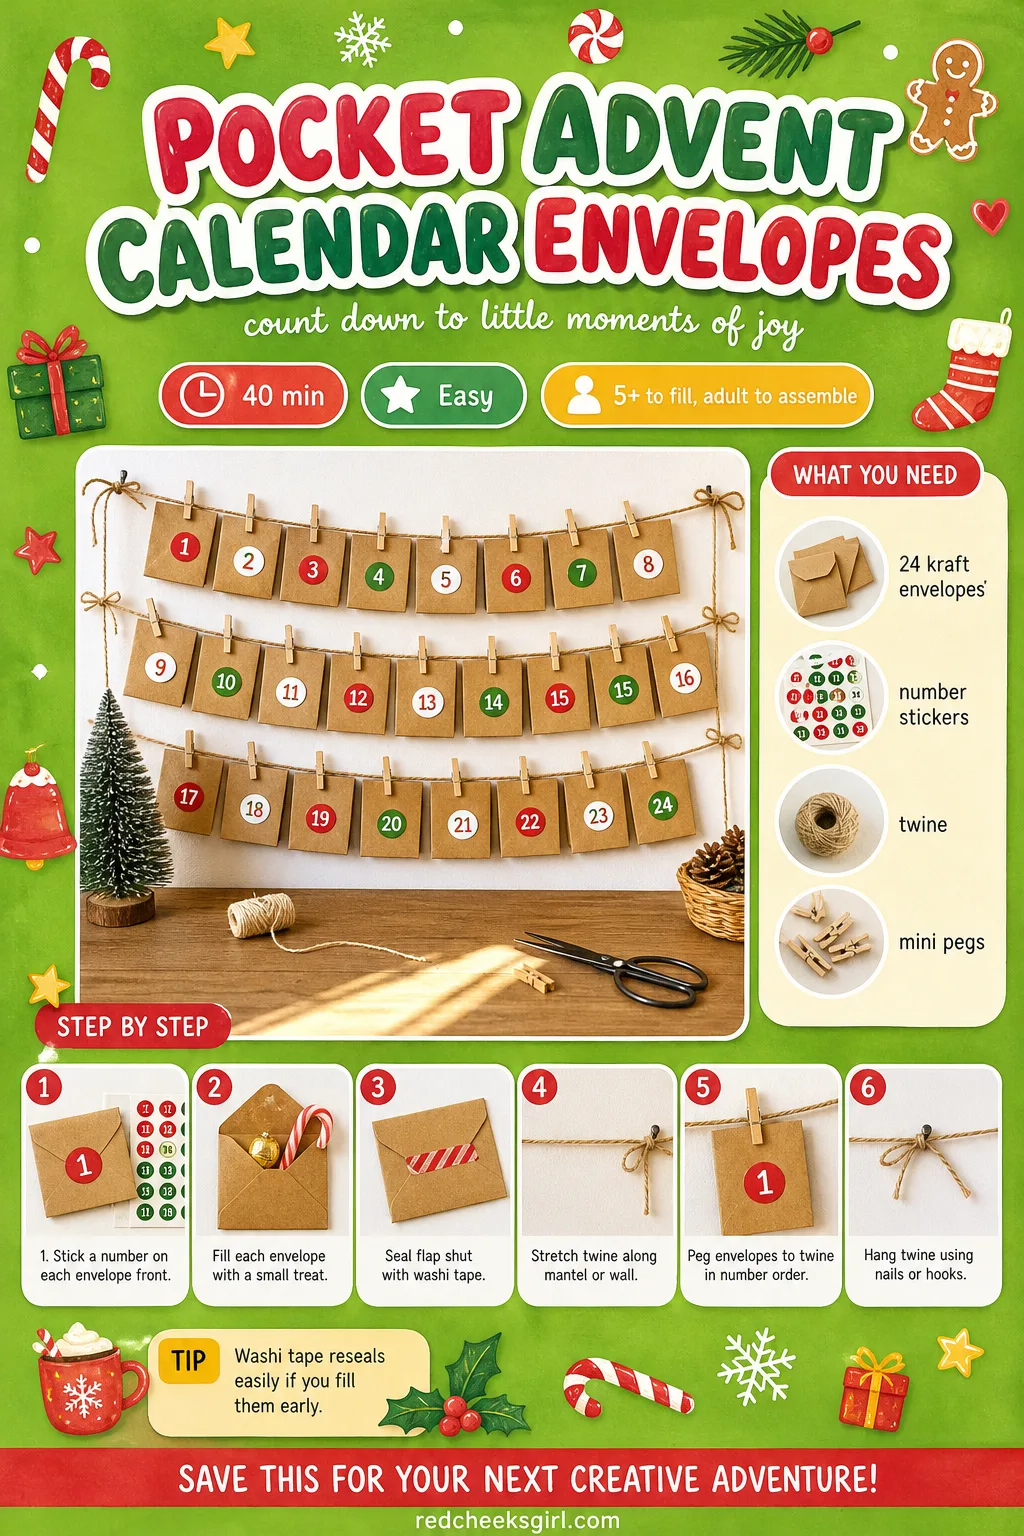
Pocket Advent Calendar Envelopes
Buying a boxed advent calendar means the treats are fixed and usually chocolate. Pegging 24 tiny envelopes to a string means you choose what goes inside, and a reused string resets the whole thing next year with nothing thrown away.
What You Need
- 24 small kraft envelopes, 7cm x 10cm
- 1 sheet number stickers, 1 to 24
- 1 roll washi tape
- 2m cotton twine
- 24 mini wooden pegs
How to Make It
- Stick a number from 1 to 24 onto the front of each envelope, mixing the order you work in.
- Slip a small treat or note into each envelope, then seal the flap with washi tape instead of glue so it’s easy to reopen.
- Stretch the twine along the mantel or wall where the calendar will live.
- Peg each envelope to the twine in number order, spacing them evenly.
- Hang the twine using small nails or removable hooks at both ends.
- Each morning, unpeg the matching envelope and leave the peg in place on the string.
🛍 Shopping guide
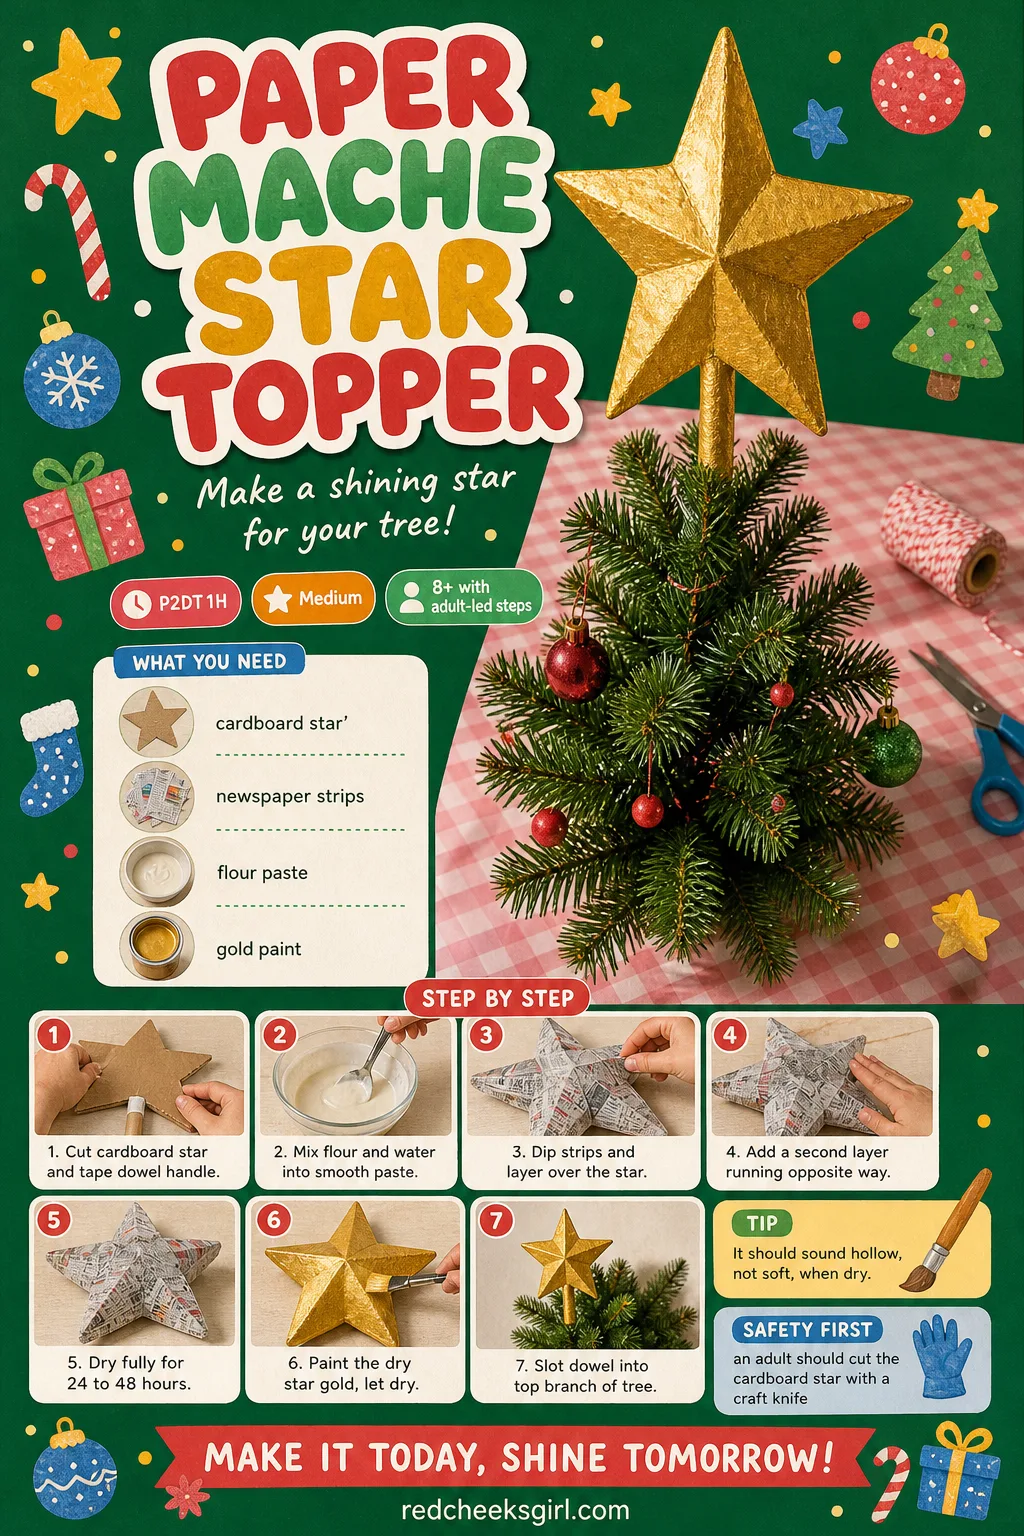
Paper Mache Star Topper
A store-bought topper always looks slightly plasticky under tree lights. This one takes patience more than skill, and the long drying time is genuinely the point: a thin, rushed layer cracks, while a slow one lasts for years of Decembers.
What You Need
- 1 cardboard star, 25cm point to point, cut from a flattened box
- 40 strips newspaper, torn
- 1 cup flour mixed with 1 cup water, for paste
- 1 small pot gold acrylic paint
- 1 wooden dowel, 15cm, for the tree socket
How to Make It
- Cut a sturdy star shape from cardboard (an adult handles the craft knife here) and tape a dowel to the back as a handle.
- Mix flour and water into a smooth, slightly runny paste, then dip newspaper strips in, wiping off excess before laying each across the star.
- Cover the whole star in one direction, let it dry for several hours, then add a second layer running the opposite way.
- Leave the star somewhere warm and dry for 24 to 48 hours between layers; it’s ready for paint when it feels rigid and sounds hollow, not soft or damp.
- Once fully dry, paint the whole star gold and let it dry another hour, adding a second coat if newsprint still shows through.
- Slot the dowel handle into the top branch of the tree so the star sits proud above the highest bough.
🛍 Shopping guide
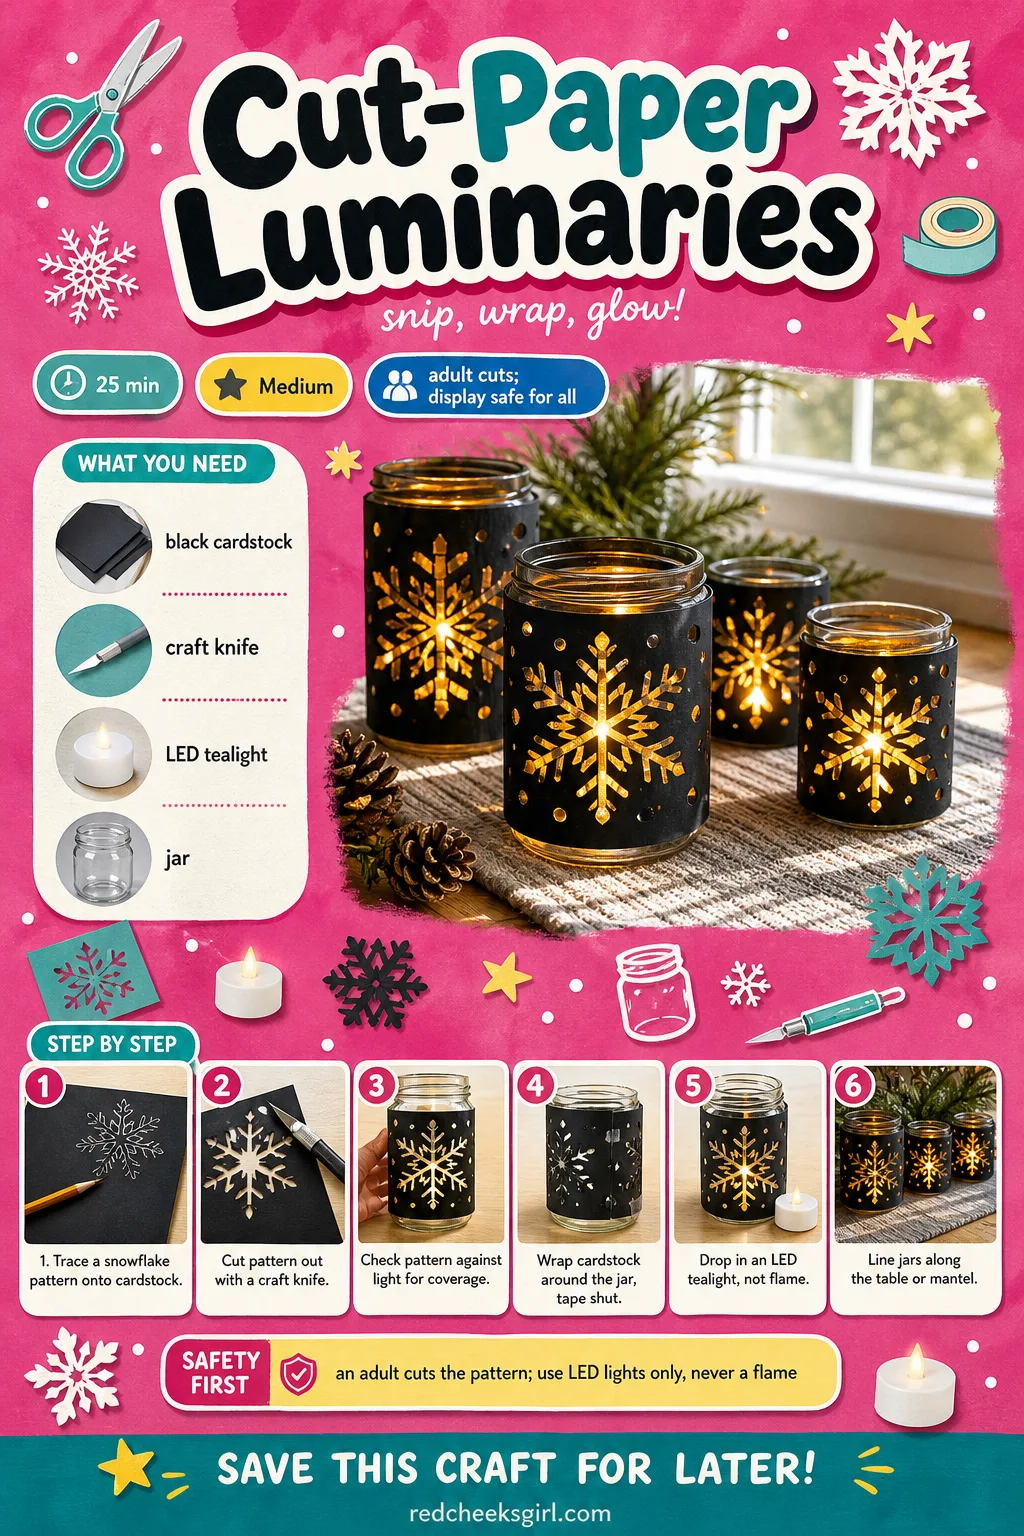
Cut-Paper Luminaries
A plain jar on the table looks like a plain jar. Wrapped in cut black paper and lit from inside with an LED tealight, the same jar throws a pattern of light across the tablecloth that does half the decorating for you.
What You Need
- 1 sheet black cardstock, A4, per jar
- 1 glass jar or vase, per luminary
- 1 LED tealight per jar (never an open flame)
- 1 craft knife and cutting mat
- double sided tape
How to Make It
- Trace or print a snowflake or star pattern onto the black cardstock so the design fills most of the sheet.
- Cut out the pattern with the craft knife on the cutting mat (this step is for an adult; small shapes need steady pressure).
- Check the paper against the light to be sure enough has been cut away for light to shine through once wrapped.
- Wrap the cut cardstock around the jar so the pattern faces outward, securing the overlap with double sided tape.
- Drop in an LED tealight only, since the paper sits close to the light source.
- Line several jars down the table or along the mantel and switch them on once the room dims.
🛍 Shopping guide
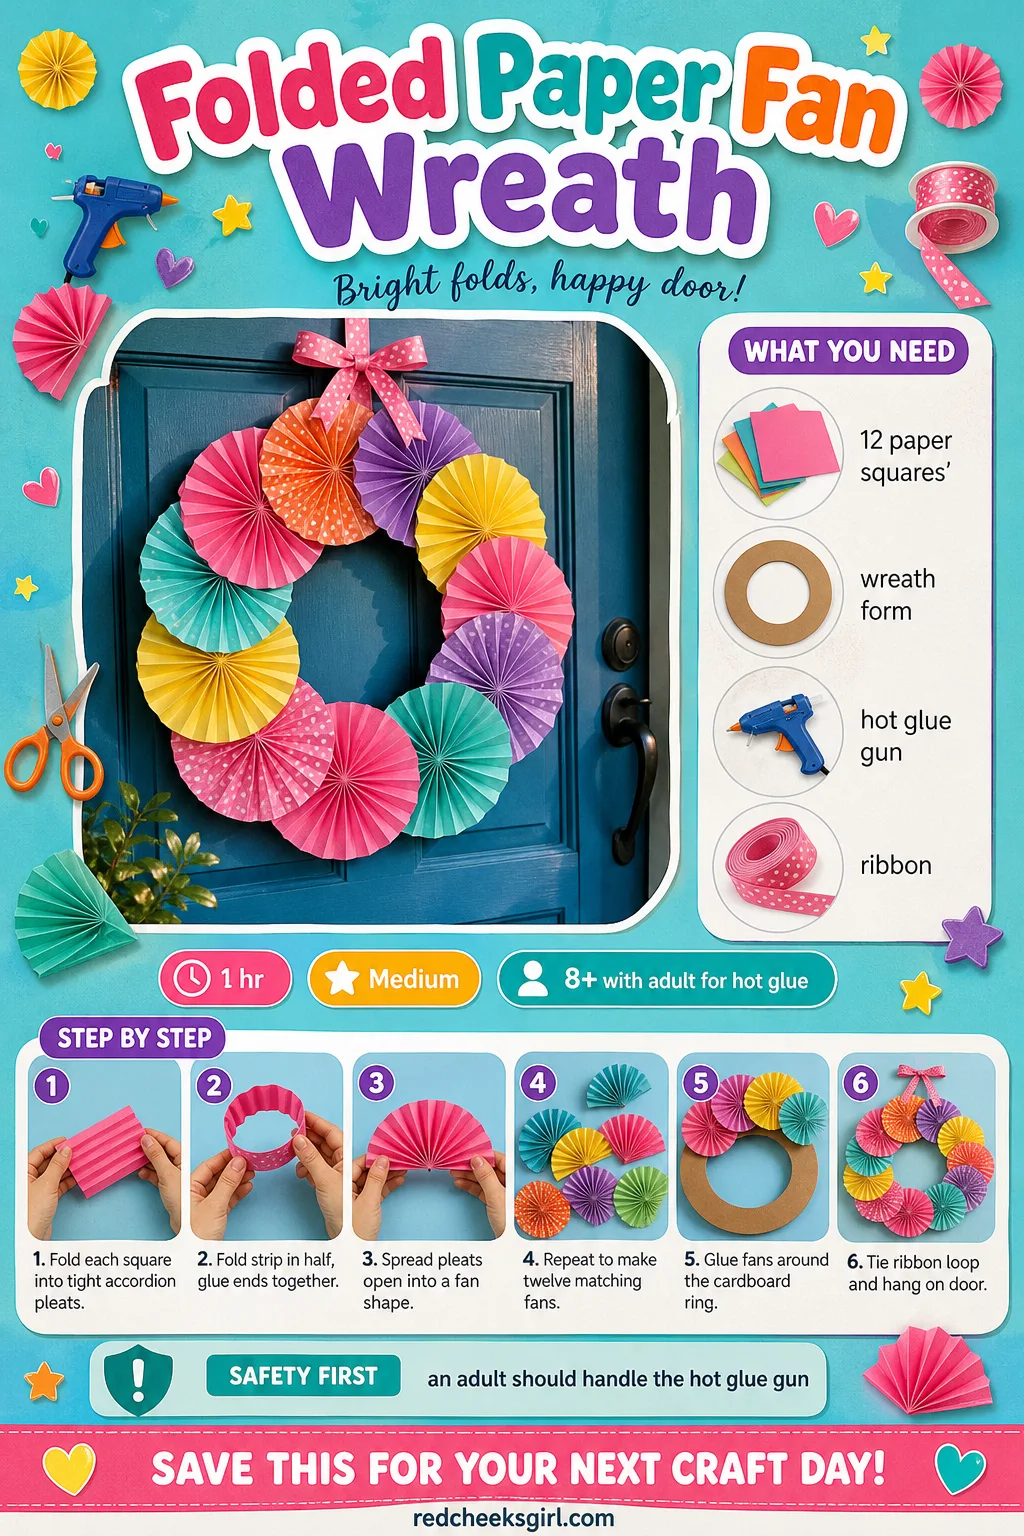
Folded Paper Fan Wreath
If roses feel like too much fiddling for a Tuesday, pleated paper fans make an equally full wreath in roughly the same time, with none of the curling. It reads as modern rather than rustic, good for a front door that wants clean lines.
What You Need
- 12 sheets patterned paper, 20cm x 20cm
- 1 cardboard ring or wreath form, 25cm diameter
- 1 hot glue gun and sticks
- 1m ribbon, for hanging
How to Make It
- Fold one square of paper into accordion pleats about 1cm wide across its full width.
- Fold the pleated strip in half so the ends meet, then glue them together at the fold to hold the fan open permanently.
- Spread the pleats into a full fan shape and flatten the glued base.
- Repeat with the remaining 11 squares, then arrange around the ring to check spacing before committing to glue.
- Hot glue each fan base to the ring, overlapping edges slightly so no cardboard shows (an adult should handle the glue gun).
- Tie a ribbon loop to the back and hang on the door.
🛍 Shopping guide
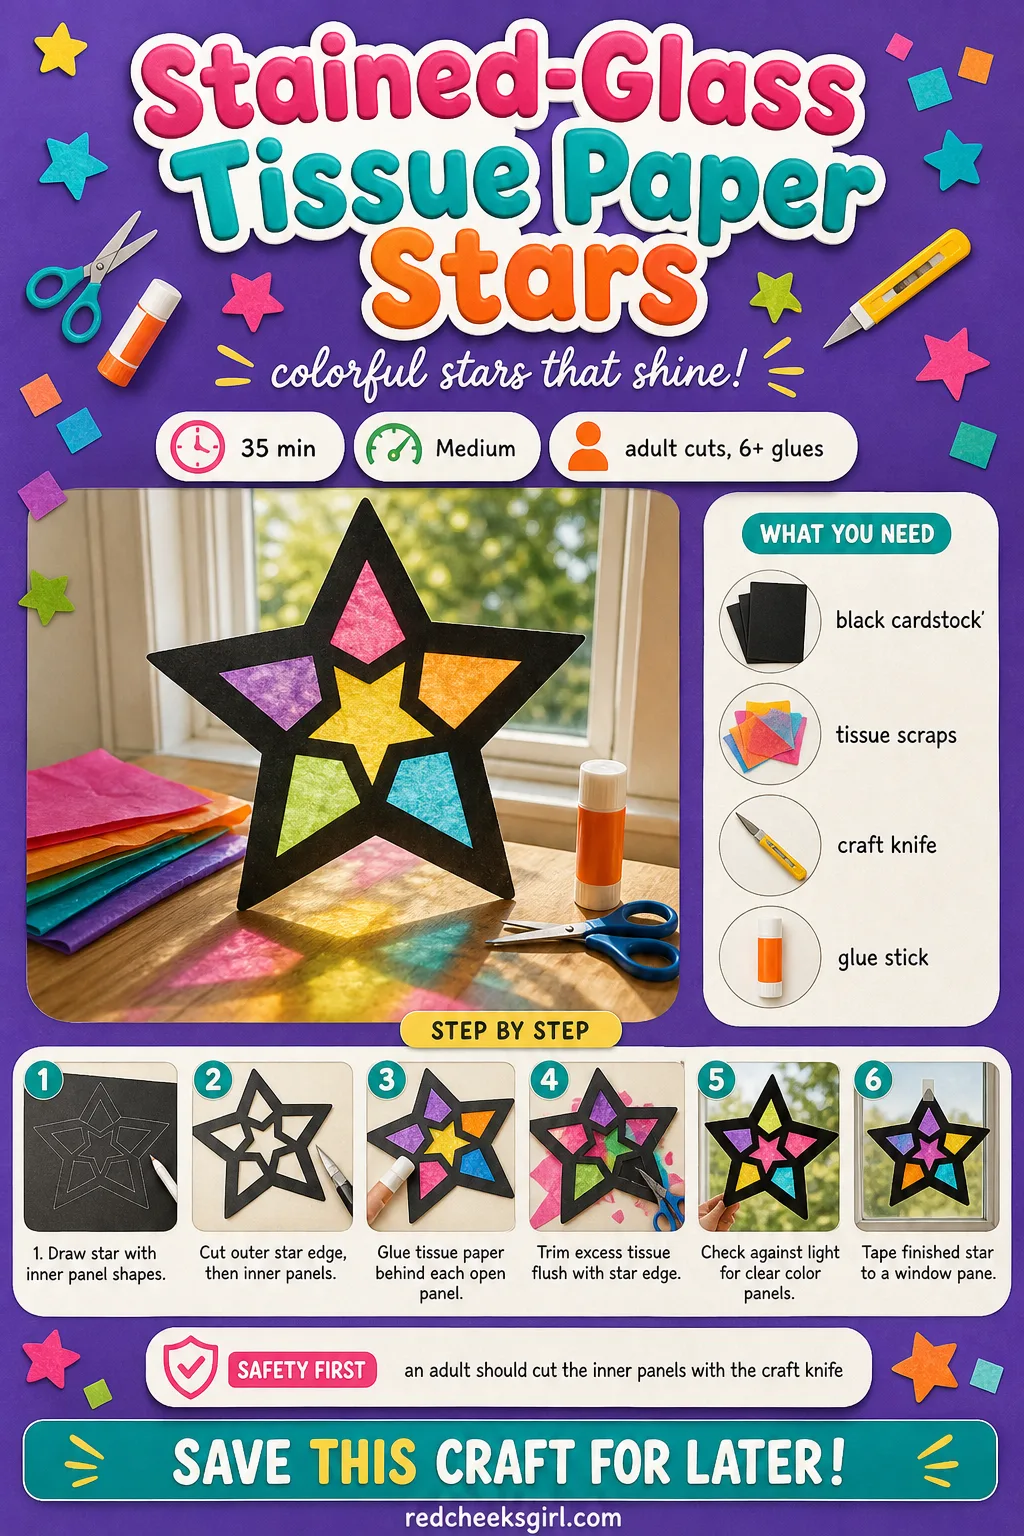
Stained-Glass Tissue Paper Stars
Without a church window in the house, this is the closest a paper craft gets to that colored-light effect, and it costs almost nothing. It belongs wherever afternoon sun hits a window directly.
What You Need
- 2 sheets black cardstock, A4
- 10 scraps tissue paper, assorted colors
- 1 craft knife and cutting mat
- 1 glue stick
How to Make It
- Draw a star outline on the black cardstock, then draw smaller shapes inside it to mark where the “glass” panels will go.
- Cut the outer edge first, then the inner panel shapes, leaving a web of black card lines between them (an adult should do this, as the inner cuts need a sharp craft knife and a steady hand).
- Lay the cut star face down and glue scraps of colored tissue over each open panel from behind, overlapping slightly past the edges.
- Trim excess tissue flush with the star’s outer edge once the glue has tacked down.
- Hold the star up to a window to check that light passes clearly through each panel.
- Tape the star to the window pane and let daylight do the rest.
🛍 Shopping guide
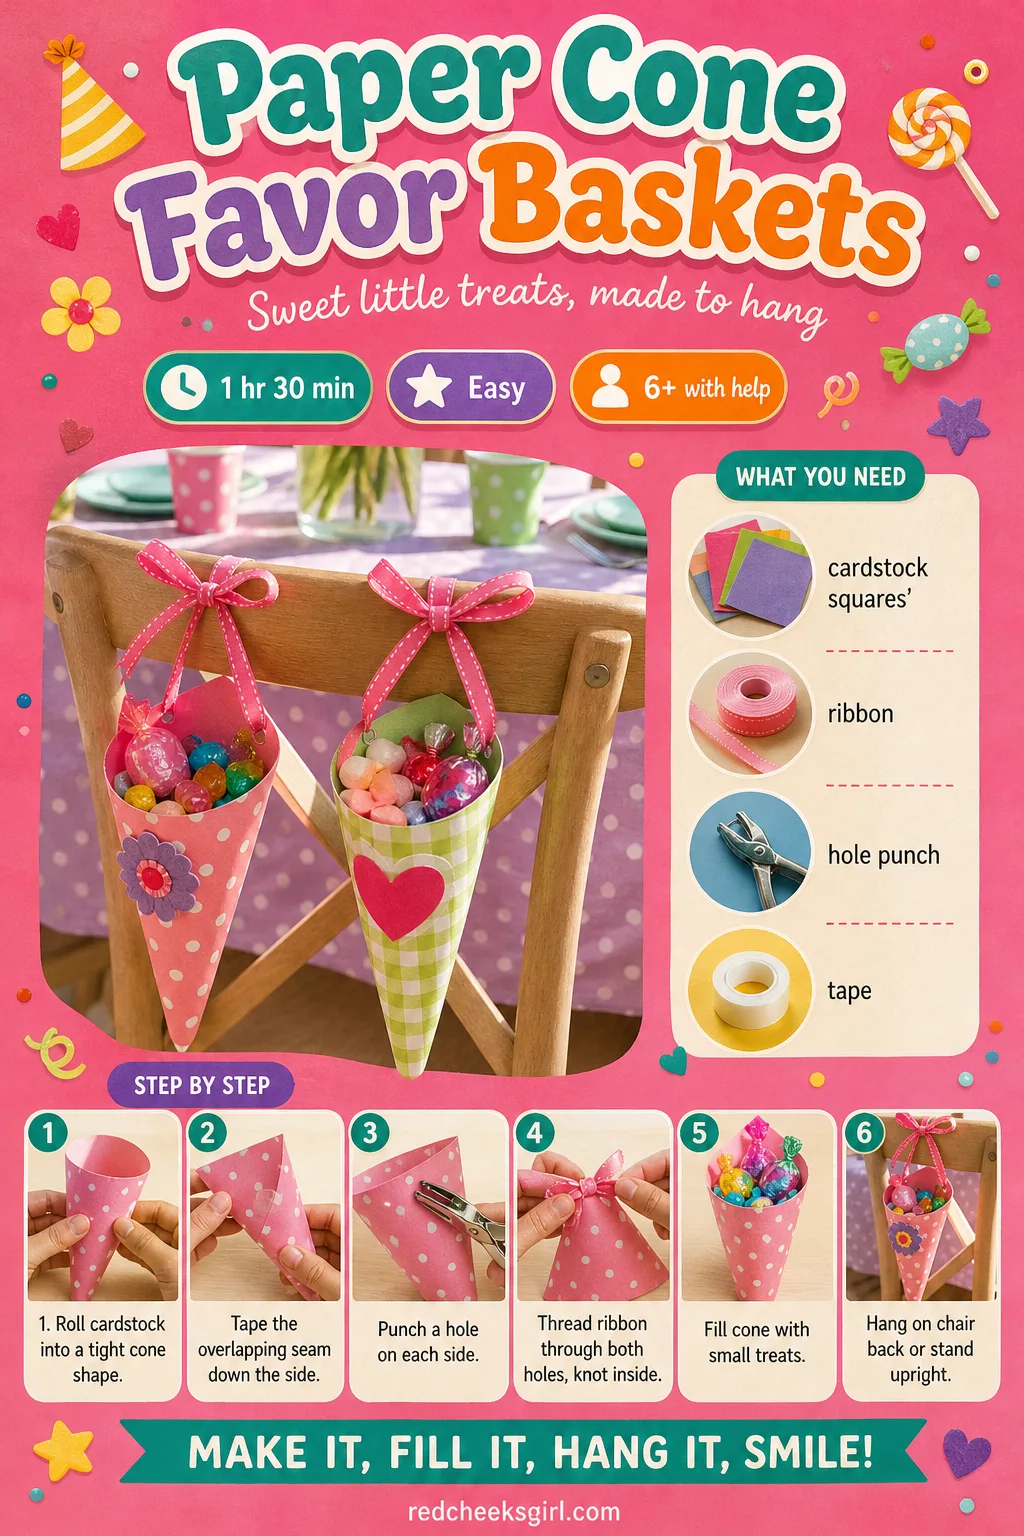
Paper Cone Favor Baskets
Place settings look bare without something small at each spot, and these roll up in minutes from a single square. Fill with a breadstick or a few wrapped sweets and hang one from every chair back.
What You Need
- 1 cardstock square, 20cm x 20cm, per guest
- 20cm ribbon per cone
- 1 hole punch
- tape or glue stick
How to Make It
- Roll the cardstock square into a cone, bringing one corner around to meet the opposite edge, adjusting until the bottom point is tight and closed.
- Tape or glue the overlapping seam down the side so the cone holds its shape.
- Punch one hole on each side near the top rim, directly opposite each other.
- Thread the ribbon through both holes from the outside and knot each end on the inside.
- Fill the cone with small treats, keeping the fill light so the paper doesn’t buckle.
- Hang one from the back of each chair or stand it upright in a glass at each place setting.
🛍 Shopping guide
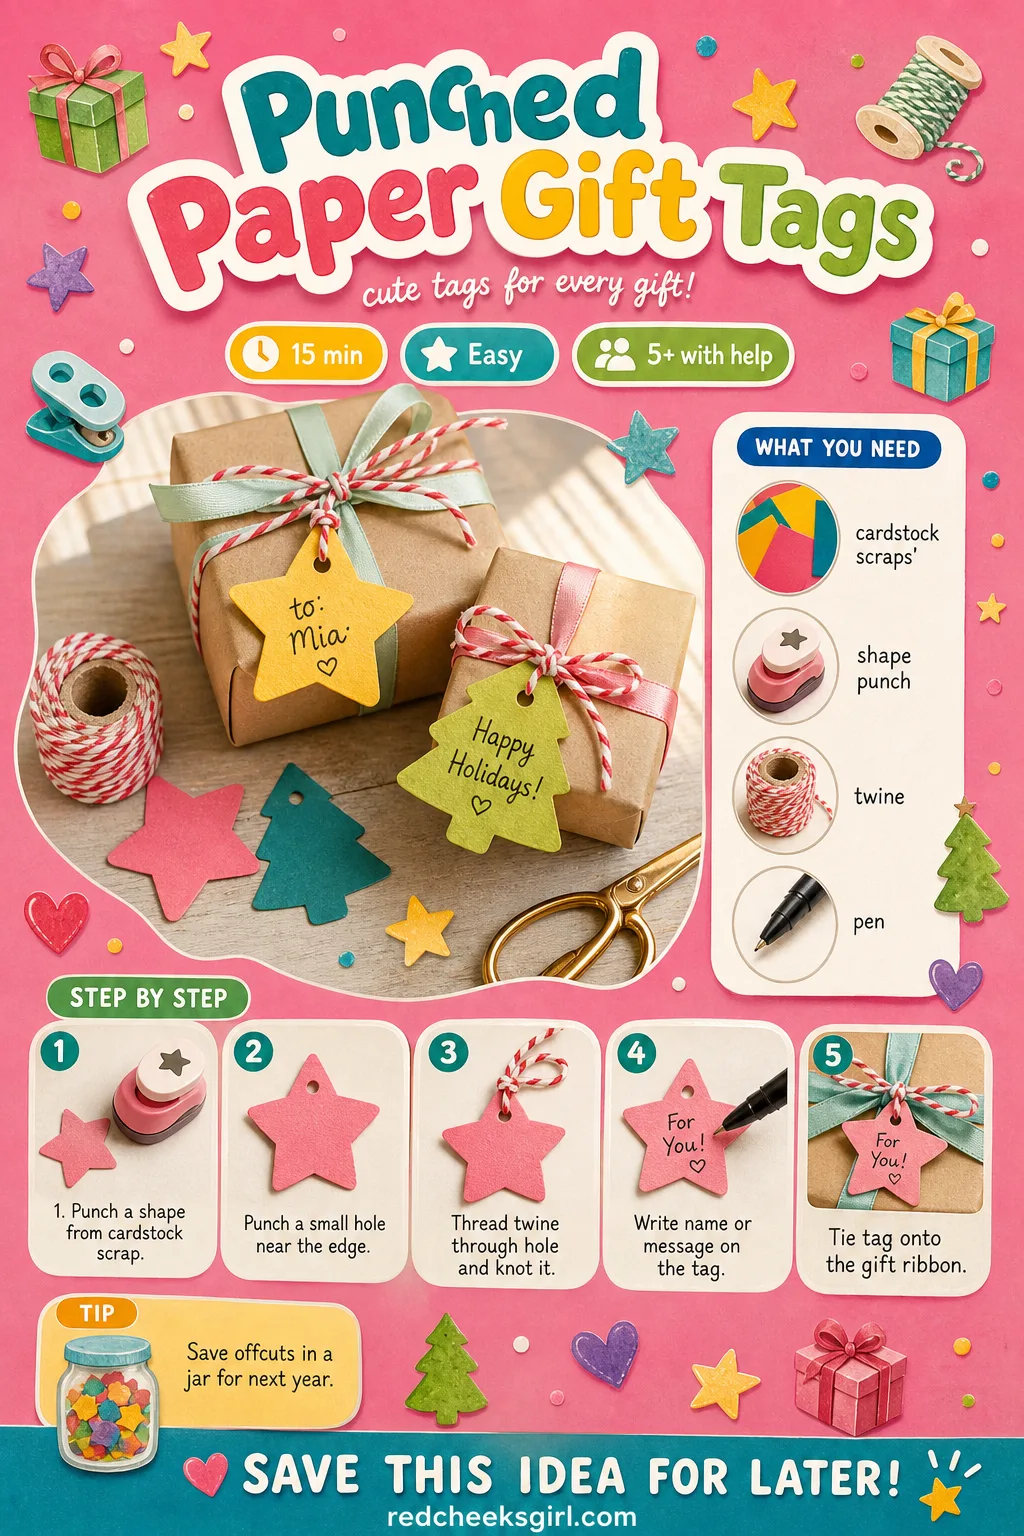
Punched Paper Gift Tags
A gift wrapped well deserves a tag that matches, not a sticker off the roll. These punch out in seconds from whatever cardstock scraps are left over from everything else on this list, so there is rarely anything to buy.
What You Need
- cardstock scraps, 300gsm, assorted colors
- 1 shape punch, star or tree design, 5cm
- 1 small hole punch
- 15cm baker’s twine per tag
How to Make It
- Punch a shape out of the cardstock scrap, pressing down firmly in one motion for a clean edge.
- Punch a small hole near one edge of the tag.
- Thread baker’s twine through the hole and knot it, leaving two tails long enough to tie around a ribbon.
- Write the recipient’s name or a short message on the front in pen.
- Tie the tag onto the gift’s ribbon where it’s the first thing seen.
🛍 Shopping guide
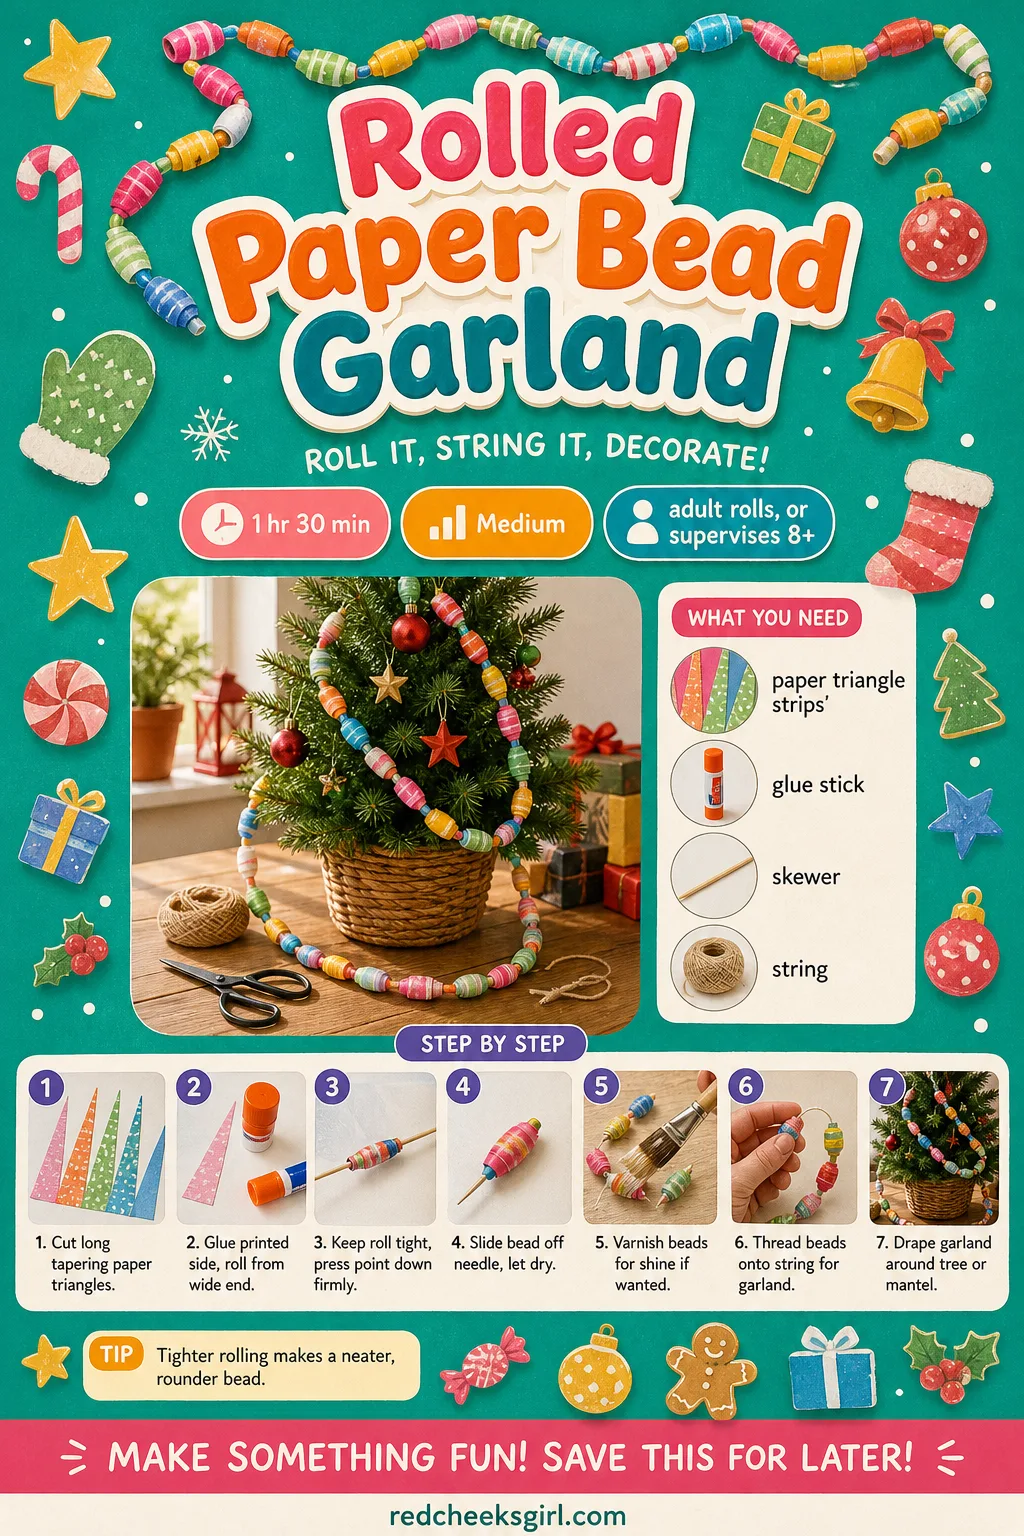
Rolled Paper Bead Garland
Magazine pages or scraps of wrapping paper, rolled tight around a skewer, turn into beads that string into a garland long enough to wind twice around the tree. It takes patience more than skill, and the beads only get neater with practice.
What You Need
- 20 long paper triangle strips, 1cm x 20cm, tapering to a point
- 1 glue stick
- 1 thin knitting needle or bamboo skewer
- 1.5m cotton string
- clear varnish, optional
How to Make It
- Cut paper into long thin triangles, wide at one end and tapering to a point at the other, about 20cm long.
- Run glue stick along the printed side, then start rolling from the wide end around the knitting needle.
- Keep the roll tight and centered so the bead ends up even, pressing the pointed tip down firmly to finish.
- Slide the bead off the needle and set it aside to dry for about 20 minutes while you roll the rest.
- Once dry, brush on a thin coat of clear varnish for shine, letting it dry another 20 minutes.
- Thread the beads onto cotton string, packed tightly or spaced with knots between, then drape around the tree or mantel.
🛍 Shopping guide
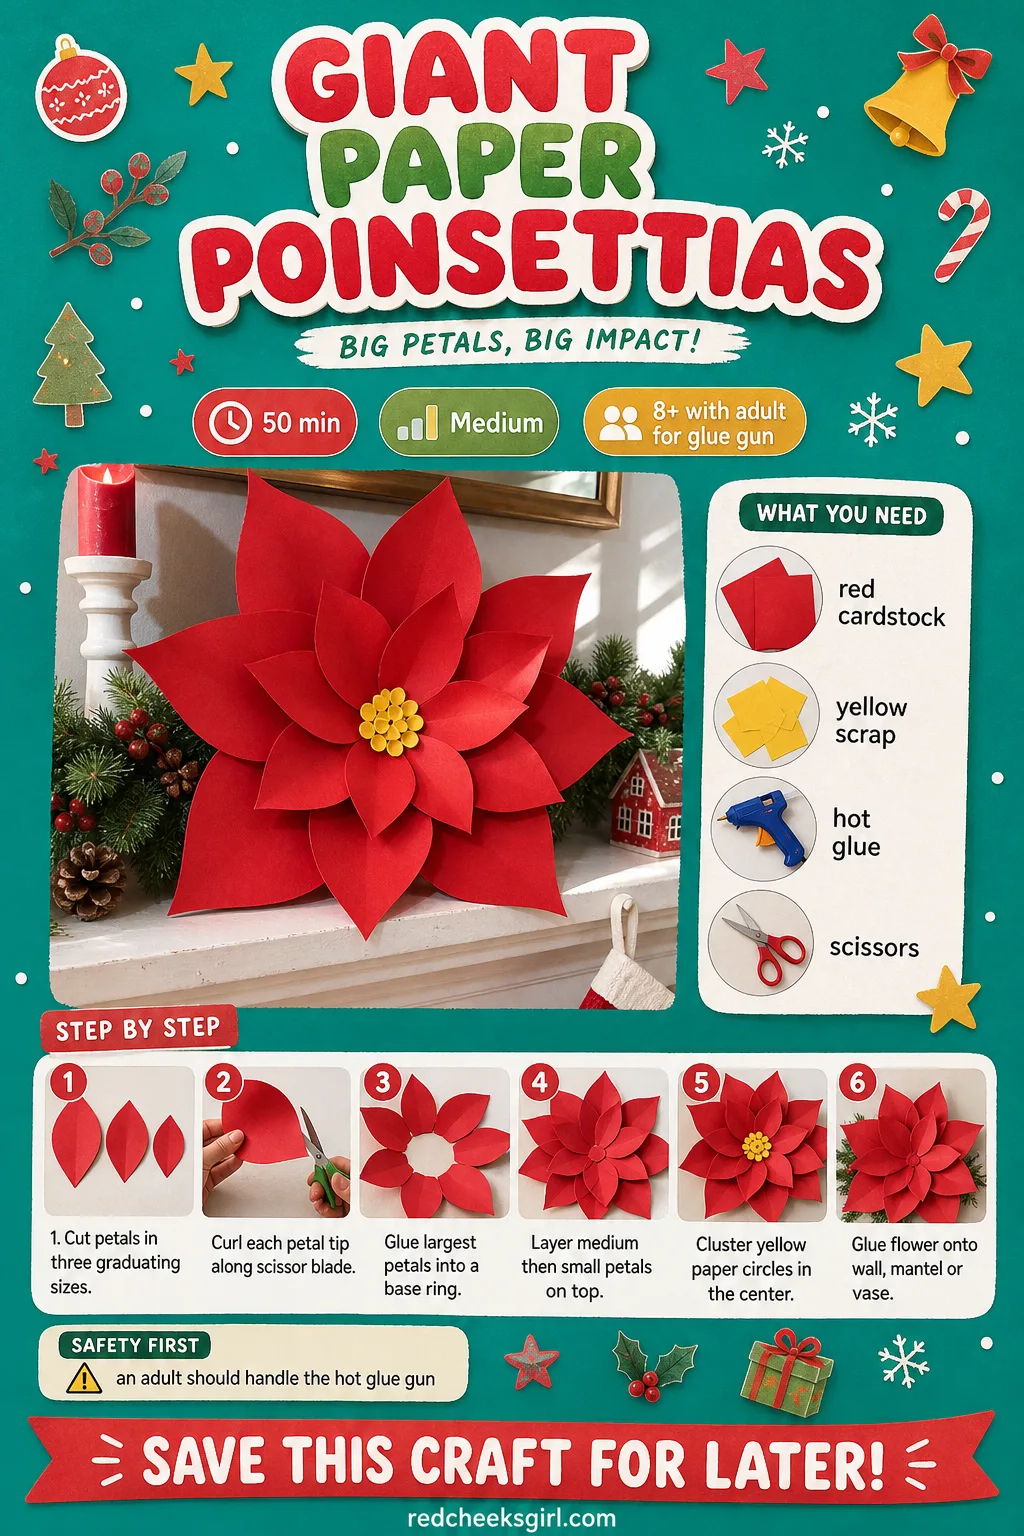
Giant Paper Poinsettias
A single oversized flower does more for a bare mantel than a dozen small ones, and this one is built from curled cardstock petals rather than anything that needs water. For smaller, paper versions of other blooms, the DIY Christmas flowers collection has more shapes to try.
What You Need
- 6 sheets red cardstock, A4, per flower
- 1 small scrap yellow cardstock
- 1 hot glue gun or craft glue
- 1 pair scissors, for curling edges
- 20cm floral wire, optional
How to Make It
- Cut petal shapes in three graduating sizes, roughly 15cm, 10cm and 6cm long, five of each size per flower.
- Curl each petal’s tip along the blunt edge of a scissor blade, the way you’d curl ribbon, for a gentle outward bend.
- Layer the five largest petals in a ring and glue their bases together at the center (an adult should run the hot glue gun, since petals need holding while it sets).
- Glue the medium petals on top in a smaller ring, offset between the gaps, then repeat with the smallest in the center.
- Snip tiny circles of yellow cardstock and cluster several in the middle to stand in for the flower’s true center.
- Glue the finished flower against a wall, lay it on the mantel, or wire a stem to the back and stand it in a vase.
🛍 Shopping guide
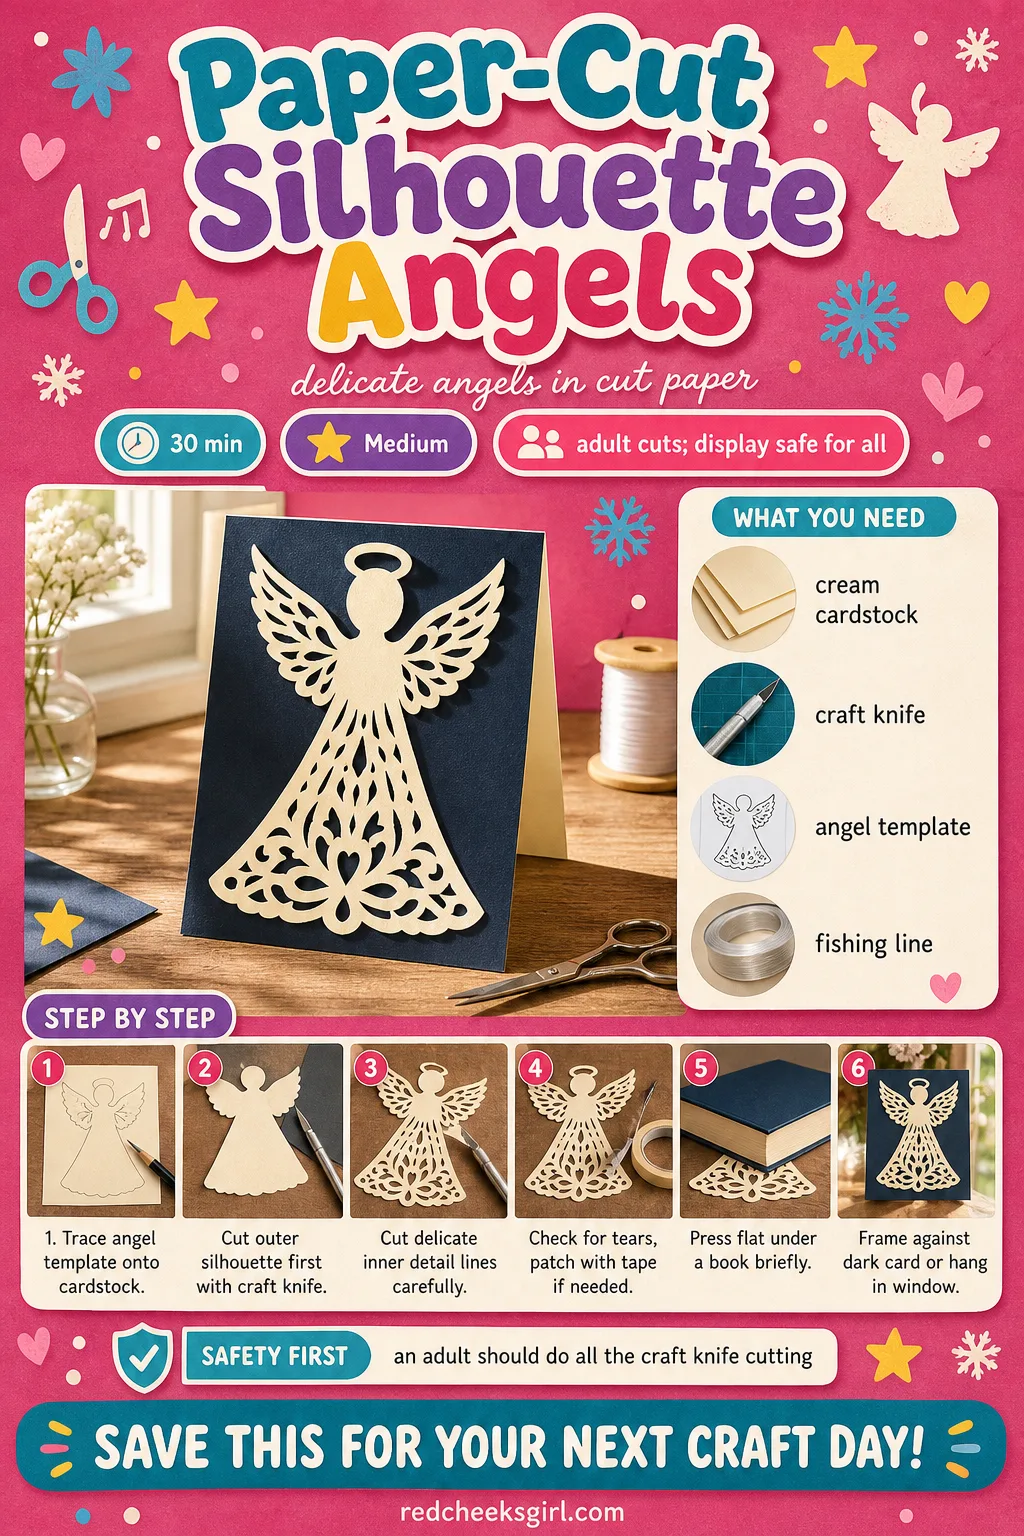
Paper-Cut Silhouette Angels
Framed against dark card or taped to a window with the light behind it, a hand-cut angel looks like something from a craft fair rather than a kitchen table, and the cutting is the only hard part.
What You Need
- 1 sheet cream or white cardstock, A5, per angel
- 1 craft knife and cutting mat
- 1 pencil and angel template
- 15cm fishing line, for hanging
How to Make It
- Trace or print an angel silhouette template onto the cardstock, including fine details like feather lines and robe folds.
- Cut around the outer silhouette first, then work inward on the delicate interior lines (an adult handles all of this, since fine lines tear easily and the blade needs full control).
- Lift the cutout gently, checking that no connecting threads of paper have snapped; patch any small tears on the back with a sliver of tape.
- Press the angel flat under a book for a few minutes if cutting has left it curled.
- Frame against a dark background so the cut lines show in silhouette, or tape a fishing line loop to the back and hang in a window.
- Store flat angels between the pages of a large book so they don’t crease before next year.
🛍 Shopping guide
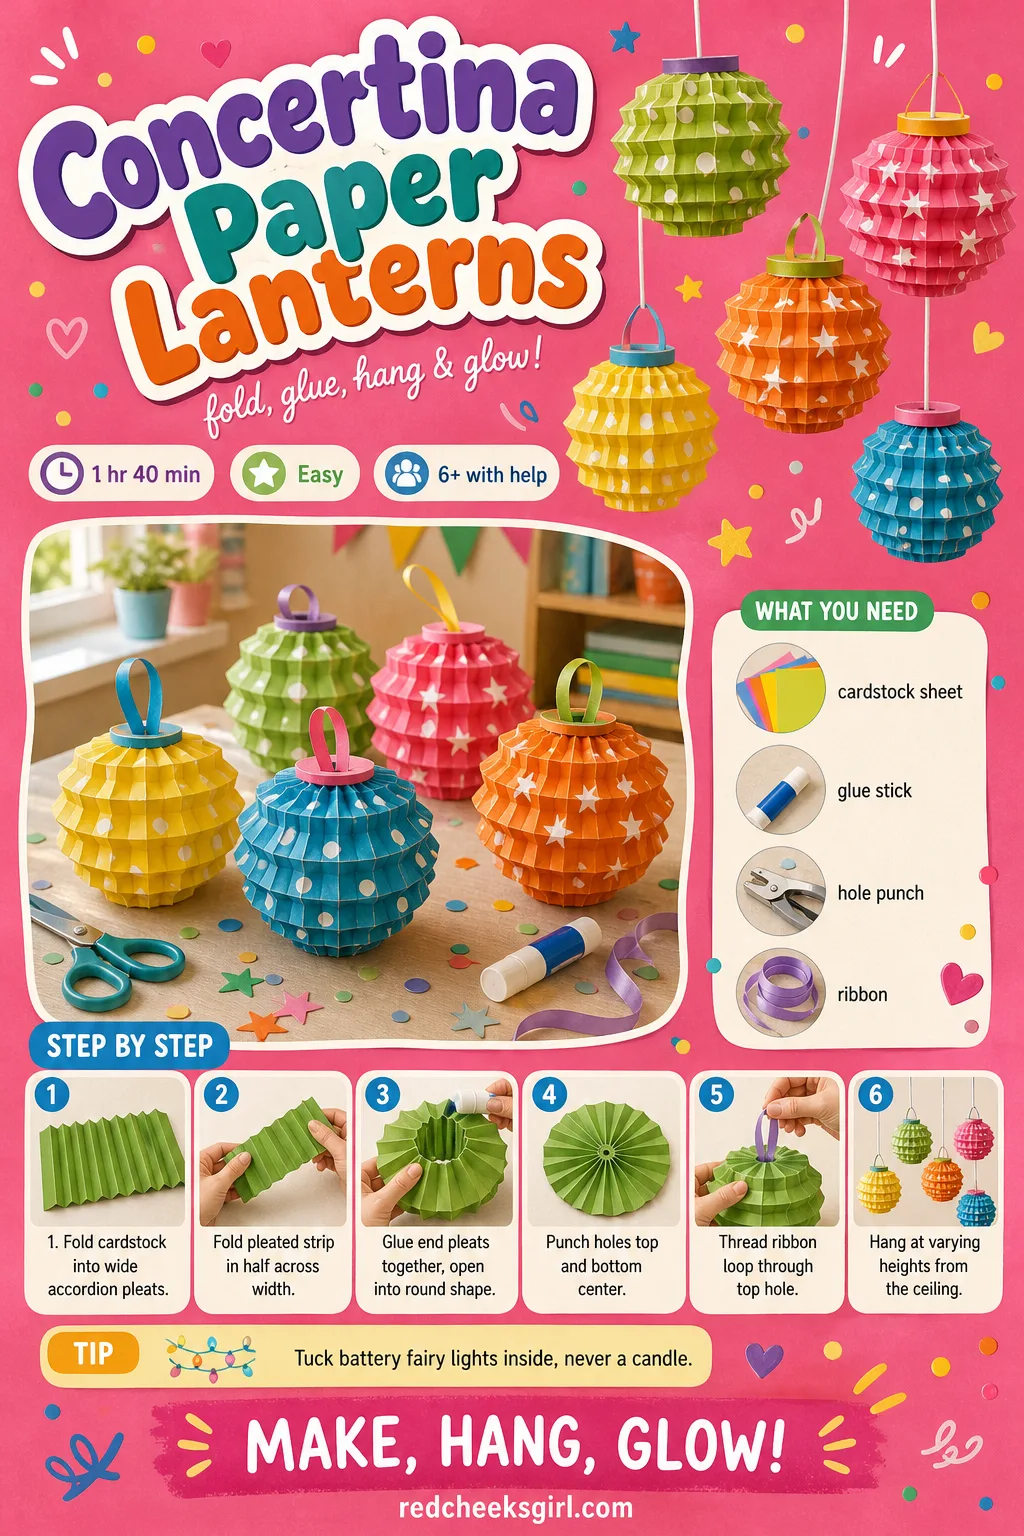
Concertina Paper Lanterns
Several of these at different heights above a party table do the job of expensive paper lanterns from a party shop, and they fold flat for storage, so nothing takes up a box all year for one evening’s use.
What You Need
- 1 sheet cardstock, 30cm x 45cm, per lantern
- 1 glue stick
- 1 hole punch
- 40cm string or ribbon, per lantern
How to Make It
- Fold the cardstock sheet into accordion pleats about 2cm wide across its longer side.
- Fold the whole pleated strip in half across its width so the short ends come together.
- Glue the two end pleats together, then open the strip into a round lantern shape, easing the pleats apart evenly.
- Punch a hole through the top center point and another through the bottom center point.
- Thread a loop of string through the top hole for hanging, knotting a small loop through the bottom if you want to weight it slightly.
- Hang several at different heights from a ceiling hook, with battery fairy lights tucked inside if you want them to glow, never a real flame.
🛍 Shopping guide
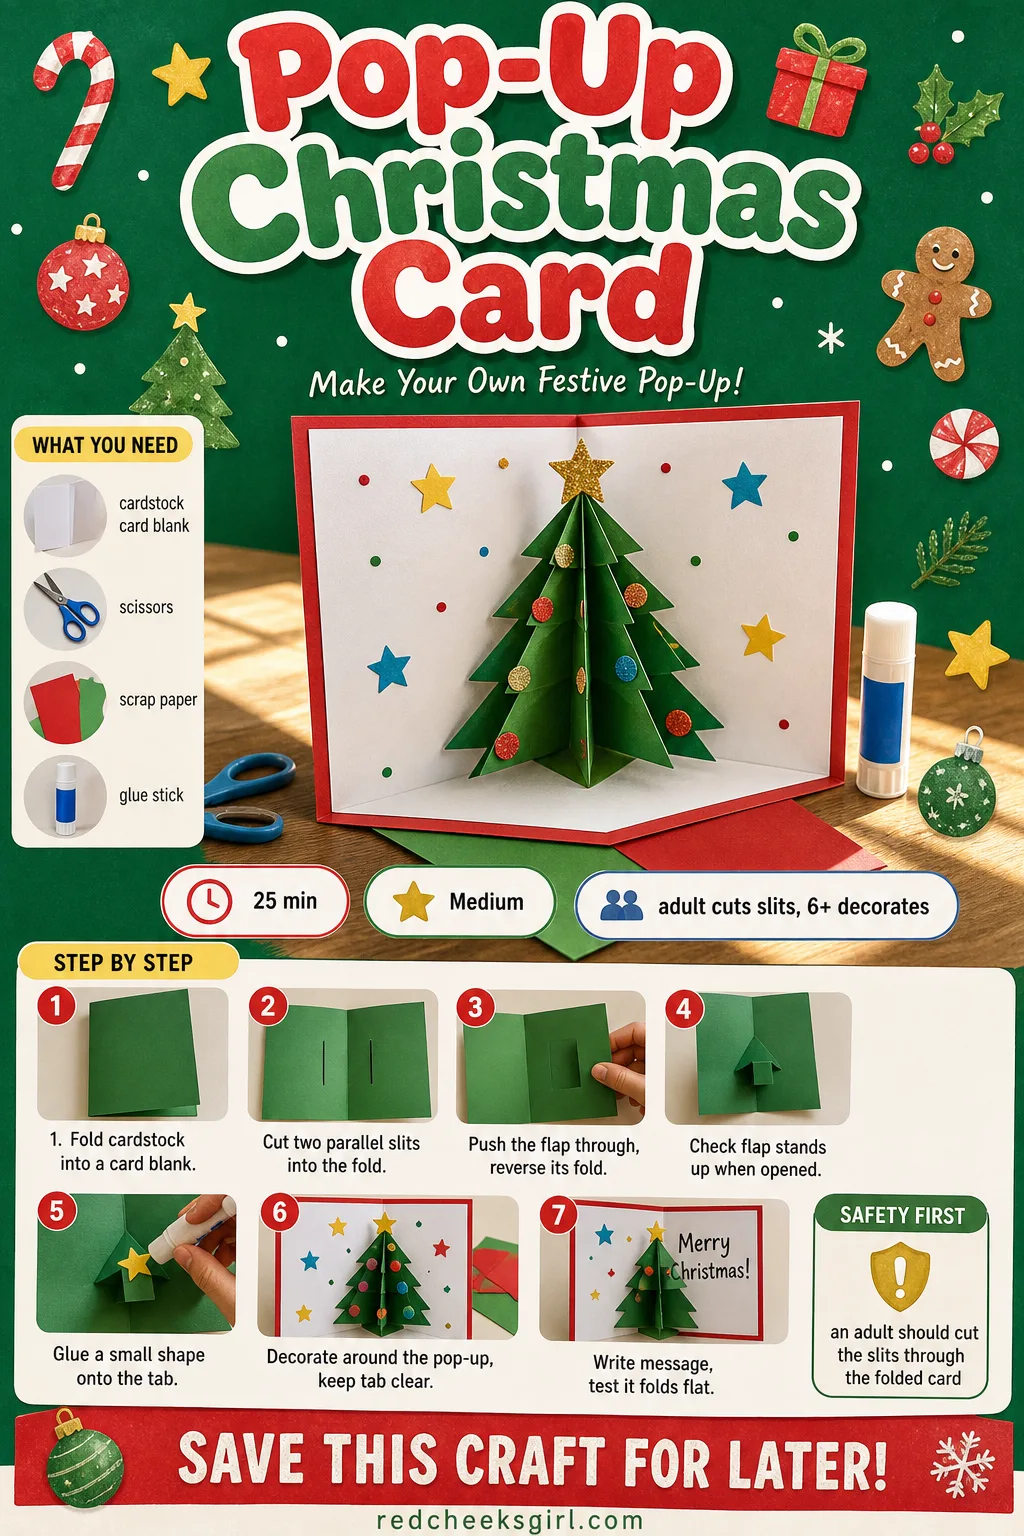
Pop-Up Christmas Card
A flat card gets opened and forgotten in a stack. One with a tree that pops up gets propped on a shelf and kept, which is the whole point of sending one in the first place.
What You Need
- 1 sheet cardstock, A5, folded in half
- 1 pair scissors and 1 craft knife
- scrap colored paper, for decorating
- 1 glue stick
How to Make It
- Fold the cardstock in half to make the card blank, then, with it still folded, cut two short parallel slits into the fold line about 3cm apart and 4cm long (an adult makes these cuts, since both layers of the fold need a steady hand).
- Push the small flap created between the two slits through to the inside of the card, reversing its fold so it pops forward when opened.
- Open the card flat and check the flap stands up on its own, forming a tab in the center of the inside page.
- Cut a small tree, star or gift shape from scrap paper, a touch smaller than the tab, and glue it onto the front of the standing tab.
- Decorate around the pop-up, keeping the area right around the tab clear so it still folds flat.
- Write a message inside, then close the card gently, testing that it folds flat without crushing the tab.
🛍 Shopping guide
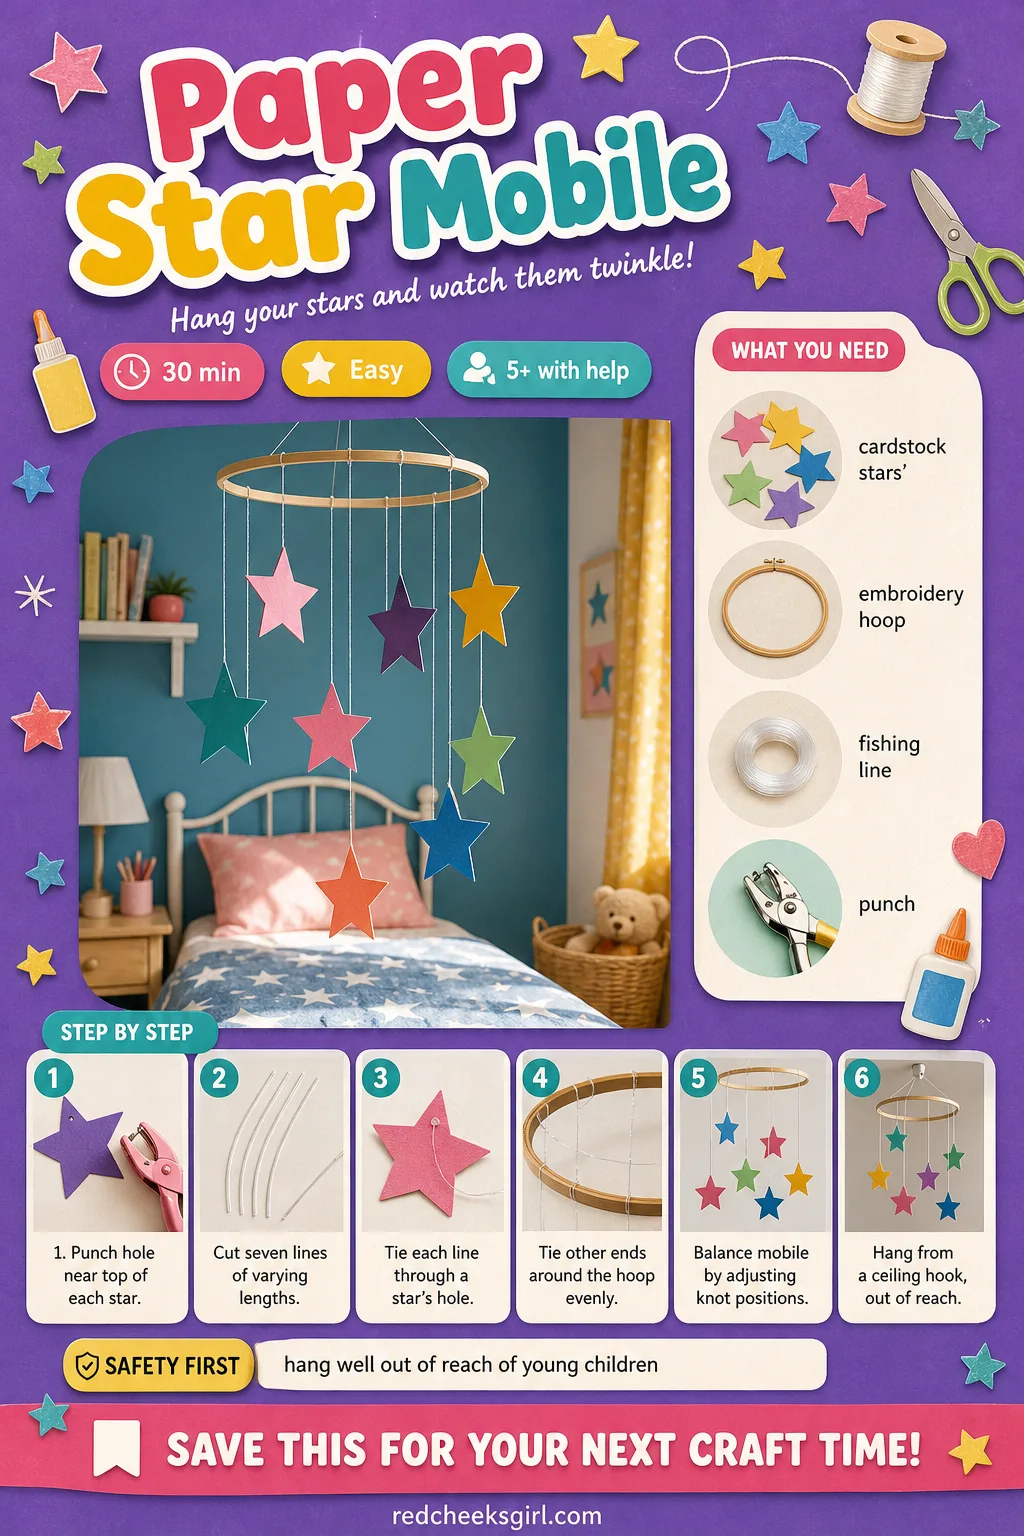
Paper Star Mobile
Over a bed or a reading corner, a mobile of staggered stars moves gently in the draft from the door, which a flat wall decoration never does. It is forgiving to make since no two stars need to hang at the same height.
What You Need
- 7 cardstock stars, precut, assorted sizes and colors
- 1 embroidery hoop, 20cm, or two crossed dowels
- 7 lengths fishing line, 20cm to 40cm
- 1 hole punch
How to Make It
- Punch a small hole near the top point of each star.
- Cut seven lengths of fishing line, varying from 20cm to 40cm so the stars hang at different heights.
- Tie one end of each line through a star’s hole with a small knot.
- Tie the other end around the embroidery hoop, spacing the attachment points evenly around the circle.
- Balance the mobile by hand, sliding the knots around the hoop until it hangs without tipping.
- Hang the finished mobile from a ceiling hook, well out of reach of anyone who might pull on the strings.
🛍 Shopping guide
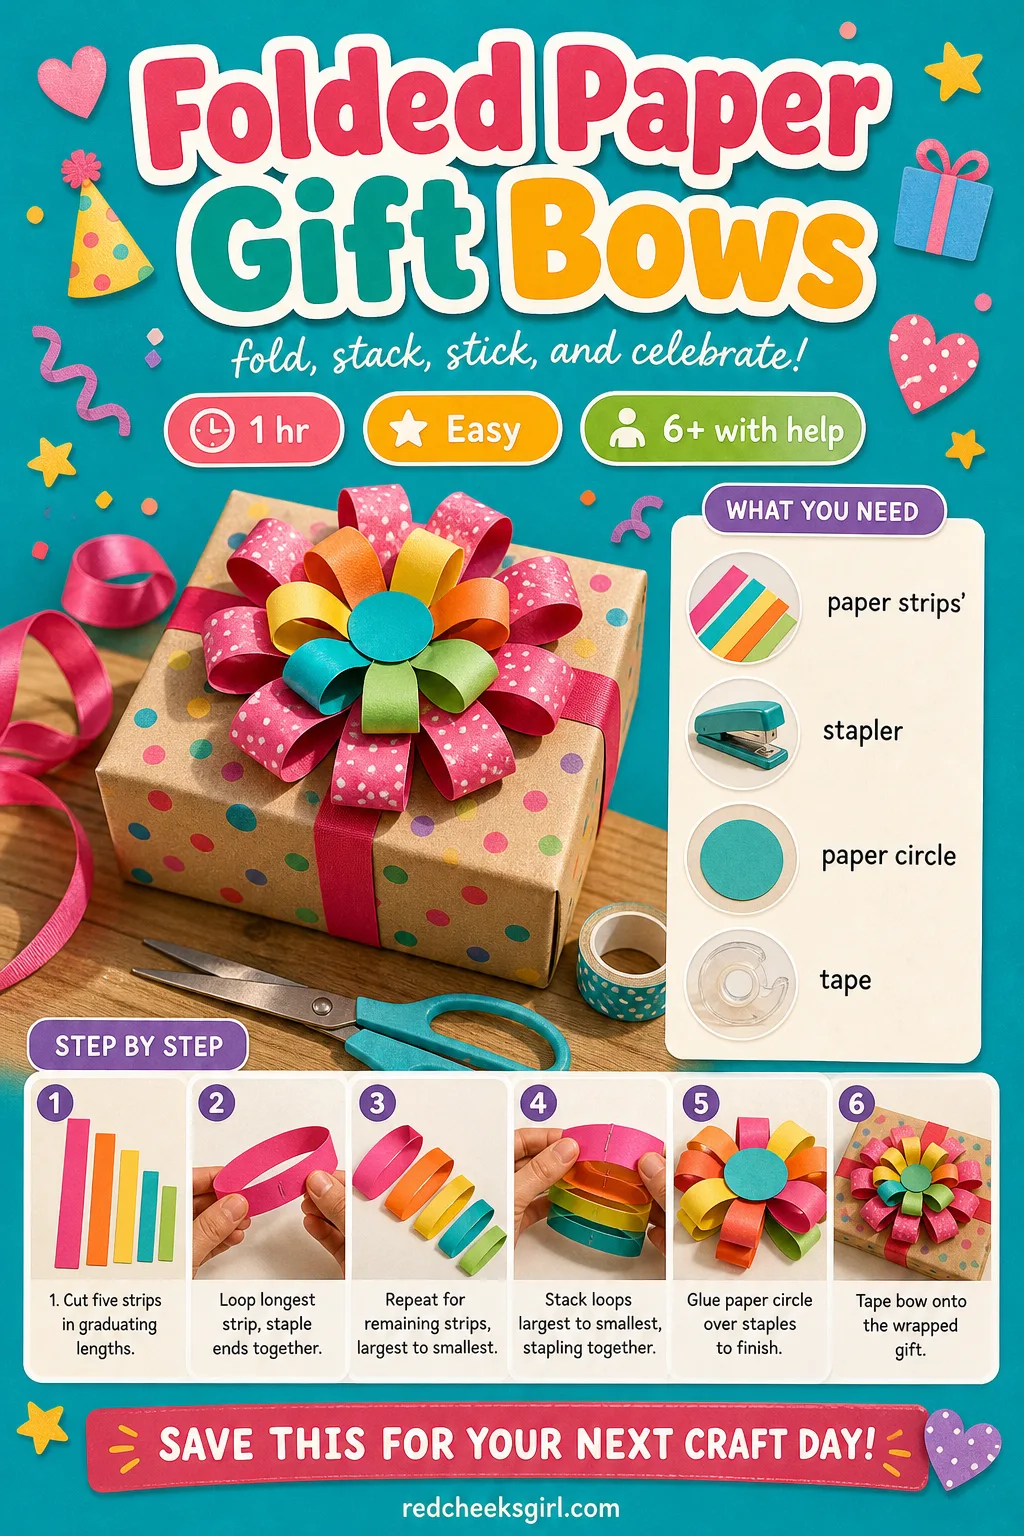
Folded Paper Gift Bows
A roll of ribbon bow costs more than the paper it sits on. Looped strips stapled into layers do the same job in fifteen minutes and use up every leftover scrap of wrapping paper in the drawer.
What You Need
- 5 strips patterned paper per bow, 2cm wide, 10cm to 20cm long
- 1 stapler
- 1 small paper circle, 3cm, for the center
- double sided tape
How to Make It
- Cut five strips in graduating lengths, the longest about 20cm and the shortest about 10cm, all 2cm wide.
- Take the longest strip and loop it into a teardrop shape, bringing both ends together at one point, then staple them in place.
- Repeat for each strip down to the shortest, making five loops of decreasing size.
- Stack the loops from largest to smallest, stapling each new loop directly on top of the staple point of the one before.
- Glue or tape the small paper circle over the stacked staples to finish the center neatly.
- Stick the finished bow to the top of a wrapped gift with double sided tape on the back.
🛍 Shopping guide
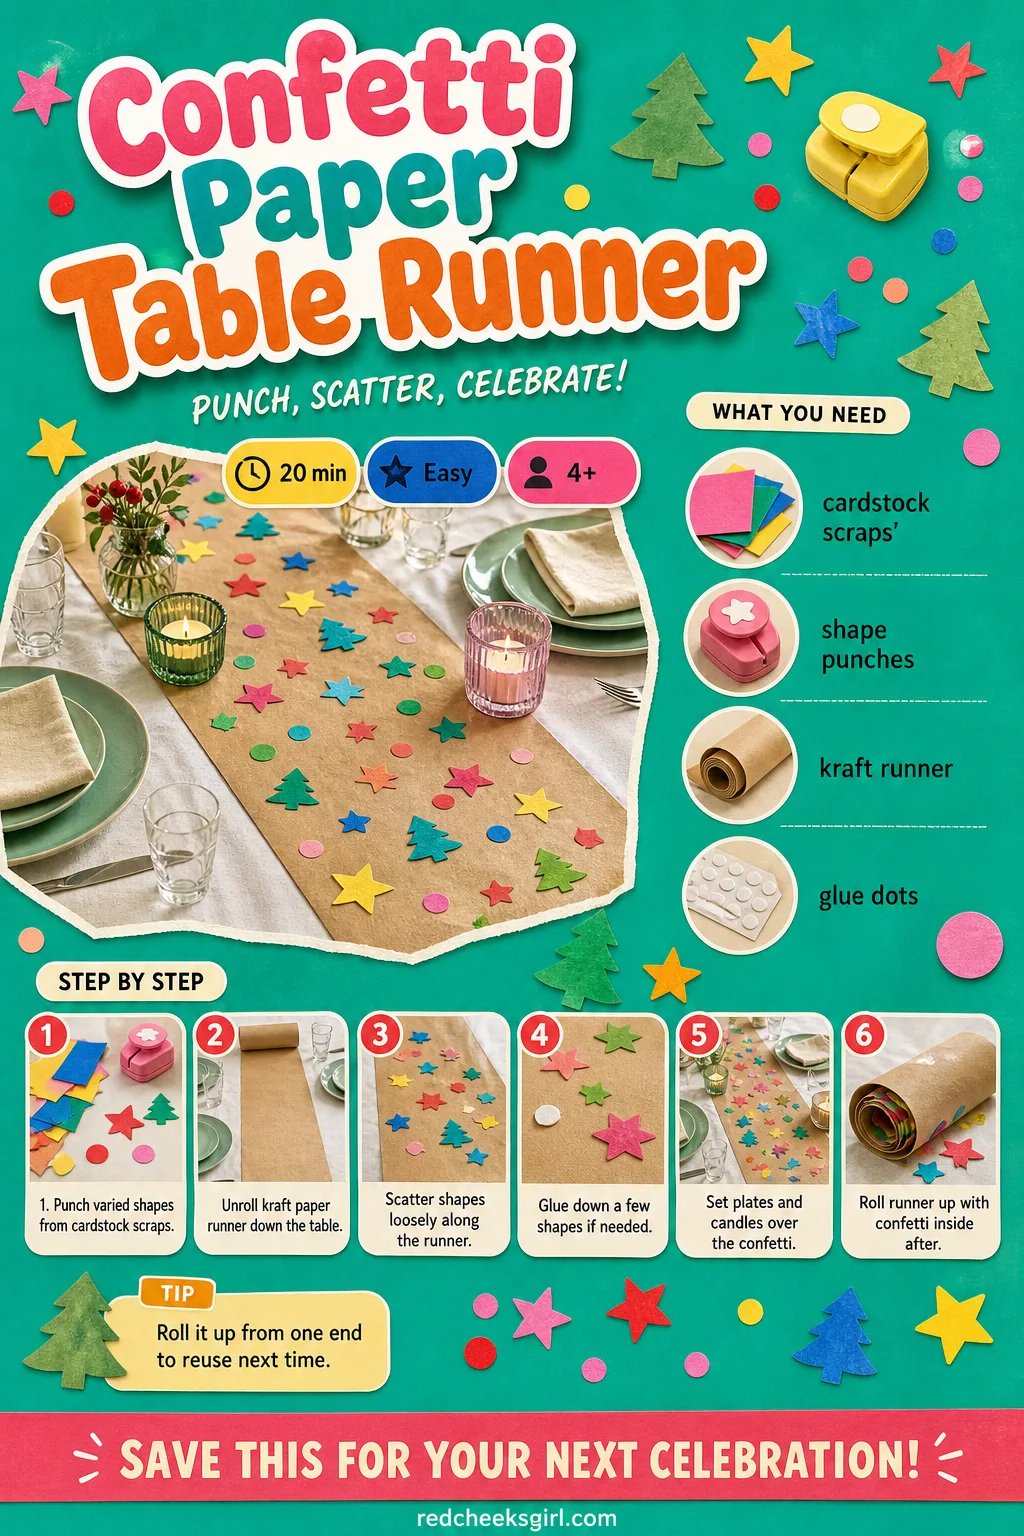
Confetti Paper Table Runner
A plain kraft runner reads as a placeholder until punched shapes scatter down the center, at which point it looks deliberately styled. Roll it up afterwards, confetti and all, and it is ready to reuse without a single sweep of the floor.
What You Need
- cardstock scraps, assorted colors
- 3 shape punches: star, tree, holly
- 1 kraft paper table runner roll, 3m
- small glue dots
How to Make It
- Punch a generous pile of shapes from the cardstock scraps, mixing stars, trees and holly so the pile looks varied.
- Unroll the kraft paper runner down the center of the table and smooth it flat.
- Scatter the punched shapes loosely along the runner, clustering some and leaving gaps elsewhere so it reads as confetti.
- If the table will be bumped a lot, fix a few shapes down with glue dots, leaving most loose for texture.
- Set plates, candles or small greenery on top so the confetti peeks through between place settings.
- After the meal, roll the runner up from one end with the confetti still inside, ready to reuse or simply bin.
🛍 Shopping guide
Frequently Asked Questions
What is the best paper for Christmas paper crafts?
Cardstock around 200 to 300gsm holds a fold and stands up on its own, which suits stars, trees and wreaths. Lighter printer paper works fine for snowflakes and chains, and tissue paper is the right weight for anything meant to fan out softly, like pom-pom baubles.
How do you make a 3D paper snowflake?
Fold paper into a tight triangle through repeated halving and one diagonal fold, cut notches along the folded edges without cutting through every fold line, then open it slowly from the center. Pressing it flat under a book for a few minutes helps it sit properly once unfolded.
Can paper Christmas decorations be reused next year?
Most of them, yes, if stored flat rather than squashed in a bag. Garlands, doilies and gift tags keep well in a flat folder or shallow box, while anything with curled or 3D petals does better standing upright in a lidded box so nothing crushes.
What age can children start making Christmas paper crafts?
Simple folding and gluing, like paper chains or cone shapes, suits children from about 4 upward with a little guidance. Anything involving a craft knife, hot glue gun, or brass paper fasteners needs an adult to handle that specific step, even if a child manages the rest.
Are paper decorations safe near candles and lights?
Paper should never sit near an open flame, which is why luminaries and lanterns in this list use battery LED tealights or fairy lights rather than real candles. Keep any paper decoration a sensible distance from hot bulbs on a string of lights too.
How long do homemade paper Christmas crafts actually take?
Most of the quicker makes here, like gift tags or a paper chain, take 15 to 30 minutes start to finish. The slower ones, like a paper mache star or a wreath full of rolled roses, trade a longer stretch of drying or assembly time for a much bigger finished piece.

Christmas eve party games that wind down, not up: 8 free printables plus 5 no-prep ideas to carry ki
20 Christmas arts and crafts for kids ages 6 to 10, grouped by ornaments, decor, gifts and wall art,

18 low-mess school Christmas party games for any elementary grade — whole-class, easy cleanup, tea
Leave a Reply