

12 Christmas Button Crafts With Button Trees, Wreaths and Colorful Ornaments
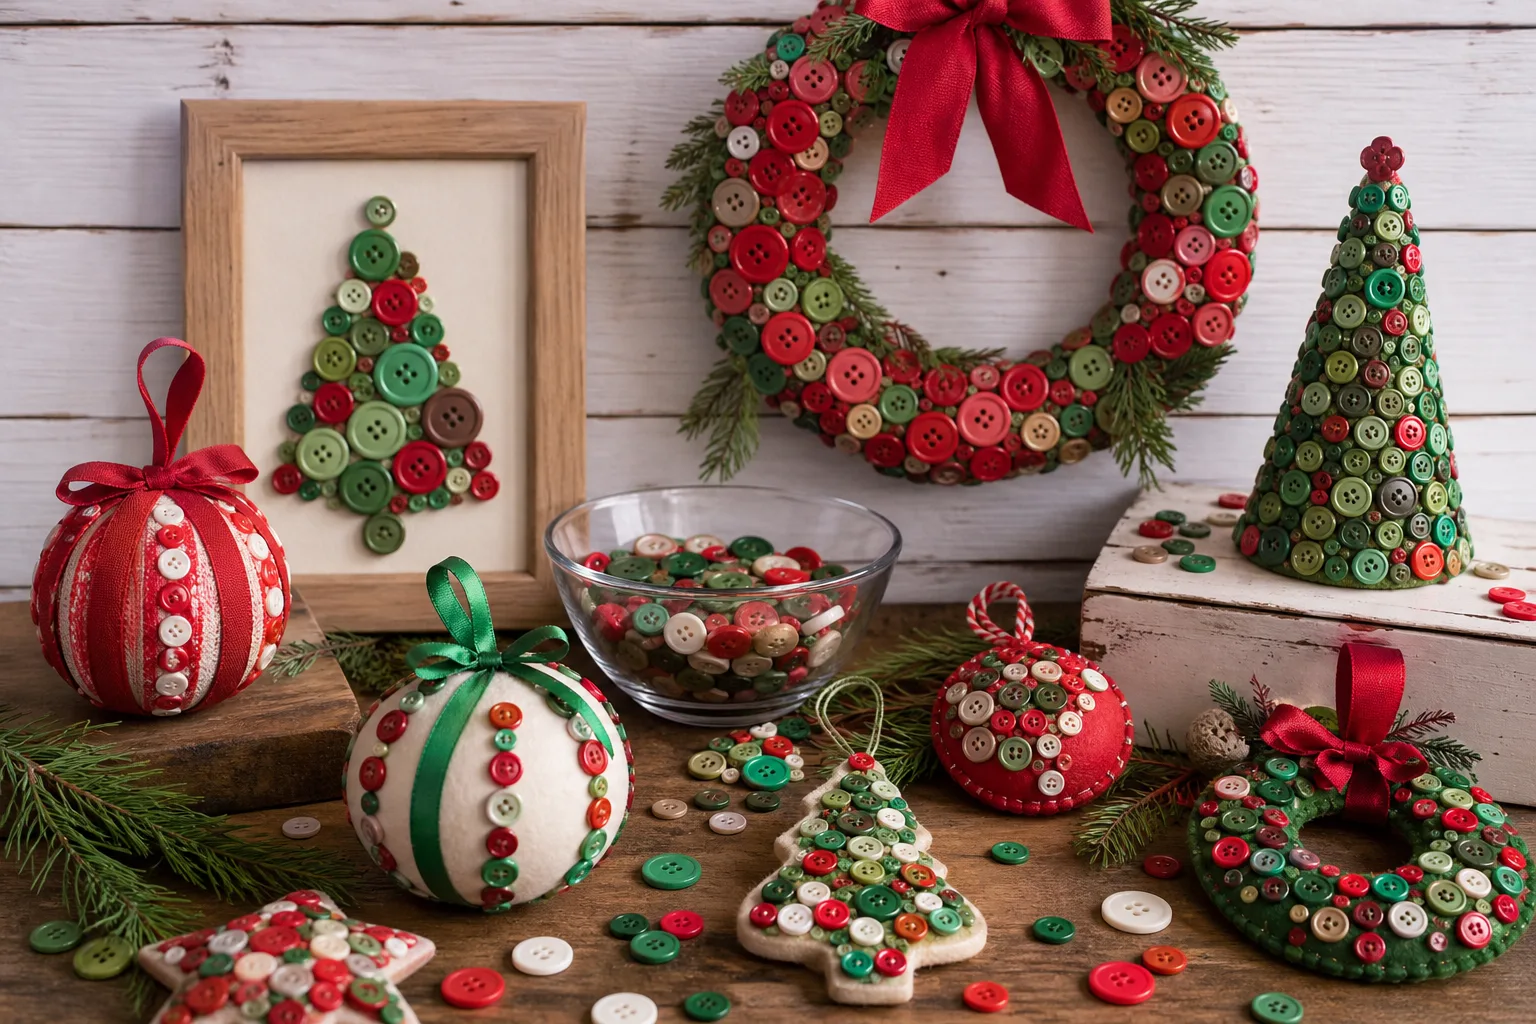
That tin of mismatched buttons at the back of the sewing drawer is not clutter, it is a whole season of decorating waiting to happen. Buttons cost almost nothing, they do not shed like glitter, and a jar of them in red, green and gold looks festive before you have even glued one down.
The twelve projects below use buttons in genuinely different ways: strung on wire, hot glued to foam, stacked on a pipe cleaner, stitched along twine. Some are a ten minute fix for a bare gift, others fill a slow afternoon with a child at the table. Every one tells you exactly what to buy, how long the glue needs and what an adult should handle.
This post contains affiliate links. If you buy through them, I may earn a small commission at no extra cost to you.
- Button Christmas Tree Wall Art
- Strung Button Christmas Tree Ornament
- Button Christmas Wreath
- Stacked Button Snowman Ornament
- Button Garland for the Mantel
- Button Christmas Gift Tags
- Button Christmas Cards
- Button Snowflake Ornament
- Button Candy Cane Ornament
- Button Star Tree Topper
- Button Napkin Rings
- Button Fridge Magnets
- Frequently Asked Questions
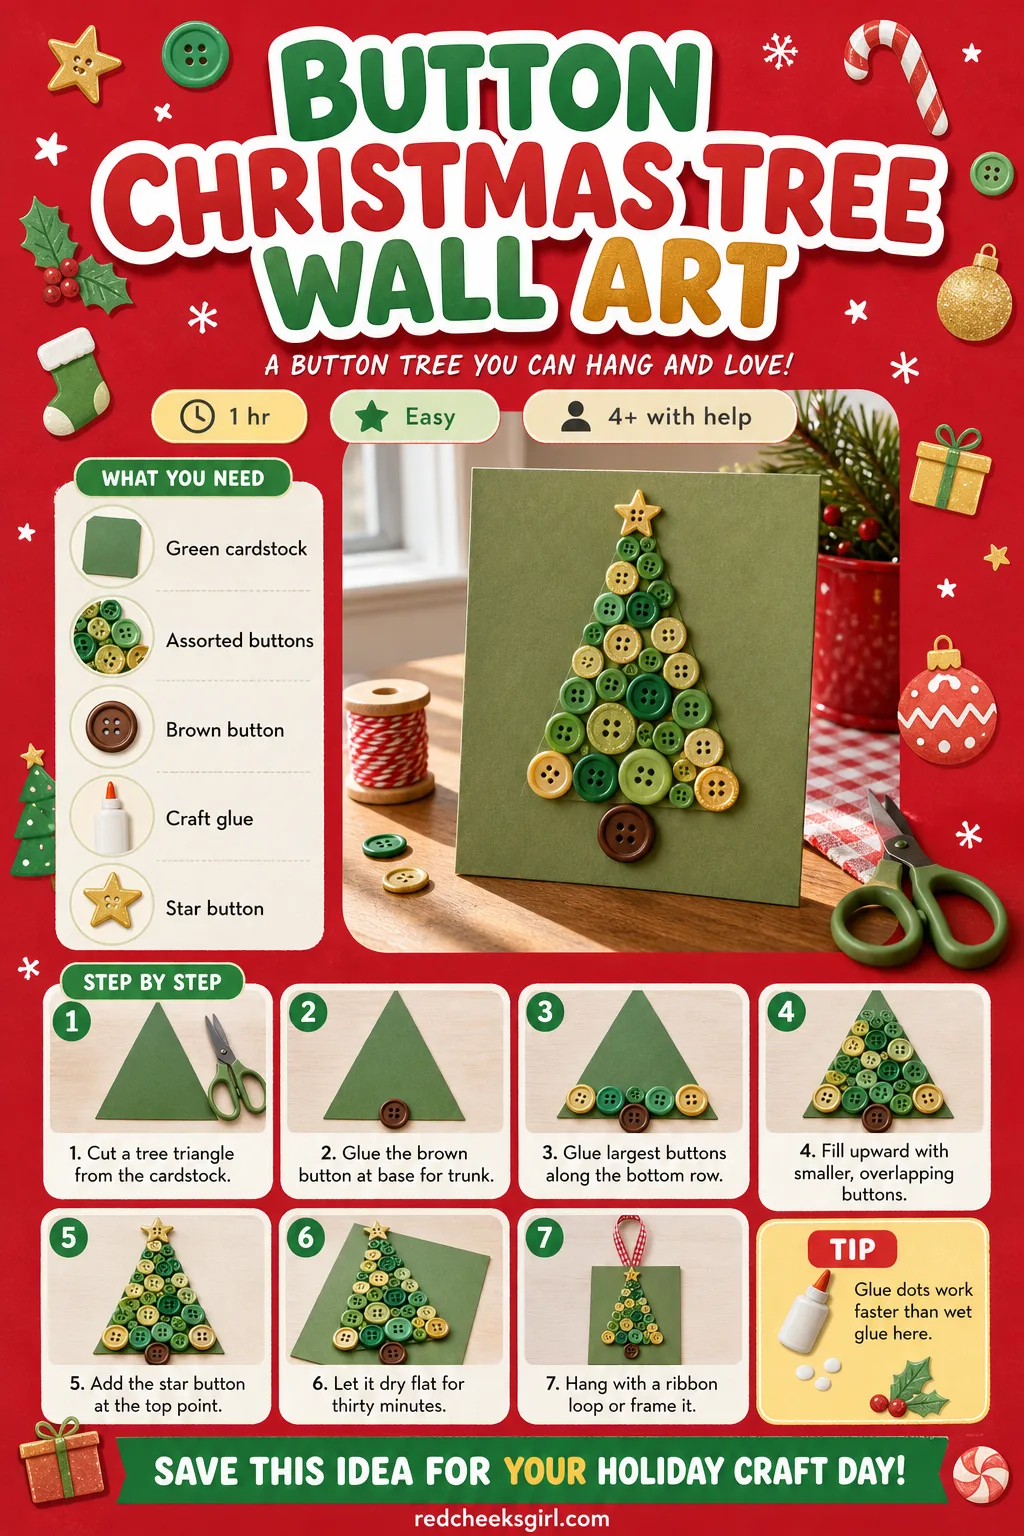
Button Christmas Tree Wall Art
A bare wall by the stairs or above the console table is begging for something that is not another string of lights. A button tree, flat and framed, gives you the shape of Christmas without a single needle to vacuum up in January, and it works even in a rented flat where nothing can go through the plaster. For more ways to fill vertical space, the wall and alternative Christmas tree ideas round-up is worth a look if floor space is the real problem.
Finished, it looks like a proper mosaic: a solid triangle built from dozens of small discs, textured rather than flat green. It costs almost nothing if you already have a buttons jar, and a bag of mixed craft buttons covers the rest.
What You Need
- 1 sheet green cardstock or foam board, A4 size (or an 8 x 10 inch canvas panel)
- 150 to 200 assorted buttons in green, red and gold, mixed sizes
- 1 brown button or small felt rectangle for the trunk
- Craft glue or glue dots
- 1 star button or small star bead for the top
- Pencil and ruler
How to Make It
- Draw and cut a tree triangle from the cardstock, about 8 inches tall.
- Glue the brown button or felt rectangle at the base for the trunk.
- Glue the largest buttons along the bottom row first.
- Work upward, filling in with smaller buttons, overlapping the edges slightly so no cardstock shows.
- Add the star button or bead at the very top point.
- Let the whole piece dry flat for 30 minutes before moving it.
- Hang it with a ribbon loop on the back or slot it into a frame.
Strung Button Christmas Tree Ornament
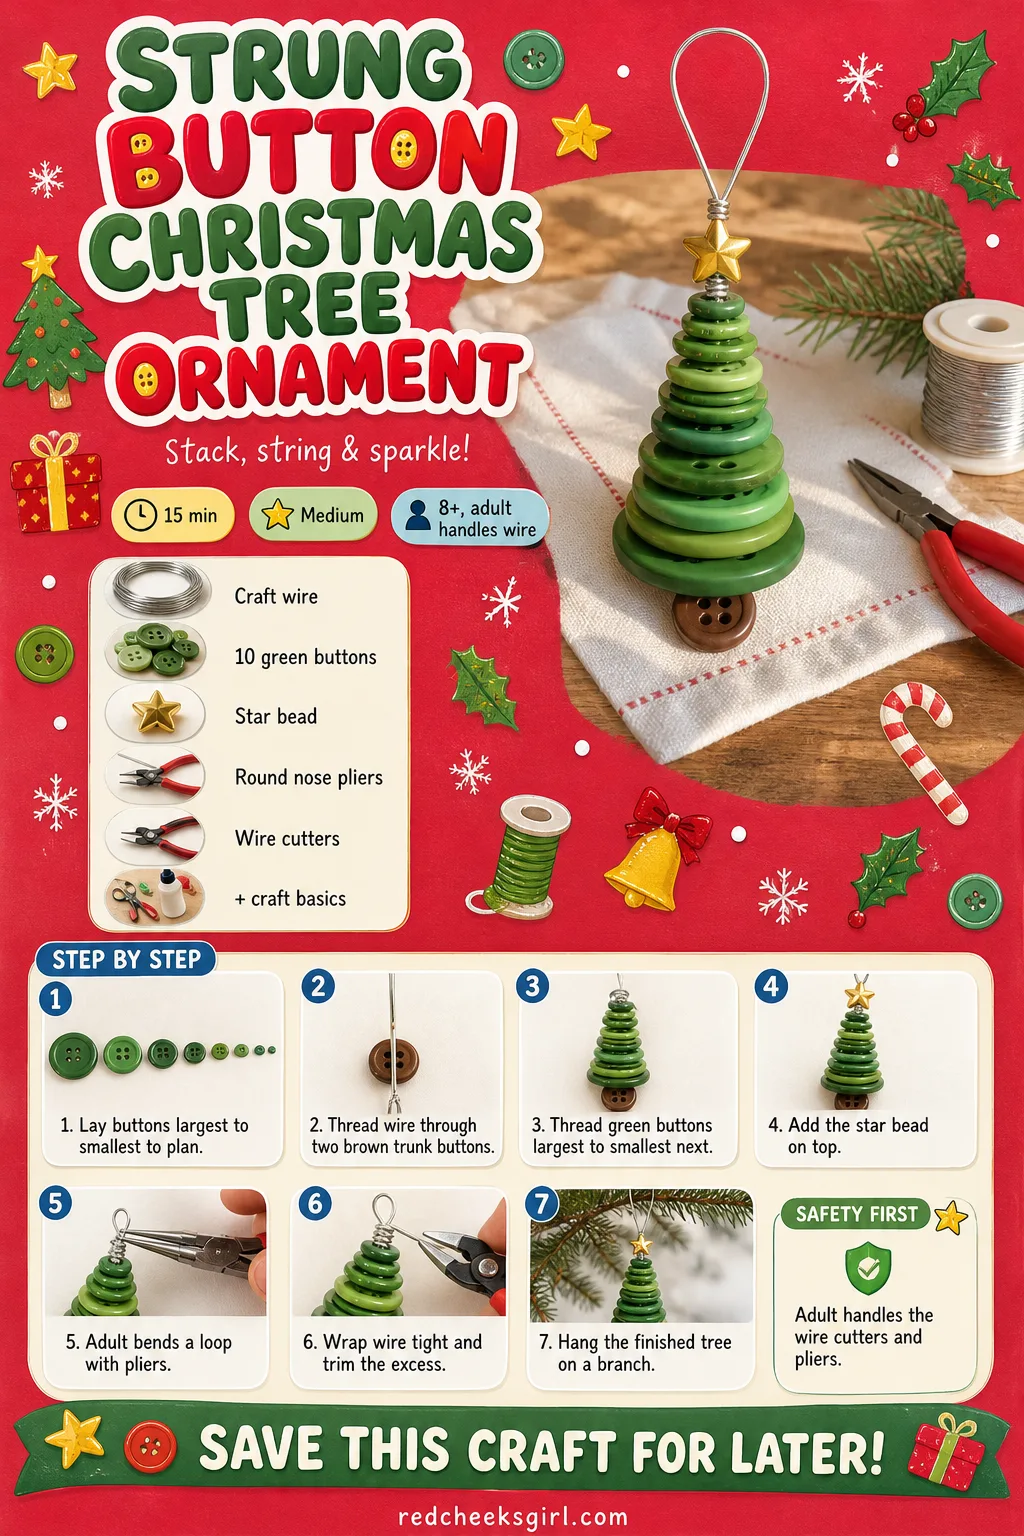
If the tree feels a little heavy on mass produced glass, a handful of these strung button trees fixes it without touching the budget. Each one takes buttons already in the house, stacked from largest to smallest on a short length of wire, so no two ever look quite the same.
Finished, it reads as a tiny, slightly wonky Christmas tree you could balance on a fingertip, with a bead or star at the top catching the light. Store them flat in a shoebox between seasons so the wire does not bend out of shape.
What You Need
- 1 length 20-gauge craft wire, 10 inches (24 gauge or similar)
- 10 to 12 green buttons, graduating from 1.5 inches down to 0.5 inches
- 2 to 3 small brown buttons for the trunk
- 1 star bead or star button for the top
- Round-nose pliers
- Wire cutters
How to Make It
- Lay the buttons out largest to smallest first to plan the shape before threading anything.
- Thread the wire through two holes of the brown trunk buttons and push them to one end.
- Thread the green buttons on next, largest to smallest, sliding each one down snugly against the last.
- Add the star bead or button right at the top.
- An adult bends a small loop in the wire above the star using round-nose pliers.
- Wrap the wire tail tightly around the base of the loop, then trim the excess with wire cutters.
- Hang the finished tree on a branch by its loop.
🛍 Shopping guide
Button Christmas Wreath
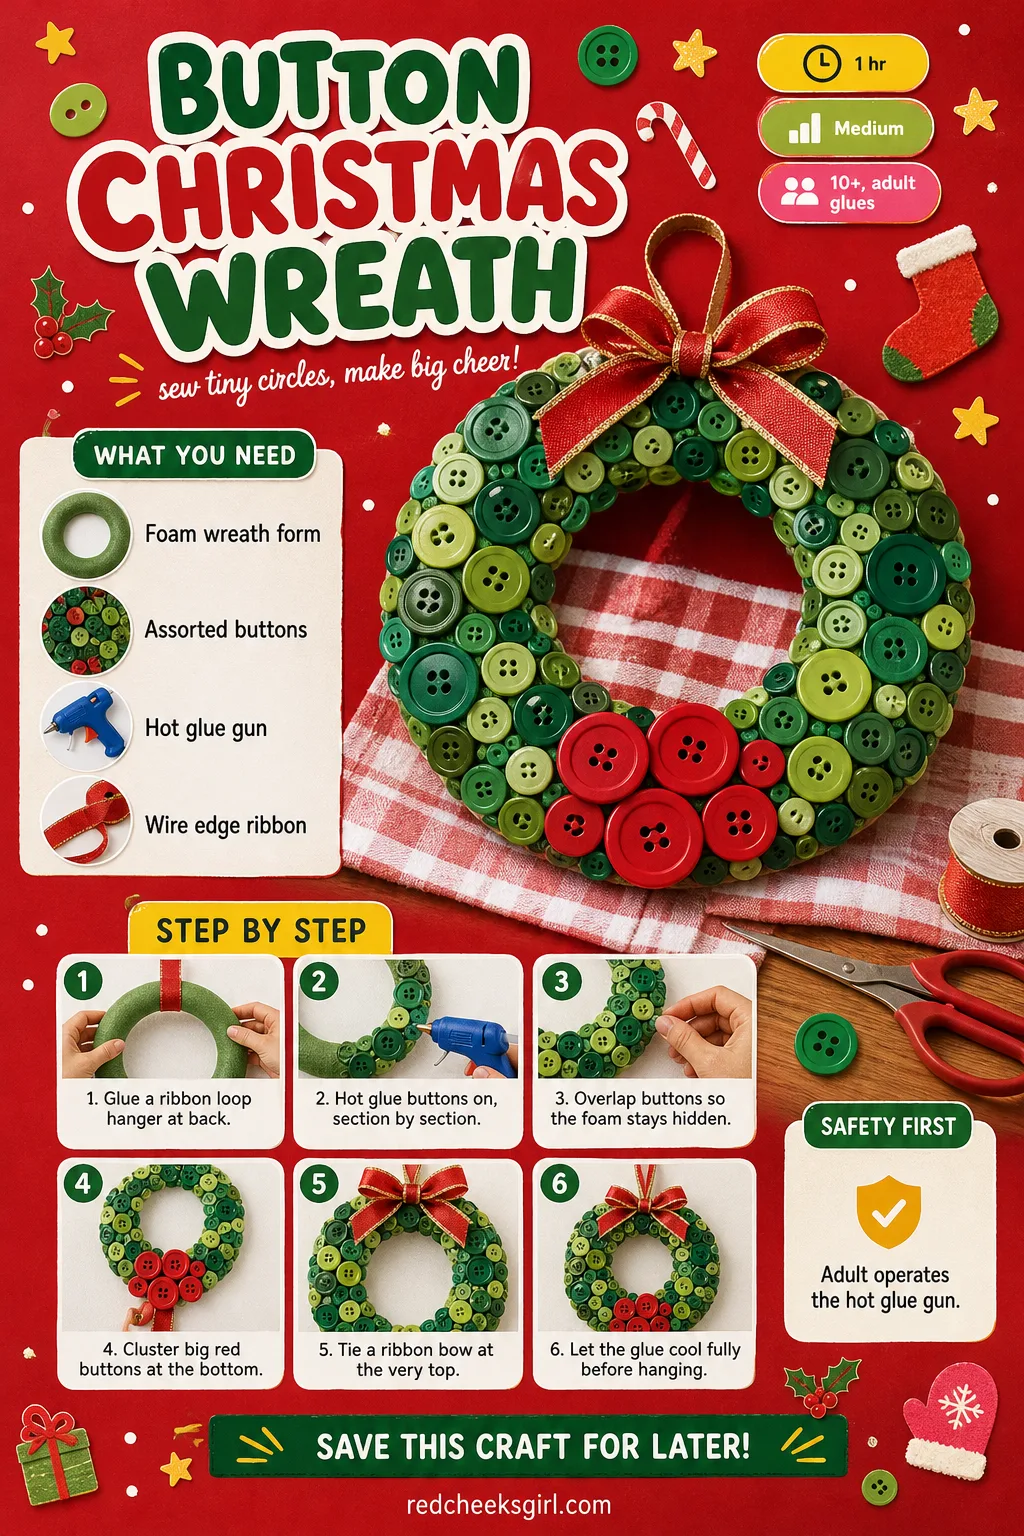
A plain foam wreath always looks like it is waiting for something, and a few hundred buttons is exactly what it was waiting for. Hung on the front door it reads as a proper, considered wreath, not a craft project, with none of the dried-flower upkeep a real one demands. If pattern and color are more her thing than texture, the colorful Christmas wreaths round-up has plenty of shade combinations to borrow for the button palette.
It takes the better part of an hour with a hot glue gun, which is the one genuinely fiddly part: work in small patches so the glue does not set before the button goes down. Store it flat in a box, not hanging, so nothing pops off over the summer.
What You Need
- 1 foam wreath form, 10 inches
- 2 bags assorted craft buttons, about 300 count each, red and green mix
- Hot glue gun and glue sticks
- 1 yard wire-edge ribbon, 2.5 inches wide
How to Make It
- An adult hot glues a ribbon loop to the back top of the wreath to use as a hanger.
- Working in small sections, hot glue buttons onto the foam, pressing each one firmly for a few seconds.
- Overlap buttons so no foam shows through, alternating colors and sizes as you go for texture.
- Continue all the way around until the whole form is covered.
- Cluster several large red buttons at the bottom to look like berries.
- Tie the ribbon into a bow at the top, trim the ends at an angle, and hot glue it in place.
- Let the glue cool fully, about 20 minutes, before hanging on the door.
Stacked Button Snowman Ornament
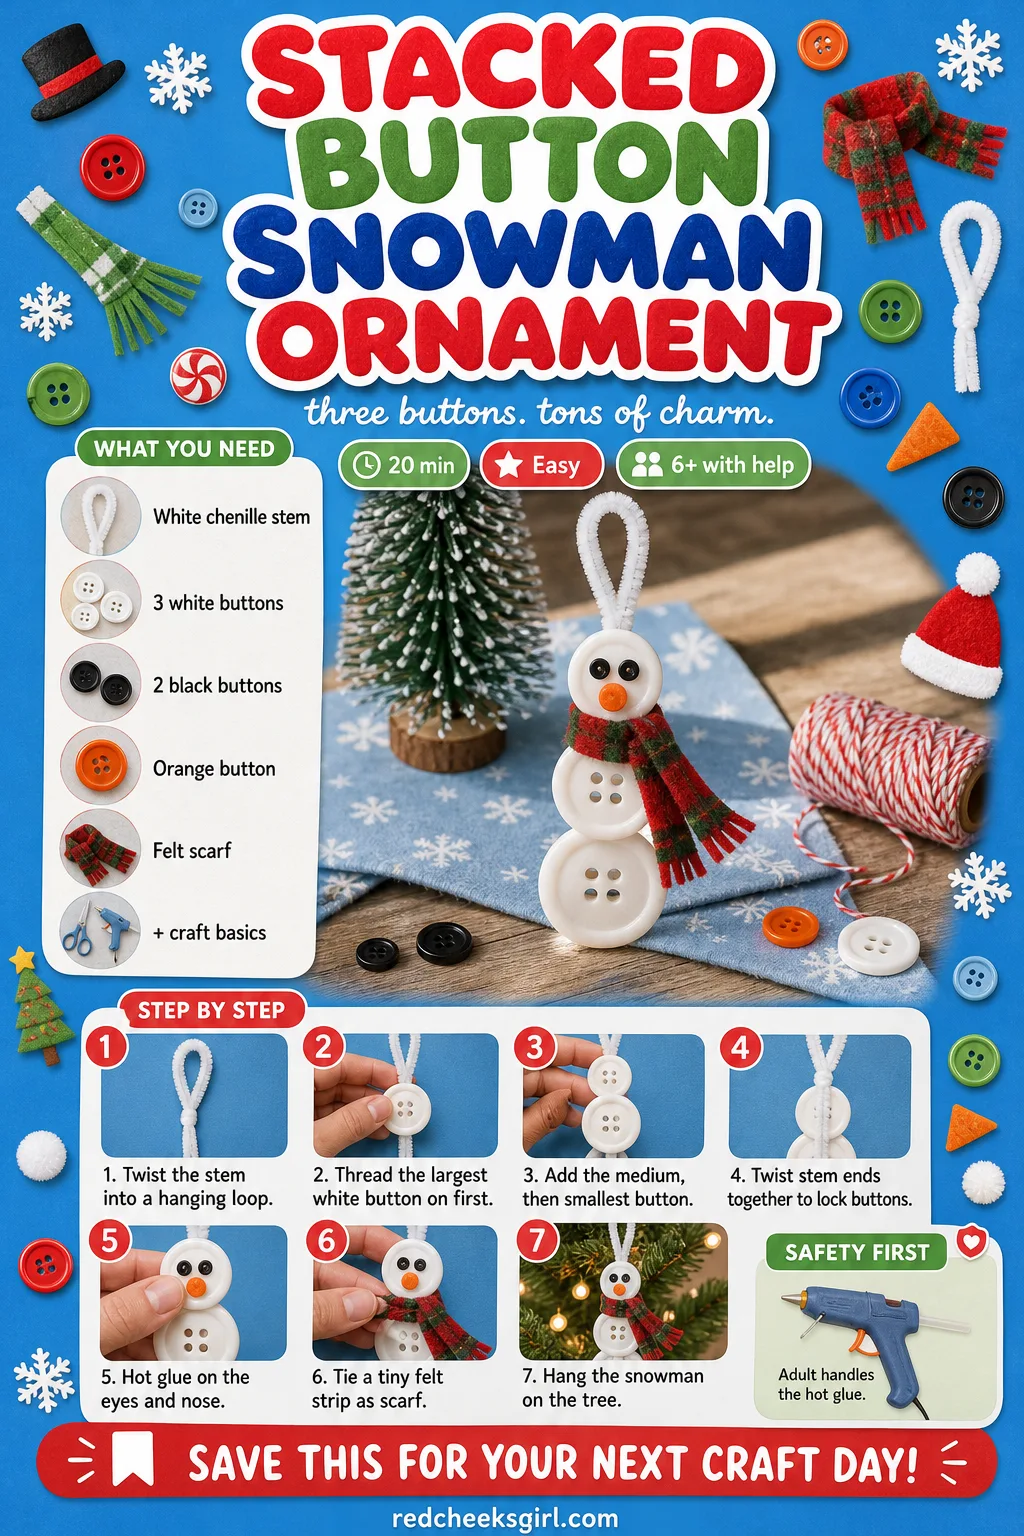
Three buttons and a pipe cleaner sound like nothing, and that is rather the point: this is the one to hand a child when the tree needs ten more ornaments by Friday. Finished, it is unmistakably a snowman, round and a little lopsided, with a scrap of plaid for a scarf.
It costs almost nothing and takes twenty minutes start to finish, no drying time to wait out. Hang several in slightly different sizes along a bookshelf or the tree for a small crowd of them.
What You Need
- 1 white chenille stem (pipe cleaner), 6 inches
- 3 white buttons, graduating 1.5, 1.25 and 1 inch
- 2 tiny black buttons for eyes
- 1 small orange button for the nose
- 1 strip plaid felt, 1 x 6 inches, for the scarf
- Hot glue gun
How to Make It
- Fold the chenille stem in half and twist the top to shape a small hanging loop.
- Thread both stem ends through the holes of the largest white button and push it to the bottom.
- Add the medium button, then the smallest, sliding each one up snugly.
- Twist the stem ends together just above the top button to lock everything in place, then trim any excess.
- An adult hot glues the two black buttons on for eyes and the orange button for a nose.
- Tie the felt strip around the neck between the top and middle buttons as a scarf.
- Hang the finished snowman on the tree.
🛍 Shopping guide
Button Garland for the Mantel
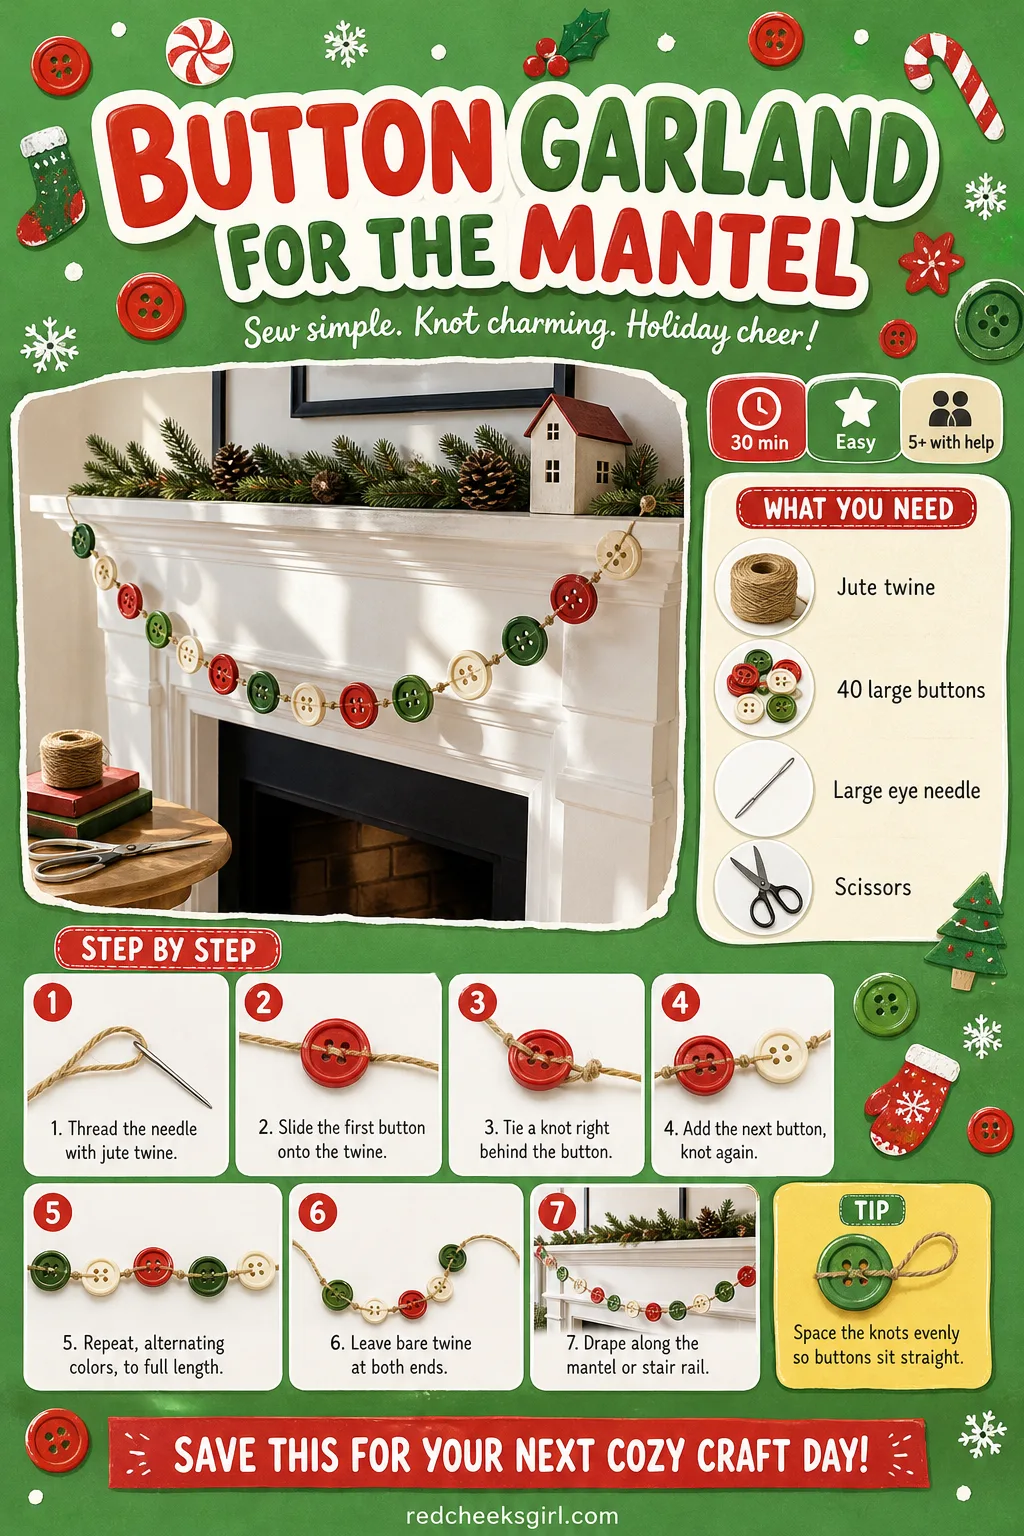
A mantel with nothing but a string of fairy lights looks half finished, and tinsel garland from the shop never quite matches anything else in the room. A button garland fixes both: it costs the price of a spool of twine and a bag of buttons, and it looks handmade in the good way, not the wonky way.
Finished, it drapes in soft loops like a strand of oversized beads, catching enough light to earn its keep without needing a plug. Coil it loosely in a drawer or tin between seasons so the buttons do not flatten against each other.
What You Need
- 6 feet jute or cotton twine
- 40 to 50 large buttons, 1 to 1.5 inches, mixed red, white and green
- 1 large-eye craft needle
- Scissors
How to Make It
- Thread the needle with the twine and knot the end.
- Slide the first button along the twine to where you want it.
- Tie a knot in the twine right behind the button to hold it in place.
- Add the next button a few inches along, tying another knot behind it.
- Repeat along the full length, alternating colors as you go.
- Leave about 6 inches of bare twine at each end for draping or tacking up.
- Trim any loose thread and drape the garland along the mantel, stair rail or tree.
Button Christmas Gift Tags
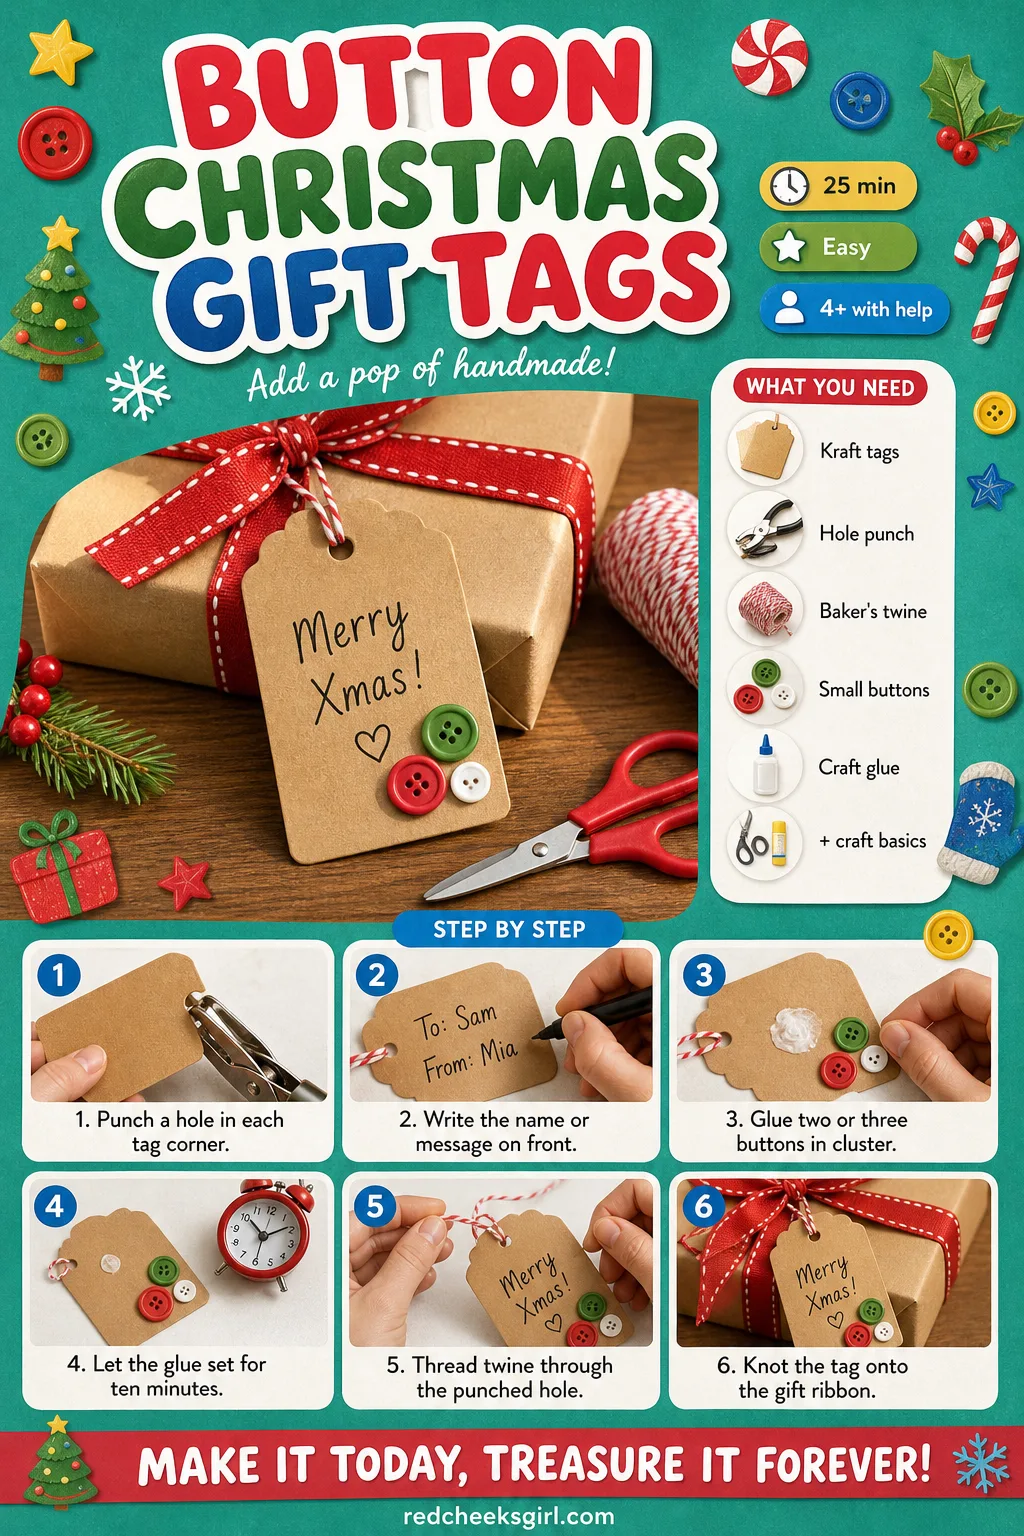
Shop-bought gift tags look like an afterthought, and a parcel with nothing on it at all is worse. A couple of buttons glued onto a plain kraft tag fixes that for pennies, and it is quick enough to do a whole pile of presents in one sitting at the kitchen table.
Finished, each tag has a small cluster of buttons in one corner, enough texture to look deliberate rather than bare. If the household already does adult craft projects for the season, this one pairs well as a quiet, low-mess evening task with a drink in hand.
What You Need
- Kraft cardstock tags, 2 x 3 inches (or a pack of blank tags)
- 1 small hole punch
- 12 inches baker’s twine per tag
- 2 to 3 small to medium buttons per tag
- Craft glue
- Fine-tip marker
How to Make It
- Cut or punch the tag shape if not using pre-made ones, then punch a hole in one corner.
- Write the recipient’s name or a short message on the tag with the marker.
- Glue two or three buttons in a small cluster in the opposite corner.
- Let the glue set for about 10 minutes before handling further.
- Thread the baker’s twine through the punched hole.
- Knot the twine around the gift ribbon to attach the tag.
Button Christmas Cards
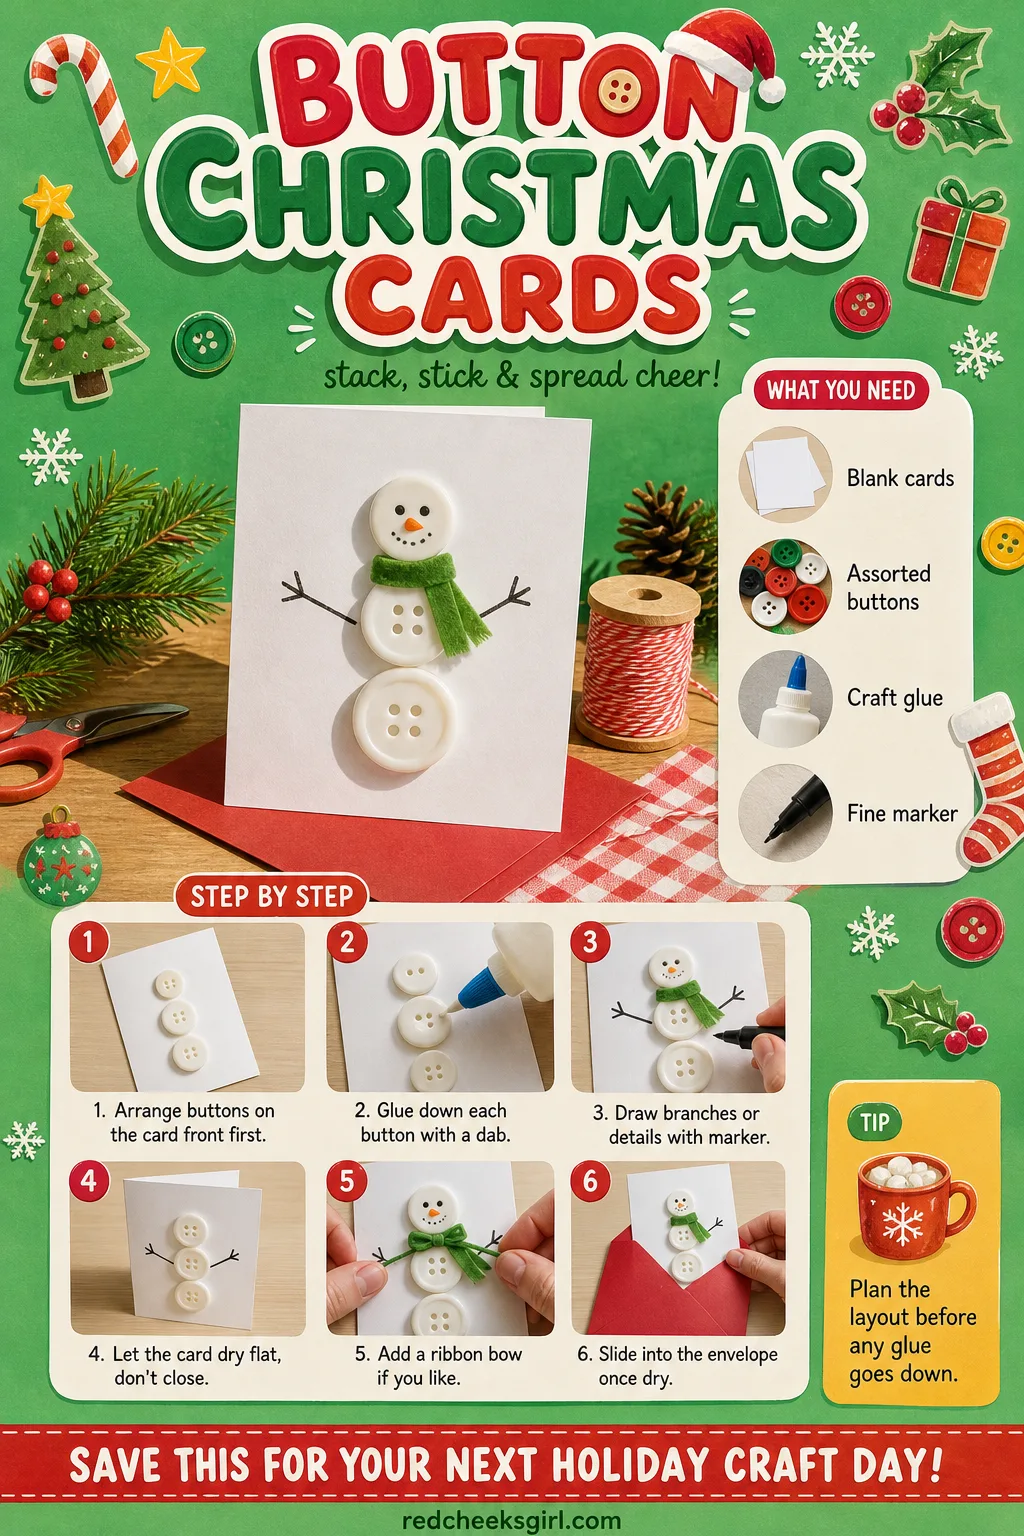
A box of identical shop cards says less than one that arrives slightly lumpy with buttons glued to the front. These take about as long as writing the message inside, and the whole batch can sit on the table while the glue dries flat before they go in envelopes.
Finished, a snowman or tiny tree in buttons gives the card a bit of weight and shine that a printed design never has. Keep a few blank cards and the leftover buttons on hand for the preschool-friendly tray crafts too, since the method barely changes for a classroom version.
What You Need
- Blank cards with envelopes, A6 size
- 8 to 10 assorted buttons per card
- Craft glue or glue dots
- Fine-tip marker
How to Make It
- Arrange the buttons on the card front in your chosen shape, a tree, snowman or wreath, before gluing anything.
- Glue down each button with a small dab, working from the bottom of the design upward.
- Once all the buttons are placed, draw in branches, a scarf or other small details with the marker.
- Leave the card open and flat to dry for about 15 minutes, do not close it yet.
- Add a tiny ribbon bow if you like, once the glue has fully set.
- Slide the card into its envelope only once completely dry.
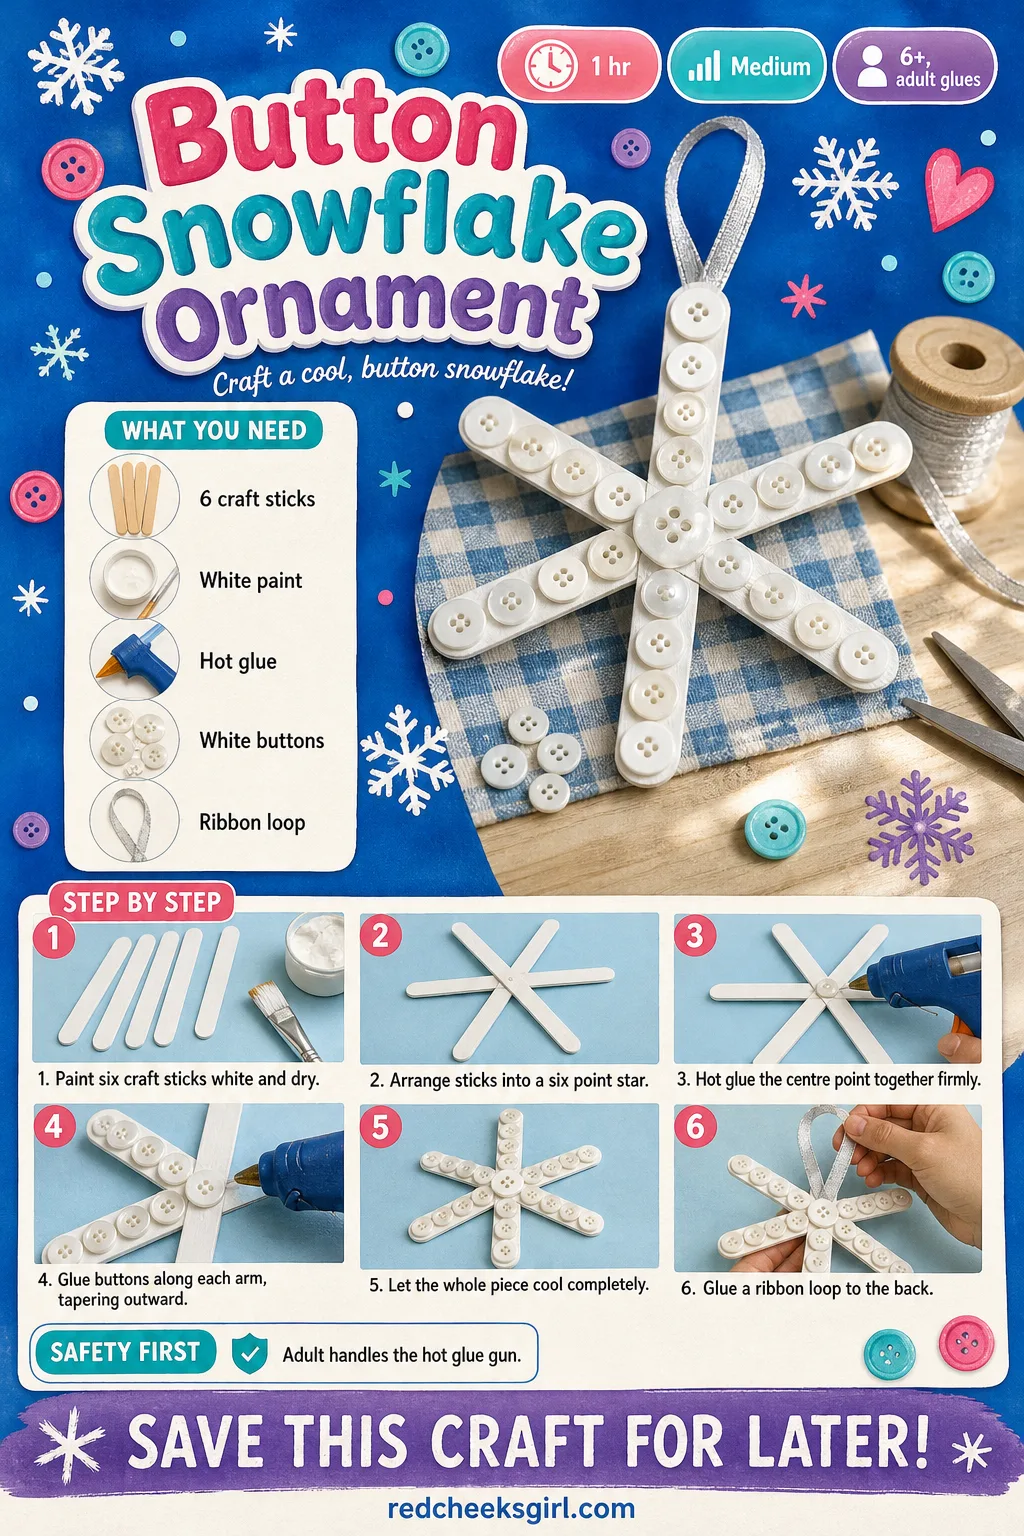
Button Snowflake Ornament
A window that just has curtains and nothing else feels unfinished once the neighbors’ lights go up. A pale, six-armed snowflake built from craft sticks and white buttons hangs there instead, catching daylight rather than needing a plug of its own.
Finished, it looks crisp and a little architectural, nothing like the lopsided paper snowflakes from school. The hot glue step is the fiddly bit, work slowly and hold each stick for a count of ten so the star centre does not slide apart before it sets.
What You Need
- 6 wooden craft sticks (popsicle sticks)
- White acrylic paint and a small brush
- 12 to 15 white, silver and pearl buttons, various sizes
- Hot glue gun
- 1 small ribbon loop for hanging
How to Make It
- Paint all 6 craft sticks white and let them dry for about 15 minutes.
- Arrange the sticks into a six-point star pattern, overlapping the centres.
- An adult hot glues the centre point where all sticks cross, holding it firmly until set.
- Hot glue buttons along each arm, placing the largest near the centre and tapering to the smallest at the tips.
- Let the whole piece cool and set fully, about 20 minutes.
- Hot glue the ribbon loop to the back of one arm for hanging.
🛍 Shopping guide
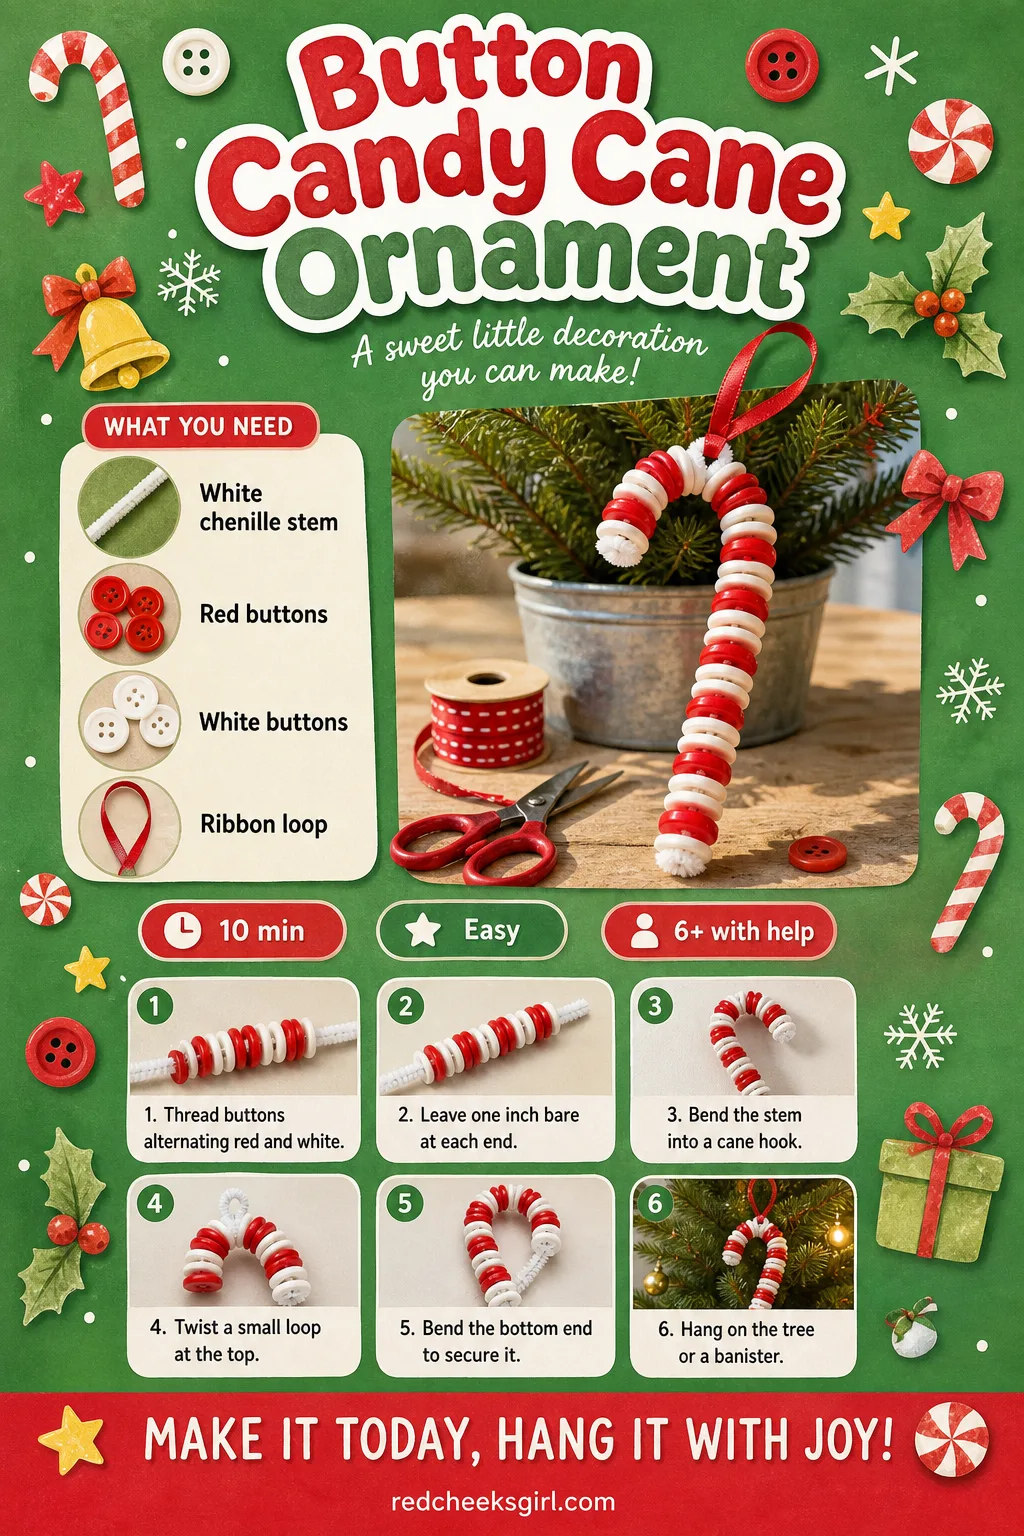
Button Candy Cane Ornament
Red and white buttons alone already look like peppermint, so this one barely needs instructions, which is exactly why it suits a last minute top-up for the tree. It is the quickest craft on this list, done before the kettle finishes boiling.
Finished, it is a small, slightly chunky candy cane that hangs with real weight, not the flimsy printed kind. It works just as well clipped to a stair banister as it does on a branch.
What You Need
- 1 white chenille stem, 12 inches
- 8 to 10 small red and white buttons, alternating
- 1 small ribbon loop (optional)
How to Make It
- Thread the buttons onto the chenille stem, alternating red and white, pushing each one down snugly.
- Leave about 1 inch of bare stem at each end so the buttons do not slide off.
- Bend the top of the stem into a cane-shaped hook.
- Twist a small loop at the very top of the hook for hanging, or tie on a ribbon loop.
- Bend the bottom end gently to lock the last button in place.
- Hang the finished cane on the tree or a banister.
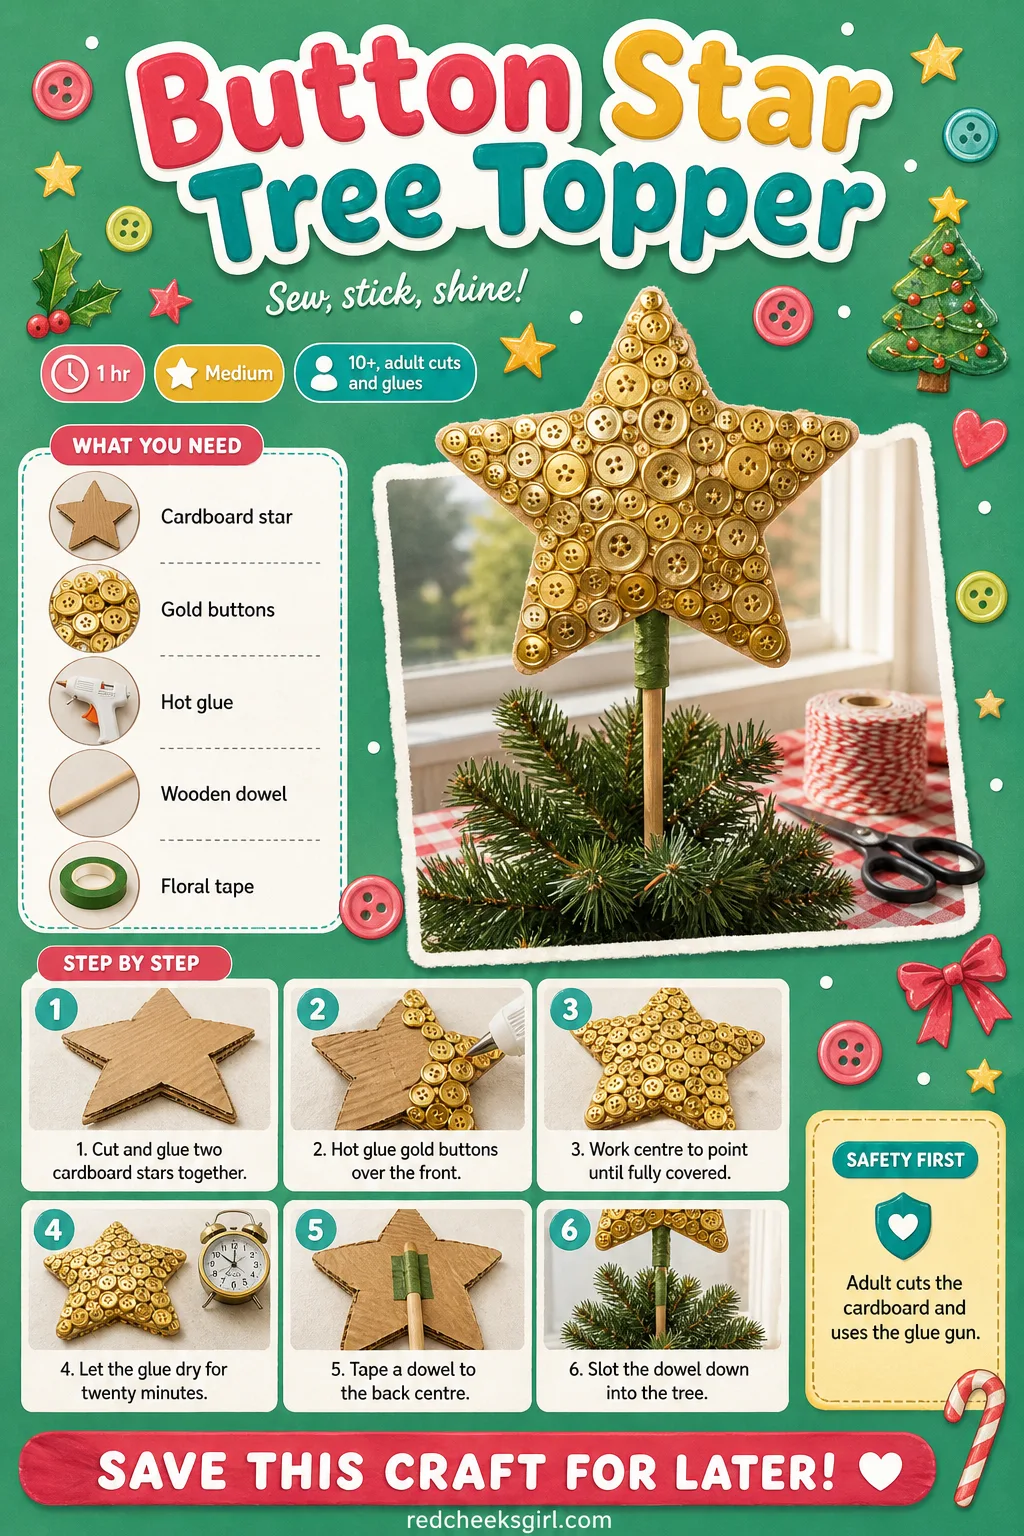
Button Star Tree Topper
A topper that came with a cheap pre-lit tree often looks tired next to everything else, a bit flat and plasticky against handmade ornaments lower down. A star built from gold buttons catches the string lights properly and gives the whole tree a finished top instead of an afterthought.
Finished, it has real texture and shine, far more interesting than a single glass point. If the base of the tree already leans toward grain and timber, pair it with the pieces in the wood crafts round-up for a tree that looks considered top to bottom.
What You Need
- Cardboard, enough for two 6-inch star shapes (a cereal box works)
- 60 to 70 gold or yellow buttons
- Hot glue gun
- 1 wooden dowel or skewer, 8 inches
- Floral tape or duct tape
How to Make It
- An adult cuts two matching star shapes from the cardboard, about 6 inches point to point, and glues them together for stiffness.
- Hot glue gold buttons over the entire front face, working from the centre out to each point.
- Continue until the cardboard is fully covered and no gaps show through.
- Let the glue dry for about 20 minutes before handling.
- Tape the dowel to the back centre of the star using floral or duct tape, leaving most of it free as a stem.
- Slot the dowel down into the top branch of the tree so the star sits upright.
🛍 Shopping guide
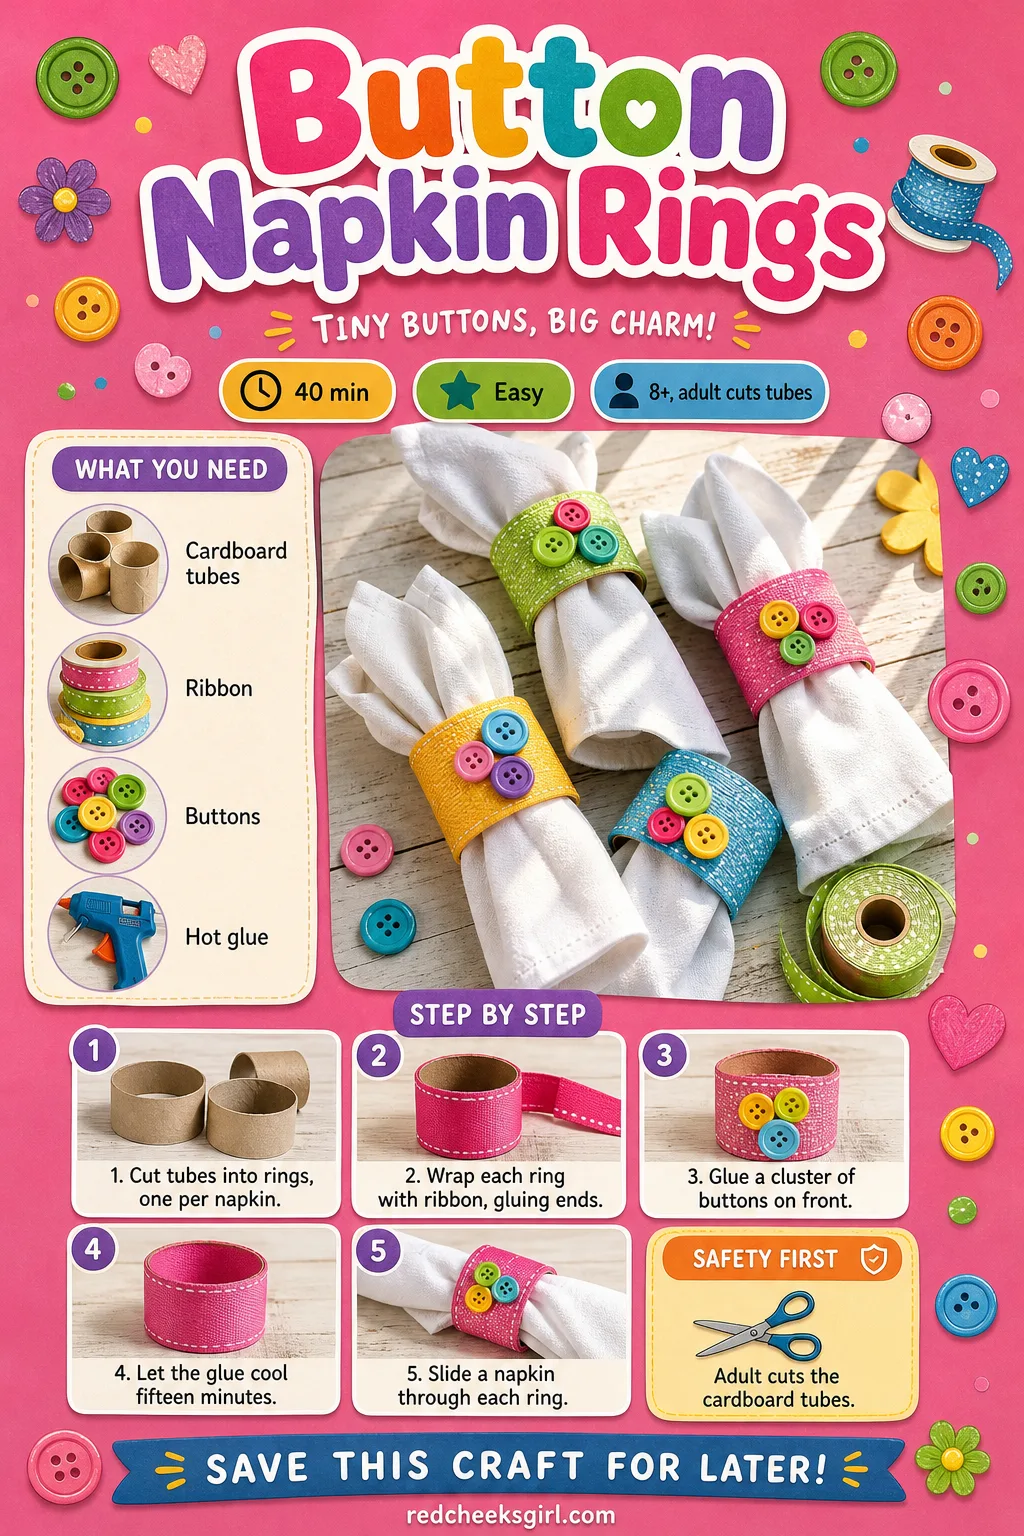
Button Napkin Rings
Paper napkins folded flat on a bare table read as weeknight, not holiday, and bought napkin rings rarely match anything already on the table. A set made from cardboard tubes and a handful of buttons costs almost nothing and ties the whole place setting back to the rest of the buttons on the mantel or tree.
Finished, each ring has a small cluster of buttons catching the candlelight, enough to look deliberate without competing with the food. Keep the set in a shoebox between dinners, they stack flat and take no real storage space.
What You Need
- Cardboard tubes (toilet paper tubes work), enough for 4 rings
- 1 yard ribbon, 1 inch wide
- 24 to 30 buttons, about 6 per ring
- Hot glue gun
How to Make It
- An adult cuts each cardboard tube into 1.5-inch wide rings, one per napkin.
- Wrap each ring in ribbon, hot gluing the ends to secure them.
- Glue a cluster of 5 to 6 buttons on the front of each ring.
- Let the glue cool for about 15 minutes before handling.
- Slide a folded napkin through each ring for the table.
🛍 Shopping guide
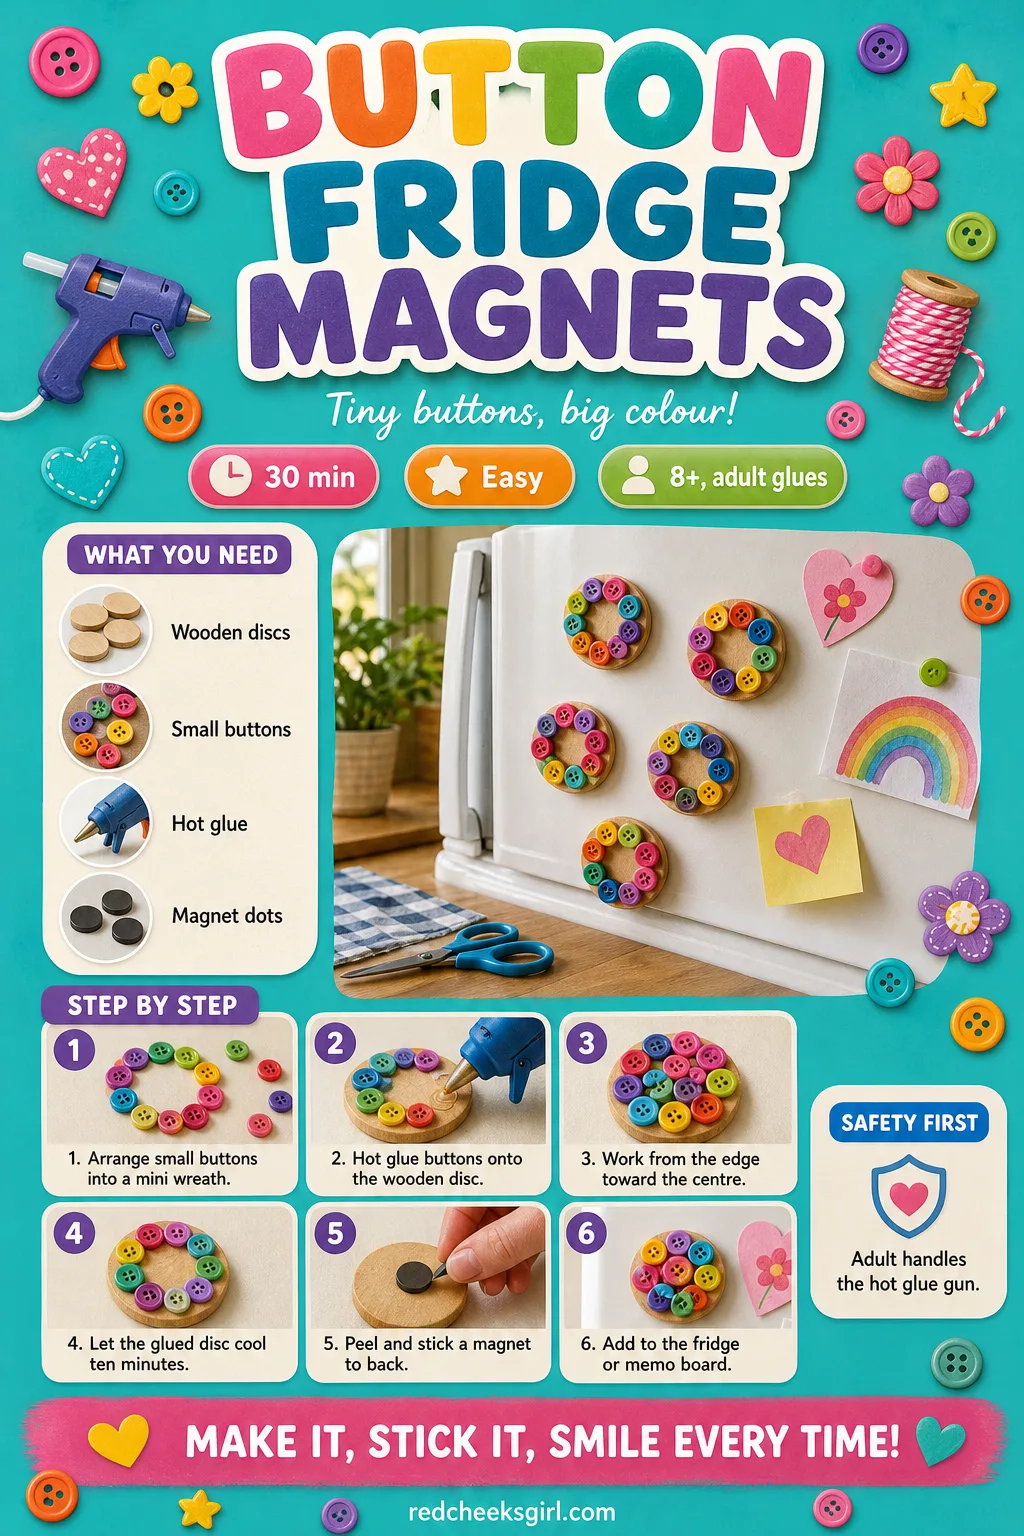
Button Fridge Magnets
The fridge collects school notices and takeaway menus all year, and a few of these magnets give it a reason to look festive for the five minutes guests spend near the kettle. They are small enough to make while something else is in the oven, and quick enough to batch six at once.
Finished, each one is a tiny wreath or starburst of buttons on a wooden disc, enough weight to stay put on the fridge door without sliding down. Keep the leftover set in a drawer, they go straight back up again next season.
What You Need
- 6 wooden craft discs, 1.5 inches (or large flat buttons as a base)
- 20 to 30 small buttons, mixed colors
- Hot glue gun
- 6 adhesive magnet dots
How to Make It
- Arrange small buttons into a mini wreath or starburst shape on each wooden disc before gluing anything.
- Hot glue the buttons onto the disc, starting from the outer edge and working toward the centre.
- Let the glued disc cool for about 10 minutes.
- Peel the backing and stick a magnet dot to the back of each disc.
- Use the finished magnets on the fridge or a memo board.
🛍 Shopping guide
Frequently Asked Questions
How do I make a quick Christmas tree decoration out of buttons?
The fastest route is threading buttons largest to smallest onto a short length of wire or strong thread, finishing with a star bead on top and a loop for hanging. It takes about fifteen minutes per ornament once the buttons are sorted by size, with no drying time to wait out.
What kind of buttons work best for Christmas crafts?
Plain, flat buttons in classic red, green, white and gold glue and thread far more easily than oddly shaped vintage ones, and a mixed bag of sizes from half an inch to one and a half inches gives any tree, wreath or garland real texture. Shell and pearl buttons add shine to snowflakes and snowmen without needing any extra sparkle.
How do you attach buttons to a wreath without them falling off?
Hot glue is the only reliable option for a foam wreath form, since craft glue and glue sticks do not hold against the foam’s texture or the weight of hundreds of buttons. Pressing each button firmly for a few seconds as it is placed, rather than coming back to check later, prevents the gaps that let buttons drop off months down the line.
Can young children make button Christmas crafts safely?
Plenty of these crafts, including the garland, the gift tags and the cards, use only craft glue and are genuinely safe for children from about age four with light supervision. Anything involving a hot glue gun, wire cutters or craft knife, like the wreath, the star topper or the napkin rings, needs an adult to handle that specific step.
How do you store button Christmas decorations after the holidays?
Flat pieces like the wall art, cards and tags keep best stored flat in a box so nothing bends or peels, while strung ornaments and garland do better coiled loosely in a tin rather than hung, which can stretch the thread. Wreaths and toppers should go back in their original box or a container just slightly larger than the piece, since squeezing them into a tight space pops buttons loose over time.
10 macrame Christmas ornaments DIY ideas in cotton cord, wood and glass, for a soft, textured tree t

Get the holiday movie aesthetic room by room: cream, stone gray, soft red and pine, a Cotswold cotta
20 Christmas arts and crafts for kids ages 6 to 10, grouped by ornaments, decor, gifts and wall art,
Leave a Reply