

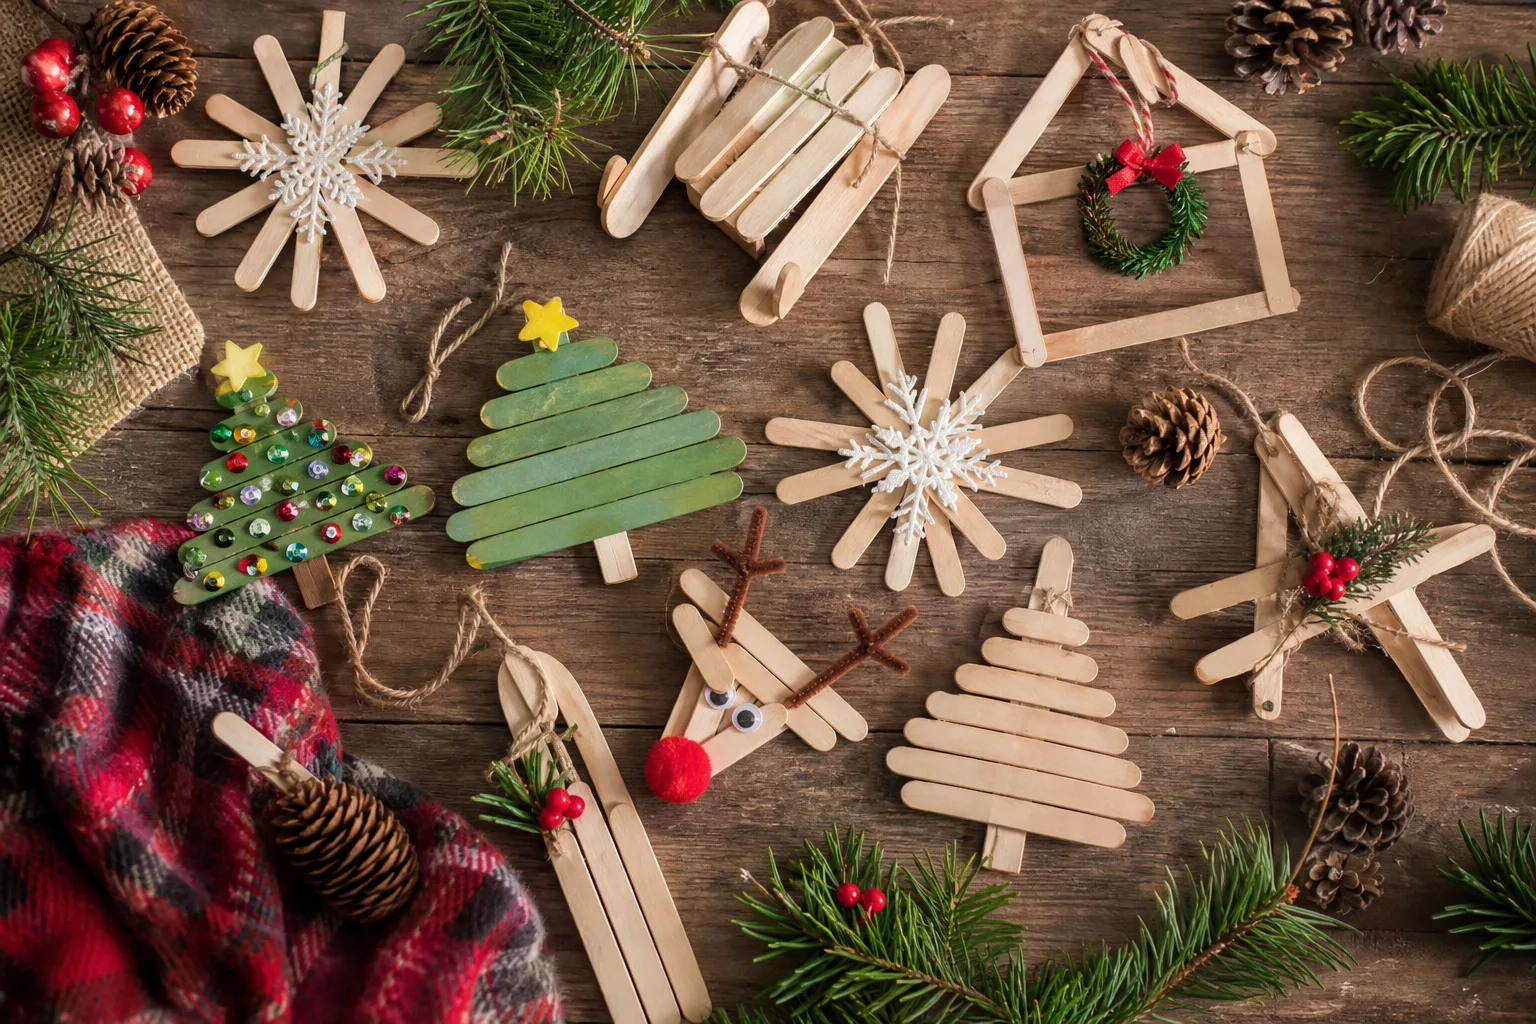
Popsicle stick Christmas crafts solve the exact problem you have this week: a box of flat wooden sticks saved from every ice lolly since July, a table full of children with nothing to do, and three hours before the light goes. None of what follows needs a trip to a craft shop you do not have time for. Paint, glue and whatever ribbon lives in the gift-wrap drawer will get you through most of these!
If the children are very small, start with the simplest shapes and build up: the same sticks that make a quick snowflake this afternoon can become a nativity stable or a whole gingerbread house by the weekend. For more to keep small hands busy over the holidays, the Christmas crafts for kids collection and the tray-ready preschool Christmas crafts sit well alongside this one, and if wood grain is the look you are after, the Christmas wood crafts list goes further with it.
This post contains affiliate links. If you buy through them, I may earn a small commission at no extra cost to you.
- Popsicle Stick Snowflake Ornament
- Popsicle Stick Christmas Tree Ornament
- Popsicle Stick Santa Claus
- Popsicle Stick Reindeer
- Popsicle Stick Star Ornament
- Popsicle Stick Snowman
- Popsicle Stick Picture Frame Ornament
- Popsicle Stick Angel
- Popsicle Stick Nativity Stable
- Popsicle Stick Wreath
- Popsicle Stick Advent Calendar
- Popsicle Stick Penguin
- Popsicle Stick Gift Tags
- Popsicle Stick Sled Ornament
- Popsicle Stick Candy Cane
- Popsicle Stick Place Card Easel
- Popsicle Stick Stocking Ornament
- Popsicle Stick Gingerbread House
- Frequently Asked Questions
Popsicle Stick Snowflake Ornament
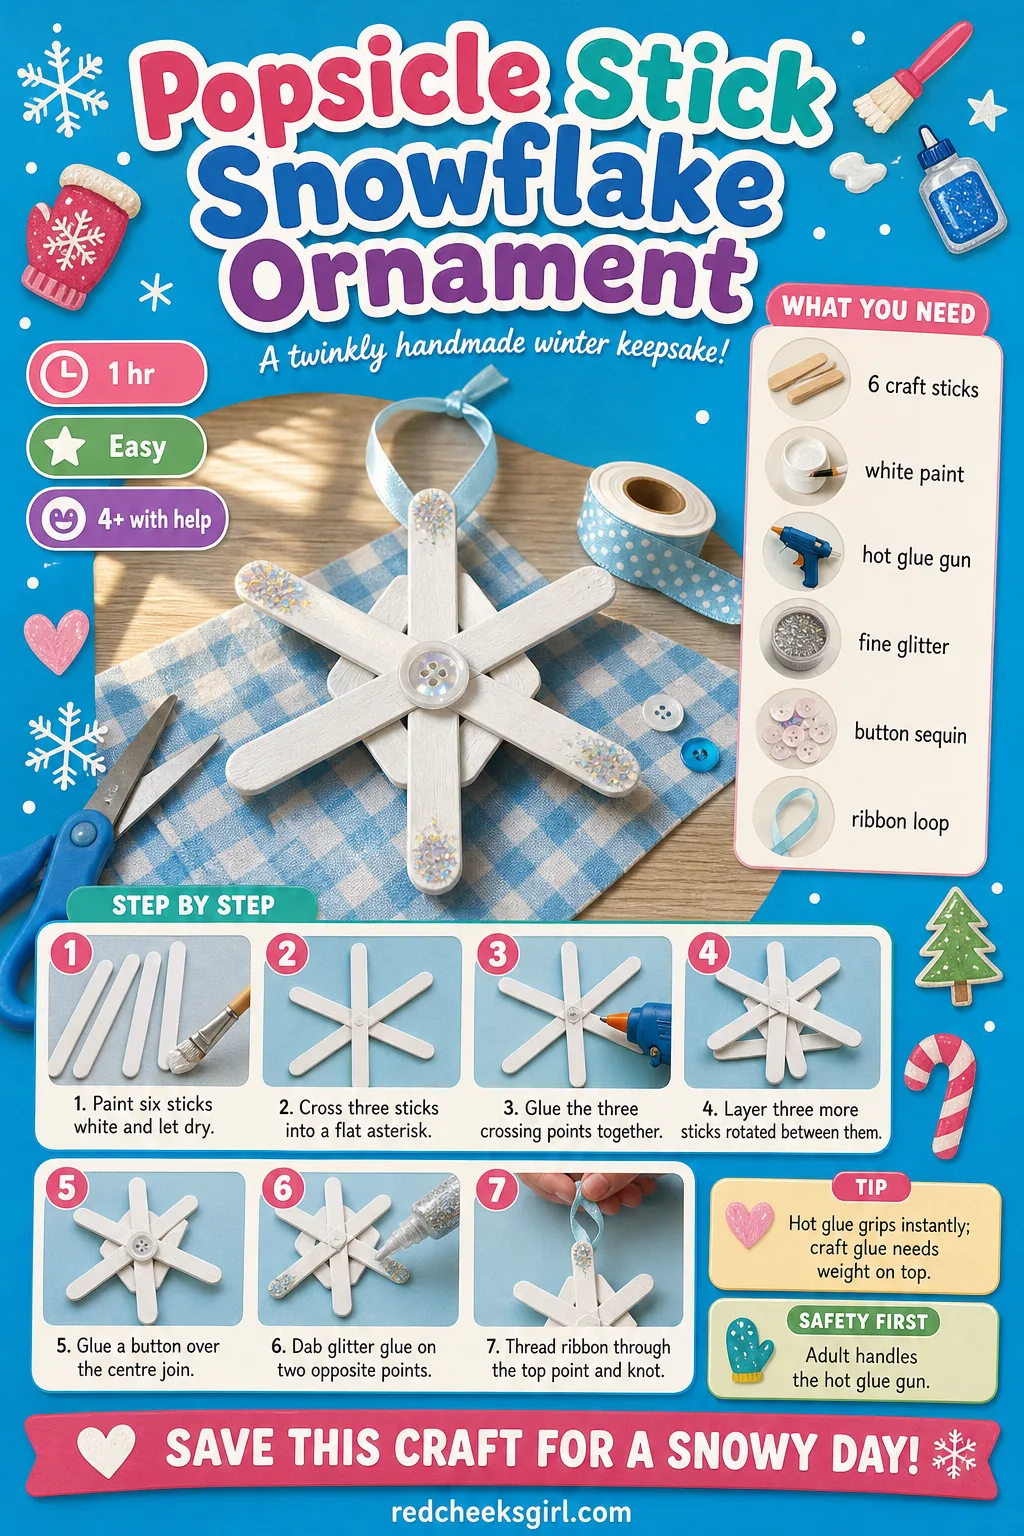
Paper snowflakes tear the moment a child’s thumb presses too hard on the scissors, and you are left taping fragments back together before the party even starts. Six jumbo sticks crossed into a six-pointed star survive being boxed up every January and dragged out again every November, no tape required!
Hang a cluster of three in a window where the afternoon light catches the glitter, or clip one flat to a wrapped gift in place of a bow.
What You Need
- 6 jumbo craft sticks, 15cm long
- White or silver acrylic paint
- Hot glue gun (or craft glue for a slower build)
- Fine glitter, 1 small pot
- 1 button or flat sequin, 2cm, for the centre
- 20cm ribbon or twine, for hanging
How to Make It
- Paint all six sticks white or silver on both sides and lay them flat to dry for 20 minutes; the wood is ready when it no longer feels cool or damp.
- Lay three dry sticks on the table in a flat asterisk, crossing in the middle like the hands of a clock pointing to 12, 4 and 8.
- Have an adult run a dot of hot glue into the centre where the three sticks cross and press for ten seconds; craft glue works too but needs a book weighted on top for five minutes.
- Lay the remaining three sticks on top, turned to sit halfway between the first layer, so the finished star has six even points, and glue the centre again.
- Glue the button or sequin over the centre to hide the joins; this is the fiddly bit, so hold it still with a fingertip for a slow count of ten.
- Run a thin line of craft glue along the top inch of two opposite points and sprinkle with glitter, tipping the excess back into the pot.
- Leave the snowflake flat for 30 minutes until completely dry, then thread the ribbon through the top point and knot it into a loop.
🛍 Shopping guide
Popsicle Stick Christmas Tree Ornament
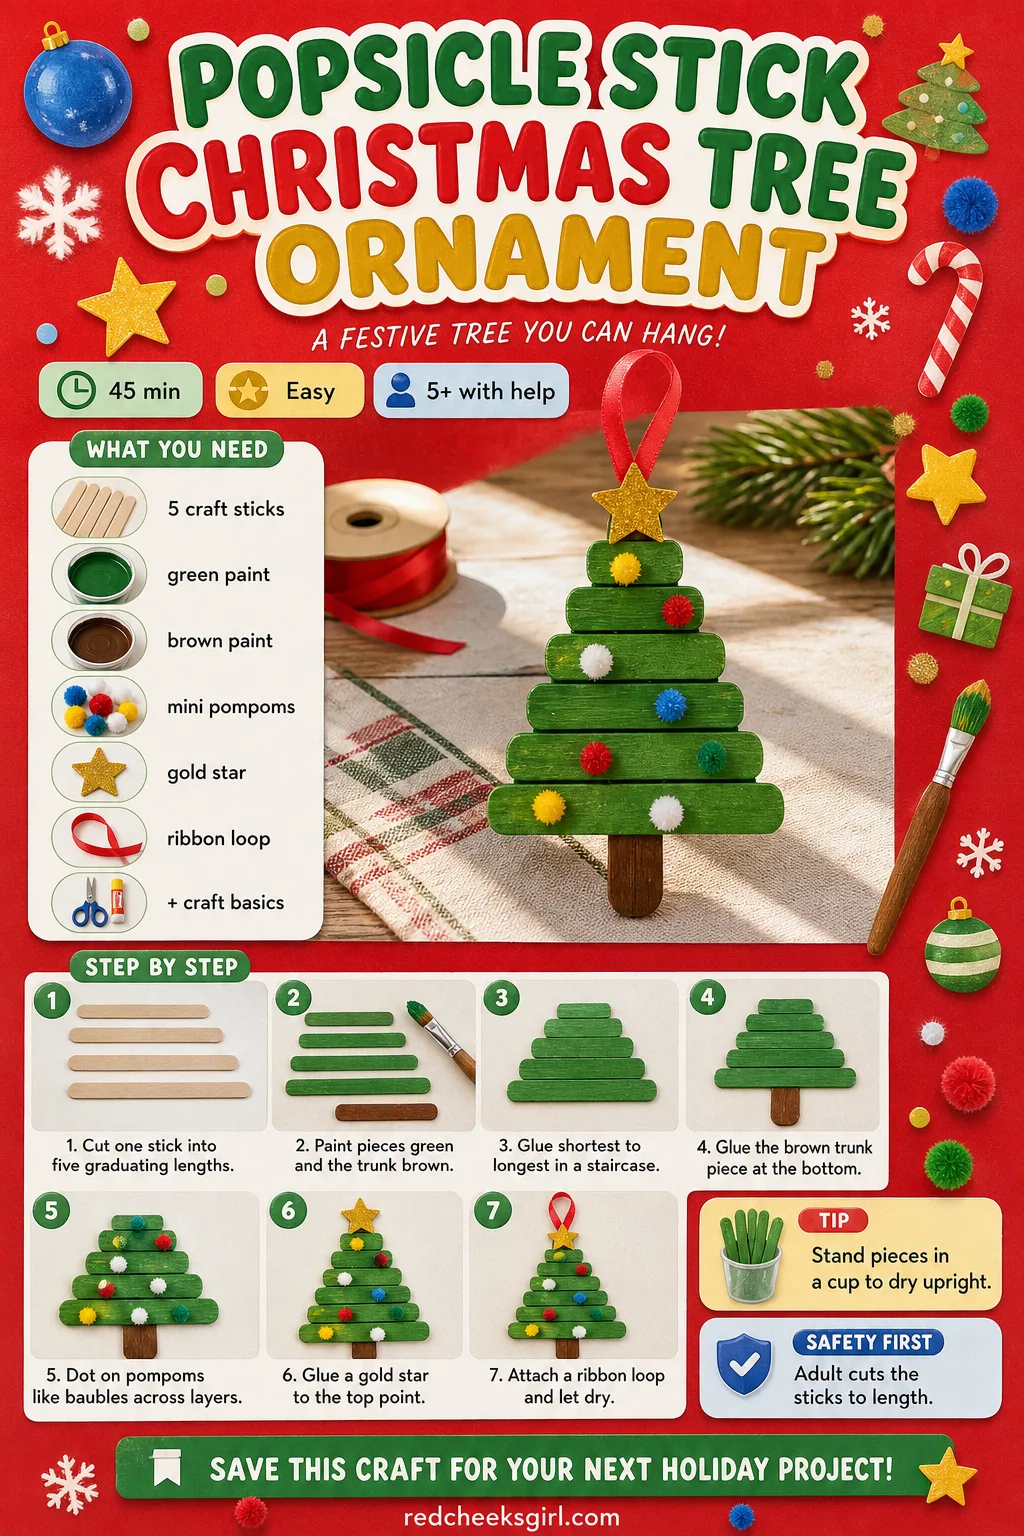
Not every tree on the mantel needs lights, and this one does not even need a trip to the shop for green card. Five sticks cut down to a staircase of lengths and glued one above another make a neat little conifer that stands nicely in a jam jar with no water in it.
If only natural-coloured sticks are on hand, paint does the job of a whole packet of green card, and in half the time.
What You Need
- 5 regular craft sticks, 11cm
- Green acrylic paint
- 1 mini craft stick or 2cm offcut, for the trunk
- Brown acrylic paint, small amount
- 5 small pompoms, 1cm, or sequins
- 1 small star cut from gold cardstock
- 15cm ribbon, for hanging
How to Make It
- Have an adult cut each of the five craft sticks down to a different length, graduating from about 10cm to 3cm, using scissors or a craft knife on a cutting mat.
- Paint all five pieces green on both sides and the mini stick brown; stand them on their ends in a cup to dry for 15 minutes.
- Lay the longest piece down as the base of the tree, then glue each shorter piece above it in a neat staircase, slightly overlapping, so the shape narrows toward the top.
- Glue the brown trunk piece centred at the bottom, poking out below the green like a real trunk.
- Dot glue along the green layers and press on the pompoms to look like baubles; they look right when they sit roughly level with each layer, not bunched in one spot.
- Glue the gold star to the very top point.
- Glue a ribbon loop to the back of the top stick and leave flat for 15 minutes before hanging.
🛍 Shopping guide
Popsicle Stick Santa Claus
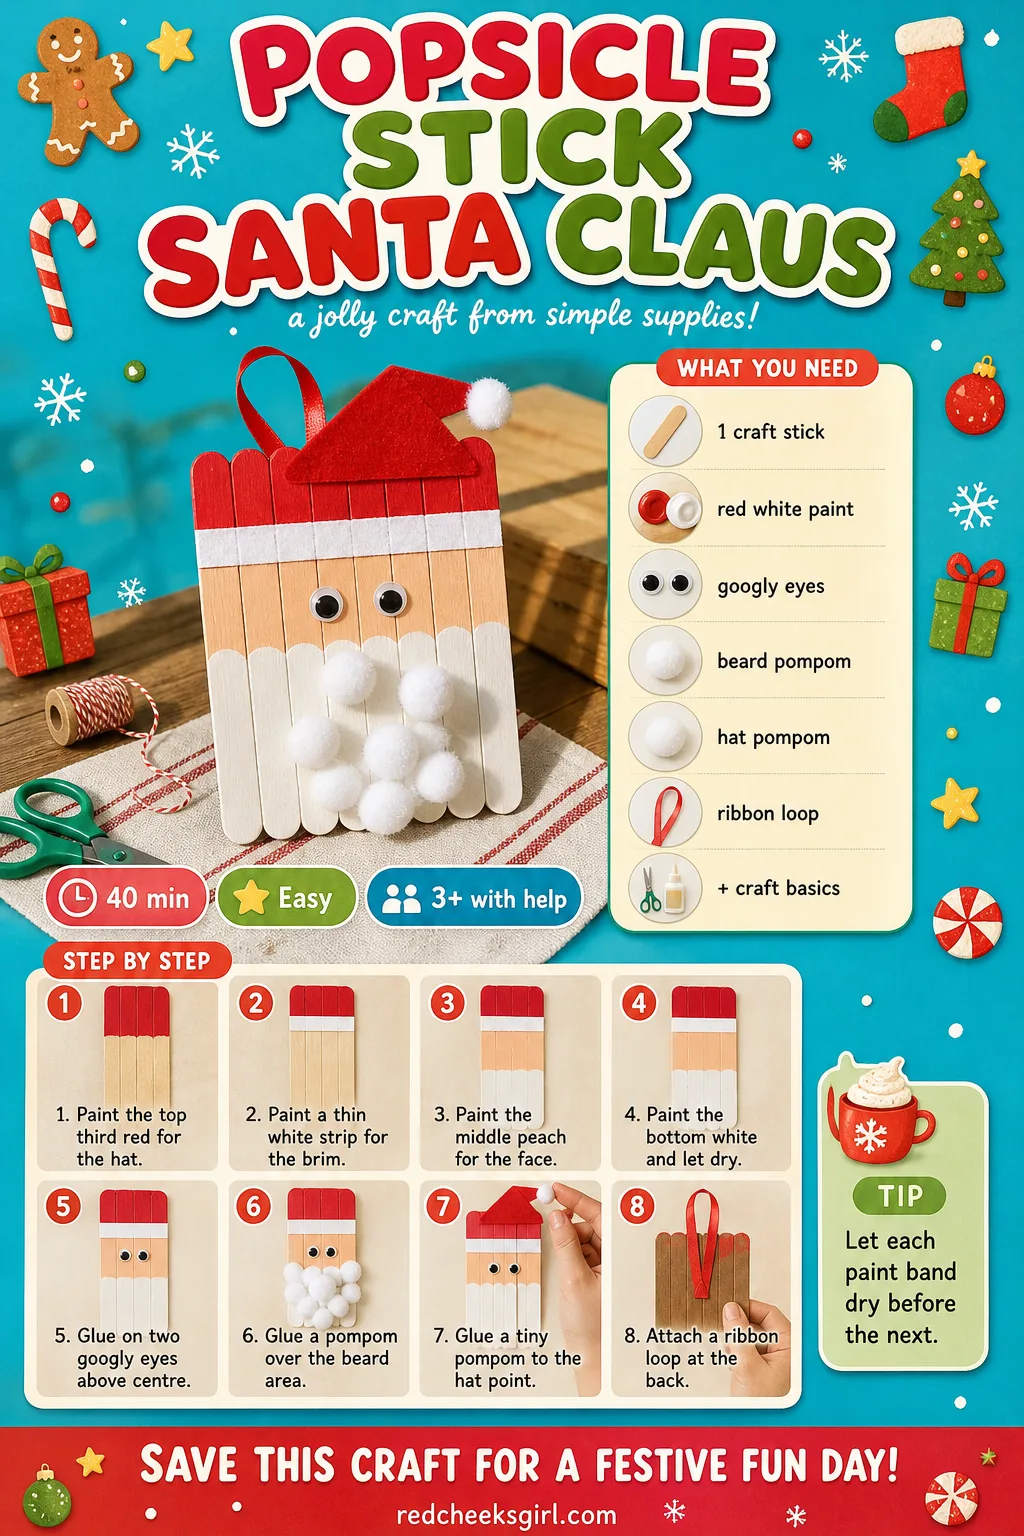
Santa does not need a beard made of real cotton wool to look convincing, just four painted bands and a good squeeze of white pompom. This one stands about as tall as a finger and looks equally at home clipped to a stocking, tucked into a card, or hung on the tree by its own loop.
Little painters tend to run the colours into each other at the joins, and that is fine: it reads as a rosy cheek rather than a mistake.
What You Need
- 1 jumbo craft stick, 15cm
- Red, white and peach (or light brown) acrylic paint
- 2 googly eyes, 8mm
- 1 small white pompom, 1.5cm, for the beard
- 1 tiny white pompom, 0.5cm, for the hat tip
- Craft glue
- 15cm ribbon, for hanging
How to Make It
- Paint the top third of the stick red for the hat and leave a thin gap.
- Paint a narrow white strip below the red for the hat brim.
- Paint the middle section peach or light brown for the face.
- Paint the bottom third white for the beard base, then leave the whole stick flat to dry for 20 minutes.
- Glue on the two googly eyes just above the middle of the face.
- Glue the larger pompom over the white beard section so it sits like a fluffy chin.
- Glue the tiny pompom to the point of the red hat.
- Glue a ribbon loop to the back and let it set for 10 minutes before hanging.
🛍 Shopping guide
Popsicle Stick Reindeer
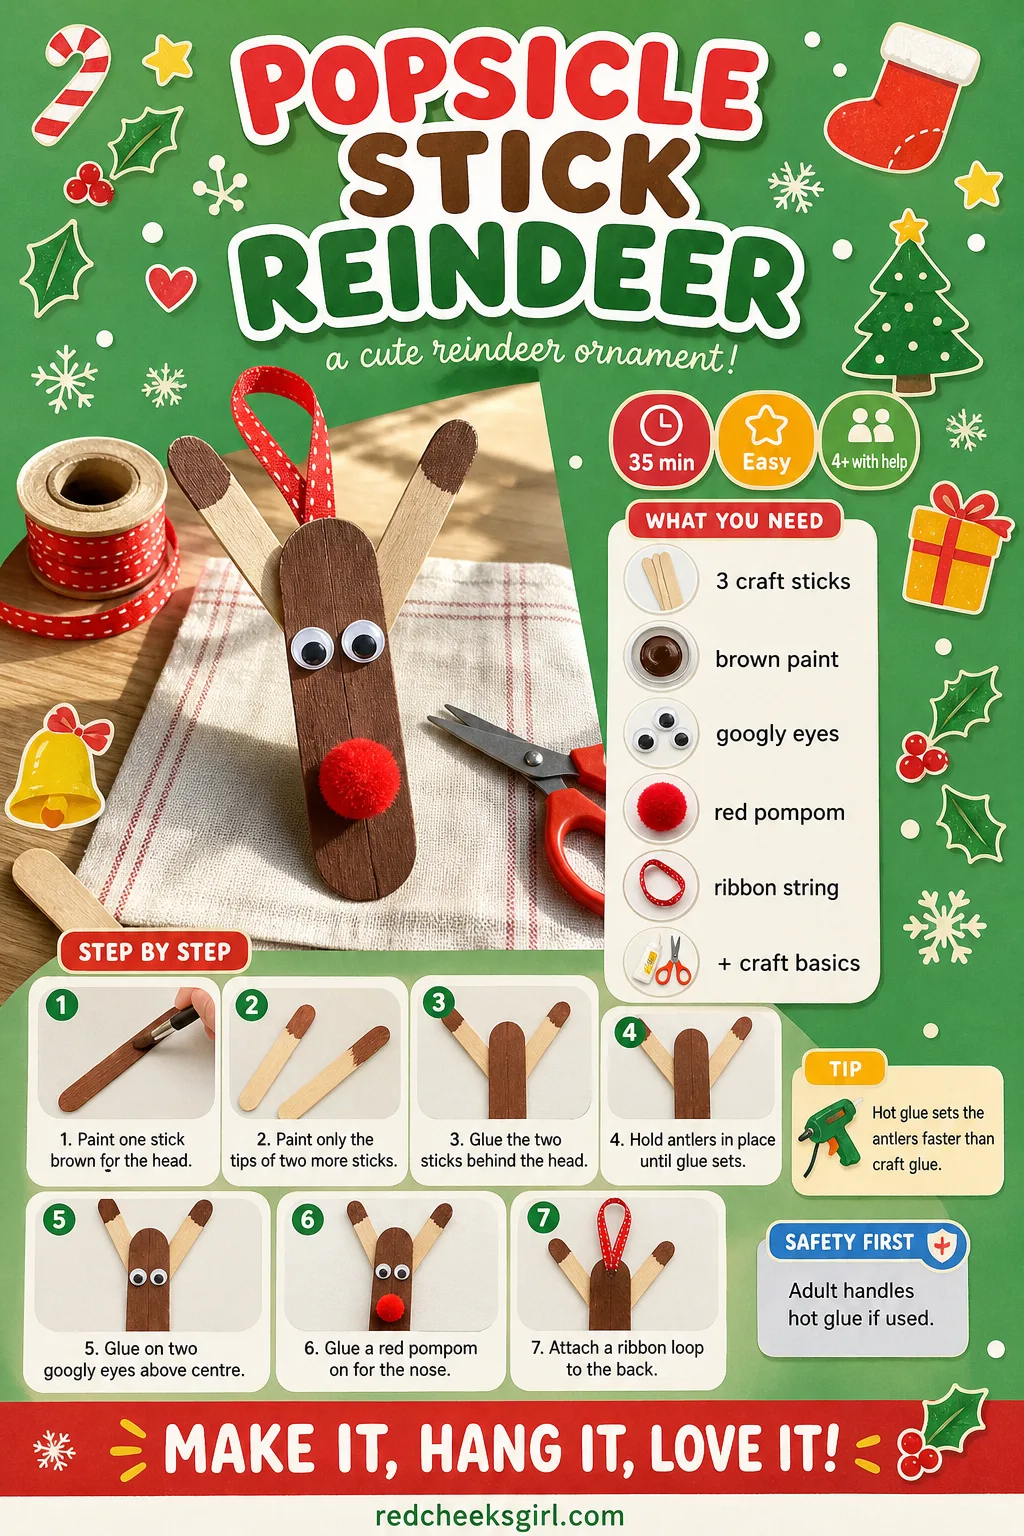
A reindeer out of three sticks and two googly eyes looks more like Rudolph than anything in a multipack of tree decorations. Two sticks glued in a V behind the head make surprisingly convincing antlers, and the whole thing stays light enough to clip onto a stocking without pulling it down.
Swap the red pompom for a brown one and it reads as a plain deer, if red is not the colour this year.
What You Need
- 3 regular craft sticks, 11cm
- Brown acrylic paint
- Craft glue or hot glue
- 2 googly eyes, 10mm
- 1 small red pompom, 1.5cm, for the nose
- 15cm ribbon or string, for hanging
How to Make It
- Paint one whole stick brown for the head and face, and paint only the top inch of the other two sticks brown, leaving the rest bare for antler tips; let everything dry for 15 minutes.
- Glue the two part-painted sticks to the back of the head stick in a wide V shape, brown ends meeting near the top, so the bare tips splay out like antlers.
- Hold the antler sticks in place for 20 seconds; an adult should take over here if hot glue is used, since it sets fast and burns on contact.
- Glue the two googly eyes onto the upper half of the face stick.
- Glue the red pompom just below the eyes for the nose.
- Glue a ribbon loop or loop of string to the back of the head and leave flat for 15 minutes to set.
🛍 Shopping guide
Popsicle Stick Star Ornament
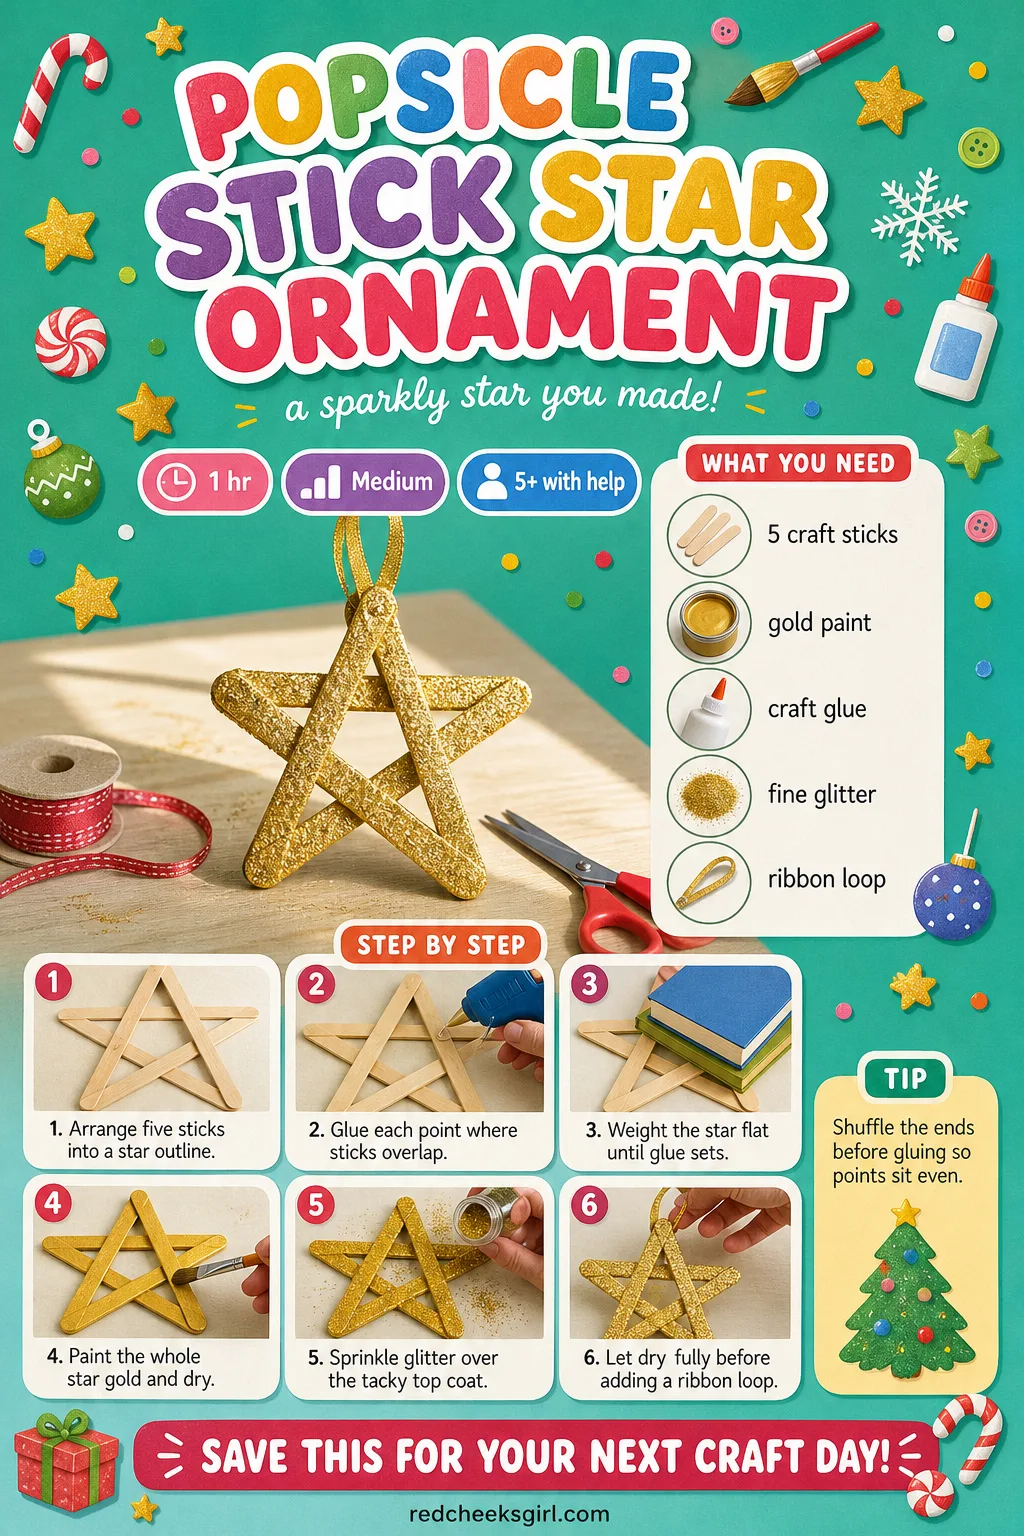
Gold stars from the shop always look thinner than the ones in your head. Five sticks glued into a proper five-pointed star, painted gold and dusted with glitter while the paint is still tacky, have real weight and catch the light like something from a shop window rather than a craft table.
Make a few in different sizes and they nest together neatly in a bowl before they go up on the tree.
What You Need
- 5 jumbo craft sticks, 15cm
- Gold acrylic paint
- Craft glue or hot glue
- Fine gold glitter, 1 small pot
- 15cm ribbon, for hanging
How to Make It
- Lay the five sticks on the table and arrange them so each one crosses two others near the ends, forming a five-pointed star outline; shuffle the ends until the points look even before gluing anything.
- Glue each crossing point where the sticks overlap, working around the shape one join at a time so nothing shifts.
- Leave the star flat under a light book for 20 minutes while the glue sets fully.
- Paint the whole star gold on both sides and leave to dry for 15 minutes.
- While the top coat is still slightly tacky, sprinkle glitter over the surface and tip off the excess.
- Leave flat for a further 20 minutes until completely dry, then glue a ribbon loop to the back of one point.
🛍 Shopping guide
Popsicle Stick Snowman
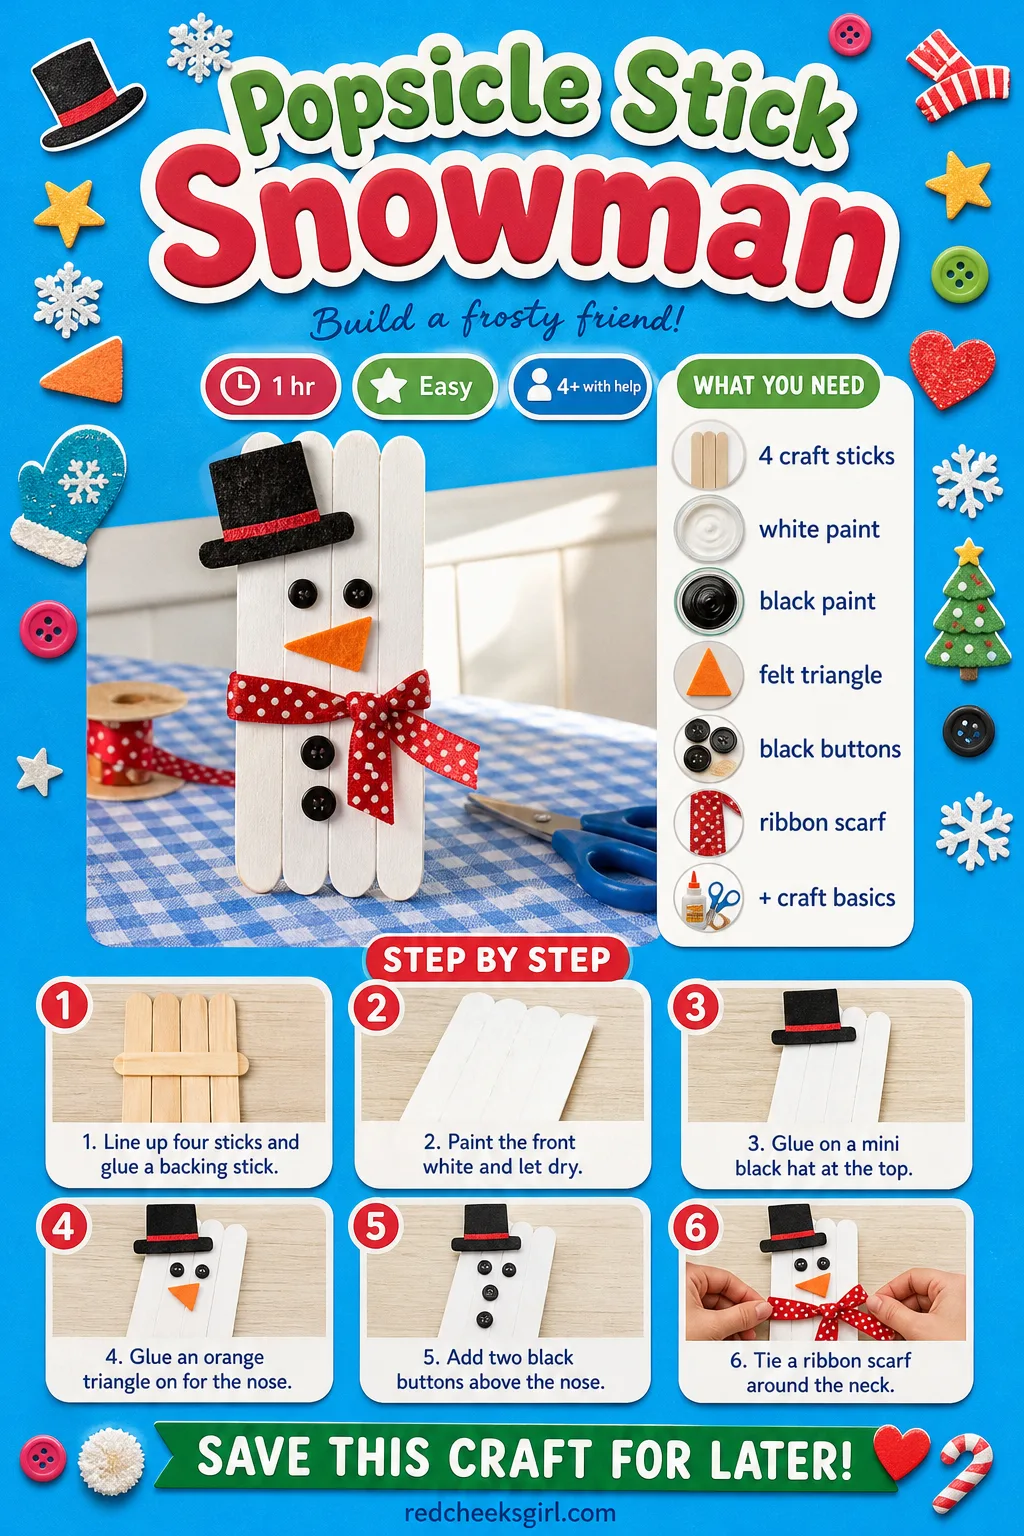
Three white circles glued in a stack is the obvious snowman, but four sticks lined up like a tiny picket fence and topped with a scrap of black card reads just as clearly and takes a third of the time. It stands flat against a windowsill without rolling away, which is more than can be said for anything round.
Tie a scrap of ribbon around the neck as a scarf and it stops looking like a craft project and starts looking like a decoration.
What You Need
- 5 regular craft sticks, 11cm (one as a backing brace)
- White acrylic paint
- 1 mini craft stick, for the hat
- Black acrylic paint
- 1 small orange felt or card triangle, 1cm, for the nose
- 3 tiny black buttons or dots of marker, for the face
- 10cm ribbon, for the scarf
How to Make It
- Line up the four sticks side by side and glue a fifth spare stick across the back to hold them together like a tiny fence panel; leave to dry flat for 15 minutes.
- Paint the front white, including right up to the top edge, and let it dry for 15 minutes.
- Paint the mini stick black and glue it across the top edge as the hat brim, with a small black-painted offcut standing up behind it as the hat top.
- Glue the orange triangle in the centre as the nose and mark three small black dots below it for the mouth with a fine marker.
- Glue two tiny black buttons above the nose for eyes.
- Tie or glue the ribbon scrap around the neck line as a scarf, and leave flat for 15 minutes before standing it up.
🛍 Shopping guide
Popsicle Stick Picture Frame Ornament
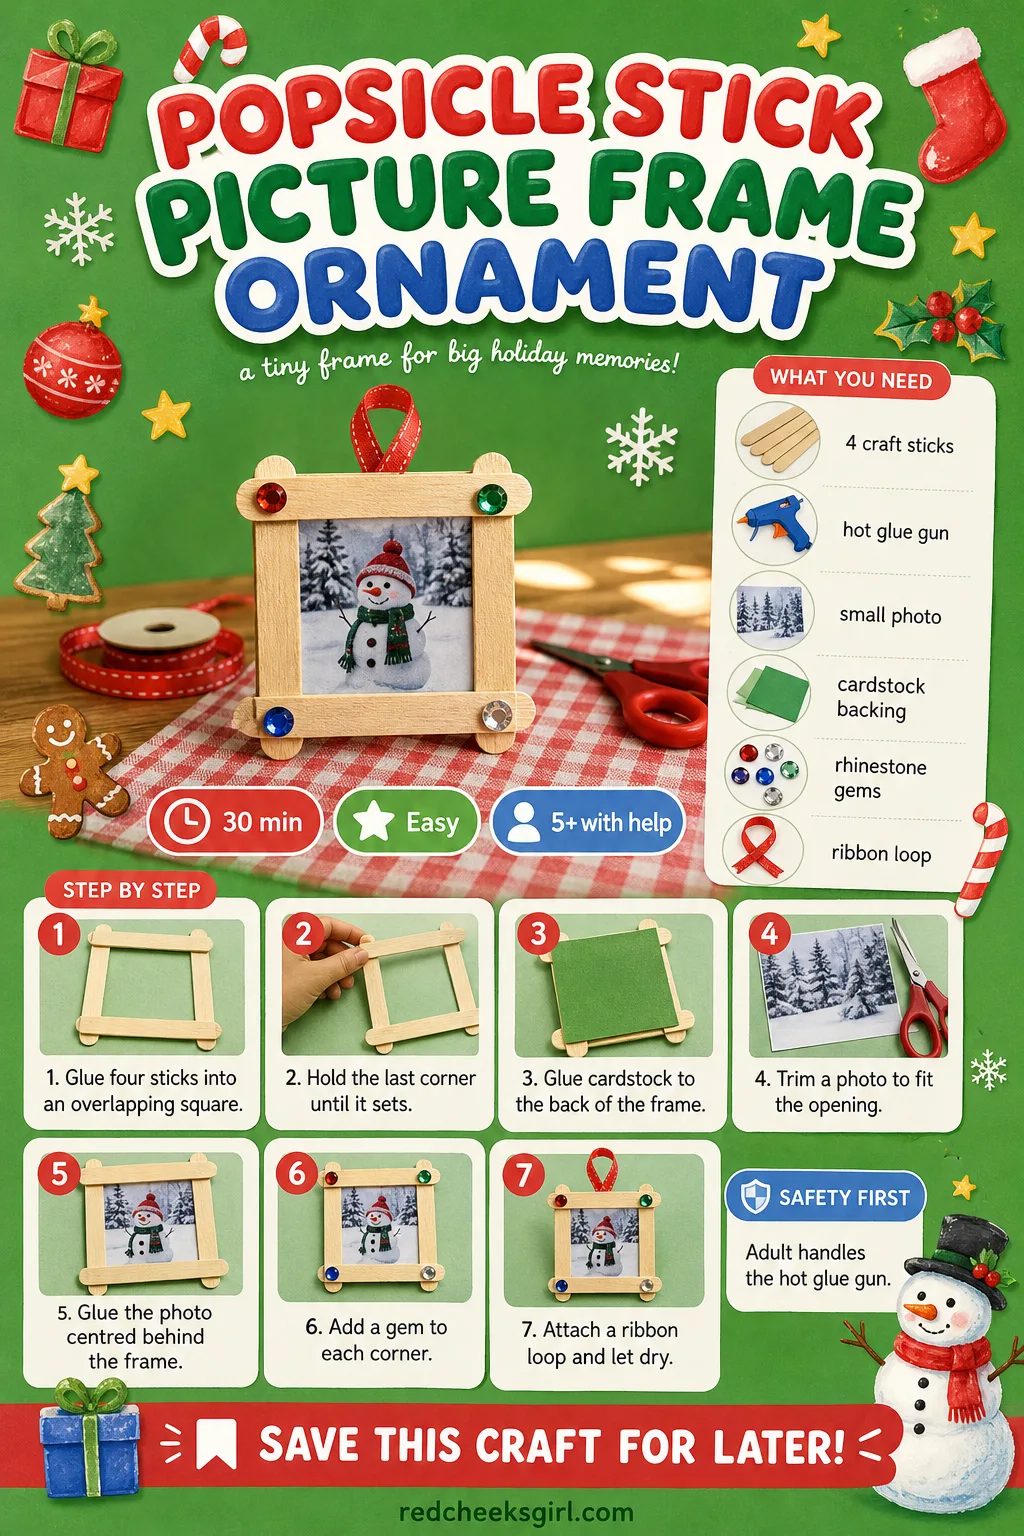
Every grandmother wants a photo of this exact Christmas, and none of them want to wait for a proper frame to arrive. Four sticks glued into a square around a small printed photo make a frame finished and hung before the oven timer goes off, and it costs almost nothing beyond the ink.
Stand it on a shelf instead if hanging is not your thing: the back sits flat without the loop.
What You Need
- 4 regular craft sticks, 11cm
- Hot glue gun
- 1 small photo, cropped to about 6cm square
- Cardstock backing, 7cm square
- Small rhinestone gems or mini pompoms, for the corners
- 15cm ribbon, for hanging
How to Make It
- Glue the four sticks into a square frame, overlapping the ends like a log cabin corner, so each stick sits on top of the one before it.
- Hold the final corner for ten seconds; an adult should run this join since hot glue sets within seconds and a slipped corner is hard to fix once it has gone off.
- Glue the cardstock square to the back of the frame, leaving the front opening clear.
- Trim the photo to fit the opening and glue it to the cardstock, centred behind the frame.
- Glue a small rhinestone or pompom to each corner of the frame.
- Glue a ribbon loop to the top back corner and leave flat for ten minutes to set.
🛍 Shopping guide
Popsicle Stick Angel
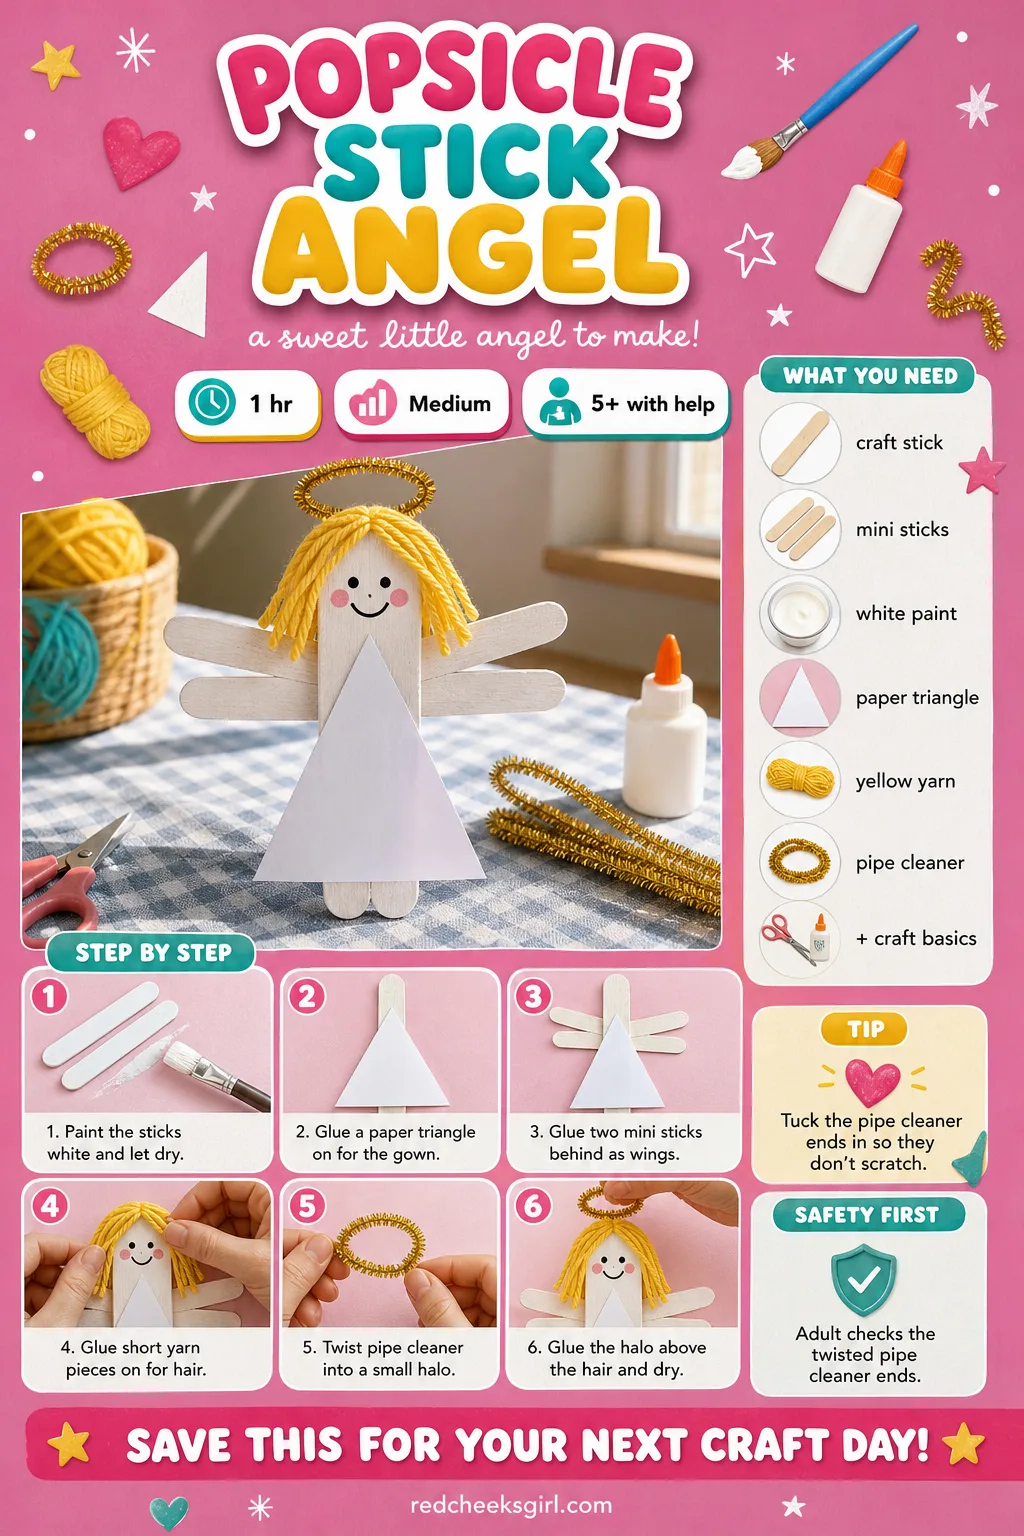
An angel out of one stick and a paper fan sounds flimsy on paper, and then it is finished and sitting on the mantel with its little triangle gown looking like something from a shop that sells only very expensive things. The fan of two mini sticks behind the back does the work real feathers would, without a single feather shedding on the carpet.
A loop of gold pipe cleaner twisted into a ring makes the halo, with no extra trip to the shop required.
What You Need
- 1 regular craft stick, 11cm, for the body
- 2 mini craft sticks, for the wings
- White acrylic paint
- 1 small paper or cardstock triangle, 6cm, for the gown
- Short length of yellow yarn, for the hair
- 5cm gold pipe cleaner, for the halo
- Craft glue
How to Make It
- Paint the long stick and the two mini sticks white on both sides and let them dry for 15 minutes.
- Glue the paper triangle over the lower half of the long stick so it flares out like a gown, with the stick’s top end free for the head.
- Glue the two mini sticks to the back of the stick in a wide V, like an open fan, to form the wings.
- Snip short lengths of yellow yarn and glue them across the top of the stick for hair, trimming the ends level once the glue has caught.
- Bend the pipe cleaner into a small circle and twist the ends together; an adult should check the twisted ends are tucked in so they do not scratch.
- Glue the halo circle just above the hair, resting flat against the back of the head, and leave the whole angel flat for 20 minutes to set.
🛍 Shopping guide
Popsicle Stick Wreath
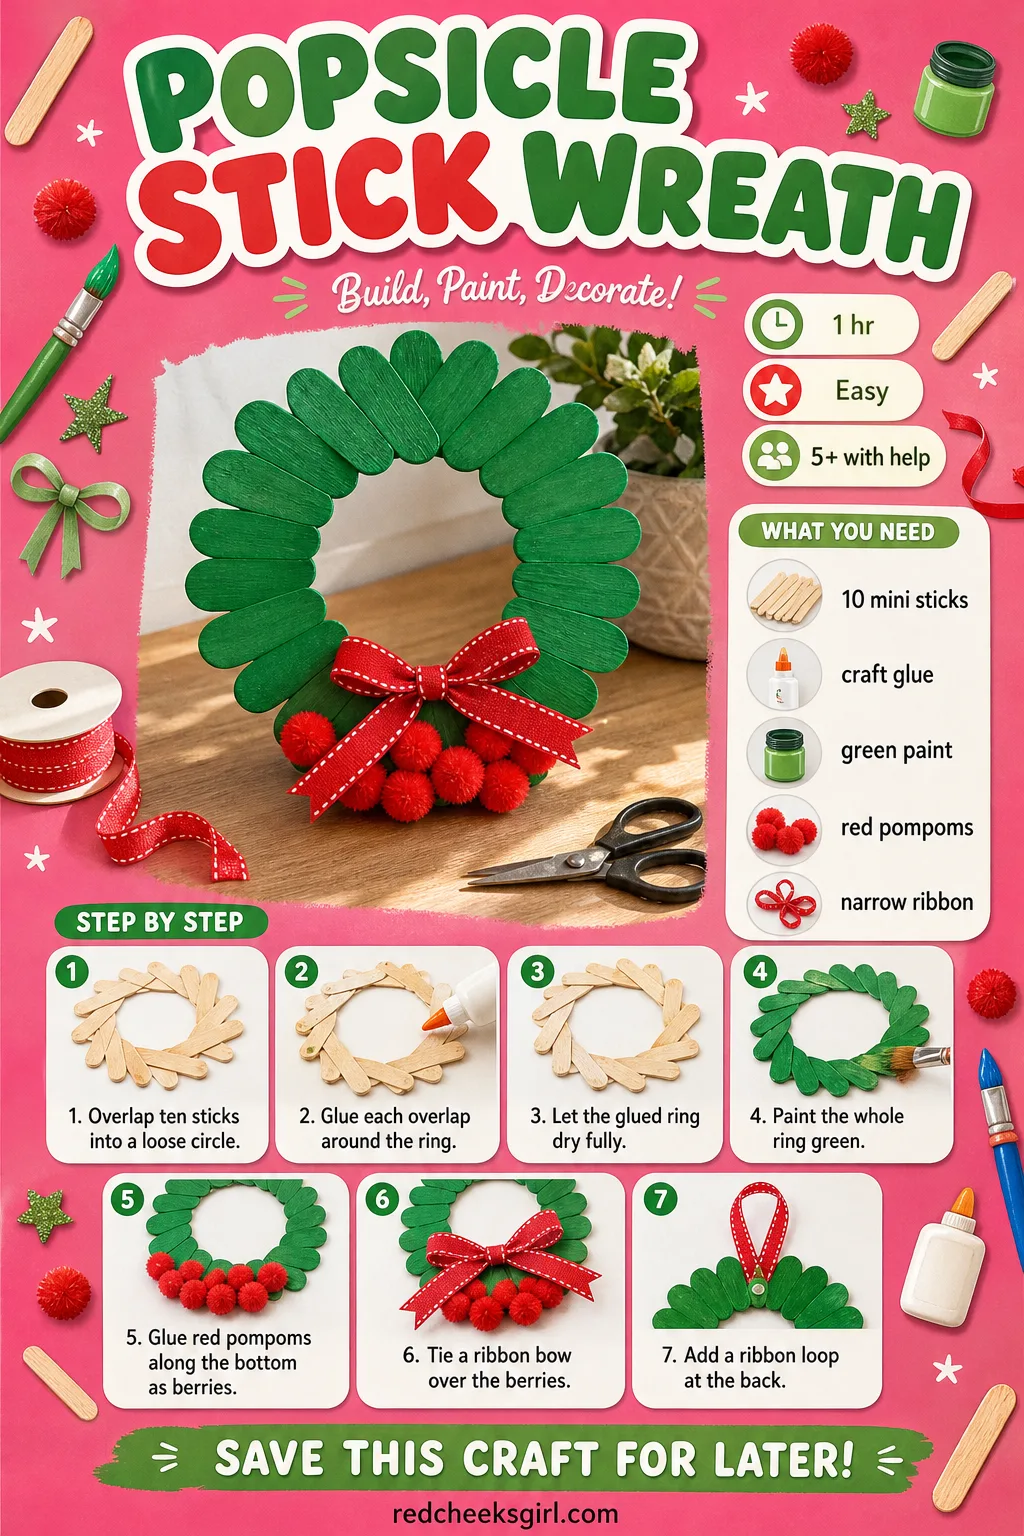
A wreath for the inside of the house, the one that goes on the fridge or a bedroom door rather than braving the weather outside. Sticks glued in a ring and painted a confident green hold their shape far better than you would expect from something so flat.
A scatter of tiny red pompom berries at the bottom does the rest, and the whole thing stores flat in a drawer for the rest of the year.
What You Need
- 10 mini craft sticks
- Craft glue or hot glue
- Green acrylic paint
- 6 small red pompoms, 1cm
- 20cm narrow ribbon, for the bow and hanger
How to Make It
- Arrange the ten mini sticks in a loose circle on the table, each one overlapping the next by about a third of its length, like the numbers on a clock face.
- Glue each overlap in turn, working around the circle, and leave the ring flat for 15 minutes until every join has set.
- Paint the whole ring green on both sides and let it dry for 15 minutes.
- Glue the red pompoms in a small cluster along the bottom edge of the wreath to look like berries.
- Tie a small bow from the ribbon and glue it over the top of the pompom cluster.
- Glue a ribbon loop to the back at the top for hanging, and leave flat for 15 minutes before hanging it up.
🛍 Shopping guide
Popsicle Stick Advent Calendar
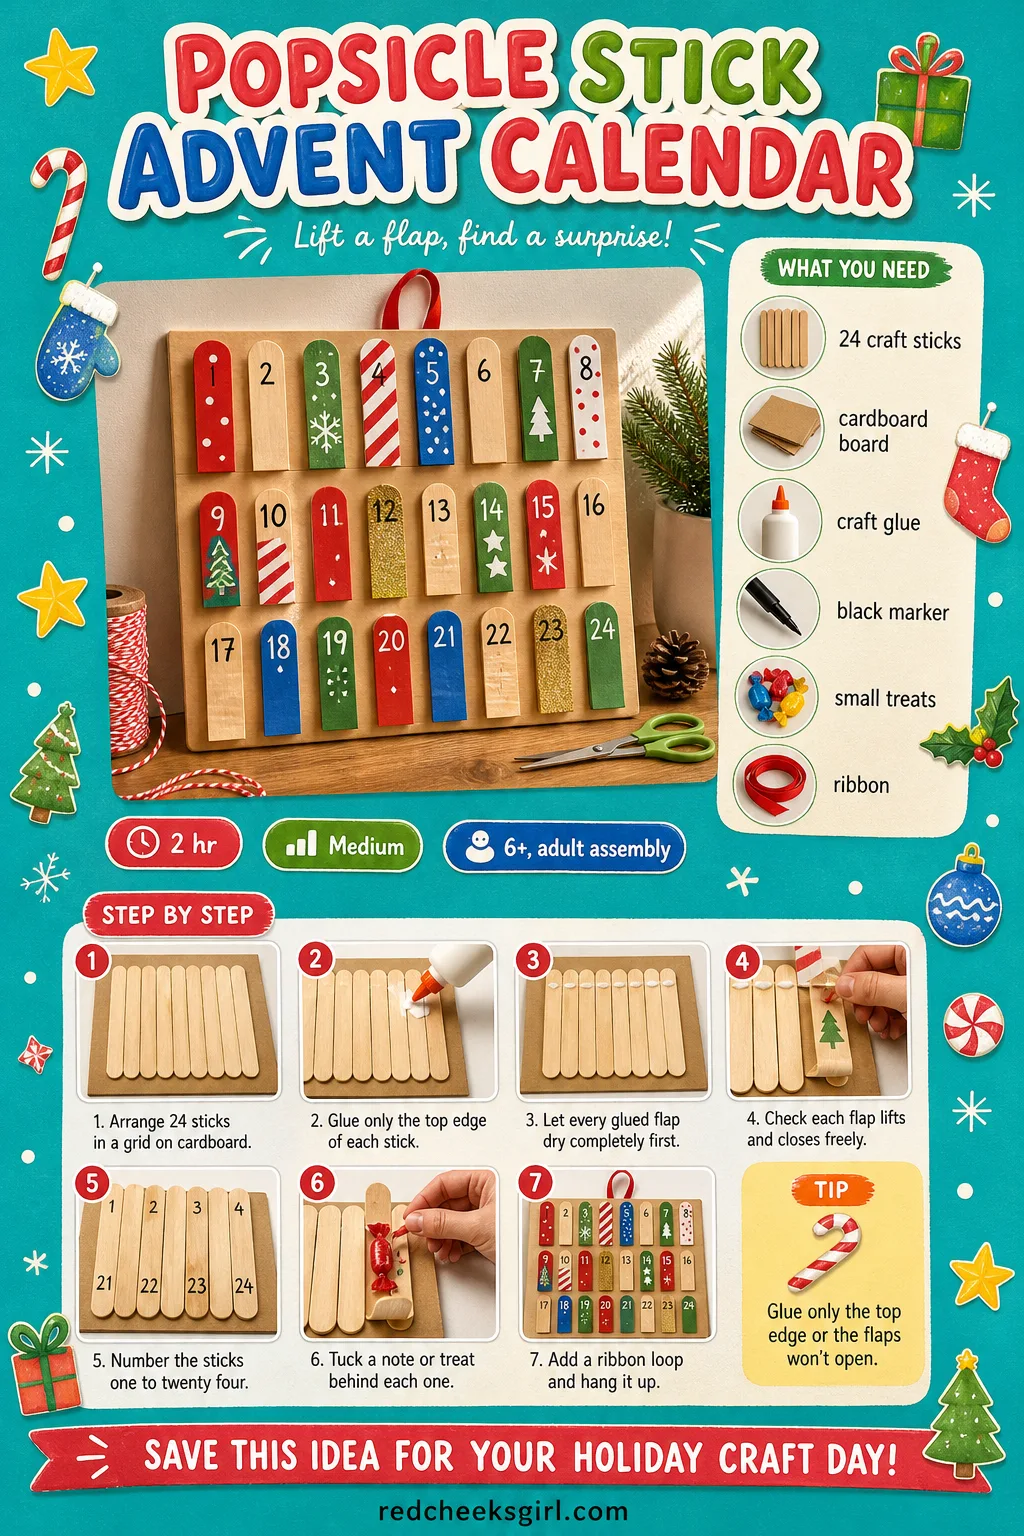
Shop-bought advent calendars with chocolate behind every door run out of chocolate by the third of the month if more than one child lives in the house. Twenty-four jumbo sticks glued side by side onto a backing board, each one lifting like a little flap, hold a note or a tiny treat behind every door, and nobody can see tomorrow’s through the gaps.
It takes the longest of anything here, mostly because of the glue drying flat, so start it on a quiet weekend rather than the first of the month.
What You Need
- 24 jumbo craft sticks, 15cm
- 1 sheet stiff cardboard or thick cardstock, A3 size (42cm x 30cm)
- Craft glue
- Black fine-tip marker
- 24 small notes, stickers, or treats, to tuck behind each stick
- Ribbon, for hanging
How to Make It
- Lay the cardboard flat and arrange the 24 sticks across it in a neat grid, leaving a gap between each one roughly the width of a finger.
- Glue only the top one centimetre of the back of each stick, then press each one onto the board so the bottom hangs free like a little flap; let the glue dry fully for at least an hour before testing.
- Once dry, lift each flap gently to check it swings freely without tearing away from the board.
- Number the sticks from 1 to 24 in any order you like with the marker, writing clearly enough to read from across the room.
- Slide a small treat or folded note behind each numbered stick, tucking it flat against the board so the flap still closes.
- Glue a ribbon loop to the top back of the board for hanging, and leave flat for 20 minutes before mounting it on the wall.
🛍 Shopping guide
Popsicle Stick Penguin
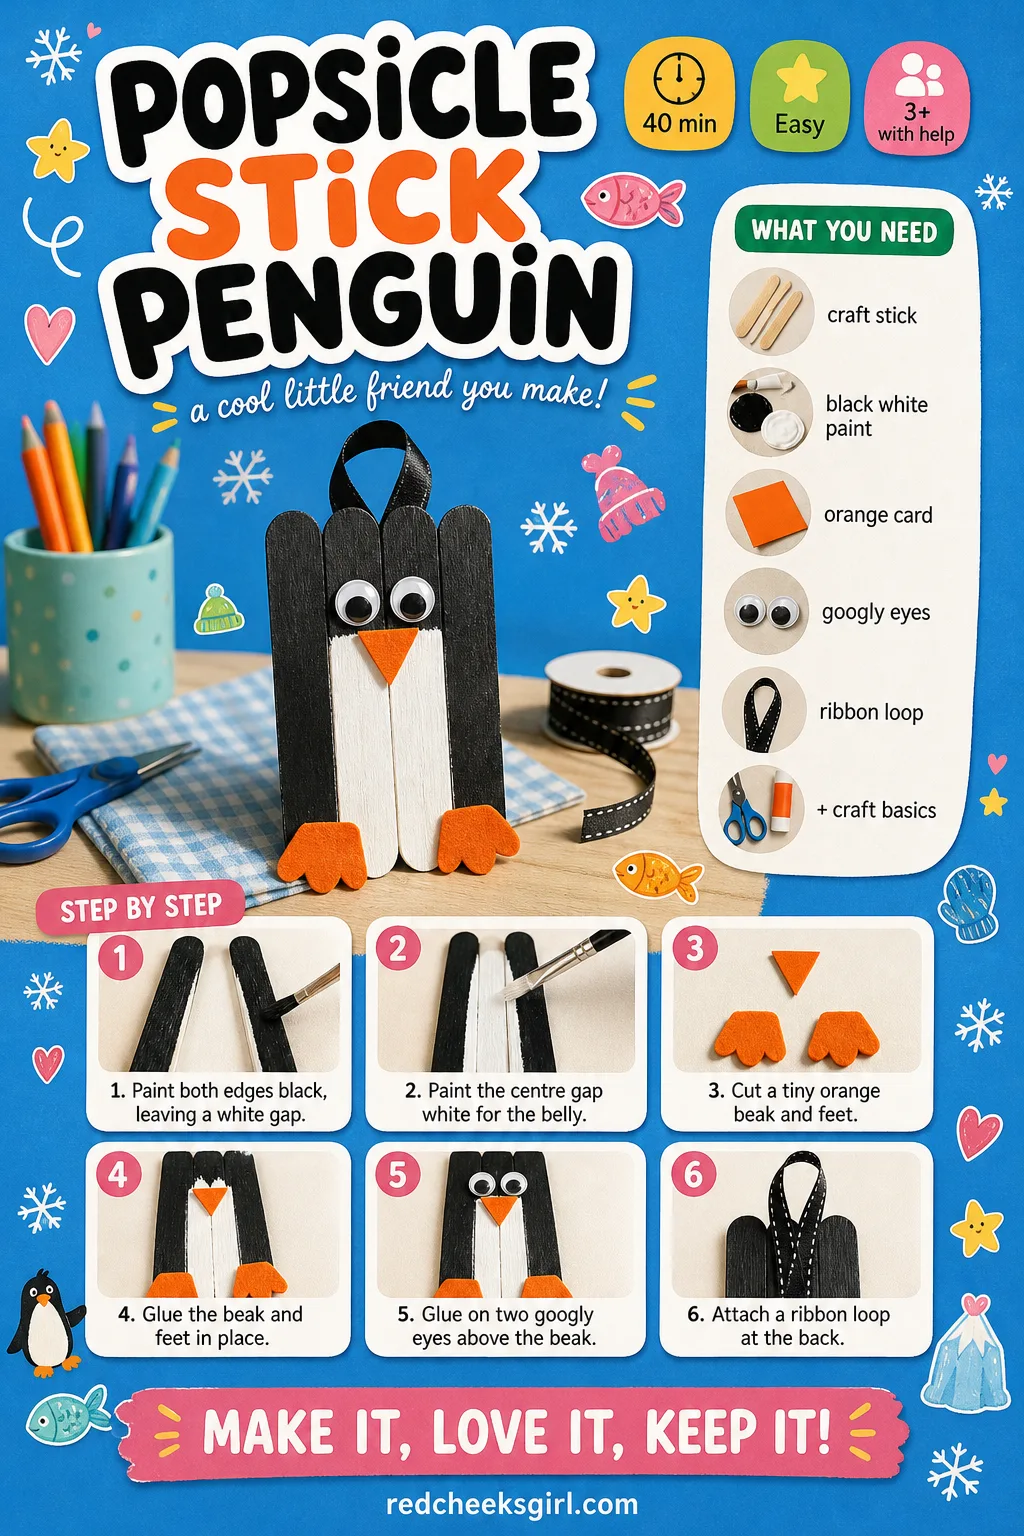
Black and white paint on a single stick turns into a penguin faster than almost anything else here, which matters on the day the children have already used up their patience on the tree. The belly stays a clean white oval if the black sides go on first and dry before the middle gets filled in.
A scrap of orange card folded in half makes feet that actually stand the stick upright on a shelf.
What You Need
- 1 jumbo craft stick, 15cm
- Black and white acrylic paint
- Small scrap of orange card or felt, for the beak and feet
- 2 googly eyes, 8mm
- Craft glue
- 15cm ribbon, for hanging
How to Make It
- Paint both edges of the stick black, leaving an oval gap down the centre unpainted, and let it dry for 15 minutes.
- Paint the centre oval white for the belly and let it dry for a further 10 minutes.
- Cut a tiny triangle of orange card for the beak and a small folded strip for the feet.
- Glue the beak to the lower face area and the feet to the very bottom edge of the stick so it can stand propped against something.
- Glue the two googly eyes above the beak.
- Glue a ribbon loop to the back and leave flat for ten minutes to set before hanging.
🛍 Shopping guide
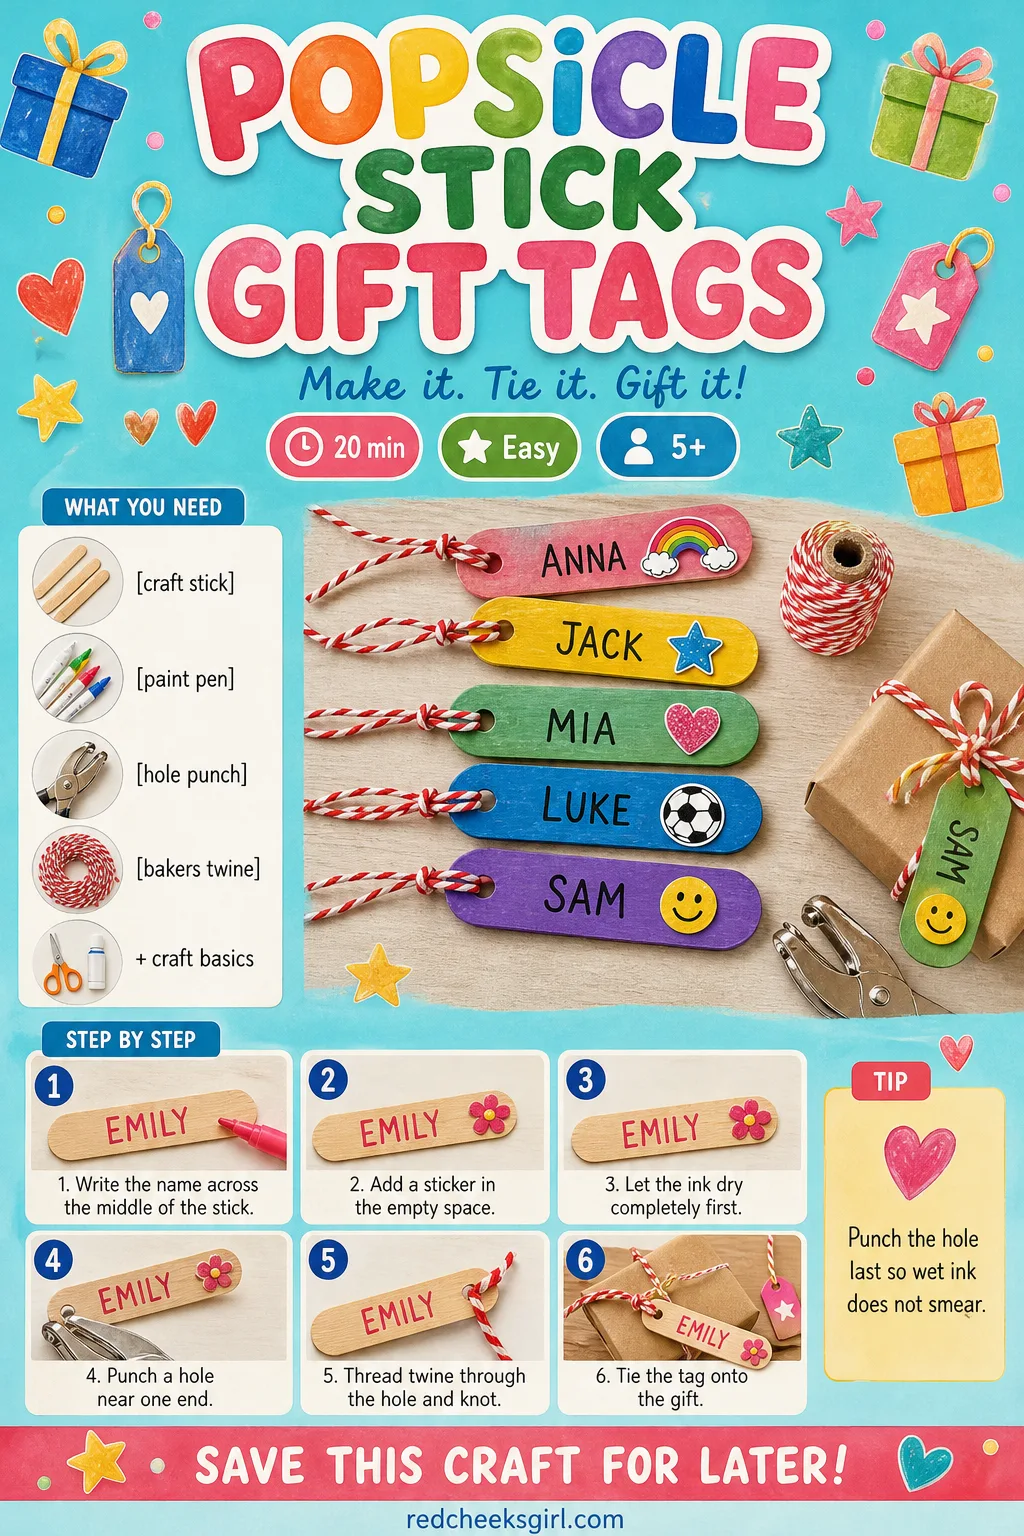
Popsicle Stick Gift Tags
Shop-bought gift tags cost more than they should for a scrap of card with a hole in it, and these use up the sticks already sitting in the drawer. One stick, one name, one small sticker, and the present under the tree looks finished rather than rushed.
These are the fastest make on the whole list, ten minutes and done, so hand them to whoever needs a small job while dinner is in the oven.
What You Need
- 1 regular craft stick per tag, 11cm
- Paint pen or fine marker, in a festive colour
- Small hole punch
- 15cm length of red and white bakers twine or ribbon, per tag
- Tiny sticker or stamp, optional, for decoration
How to Make It
- Write the recipient’s name clearly across the middle of the stick with the paint pen, leaving a clear space near one end.
- Add a small sticker or stamped design in the empty space if you want more than just a name.
- Let the paint pen ink dry fully for about ten minutes before handling the stick again.
- Punch a small hole through the clear end of the stick, keeping it about half a centimetre from the tip so it does not split.
- Thread the twine or ribbon through the hole and knot it.
- Tie the finished tag onto the gift ribbon or string.
🛍 Shopping guide
Popsicle Stick Place Card Easel
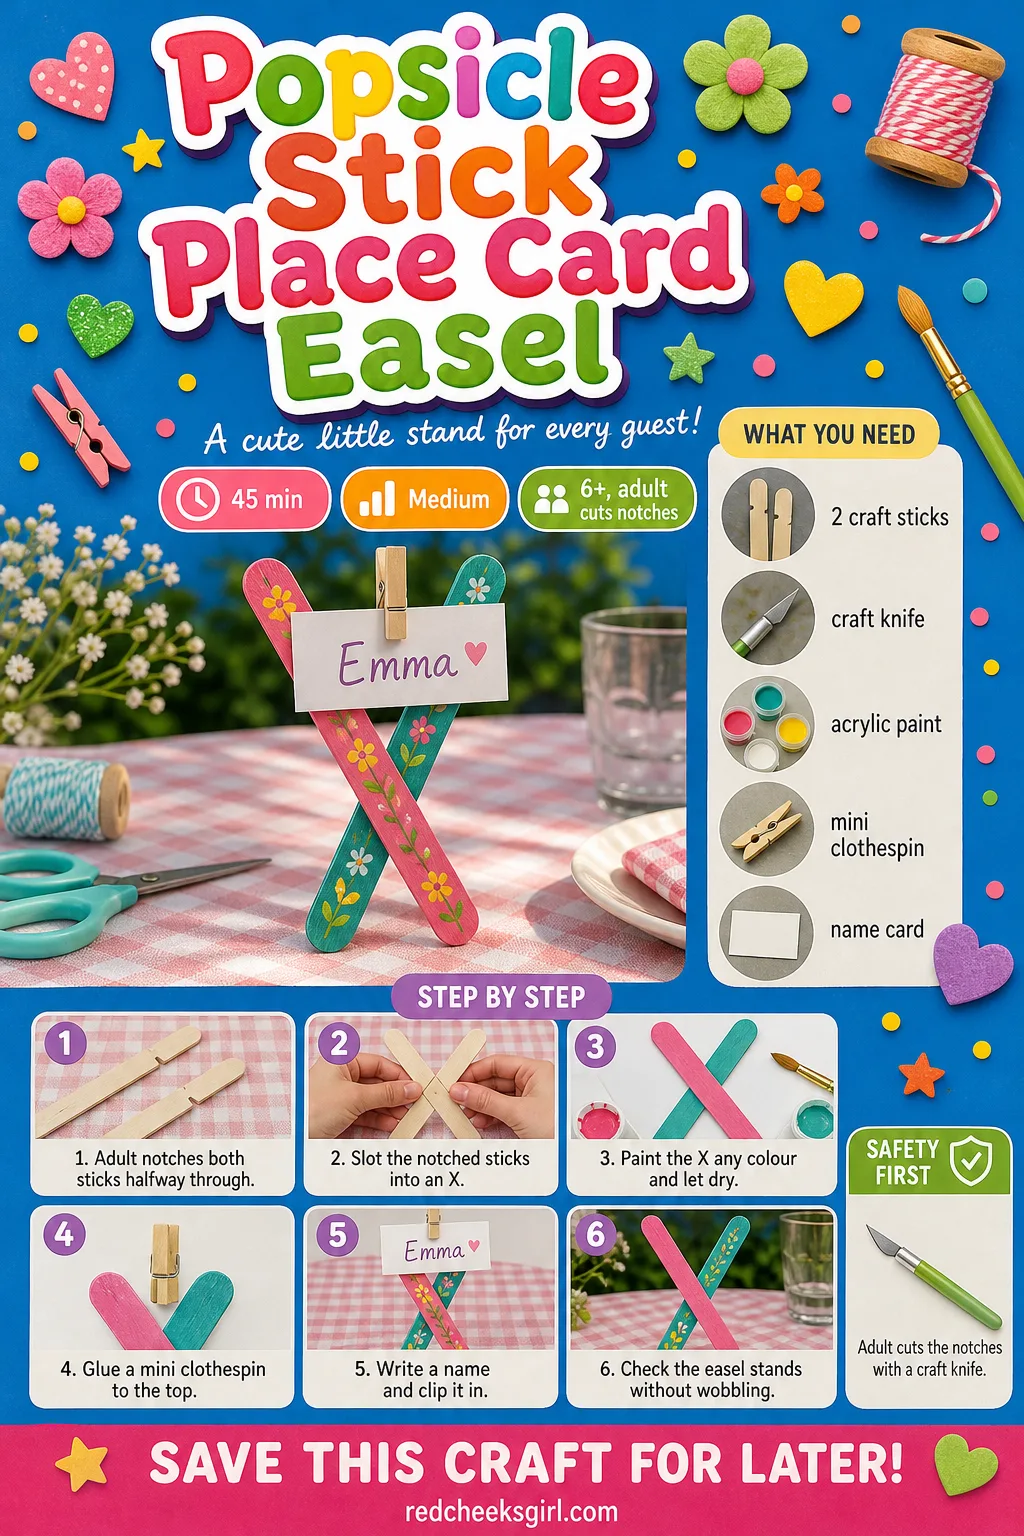
A dinner table looks finished the moment every seat has a name on it, and this little easel does that job better than a folded card that keeps sliding flat. Two notched sticks that lock together into an X hold a small card at just the right angle to read from across the table.
Keep the notching to the adult in the room: a craft knife through a thin stick needs a steady hand and a proper cutting mat underneath.
What You Need
- 2 jumbo craft sticks, 15cm
- Craft knife and cutting mat
- Acrylic paint, any colour
- 1 mini wooden clothespin
- Small cardstock card, 5cm x 3cm, for the name
How to Make It
- An adult marks the centre of each stick and cuts a narrow notch halfway through from opposite sides, one notch cut from the top edge and one from the bottom, using the craft knife on a cutting mat.
- Slot the two notched sticks together at the centre to form an X shape, checking that both legs sit flat and even on the table.
- Paint the whole X shape any colour you like and let it dry for 20 minutes.
- Glue the mini clothespin to the top of the X, angled slightly forward so a card slots into it easily.
- Write a name on the small card and clip it into the clothespin.
- Set the finished easel upright on the table to test it stands without wobbling before the party.
🛍 Shopping guide
Popsicle Stick Gingerbread House
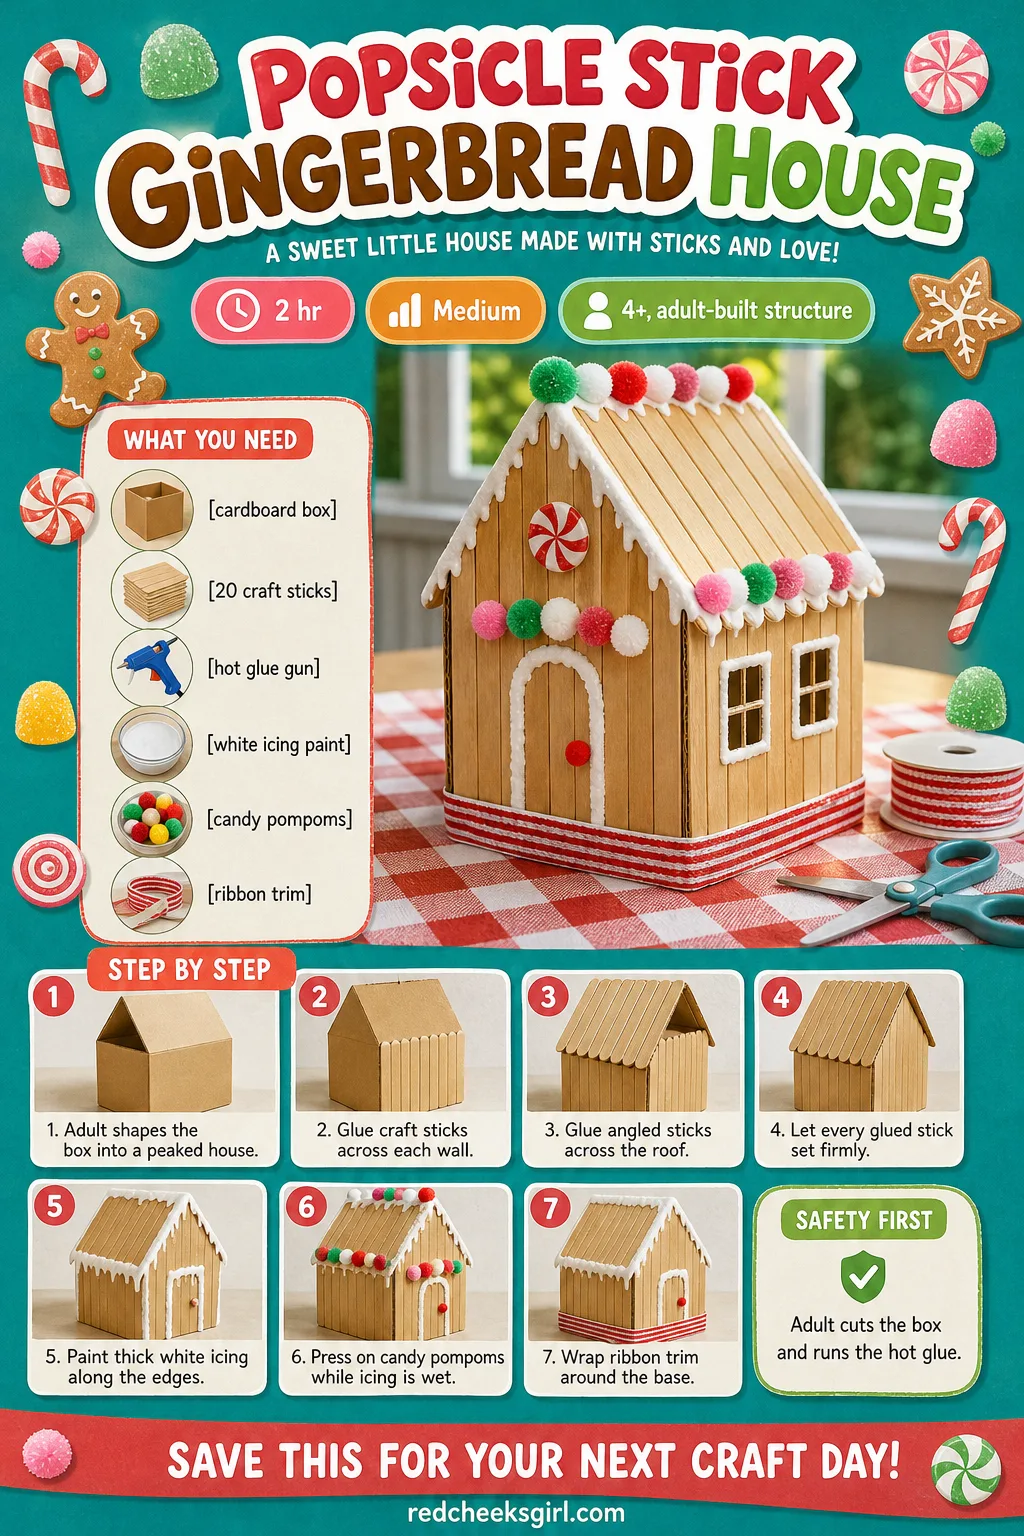
A real gingerbread house collapses by the second day and draws every ant in the postcode if it sits out too long. This one stands on the table through the whole season without going soft, built from a small box walled in craft sticks and iced in white paint instead of royal icing.
It is the biggest build on this page, so treat the construction as the adult’s job and the decorating, with all the fake candy, as everyone else’s.
What You Need
- 1 small cardboard box, about 10cm cube, or a cut-down cereal box
- 20 regular craft sticks, 11cm, to cover the walls and roof
- Hot glue gun
- White acrylic paint or thick white craft glue, for the icing
- Small mixed pompoms, buttons and sequins, for the candy decorations
- Short length of red and white twisted ribbon, for the trim
How to Make It
- An adult cuts the cardboard box down to a simple house shape with a peaked roof flap, or glues two triangle card pieces to a cube box to fake the peak.
- Glue craft sticks side by side across each wall of the box, trimming the last stick on each row to fit with scissors, and let the glue set for 15 minutes.
- Glue a second layer of sticks across the roof sections, angled to meet at the peak like real shingles.
- Once every stick has set firmly, paint or dab thick white glue along the roof edges and windowsills to look like dripping icing, and let it dry for 30 minutes.
- Glue pompoms, buttons and sequins over the icing in clusters to look like candy, pressing them into the glue while it is still slightly wet.
- Wrap the red and white ribbon around the base of the house as a trim and glue the ends at the back.
🛍 Shopping guide
Frequently Asked Questions
What age is best for popsicle stick Christmas crafts?
With plenty of adult help, toddlers aged one to three can join in by painting sticks, gluing on large pom-poms or cotton balls, and simple stick arrangements, focusing on sensory play rather than a tidy result. By three to five, most children can manage most painting and gluing tasks independently, especially with jumbo sticks, and can start cutting simple shapes with safety scissors.
What materials do you need for popsicle stick crafts?
The core kit barely changes from project to project: Popsicle sticks, craft glue, paint, and markers cover most of what is here, and glitter, ribbon, or mini pom poms cover the rest.
Can you use regular glue instead of hot glue?
Craft glue works for almost everything on this list, just with a longer wait. One commenter asked a maker exactly this about a popsicle stick tree ornament, and the answer was simple, “Yes, this would definitely work.” Expect to hold or weight the pieces for longer while it sets.
Are popsicle stick crafts safe for young kids?
Yes, as long as the basics are non-toxic: Popsicle stick crafts are perfect for little hands when you use non-toxic paints, glue, and markers. Save the scissors, hot glue gun and craft knife steps for an adult, since those are the only genuinely risky parts of any of this.
Can you reuse sticks from actual popsicles?
Yes: clean Popsicle sticks from frozen treats can be reused for crafts, so the stash collecting in the kitchen drawer is not wasted. Give them a wash and a full day to dry before painting, since damp wood holds paint badly.
How do you display finished popsicle stick crafts?
Not everything needs a branch: freestanding crafts like the stable or the sled can sit on a shelf, windowsill, or dinner table, and smaller flat pieces work just as well as greeting card embellishments or simple holiday bookmarks.

26 Christmas tree color schemes, one finished look per room, real and artificial, with the exact orn
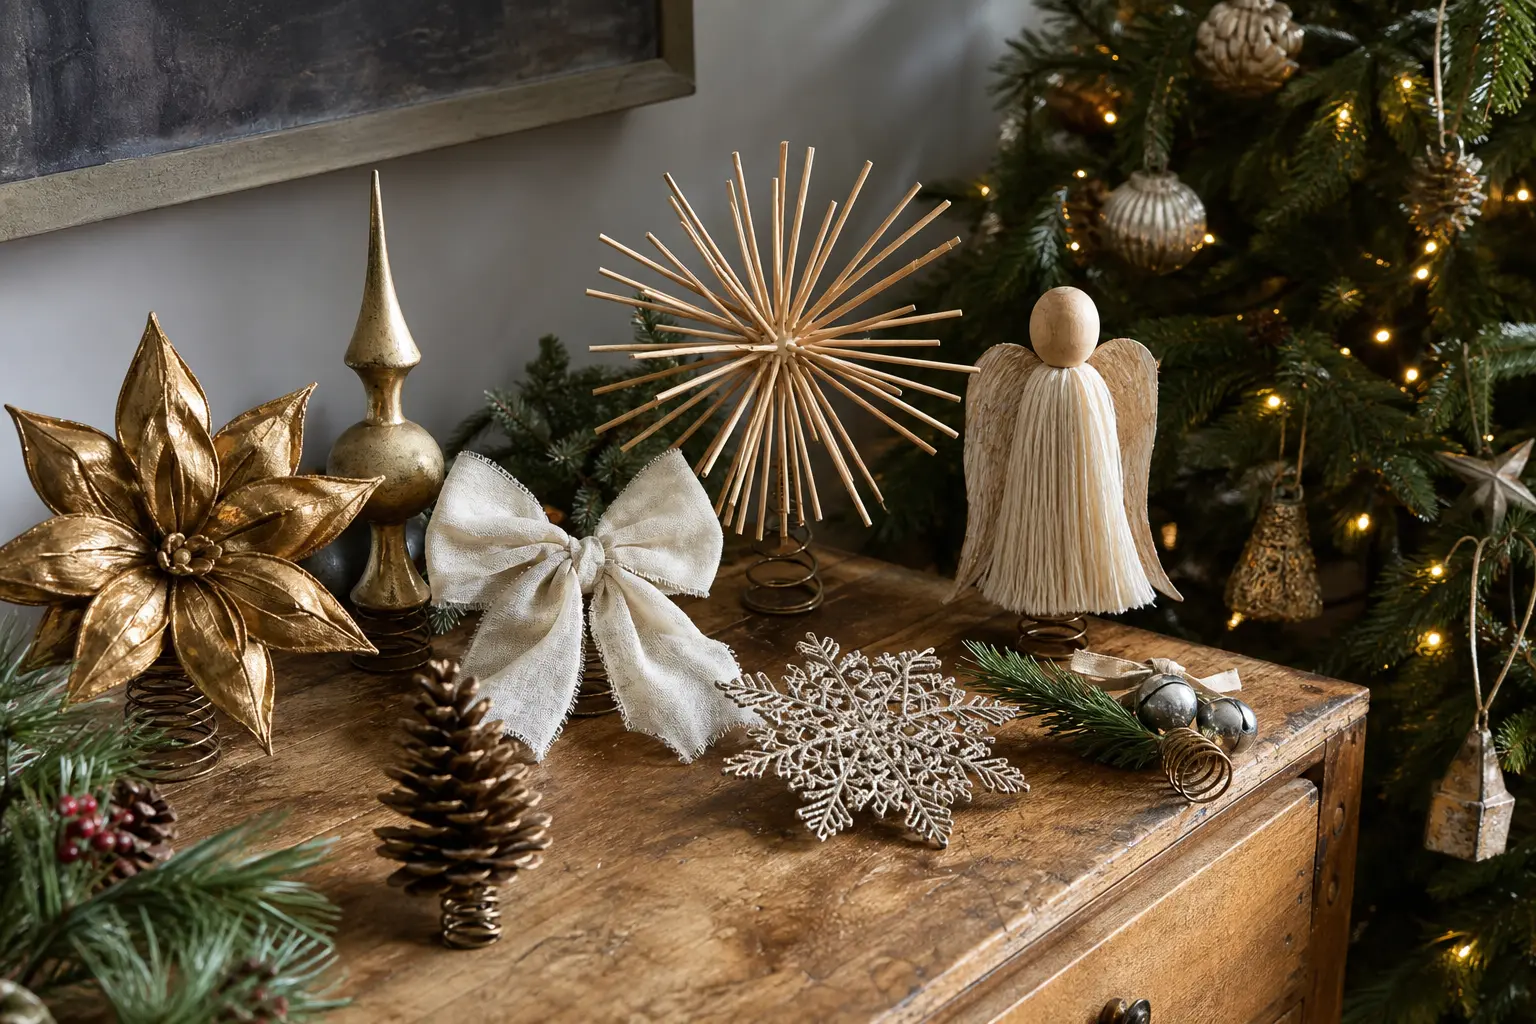
Eleven full tree looks built around the topper first, real and artificial, with the exact baubles, p
25 pink Christmas tree looks, real and artificial, in blush, rose and bubblegum, each with its own r
Leave a Reply