

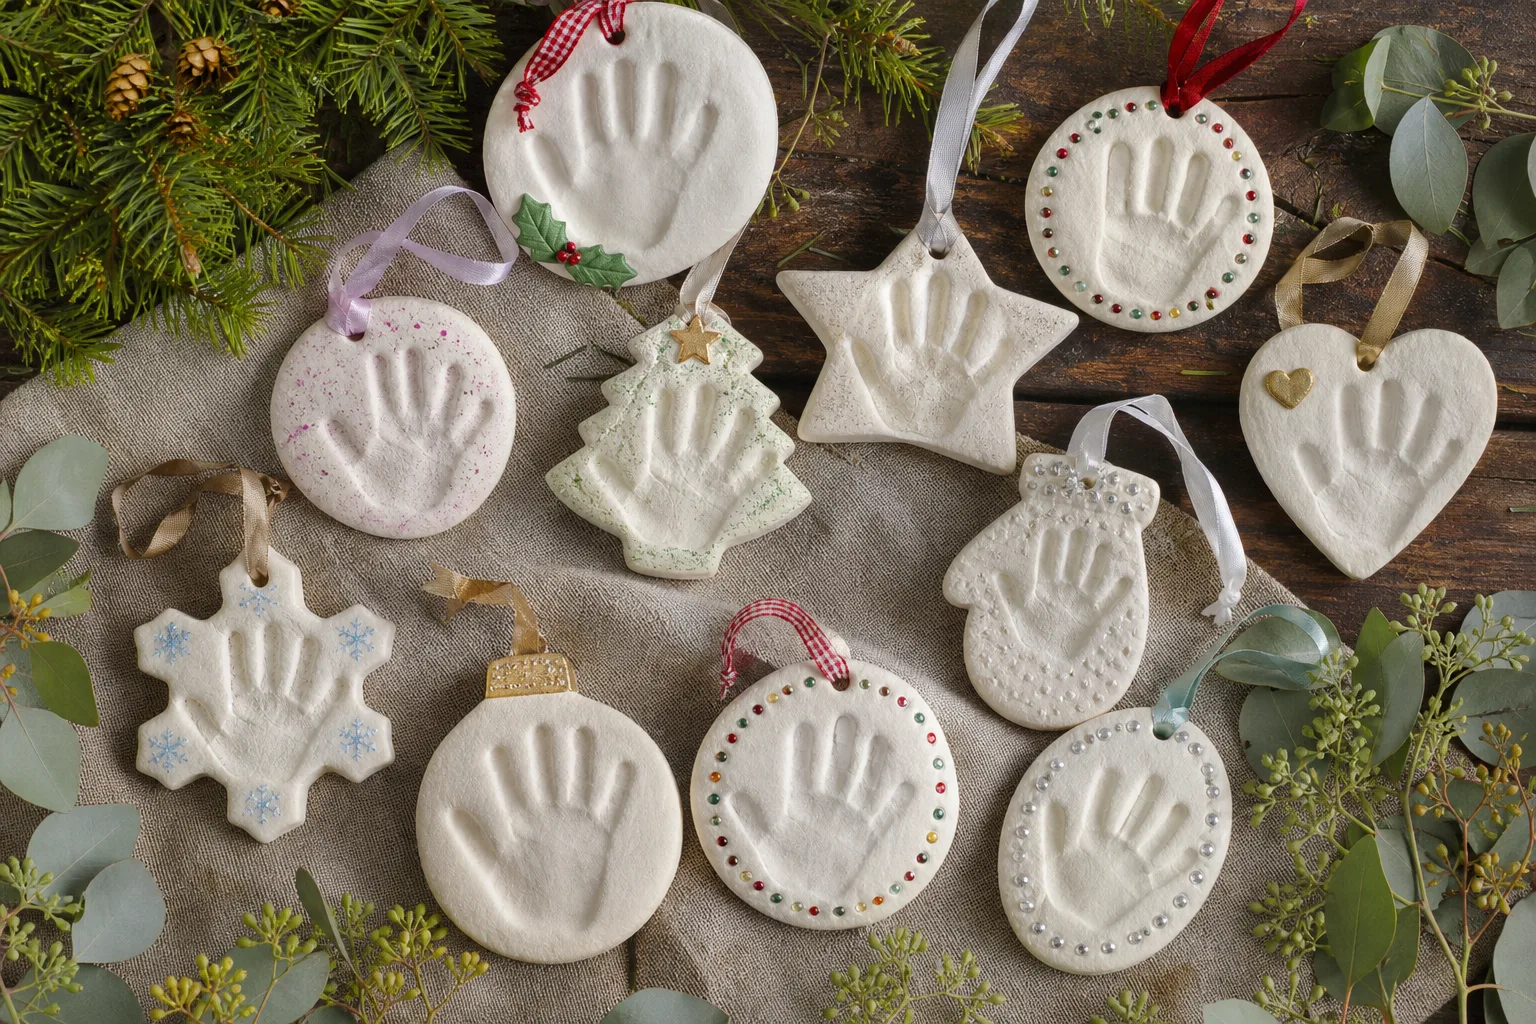
A box of shop ornaments looks the same every year, no matter how much it cost. A small hand pressed into dough looks like nobody else’s tree on earth, and it costs less than the coffee you had while the kids napped.
Salt dough handprint ornaments work because the hand itself is the whole decoration: no stencil, no printable, nothing to download. They mark how quickly a child is growing, which is exactly why people keep making them year after year. Below are twelve genuinely different takes, from the plain classic disc to a version that skips the oven entirely, so you can pick the one that matches the hour you actually have free.
This post contains affiliate links. If you buy through them, I may earn a small commission at no extra cost to you.
- Classic Round Salt Dough Handprint Ornament
- Santa Handprint Ornament
- Reindeer Handprint Ornament
- Angel Handprint and Footprint Ornament
- Snowflake Handprint Ornament
- Wreath Handprint Ornament
- Marbled Galaxy Handprint Ornament
- Gold-Leaf Framed Handprint Keepsake
- Family Handprint Medallion
- Air-Dry No-Bake Handprint Ornament
- Handprint Trinket Dish
- Handprint Gift Tag Ornament
- Frequently Asked Questions
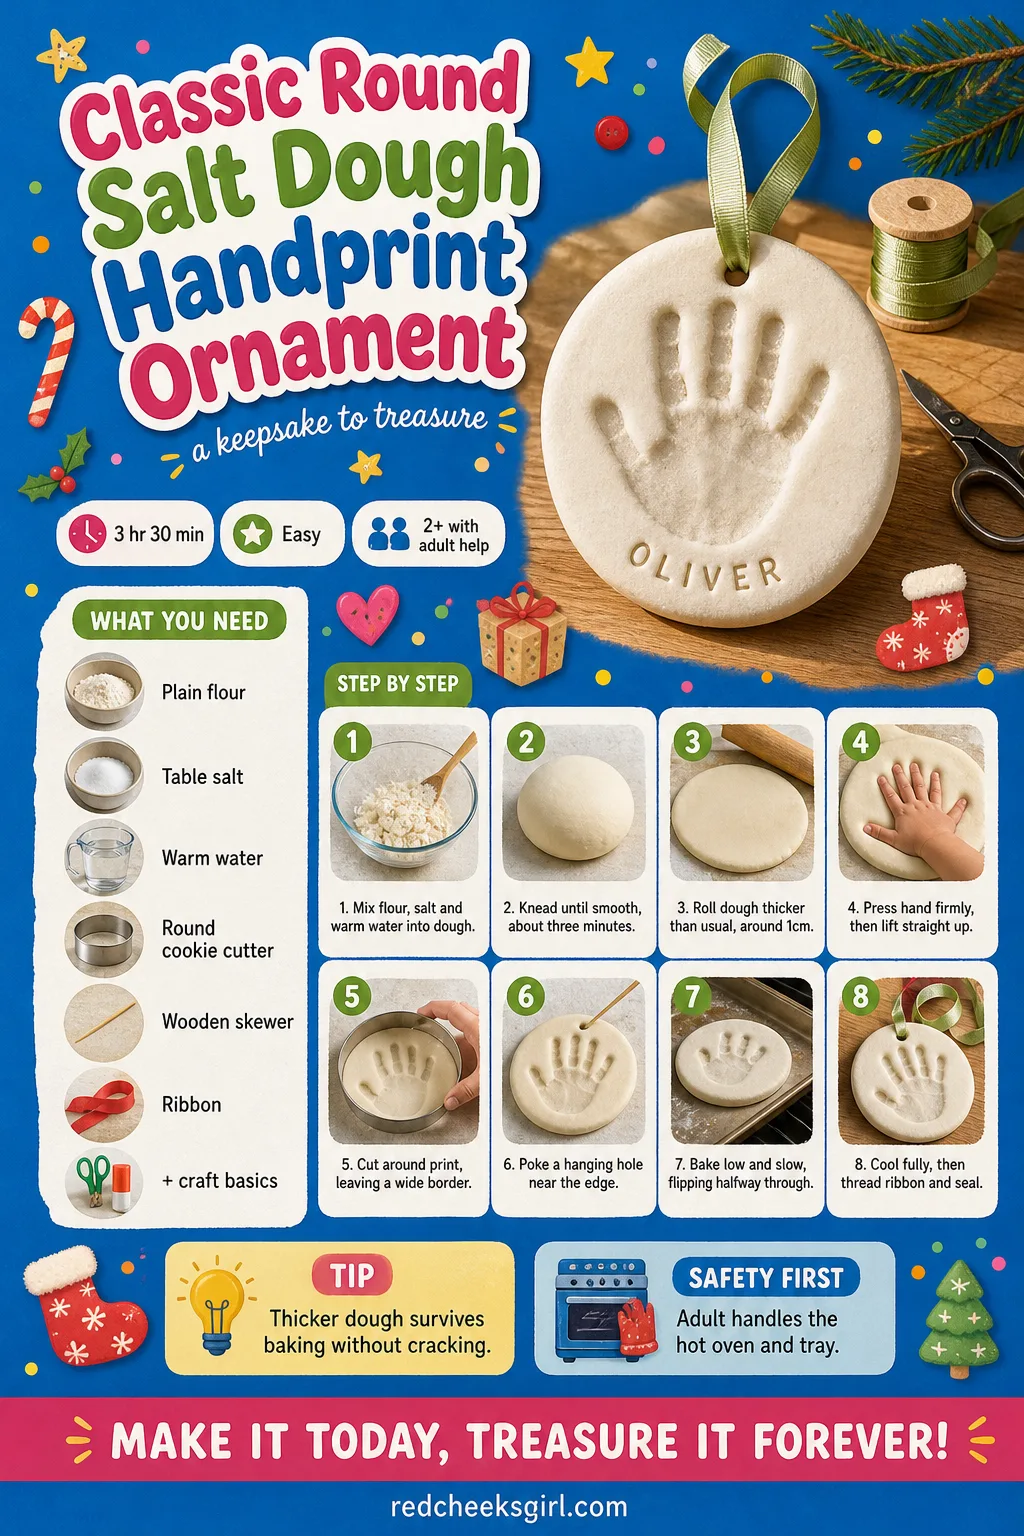
Classic Round Salt Dough Handprint Ornament
Start here if you have never done this before, because everything else on this list is a variation on it. Finished, it is a smooth ivory disc with one clear handprint pressed into the centre and a ribbon loop at the top, the kind of thing that looks handmade on purpose rather than by accident.
The base recipe is almost insultingly simple. A workable batch is about a cup of plain flour to half a cup of salt and half a cup of warm water, enough dough for one generous handprint. Roll it thicker than you would for a cut-out star, because a thin sheet does not survive a small hand pressing down on it, and most people reach for a round cookie cutter four to five inches across so the whole palm fits with room to spare. If the child wriggles, do not panic: a good print sometimes takes a few tries with a baby’s hand, and the leftover dough rolls out again.
What You Need
- 1 cup plain flour
- 1/2 cup table salt
- 1/2 cup warm water
- rolling pin
- large sheet of parchment paper
- 4 to 5 inch round cookie cutter (or a glass to trace around)
- wooden skewer or thick drinking straw
- 30cm ribbon or garden twine
- clear varnish or matte Mod Podge
How to Make It
- Stir the flour and salt together in a bowl, then work in the warm water a little at a time until a soft, non-sticky dough forms.
- Knead the dough on a floured surface for about three minutes, until it feels smooth rather than crumbly.
- Roll it out between two sheets of parchment paper to about 1cm thick, thicker than you would for a cut-out shape, so the handprint survives baking.
- Press the child’s hand flat and firmly into the dough for a count of three, then lift it straight up without dragging.
- Cut around the print with the cookie cutter or glass rim, leaving at least a 1cm border of dough.
- Push the skewer through the top edge to make a hanging hole, well clear of the fingers.
- Slide the parchment onto a baking tray and bake at 200°F (95°C) for 2 to 3 hours, flipping halfway, until it feels solid all the way through.
- Let it cool completely on the tray before threading the ribbon and sealing with varnish once fully dry.
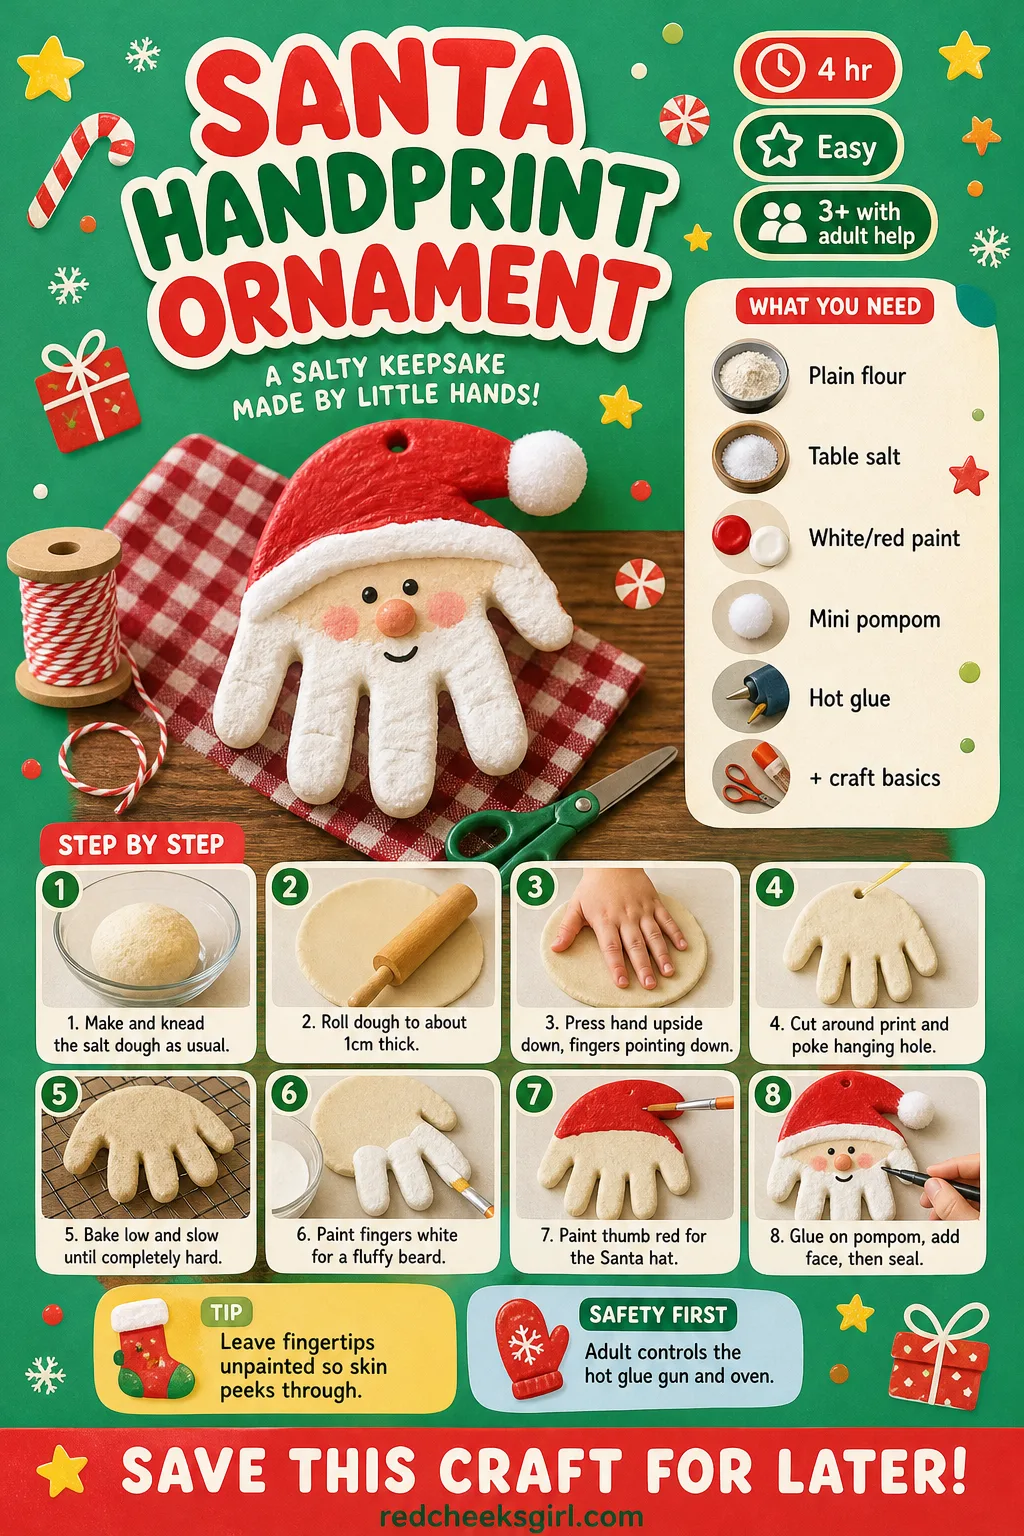
Santa Handprint Ornament
Grandparents already have a phone full of photos. What they do not have is a Santa made entirely from a toddler’s hand, fingers fanned into a beard and the thumb bent sideways into a hat. Turned upside down before pressing, the fingers read as the beard, the palm as the face, and the thumb as the hat leaning off to one side.
Paint it once the baked disc has cooled completely, never while it is still warm, or the acrylic drags instead of covering cleanly.
What You Need
- 1 cup plain flour
- 1/2 cup table salt
- 1/2 cup warm water
- rolling pin and parchment paper
- 4 to 5 inch round cookie cutter
- wooden skewer
- white, red, pink and black acrylic paint
- small paintbrush
- 1 mini white pompom, 1cm
- hot glue gun
- clear varnish
How to Make It
- Mix the flour, salt and warm water into a dough and knead until smooth.
- Roll it to about 1cm thick between the parchment sheets.
- Turn the child’s hand upside down, fingers pointing down, and press it firmly into the dough.
- Cut around the print with the cookie cutter, leaving a wide border, and poke a hanging hole at the top.
- Bake at 200°F (95°C) for 2 to 3 hours until hard, then cool completely on the tray.
- Paint the spread fingers white for the beard, leaving the very fingertips bare so a little skin tone peeks through.
- Paint the thumb red for the hat and dot a line of white along its folded edge for the fur trim.
- Once the paint is dry, have an adult glue on the pompom with the hot glue gun, add two black dot eyes and pink cheeks with a cotton swab, then seal with varnish.
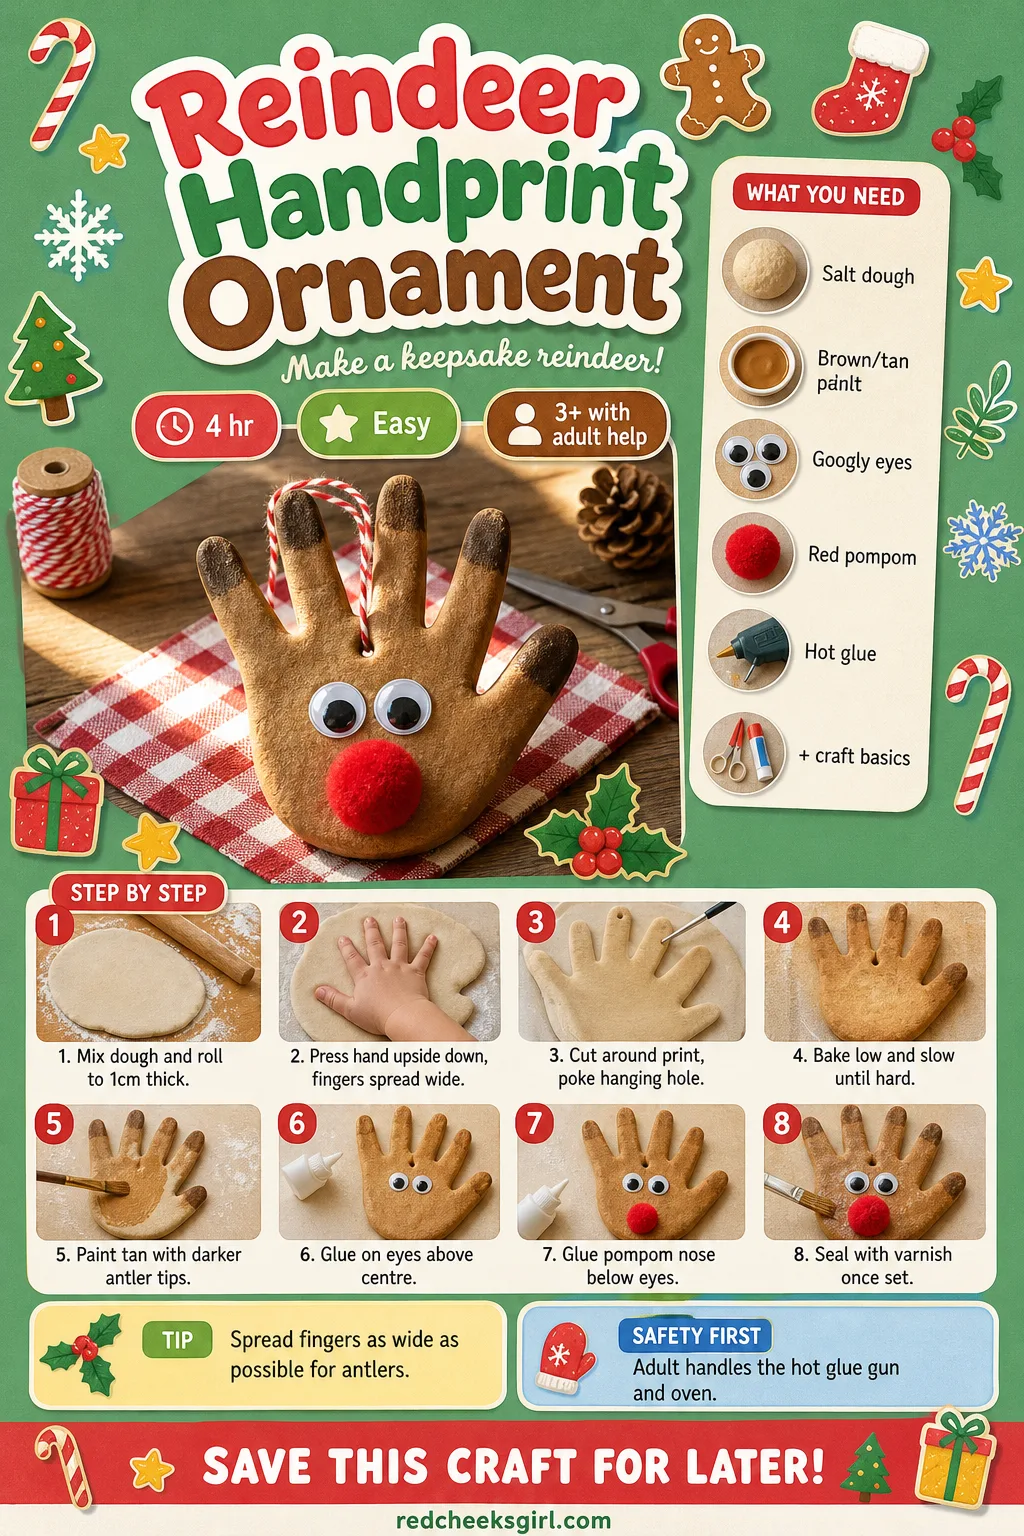
Reindeer Handprint Ornament
If Santa feels fiddly, this one is more forgiving, because the whole hand gets one easy coat of brown rather than careful detail work. Spread wide, the fingers become antlers, the palm becomes the face, and a red pompom nose does most of the charm on its own.
It hangs well anywhere a Santa would, but reads a little less formal, which makes it the one to put on a child’s own small gift tree in their room rather than the main one in the hallway (if you would rather keep the good tree looking matched).
What You Need
- 1 cup plain flour
- 1/2 cup table salt
- 1/2 cup warm water
- rolling pin and parchment paper
- 4 to 5 inch round cookie cutter
- wooden skewer
- brown and tan acrylic paint
- 2 googly eyes, 10mm
- 1 red pompom, 1.5cm
- hot glue gun
- clear varnish
How to Make It
- Mix and knead the dough until smooth, then roll to about 1cm thick.
- Spread the child’s fingers as wide as they will go and press the hand firmly into the dough, upside down so the fingers point down and out.
- Cut around the print with the cookie cutter, leaving a wide border, and poke a hanging hole near the wrist end.
- Bake at 200°F (95°C) for 2 to 3 hours until hard, then cool fully.
- Paint the whole shape tan, then add slightly darker brown at the fingertips to suggest antler tips.
- Once dry, have an adult glue the two googly eyes above centre and the red pompom just below them as the nose.
- Seal with varnish once the glue has set and thread the ribbon.
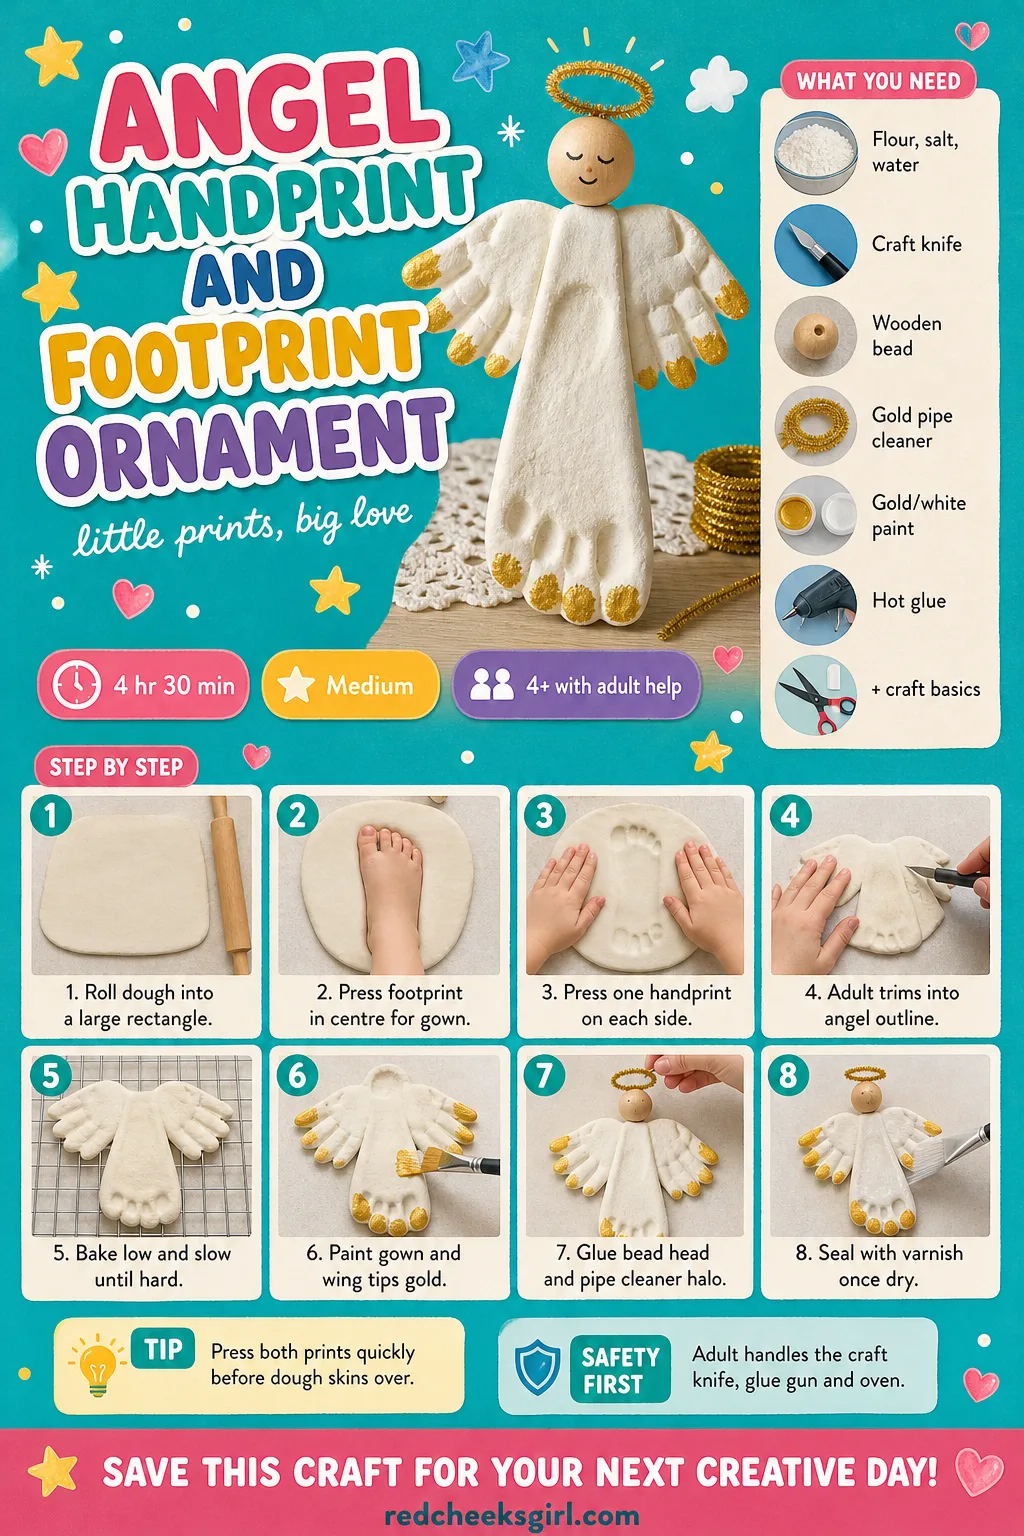
Angel Handprint and Footprint Ornament
This is the one for the sibling who insists on helping, since it genuinely needs two prints: a footprint down the middle for the gown, and a handprint flaring out on each side for wings. It is a little fiddly getting both lined up before the dough skins over, so if the first attempt looks lopsided, smooth that section flat and press again while it is still soft.
A small wooden bead becomes the head and a loop of gold pipe cleaner becomes the halo, so the finished piece stands somewhere between a craft and a tiny sculpture.
What You Need
- 2 cups plain flour
- 1 cup table salt
- 1 cup warm water
- rolling pin and parchment paper
- craft knife
- wooden skewer
- 1 pre-drilled wooden bead, 15mm
- 15cm thin gold pipe cleaner
- gold and white acrylic paint
- hot glue gun
- clear varnish
How to Make It
- Mix the larger batch of dough and knead well, then roll into a large rectangle about 1.2cm thick.
- Press a footprint firmly down the centre, toes pointing up, for the gown.
- Press one small handprint on each side, fingers angled outward, for the wings (the same child twice, or two siblings).
- Have an adult trim around the three prints with a craft knife into one flowing angel outline, leaving a small gap above the footprint for the neck.
- Poke a hanging hole, then bake at 200°F (95°C) for about 3 hours until hard, and cool completely.
- Paint the footprint gown white with a gold wash, and brush a faint gold wash along the wing fingertips.
- Once dry, have an adult hot glue the wooden bead above the neck gap as the head, then bend and glue the pipe cleaner into a halo loop behind it.
- Seal with varnish once fully dry.
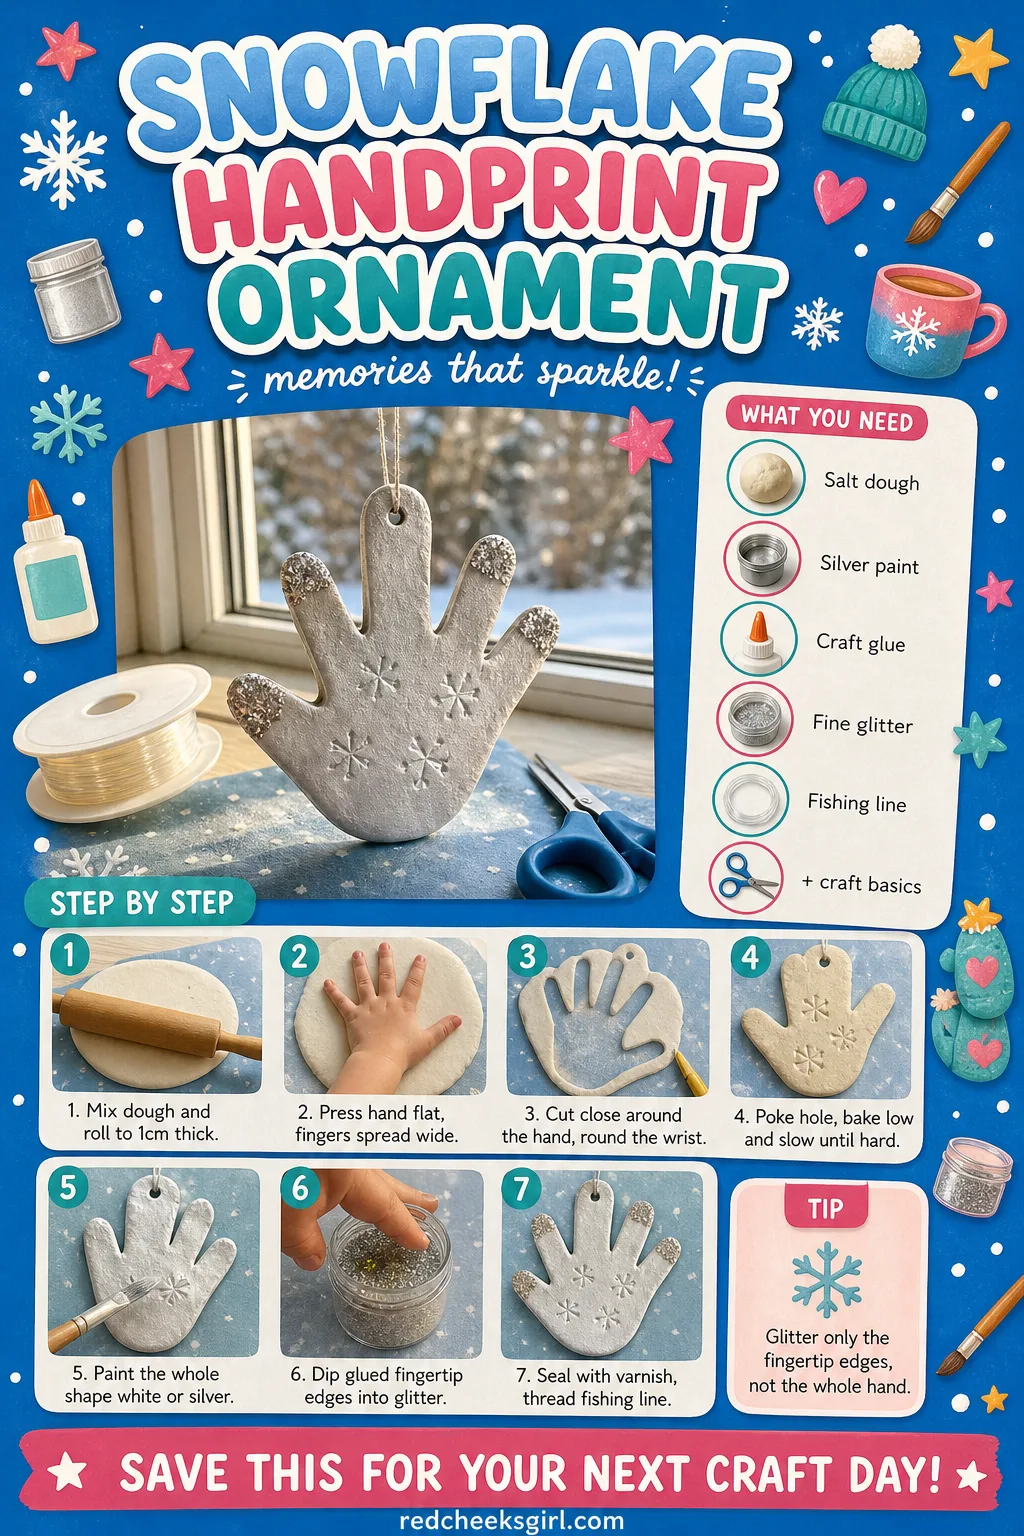
Snowflake Handprint Ornament
Fingers spread as wide as they will go, this one reads as a snowflake rather than a hand the moment it is painted silver, especially hung in a window where it catches the light from both sides. It needs no careful face-painting at all, so it is the quickest of the painted versions here.
Hang it on clear fishing line rather than ribbon so it looks like it is floating, not dangling.
What You Need
- 1 cup plain flour
- 1/2 cup table salt
- 1/2 cup warm water
- rolling pin and parchment paper
- wooden skewer
- white or silver acrylic paint
- craft glue
- fine iridescent glitter
- clear varnish
- clear fishing line or thread
How to Make It
- Mix and knead the dough, then roll it to about 1cm thick.
- Spread the fingers as wide as they will go and press the hand flat into the dough.
- Cut close around the whole hand outline, leaving only a 3mm border, and round off the wrist end so there are no sharp corners.
- Poke a hanging hole near the wrist, well clear of the fingers, then bake at 200°F (95°C) for 2 to 3 hours until hard, and cool fully.
- Paint the entire shape white or silver and let it dry completely, about 30 minutes.
- Brush a thin line of craft glue along just the fingertip edges and dip into the glitter, tapping off the excess.
- Once the glitter glue has dried, seal with varnish and thread the fishing line through the hole.
🛍 Shopping guide
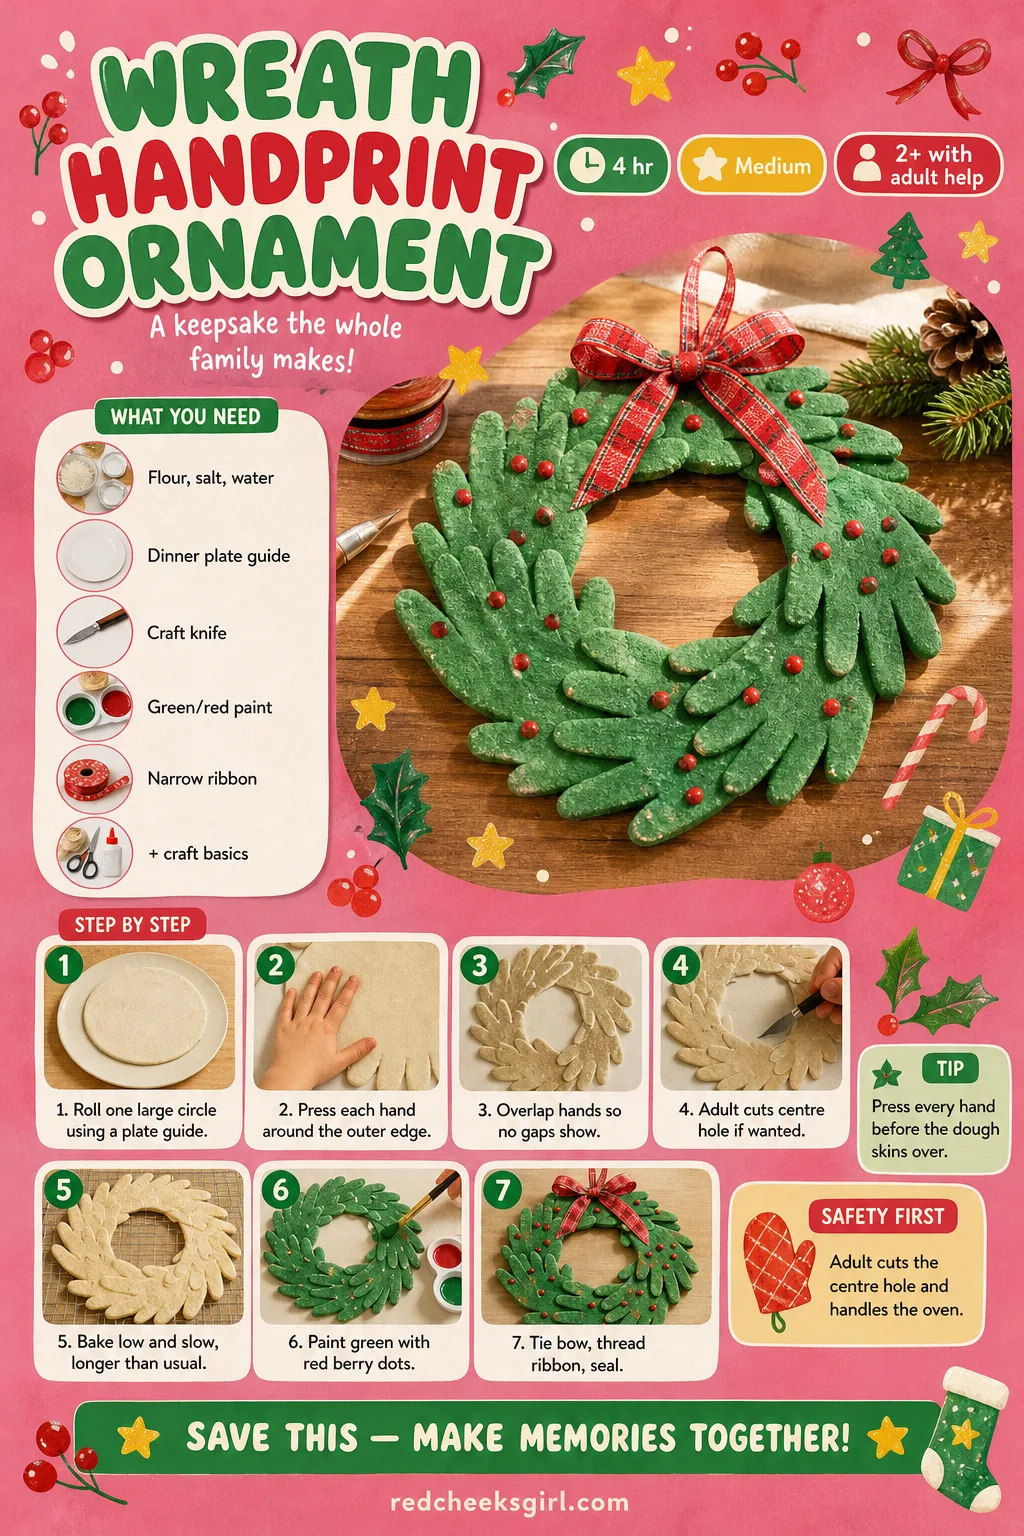
Wreath Handprint Ornament
If four people’s hands never find a free ten minutes together, do two now and two later on a separate disc; this one works just as well hung on the front door as a half-finished family wreath. Pressed in a ring, overlapping slightly like petals, the hands read as a leafy wreath once painted green, with tiny red dots for berries.
It replaces the usual evergreen door wreath nicely, and it costs nothing but flour and paint, which is worth saying since it looks far more deliberate than it was to make.
What You Need
- 2 cups plain flour
- 1 cup table salt
- 1 cup warm water
- rolling pin and parchment paper
- a dinner plate, about 20cm, to trace around
- wooden skewer
- craft knife
- green and red acrylic paint
- narrow ribbon, 40cm, for a bow
- wider ribbon or twine for hanging
- clear varnish
How to Make It
- Mix the larger batch of dough and knead well.
- Roll it into one large circle, using the plate as a guide, about 1cm thick.
- Working quickly before the surface skins over, press each family member’s hand around the outer edge, fingers pointing outward, overlapping slightly so no bare dough shows between them.
- If you want an open wreath rather than a solid disc, have an adult cut away the dough inside the ring with a knife, leaving the hands as the outer rim.
- Poke a hanging hole at the top, then bake at 200°F (95°C) for about 3 hours 30 minutes, longer than a single handprint since the disc is bigger, and cool fully.
- Paint the whole ring green and dab small red dots between the prints for berries.
- Tie the narrow ribbon into a bow and glue it near the bottom, thread the hanging ribbon, and seal with varnish.
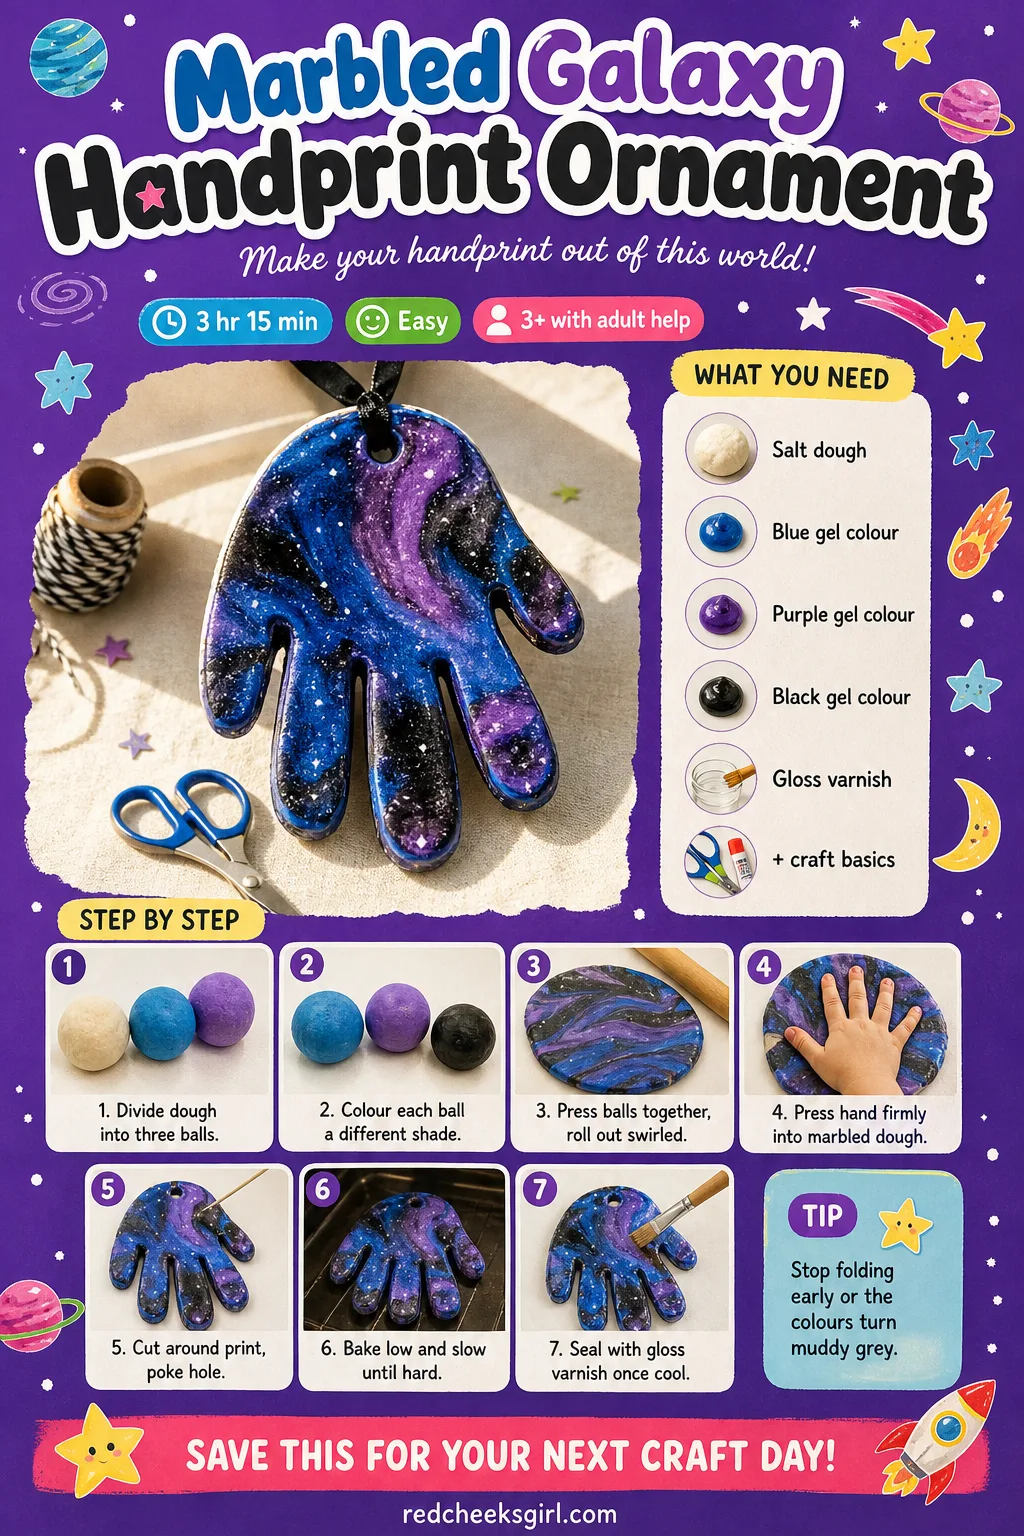
Marbled Galaxy Handprint Ornament
This is the quick one, because the colour goes into the dough itself before the hand goes in, which means there is no painting-and-drying stage afterward at all. Swirls of blue, purple and black marble through the disc so it looks like a tiny night sky, and a single coat of gloss varnish makes the colours glow.
It is a tidy option if glitter and pompoms feel like one craft project too many this week; the whole thing is done once it comes out of the oven.
What You Need
- 1 cup plain flour
- 1/2 cup table salt
- 1/2 cup warm water
- blue, purple and black gel food colouring
- toothpick
- rolling pin and parchment paper
- round cookie cutter
- wooden skewer
- gloss varnish or Mod Podge
How to Make It
- Mix and knead the dough until smooth.
- Divide it into three small balls and work a few drops of a different gel colour into each with the toothpick until evenly coloured.
- Press the three balls together and roll out, folding and re-rolling only two or three times so the colours streak rather than blend into grey.
- Press the hand firmly into the marbled dough.
- Cut around the print and poke a hanging hole.
- Bake at 200°F (95°C) for 2 to 3 hours until hard, then cool completely.
- Brush on one coat of gloss varnish once fully cool; no paint is needed since the colour is already baked through.
🛍 Shopping guide
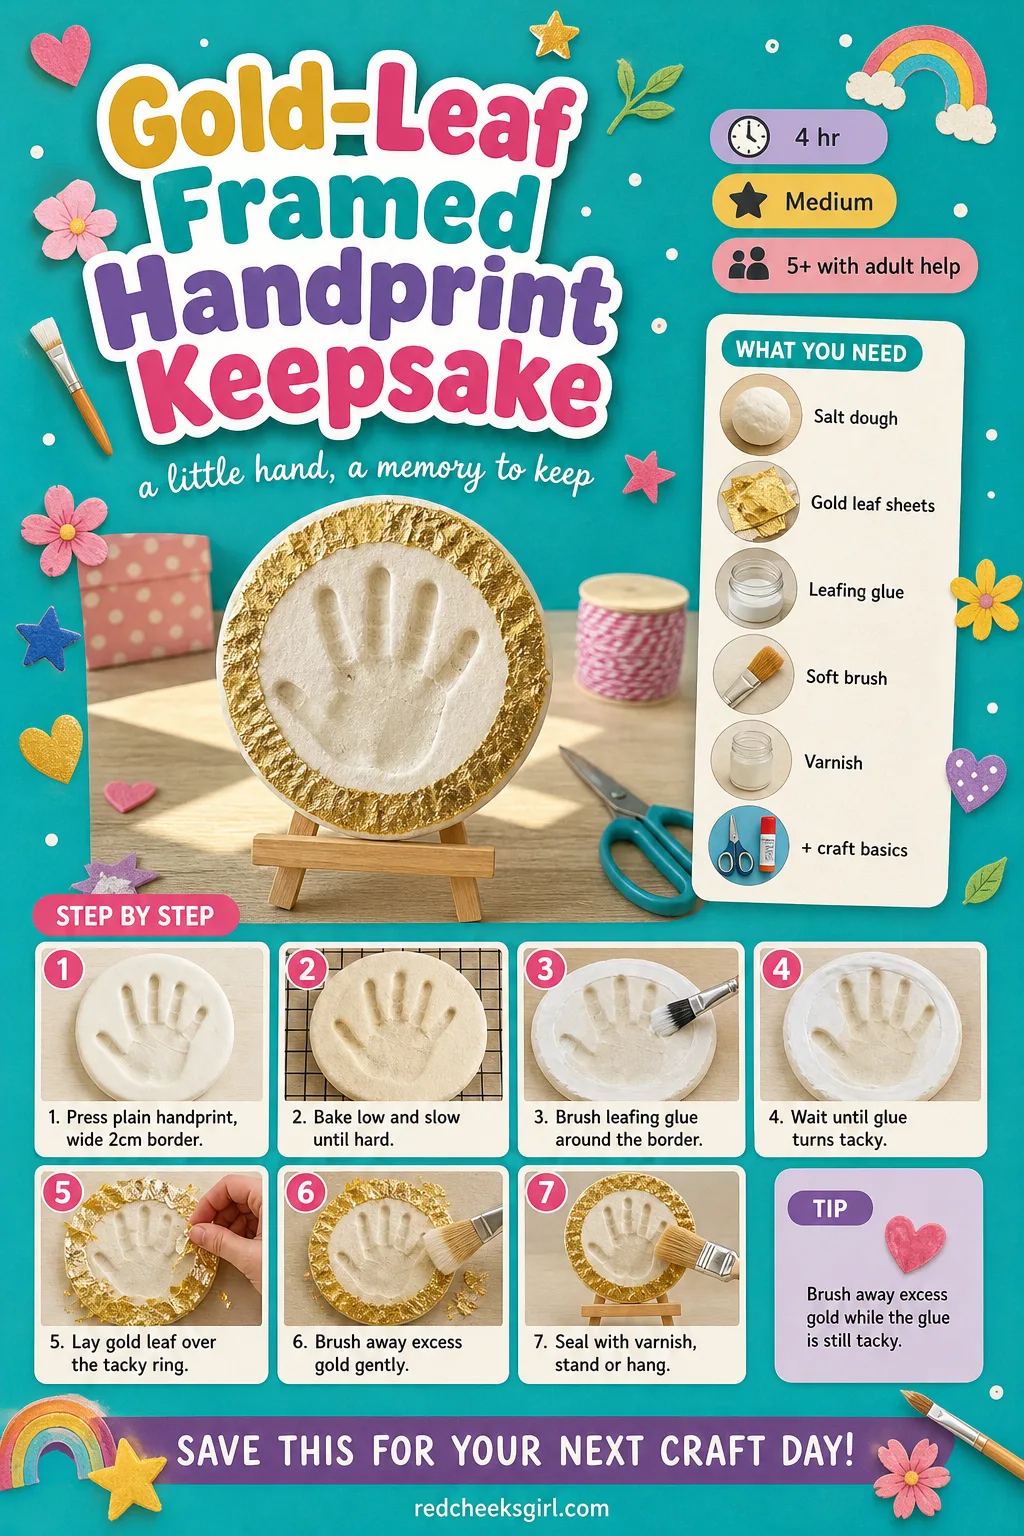
Gold-Leaf Framed Handprint Keepsake
This one does not go on the tree at all. It stands on a small easel on the mantel or hangs flat on the wall beside the family photos, a plain handprint left unpainted inside a gilded ring, read as a keepsake rather than a decoration. If gold leaf sounds like a step too far, a little dry gold paint rubbed on with a fingertip does nearly the same job.
For more ways to dress salt dough without reaching for paint every time, the hand painted Christmas ornaments collection has a few finishes worth borrowing.
What You Need
- 1 cup plain flour
- 1/2 cup table salt
- 1/2 cup warm water
- rolling pin and parchment paper
- round cookie cutter, cutting with a 2cm border
- wooden skewer
- leafing glue (size)
- imitation gold leaf sheets
- soft dry brush
- clear varnish
- small wooden easel stand (optional)
How to Make It
- Mix and knead the dough, roll to about 1cm thick, and press the hand in, leaving it plain and unpainted.
- Cut a clean circle with a generous 2cm border this time, wider than usual, to leave room for the frame.
- Poke a hanging hole only if you plan to hang it rather than stand it on the easel.
- Bake at 200°F (95°C) for 2 to 3 hours until hard, then cool fully.
- Brush a thin ring of leafing glue around the outer 2cm border only and leave until tacky, usually 15 to 20 minutes.
- Lay the gold leaf over the tacky ring, press down gently with the soft brush, then brush away the excess to reveal a clean gilded edge around the plain handprint.
- Seal the whole piece with varnish once the leaf has settled, about 20 minutes, then stand it on the easel or hang it.
🛍 Shopping guide
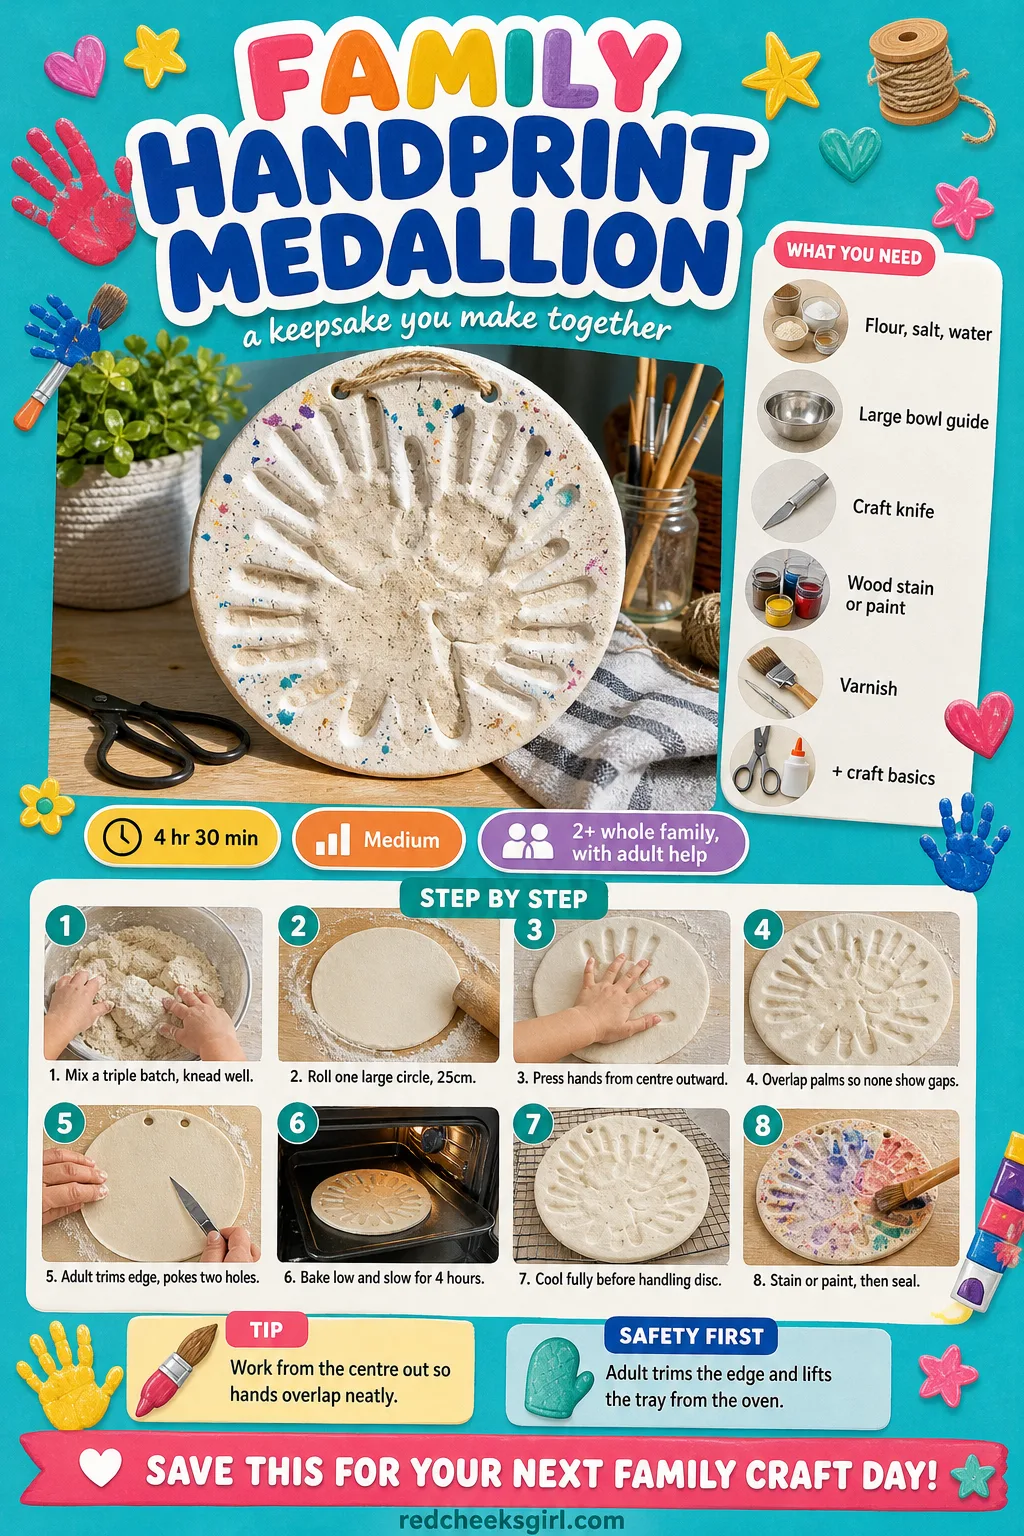
Family Handprint Medallion
Every hand in the house, fanned out from one centre point like an open flower, baked onto a single oversized disc. It is too big for most trees, so it goes on a stand on the console table, or replaces the front door wreath altogether in a warmer climate that skips evergreen entirely.
Work from the centre outward and quickly, because with several hands to press the dough starts skinning over before the last one goes in.
What You Need
- 3 cups plain flour
- 1.5 cups table salt
- 1.5 cups warm water
- large mixing bowl, about 25cm, as a cutting guide
- rolling pin and parchment paper (two trays if needed)
- craft knife
- wooden skewer
- walnut ink wood stain or acrylic paint of choice
- clear varnish
- sturdy ribbon or picture wire
How to Make It
- Mix the triple batch of dough, kneading for about 5 minutes since it is a larger ball, dividing it in half first if it is hard to handle.
- Roll into one very large circle, as close to 25cm as the bowl rim allows, about 1.2cm thick, across joined trays if needed.
- Starting from the centre and working outward, press each family member’s hand with fingers pointing toward the rim, overlapping the heel of each palm near the middle.
- Have an adult trim the outer edge neatly with a knife, following the curve of the outermost fingers, then poke two hanging holes spread apart so a heavy disc does not tilt.
- Bake at 200°F (95°C) for about 4 hours given the size, checking the centre is fully hard before removing.
- Leave to cool completely on the tray for several hours, since a warm large disc is more likely to crack if handled early.
- Wash with diluted walnut ink stain for a warm wood look, or paint plainly, then seal with two coats of varnish once dry.
🛍 Shopping guide
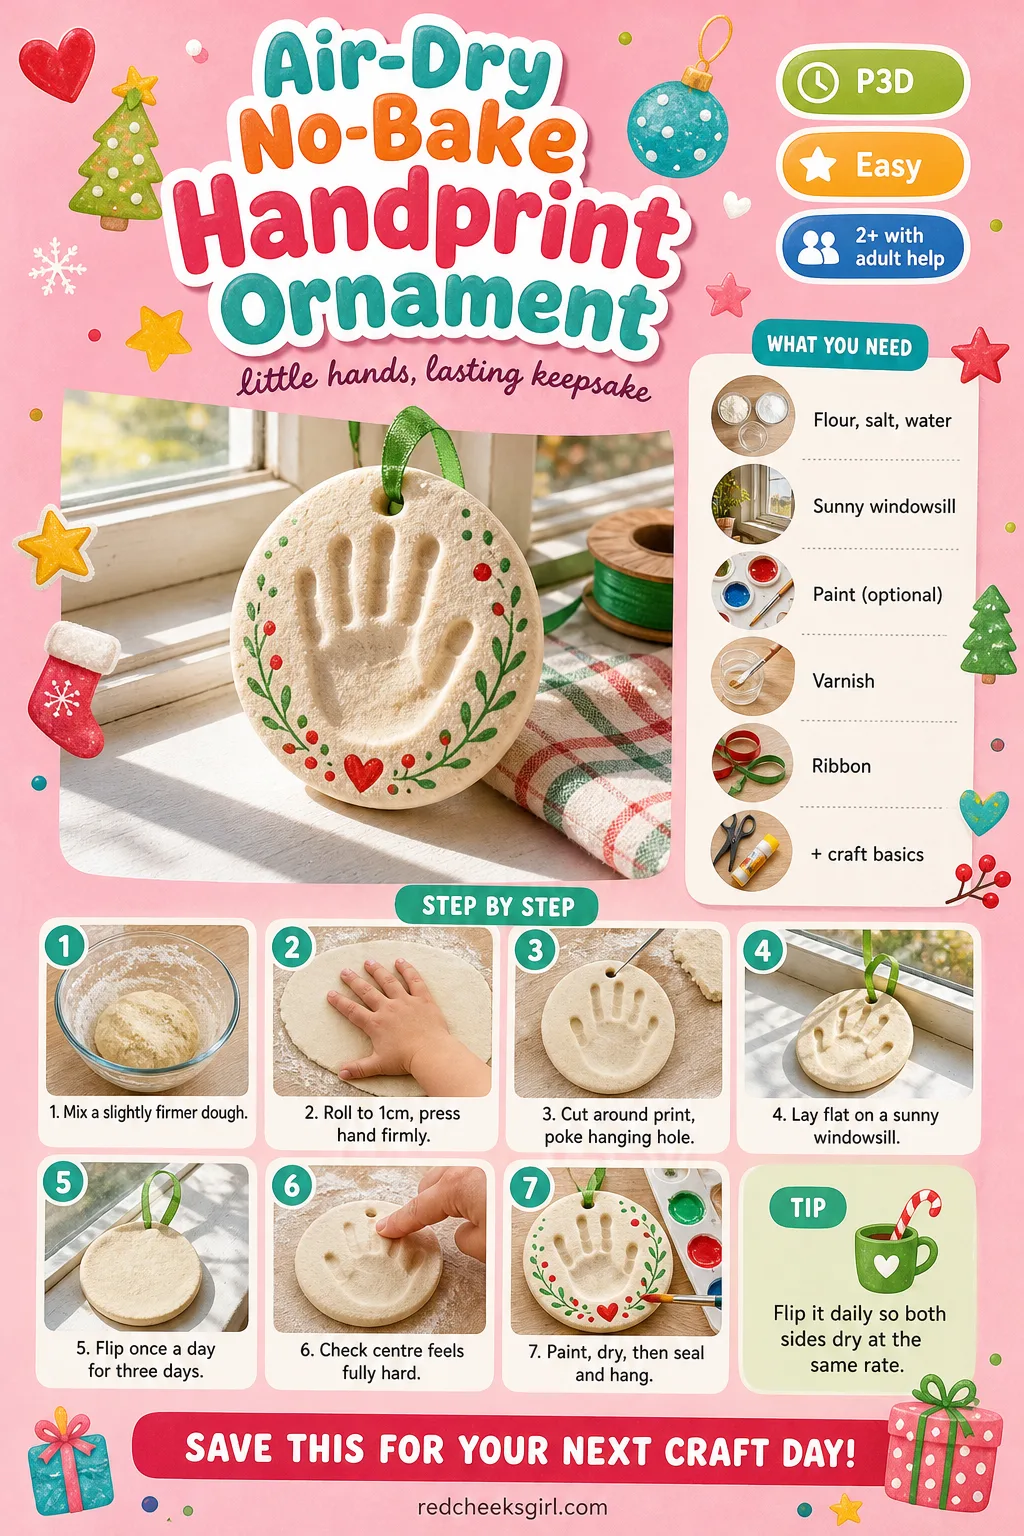
Air-Dry No-Bake Handprint Ornament
If the oven is shared with dinner, or there simply is not one in the nursery flat, this version needs none of it. The same dough can skip the oven altogether and air dry over about three days instead, which trades supervision for patience.
It sits flat on a sunny windowsill or in an airing cupboard, turned once a day, and it comes out just as hard as a baked one if you let it finish properly.
What You Need
- 1 cup plain flour
- 1/2 cup table salt
- slightly less than 1/2 cup warm water, for a firmer dough
- rolling pin and parchment paper
- round cookie cutter
- wooden skewer
- acrylic paint (optional)
- clear varnish
- ribbon
How to Make It
- Mix and knead the dough, using slightly less water than usual so it holds its shape without an oven’s help.
- Roll to about 1cm thick, press the hand in firmly, and cut around it with a generous border.
- Poke a hanging hole near the edge.
- Lay it flat on a sunny windowsill or similar warm, dry spot, turning it over once a day so both sides dry evenly.
- Leave for two to three days until it feels completely hard and no longer cool to the touch in the centre, a sign of leftover moisture.
- Paint if wanted, let the paint dry fully, then seal with varnish and thread the ribbon.
🛍 Shopping guide
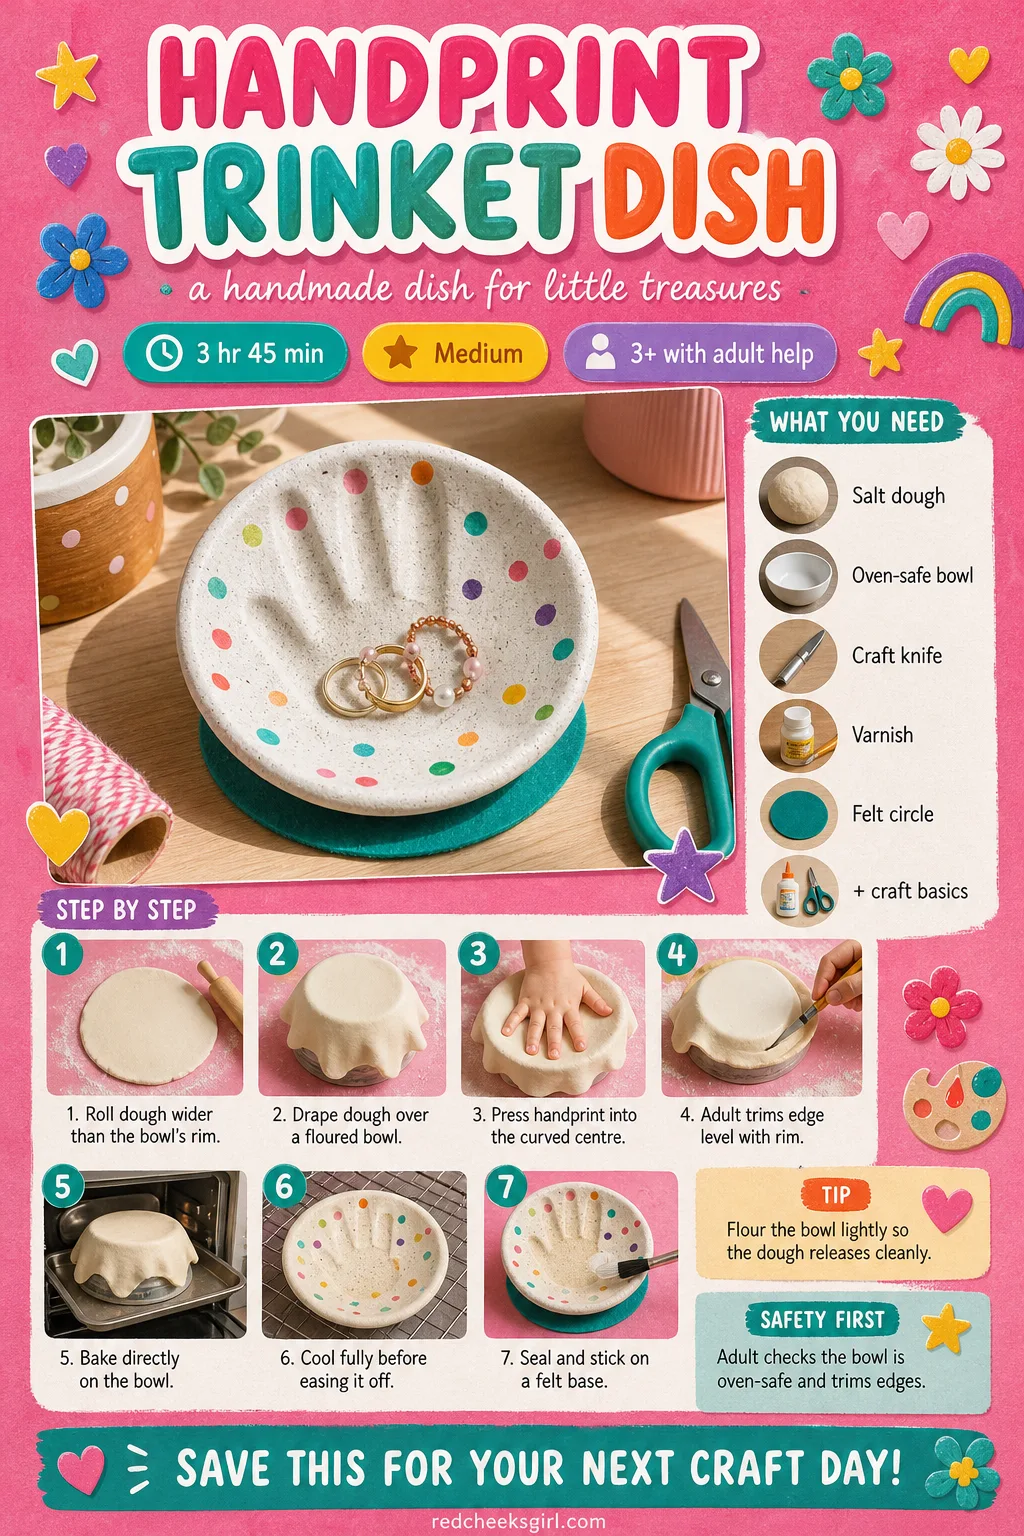
Handprint Trinket Dish
Not every print has to hang. This one drapes over an upturned bowl before baking, so it comes out curved rather than flat, a shallow dish for rings or hair ties on the dresser instead of one more thing competing for space on the tree.
If a flat wall ornament feels like one too many already, this earns its spot by actually holding something.
What You Need
- 1 cup plain flour
- 1/2 cup table salt
- 1/2 cup warm water
- rolling pin and parchment paper
- small oven-safe bowl, 12cm diameter, upturned as a mould
- craft knife
- clear varnish
- small felt circle for the base
How to Make It
- Mix and knead the dough until smooth.
- Roll it into a circle roughly 2cm wider all round than the upturned bowl’s rim.
- Lightly flour the bowl, then drape the dough gently over it, easing it into a shallow curve without stretching it thin at the centre.
- While it still sits on the bowl, press the handprint into the centre, fingers spread so they trail down the dish’s inner curve.
- Have an adult trim the overhanging edge level with the bowl’s rim using the craft knife.
- Check the bowl is labelled oven-safe, then bake directly on it at 200°F (95°C) for about 2 hours 30 minutes, until firm enough to hold its curve.
- Let it cool fully on the bowl before easing it off, then seal with varnish and stick a felt circle under the base so it does not scratch the dresser.
🛍 Shopping guide
Handprint Gift Tag Ornament
This is the one for a spare ten minutes before wrapping starts, because the batch is tiny and it does double duty: a gift tag this year, kept as a small tree ornament every year after. For a baby, just two fingers and a thumb are enough; an older child can give the whole flat hand.
If you like the idea of small painted keepsakes beyond this one, the painted salt dough ornaments collection has more shapes worth trying, and the DIY Christmas ornaments ideas are worth a look if dough is not the only material in the house this week.
What You Need
- 1/2 cup plain flour
- 1/4 cup table salt
- 1/4 cup warm water
- rolling pin and parchment paper
- tag-shaped cutter or craft knife
- wooden skewer
- fine paint pen or permanent marker
- 15cm narrow twine
How to Make It
- Mix the small batch of dough and knead briefly, it will come together quickly since there is so little of it.
- Roll it to about 8mm thick, thinner than a full-size ornament, so it sits flat against wrapping paper.
- Press just two or three fingers and the thumb for a small child, or a full flat hand for someone older.
- Cut a simple tag shape around the print with the cutter, or have an adult trim one freehand with a craft knife, leaving a slim border.
- Punch or poke the hanging hole through the tag’s narrow top corner.
- Bake at 200°F (95°C) for about 1 hour 30 minutes to 2 hours, since it is thinner and smaller than the other ornaments here, then cool fully.
- Write the name and the year onto the dough with a fine paint pen once cool, thread the twine through the hole, and tie it to the parcel.
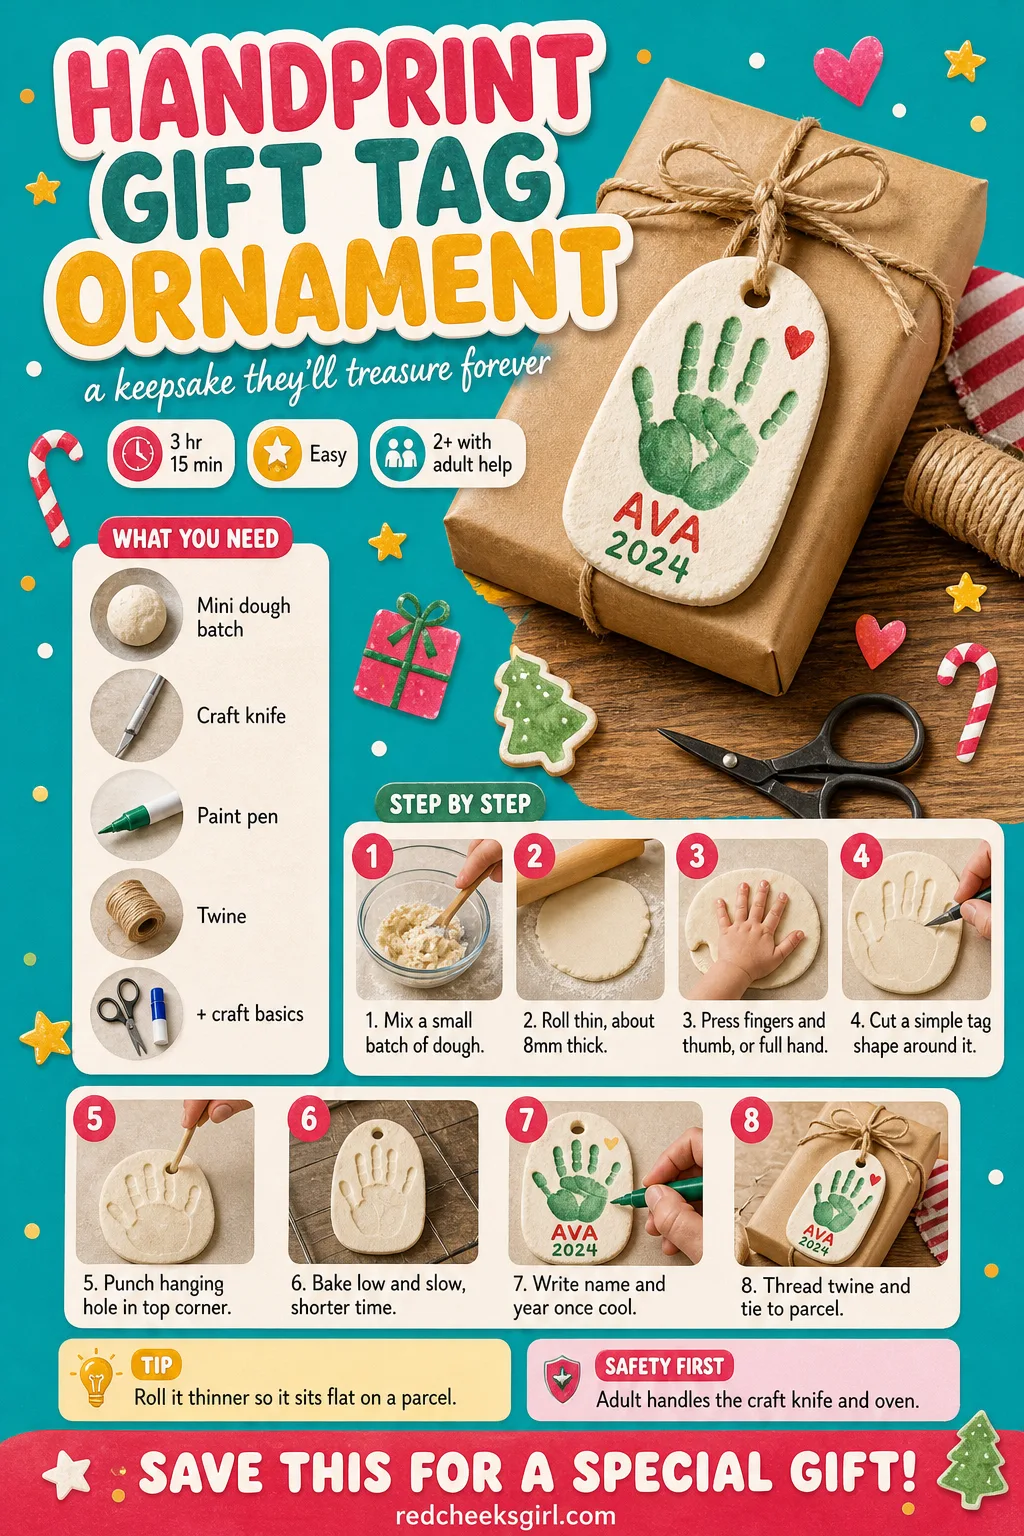
🛍 Shopping guide
Frequently Asked Questions
What is the best salt dough recipe for handprint ornaments?
A dependable ratio is roughly a cup of plain flour to half a cup of table salt and half a cup of warm water, which gives a dough soft enough to take a clean print but firm enough to hold its shape. Bigger batches just scale those same proportions up for more hands.
How long do you bake salt dough handprint ornaments?
Low and slow is the rule here. Bake at around 200 to 225°F for two to three hours or longer, until the piece is totally hard and no longer soft or wet in the centre, flipping it halfway so both sides dry evenly.
Can you air dry salt dough ornaments instead of baking them?
Yes. Instead of the oven, the same dough can simply be left to air dry for about three days, turned daily on a warm, dry windowsill, which suits anyone without easy oven access.
Why did my salt dough handprint ornament crack after baking?
Cracking almost always comes down to the oven running too hot or the piece drying unevenly, since baking at too high a temperature dries the outside before the inside has a chance to catch up. A lower, slower bake and an even thickness across the whole disc fixes most cases.
How do you seal or preserve a salt dough ornament so it lasts?
Once it is fully baked, cooled and (if wanted) painted and completely dry, a coat of clear varnish or a sealant like Mod Podge does the job. Sealing properly is what lets these ornaments last for many years rather than just one season.
Can you make salt dough handprint ornaments gluten free?
Gluten-free flour works well as a substitute, ideally a 1-to-1 all-purpose gluten-free blend that already contains starches and gums rather than a single gluten-free flour like rice flour on its own.

34 Ralph Lauren Christmas ideas using deep navy, burgundy, and emerald with velvet, plaid, and ribbo

Turn the whole house into a cheeky Whoville: 24 lime-green, cherry-red ideas from the front walk to

Colorful christmas decorations for a whole house, room by room, in red, pink, turquoise and yellow w
Leave a Reply