

26 Easy Christmas Crafts for Kids That Take One Afternoon and One Glue Stick
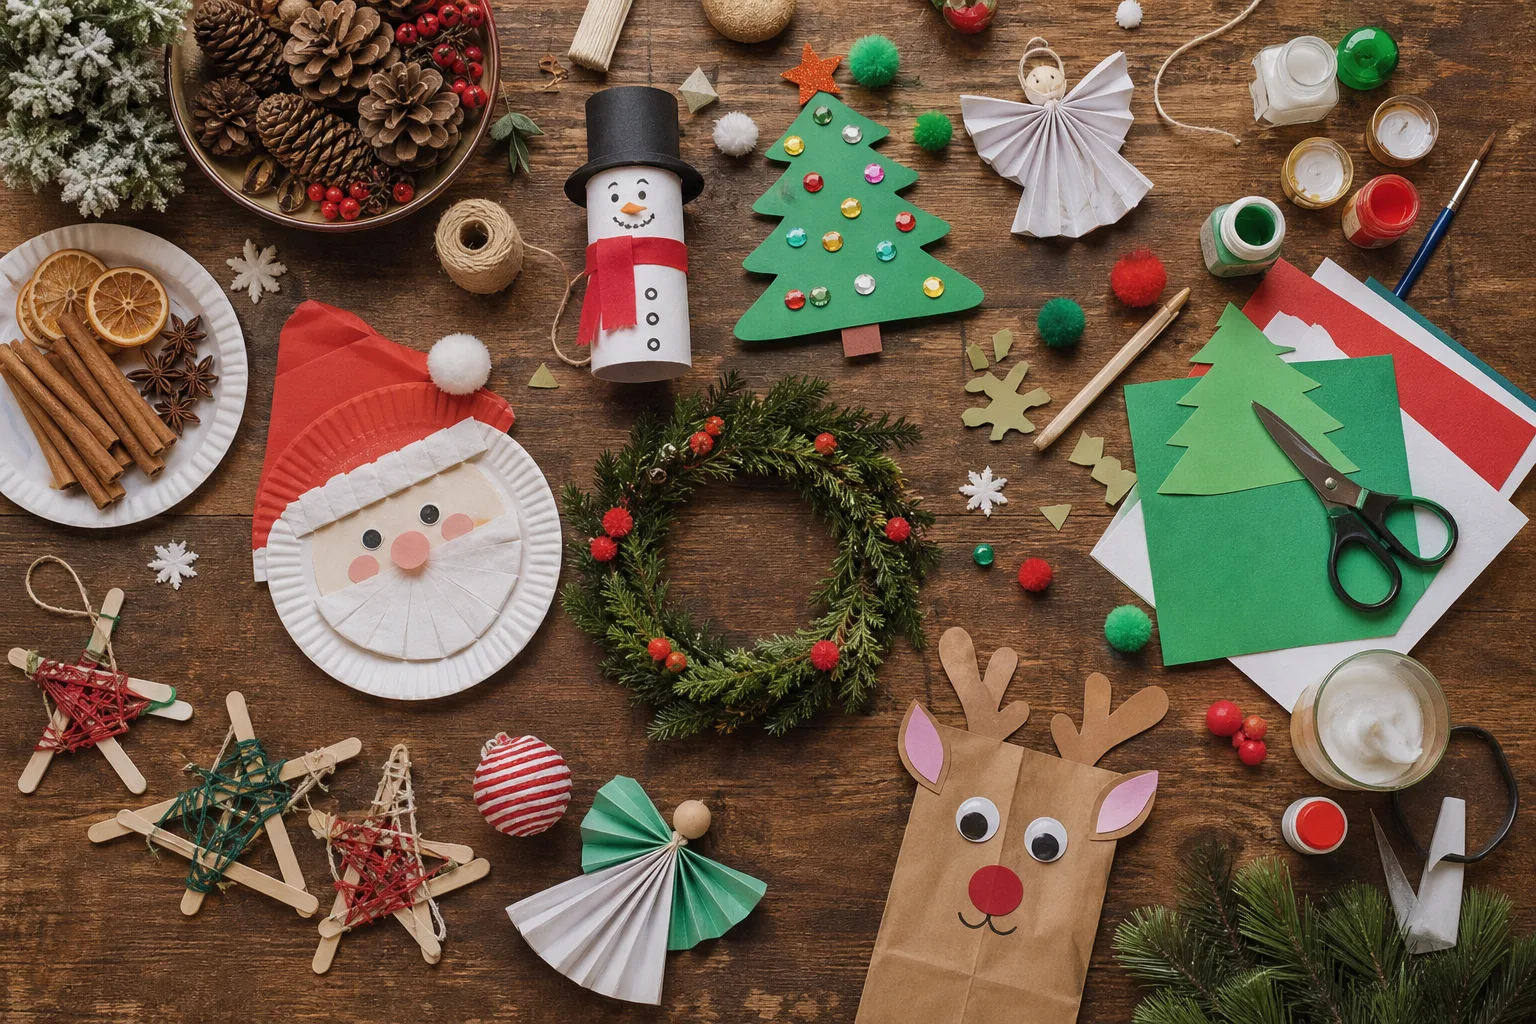
December afternoons stretch long once the tree is up and the good biscuits are gone. These 26 crafts need one trip to the craft drawer, not a shopping trip, and most of them fit between lunch and bath time. Pair one with a round of Christmas Games for Kids to Play All December and the whole wet afternoon sorts itself out.
Every entry says exactly what age it suits and what you, not the five year old, should be holding: the oven door, the hot glue gun, the craft knife. Nothing here needs a special order online, and most of it can start in the next ten minutes.
This post contains affiliate links. If you buy through them, I may earn a small commission at no extra cost to you.
- Salt Dough Handprint Ornaments
- Cinnamon Applesauce Ornaments
- Paper Plate Santa Face
- Popsicle Stick Christmas Tree
- Pine Cone Mini Christmas Trees
- Handprint Reindeer Card
- Melted Crayon Shaving Ornaments
- Paper Chain Countdown Garland
- Clothespin Reindeer Ornaments
- Pipe Cleaner Candy Cane Ornaments
- Button Christmas Tree Card
- Tissue Paper Stained Glass Star
- Paper Cup Snowman
- Yarn Pom Pom Wreath Ornament
- Salt Painted Snowflake Art
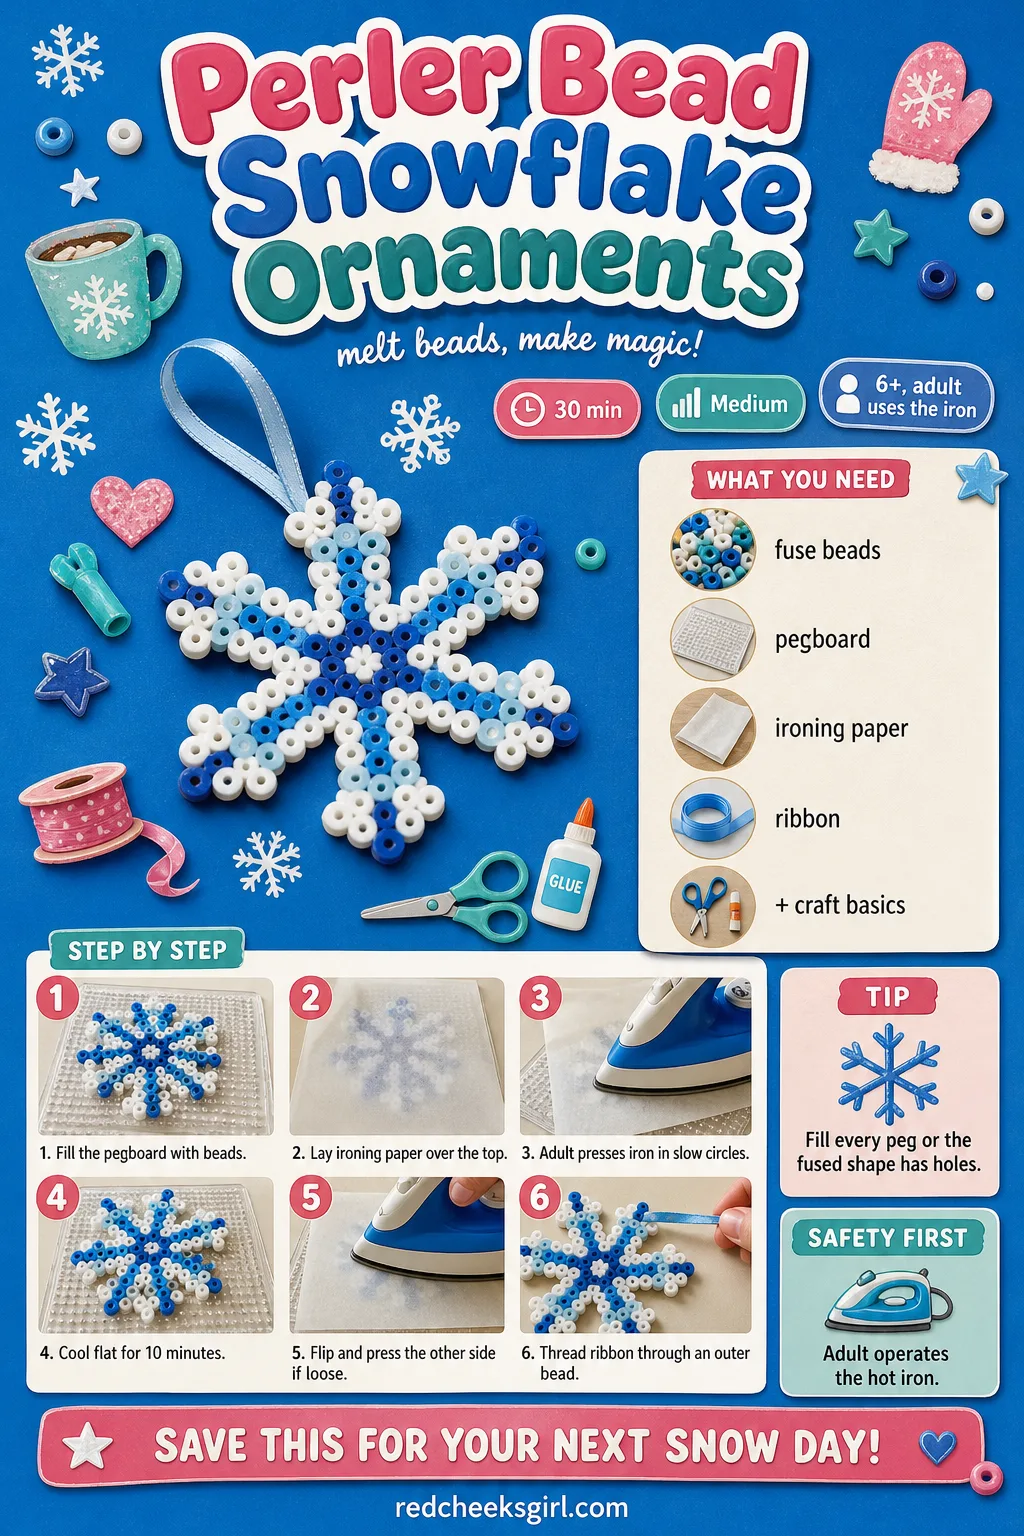
- Perler Bead Snowflake Ornaments
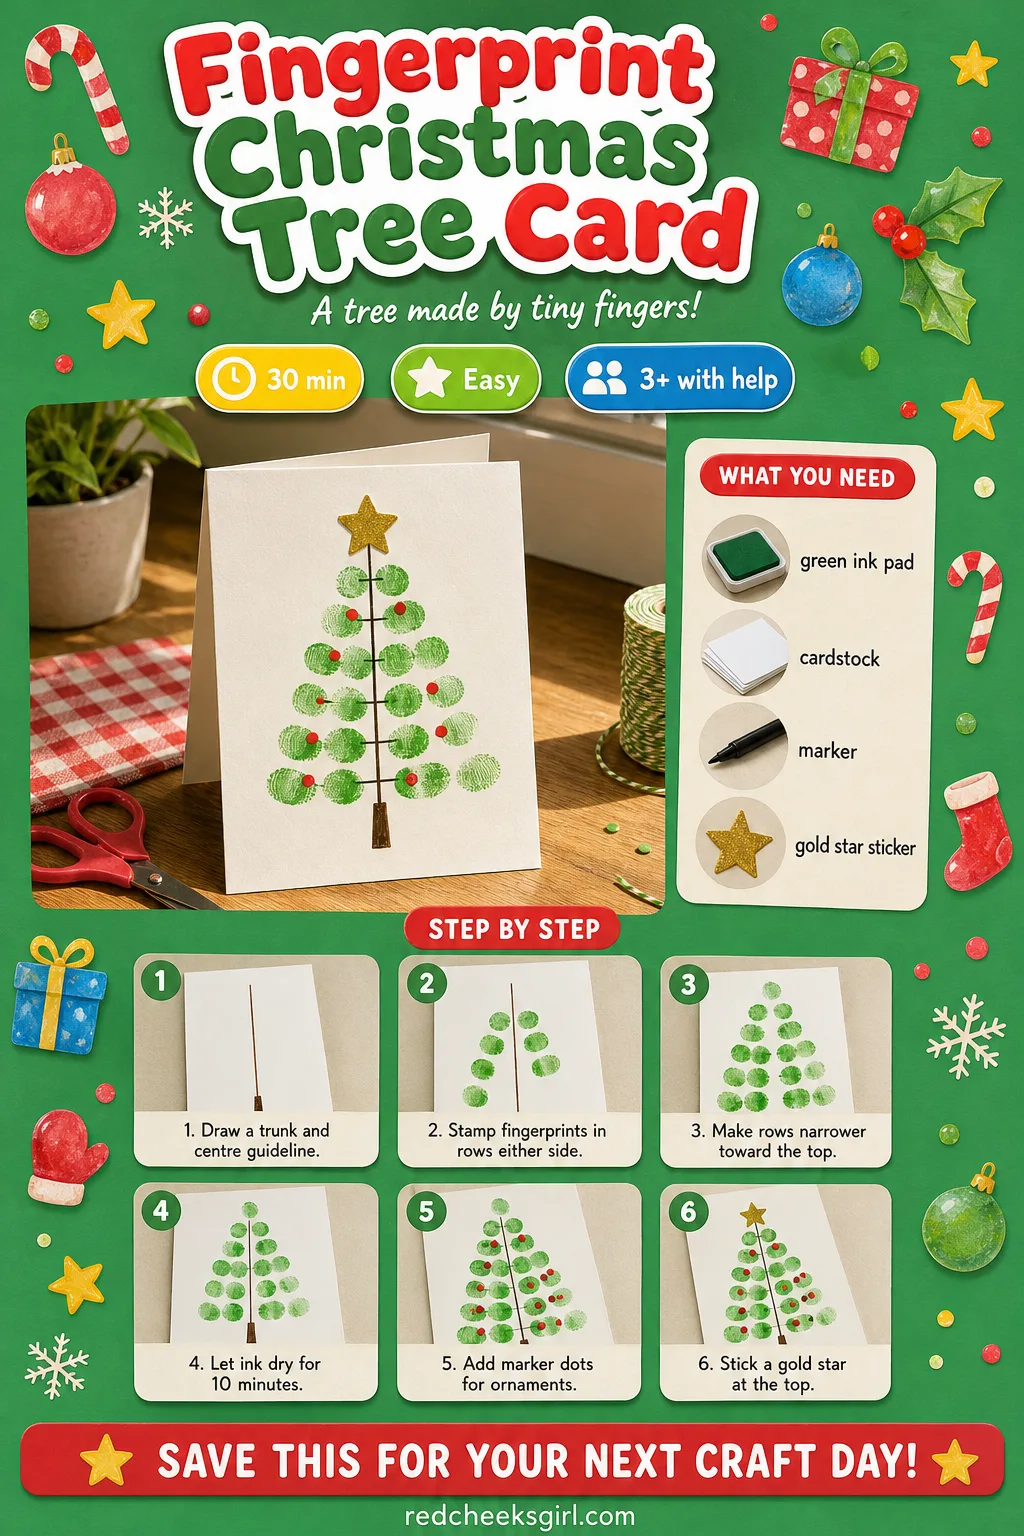
- Fingerprint Christmas Tree Card
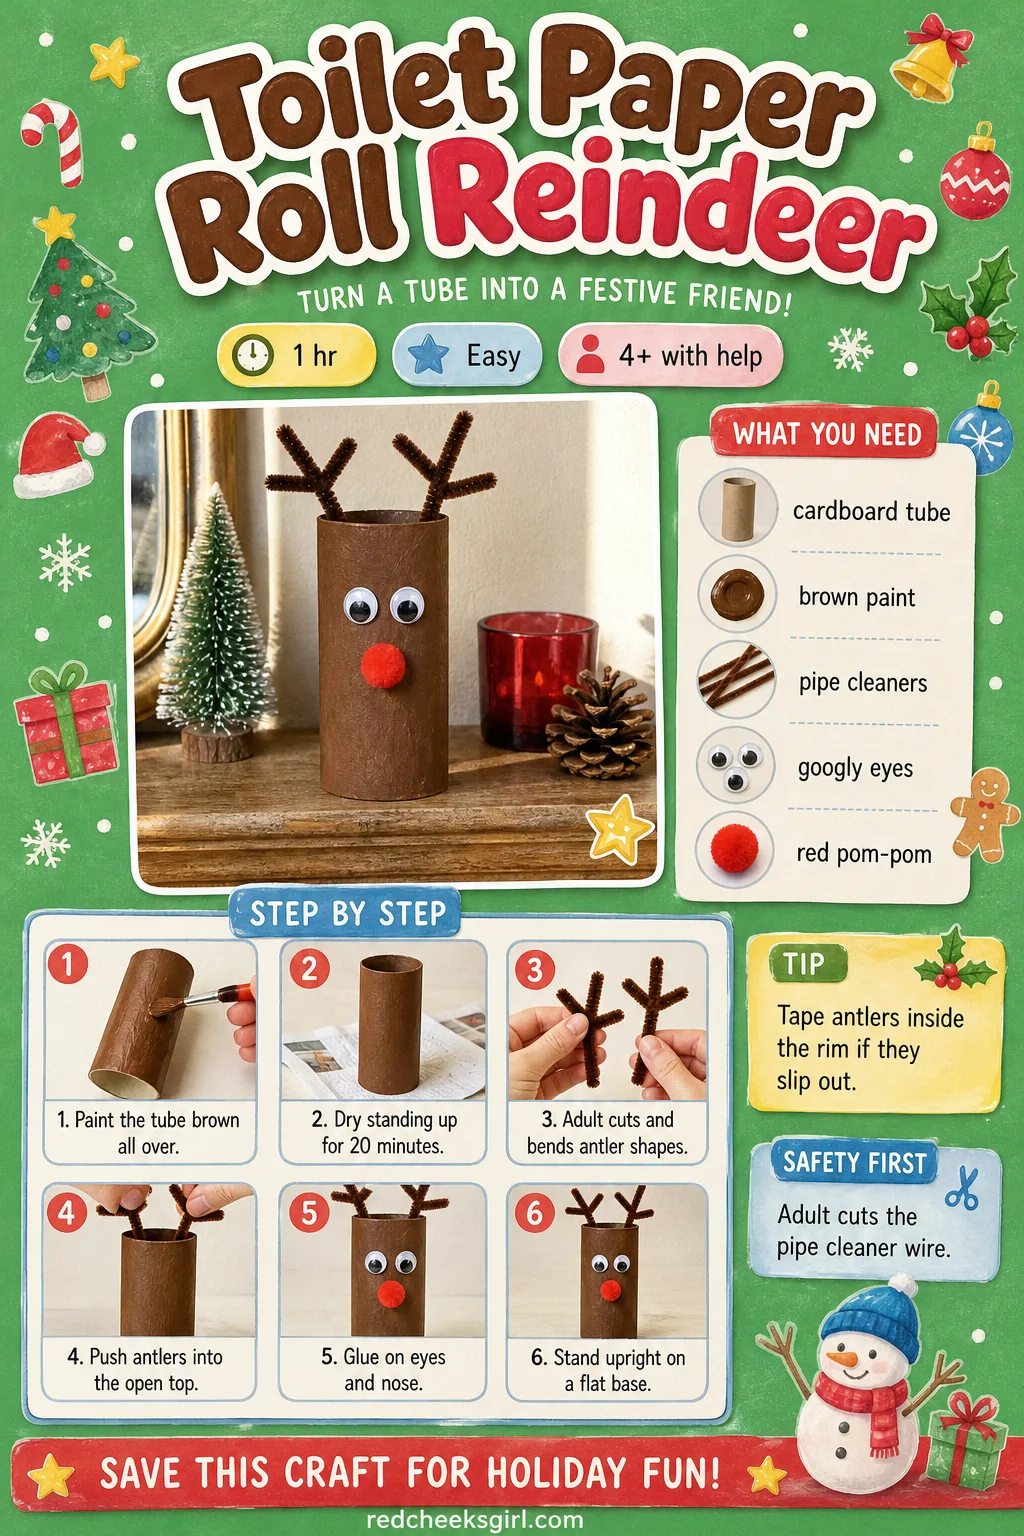
- Toilet Paper Roll Reindeer
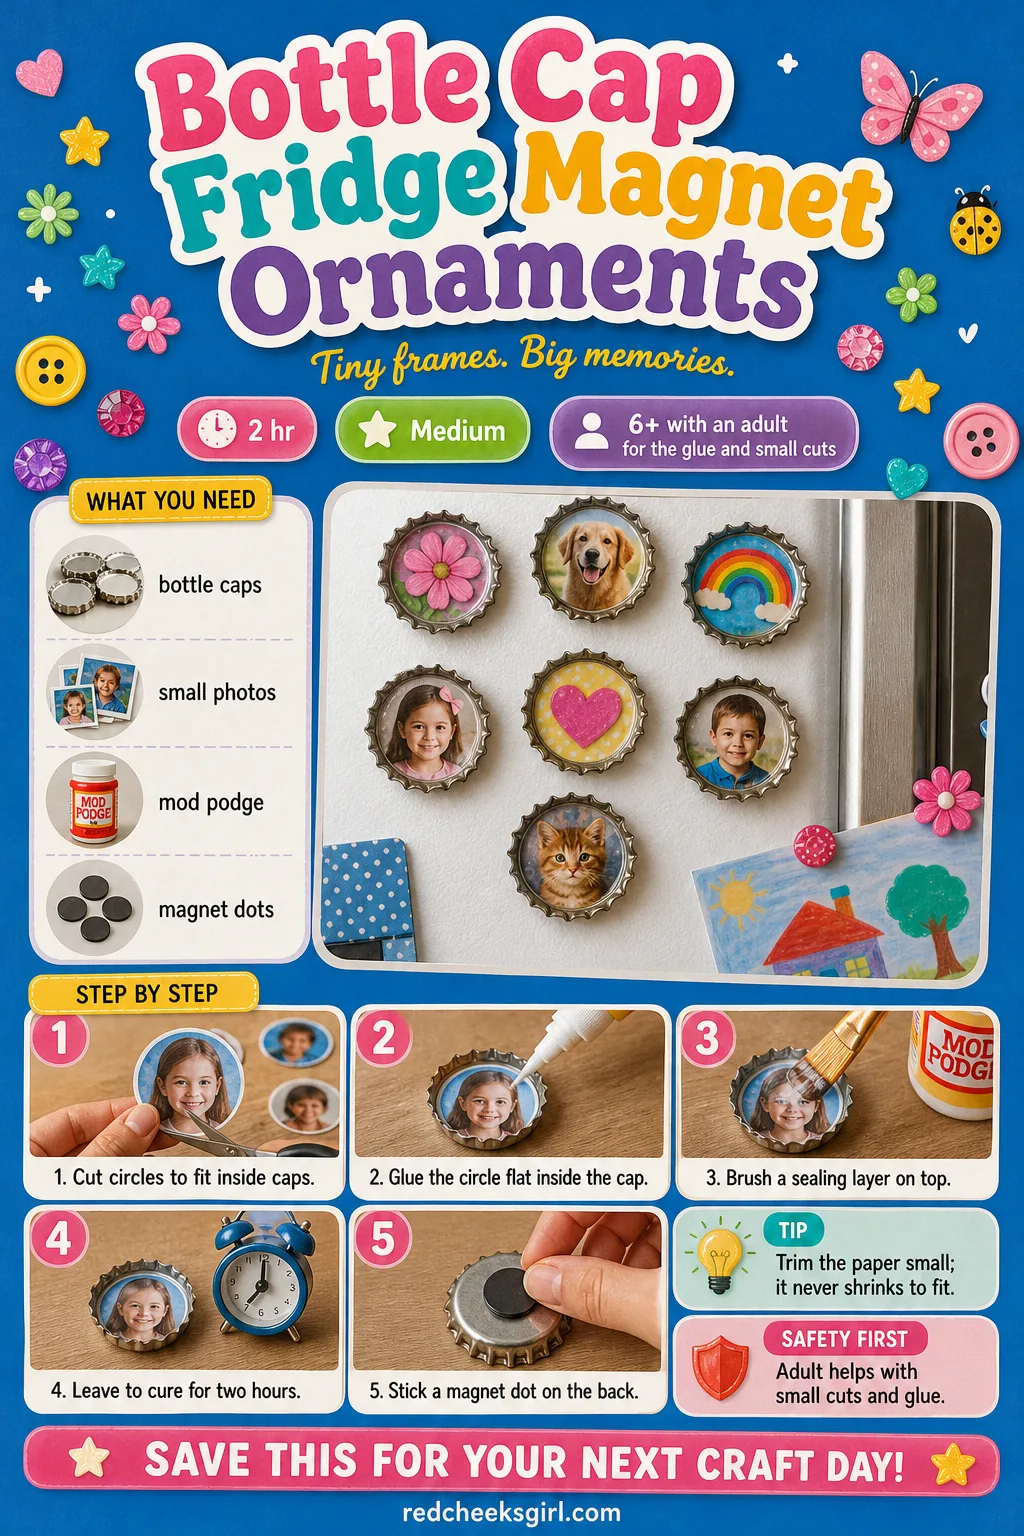
- Bottle Cap Fridge Magnet Ornaments
- Marshmallow Snowman Garland
- Popcorn and Cranberry Garland
- Paper Snowflakes
- DIY Snow Globe Jar
- Footprint Penguin Craft
- Painted Rock Ornaments
- Jingle Bell Bracelet
- Frequently Asked Questions
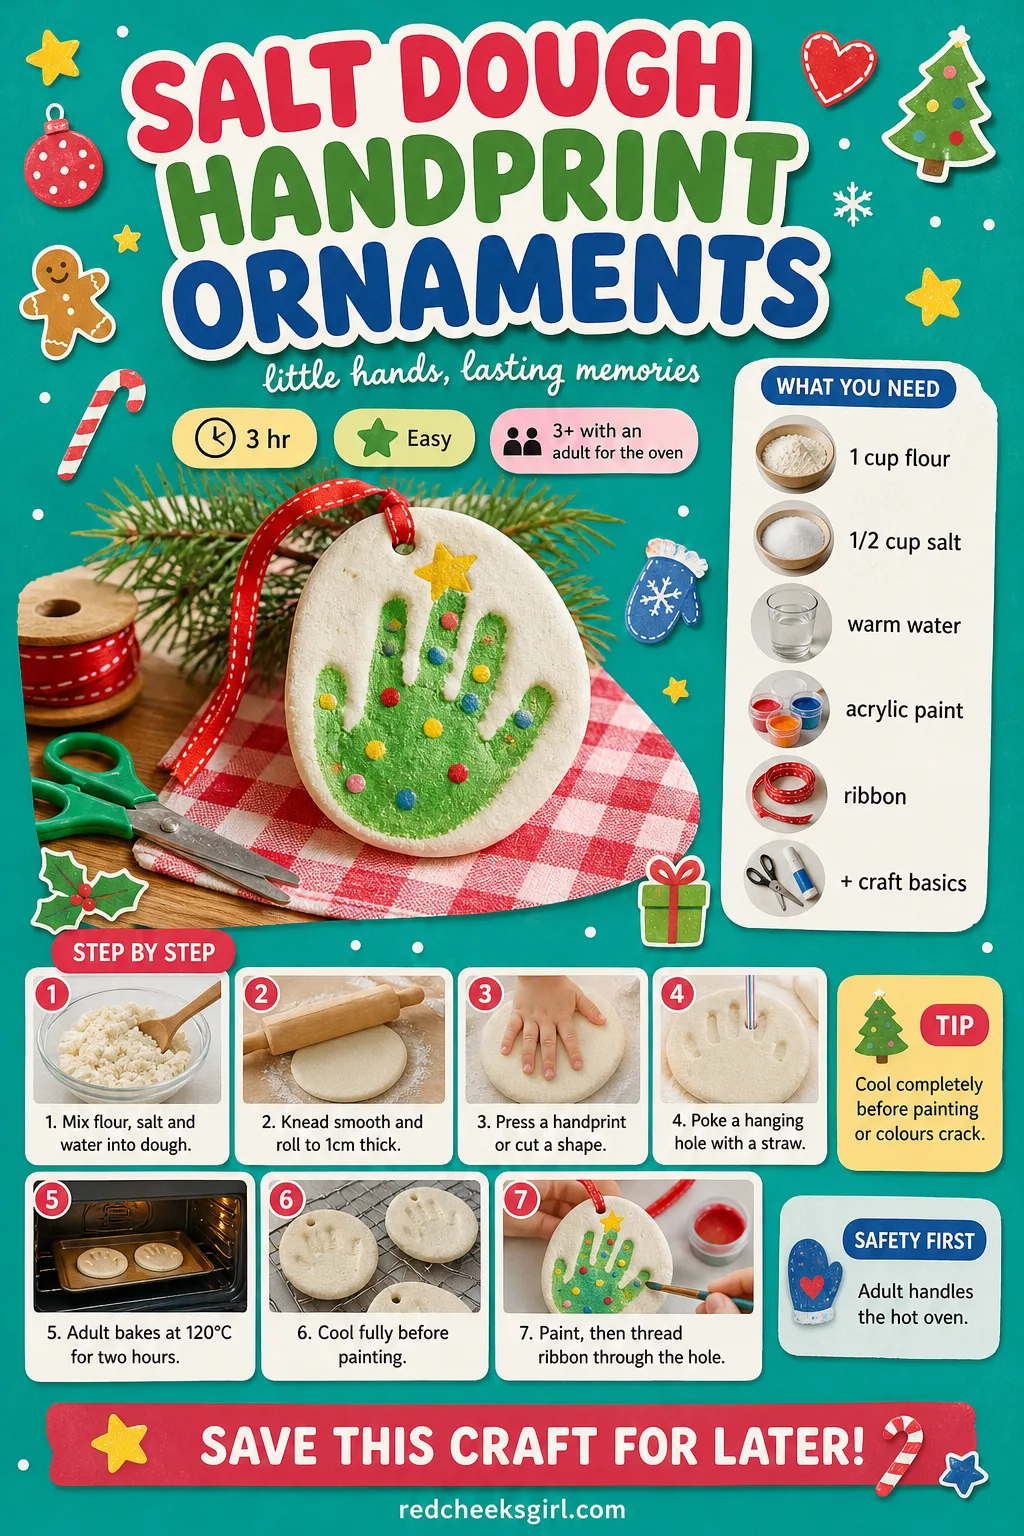
Salt Dough Handprint Ornaments
A plain tree needs one branch that says a particular small hand made this, not a shop. Salt dough takes a handprint beautifully, bakes rock hard and survives being wrapped in tissue paper and dug out again next winter.
What You Need
- 1 cup plain flour
- 1/2 cup table salt
- 1/2 cup warm water
- Rolling pin
- Drinking straw
- Acrylic paint and 30cm ribbon per ornament
How to Make It
- Mix the flour, salt and water into a firm dough and knead for two minutes until it stops sticking to your hands.
- Roll it out on a floured surface to about 1cm thick.
- Press a small hand flat into the dough, then cut around it, or stamp shapes out with a cutter.
- Poke a hanging hole near the top with the straw, well clear of the edge.
- An adult bakes the shapes at 120°C (250°F) for around 2 hours, until they feel hard and sound hollow when tapped.
- Let them cool completely on the tray, or the paint will crack later.
- Paint once cool, then thread ribbon through the hole and knot it.
🛍 Shopping guide
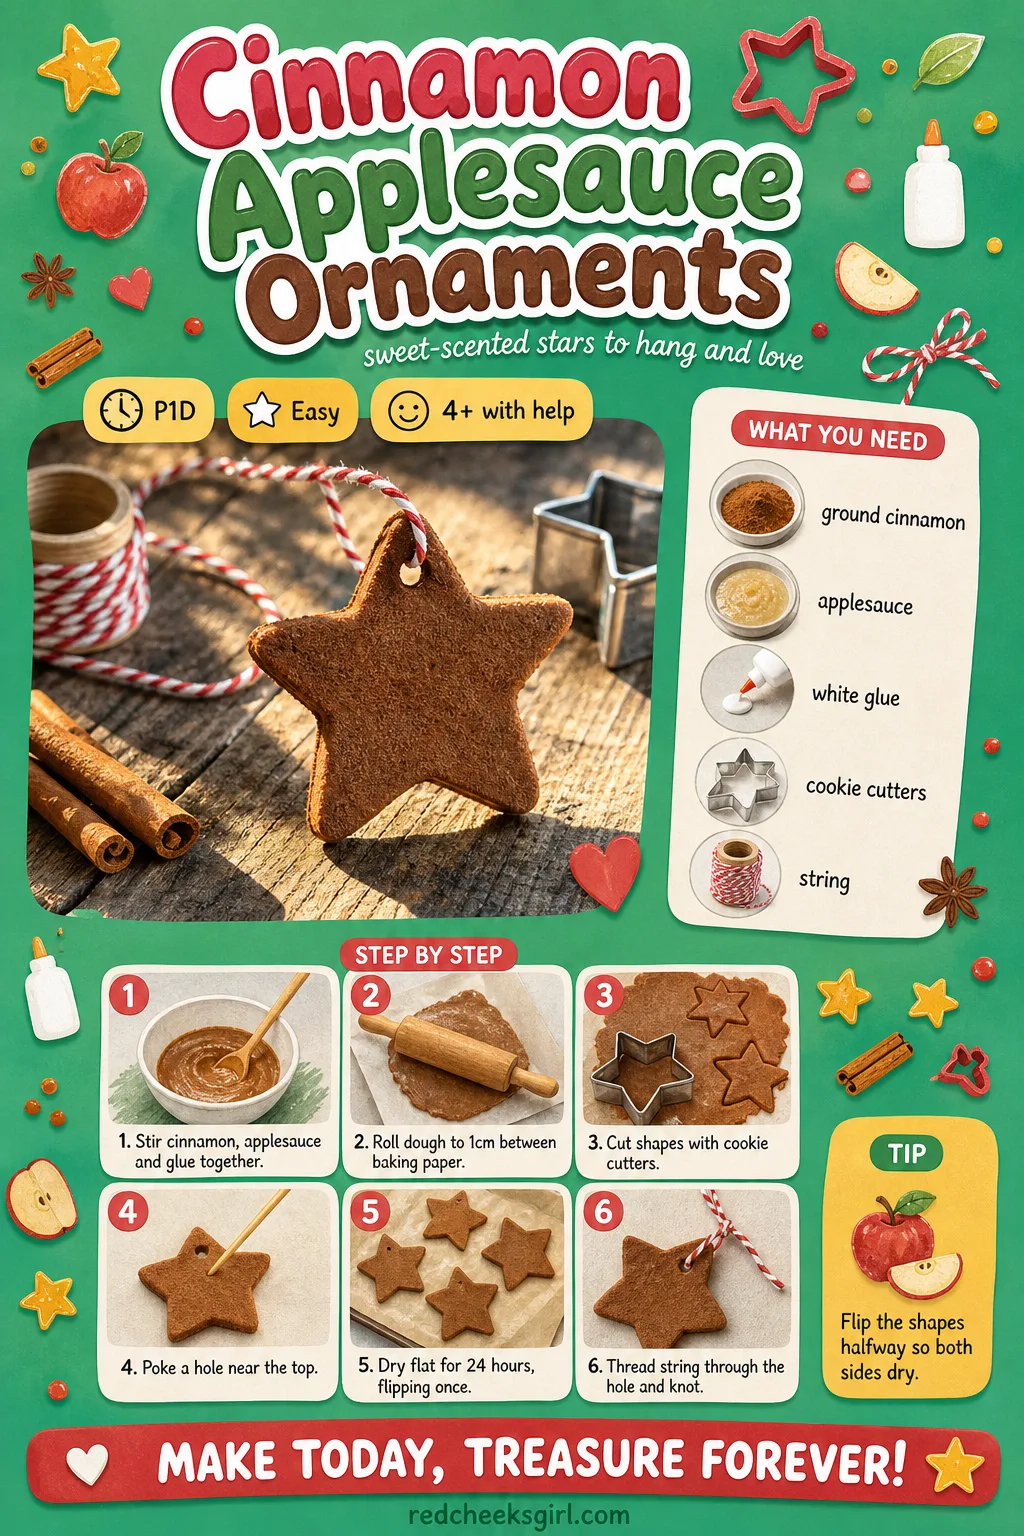
Cinnamon Applesauce Ornaments
No oven, no hot glue, and the whole house smells like a candle for free. These dry on the windowsill overnight and darken to a deep rust brown that looks handsome tied with plain string.
What You Need
- 1 cup ground cinnamon
- 3/4 cup applesauce
- 2 tbsp white glue
- Cookie cutters, about 6cm
- String or ribbon, 25cm per ornament
How to Make It
- Stir the cinnamon, applesauce and glue in a bowl until it forms a stiff dough that holds together.
- Roll it out between two sheets of baking paper to about 1cm thick.
- Press cookie cutters firmly through the dough and lift the shapes out carefully, as this stage is the fiddly bit.
- Poke a hole near the top with a straw or skewer.
- Lay the shapes flat on baking paper and leave them somewhere dry for a full 24 hours, flipping once halfway so both sides harden.
- Once stiff and darker in colour, thread string through the hole and knot it.
🛍 Shopping guide
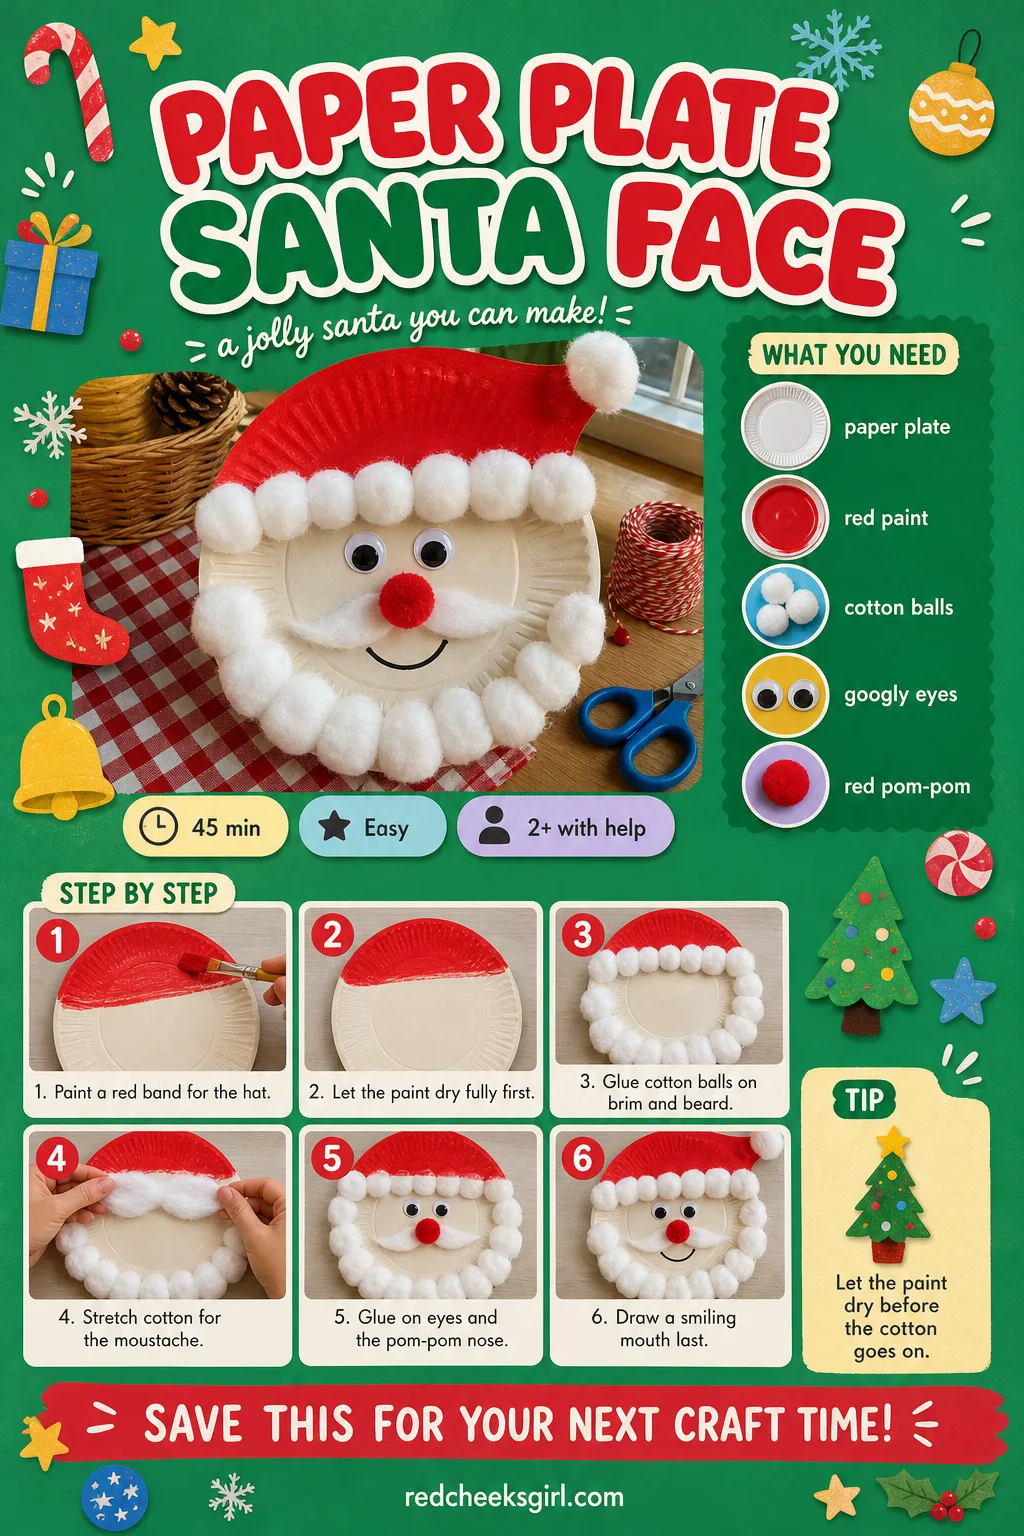
Paper Plate Santa Face
She will tell you she is too old for cotton balls, then ask for a second plate. The finished face is cheerful and lopsided in the right way, and it dries flat enough to post through a letterbox as a card if you want to send one.
What You Need
- 1 white paper plate, 23cm
- Red paint
- 20 jumbo cotton balls
- 2 googly eyes, 15mm
- 1 red pom-pom, 3cm, for the nose
How to Make It
- Paint a wide band across the middle of the plate red, for Santa’s hat and leave the rest plain for his face.
- Let the paint dry fully, about 15 minutes, before gluing anything on top.
- Glue cotton balls along the hat brim and in a thick cluster at the bottom for the beard.
- Stretch a few cotton balls out to fill the moustache above where the mouth will go.
- Glue on the googly eyes and the pom-pom nose.
- Draw a small smiling mouth with marker once everything else is stuck down.
🛍 Shopping guide
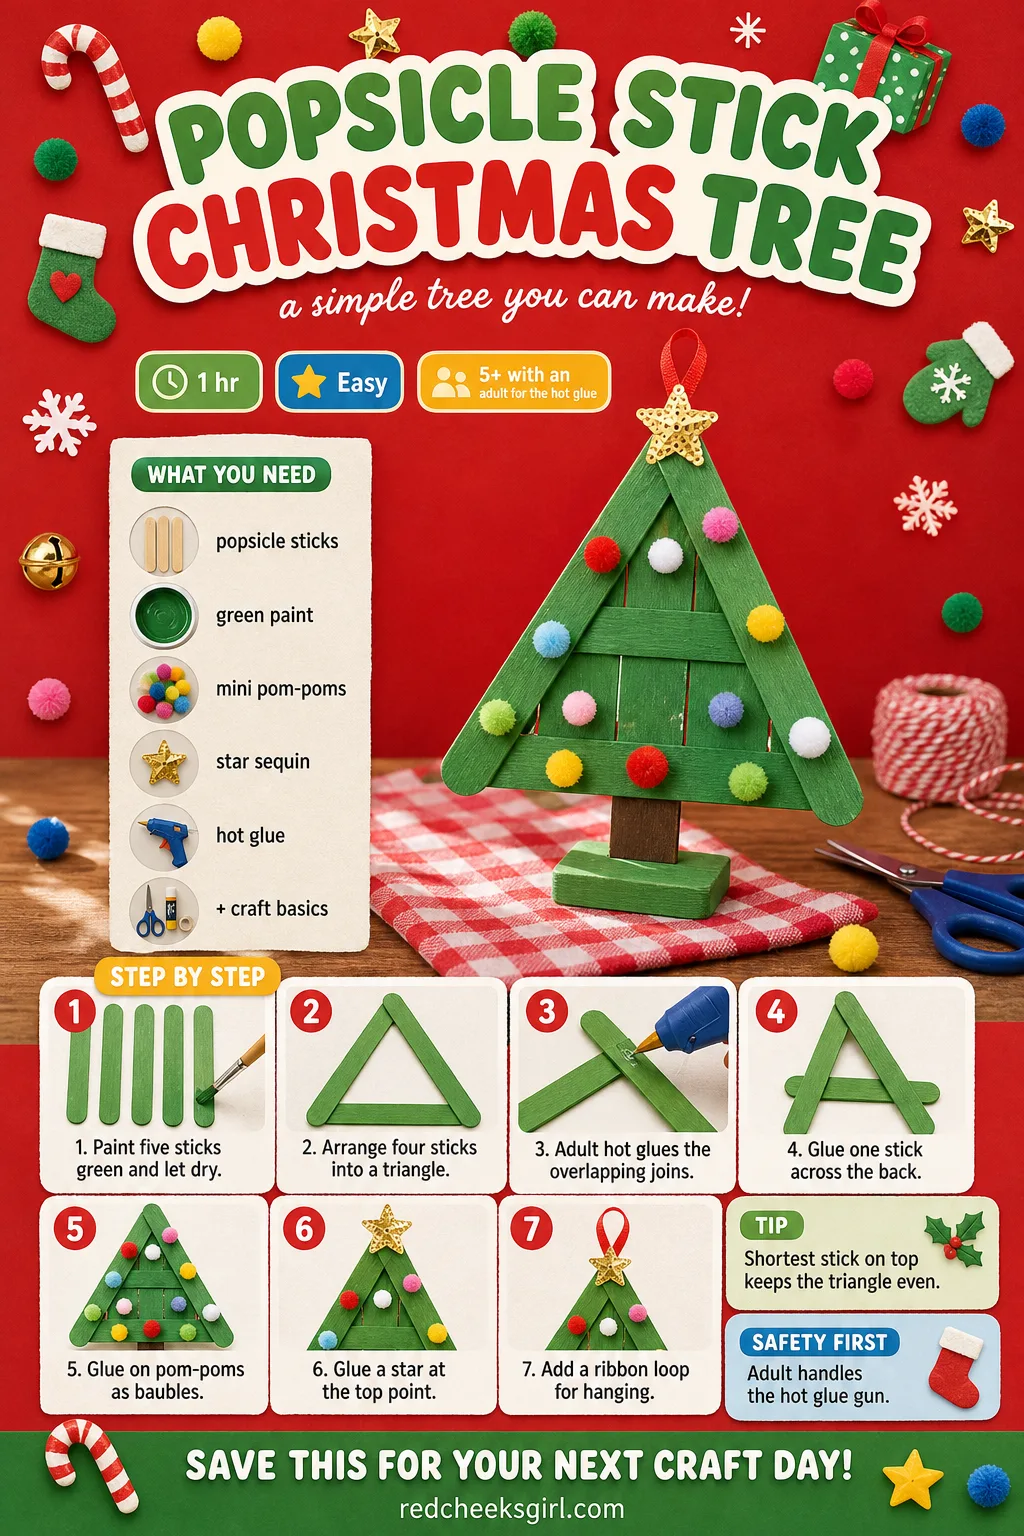
Popsicle Stick Christmas Tree
Five sticks and a dab of glue make a tree flat enough to post on a card front or stand against a window ledge in a jar of rice. If the mantel is already crowded, this one leans against a photo frame instead and nobody minds.
What You Need
- 5 jumbo popsicle sticks per tree: four trimmed to graduating lengths (15cm, 12cm, 9cm, 6cm) and one left whole for the back
- Green acrylic paint
- 6 mini pom-poms, 1cm
- 1 small star button or sequin
- Hot glue gun
- Ribbon loop, 15cm
How to Make It
- An adult trims four sticks to graduating lengths (15cm, 12cm, 9cm, 6cm) using scissors, then paint all five sticks green on both sides and let them dry flat, about 20 minutes.
- Lay four sticks in a rough triangle, each one shorter than the last, to build the tree shape.
- An adult hot glues the sticks where they overlap, holding each join for a few seconds until it grips.
- Glue the fifth stick across the back horizontally to hold the whole triangle together.
- Glue the pom-poms on as baubles and the star at the top point.
- Loop the ribbon through the back stick for hanging, or simply lean the tree on a shelf.
🛍 Shopping guide
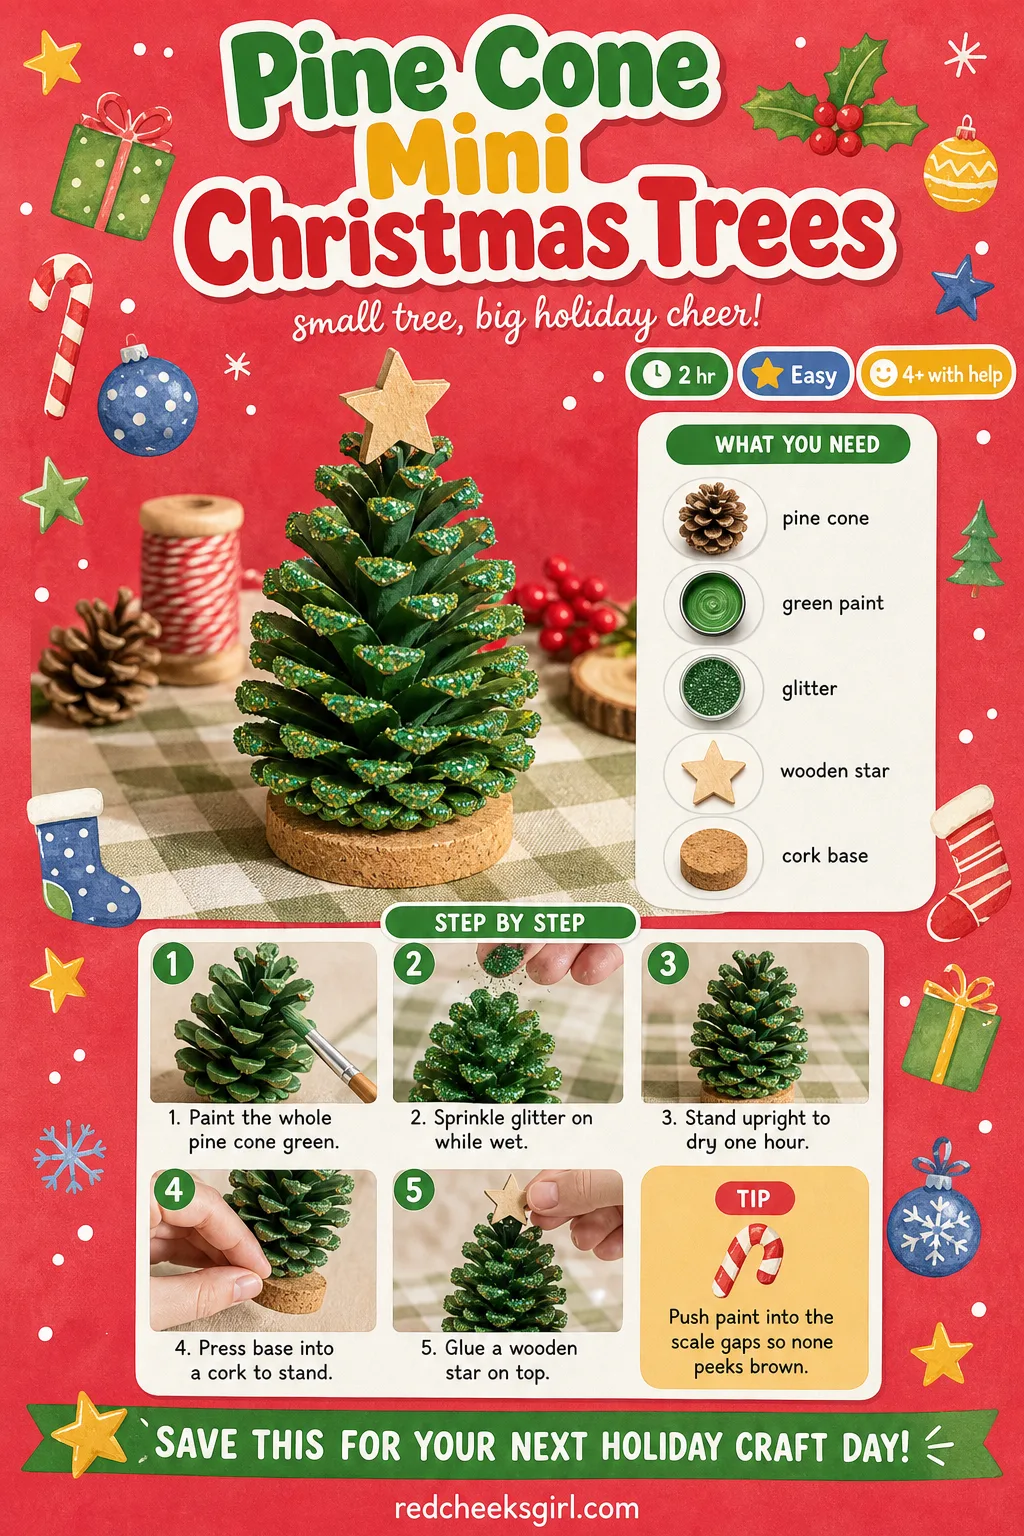
Pine Cone Mini Christmas Trees
Free, if there is a park nearby: pine cones make a tabletop forest that smells faintly of outside. Stand a cluster of them down the centre of the table and they do the job a centrepiece usually costs money to do. For a sleeker version for the good room, see these Elegant Christmas Tree Decorations instead, these ones are strictly for the kids’ table.
What You Need
- 1 pine cone, 10-12cm, per tree
- Green acrylic paint
- Fine glitter
- 1 small wooden bead star
- 1 wine cork or lump of air-dry clay, for the base
How to Make It
- Brush green paint over the whole cone, pushing the brush into the gaps between the scales so no brown shows through.
- While the paint is still wet, sprinkle glitter over the tips so it catches in the open scales.
- Stand the cone upright and let it dry for about an hour, scales up.
- Press the base of the cone into the cork or a ball of clay so it stands without tipping.
- Glue the wooden star to the very top point.
🛍 Shopping guide
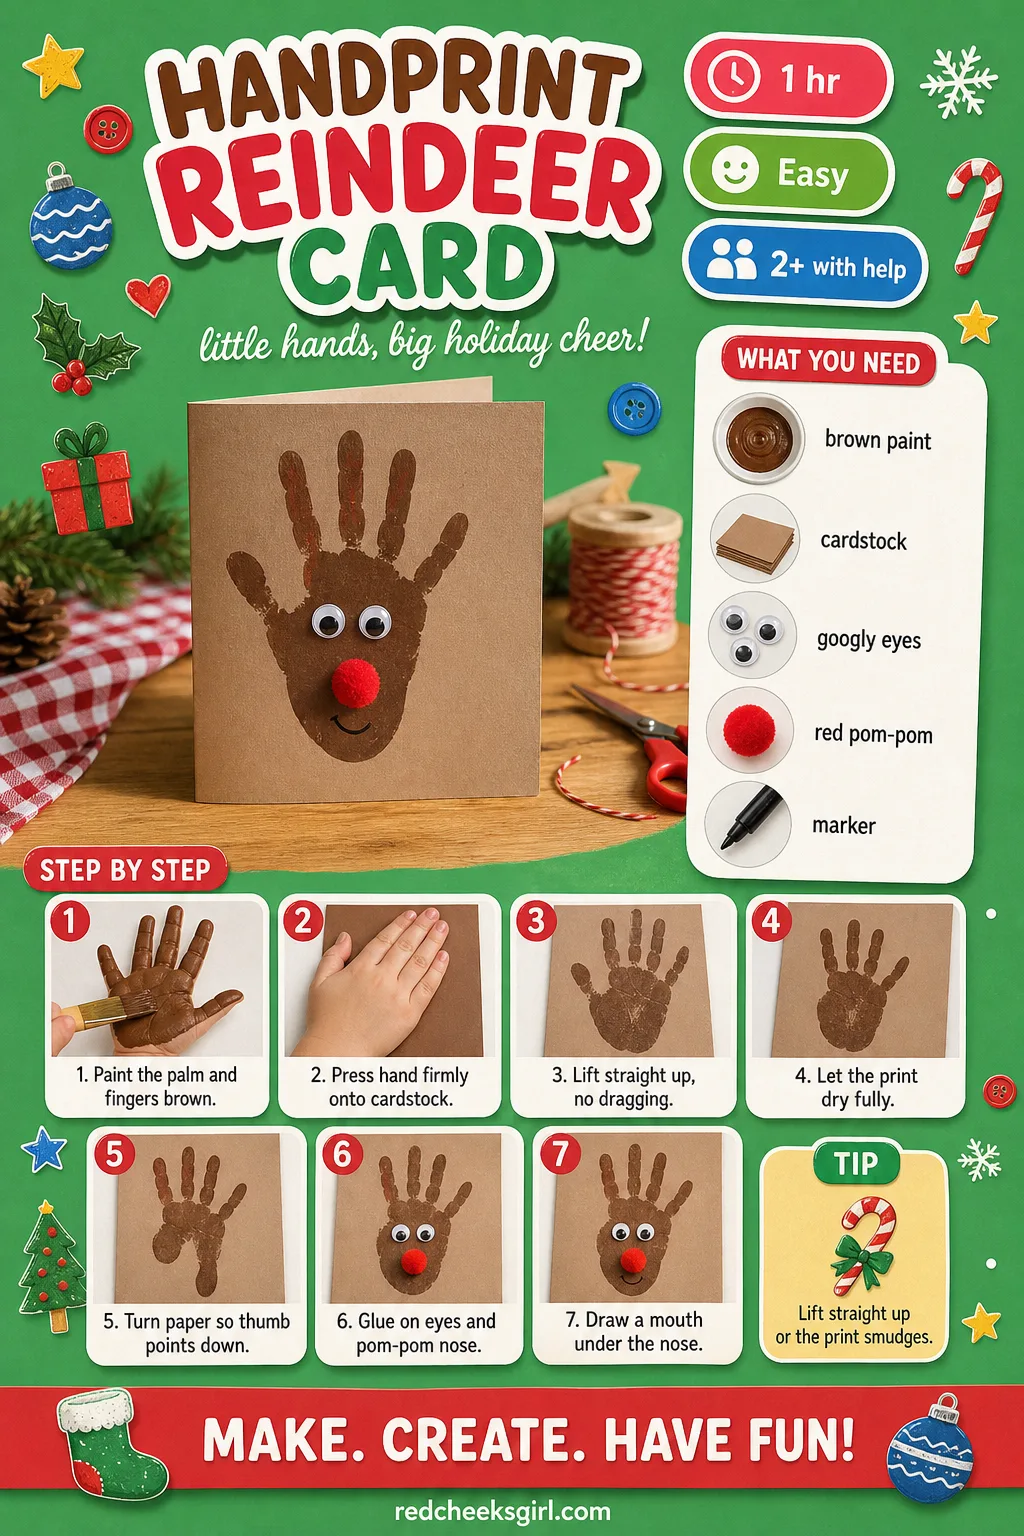
Handprint Reindeer Card
One painted palm turns upside down and becomes an entire reindeer, antlers and all, which still counts as sleight of hand to anyone under six. It flattens and posts well, so it doubles as this year’s card to grandparents.
What You Need
- Brown washable paint
- 1 sheet A5 cardstock per card
- 2 googly eyes, 10mm
- 1 small red pom-pom, for the nose
- Black fine marker
How to Make It
- Paint a child’s palm and fingers brown, keeping the fingers spread wide apart.
- Press the hand firmly onto the cardstock and lift straight up without dragging.
- Let the print dry for about 20 minutes, then turn the paper so the thumb points down: the thumb is the head, the fingers are antlers.
- Glue on the googly eyes near the thumb tip and the pom-pom for the nose.
- Draw a small smiling mouth under the nose with marker.
🛍 Shopping guide
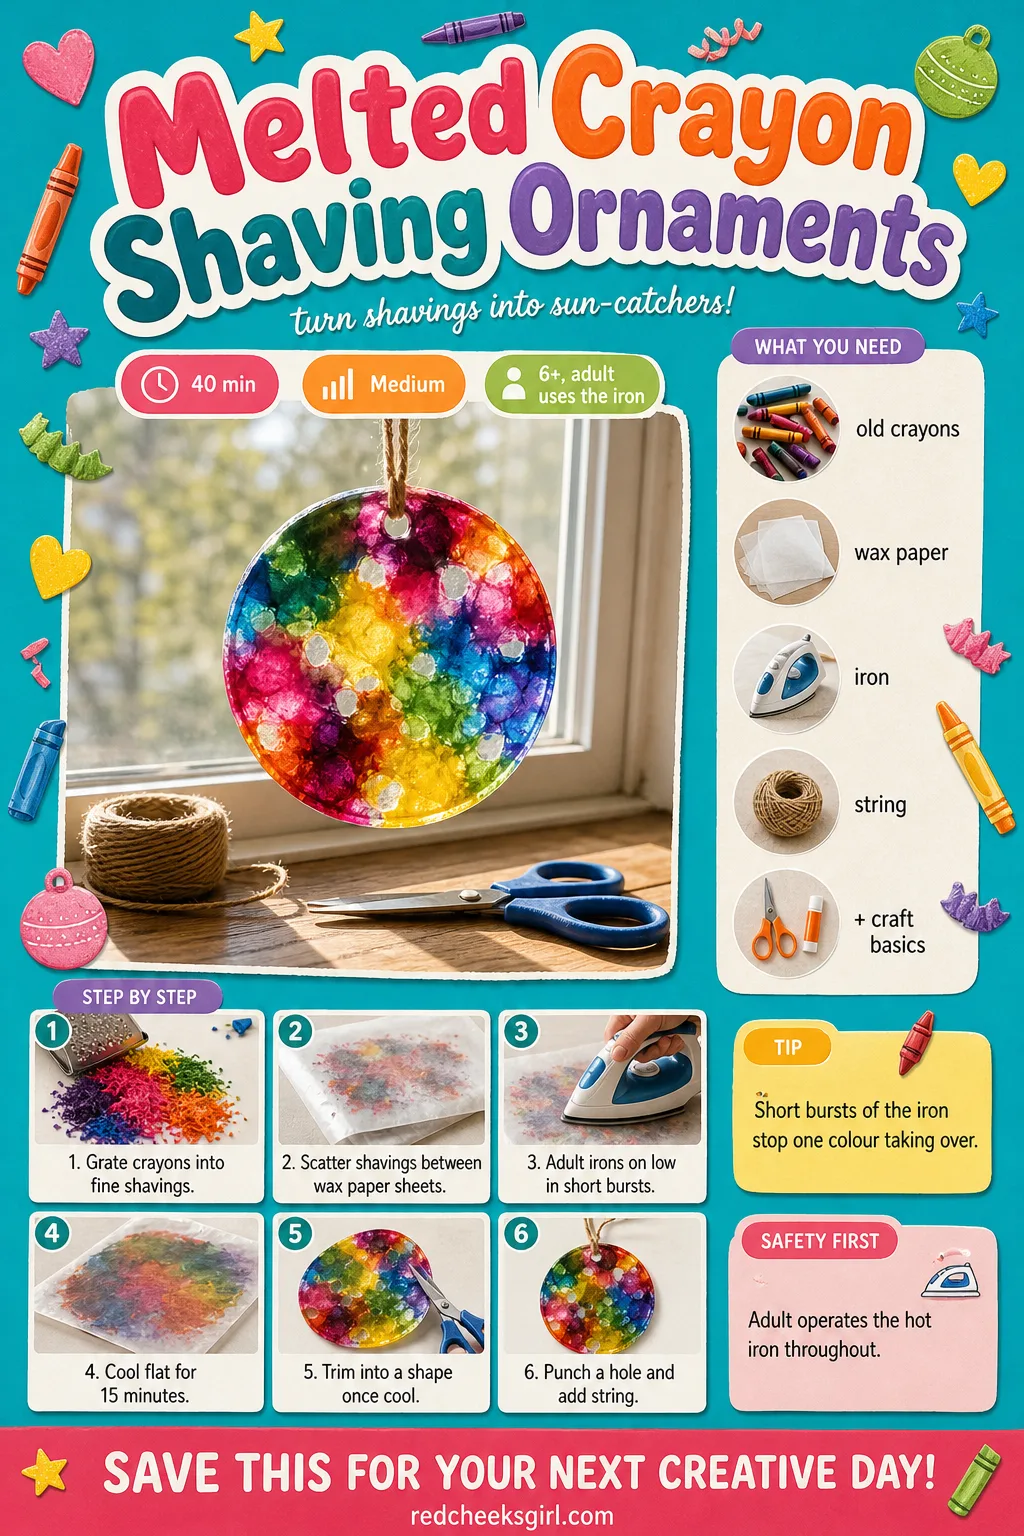
Melted Crayon Shaving Ornaments
Every house has a tin of broken crayons nobody wants to throw out. Grated into shavings and ironed between wax paper, they melt into a stained-glass swirl that genuinely looks expensive hung in a window.
What You Need
- 10 old crayons, broken into pieces
- Cheese grater or crayon sharpener
- 2 sheets wax paper, 20x20cm
- Iron, on low heat
- String loop and cardstock frame, optional
How to Make It
- Grate the crayons into fine shavings, keeping colours in separate small piles.
- Scatter the shavings between the two sheets of wax paper, loosely so the colours stay distinct.
- An adult sets the iron to low with no steam, then presses it over the wax paper for about 10 seconds at a time until the shavings melt into coloured pools.
- Lift the iron away and let the sheet cool flat for 15 minutes before touching it.
- Trim into a circle or star shape once cool and punch a hole for the string.
🛍 Shopping guide
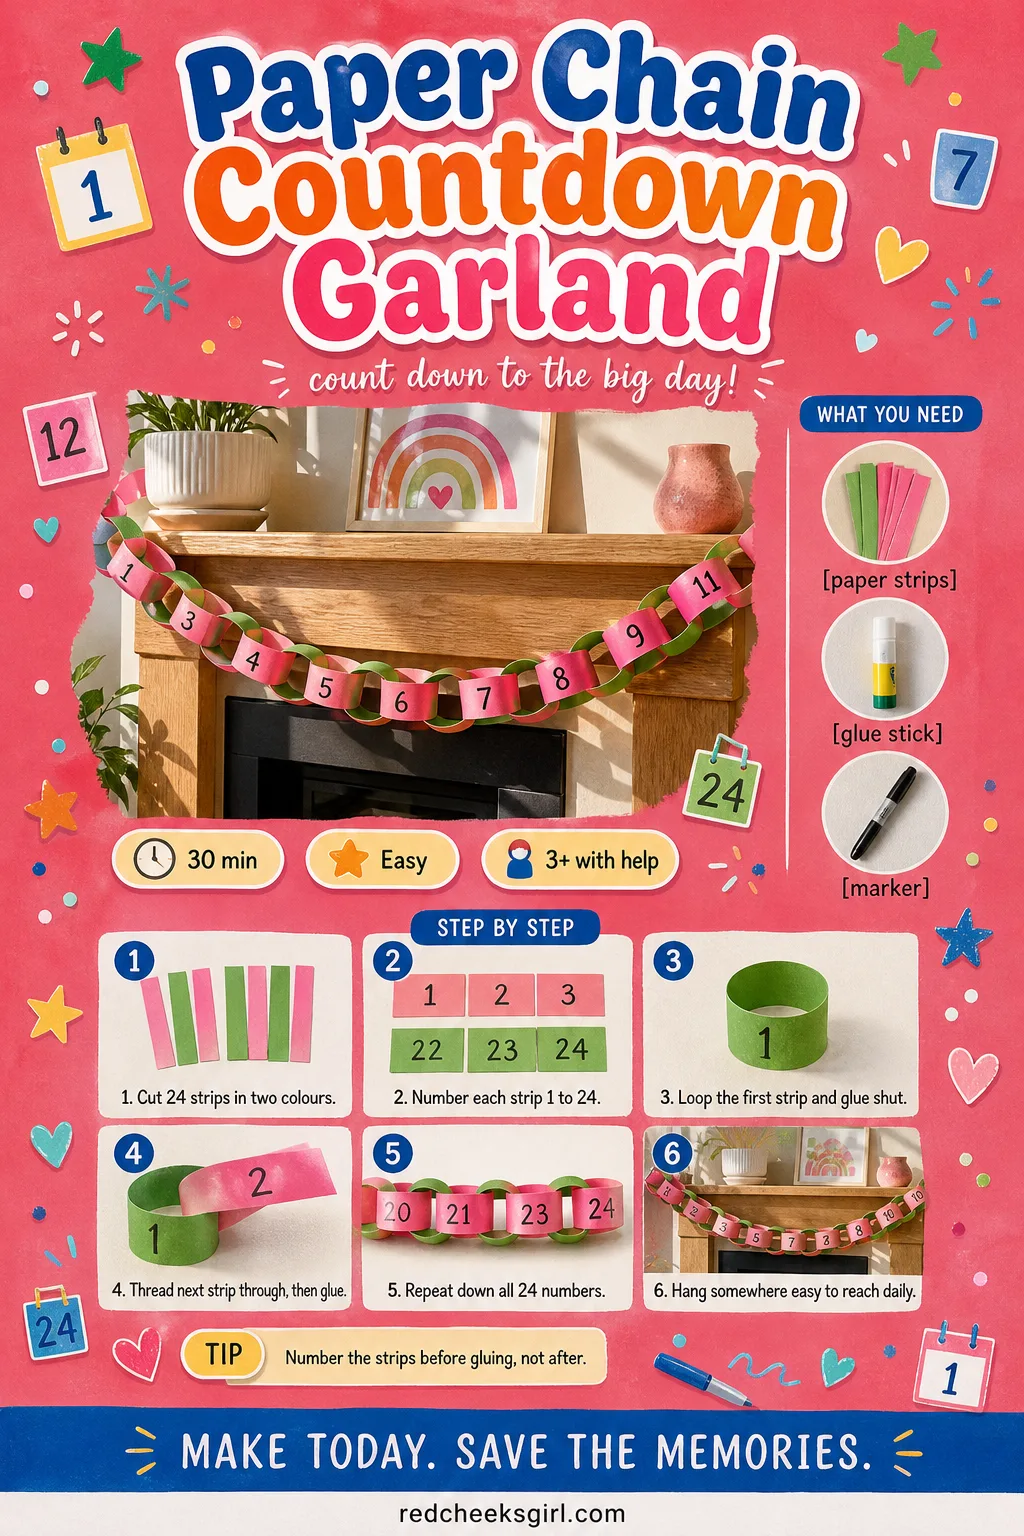
Paper Chain Countdown Garland
Nothing teaches patience like tearing one loop off a chain each morning until Christmas actually arrives. It costs the price of two packs of paper, drapes along a mantel or stair rail, and folds flat into an envelope for next year if nobody rips it apart first.
What You Need
- 24 paper strips, 3cm x 18cm, two colours
- Glue stick or stapler
- Marker, for numbering
How to Make It
- Cut or buy 24 strips, alternating two colours so the finished chain reads as a pattern.
- Number each strip from 1 to 24 along one edge before gluing anything.
- Loop the first strip into a circle and glue or staple the ends together.
- Thread the next strip through that loop before closing it into its own circle, and keep going down the numbers.
- Hang the finished chain somewhere it can be reached easily, since one loop comes off every single day.
🛍 Shopping guide
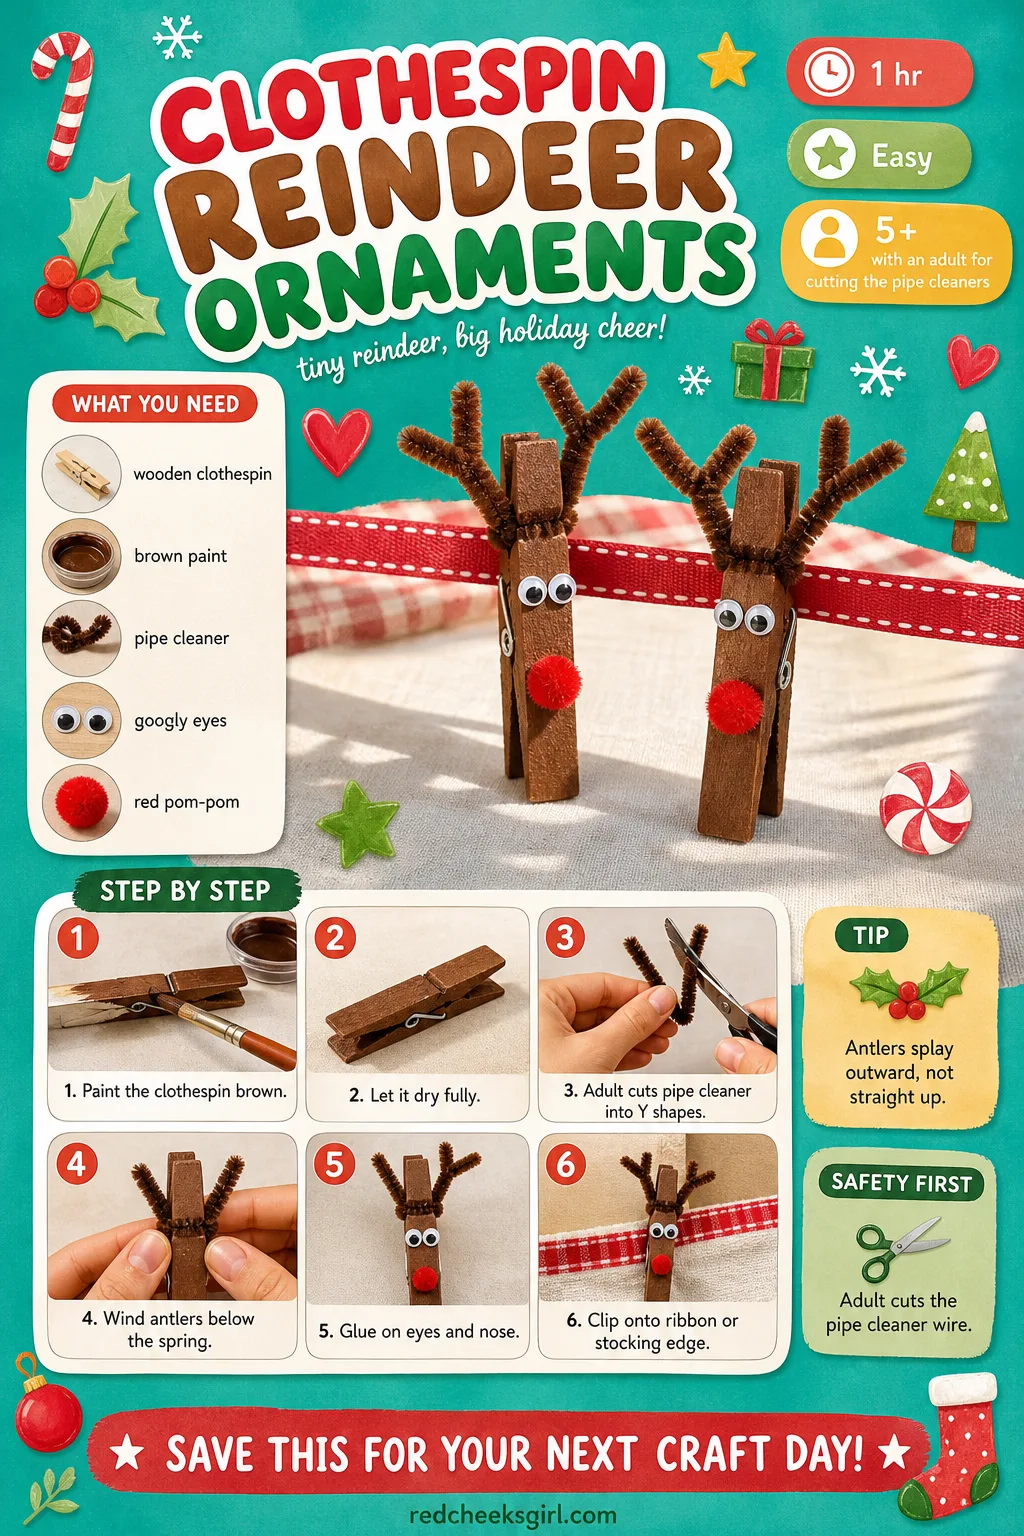
Clothespin Reindeer Ornaments
A wooden peg, painted brown and given two bent pipe cleaner antlers, looks like it walked out of a proper craft shop rather than a kitchen drawer. Clip a row of them along a ribbon strung across a doorway and the hallway suddenly feels dressed.
What You Need
- 1 wooden clothespin per reindeer
- Brown acrylic paint
- 1 brown pipe cleaner per reindeer, for antlers
- 2 googly eyes, 10mm
- 1 mini red pom-pom, for the nose
How to Make It
- Paint the clothespin brown all over and stand it to dry for about 20 minutes.
- An adult cuts the pipe cleaner in half, then bends each half into a small Y shape for an antler.
- Wind the two antler pieces around the top of the clothespin, just below the spring, so they splay outward.
- Glue the googly eyes and the pom-pom nose onto the rounded end of the peg.
- Clip the finished reindeer onto a ribbon, a stocking edge, or the lip of a bowl of nuts on the table.
🛍 Shopping guide
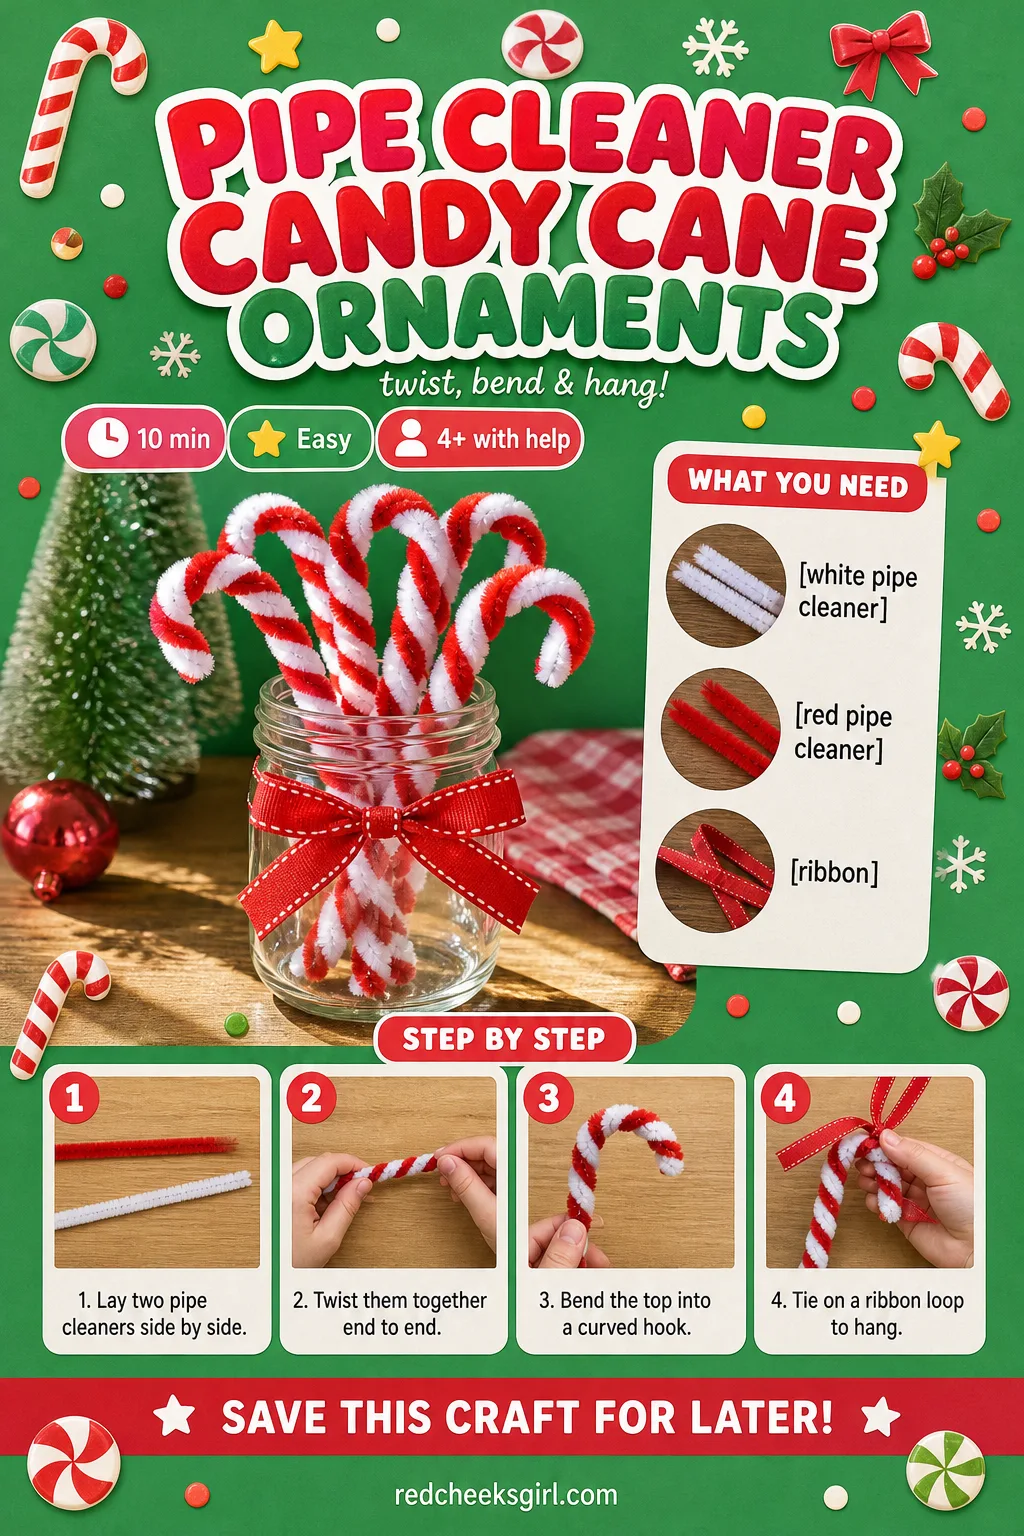
Pipe Cleaner Candy Cane Ornaments
This is the one to hand a four year old while the oven preheats for something else: two pipe cleaners twisted together, no glue, no drying time, done before the timer goes off.
What You Need
- 1 white pipe cleaner per cane
- 1 red pipe cleaner per cane
- Ribbon loop, 10cm, optional
How to Make It
- Lay the white and red pipe cleaners side by side and twist them together loosely from one end to the other.
- Bend the top third over into a curved hook shape to make the candy cane curl.
- Tie a small ribbon loop around the straight end if it needs to hang rather than stand in a jar.
🛍 Shopping guide
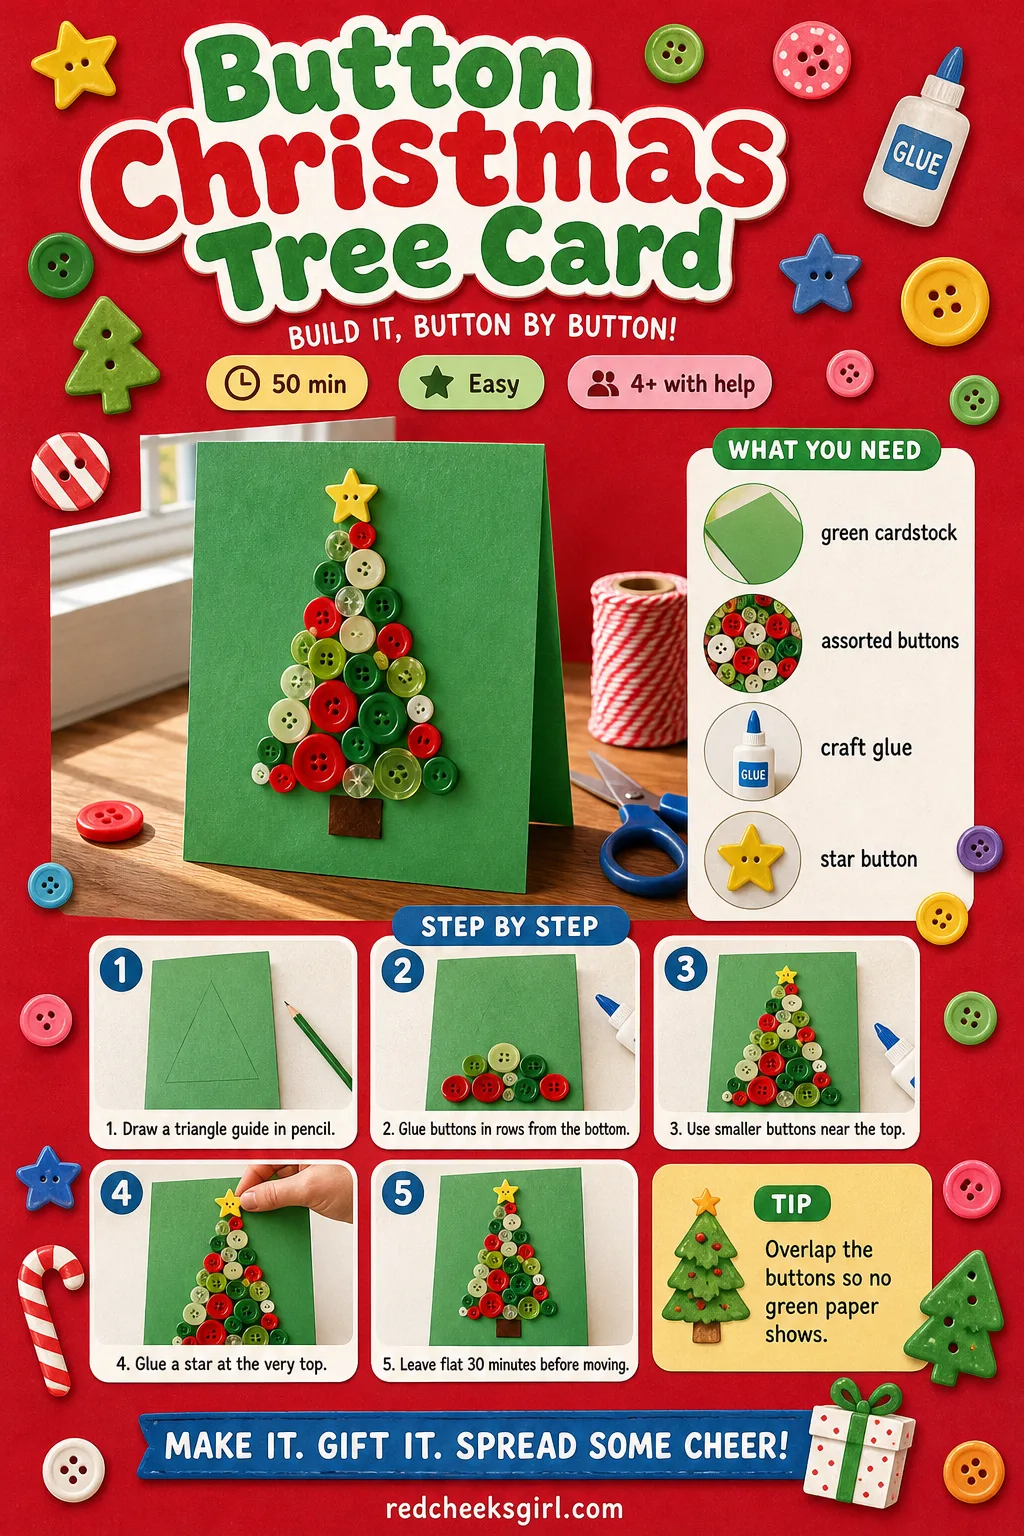
Button Christmas Tree Card
The button jar nobody sorts turns out to have a tree hiding inside it. Mismatched sizes actually help here, since a tree with uneven ornaments looks more like a real one than a neat grid ever would.
What You Need
- 1 sheet green cardstock, A5
- 25-30 assorted buttons, 10-20mm
- Craft glue
- 1 star button or sequin, for the top
How to Make It
- Draw a simple triangle outline on the cardstock in pencil, for a guide only.
- Starting at the bottom, glue buttons inside the triangle in rough rows, overlapping edges slightly so no green shows between them.
- Work upward, using smaller buttons as the tree narrows toward the top.
- Glue the star button at the very top point.
- Leave flat for 30 minutes so the glue grips every button before the card is moved or stood up.
🛍 Shopping guide
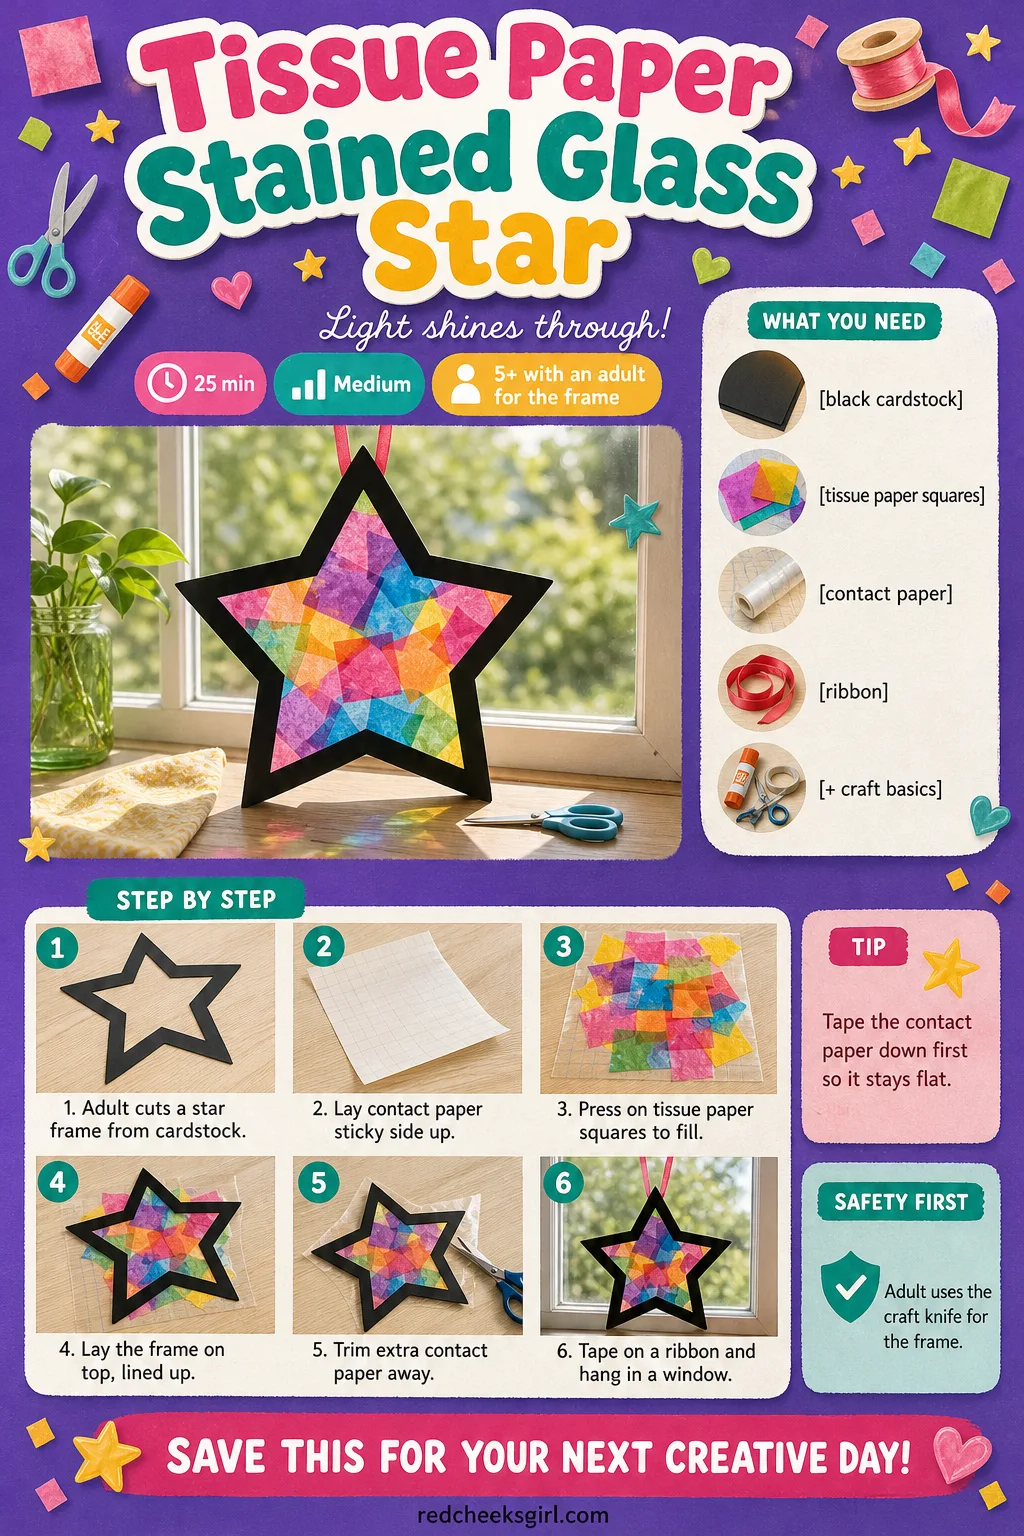
Tissue Paper Stained Glass Star
If the window looks bare from the street, this fixes it for less than the price of a coffee. Light comes through the coloured tissue paper in blocks, so the star glows rather than just sitting flat against the glass.
What You Need
- 1 sheet black cardstock, A4, for the frame
- 15 tissue paper squares, 5cm, assorted colours
- 1 sheet clear contact paper, 20x20cm
- Craft knife (adult use)
- Ribbon hanger, 15cm
How to Make It
- An adult draws a star outline on the black cardstock and cuts out both the outer star and an inner star shape, leaving a frame about 2cm wide.
- Lay a sheet of contact paper sticky side up on the table.
- Press tissue paper squares onto the sticky side, overlapping colours until the whole shape is covered, inside the star window.
- Lay the black cardstock frame on top, lining up the inner star edges.
- Trim away the extra contact paper around the outside with scissors.
- Tape a ribbon loop to the back and hang it in a window where daylight hits it.
🛍 Shopping guide
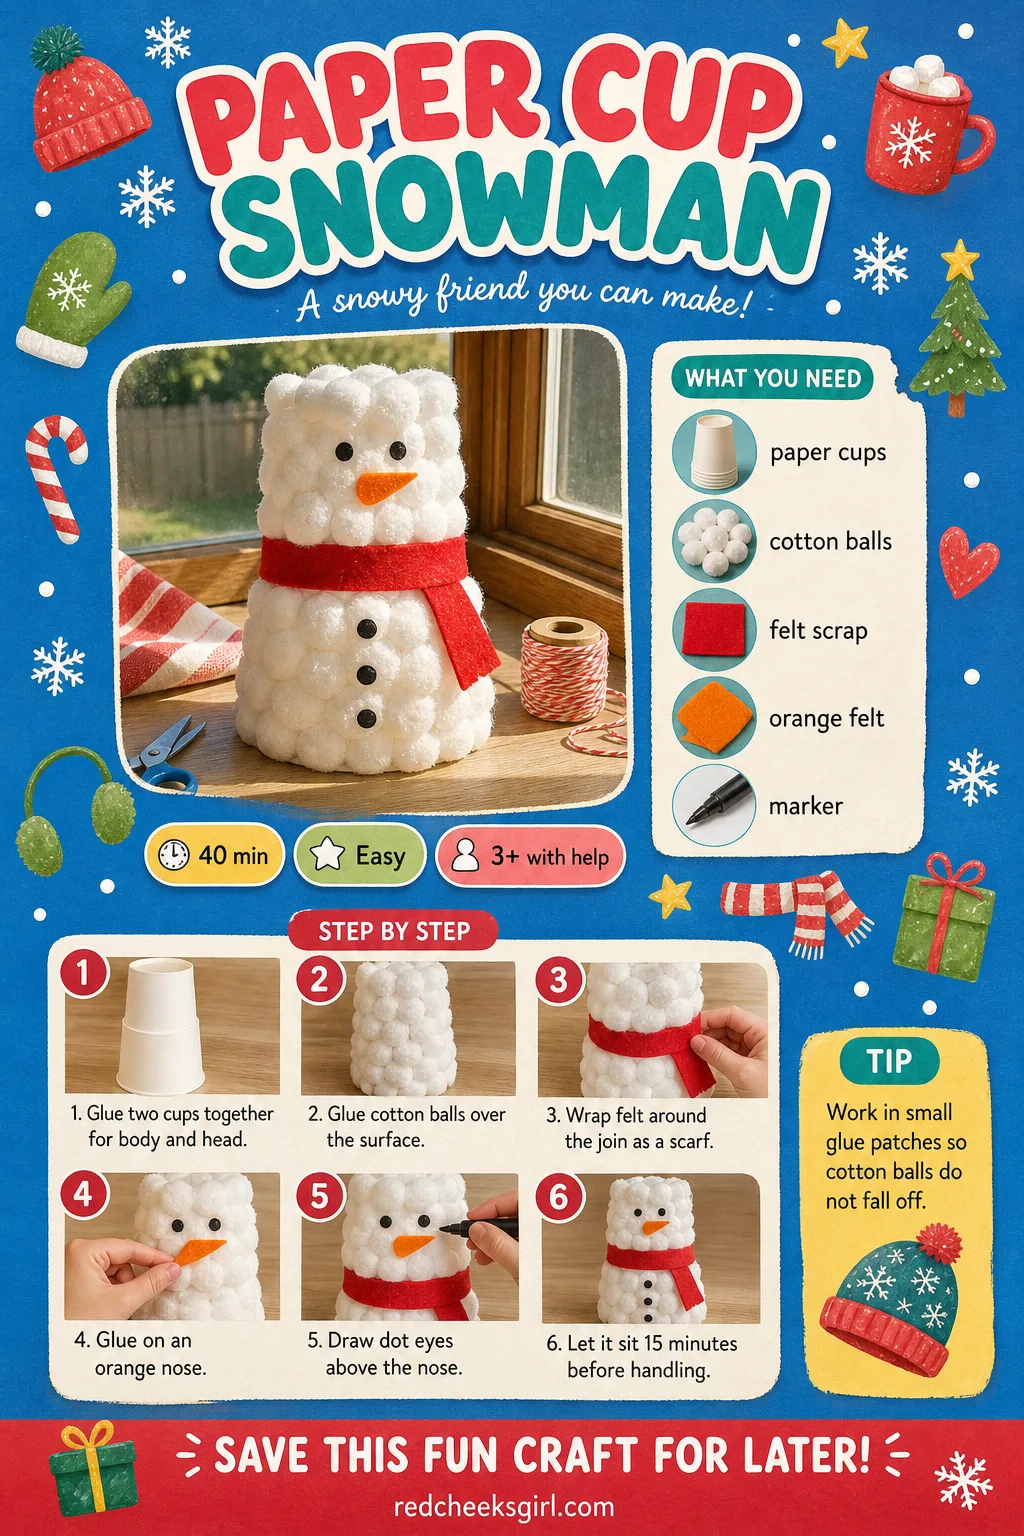
Paper Cup Snowman
Two stacked cups and a scrap of felt make a snowman sturdy enough to survive being carried around the house all afternoon, unlike his melting namesake outside. Line up three or four along the windowsill and it reads as a whole scene.
What You Need
- 2 white paper cups, 9oz, per snowman
- 15 cotton balls or white pom-poms
- Felt scrap, 10x2cm, for the scarf
- Orange felt triangle, for the nose
- Black marker
How to Make It
- Turn one cup upside down and glue the rim of the second, smaller side, on top to build the body and head.
- Glue cotton balls or pom-poms over the whole surface, working in small patches so the glue does not dry before they stick.
- Wrap the felt strip around the join between the two cups as a scarf and glue the ends.
- Glue on the orange triangle as a nose and draw dot eyes above it.
- Let it sit for 15 minutes so every cotton ball holds firm before it gets picked up again.
🛍 Shopping guide
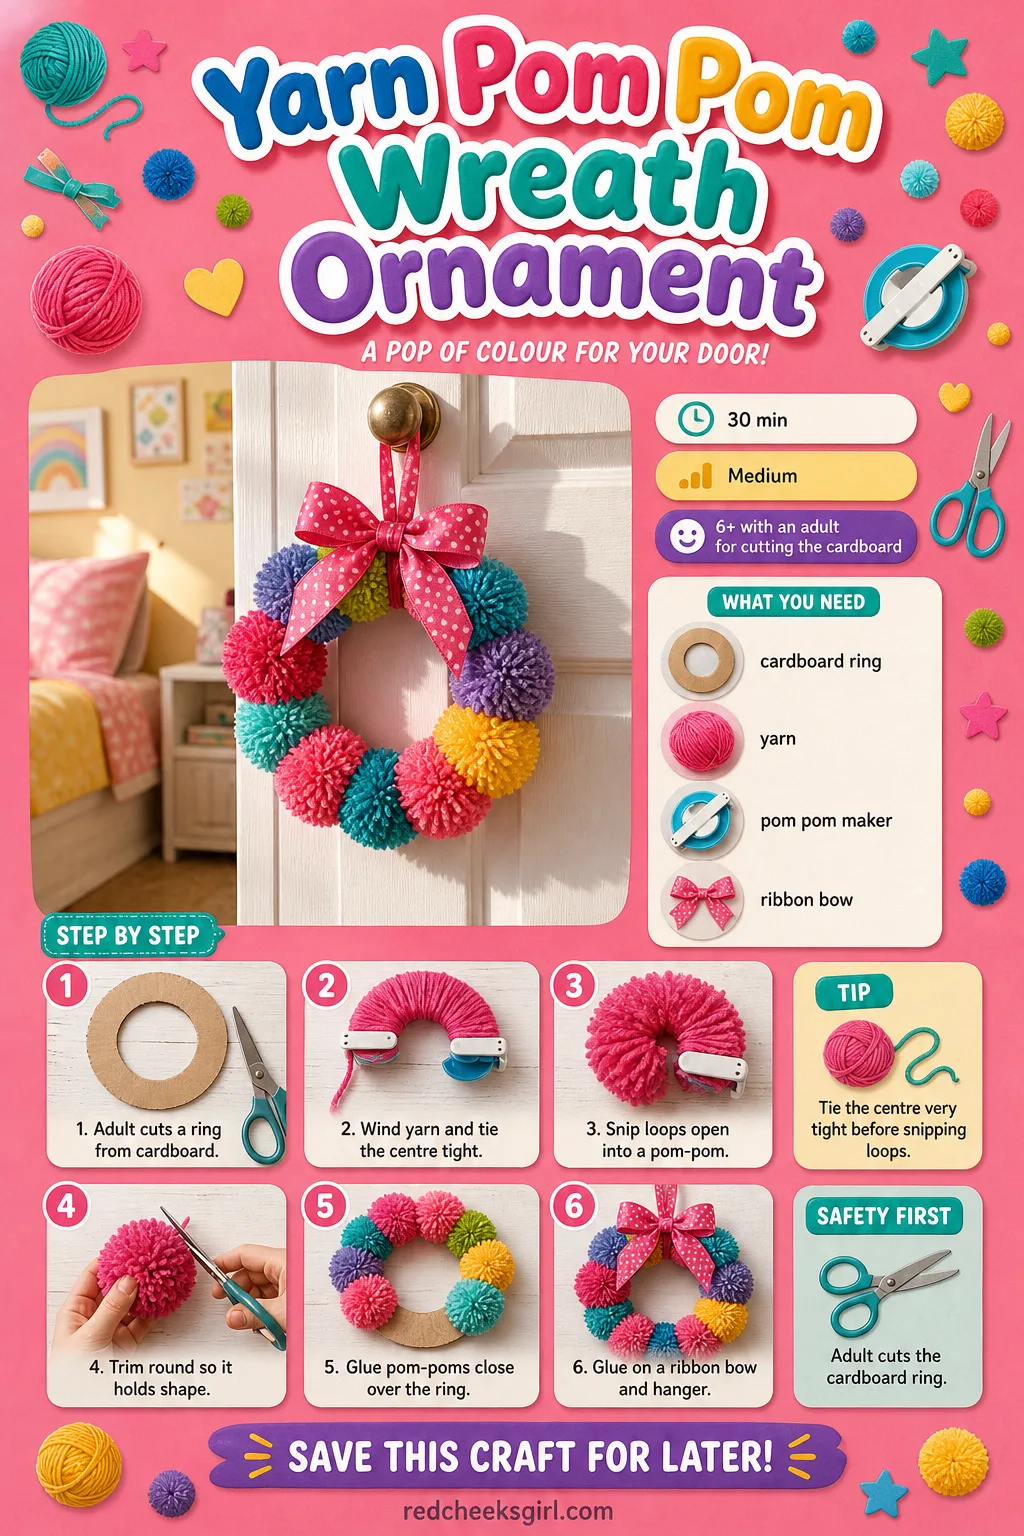
Yarn Pom Pom Wreath Ornament
A fistful of leftover yarn from last winter’s knitting basket turns into a soft, textured wreath small enough to hang on a bedroom door rather than the front one. It has real weight to it, nothing flimsy, which makes it satisfying to hold.
What You Need
- 1 cardboard ring, 8cm outer diameter, cut from a cereal box
- Yarn, assorted colours, about 10 metres total
- Pom pom maker or fork
- Small ribbon bow
How to Make It
- An adult cuts a ring shape from cardboard, like a thick doughnut, for the wreath base.
- Wind yarn around the pom pom maker or fork, tie the centre tightly, and snip the loops open to make each small pom-pom.
- Trim each pom-pom round so it holds its shape.
- Glue the pom-poms onto the cardboard ring, packing them close together until no cardboard shows.
- Glue a ribbon bow at the bottom or top, and add a ribbon loop on the back for hanging.
🛍 Shopping guide
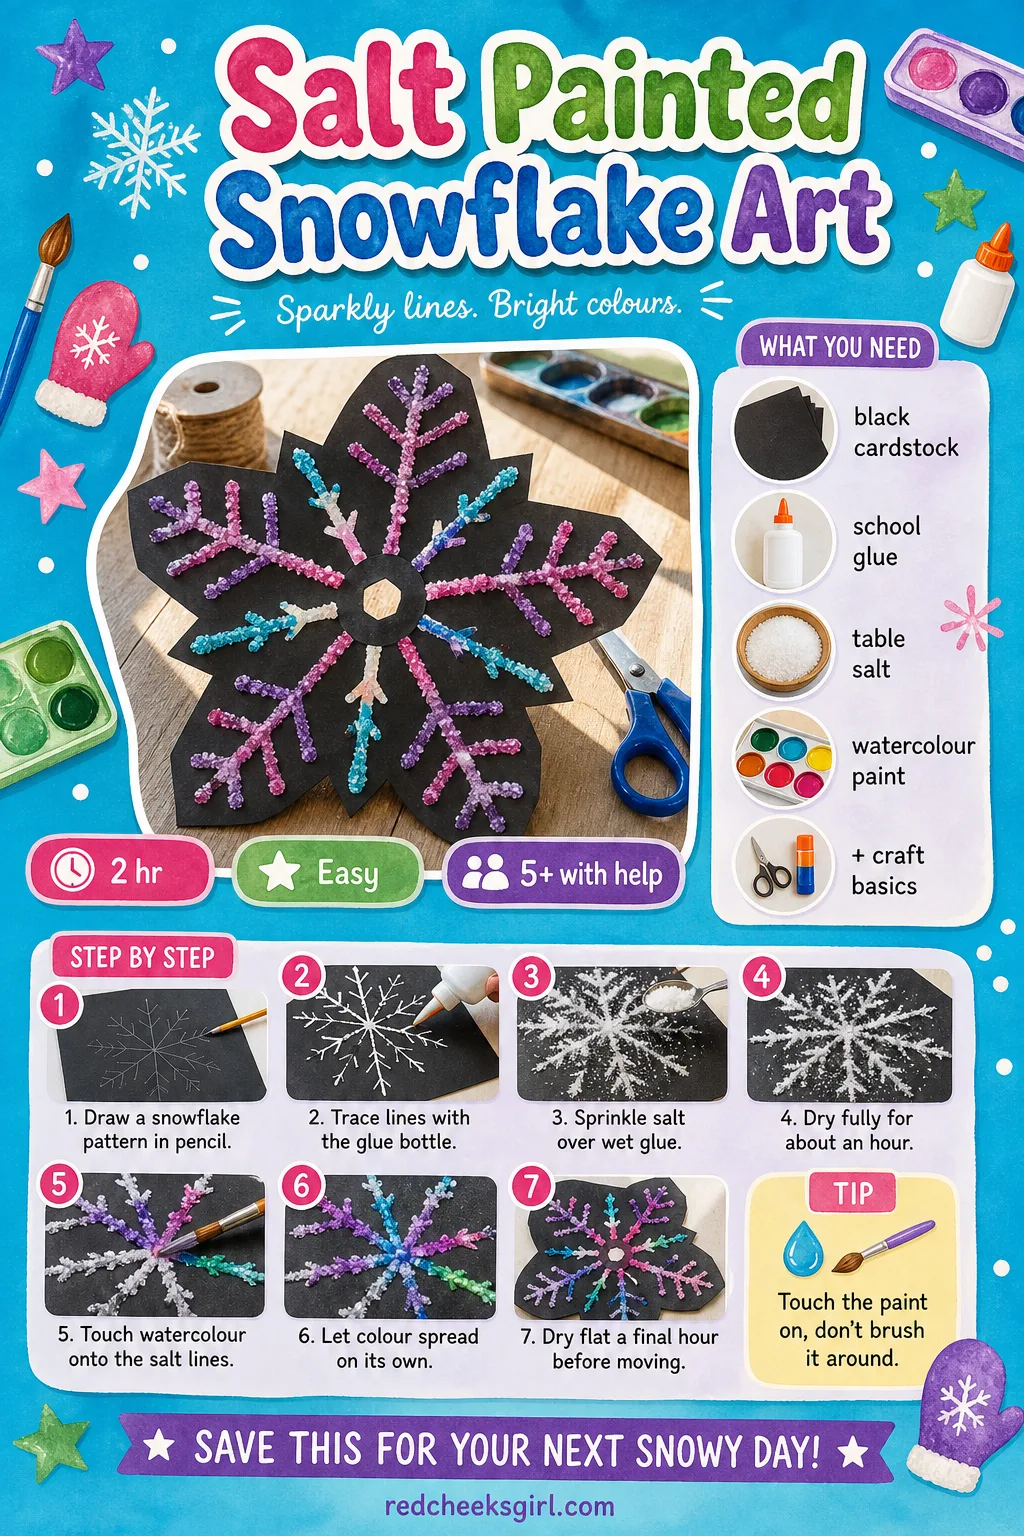
Salt Painted Snowflake Art
Glue lines and table salt do something close to magic once watercolour touches them: the colour creeps along the salt and stops dead at the glue, so the whole snowflake blooms in soft, feathered colour. It needs patience more than skill, and it dries into something worth framing.
What You Need
- 1 sheet black cardstock, A4
- White school glue, in a fine-tip bottle
- 3 tbsp table salt
- Liquid watercolour or diluted food colouring, 3 colours
- Paintbrush or pipette
How to Make It
- Draw or trace a snowflake pattern lightly in pencil on the black cardstock.
- Trace over every pencil line with the glue bottle, keeping a steady, even line.
- While the glue is still wet, sprinkle salt generously over the whole design and tip off the excess.
- Let the glue and salt dry fully, about 1 hour, until it feels gritty and firm rather than tacky.
- Dip a paintbrush or pipette tip into watercolour and touch it to the salt lines, letting the colour spread on its own rather than brushing it around.
- Leave it flat to dry a final hour before moving it, so the colour does not run.
Perler Bead Snowflake Ornaments
These little plastic beads are oddly satisfying to place one by one, and the finished snowflake has real heft once it is fused, nothing like the paper kind. They catch light nicely strung in a window or clipped to gift ribbon.
What You Need
- About 80 fuse beads, white and blue, per snowflake
- 1 snowflake-shaped pegboard
- Ironing paper, 2 sheets
- Iron, on medium heat
- Ribbon loop, 15cm
How to Make It
- Place beads onto the pegboard following the snowflake arms, filling every peg so there are no gaps once fused.
- Lay a sheet of ironing paper over the top of the completed design.
- An adult presses the iron over the paper in slow circles for about 10 seconds, just enough for the tops of the beads to melt and fuse without the shapes sagging.
- Let the piece cool flat on the pegboard for 10 minutes before lifting it off.
- Flip it and repeat a light press on the other side if the beads look loose.
- Thread a ribbon loop through one of the outer beads for hanging.
🛍 Shopping guide
Fingerprint Christmas Tree Card
Smaller than a handprint and far less messy, a row of inked fingertips becomes a whole tree of ornaments once a marker draws the trunk underneath. It fits in an envelope without bending, which the previous one never quite managed.
What You Need
- Green ink pad (washable)
- 1 sheet A5 cardstock per card
- Fine black marker
- 1 small gold star sticker
How to Make It
- Draw a simple trunk and a straight vertical guideline in pencil for the centre of the tree.
- Press a fingertip onto the ink pad, then stamp it onto the paper in a row either side of the guideline, widest at the bottom and narrower toward the top.
- Keep stamping rows upward until the triangle shape is full.
- Let the ink dry for about 10 minutes before touching the page again.
- Draw a small dot of colour on a few fingerprints with marker for ornaments, and stick the gold star at the top.
🛍 Shopping guide
Toilet Paper Roll Reindeer
It costs nothing but paint, since the tube was headed for recycling anyway.
What You Need
- 1 empty cardboard tube per reindeer
- Brown acrylic paint
- 2 brown pipe cleaners, for antlers
- 2 googly eyes, 12mm
- 1 red pom-pom, for the nose
How to Make It
- Paint the whole tube brown, inside the rim too, and stand it up to dry for about 20 minutes.
- An adult cuts each pipe cleaner in half and bends the halves into small branching antler shapes.
- Push the antlers into the open top of the tube on either side, or tape them to the inside rim if they will not sit still.
- Glue the googly eyes and pom-pom nose onto the front of the tube.
- Stand it upright on a flat base, or add a strip of cardboard folded underneath as feet.
🛍 Shopping guide
Bottle Cap Fridge Magnet Ornaments
The fridge is already covered in artwork, so give it something tidier: a row of tiny framed pictures made from bottle caps that were headed for the recycling bin anyway. They take up no shelf space at all.
What You Need
- Clean metal bottle caps, 1 per magnet
- Small Christmas images or photos, cut to a 3cm circle
- Mod podge or clear craft glue
- Adhesive magnet dots, 20mm
How to Make It
- Cut small circles of paper or photo to fit snugly inside the bottle cap, trimming a little at a time since paper does not shrink back.
- Brush a thin layer of glue inside the cap and press the circle down flat.
- Brush a second layer of glue over the top of the image to seal and shine it.
- Leave it flat to cure for about 2 hours, until the glue feels completely dry and glassy, not tacky.
- Stick a magnet dot to the back of the cap once fully cured.
🛍 Shopping guide
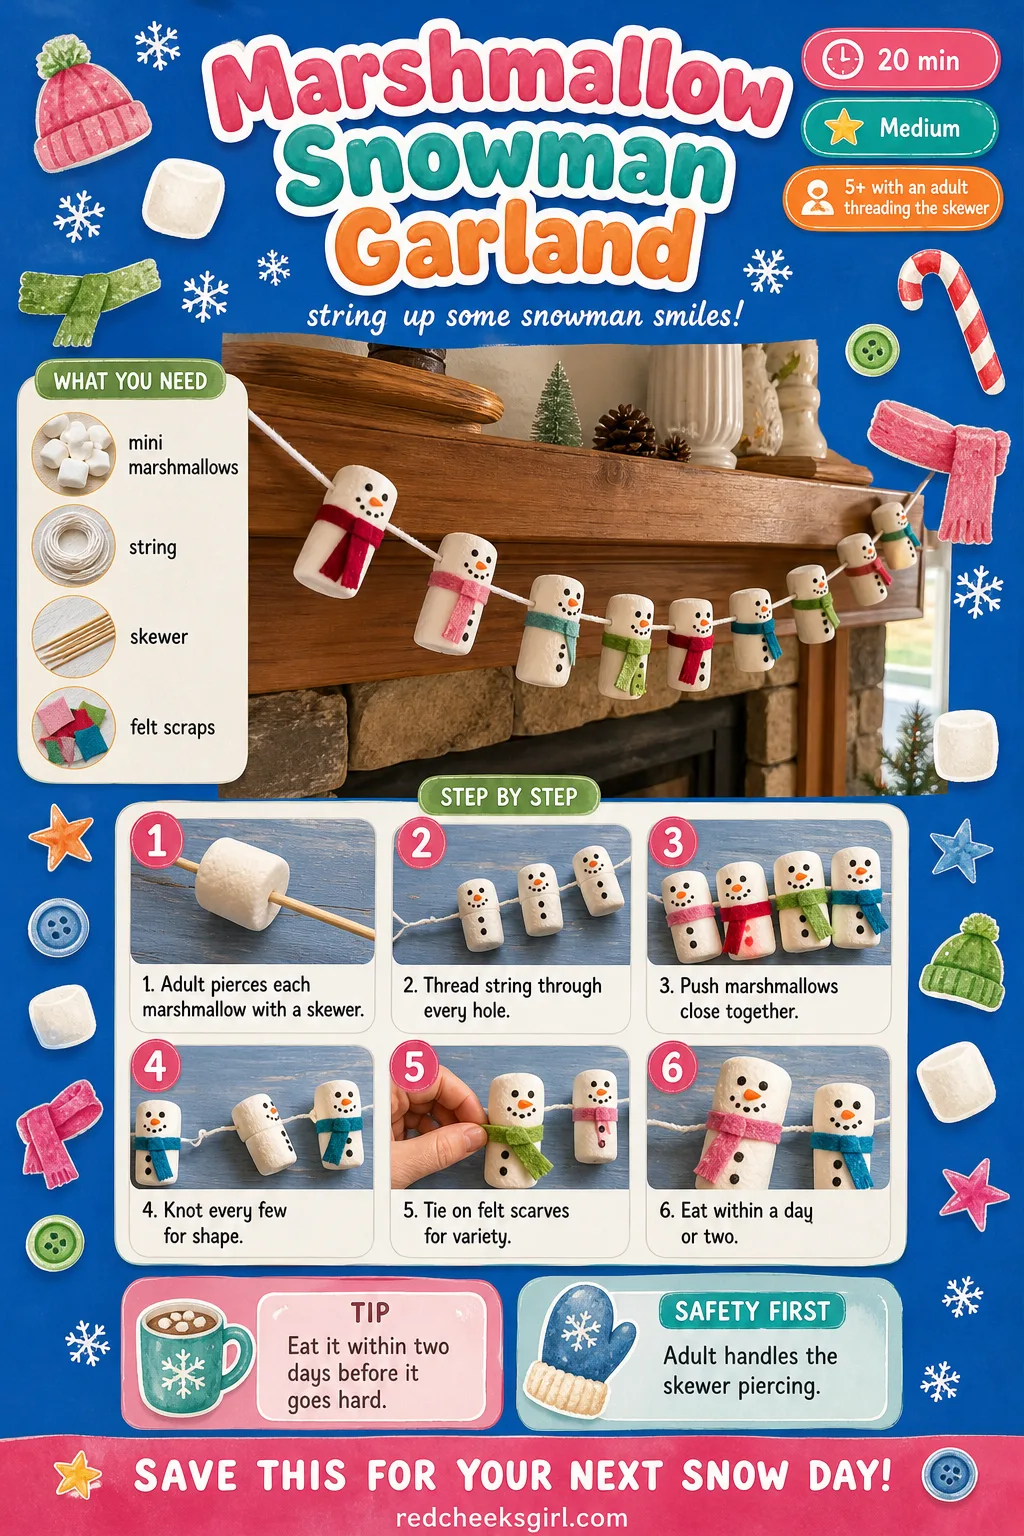
Marshmallow Snowman Garland
This one is a treat first and a decoration second, so warn everyone it will not last past the weekend. Threaded along the mantel or a window frame, it looks like a string of plump little snowmen until someone eats the evidence.
What You Need
- 40 mini marshmallows, for a 1 metre garland
- Kitchen string or thin ribbon, 1.5 metres
- Wooden skewer, for piercing
- Small felt or ribbon scraps, for scarves, optional
How to Make It
- An adult pierces a starter hole through the centre of each marshmallow with the skewer, since pushing string straight through squashes them flat.
- Thread the string through each pierced hole, pushing the marshmallows along close together.
- Tie a small knot every few marshmallows if the garland needs to hold shape in loops rather than a straight line.
- Tie tiny felt scraps around a few marshmallows as scarves for variety.
- Drape the garland somewhere it will be eaten within a day or two, since marshmallows go hard and sticky left out longer.
🛍 Shopping guide
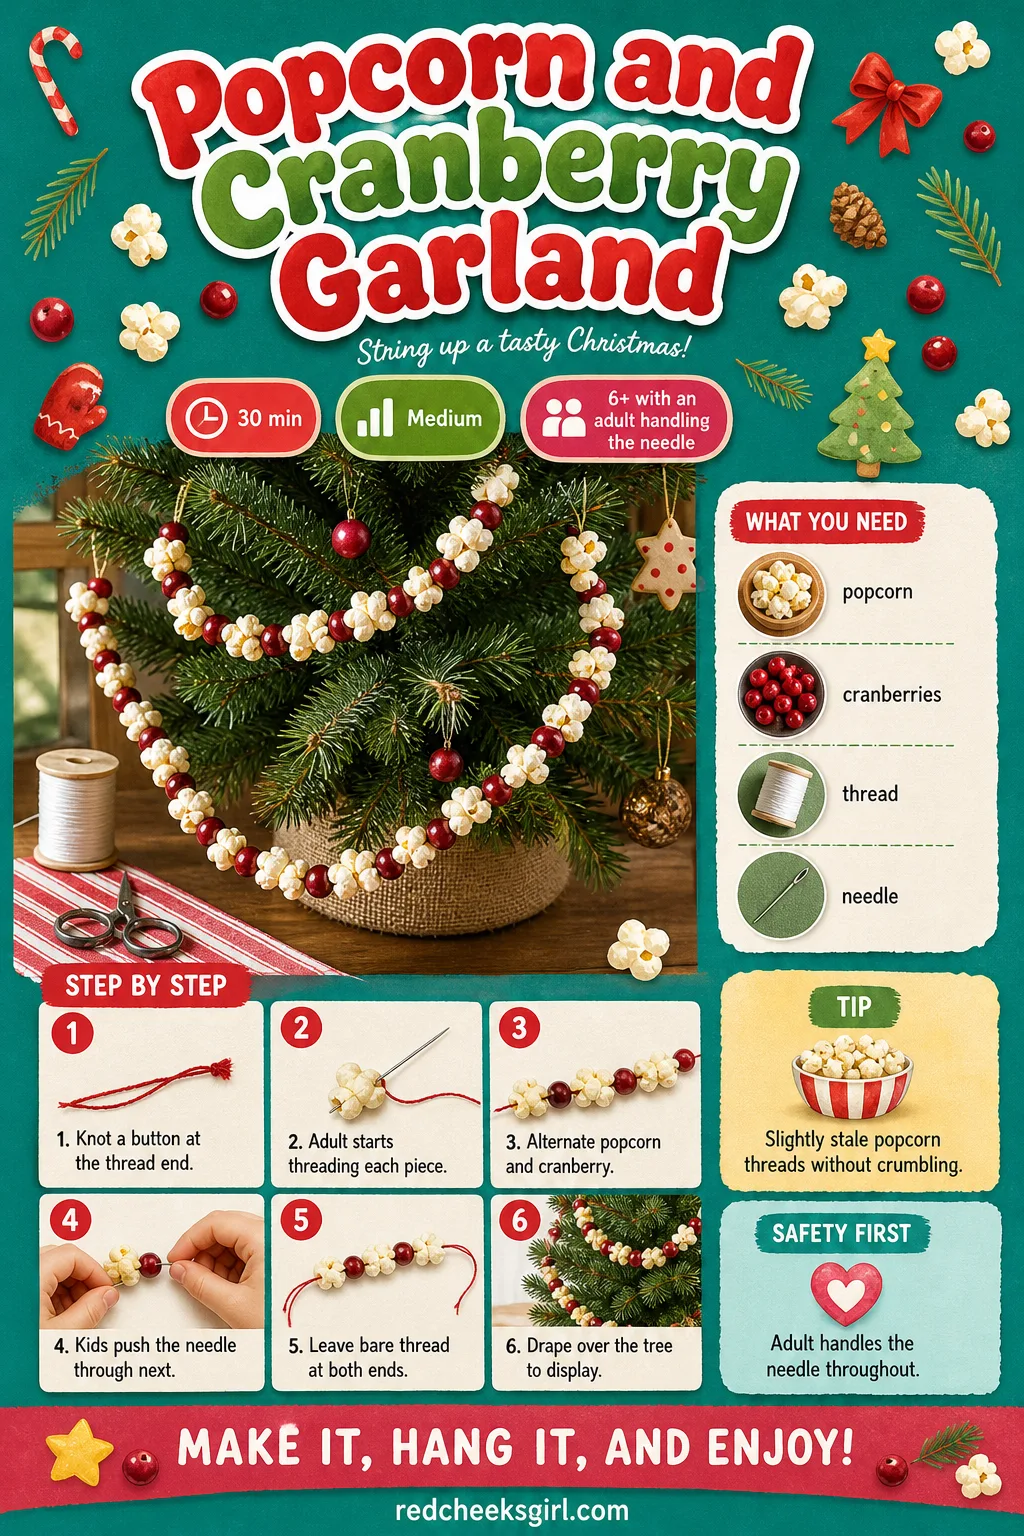
Popcorn and Cranberry Garland
The oldest tree garland there is, and still the one that makes a plain tree look properly dressed without a single bought bauble. Fresh cranberries add little beads of red between the white popcorn, and the whole thing composts when the holidays end.
What You Need
- 4 cups popped popcorn, plain, slightly stale
- 2 cups fresh cranberries
- 2 metres strong thread or dental floss
- Large-eye needle
How to Make It
- Thread the needle and knot a large bead or button at the end so nothing slides off.
- An adult pushes the needle through the centre of a popcorn piece, then a cranberry, alternating the pattern along the string.
- Let younger hands push the needle through once an adult has started each piece, since stale popcorn is less likely to crumble.
- Keep going until the garland reaches the length needed, leaving a bit of bare thread at each end for tying.
- Drape it over the tree and expect it to last about a week outdoors or indoors before it starts to dry out.
🛍 Shopping guide
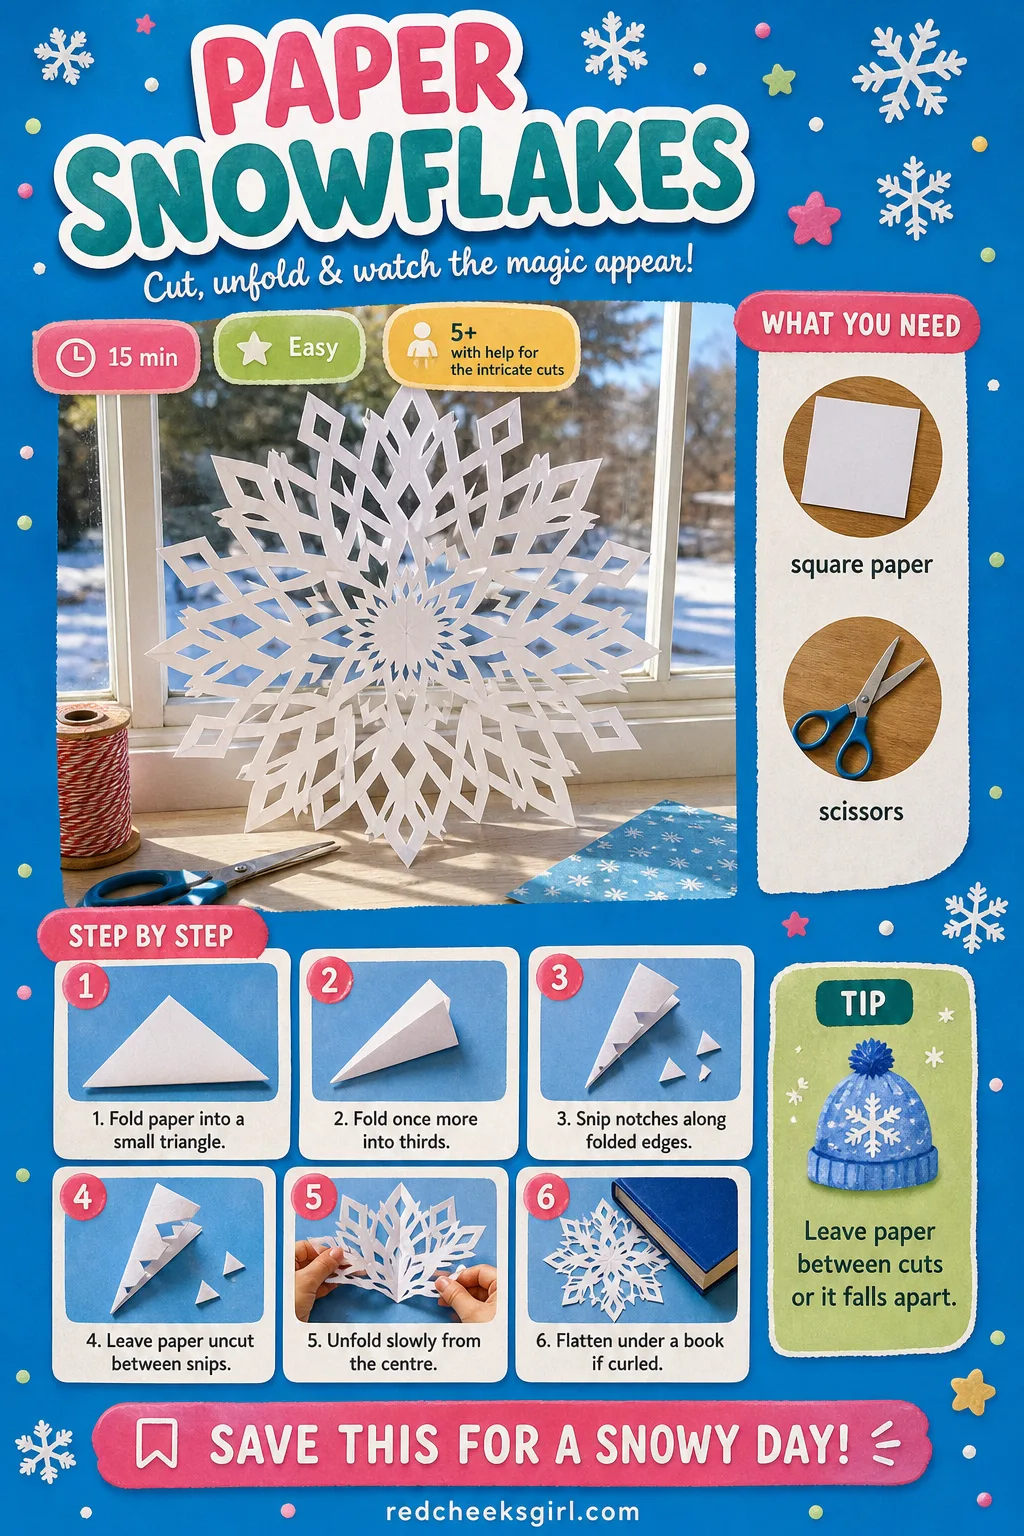
Paper Snowflakes
One sheet of paper, folded and snipped, turns into something she will hold up to the light before it even reaches the window. No glue, no paint, no drying time, which makes it the one to reach for when patience has already run out that day.
What You Need
- 1 square sheet of paper, 15x15cm, per snowflake
- Scissors
How to Make It
- Fold the square in half to make a triangle, then in half again to make a smaller triangle.
- Fold it one more time into thirds, so the point at the centre is where every fold meets.
- Snip small triangles, half circles and notches along both folded edges, leaving some paper uncut between each snip so the shape holds together.
- Unfold slowly and carefully, since the paper tears easily right at the centre point.
- Flatten it gently with a hand if it springs into a curl, or press it under a heavy book for a few minutes.
🛍 Shopping guide
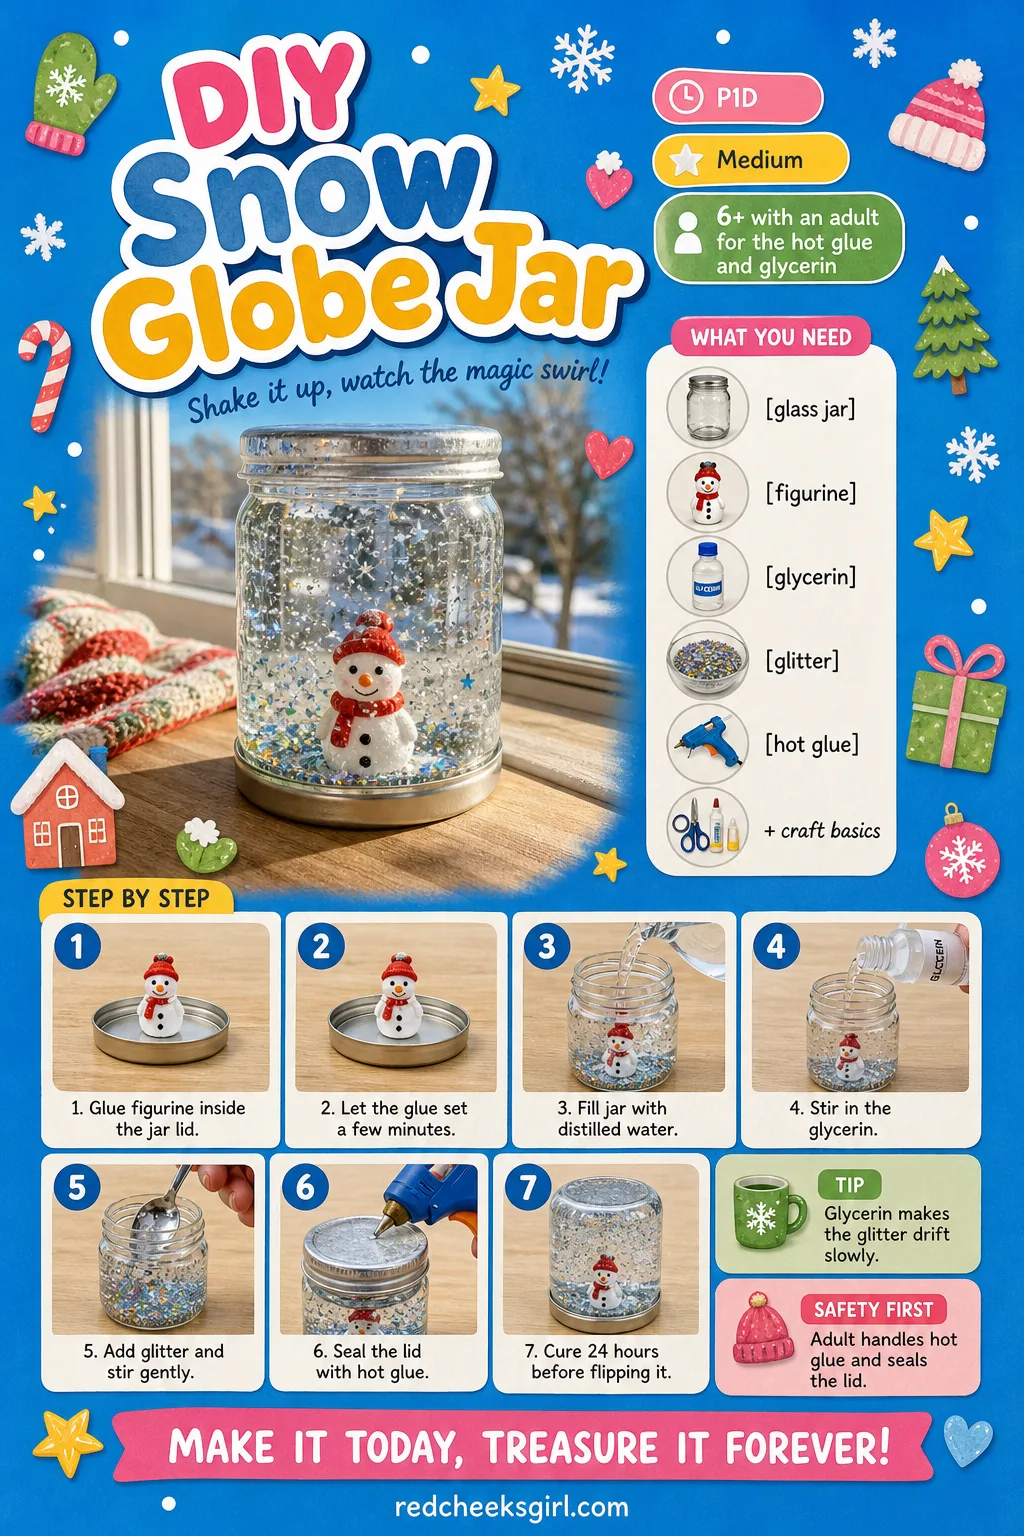
DIY Snow Globe Jar
A small jam jar, a figure from an old toy set and a spoonful of glitter make a snow globe that shakes up a proper blizzard. It sits well on a windowsill or a desk, somewhere it will not get knocked, since glass is glass whatever is floating inside it.
What You Need
- 1 small glass jar with lid, 200ml
- 1 small waterproof figurine, about 3cm
- 1 tsp glycerin
- 1 tsp fine glitter
- Distilled water, to fill
- Hot glue gun, to seal the lid
How to Make It
- An adult hot glues the figurine firmly to the inside of the jar lid and lets it set for a few minutes.
- Fill the jar almost to the top with distilled water, leaving a small gap.
- Stir in the glycerin, which slows the glitter down so it drifts instead of falling fast.
- Add the glitter and stir gently.
- Screw the lid on tightly and an adult runs a line of hot glue around the rim to seal it against leaks.
- Let the glue cure for a full 24 hours before turning the jar upside down to test it.
🛍 Shopping guide
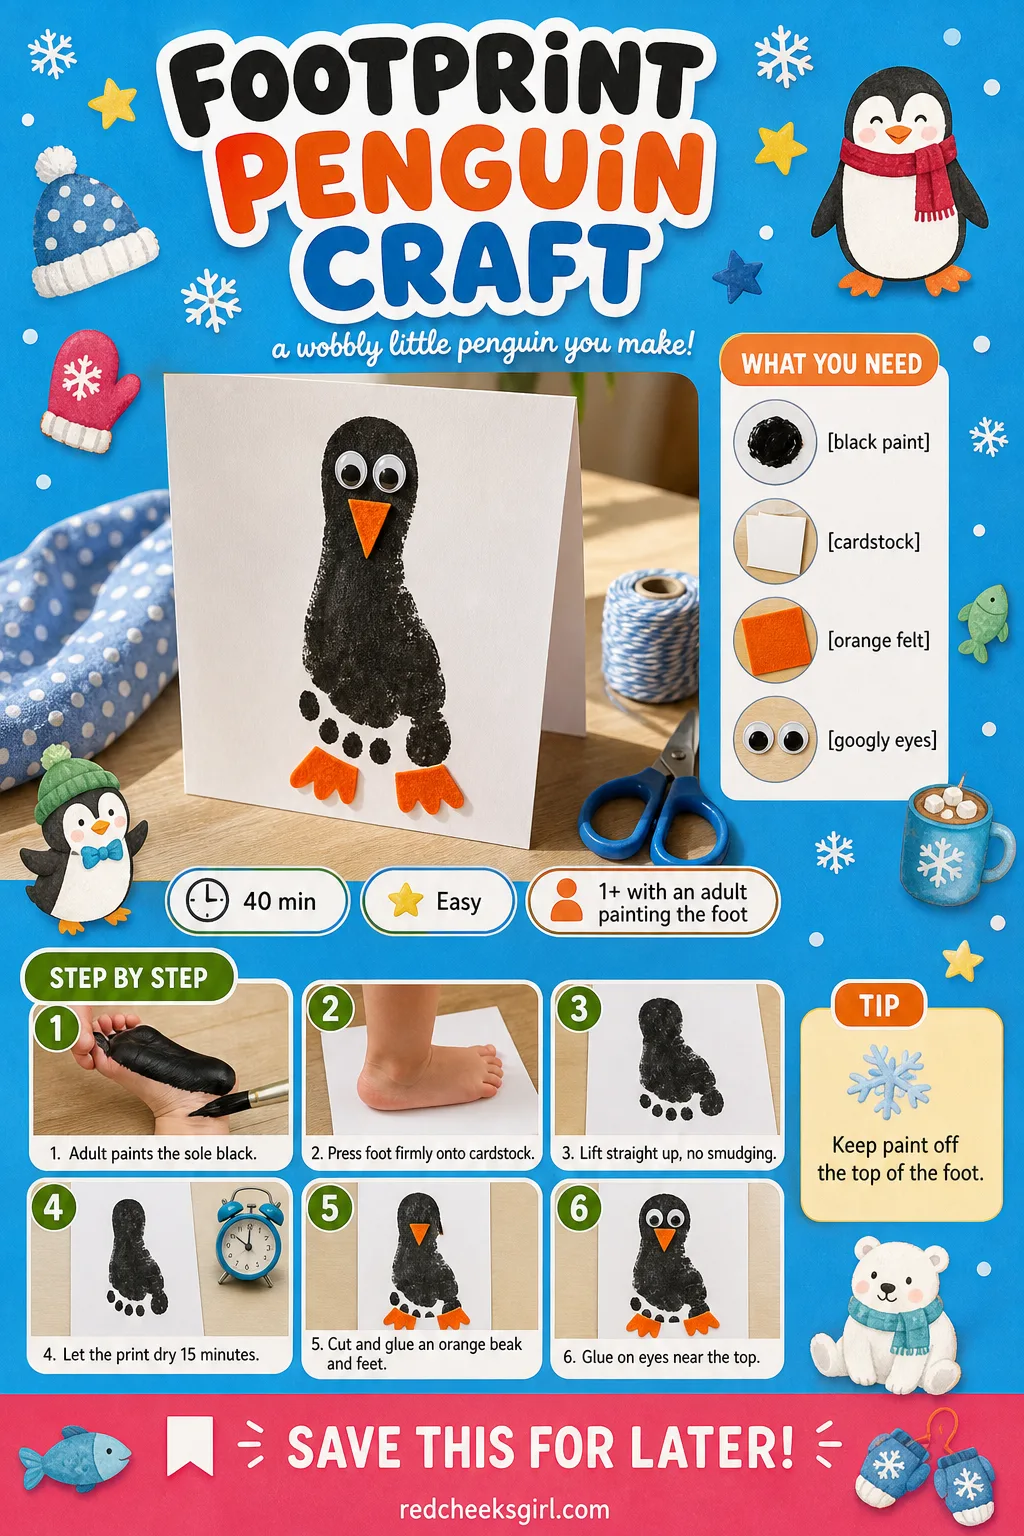
Footprint Penguin Craft
A painted sole, pressed onto white paper, turns into a round little penguin standing on ice before anyone has quite worked out how. It is forgiving enough for the smallest crafter in the house, and it dries flat enough to frame.
What You Need
- Black washable paint
- 1 sheet white cardstock, A5
- Orange felt or paper scrap, for the beak and feet
- 2 googly eyes, 10mm
How to Make It
- An adult paints the sole and toes of a foot black, keeping the paint off the top of the foot.
- Press the foot down firmly onto the cardstock with the heel toward the bottom of the page, then lift straight up.
- Let the print dry for about 15 minutes before adding anything else.
- Cut a small orange triangle for the beak and two tiny ovals for feet, and glue them on at the base of the print.
- Glue the googly eyes near the top, above where the heel printed.
🛍 Shopping guide
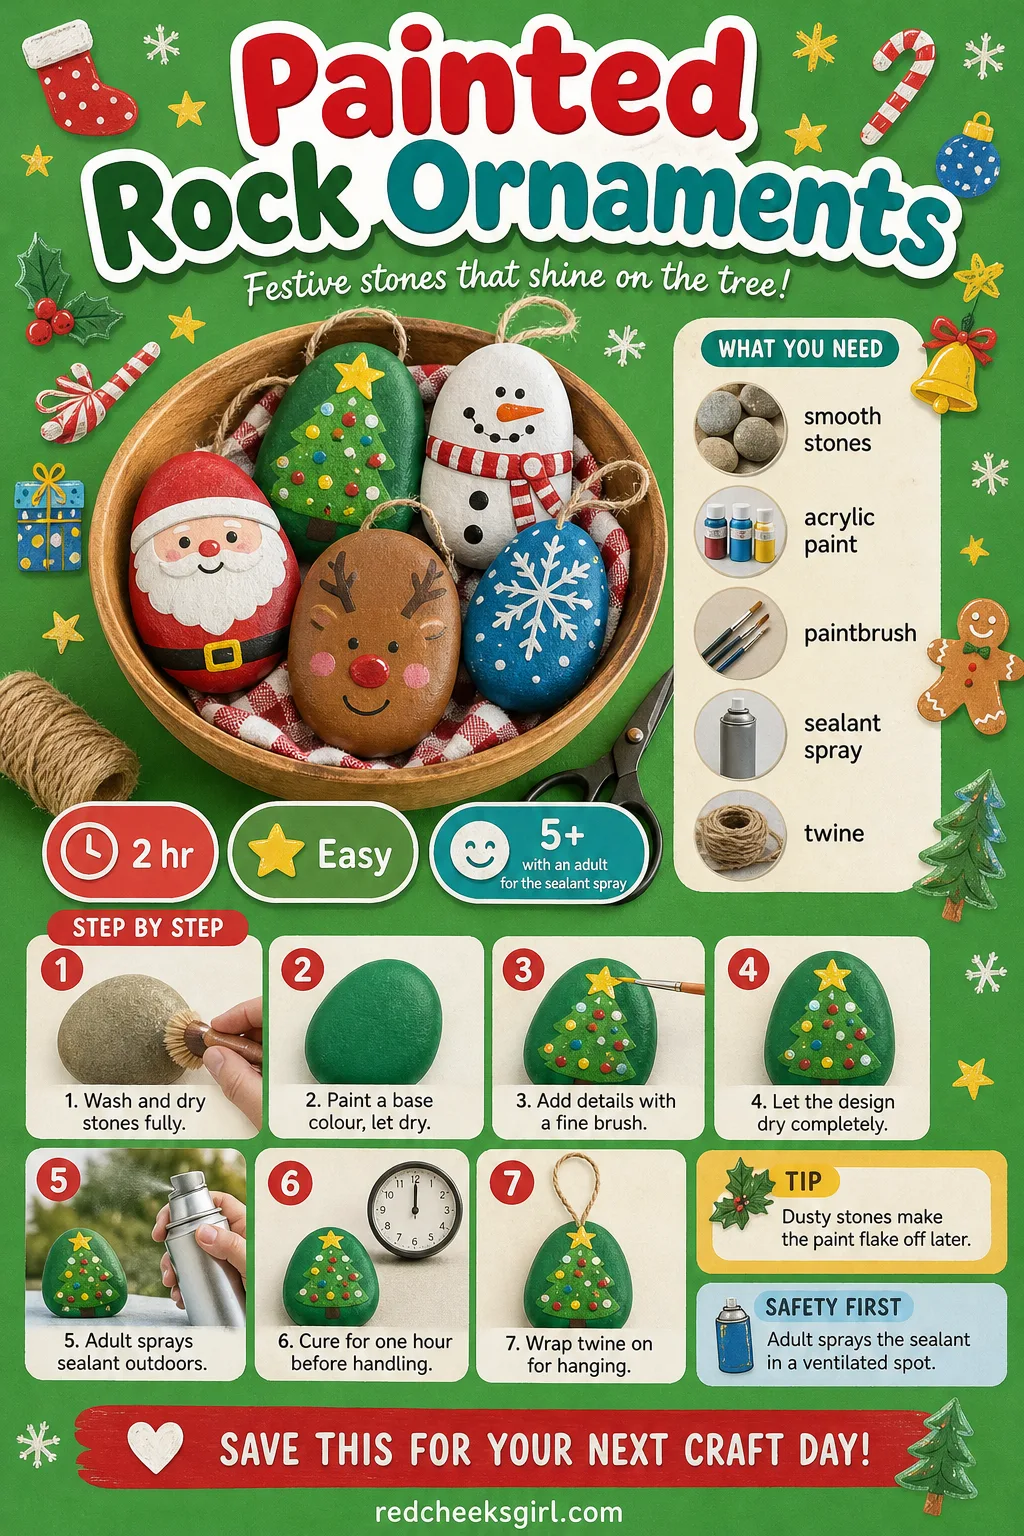
Painted Rock Ornaments
Smooth stones from the garden or a bag from the garden centre become a set of little ornaments that will not shatter if the cat knocks them off a branch. They look good piled in a bowl too, if hanging them feels like too much faff.
What You Need
- 5-6 smooth flat stones, 5-6cm each
- Acrylic paint, several colours
- Fine paintbrush
- Clear matte sealant spray
- Twine, 20cm per stone, optional for hanging
How to Make It
- Wash and dry the stones fully before painting, since any dust stops paint sticking well.
- Paint a base colour over the whole stone and let it dry for about 20 minutes.
- Add details on top with the fine brush: a tree, a simple face, stripes, whatever suits the stone’s shape.
- Let the design dry completely, another 20 minutes or so.
- An adult takes the stones outdoors or to a well ventilated spot and sprays on a thin coat of sealant, then leaves them for an hour to cure.
- Glue or wrap twine around a stone if it needs to hang rather than sit.
🛍 Shopping guide
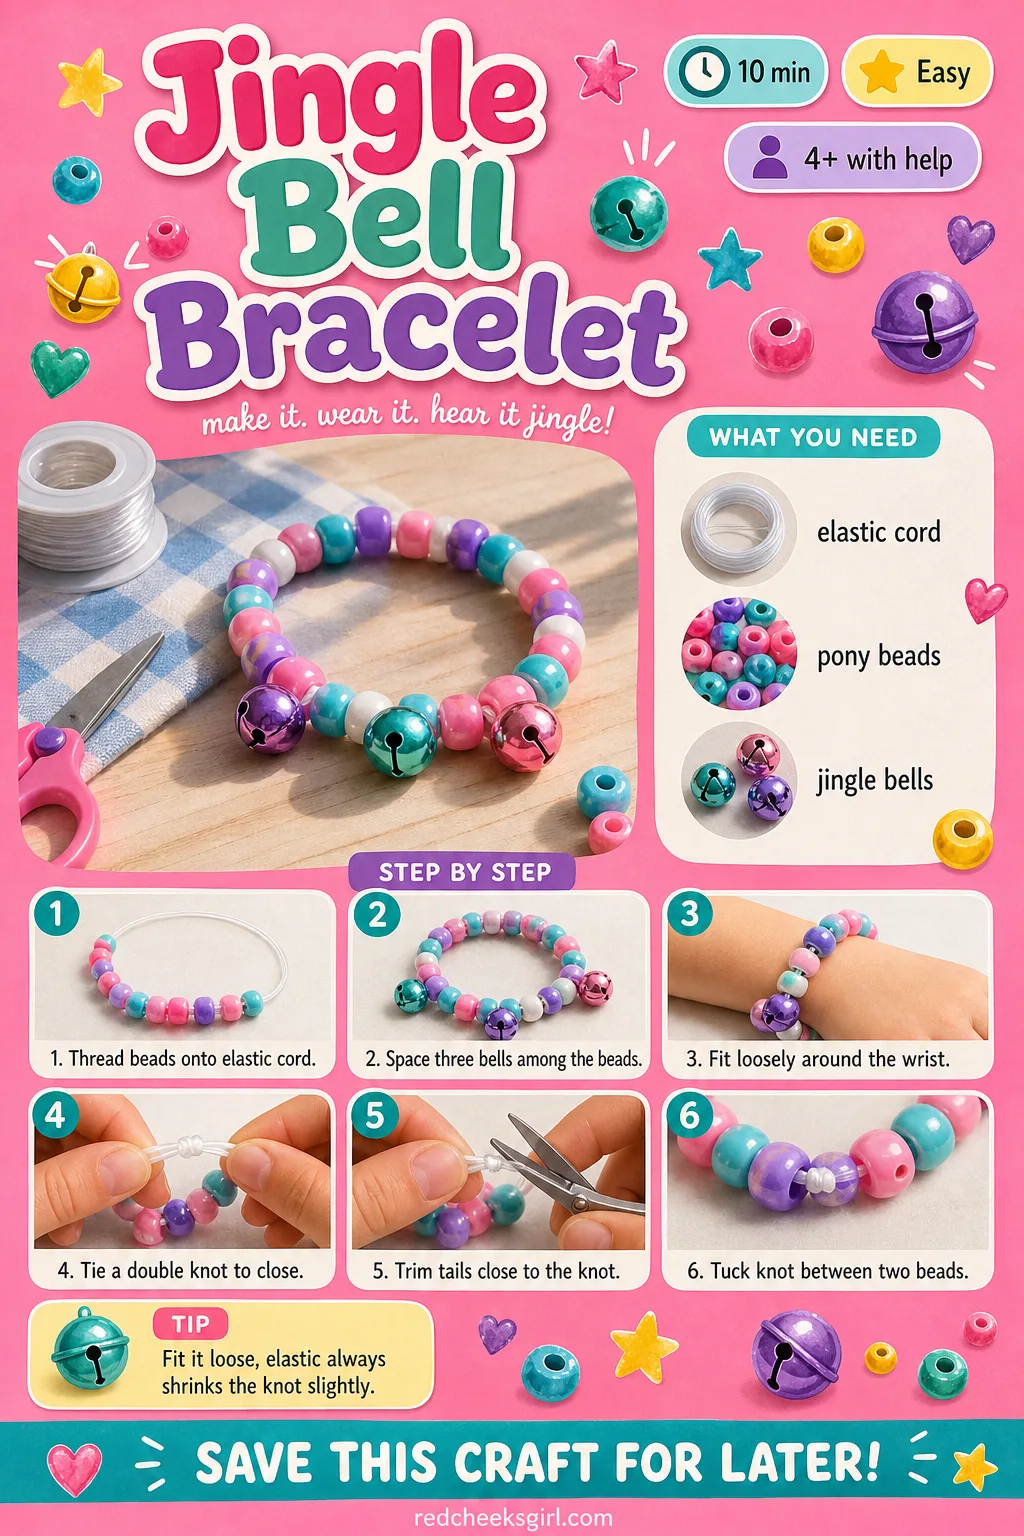
Jingle Bell Bracelet
A wearable that actually survives the school run: stretchy cord, a handful of beads and three small bells that jingle rather than jangle every time an arm swings. It costs almost nothing per child, which matters if there is a whole class to make one for.
What You Need
- 20cm elastic cord per bracelet
- 15 pony beads, assorted colours
- 3 small enamel or painted metal jingle bells
How to Make It
- Thread pony beads onto the elastic cord in whatever order looks good, leaving about 4cm of bare cord at each end.
- Thread the three bells on among the beads, spacing them apart so they each have room to swing and ring.
- Tie the two ends of the elastic together in a double knot once the bracelet fits loosely around the wrist.
- Trim the short tail ends close to the knot and tuck the knot between two beads to hide it.
🛍 Shopping guide
Frequently Asked Questions
What is a good Christmas craft for a 3 year old?
Stick to anything with no drying wait and big, forgiving pieces: the Paper Plate Santa Face, the Handprint Reindeer Card and the Footprint Penguin Craft all work well, since an adult does the fiddly bit and the child does the fun, messy part.
What age range do these crafts actually suit?
Most spread from toddler to tween, but the age listed on each card is the floor, not a suggestion: anything naming hot glue, an iron, a craft knife or a needle needs an adult doing that specific step, whatever the child’s age.
How do I keep the mess manageable?
Use washable paint, work on a wipeable tray or old towel, and pick projects like paper snowflakes or pipe cleaner candy canes on days when energy for cleanup is low.
How do I store the ornaments once Christmas is over?
Wrap anything breakable like salt dough or painted rocks in tissue paper inside a labelled shoebox, and keep edible garlands separate since they will not survive storage at all.
Can these crafts be adapted for Hanukkah or another holiday?
Most swap easily: change the colour palette, cut stars of David instead of trees on the button card, or use blue and silver on the salt dough instead of red and green.
Do I need a hot glue gun or an oven for these?
Only a handful do. The Salt Dough Handprint Ornaments need an oven and the popsicle stick tree, clothespin reindeer and bottle cap magnets need a hot glue gun, but over half the list needs nothing more than paint, paper and a regular glue stick.

18 christmas birthday party games that blend festive fun with birthday magic — so your December bi
15 diy rhinestone crafts for kids this Christmas, from snowflake ornaments to reindeer headbands, ea

13 Ralph Lauren Christmas tree ideas with tartan ribbon, velvet and brass, from a panelled living ro
Leave a Reply