

20 Baby Christmas Crafts for a First Christmas Keepsake You’ll Treasure Forever
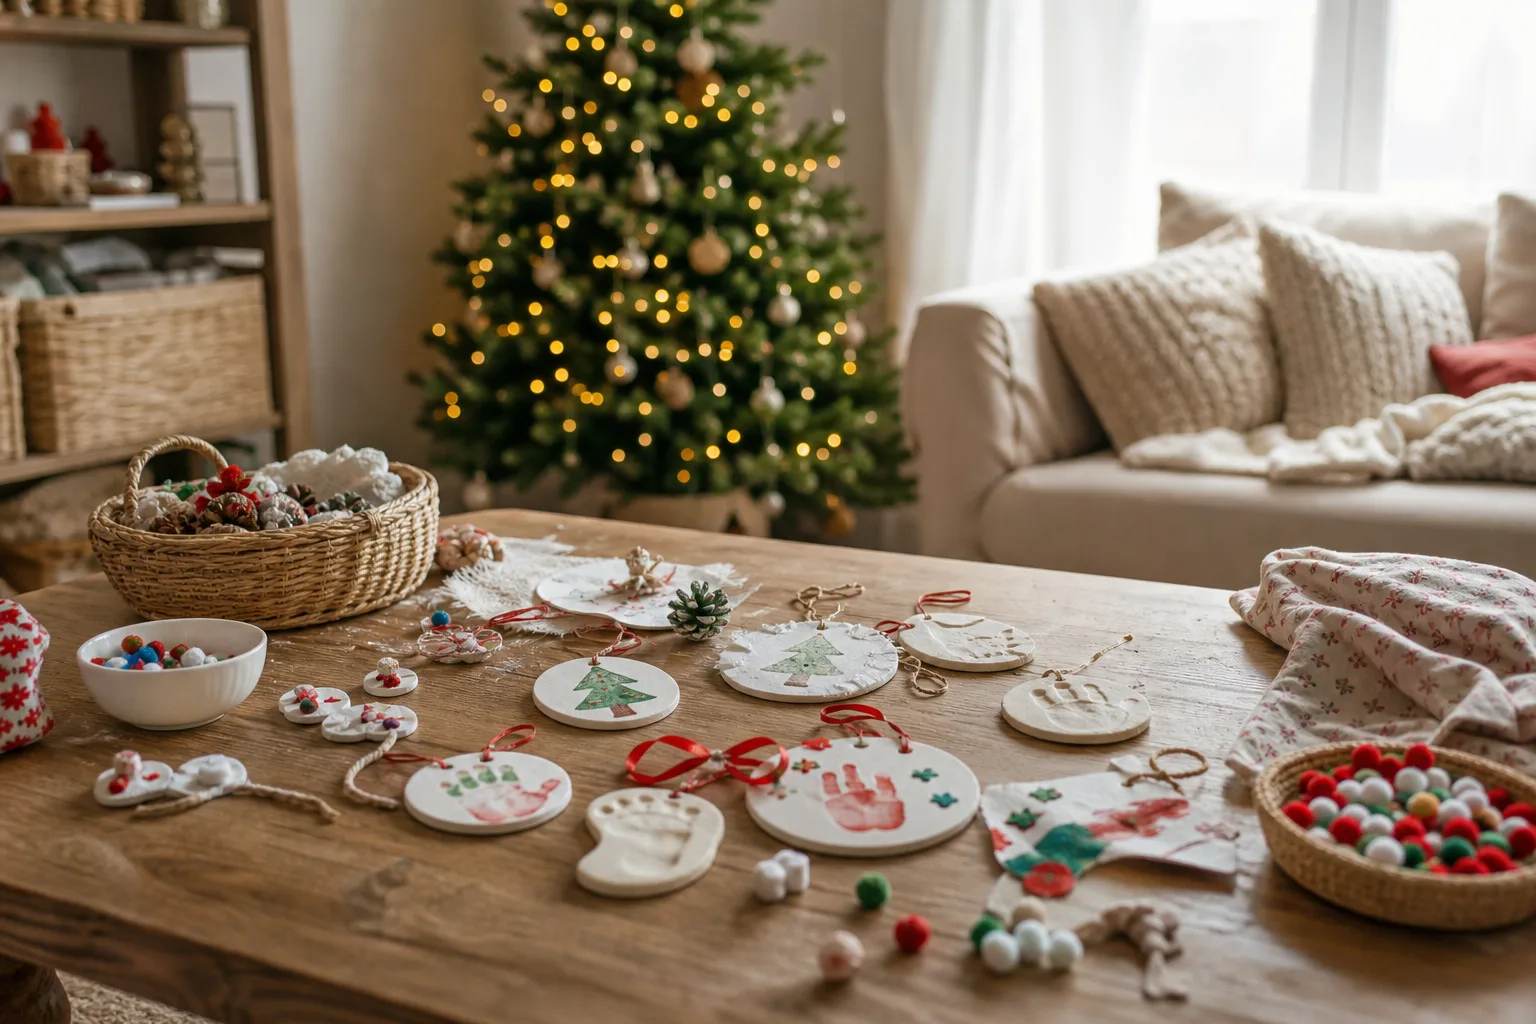
A baby’s first Christmas lasts about six weeks on the calendar and then it is gone, which is exactly why you want something more permanent than a photo on your phone to show for it. The twenty ideas below all use some version of a real print, a real date or a real scrap of fabric from this exact year, so the keepsake means something the plastic ornaments from the supermarket never will. Nothing here needs a craft room: you are working at the kitchen table in nap-length windows, with paint that washes off skin and glue an adult controls.
Once the baby is asleep and you fancy something that does not involve paint on fingers at all, these Christmas crafts are built for grown-up hands. If you kept a Halloween print from a few months back, it is worth comparing technique against these first Halloween crafts, since the same wriggly-baby tricks apply here. And if family is coming for the day itself, these cozy Christmas games fill the hour after lunch nicely.
This post contains affiliate links. If you buy through them, I may earn a small commission at no extra cost to you.
- Handprint Reindeer Wood Slice Ornament
- Footprint Angel Keepsake Card
- Salt Dough Footprint Medallion
- Clear Fillable Photo Bauble
- Fingerprint Christmas Tree Canvas
- Hospital Bracelet Memory Bauble
- Handprint Santa Beard Card
- Footprint Mouse Ornament
- Wooden Name Block Garland
- Onesie Keepsake Hoop Ornament
- Thumbprint Snowman Ornament
- Plaster Handprint Nursery Plaque
- Baby Food Jar Snow Globe
- Baby Milestone Photo Clothespin Garland
- Felt Mini Stocking Nursery Bunting
- Handprint Holly Wreath Card
- Footprint Rudolph Stocking Tag
- Felt Holly Headband for Baby’s First Christmas Photo
- Footprint Reindeer Mason Jar Luminary
- Keepsake Christmas Eve Memory Box
- Frequently Asked Questions
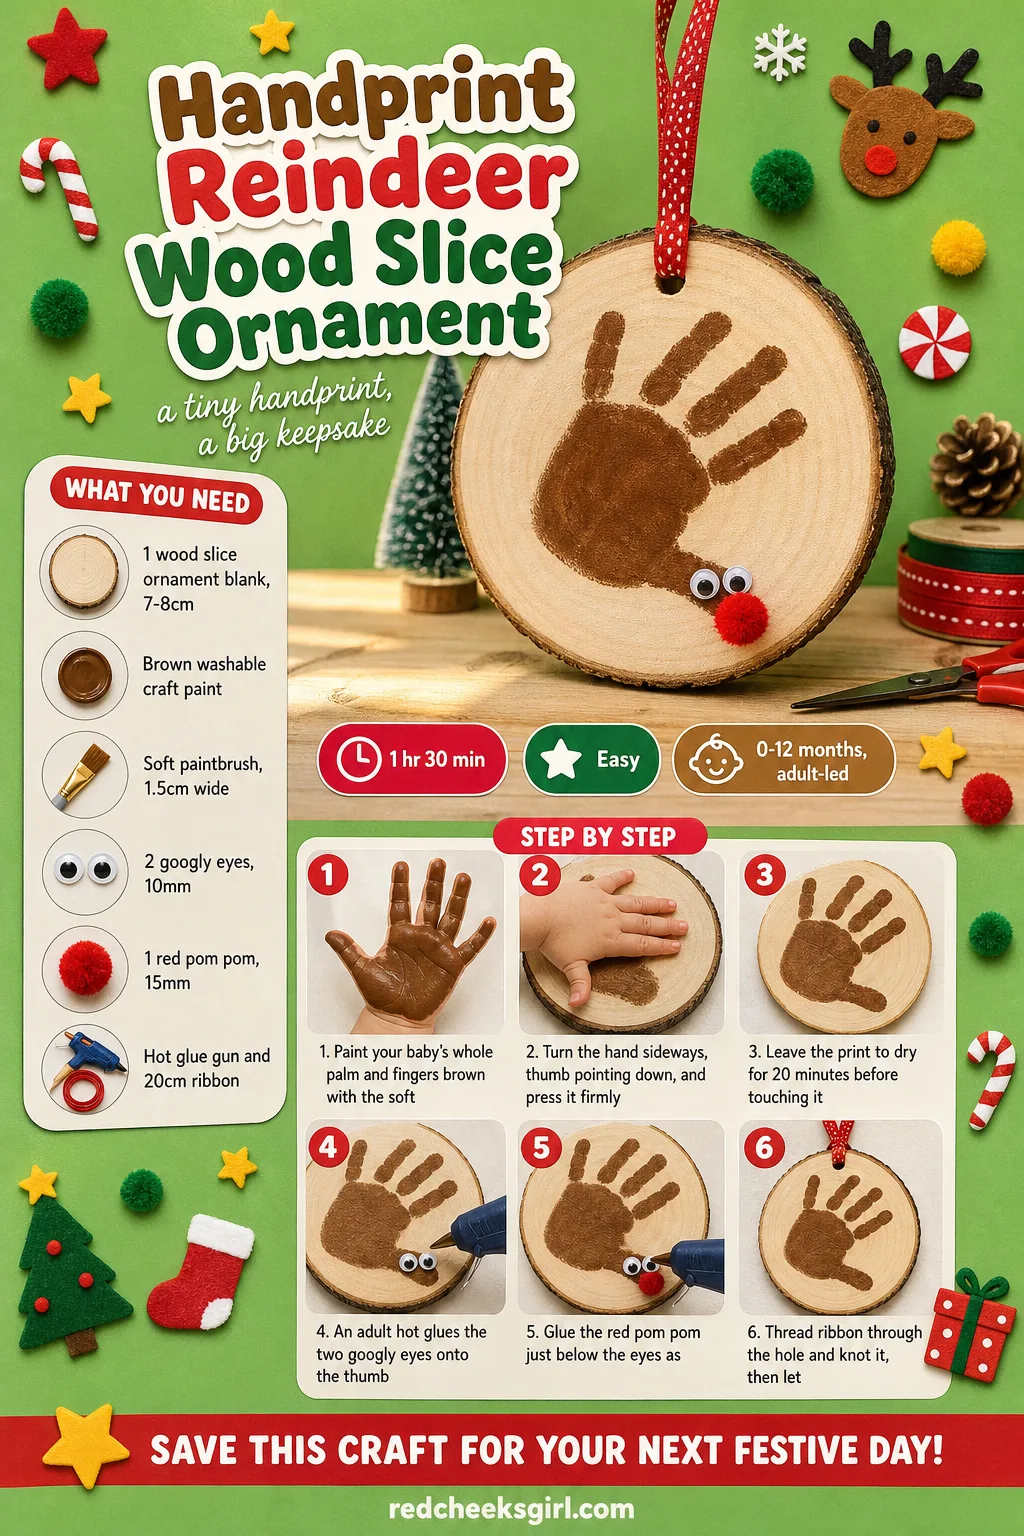
Handprint Reindeer Wood Slice Ornament
Every tree has at least one ornament that stops a guest mid-sentence, and a tiny handprint turned into a reindeer is usually it. The thumb becomes the head, the fingers fan out into antlers, and the whole thing looks nothing like a craft kit and everything like your baby’s actual hand. It hangs on the tree itself, not tucked in a drawer, so it earns its spot every year without you having to explain what it is.
What You Need
- 1 wood slice ornament blank, about 7-8cm across, with a pre-drilled hole
- Brown washable craft paint, small pot
- Soft paintbrush, 1.5cm wide
- 2 googly eyes, 10mm
- 1 red pom pom, 15mm
- Hot glue gun and 20cm thin ribbon
How to Make It
- Paint your baby’s whole palm and fingers brown with the soft brush, keeping the fingers spread as you go.
- Turn the hand sideways, thumb pointing down, and press it firmly onto the wood slice, then lift straight up without dragging.
- Leave the print to dry for 20 minutes before touching it again.
- An adult hot glues the two googly eyes onto the thumb print to make the reindeer’s head.
- Glue the red pom pom just below the eyes as the nose.
- Thread ribbon through the hole and knot it, then let the glue set fully for an hour before hanging.
🛍 Shopping guide
Footprint Angel Keepsake Card
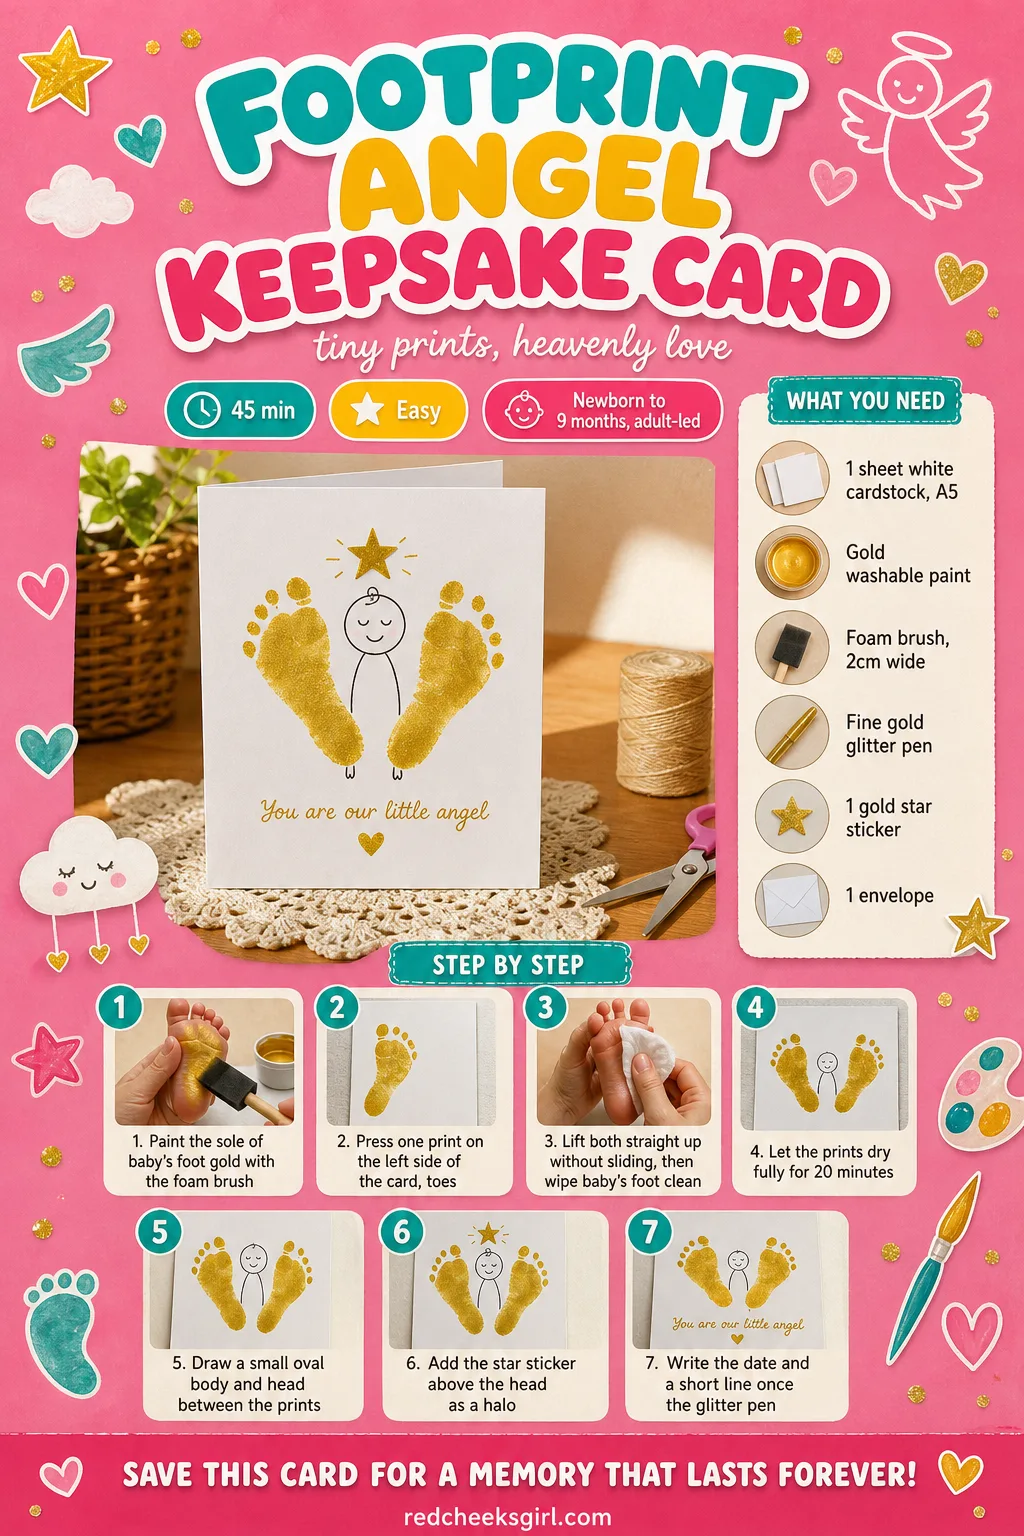
Grandparents do not want another gadget, they want proof the baby exists and is theirs too. A gold footprint angel, sent flat in an envelope, does that job better than any photo card from the chemist, and it costs about the price of one sheet of good cardstock. Keep the spare print from step one; it is the one you will frame later.
What You Need
- 1 sheet white cardstock, A5, folded to a card
- Gold washable paint, small pot
- Foam brush, 2cm wide
- Fine gold glitter pen
- 1 small gold star sticker
- 1 envelope to fit
How to Make It
- Paint the sole of baby’s foot gold with the foam brush, covering heel to toes evenly.
- Press one print on the left side of the card, toes pointing outward, then a second mirrored print close beside it so the two form a pair of wings.
- Lift both straight up without sliding, then wipe baby’s foot clean right away.
- Let the prints dry fully for 20 minutes.
- Draw a small oval body and head between the two prints with the glitter pen, and add the star sticker above the head as a halo.
- Write the date and a short line inside once the glitter pen has dried another 10 minutes.
🛍 Shopping guide
Salt Dough Footprint Medallion
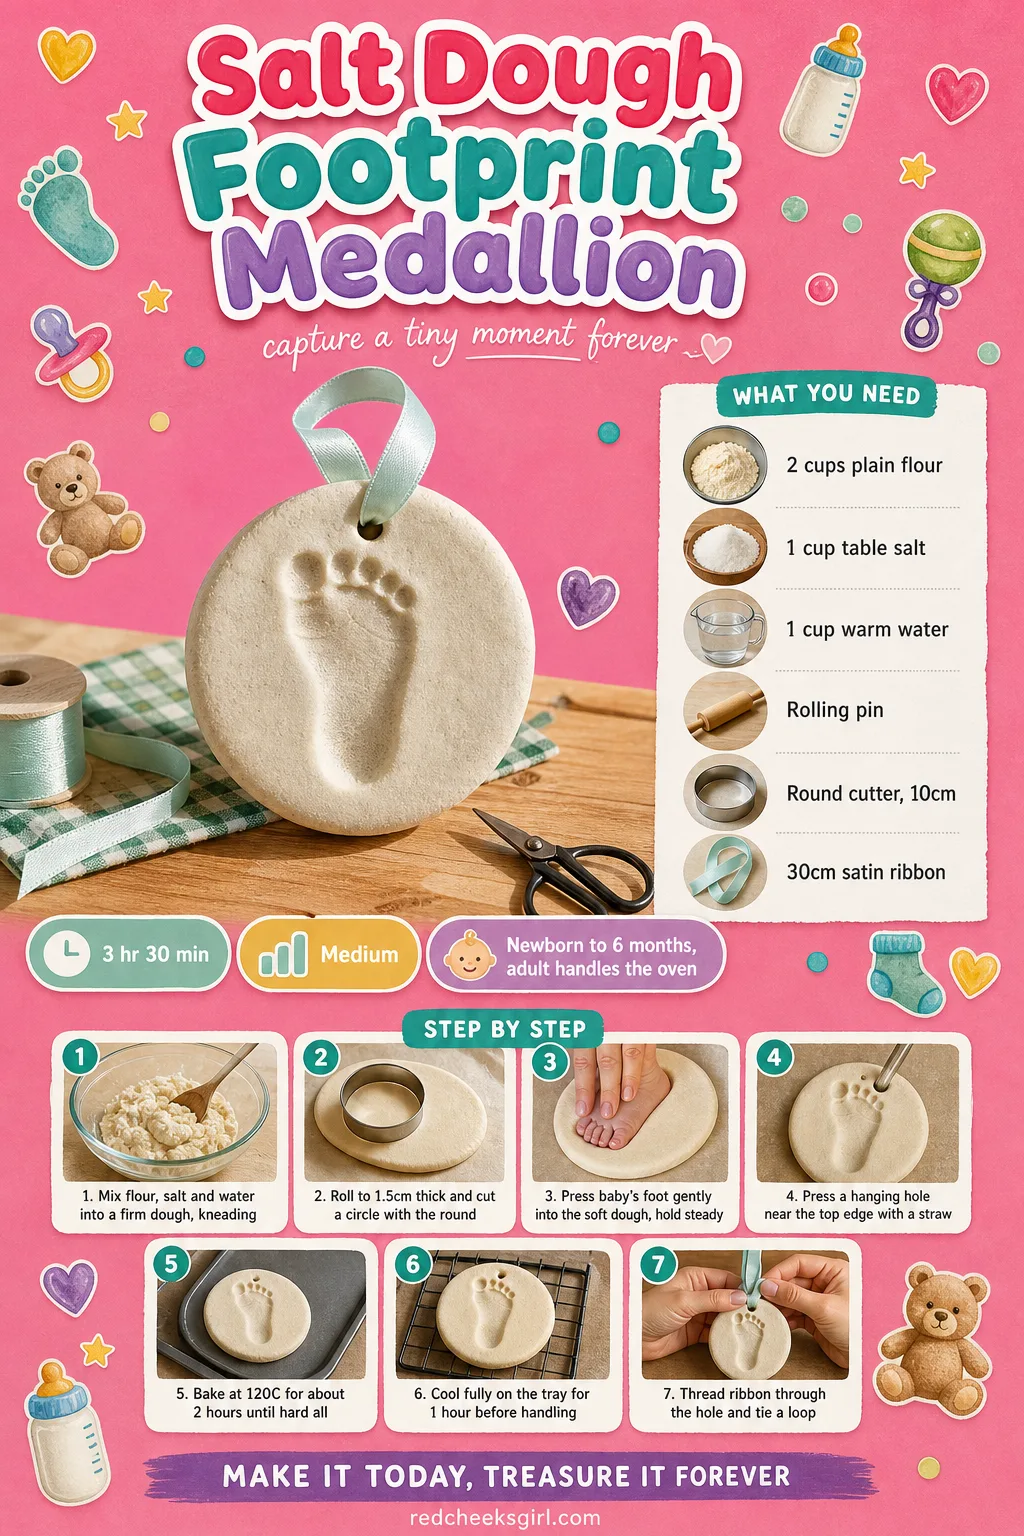
If you would rather not buy anything new, this one comes from the pantry. A salt dough medallion holds the actual shape of a newborn foot, heel and all, in a way a flat painted print never quite manages, and it sits happily on a shelf or mantel all December without needing a tree to hang from.
What You Need
- 2 cups plain flour
- 1 cup table salt
- 1 cup warm water
- Rolling pin
- Round cutter, 10cm
- 30cm satin ribbon
How to Make It
- Mix the flour, salt and water into a firm dough, kneading for a few minutes until it stops being sticky.
- Roll it out to about 1.5cm thick and cut a circle with the round cutter.
- Gently press baby’s foot into the centre of the dough while it is still soft, holding the ankle steady, then lift straight up.
- Use a straw to press a hanging hole near the top edge before the dough firms up.
- An adult bakes the medallion on a lined tray at 120C for about 2 hours, until hard all the way through, then leaves it to cool fully on the tray for 1 hour.
- Thread ribbon through the hole once completely cool and tie a loop for hanging.
🛍 Shopping guide
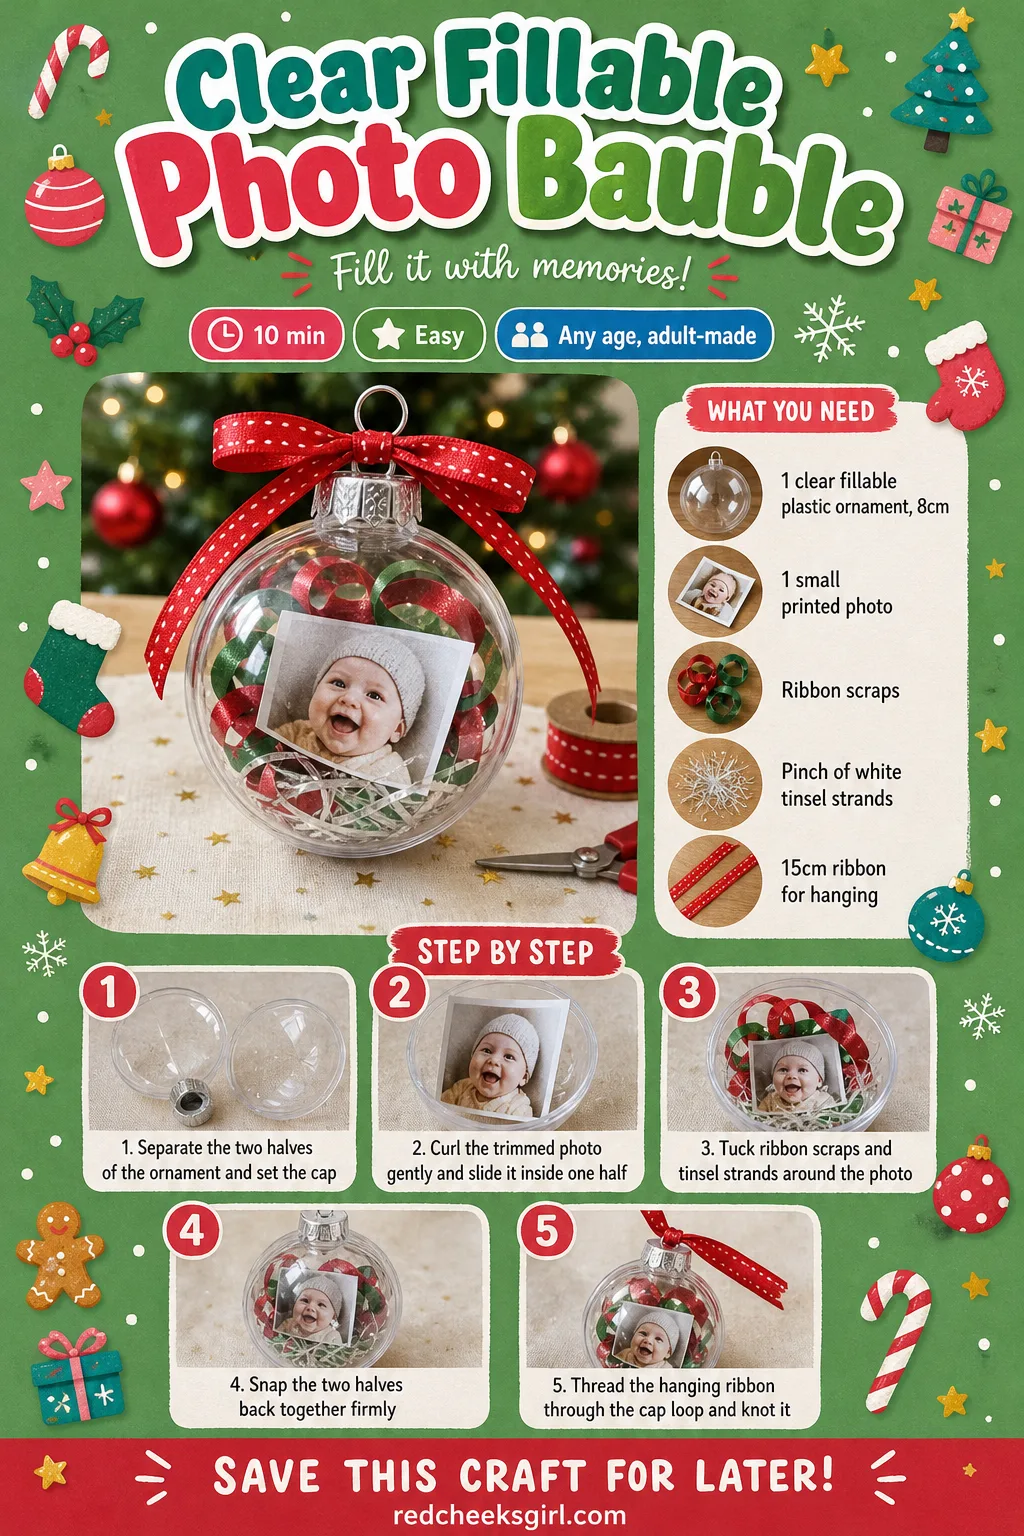
Clear Fillable Photo Bauble
Some evenings you simply do not have paint-drying energy, and that is fine, because this one takes about ten minutes start to finish with nothing to clean off anyone’s hands. A small photo rolled inside a clear bauble reads as deliberate rather than rushed once it is on the tree, and it works just as well hung on a doorknob if you would rather not drill into anything.
What You Need
- 1 clear fillable plastic ornament, 8cm
- 1 small printed photo, trimmed to fit
- A few scraps of thin ribbon
- Pinch of white tinsel strands or shredded tissue
- Thin ribbon for hanging, 15cm
How to Make It
- Separate the two halves of the ornament and set the cap aside.
- Curl the trimmed photo gently and slide it inside one half, facing outward.
- Tuck in a few ribbon scraps and the tinsel strands around the photo for a bit of sparkle.
- Snap the two halves back together firmly.
- Thread the hanging ribbon through the cap loop and knot it.
🛍 Shopping guide
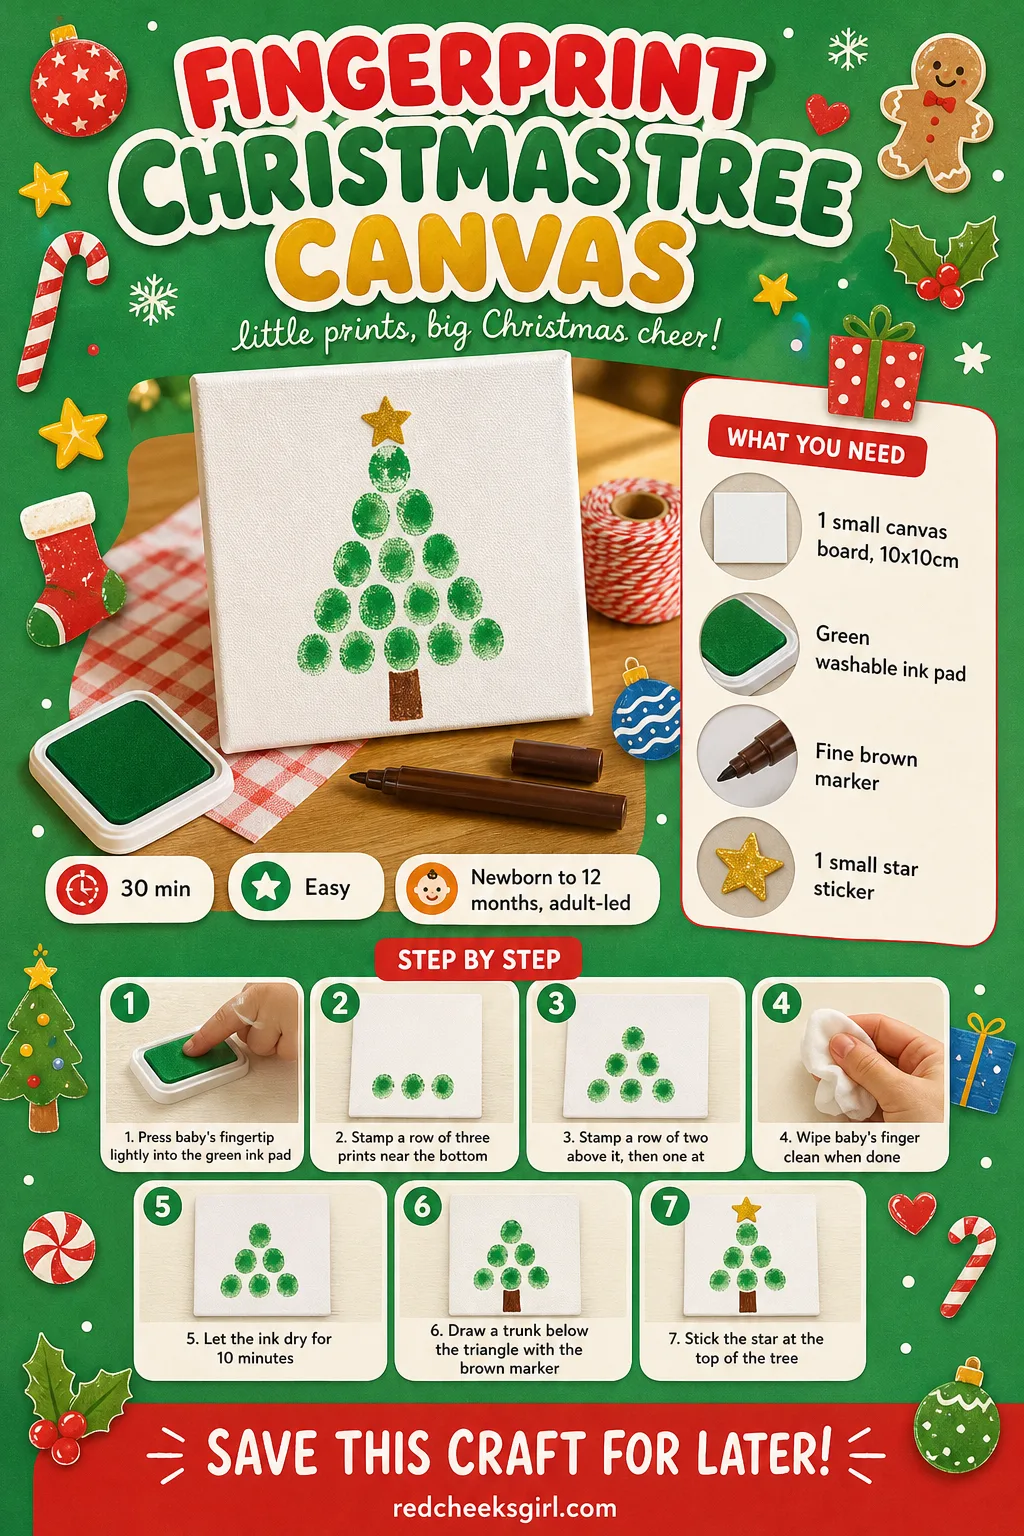
Fingerprint Christmas Tree Canvas
A whole handprint can feel like a lot of commitment for a two-week-old. A single fingertip is easier to manage, and stamped in neat rows it builds into a proper little tree that looks intentional on a nursery shelf rather than like an accident with an ink pad.
What You Need
- 1 small canvas board, 10x10cm
- Green washable ink pad
- Fine brown marker
- 1 small star sticker
How to Make It
- Press baby’s fingertip into the green ink pad, just enough to coat it lightly.
- Stamp a row of three prints near the bottom of the canvas, then a row of two above it, then one print at the top, building a loose triangle.
- Wipe baby’s finger clean between colours or at the end.
- Let the ink dry for 10 minutes before touching the canvas.
- Draw a short trunk below the triangle with the brown marker.
- Stick the star sticker at the very top of the tree.
🛍 Shopping guide
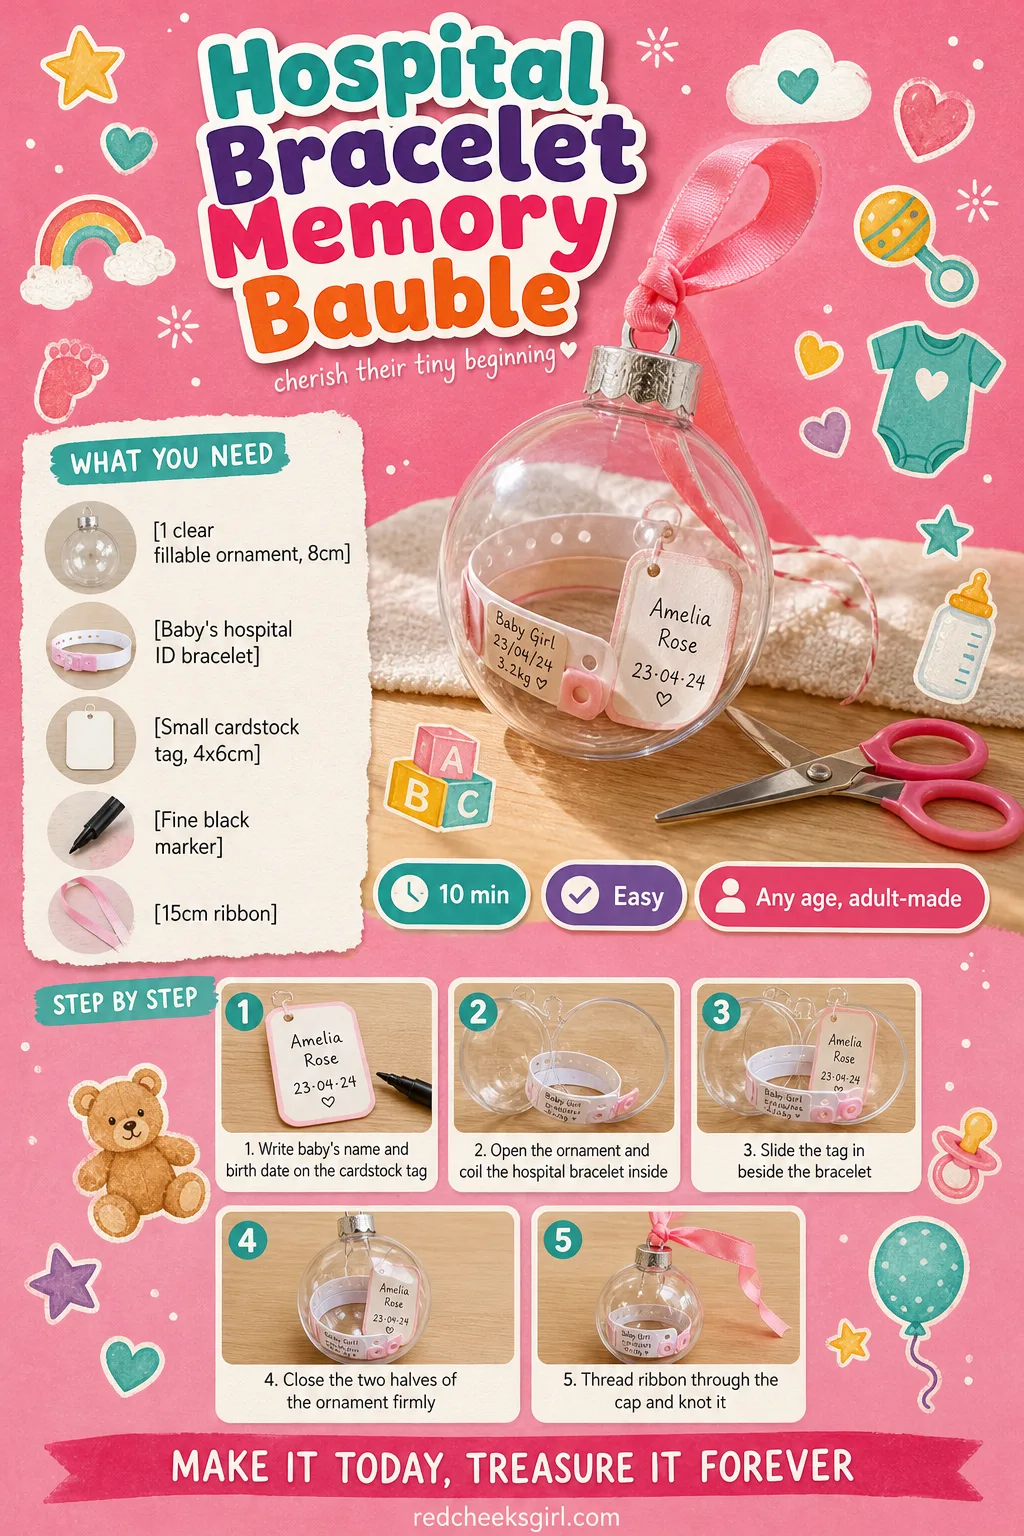
Hospital Bracelet Memory Bauble
That paper or plastic bracelet from the hospital gets lost in a drawer by February if nobody gives it a home. Sealed inside a clear bauble with a hand-lettered tag, it becomes the one ornament on the tree nobody else could possibly own, and it needs no paint, no glue gun and no drying time at all.
What You Need
- 1 clear fillable ornament, 8cm
- Baby’s hospital ID bracelet
- Small cardstock tag, 4x6cm
- Fine black marker
- 15cm ribbon for hanging
How to Make It
- Write baby’s name and birth date on the small cardstock tag with the marker.
- Open the ornament and place the hospital bracelet inside, coiled to fit.
- Slide the tag in beside it so both are visible.
- Close the two halves of the ornament firmly.
- Thread ribbon through the cap and knot it for hanging.
🛍 Shopping guide
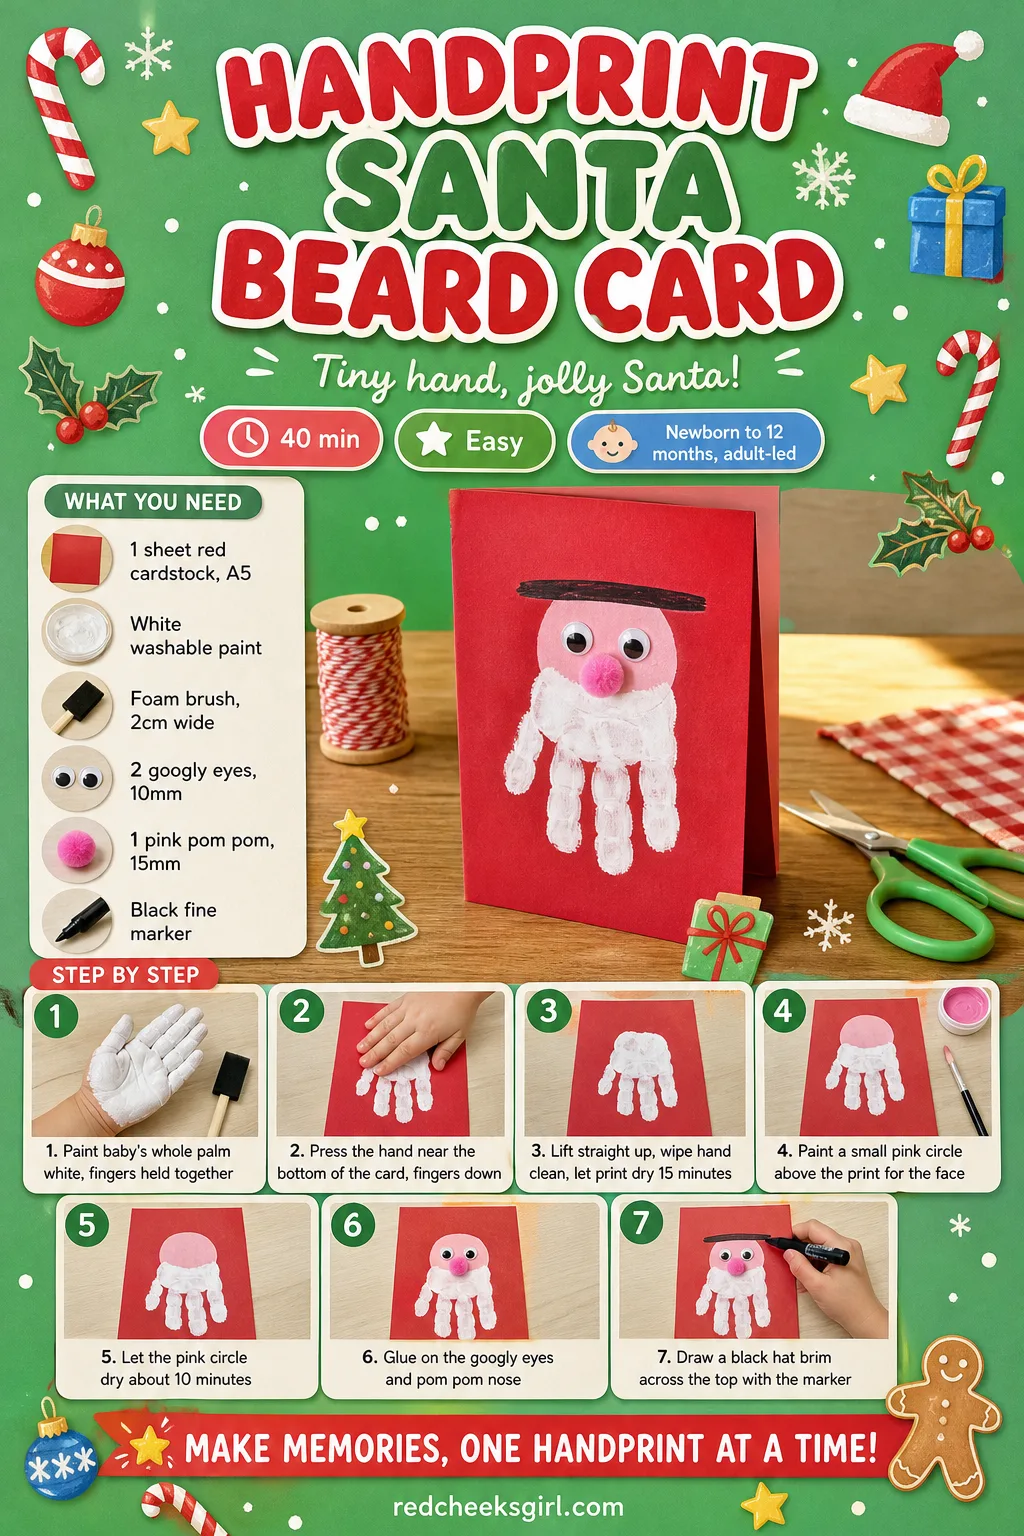
Handprint Santa Beard Card
White paint on red card does almost all the work here: a single handprint becomes a beard the moment you add two eyes and a round pink nose. It is the card you actually send, not the one you mean to send, because the whole thing dries in under ten minutes and fits flat in a standard envelope.
What You Need
- 1 sheet red cardstock, A5, folded to a card
- White washable paint
- Foam brush, 2cm wide
- 2 googly eyes, 10mm
- 1 small pink pom pom, 15mm
- Black fine marker
How to Make It
- Paint baby’s whole palm white, keeping the fingers held together rather than spread.
- Press the hand near the bottom of the card, fingers pointing down, to form the beard shape.
- Lift straight up and wipe the hand clean right away, then let the print dry 15 minutes.
- Paint a small pink circle just above the print for the face.
- Once that circle is dry, about 10 minutes, glue on the googly eyes and the pom pom nose.
- Draw a thin black hat brim across the very top of the face with the marker.
🛍 Shopping guide
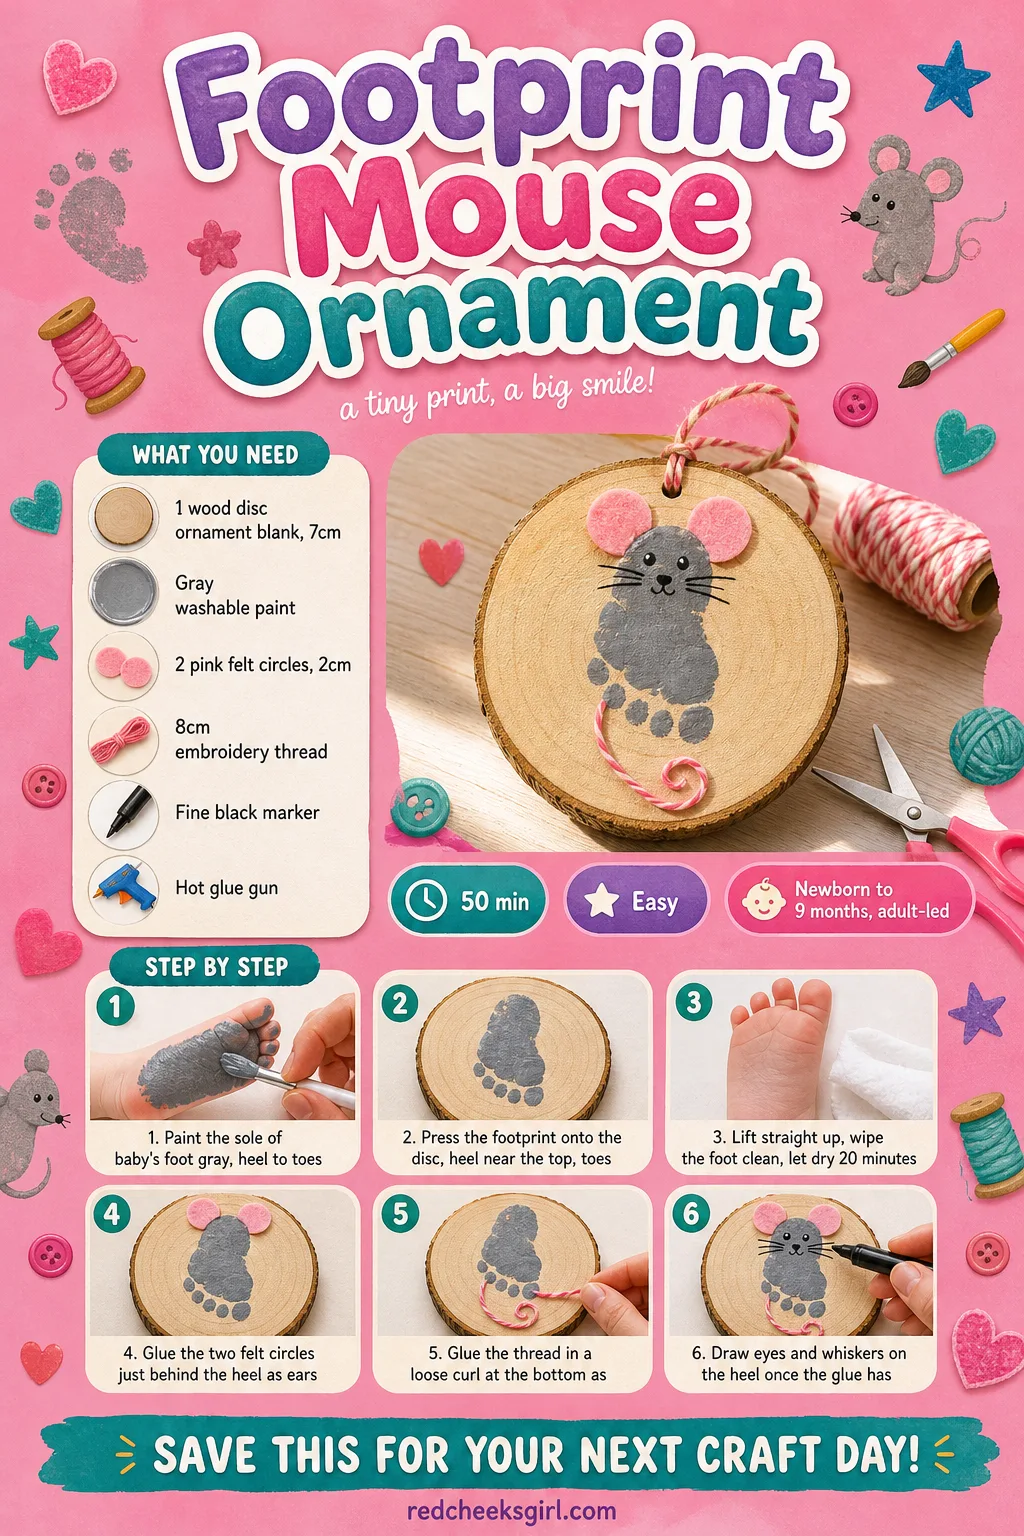
Footprint Mouse Ornament
Turned the right way up, a baby footprint is already shaped like a mouse: the heel makes a round nose and the toes fan out like little paws. Felt ears and a curled thread tail finish the joke, and the whole thing hangs on the tree looking far more deliberate than a single sock print has any right to.
What You Need
- 1 wood disc ornament blank, 7cm
- Gray washable paint
- 2 small felt circles, pink, 2cm
- 8cm length of embroidery thread
- Fine black marker
- Hot glue gun
How to Make It
- Paint the sole of baby’s foot gray, covering heel to toes.
- Press the footprint onto the disc with the heel near the top edge and the toes fanning toward the bottom.
- Lift straight up, wipe baby’s foot clean, and let the print dry for 20 minutes.
- An adult hot glues the two pink felt circles just behind the heel as ears.
- Glue the thread in a loose curl at the bottom as a tail.
- Draw two small eyes and whiskers on the heel with the black marker once the glue has set.
🛍 Shopping guide
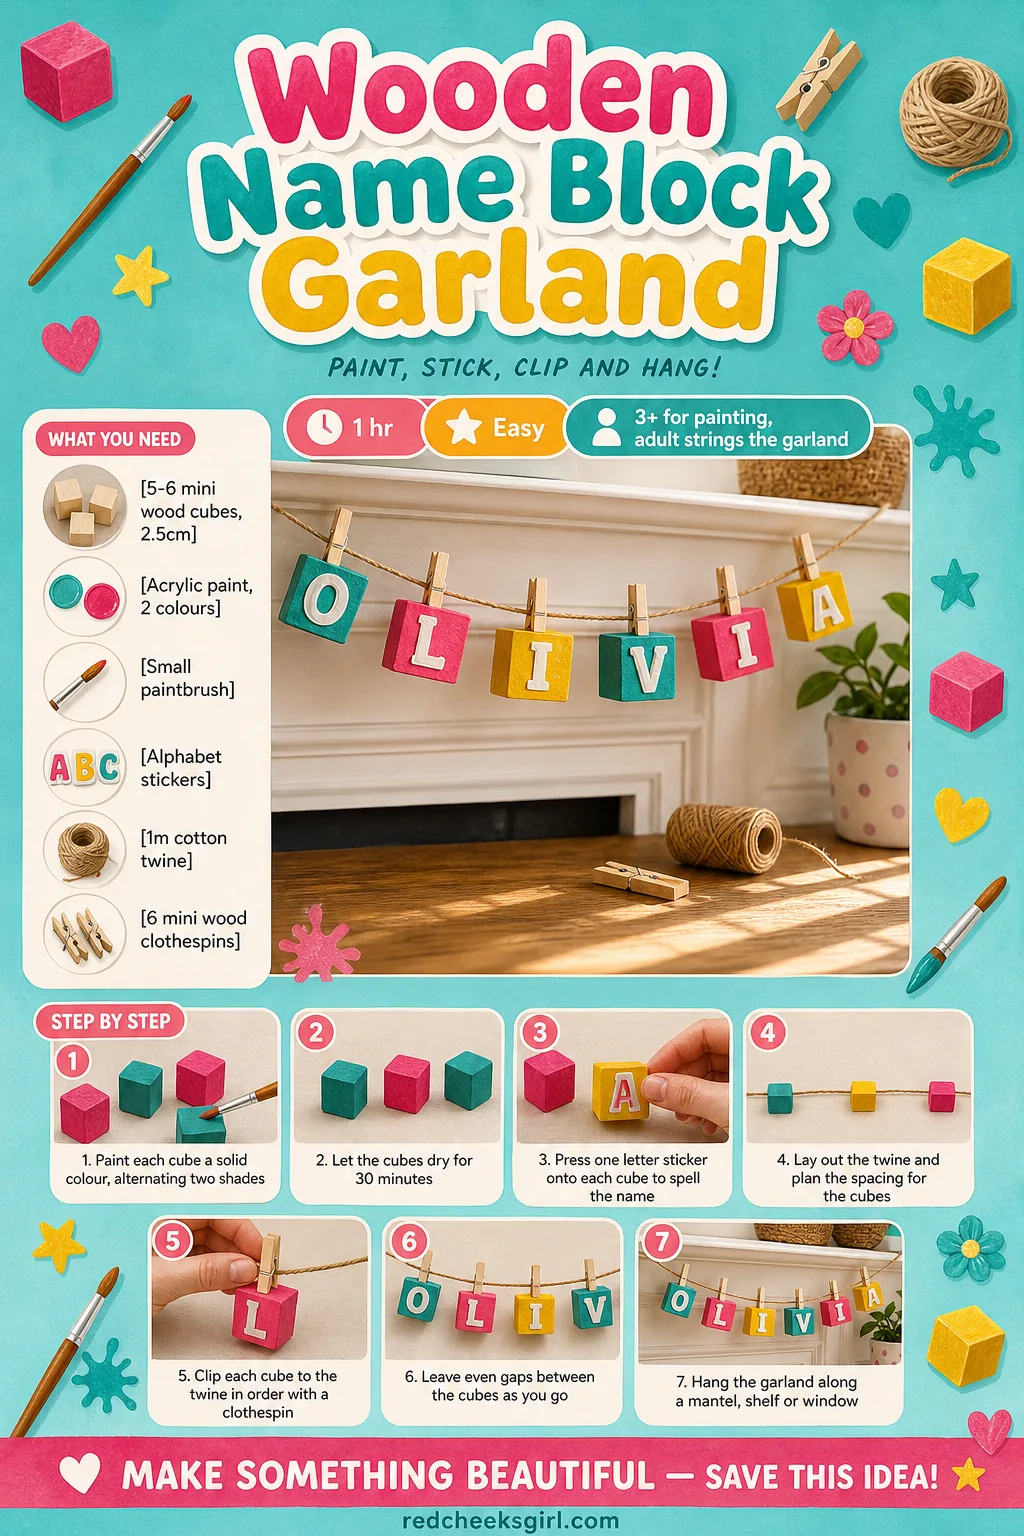
Wooden Name Block Garland
If an older sibling is desperate to help and paint-covered feet are not an option today, this is the one to hand them. Five or six wooden cubes spell out the baby’s name along a length of twine, and it hangs across a mantel or window looking far more finished than the ten minutes it actually took.
What You Need
- 5-6 mini wood cubes, 2.5cm, one per letter
- Acrylic paint in 2 colours
- Small paintbrush
- Alphabet stickers to fit the cubes
- 1m cotton twine
- 6 mini wood clothespins
How to Make It
- Paint each cube a solid colour, alternating the two shades, and let them dry for 30 minutes.
- Press one letter sticker onto each cube, spelling out the baby’s name in order.
- Lay the twine along a flat surface and decide the spacing for the cubes before clipping anything.
- Clip each cube to the twine with a mini clothespin, in order, leaving even gaps between them.
- Hang the finished garland along a mantel, shelf edge or window frame.
🛍 Shopping guide
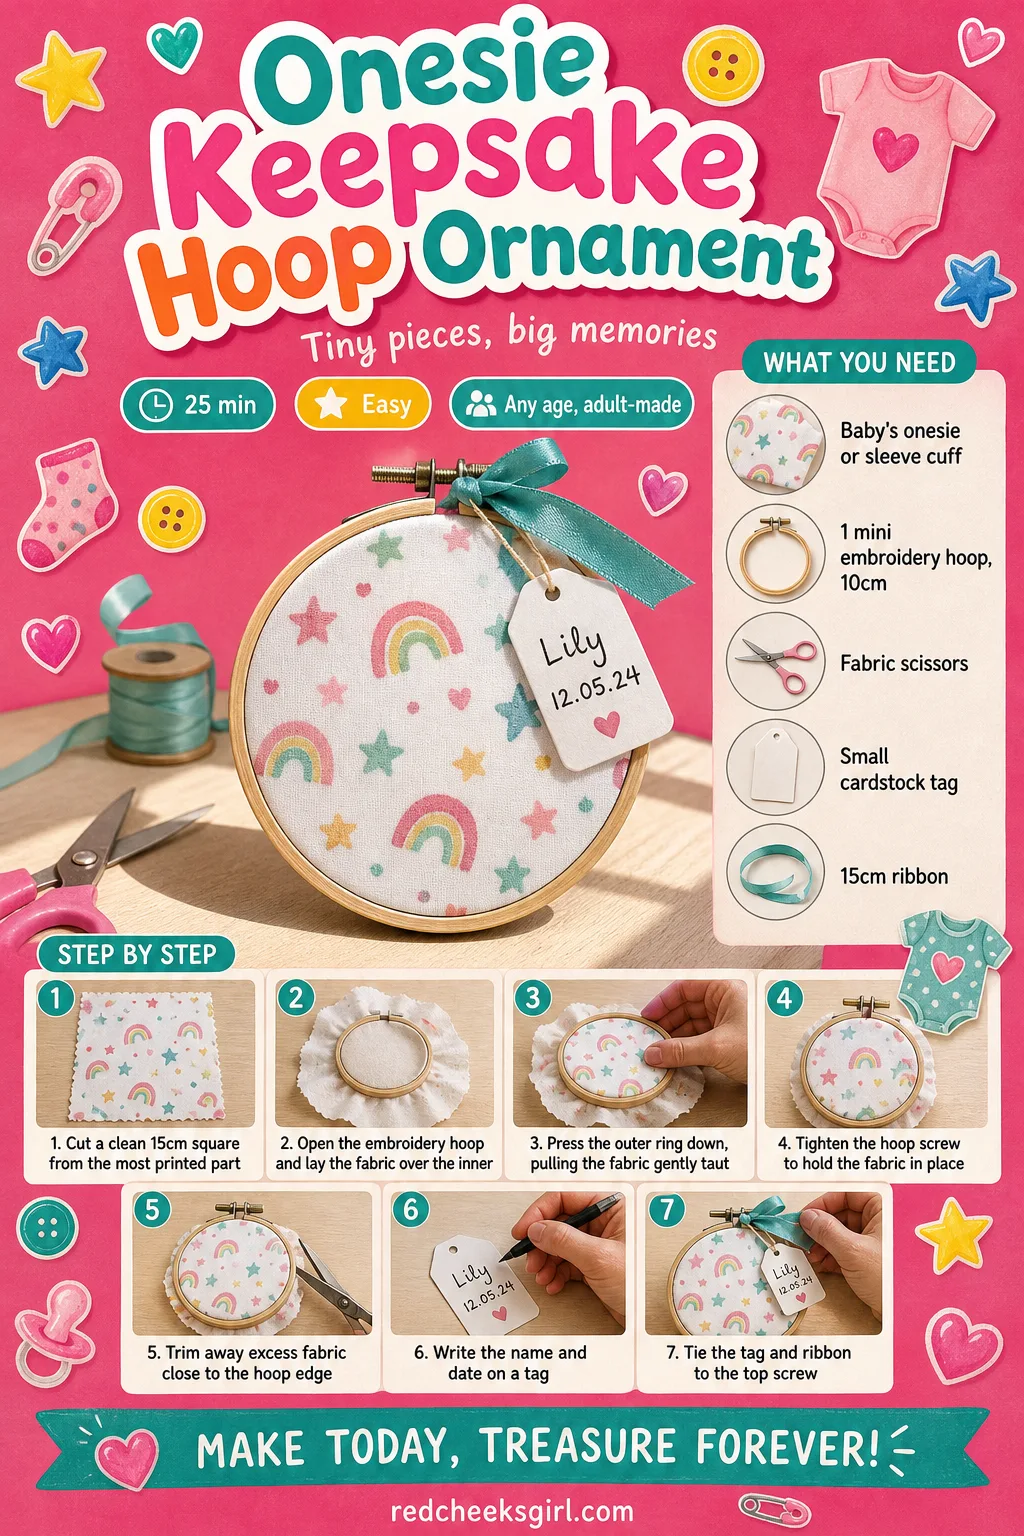
Onesie Keepsake Hoop Ornament
The going-home onesie is soft against newborn skin for about six weeks and then it never fits again, which is the whole reason to save a piece of it rather than the whole thing. Hooped like a tiny piece of embroidery, the fabric sits inside a little frame instead of folded in a box, and you can still see every print on it.
What You Need
- Baby’s going-home onesie or a sleeve cuff from it
- 1 mini embroidery hoop, 10cm
- Fabric scissors
- Small cardstock tag
- 15cm ribbon
How to Make It
- An adult cuts a clean 15cm square from the most printed part of the onesie fabric using fabric scissors.
- Open the embroidery hoop and lay the fabric square over the inner ring.
- Press the outer ring down over the fabric, pulling it gently taut as you tighten the screw.
- Trim away the excess fabric close to the edge of the hoop with the fabric scissors.
- Write baby’s name and the date on the small tag and tie it, with the hanging ribbon, to the top screw.
🛍 Shopping guide
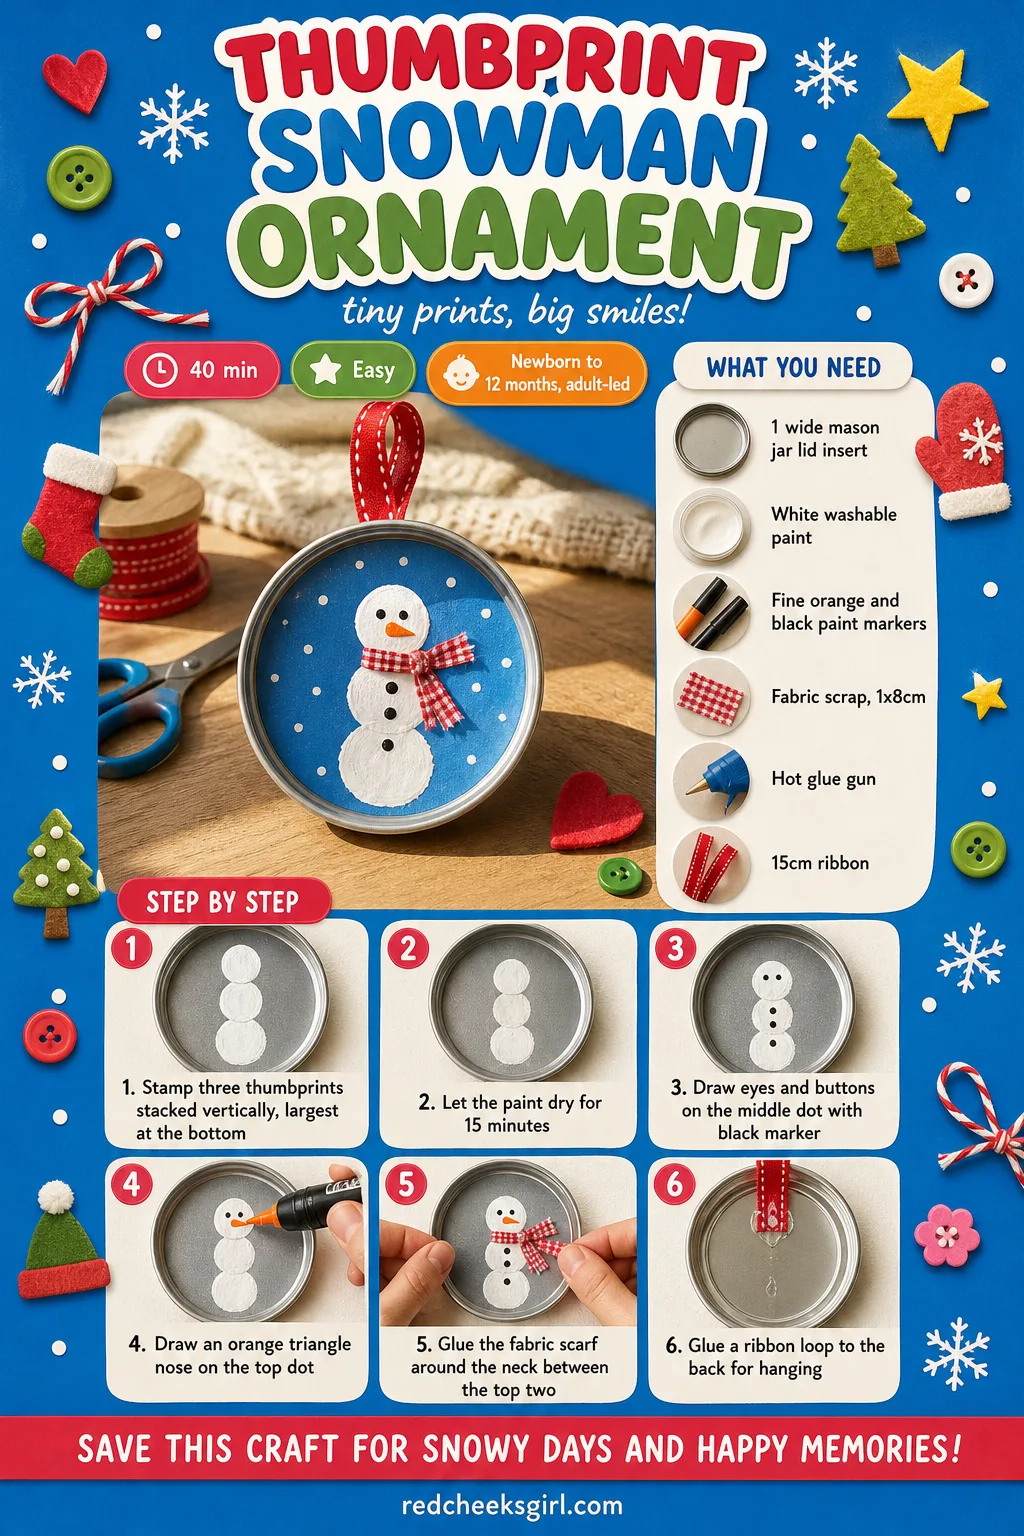
Thumbprint Snowman Ornament
Three thumbprints stacked on top of each other, largest to smallest, make a snowman that takes about two minutes of actual baby cooperation. Painted on a wide mason jar lid insert instead of buying a blank, it costs almost nothing and clips straight onto the tree with a loop of ribbon.
What You Need
- 1 wide mason jar lid insert (flat disc)
- White washable paint
- Fine orange and black paint markers
- Small fabric scrap for a scarf, 1x8cm
- Hot glue gun
- 15cm ribbon
How to Make It
- Press baby’s thumb into the white paint and stamp three dots stacked vertically on the lid, largest at the bottom, smallest at the top, slightly overlapping.
- Let the paint dry for 15 minutes before adding detail.
- Draw two small dot eyes and a row of buttons on the middle dot with the black marker.
- Draw a small orange triangle nose on the top dot with the orange marker.
- An adult hot glues the tiny fabric scarf around the neck between the top two dots.
- Glue a ribbon loop to the back of the lid for hanging.
🛍 Shopping guide
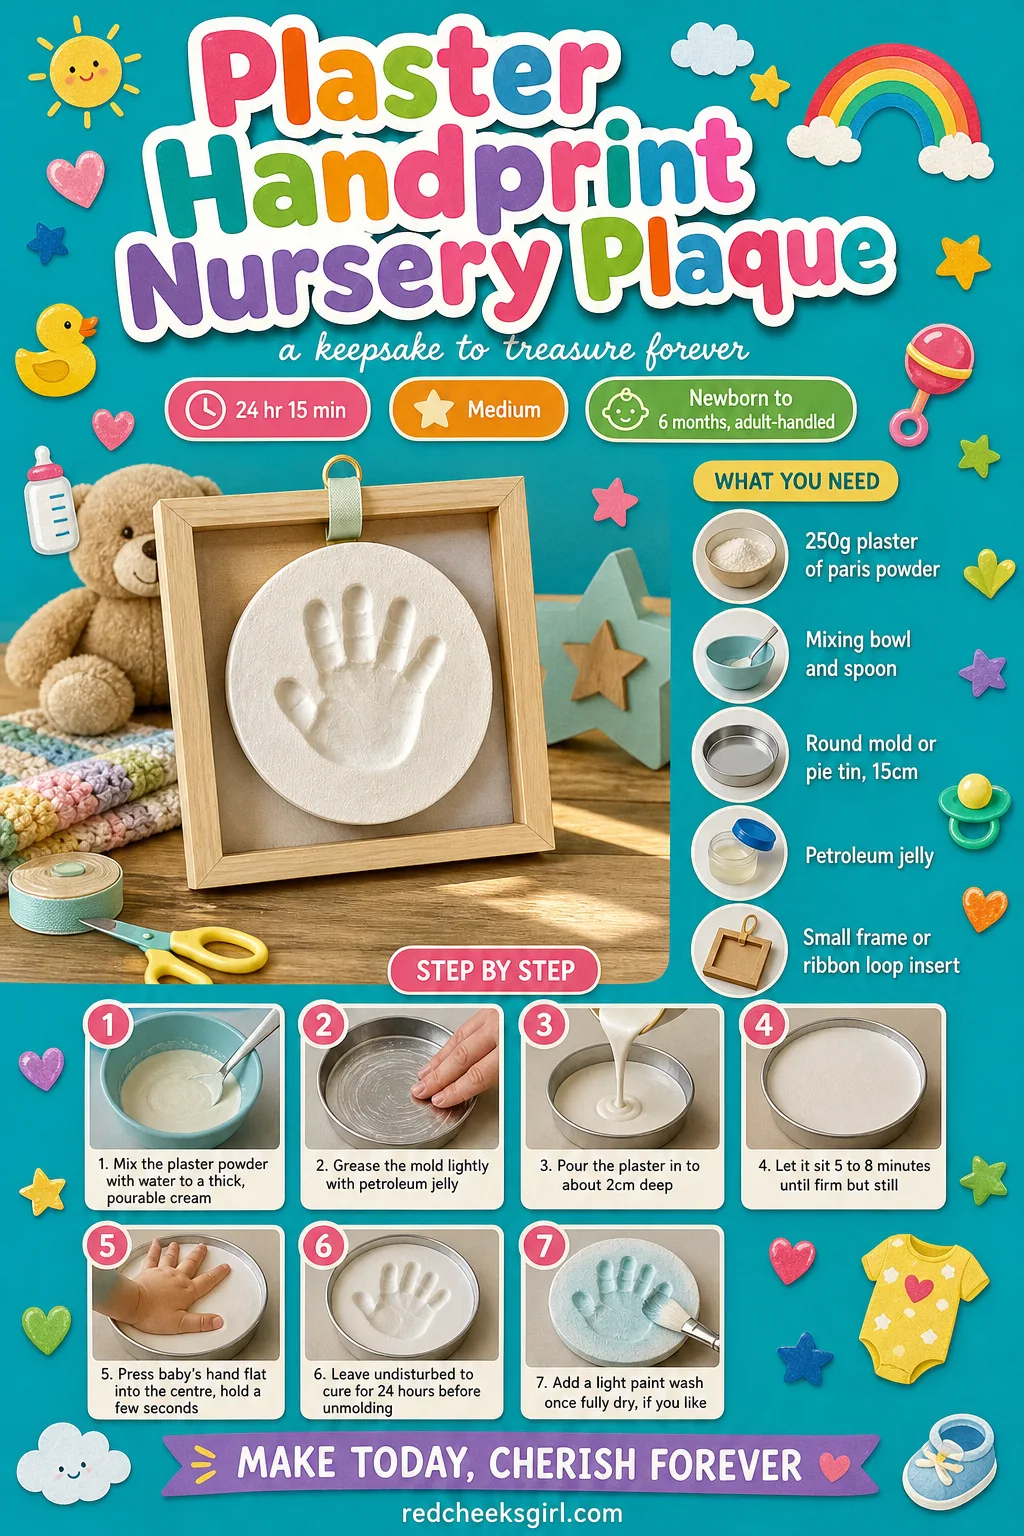
Plaster Handprint Nursery Plaque
A painted handprint fades into just another craft after a few years, but a cast one keeps every crease and fingernail in actual relief, which is the difference between decoration and a small sculpture. This one lives on the nursery wall rather than the tree, so it does not need to be packed away each January, and that permanence is worth the extra half hour it takes.
What You Need
- 250g plaster of paris powder
- Mixing bowl and spoon
- Round disposable mold or pie tin, 15cm
- Petroleum jelly
- Small frame or ribbon loop insert
How to Make It
- An adult mixes the plaster powder with water according to the packet, aiming for a thick, pourable cream.
- Lightly grease the mold with petroleum jelly and pour the plaster in to about 2cm deep.
- Let it sit for 5 to 8 minutes, checking with a finger at the edge, until it is firm but still slightly soft.
- Gently press baby’s hand flat into the centre, supporting the wrist, hold still for a few seconds, then lift straight up without wiggling.
- Leave the plaque completely undisturbed to cure for 24 hours before removing it from the mold.
- Once fully cured and dry, you can leave the plaster its natural white or add a light wash of acrylic paint.
🛍 Shopping guide
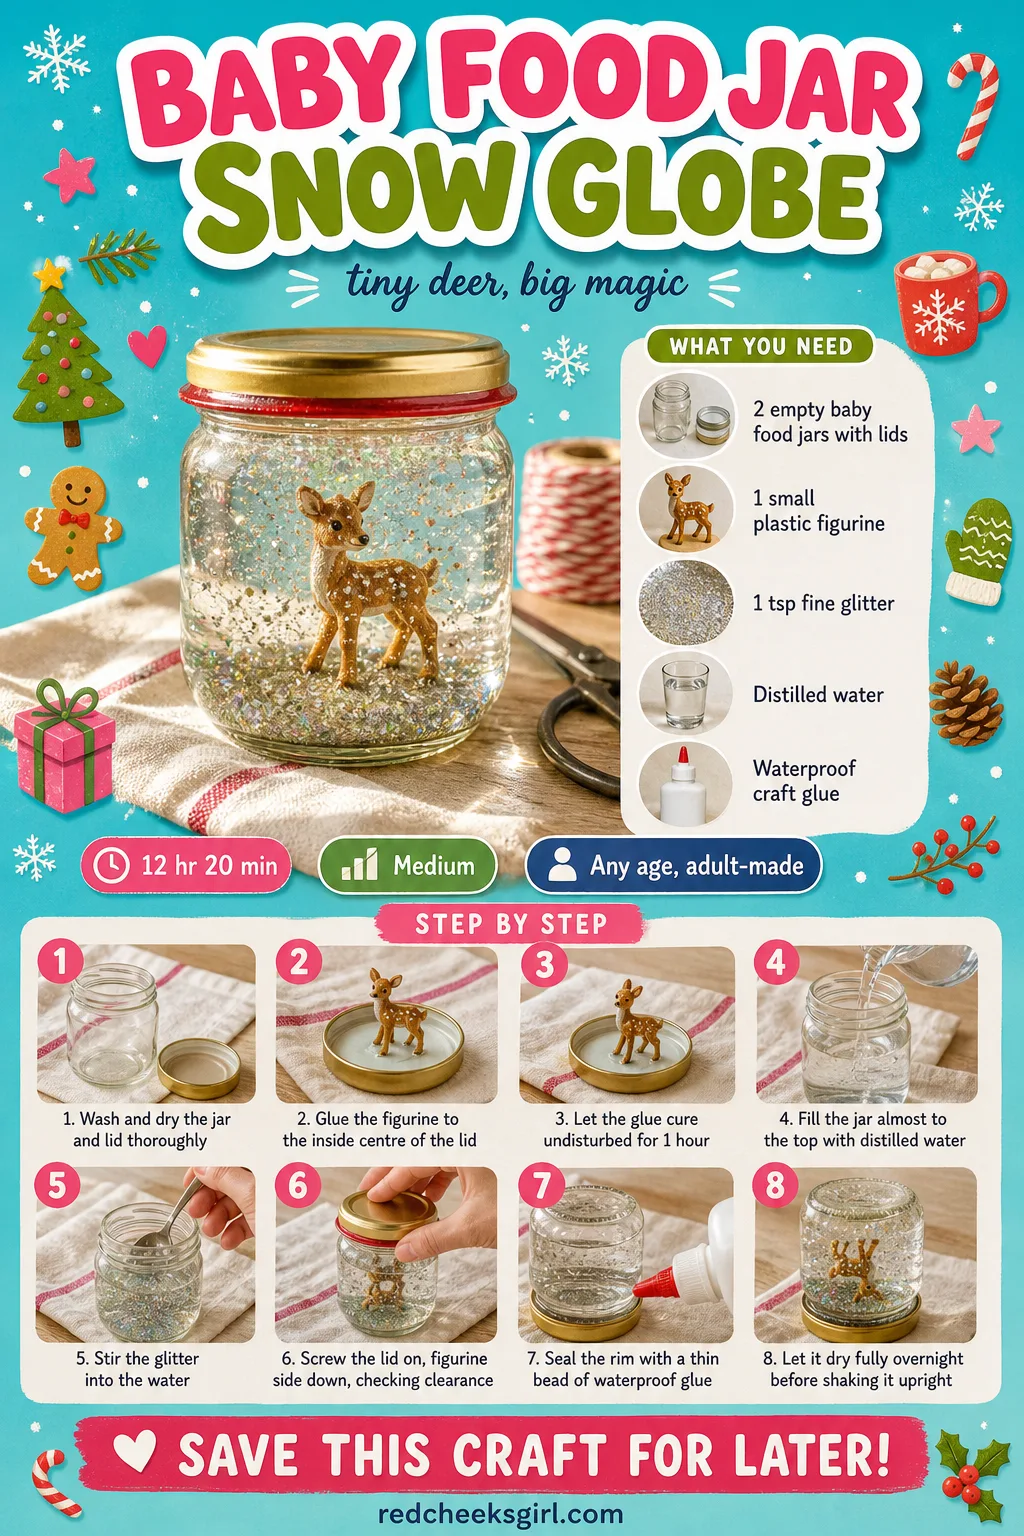
Baby Food Jar Snow Globe
Every jar of pureed carrot generates one perfectly good little glass bottle, and by the time you have fed the baby through a few jars of food you have enough for a whole shelf of these. Shaken once, the glitter settles slowly over a tiny figure inside, and it is a genuinely different technique from anything with a handprint on it.
What You Need
- 2 empty baby food jars with lids, labels removed
- 1 small plastic figurine (deer or tree), washed
- 1 tsp fine glitter
- Distilled water, enough to fill one jar
- Waterproof craft glue
How to Make It
- Wash and dry the jar and lid thoroughly, making sure no food residue remains.
- An adult glues the small figurine to the inside centre of the lid using waterproof glue, then lets it cure undisturbed for 1 hour.
- Fill the jar almost to the top with distilled water and stir in the glitter.
- Carefully screw the lid, figurine side down, onto the jar, checking the figurine clears the glass walls.
- Run a thin bead of waterproof glue around the rim where the lid meets the jar to seal it.
- Stand the jar upside down (lid at the bottom) and let it dry fully overnight before shaking it the right way up.
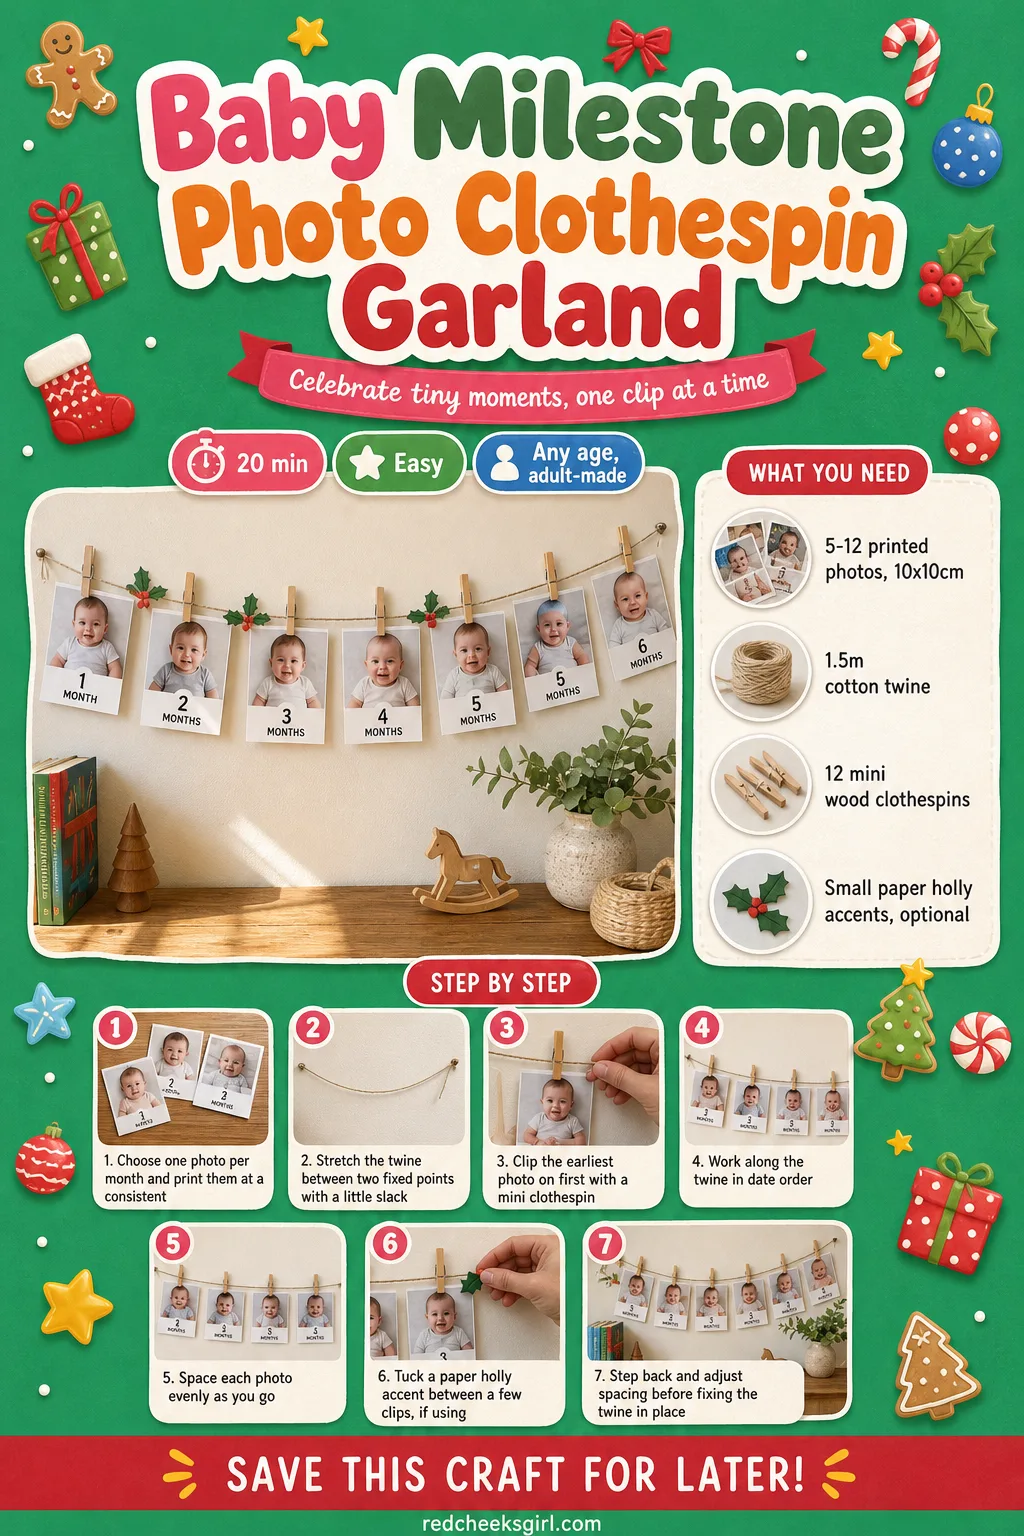
Baby Milestone Photo Clothespin Garland
Not every keepsake needs paint on a baby at all, and if you are touched out by week three, that matters. This one is pure printing and clipping: a photo from each month of the baby’s first year, pegged along a length of twine across a mantel or stair rail, with no mess and no drying time whatsoever.
What You Need
- 5-12 printed photos, 10x10cm, one per month so far
- 1.5m cotton twine
- 12 mini wood clothespins
- A few small paper holly accents (optional)
How to Make It
- Choose one photo per month and have them printed at a consistent small size.
- Stretch the twine between two fixed points, such as mantel hooks or a stair rail, with a little slack.
- Starting from one end, clip the earliest photo on with a mini clothespin.
- Work along the twine in date order, spacing each photo evenly.
- Tuck a small paper holly accent between a few of the clips if you want extra colour.
- Step back and adjust spacing before the twine is fixed in its final place.
🛍 Shopping guide
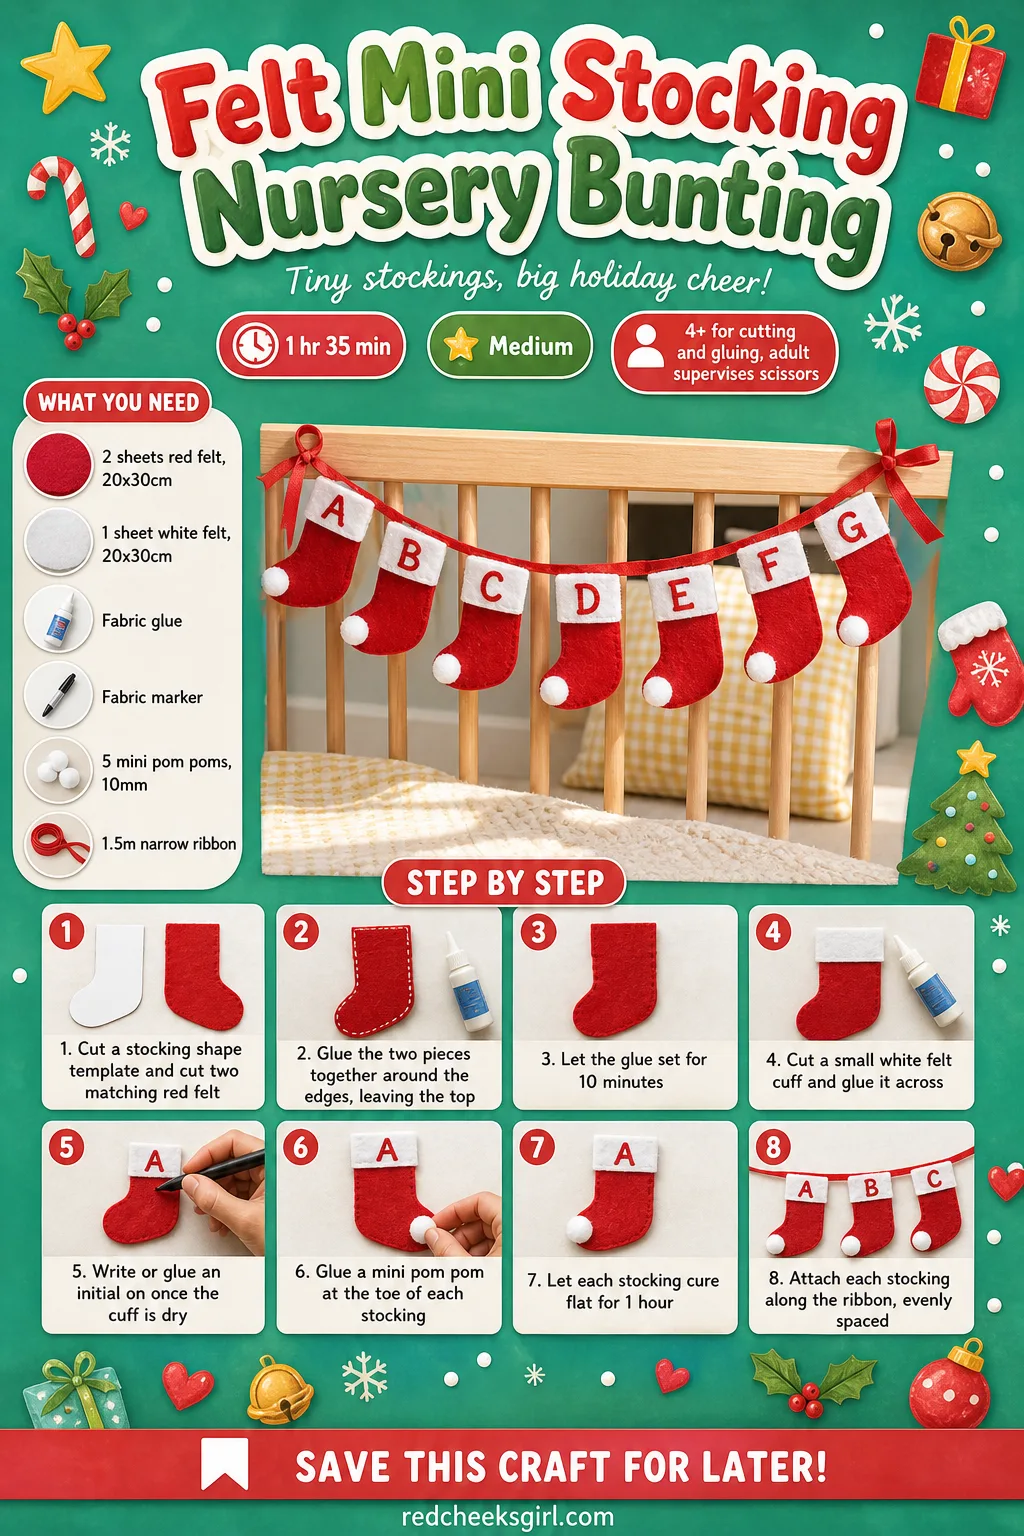
Felt Mini Stocking Nursery Bunting
A row of tiny felt stockings along the crib rail reads as Christmas without a single speck of paint near the baby, which matters if this is a newborn still mostly in the bassinet. An older sibling can cut and glue felt shapes while the baby sleeps, so it works well as the craft you do together without the baby present at all.
What You Need
- 2 sheets red felt, 20x30cm
- 1 sheet white felt, 20x30cm
- Fabric glue
- Fabric marker or cardstock for initials
- 5 mini pom poms, 10mm
- 1.5m narrow ribbon
How to Make It
- An adult cuts a simple stocking shape template and uses it to cut two matching red felt pieces per stocking.
- Glue the two felt pieces together around the edges, leaving the top open, and let the glue set for 10 minutes.
- Cut a small white felt cuff and glue it across the stocking top.
- Write or glue on an initial for the baby’s name once the cuff is dry.
- Glue a mini pom pom at the toe of each stocking.
- Let every stocking cure flat for 1 hour, then glue or clip each one along the ribbon, evenly spaced.
- Hang the finished bunting along the crib rail or a low shelf, out of baby’s reach.
🛍 Shopping guide
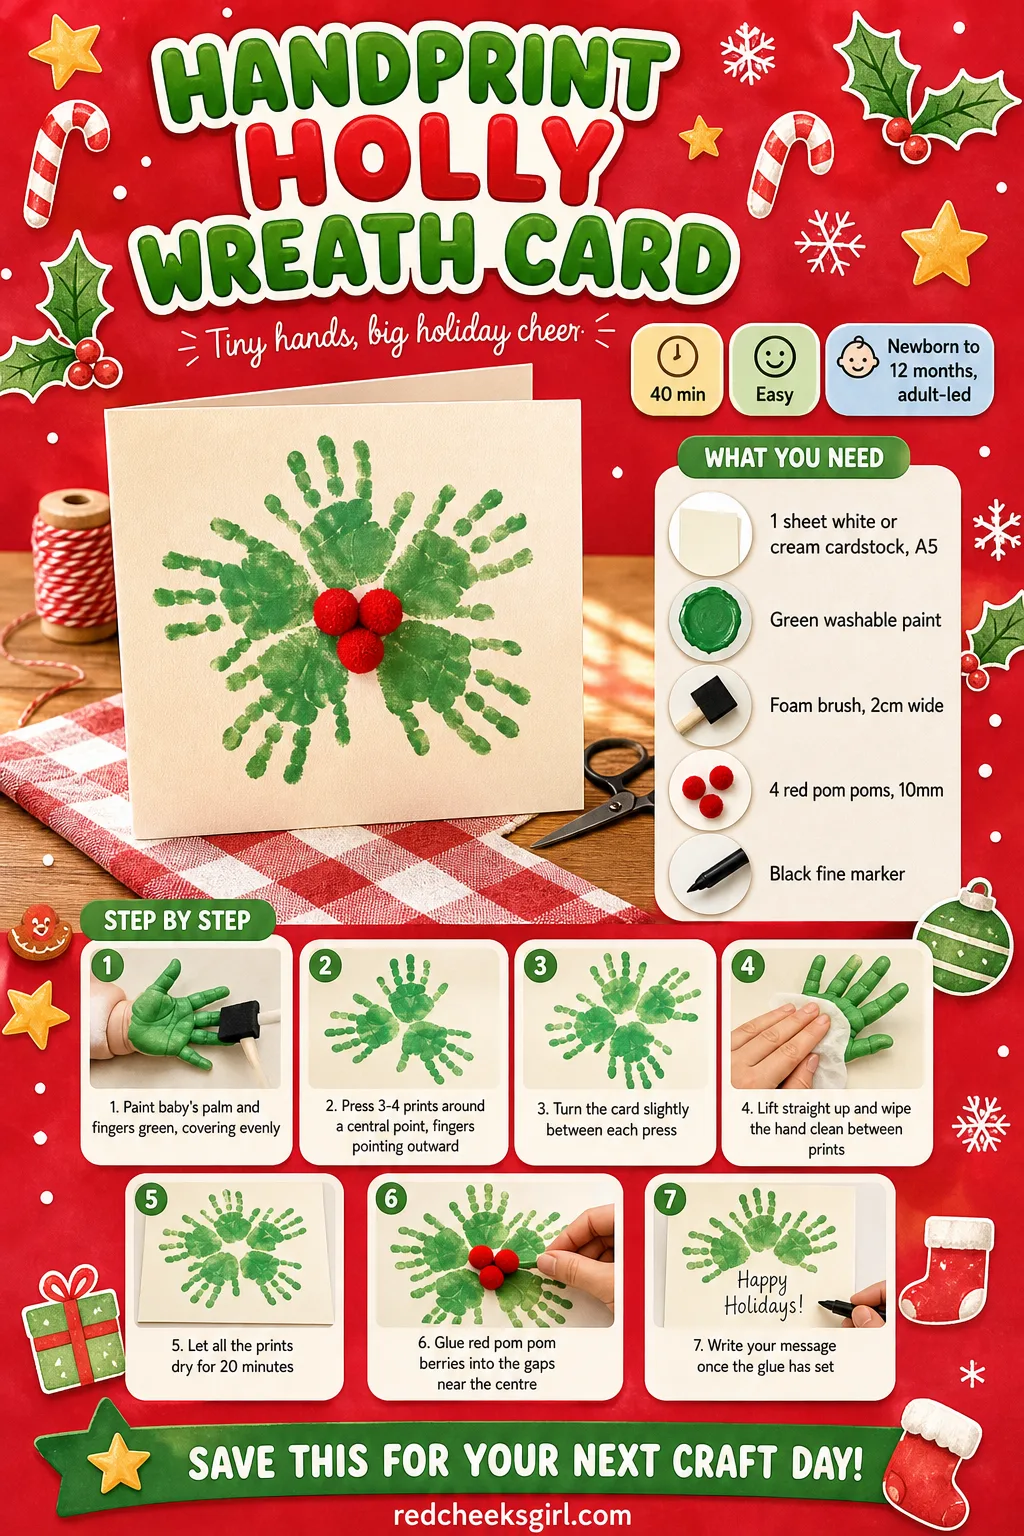
Handprint Holly Wreath Card
Three or four small handprints, fanned around a point and dotted with red at the centre, look exactly like holly leaves without anyone having to draw a thing. It flattens into an envelope like any other card, which makes it the better choice over the wreath-shaped ones that need a frame and a wall.
What You Need
- 1 sheet white or cream cardstock, A5
- Green washable paint
- Foam brush, 2cm wide
- 4 small red pom poms, 10mm
- Black fine marker
How to Make It
- Paint baby’s palm and fingers green, covering evenly.
- Press three or four prints around a central point on the card, fingers pointing outward each time like holly leaves, turning the card slightly between presses.
- Lift straight up each time and wipe the hand clean before repainting.
- Let all the prints dry for 20 minutes.
- Glue the red pom pom berries into the gaps near the centre of the arrangement.
- Write your message underneath once the glue has set, about 5 minutes.
🛍 Shopping guide
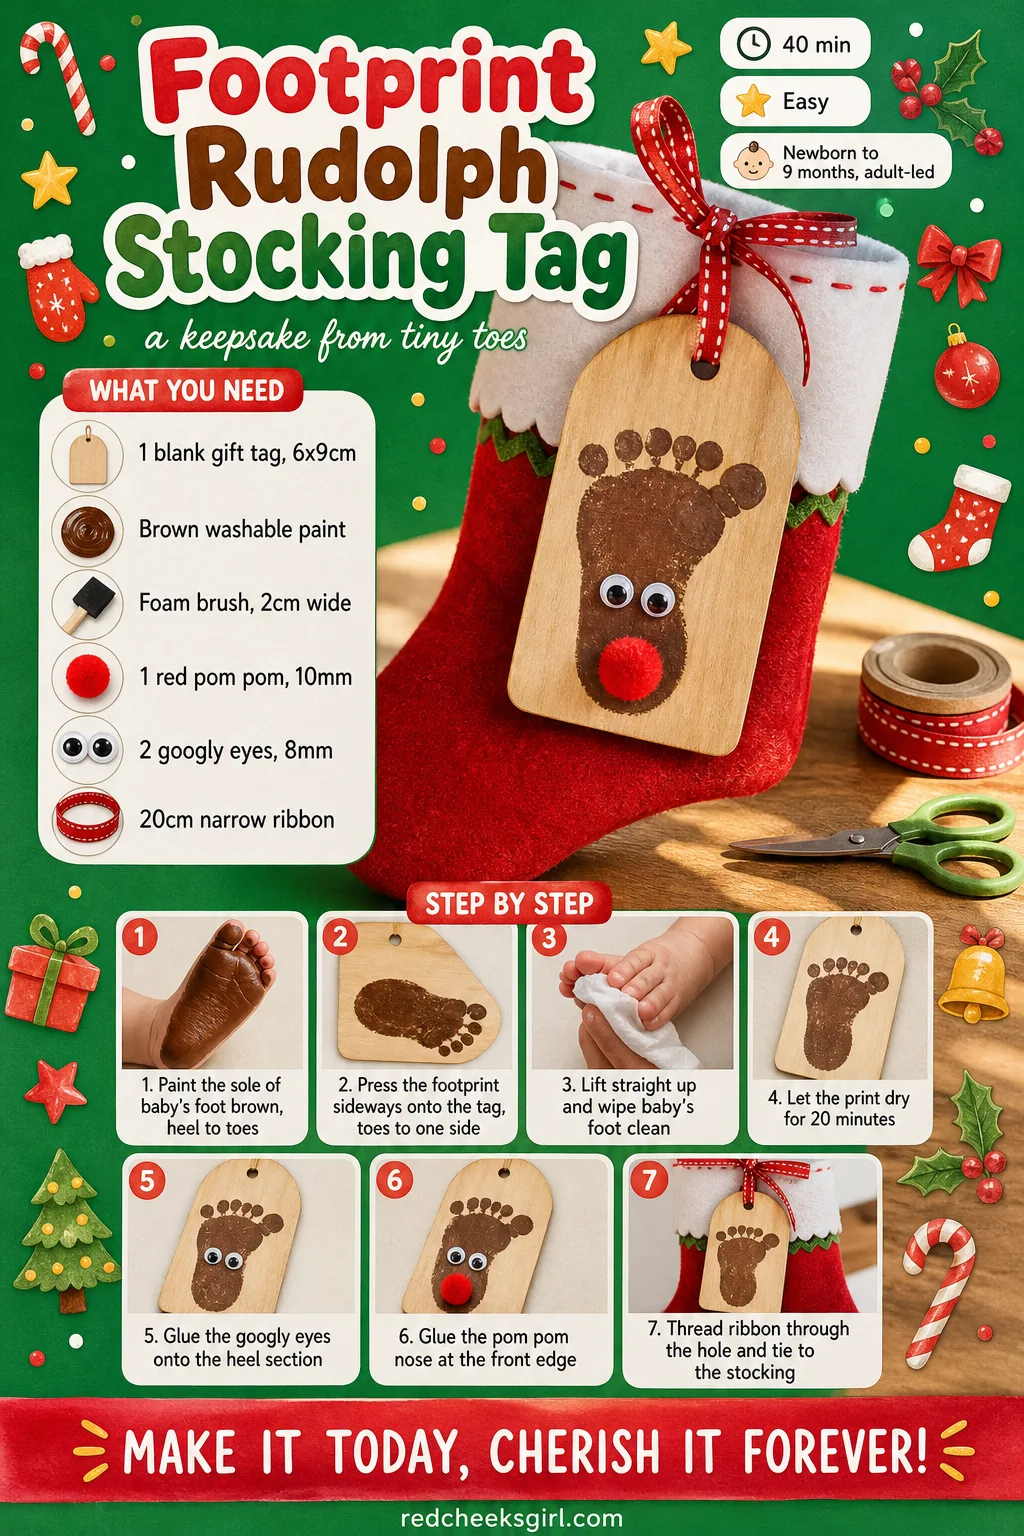
Footprint Rudolph Stocking Tag
Baby’s very first stocking deserves its own name tag, and a red footprint turned sideways makes a convincing Rudolph with barely any effort. Tie it to the cuff of the stocking itself rather than framing it separately, so it travels out of storage each year already attached to the thing it belongs to.
What You Need
- 1 blank wood or cardstock gift tag, 6x9cm, with a hole
- Brown washable paint
- Foam brush, 2cm wide
- 1 small red pom pom, 10mm
- 2 googly eyes, 8mm
- 20cm narrow ribbon
How to Make It
- Paint the sole of baby’s foot brown, covering heel to toes.
- Press the footprint sideways onto the tag, toes pointing to one side, so the toes read as antlers and the heel as the head.
- Lift straight up, wipe baby’s foot clean, and let the print dry 20 minutes.
- Glue the two googly eyes onto the heel section.
- Glue the red pom pom at the front edge of the heel as Rudolph’s nose.
- Thread ribbon through the hole and tie it to the stocking’s cuff once the glue is fully set.
🛍 Shopping guide
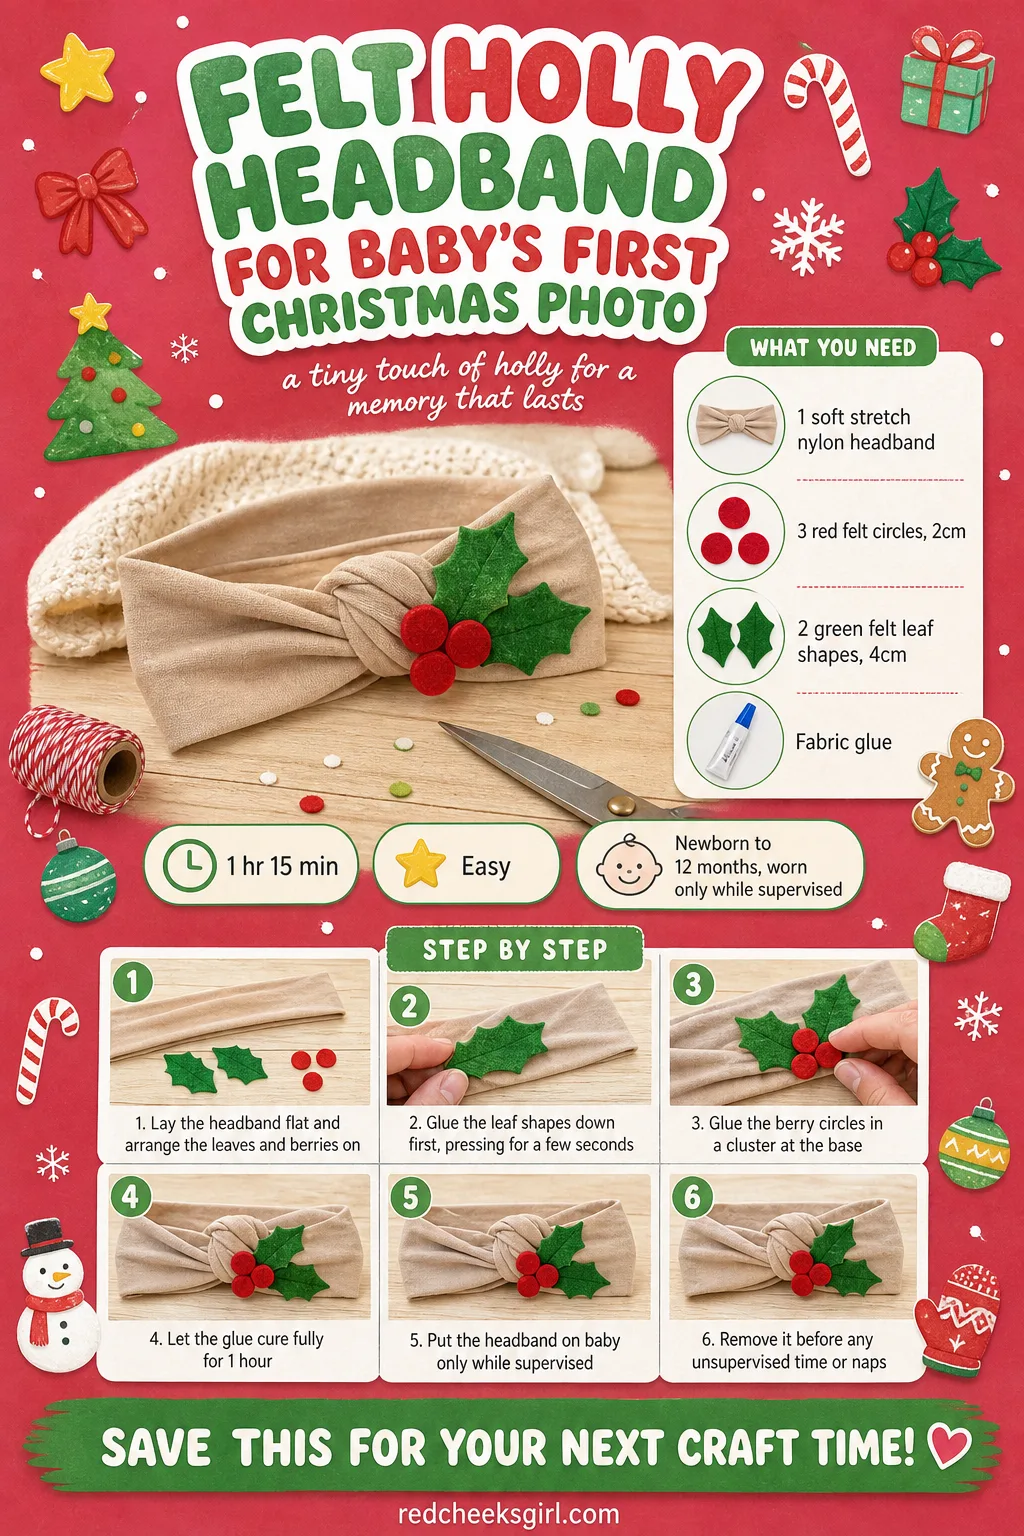
Felt Holly Headband for Baby’s First Christmas Photo
Half the Christmas photos you actually keep are the ones where the baby is wearing something simple that was not bought from a costume aisle. A soft stretch band with a few felt holly leaves and berries glued across the top photographs beautifully and, unlike plastic headbands, has nothing stiff pressing on a newborn’s head.
What You Need
- 1 soft stretch nylon headband
- 3 small red felt circles, 2cm
- 2 green felt leaf shapes, 4cm
- Fabric glue
How to Make It
- Lay the headband flat and arrange the two leaf shapes and three berry circles where you want them on the band, usually just off to one side.
- Glue the leaves down first, pressing firmly for a few seconds each.
- Glue the berry circles in a small cluster at the base of the leaves.
- Let the glue cure fully for 1 hour before the headband is worn.
- Put the headband on baby only while someone is watching, and take it off before any unsupervised time, including naps.
🛍 Shopping guide
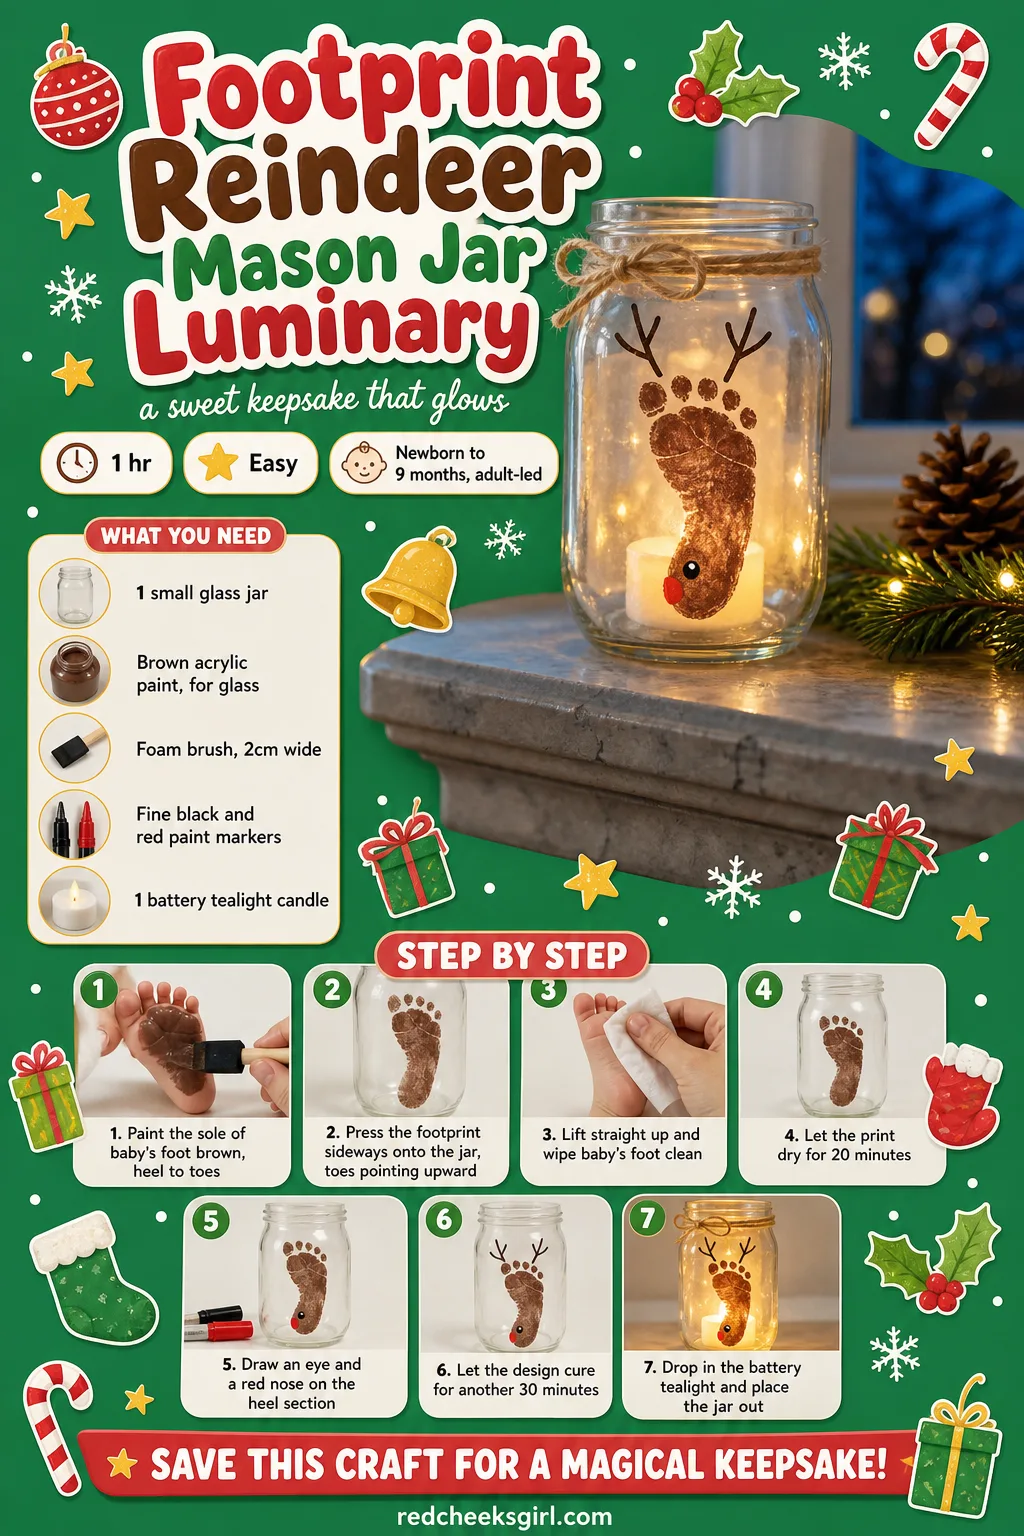
Footprint Reindeer Mason Jar Luminary
A small jar with a tealight inside gives off the kind of warm glow that photographs better than any overhead light, and painting a footprint reindeer onto the glass turns a plain jar into a mantel piece instead of just a candle holder. Keep the flame battery-powered if the jar will sit anywhere near baby’s reach.
What You Need
- 1 small glass jar, clean and dry
- Brown acrylic paint, for glass
- Foam brush, 2cm wide
- Fine black and red paint markers
- 1 battery tealight candle
How to Make It
- Paint the sole of baby’s foot brown, covering heel to toes.
- Press the footprint sideways onto the outside of the jar, toes pointing upward to read as antlers.
- Lift straight up, wipe baby’s foot clean, and let the print dry for 20 minutes.
- Draw a small eye and a red nose dot on the heel section with the paint markers.
- Let the whole design cure for another 30 minutes before handling the jar again.
- Drop the battery tealight inside and set the jar where the glow will show, well away from baby’s reach.
🛍 Shopping guide
Keepsake Christmas Eve Memory Box
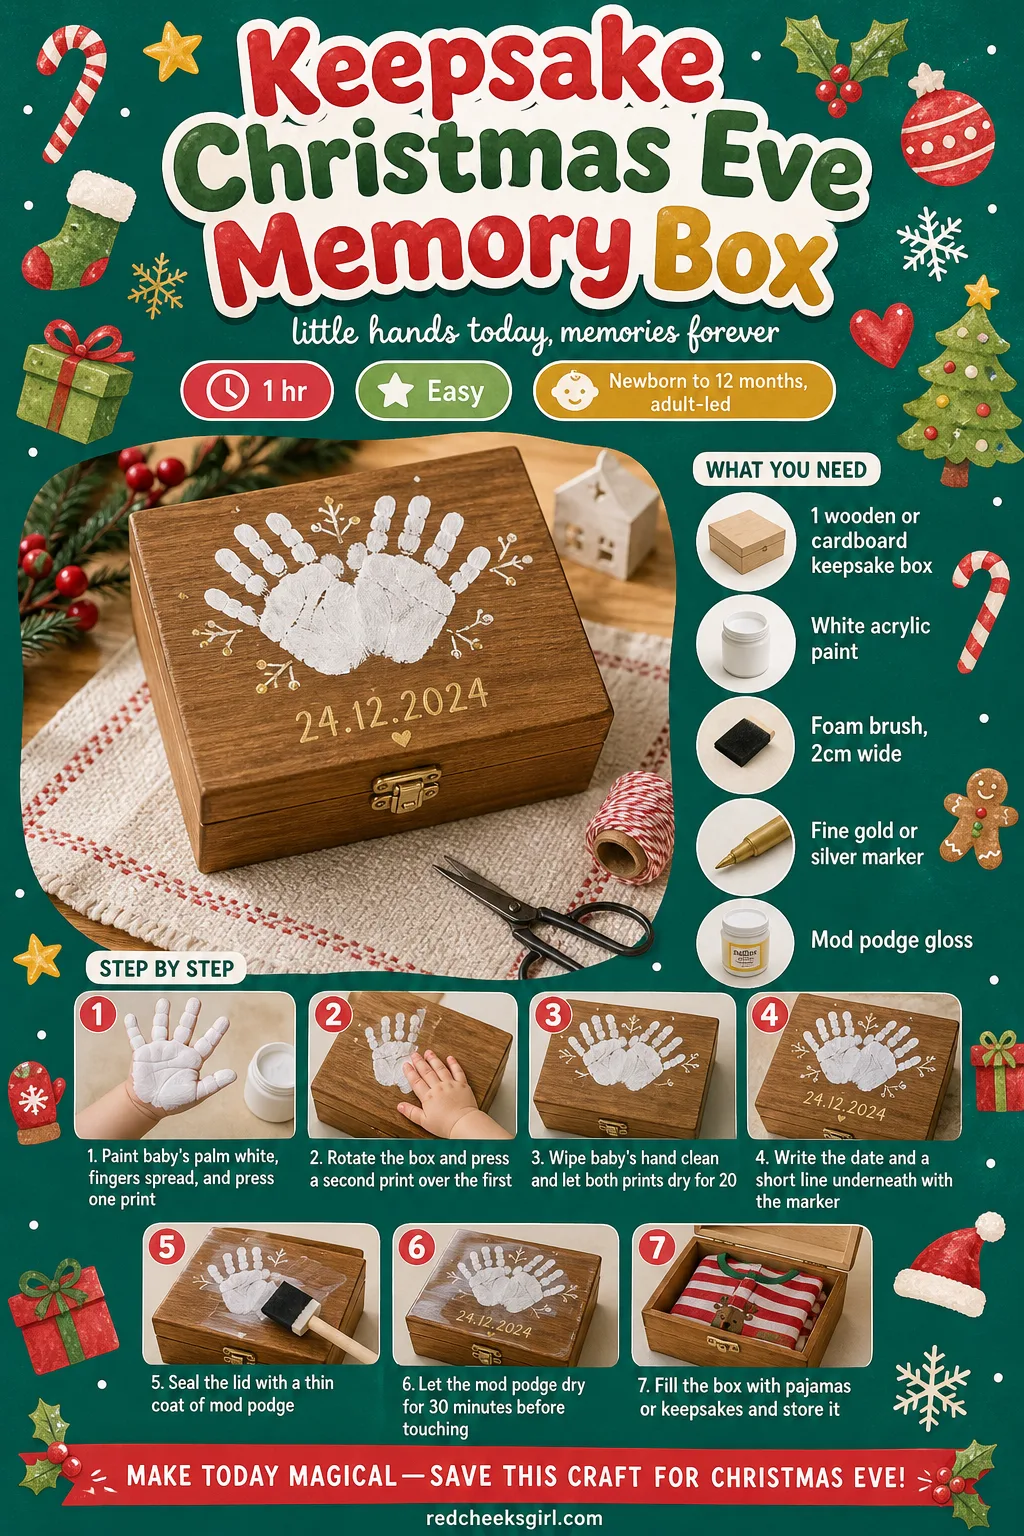
Every family ends up with some version of a Christmas Eve box eventually, usually bought plain from a craft shop, so give it a reason to matter this year. A single white handprint snowflake on the lid, with the date underneath, turns a generic box into the one that holds baby’s first pair of Christmas pajamas, and it comes back out, instantly recognisable, every year after.
What You Need
- 1 plain wooden or sturdy cardboard keepsake box
- White acrylic paint
- Foam brush, 2cm wide
- Fine gold or silver marker
- Mod podge gloss, small pot
How to Make It
- Paint baby’s palm white, fingers spread wide, and press one print in the centre of the lid, then lift straight up.
- Rotate the box slightly and press a second print directly over the first, fingers spread at a different angle, so the two overlap into a snowflake shape.
- Wipe baby’s hand clean and let both prints dry for 20 minutes.
- Write the date and “baby’s first Christmas” underneath the design with the gold or silver marker.
- Seal the lid with a thin coat of mod podge using the foam brush, and let it dry for 30 minutes before touching.
- Once fully dry, fill the box with that year’s pajamas, cards or small keepsakes and store it to bring out again next December.
🛍 Shopping guide
Frequently Asked Questions
How do you get a clean handprint or footprint from a wriggly baby?
Work right after a feed when baby is calmest, and have everything set out before you start so there is no scrambling with a painted hand mid-air. Press firmly and lift straight up in one motion rather than rolling the hand or foot, since dragging is what smudges a print.
What paint is actually safe to use on a baby’s skin?
Look for paint labelled specifically as safe for skin or for handprint crafts, since a product marked washable or non-toxic for surfaces is not automatically approved for skin contact. It works well on a wood, ceramic or other flat ornament blank, but only use a marking product according to its label, and don’t assume that a paint marked washable or non-toxic is automatically intended for use on a baby’s skin. When in doubt, do a small patch test on the inner arm a day ahead.
What age can a baby actually take part in a Christmas craft?
A newborn can give you a handprint or footprint from day one, since an adult does all the pressing and the baby simply has to hold still for a few seconds. Crafts that need cutting, hot glue or small parts like pom poms and googly eyes are adult-only steps at any age, with older toddlers able to help with painting, sticking and stirring from around age two or three.
What is a good Christmas craft gift to make for grandparents?
A flat card or a small ornament travels well and fits in a standard envelope or a padded mailer without needing to be wrapped. A handprint or footprint design works especially well as a gift because it carries meaning a shop-bought decoration cannot, giving the grandparents something unique to that year rather than another generic trinket.
Can you do these crafts with a very new newborn, or should you wait?
Most of the paint and print based crafts work fine from the first few weeks, since a newborn’s foot is actually easier to press flat than a toddler’s, who tends to curl their toes or pull away. If paint feels like too much this early, start with a no-mess option like the photo bauble or the hospital bracelet keepsake and save the handprint pieces for when baby is a little steadier.
How do you store these keepsakes so they actually last?
Ornaments and cards keep best wrapped in tissue inside a labelled box rather than loose in a drawer, where corners get bent and paint can rub against other items. Write the date directly on anything that will not obviously show its own year, since a plain handprint without a date becomes a mystery by the time the baby is at school.
16 nutcracker Christmas tree looks, real and artificial, in red and gold, jewel tones, icy silver an

25 cozy christmas decor ideas in cream, oatmeal, warm red and pine, carried from the tree to the sma

22 luxury Christmas decor ideas that turn a whole house into a five-star hotel lobby, room by room,
Leave a Reply