

24 Halloween Activities for Kids With Free Printables to Cut, Count and Colour

These halloween activities for kids cover every minute from the moment the first child sits down to the last sweet being sorted: sixteen printable sheets that give hands a real job, plus eight no-print activities that need nothing more than what is already in the room.
The mix works for a classroom party, a home gathering or a rainy afternoon, and every single item here is built for doing, not for sitting quietly with a pencil.
This post contains affiliate links. If you buy through them, I may earn a small commission at no extra cost to you.
- Colour by Number Pumpkin
- Cut and Glue the Skeleton
- Count the Bats
- Ghost Bowling With Paper Cups
- Trace the Spider Web
- The Costume Parade Around the Room
- Follow the Line, Bat to Cave
- Pumpkin Painting on Newspaper
- I Spy and Count
- Spot the Difference, Haunted House
- The Sensory Bin of Dried Pasta and Small Toys
- Match the Shadow to the Costume
- Torchlight Shadow Puppets
- Roll and Cover the Pumpkin
- Dot Marker Ghosts
- Apple Bobbing Outside
- Cut Out Paper Puzzle, Six Pieces
- Finish the Pattern, Sweets Row
- The Sweet Sorting Race After Trick or Treating
- Build a Paper Lantern
- Draw the Rest of the Monster
- Sort the Sweets by Colour
- Trace and Write the Halloween Words
- The Craft Box With Card, Glue and Googly Eyes
- Frequently Asked Questions
1. Colour by Number Pumpkin
Each child gets one sheet showing a large pumpkin outline divided into numbered sections.
Every number corresponds to a colour in the key at the bottom: orange for the main body, green for the stem, dark grey for the carved eyes and mouth, yellow for the glow inside.
Children pick up their crayons and work section by section until the whole pumpkin is lit up.
Print one copy per child on standard paper. Crayons or coloured pencils both work fine. The activity runs about ten to fifteen minutes, which is long enough to settle a group down after an active game. No scissors needed, no glue, just the sheet and something to colour with.
Younger children sometimes colour outside the lines and stress about it. Tell them before they start that the pumpkin can look however they like once the numbers are done, and any stray colour becomes part of the design. For older children, add a challenge: colour the sheet without lifting the pencil between sections of the same colour.
- Ages 3 and up
- Works as a calm starter activity while latecomers arrive

🛍 Shopping guide
2. Cut and Glue the Skeleton
The sheet shows a friendly cartoon skeleton broken into labelled body parts: skull, ribcage, pelvis, two arm bones, two leg bones, two hand shapes and two foot shapes. Children cut out each piece along the printed dotted lines, then arrange and glue them onto the blank body outline on the right side of the sheet to build a complete skeleton.
Print one copy per child. Each child needs child-safe scissors, a glue stick and a flat surface to work on. The activity takes fifteen to twenty minutes depending on age. It is worth pre-cutting the sheets for children under four, leaving only the gluing stage for the smallest hands.
The most common problem is children gluing everything at once before checking the layout, ending up with bones in the wrong place. A quick rule before starting: lay all the pieces in position first, then glue.
For an extra challenge with older children, turn the label text face-down and see whether they can name and place each bone correctly from memory.
- Child-safe scissors, one pair per child
- Glue sticks, one per child
- A firm surface or clipboard

🛍 Shopping guide
3. Count the Bats
The sheet is packed with cartoon bats of slightly different sizes scattered across a night-sky scene. Some bats are easy to spot in open sky. Others partially hide behind clouds or in cave openings at the bottom. Children count every bat they can find and write the total in the answer box at the bottom of the sheet.
Print one copy per child. A pencil is all they need. The activity takes five to eight minutes for most children and works well as a quick warm-up or filler between longer crafts. It sharpens careful looking skills without feeling like a school task.
The answer key appears at the bottom of the sheet in small italics so the host can fold it back or trim it before handing the sheets out. If children finish at different speeds, ask fast finishers to circle every bat that is hiding and count those separately as a bonus round.
Fold or trim the answer key strip before handing sheets out so children cannot peek.

4. Ghost Bowling With Paper Cups
Set ten paper cups in a triangle formation at one end of the room, each with a ghost face drawn on in black marker. Children take turns rolling a small rubber ball along the floor from behind a tape line to knock as many ghost cups down as possible. Each player gets two rolls per turn, just like real bowling.
No printing needed. You need ten plain paper cups, a black marker for the ghost faces, a small rubber or foam ball, and a strip of painter’s tape for the bowling line. Mark the line about two metres from the cups for younger children and three metres for older ones. Reset the cups between each player’s turn.
The ball veering sideways is the main frustration. A narrow corridor made from two strips of tape on either side of the lane solves it instantly and keeps the game moving. To make it competitive, keep a tally on a scrap of paper and award a small sweet prize to the highest score.
- 10 paper cups
- Black marker for ghost faces
- Small rubber or foam ball
- Painter’s tape for the lane
🛍 Shopping guide
5. Trace the Spider Web
The sheet shows a large, intricate spider web drawn with dotted lines radiating from a centre point, with a small friendly spider sitting at the middle. Children trace every dotted line with a pencil or crayon, working from the centre outward, until the whole web is solid. The finished sheet looks like a real inked web.
Print one copy per child. A pencil works best for control, but chunky crayons are fine for younger children who find pencil grip tiring. The activity takes about eight minutes. It builds pencil control and fine motor confidence without looking like a handwriting drill.
Children sometimes rush and skip sections. Encourage them to go slowly and trace each spoke before moving to the next ring. For a finishing touch, let children add their own spider somewhere on the web in pen after they finish tracing, giving the sheet a personalised result they want to keep.
Use chunky crayons or thick markers for children under 4 who find thin pencils hard to grip.

6. The Costume Parade Around the Room
Every child in costume joins a parade lap around the room or garden while a spooky playlist plays. One adult or older child acts as the announcer, calling out each child’s costume name as they pass. When the music stops, everyone freezes on the spot. The last child to freeze sits out for one round, and the parade restarts.
No printing needed. The only requirement is a phone or speaker and a short Halloween playlist. The parade works inside along a clear path or outside if space allows. It takes as long as you like, five minutes or twenty, depending on how many laps you run before cutting.
Children who are shy about their costume often hang back at the start. Give them a role as the music controller or parade judge for the first round so they join on their own terms. The freeze element keeps even reluctant participants alert and laughing.
Every child’s costume gets a moment without a formal contest or winner, so no child feels overlooked.
7. Follow the Line, Bat to Cave
The sheet shows four cartoon bats in a row on the left side of the page and four cave openings on the right side.
A tangle of looping, crossing lines connects each bat to one cave, but the lines twist across each other so the path is not obvious at first glance.
Children trace each line with a finger first, then use a pencil or a different coloured crayon per bat to follow the route from bat to cave.
Print one copy per child. Coloured pencils make it easier to tell the paths apart, though a single pencil works fine. The activity takes about five minutes. It trains visual tracking, which is a genuine pre-reading skill, and children find the puzzle satisfying because there is a clear answer at the end.
Children often try to draw straight lines instead of following the actual path. Show one example by tracing the first line visibly with your finger before they start. The answer key prints in small italics at the bottom of the sheet, so fold or trim it before handing the sheets out.
- Ages 4 and up
- Works well after a high-energy game as a calming transition

8. Pumpkin Painting on Newspaper
Lay sheets of newspaper across the table and place one small white or pale orange pumpkin in front of each child. Set out pots of washable paint in Halloween colours and a few brushes per child. Children paint their pumpkin however they like: a face, stripes, polka dots, a spider, anything goes. No carving, no knives, entirely child-safe.
No printing needed. You need small pumpkins (the palm-sized craft pumpkins work perfectly), washable paint, brushes, newspaper or a plastic tablecloth, and a cup of water per child for rinsing brushes. Allow twenty to thirty minutes including drying time. Send each child home with their pumpkin as a party favour.
Paint dripping onto clothes is the main hazard. Old shirts or aprons solve it. If paint pots get muddled, set out one colour per pot with its own dedicated brush and ask children not to switch brushes between pots, a rule most children follow surprisingly well when you frame it as the brush belonging to that colour.
Buy mini craft pumpkins from a garden centre in bulk. They are cheaper than full-size pumpkins and easier for small hands to hold.
9. I Spy and Count
The sheet is a busy Halloween scene packed with small objects: bats, cats, spiders, broomsticks, cauldrons, stars, moons, ghosts, candy corn and pumpkins, all jumbled together in a chaotic illustration. At the bottom, a grid asks children to find and count how many of each object they can see, then write the number in the box beside it.
Print one copy per child. A pencil is all that is needed. The activity takes ten to fifteen minutes depending on how carefully children search, and it works well with mixed ages because older children simply find more items. The answer key prints in small italics at the very bottom and should be folded or trimmed before handing out.
Children who finish first sometimes call out the answers and spoil it for others nearby. A quick rule: whisper your answers to an adult to check, and get a sticker if you are right, keeps fast finishers occupied and quiet. For younger children, simplify by circling just one object type together as a group before letting them work independently.
Counting real objects in a picture is more engaging than a number worksheet and develops the same skills.

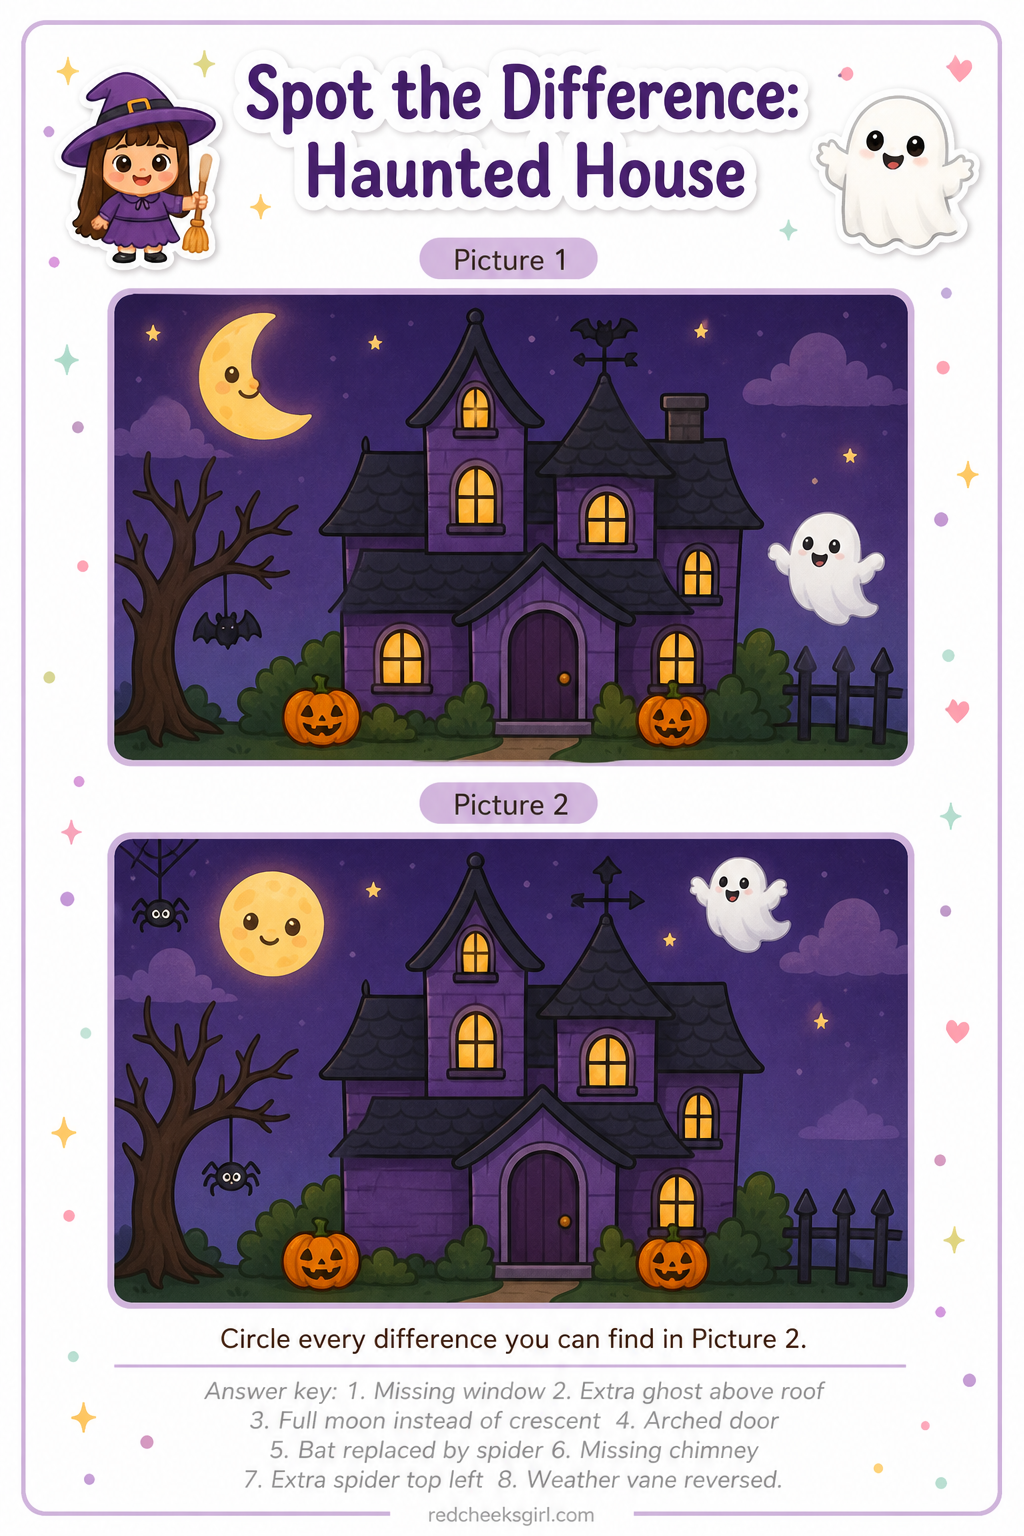
10. Spot the Difference, Haunted House
The sheet shows two almost-identical illustrations of a haunted house side by side.
One picture has eight deliberate differences hidden inside it: a missing window, an extra ghost, a changed moon, a different door colour, a bat turned upside down, a missing chimney, an added spider and a reversed weather vane.
Children circle each difference they find on the second picture.
Print one copy per child. A pencil or red crayon to circle differences is all that is needed. The activity runs ten to fifteen minutes. It works especially well as a quiet activity after lunch or after an energetic game when you need children to sit and focus.
Children frequently circle things that are not actual differences, convinced they have spotted one. The answer key at the bottom of the sheet, trimmed before handing out, lets the host confirm or redirect without a debate. For younger children, tell them the total number of differences to find upfront so they know when to stop looking.
Tell the children there are exactly 8 differences to find. Giving the number keeps them hunting instead of giving up after three.
11. The Sensory Bin of Dried Pasta and Small Toys
Fill a large plastic bin or a deep tray with dried pasta, dried rice, or dried black beans, then bury ten to fifteen small Halloween-themed plastic toys or figures inside: tiny skulls, spiders, bats, mini pumpkins.
Children dig through the bin with their hands and a spoon to find every hidden object, pulling each one out and setting it on the table beside the bin.
No printing needed. You need the bin, the filler, the small toys, and a spoon or small scoop per child. Set it up as a station where two or three children explore at once. It can run for as long as children are interested, five minutes to half an hour, and it resets itself instantly by burying the toys again.
The bin becomes chaotic fast as filler spills onto the table. Place the bin on a plastic sheet or old tablecloth and set a rule that scooping stops at the bin edge. If children are competitive, hide a small numbered card with each toy so they can compare what they found and tally a score.
- Large plastic bin or deep tray
- Dried pasta, rice or black beans as filler
- 10-15 small Halloween plastic toys
- One spoon or scoop per child
🛍 Shopping guide
12. Match the Shadow to the Costume
The left column shows five cartoon children in Halloween costumes: a witch, a ghost, a vampire, a pumpkin and a cat. The right column shows the same five silhouettes in shuffled order. Children draw a line from each character on the left to the matching shadow on the right. One child per sheet, one pencil needed.
Print one copy per child. The activity takes four to six minutes and works as a quick filler or a table task while children arrive. It suits ages four and up, and younger children often find it surprisingly satisfying because the visual match feels obvious once they see it.
The answer key prints in small italics at the foot of the sheet. Fold the bottom edge back before handing the sheets out so children cannot see it. For a group version, project a large version on a wall and have children call out the matches one by one as a whole-class activity.
- Ages 4 and up
- Perfect five-minute filler while waiting for everyone to sit down

13. Torchlight Shadow Puppets
Darken the room as much as possible, shine a torch or a phone flashlight at a plain white wall, and let children hold their hands between the light and the wall to cast shadows.
Teach two or three classic hand shapes: the flapping bat (fingers spread, hands crossed at wrists), the howling wolf (fist with index finger and pinkie raised), the creeping spider (fingers spread wide and wiggling).
Children take turns making shadows and guessing what each shape is meant to be.
No printing needed. A torch per group of three children works well, or one large light for the whole room if the space is small enough. The activity needs a plain pale wall or a white sheet hung flat.
It runs naturally for ten to fifteen minutes and winds down on its own when children run out of shapes to try.
Shadows lose definition if the torch is too close to the hands. The sweet spot is roughly fifty centimetres between hand and wall, and the torch about one metre behind the hand. If children get frustrated with their shapes, pair them up so one child holds the torch and the other shapes the shadow, taking pressure off both at once.
No materials, no setup, no cleanup: just a dark room and a light source, which most phones already provide.
14. Roll and Cover the Pumpkin
The sheet shows a large cartoon pumpkin outline divided into numbered sections, each section labelled with a number from one to six.
Children roll a standard die, find a section on the pumpkin with that number and cover it with a round dot sticker, a small square of coloured paper, or a dot marker blot. The game ends when every section is covered.
Print one copy per child. Each child needs one die and either dot stickers, dot markers, or small torn pieces of coloured paper and a glue stick. The activity runs five to fifteen minutes depending on luck and pace. It builds number recognition in the most direct way possible: roll, read, find, cover.
Children who roll the same number repeatedly and cannot find an uncovered section get frustrated quickly. Solve this by including two sections labelled with each number so there is always somewhere to go. If dot stickers run out, a simple pencil scribble to fill each section works just as well.
- One die per child or shared between two
- Dot stickers or dot markers, one per child
- Printed sheet, one per child

🛍 Shopping guide
15. Dot Marker Ghosts
The sheet shows three large ghost outlines, each one filled entirely with empty circles of the right size for dot markers. Children press a dot marker into each circle until all the circles inside each ghost are filled in.
The finished result is a ghost made entirely of overlapping coloured dots, which looks genuinely striking and takes real focus to complete.
Print one copy per child. Dot markers (also called bingo daubers) are the only tool needed. White or light grey dot markers on a dark background create the most ghost-like effect, but any colour combination works. The activity runs ten to fifteen minutes. It develops hand-eye coordination and grip strength in a format that feels more like art than exercise.
Dot markers bleed through standard paper onto the table. Put a spare sheet of newspaper or scrap paper underneath each child’s sheet before they start. If dot markers are not available, large round stickers placed inside each circle give exactly the same result.
- Dot markers (bingo daubers), at least one per child
- Scrap paper or newspaper underneath each sheet to prevent bleed-through

🛍 Shopping guide
16. Apple Bobbing Outside
Fill a large plastic tub or barrel with cold water and float six to eight apples on the surface. Children take turns kneeling at the tub and trying to bite and lift an apple out of the water using only their teeth, no hands.
The child who retrieves an apple in the shortest time wins that round. Keep a timer running and write times on a scrap of paper to compare.
No printing needed. The setup is a tub, water, apples and a towel per child. This one genuinely needs to happen outside or in a room with a washable floor, as water goes everywhere. Lay an old towel or mat in front of the tub.
Allow two minutes per child as a maximum and move on so the line stays short.
Children with long hair should tie it back before their turn, and an adult should be kneeling beside the tub at all times to supervise. For a hygiene-conscious group, use a fresh set of apples per child or replace the water halfway through. A dry towel handed immediately after each turn keeps the mood cheerful rather than soggy.
Run this one at the end of the party so wet children can go straight home to change.
🛍 Shopping guide
17. Cut Out Paper Puzzle, Six Pieces
The sheet shows a full-colour Halloween illustration (a friendly witch flying on a broomstick across a full moon) printed with six large jigsaw-style cut lines marked in bold dotted lines over the image. Children cut the sheet into its six pieces along the dotted lines, then shuffle the pieces and reassemble the picture into the correct order on the table.
Print one copy per child on cardstock if possible, as thicker paper makes the puzzle pieces easier to handle and more satisfying to assemble. Child-safe scissors and a flat surface are all that is needed. The activity runs ten to fifteen minutes, longer if children swap puzzles and try to solve each other’s.
The puzzle falls apart when pieces get muddled between children. Give each child a small zip-lock bag labelled with their name to store their pieces while cutting. After assembly, children can glue the completed puzzle onto a second sheet of plain paper to take home as a finished picture.
- Print on cardstock for sturdier pieces
- Pre-cut for children under 4 so they only do the assembly stage

🛍 Shopping guide
18. Finish the Pattern, Sweets Row
The sheet shows six rows of Halloween sweets and treats in a repeating pattern: a lollipop, candy corn, chocolate bar, then a gap where the next item should be.
Children look at the pattern in each row, work out what comes next and draw it in the blank box at the end of each row.
Patterns grow more complex as the rows progress, from simple two-item repeats at the top to three-item and four-item cycles at the bottom.
Print one copy per child. A pencil is enough, though crayons let children colour in their drawn answer which makes the finished sheet more satisfying. The activity takes five to ten minutes and suits ages four and up. It builds pattern recognition directly and gives children a clear, achievable result at the end of each row.
Children sometimes draw the wrong item with total confidence. The answer key at the bottom of the sheet, folded away before handing out, lets you confirm answers quietly without making a child feel corrected in front of others. Frame the check as: “let’s see if yours matches the secret answer” rather than marking it right or wrong.
- Ages 4 and up
- Good for mixed-age groups: younger children tackle the first rows, older ones push to the end

19. The Sweet Sorting Race After Trick or Treating
Empty a bag of trick-or-treat sweets onto the table and challenge children to sort them into groups by type as fast as possible: all chocolates together, all lollipops together, all gummies together, and so on. Set a two-minute timer.
When time is up, each child counts how many sweets are in the biggest group they sorted and that number is their score.
No printing needed. The sweets are already there after trick or treating, which is the whole point. A flat table and a timer are the only requirements. This works brilliantly as an immediate post-trick-or-treat activity before anyone has eaten anything, because sorting comes before eating in the rules of the game.
Disagreements about which category a sweet belongs to are inevitable and surprisingly heated. Decide one simple rule before the race: if it has chocolate, it goes with chocolate, no exceptions. Assigning one child per category to be the “guardian” of that pile gives everyone a stake in the sorting and keeps arguments short.
It delays the moment children tear into the bag by about ten satisfying minutes, and everyone has fun doing it.
20. Build a Paper Lantern
The sheet is a single A4 template printed with a Halloween pattern (bats, stars and crescent moons) across its surface.
Children cut along the marked lines to create a fringe of vertical slits across the middle of the sheet, then roll the sheet into a cylinder and glue or tape the short edges together.
A strip handle cut from a separate scrap of paper gets attached at the top. The finished lantern holds an LED tea light safely inside.
Print one copy per child on standard paper. Each child also needs scissors, tape or a glue stick, and an LED tea light to place inside the finished lantern. The assembly takes twelve to fifteen minutes with guidance. Real candles must never go inside: LED tea lights only, always.
The cylinder collapsing before the glue dries is the most common issue. Use tape instead of glue on the seam and it holds immediately. If children struggle with rolling the cylinder evenly, pre-crease the sheet along its short axis before handing it out so there is already a natural curve to follow.
- Scissors, one pair per child
- Tape or glue stick per child
- LED tea lights, one per child (never real candles)

🛍 Shopping guide
21. Draw the Rest of the Monster
The sheet shows the left half of a large cartoon monster printed in detail: one eye, one arm with claws, half a mouth full of teeth, one leg, and a few warts and scales. The right half of the page is completely blank.
Children use the printed half as their guide and draw the rest of the monster to complete the picture, adding their own details, extra arms, horns, spots or stripes as they see fit.
Print one copy per child. Pencil first, then crayons or markers to colour in the finished monster. The activity runs ten to twenty minutes depending on how elaborate each child gets. It suits all ages because the printed side gives guidance without removing creative choice, and no two finished monsters look the same.
Some children freeze, unsure they can draw well enough. Tell them the monster can look however they want on their side, there is no right answer. Positioning it as “make your own side different on purpose” takes the pressure off completely and usually results in wilder, more interesting monsters than a careful copy would produce.
Every child gets a unique result they made themselves, which means every sheet is worth taking home.

22. Sort the Sweets by Colour
The sheet shows five large coloured sorting circles arranged across the page, each one labelled with a colour: red, orange, yellow, green, purple. Scattered across the top of the sheet are cartoon drawings of twenty mixed sweets in those five colours.
Children draw a line from each sweet to the matching colour circle, or cut out the sweet pictures and glue them into the right circle if scissors are available.
Print one copy per child. For the draw-a-line version, a pencil is enough. For the cut-and-glue version, add scissors and a glue stick per child.
The activity takes five to ten minutes and works well as an early activity while children are still arriving and settling in. The answer key prints at the foot of the sheet for the host to check against if needed.
Sweets that sit between two colours, a red-orange lollipop for example, cause debate every time. Solve this before starting by declaring one official colour for each borderline sweet on the sheet, printed small beside it, so the sheet itself settles the argument. The answer key confirms those decisions.
For under-4s, reduce to three colours and ten sweets so the task stays achievable in one sitting.

23. Trace and Write the Halloween Words
The sheet has eight Halloween words arranged in rows: GHOST, WITCH, BAT, SPIDER, PUMPKIN, CAULDRON, MOON and BONES. Each word appears twice: once in large dotted trace letters and once as a blank writing line beside it where children write the word independently from memory. A small cartoon illustration sits beside each word to anchor the meaning visually.
Print one copy per child. A pencil is the right tool for tracing and writing, though a thin marker works for older children who have moved past pencil-grip development. The sheet takes ten to fifteen minutes to complete in full. It builds letter formation and Halloween vocabulary simultaneously without feeling like a spelling test.
Children who are not yet writing independently can trace both columns instead of writing freely in the second. The sheet works for both: tracers use the dotted column and then trace the blank line freehand, writers use the dotted column for reference and write independently in the second. No one needs to know which version they are doing.
- Ages 4 to 7 as a main activity
- Works as a calming task after something loud and energetic

24. The Craft Box With Card, Glue and Googly Eyes
Set out a box of craft supplies in the centre of the table: sheets of coloured card in orange, black, white and green, a pot of googly eyes in various sizes, glue sticks, safety scissors, black markers and scraps of yarn or tissue paper.
Children pick up materials and make whatever Halloween creature they want: a ghost from white card and googly eyes, a pumpkin from orange card with a marker face, a spider from black card with yarn legs.
No printing needed. The craft box is the activity and it runs itself once the materials are out. Allow at least twenty minutes, and expect most children to make two or three things once they get going. This works particularly well at the end of a party when energy levels have dropped and children need something calm and absorbing.
Googly eyes disappear under tables at a rate that defies physics. Put a tray or baking sheet under the craft materials so rolling items are caught. Keep a second pot of eyes in reserve and do not put everything out at once: refilling halfway through feels like a bonus and keeps enthusiasm up rather than creating an end-of-supplies slump.
- Coloured card in orange, black, white, green
- Googly eyes, various sizes
- Glue sticks and safety scissors
- Black markers and tissue paper scraps
🛍 Shopping guide
Frequently Asked Questions
What halloween activities for kids work without any preparation?
Ghost bowling with paper cups, the costume parade, apple bobbing and the craft box need no printing and minimal setup. The sensory bin takes five minutes to fill. These are the activities to lean on when time is short.
Which printable sheets are suitable for children under four?
Colour by Number Pumpkin, Dot Marker Ghosts and Trace the Spider Web all work for three-year-olds with adult support. Cut-and-glue sheets are better with pre-cut pieces for that age group, leaving only the gluing stage.
How many sheets should be printed per child versus shared?
Print one copy per child for: Colour by Number Pumpkin, Cut and Glue the Skeleton, Trace the Spider Web, Follow the Line, Roll and Cover the Pumpkin, Dot Marker Ghosts, Cut Out Paper Puzzle, Build a Paper Lantern, Draw the Rest of the Monster, Trace and Write the Halloween Words, Match the Shadow to the Costume and Finish the Pattern.
The counting, I Spy, Spot the Difference and Sort the Sweets sheets can be shared between two children or printed per child if the budget allows.
What is the best order to run these halloween activities for kids at a party?
Start with a quiet printable like Colour by Number while children arrive. Move to something active like Ghost Bowling once the group is settled. Alternate between physical and seated activities throughout, and save messy crafts like Pumpkin Painting and the Craft Box for the final third of the party.
Can these activities work in a classroom as well as a home party?
Every activity here was designed with both settings in mind. The printable sheets work at individual desks, the active games need only a small clear space, and the no-print activities need a flat table and basic supplies. The only exception is Apple Bobbing, which needs outdoor space and supervision, so swap it for the Sensory Bin in a classroom setting.
Do children need to be able to read to do the printable sheets?
Most sheets are visual tasks: counting, tracing, matching shadows, colouring by number. The Halloween Words handwriting sheet is the only one that requires letter recognition, and even that sheet uses dotted trace letters so pre-readers can participate by tracing rather than writing independently.
Halloween party activities for kids that run in parallel, no queues. Eleven free printables plus nin
14 freehand-painted DIY Halloween doormats you can finish in one afternoon, using acrylic paint, ste

Boo basket ideas for boyfriends that feel personal and intentional: gourmet snacks, grooming picks,
Leave a Reply