


Candy is the cheapest decoration in the house, and the most forgiving: nobody checks the glue lines on a gumdrop tree the way they check a hand-painted sign. These fifteen projects turn the stuff already sitting in the pantry bowl into ornaments, centerpieces and party favors, and every one of them survives an evening of small hands and sticky fingers.
Pick two or three rather than all fifteen: a wreath for the door, an ornament for the tree, something small at each place setting. If the whole table needs filling, the wider Christmas crafts round-up covers the non-candy side of the room.
This post contains affiliate links. If you buy through them, I may earn a small commission at no extra cost to you.
- Candy Cane Reindeer Ornaments
- Peppermint Mint Wreath
- Gumdrop Christmas Tree Centerpiece
- M&M Fillable Ornaments
- Candy Cane Sleigh
- Hershey Kiss Wreath Ornaments
- Melted Life Savers Stained Glass Ornaments
- Candy Button Picture Frame
- Peppermint Bark Resin Coasters
- Jelly Bean Mosaic Ornament
- Candy Cane Heart Ornaments
- Gumdrop Pomander Ball
- Candy Snow Globe Jar
- Starlight Mint Place Card Holders
- Candy Cane Mouse Ornament
- Frequently Asked Questions
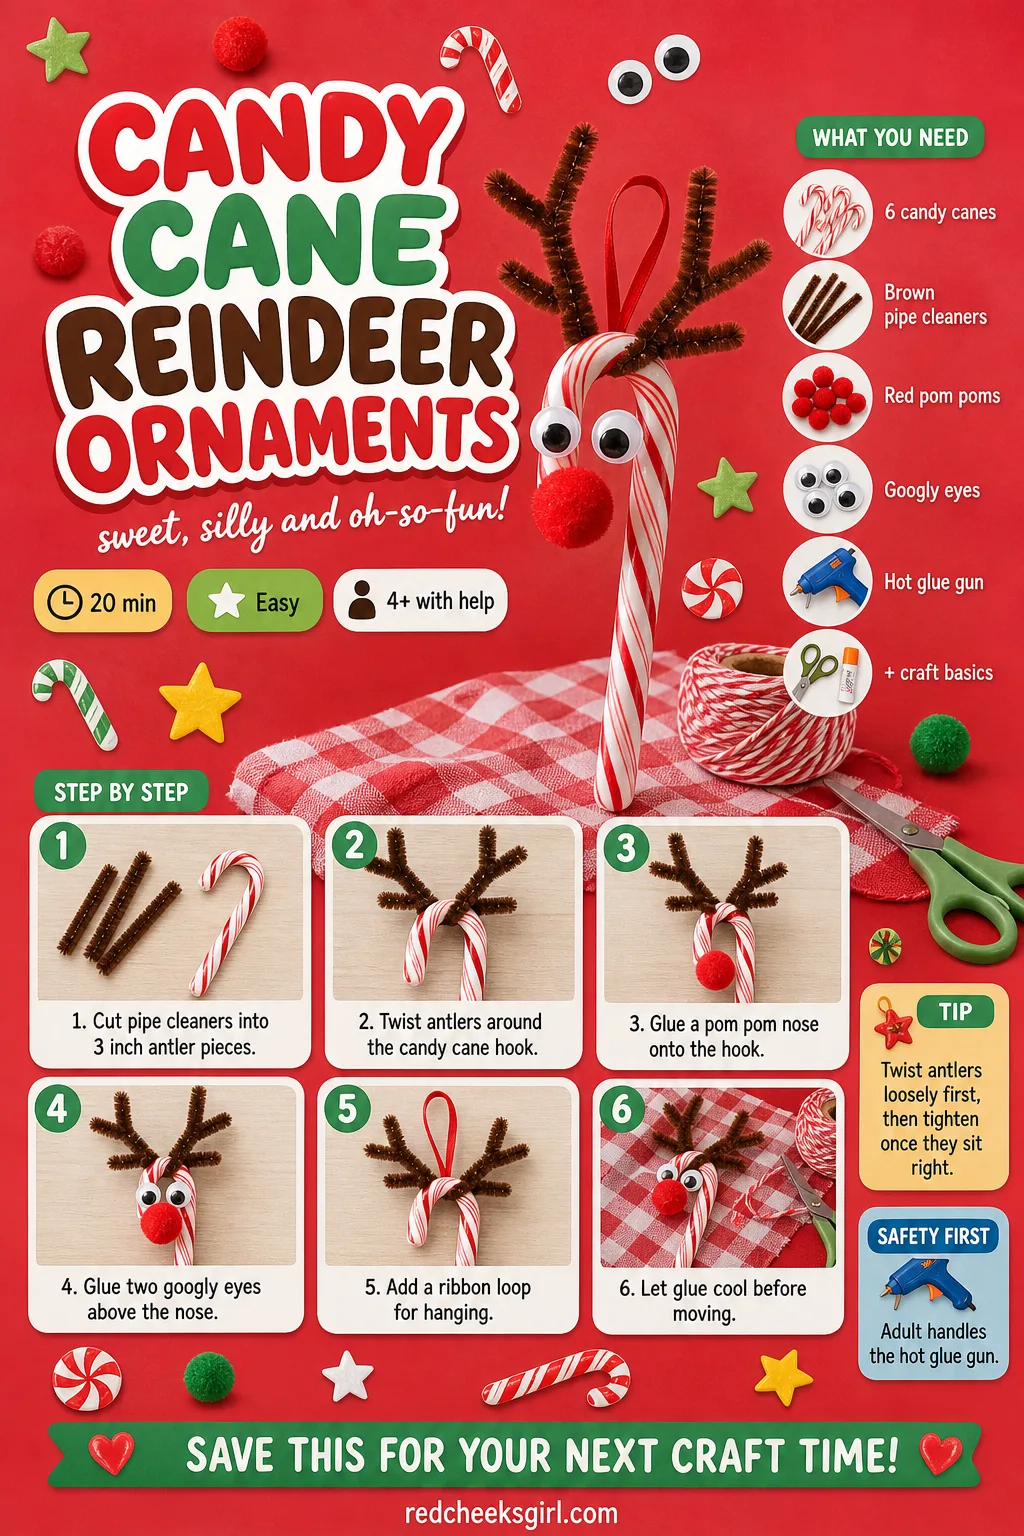
Candy Cane Reindeer Ornaments
A plain candy cane looks like a shop shelf. Two pipe cleaner antlers and a red pom pom nose and it looks like Rudolph took a wrong turn onto your tree. These take fifteen minutes, cost almost nothing, and double as place settings if you skip the hanging loop.
What You Need
- 6 candy canes, standard size
- 6 brown pipe cleaners, 6 inches, cut in half
- 12 red pom poms, 10mm
- 24 googly eyes, 8mm
- Hot glue gun
- Narrow ribbon, 12 inches, for hanging (optional)
How to Make It
- Cut each pipe cleaner in half to make two 3 inch antler pieces.
- Twist each pair around the curved hook of the candy cane so they sit like antlers.
- An adult dabs hot glue on the back of a pom pom and presses it onto the cane for the nose.
- Glue two googly eyes just above the nose.
- Tie a small ribbon loop around the hook if the reindeer is going on the tree, or leave it straight for a place setting.
- Let the glue cool fully, about 5 minutes, before moving them.
Peppermint Mint Wreath
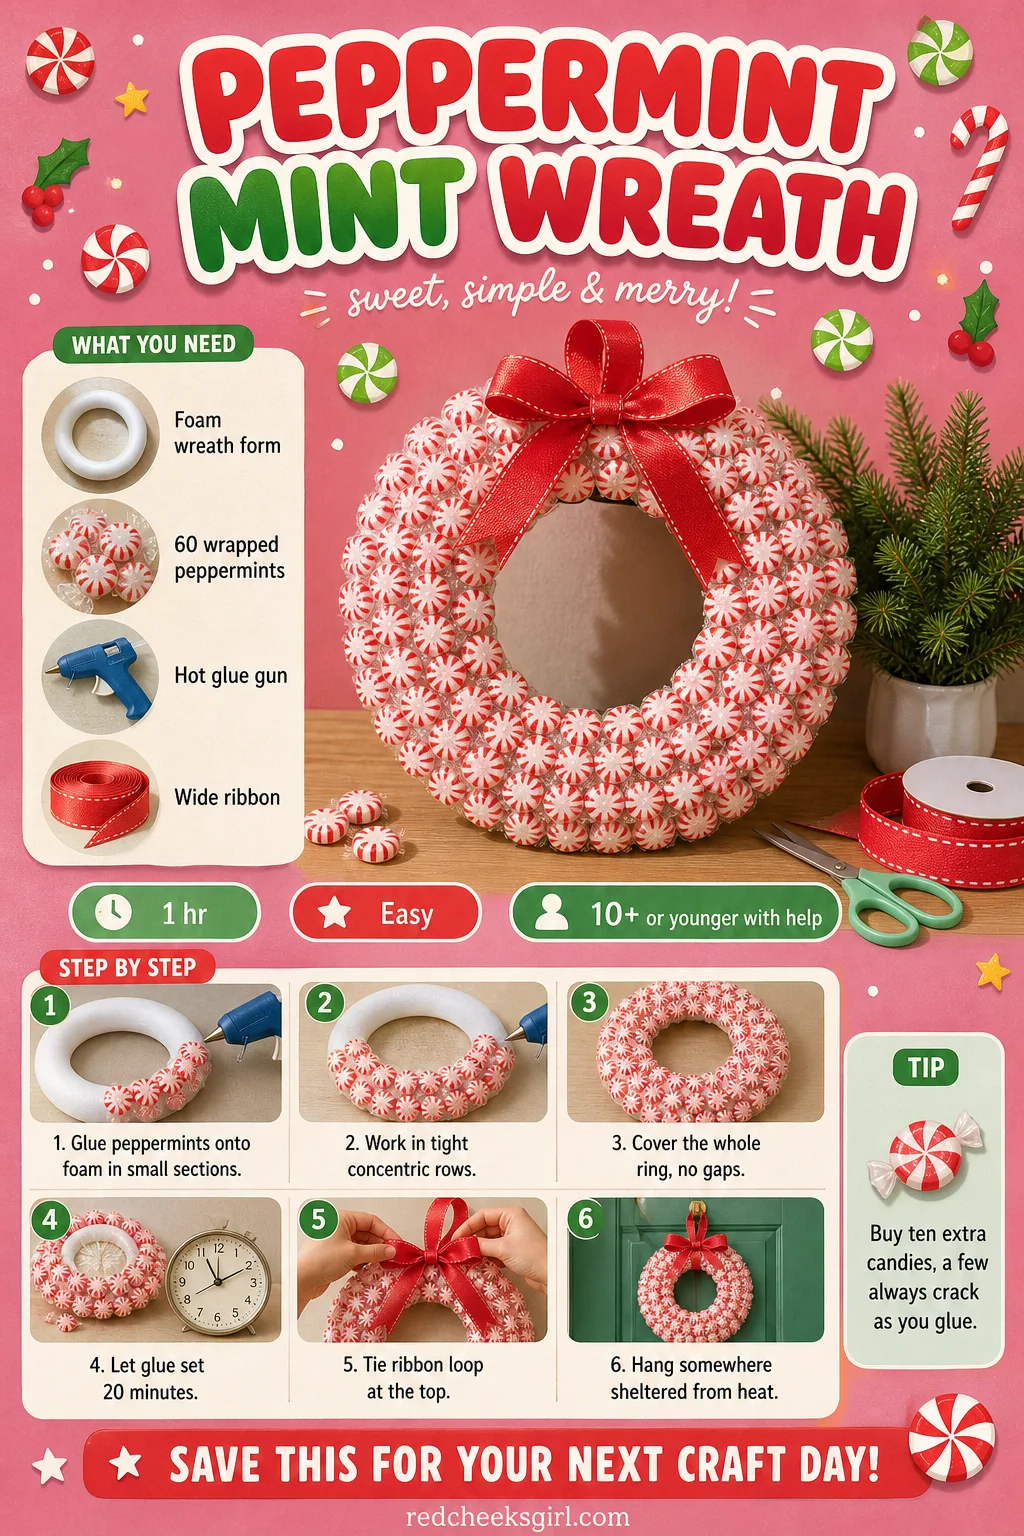
This is the wreath that makes people stop on the porch and say “wait, are those real peppermints.” They are, and they stay wrapped, which means the whole thing survives being touched at a party and still looks sharp next year if you store it flat in a box lid.
What You Need
- 1 foam wreath form, 12 inches
- About 60 wrapped peppermint candies, standard starlight size
- Hot glue gun
- Wide ribbon, 2 inches wide by 36 inches, for the bow and hanger
How to Make It
- Working in one small section at a time, run a bead of hot glue onto the foam and press a peppermint in, wrapper and all.
- Keep adding candies in tight concentric rows so no bare foam shows through.
- Work all the way around the ring until the whole form is covered.
- Let the glue set fully, about 20 minutes, before you lift it.
- Tie the wide ribbon into a loop at the top for hanging, with a loose bow left hanging down.
- Hang indoors or somewhere sheltered: heat and damp soften the wrappers over time.
🛍 Shopping guide
Gumdrop Christmas Tree Centerpiece
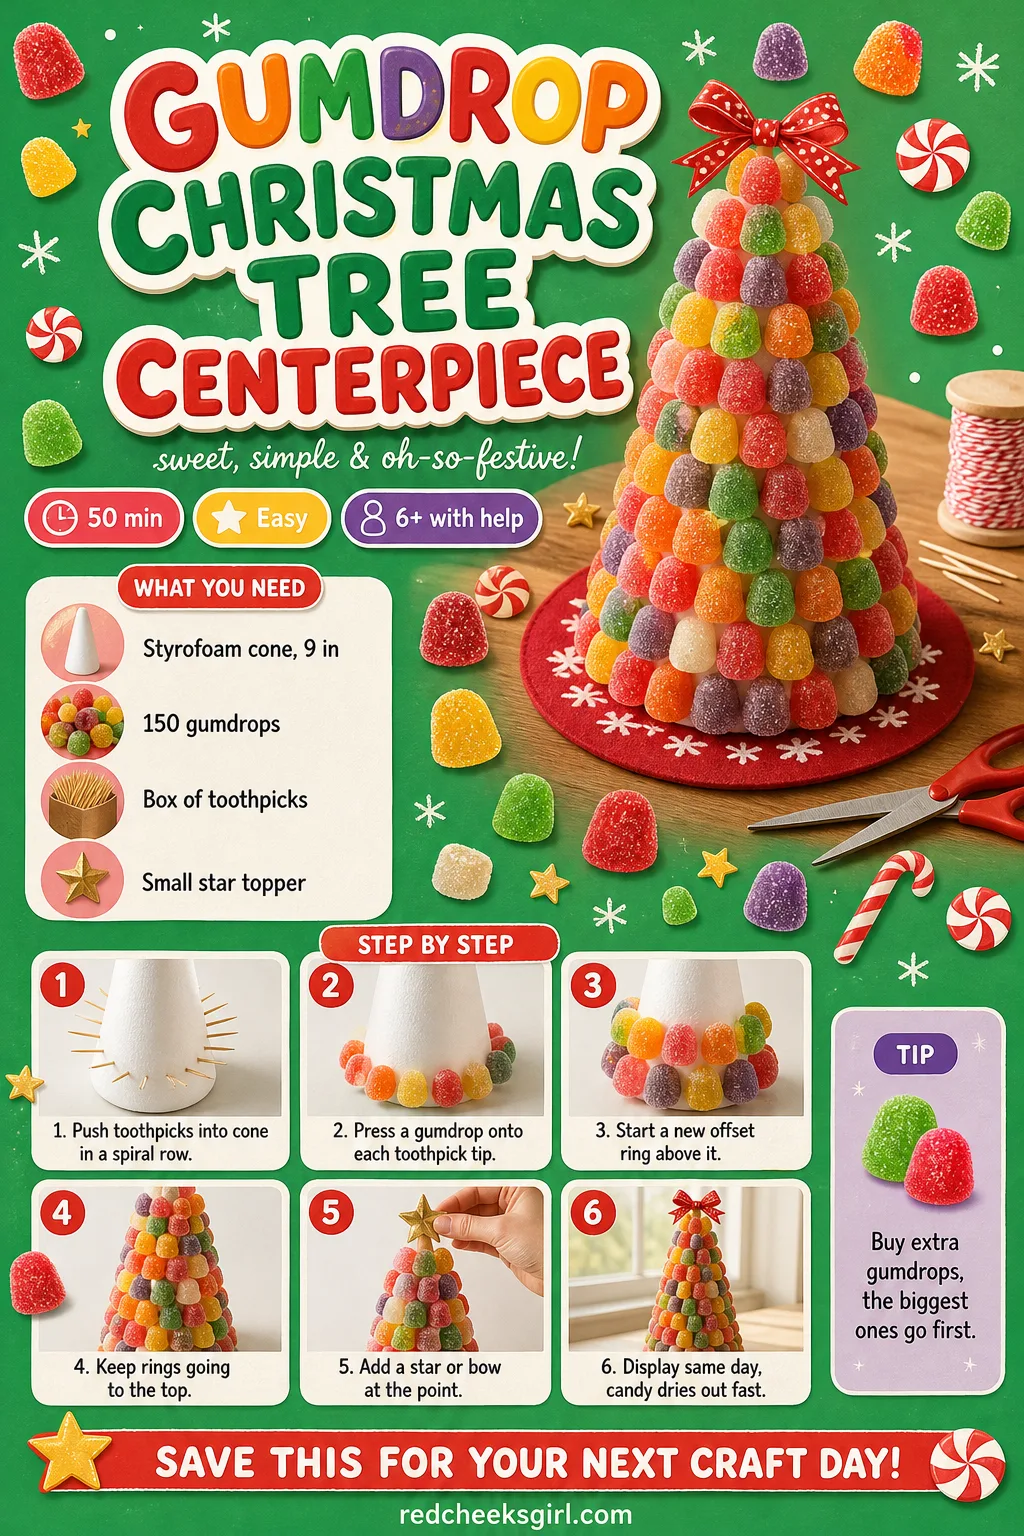
If the table needs one loud, cheerful object and nothing else, this is it. A cone studded solid with spice drops reads as a proper centerpiece from across the room, and it costs about as much as a bag of candy and a block of foam.
What You Need
- 1 styrofoam cone, 9 inches tall
- About 150 spice-drop gumdrops, mixed colors
- 1 box wooden toothpicks, 3 inches (about 150 needed)
- 1 small star or bow for the top
How to Make It
- Starting at the base, push toothpicks halfway into the cone in a spiral row, leaving an even thumb-width gap between each.
- Press one gumdrop onto the exposed tip of every toothpick.
- Start a new ring just above the first, offsetting the toothpicks so gumdrops nestle between the row below.
- Keep working up and around until you reach the point of the cone.
- Top it with a small bow or star pushed into the very tip.
- Display on a cake stand and treat it as a one-event centerpiece: the gumdrops dry out and go sticky after about a week at room temperature.
🛍 Shopping guide
M&M Fillable Ornaments
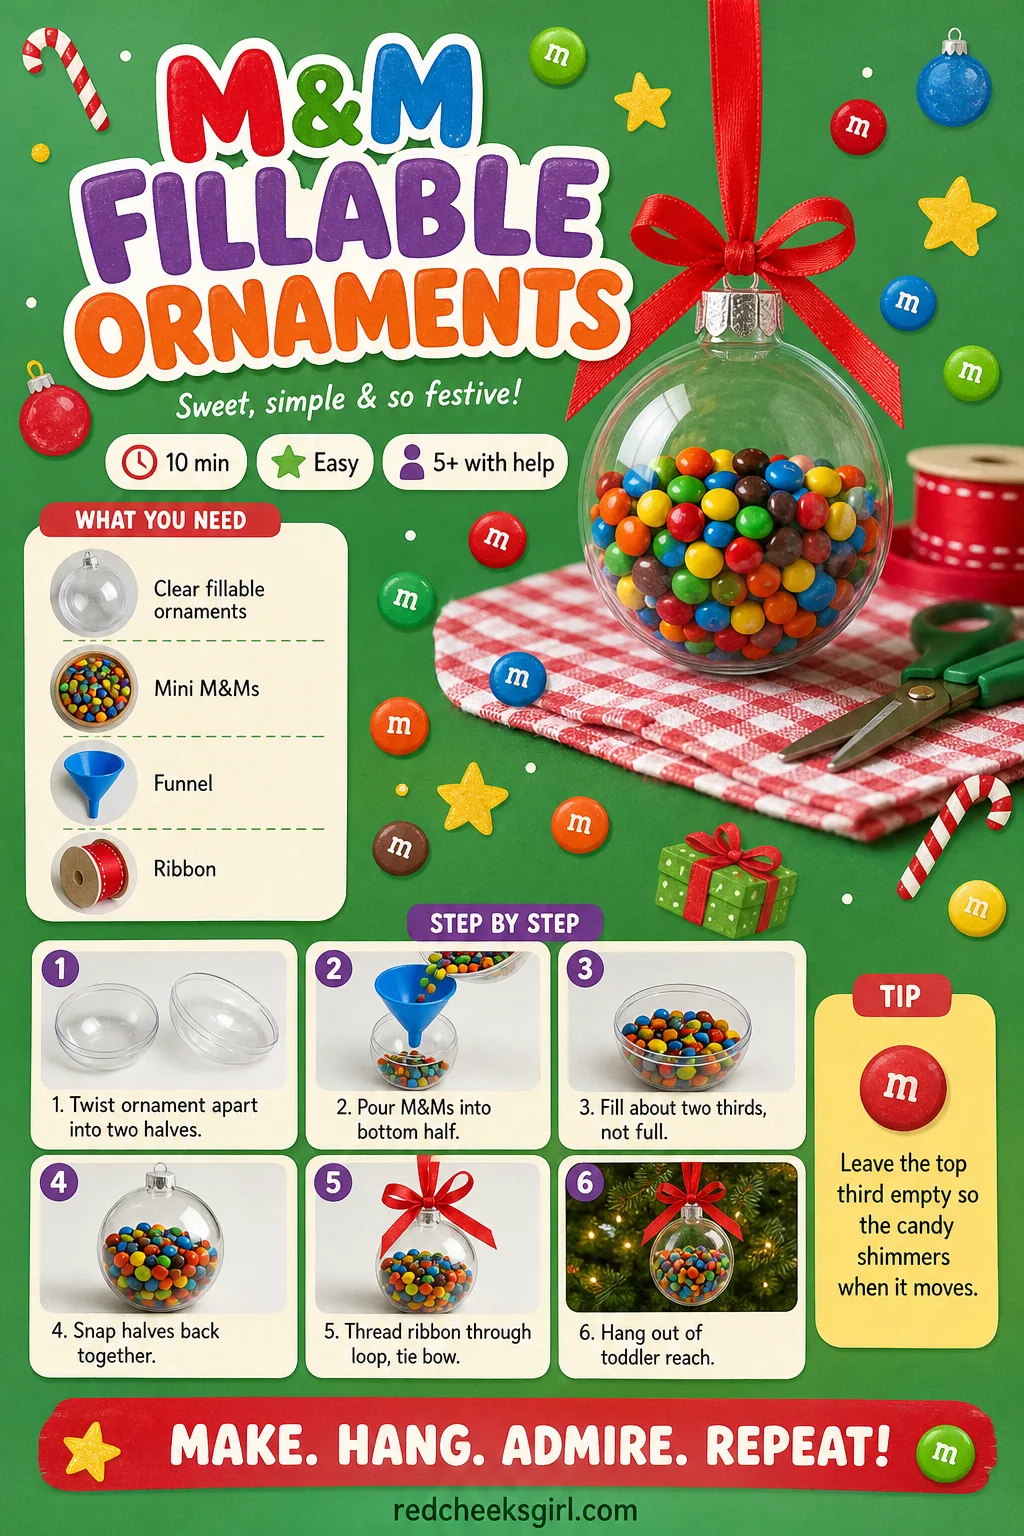
Nothing to glue, nothing to dry, and the tree gets a bauble that catches light like a jar of jewels. Twist the two halves apart, pour, twist back together, and the whole thing takes about ten minutes!
What You Need
- 6 clear fillable plastic ornament balls, 3 inches
- 2 cups mini M&Ms, or a red and green mix
- 1 small funnel or a sheet of paper rolled into a cone
- Ribbon, 12 inches per ornament, for the hanger
How to Make It
- Twist each ornament apart into its two halves.
- Use the funnel to pour M&Ms into the bottom half until it is about two thirds full, leaving room for them to shift.
- Snap the two halves firmly back together.
- Thread ribbon through the top loop and tie a bow.
- Hang on the tree somewhere a curious toddler can’t reach.
- Store the shells after the season and refill with fresh candy next year.
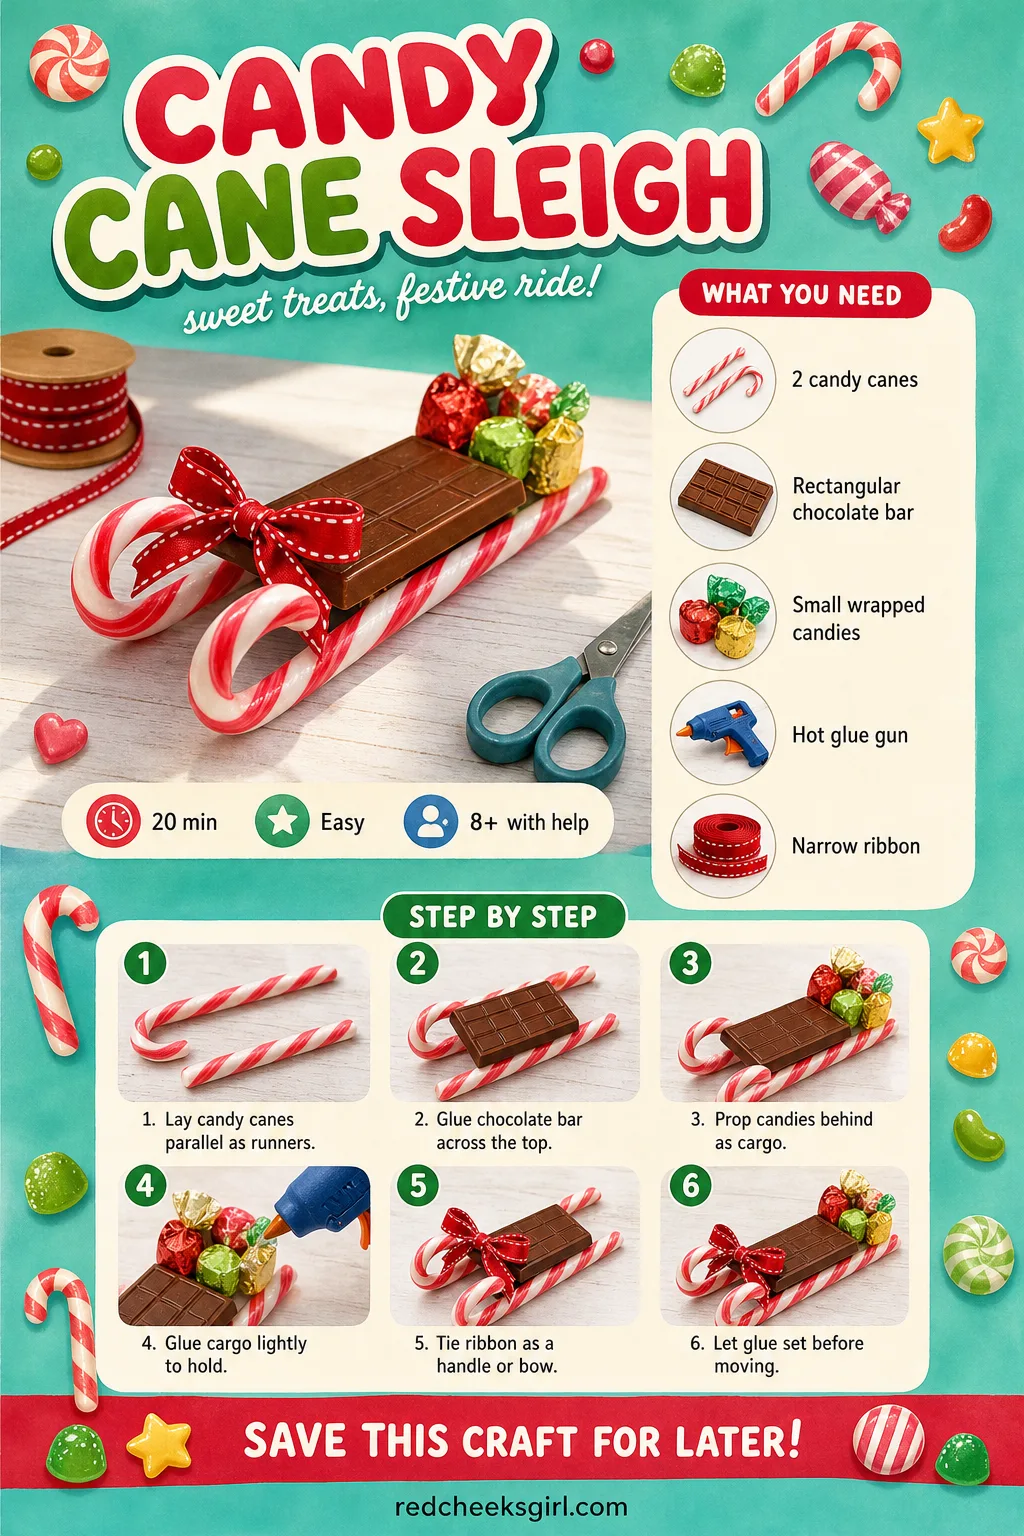
Candy Cane Sleigh
Two candy canes and a chocolate bar look like nothing until they’re lying flat with a bow tied over the top, and then they look exactly like Santa’s sleigh parked on the table. It takes fifteen minutes and works as a place card, a gift topper, or a favor by itself.
What You Need
- 2 candy canes, standard size
- 1 full-size rectangular chocolate bar, for the sleigh body
- A few small wrapped candies or gumdrops, for cargo
- Hot glue gun
- Narrow ribbon, 10 inches, for the handle or bow
How to Make It
- Lay the two candy canes parallel with the curved hooks facing the same direction, for the front of the sleigh.
- An adult runs hot glue along the top of both canes and presses the chocolate bar down across them to form the base.
- Prop a few wrapped candies or gumdrops behind the bar as cargo, with a dab of glue to hold them in place.
- Tie the ribbon across the top like a handle, or into a bow at the front.
- Let the glue set about 5 minutes before moving it.
- Use as a place setting or sit it under the tree as a small gift topper.
🛍 Shopping guide
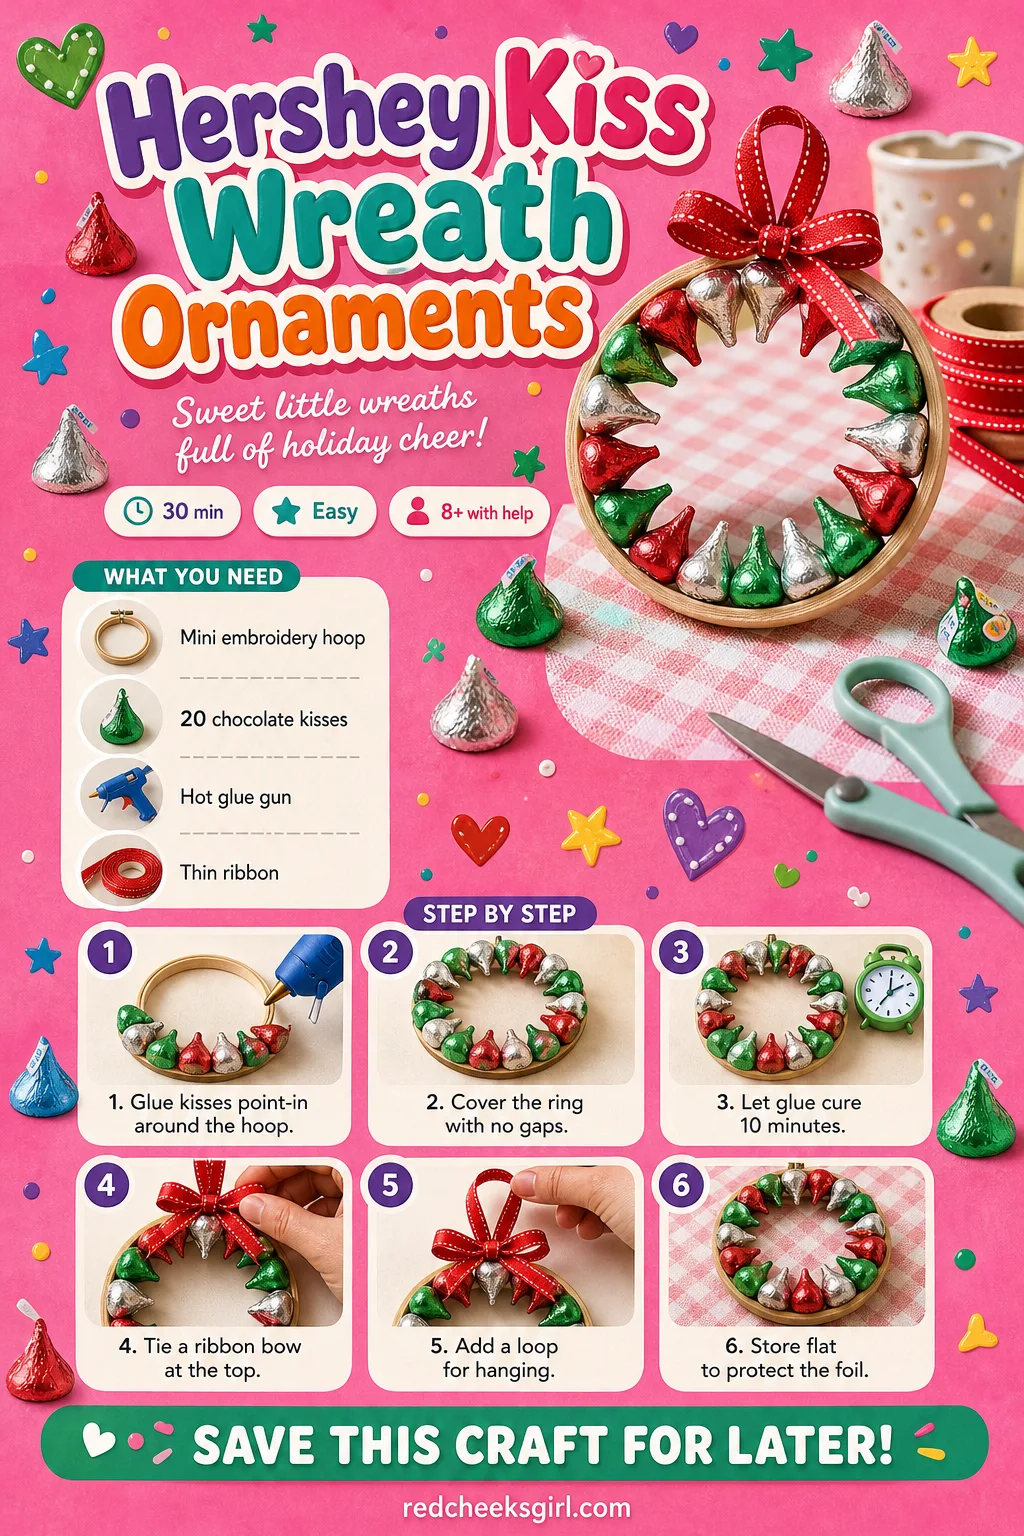
Hershey Kiss Wreath Ornaments
Scaled down for the tree rather than the door, this one rings a tiny hoop with foil kisses until the whole ring is solid silver and gold. It reads as fussy and actually takes twenty minutes, most of which is just lining candies up in a circle.
What You Need
- 1 mini embroidery hoop, 3 inches (or a ring cut from cardboard)
- About 20 foil-wrapped chocolate kisses
- Hot glue gun
- Thin ribbon, 8 inches, for a hanging bow
How to Make It
- An adult hot glues the kisses point-side-in around the ring, touching each other all the way round.
- Keep adding kisses until there are no gaps and the ring looks fully covered.
- Let the glue cure for 10 minutes so nothing shifts.
- Tie a small ribbon bow at the top of the ring.
- Add a loop of ribbon behind the bow for hanging.
- Hang on the tree or a door knob, and store flat between seasons to protect the foil.
🛍 Shopping guide
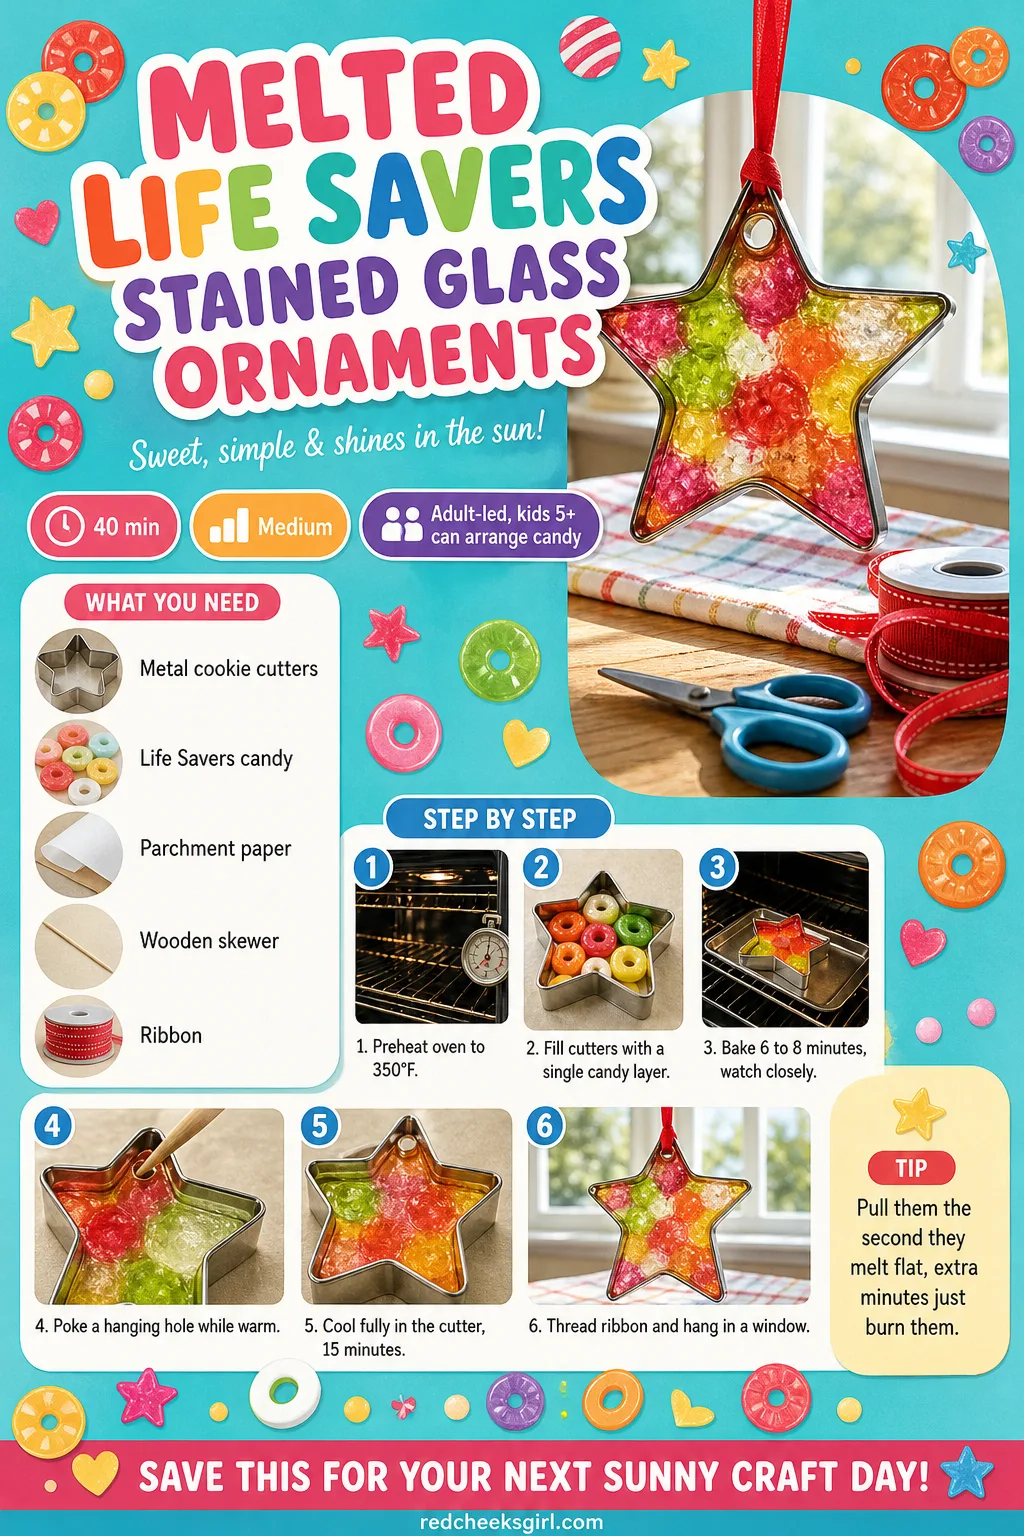
Melted Life Savers Stained Glass Ornaments
This is the one that looks like it needed a kiln. It didn’t, just an oven and a cookie cutter, and the result is a disc of real stained glass colour that a window light turns properly gorgeous. This step is adult-only: hot sugar burns fast and badly.
What You Need
- Metal cookie cutters, 3 to 4 inches, star or wreath shapes
- About 30 Life Savers hard candies, same or mixed colors
- Parchment paper
- A wooden skewer, for the hanging hole
- Ribbon, 6 inches per ornament, for hanging
How to Make It
- Preheat the oven to 350°F (175°C) and line a baking sheet with parchment paper.
- Set the cookie cutters on the sheet and fill each one with a single layer of candies, touching edges.
- An adult bakes for 6 to 8 minutes, watching closely: the candy melts fast and burns just as fast.
- While the tray is still warm, an adult uses the skewer to poke a hole near one edge for the ribbon.
- Let the ornaments cool completely in the cutters, about 15 minutes, before lifting them out.
- Thread ribbon through the hole and hang where light will pass through, and keep them somewhere cool and dry since they soften again in heat.
🛍 Shopping guide
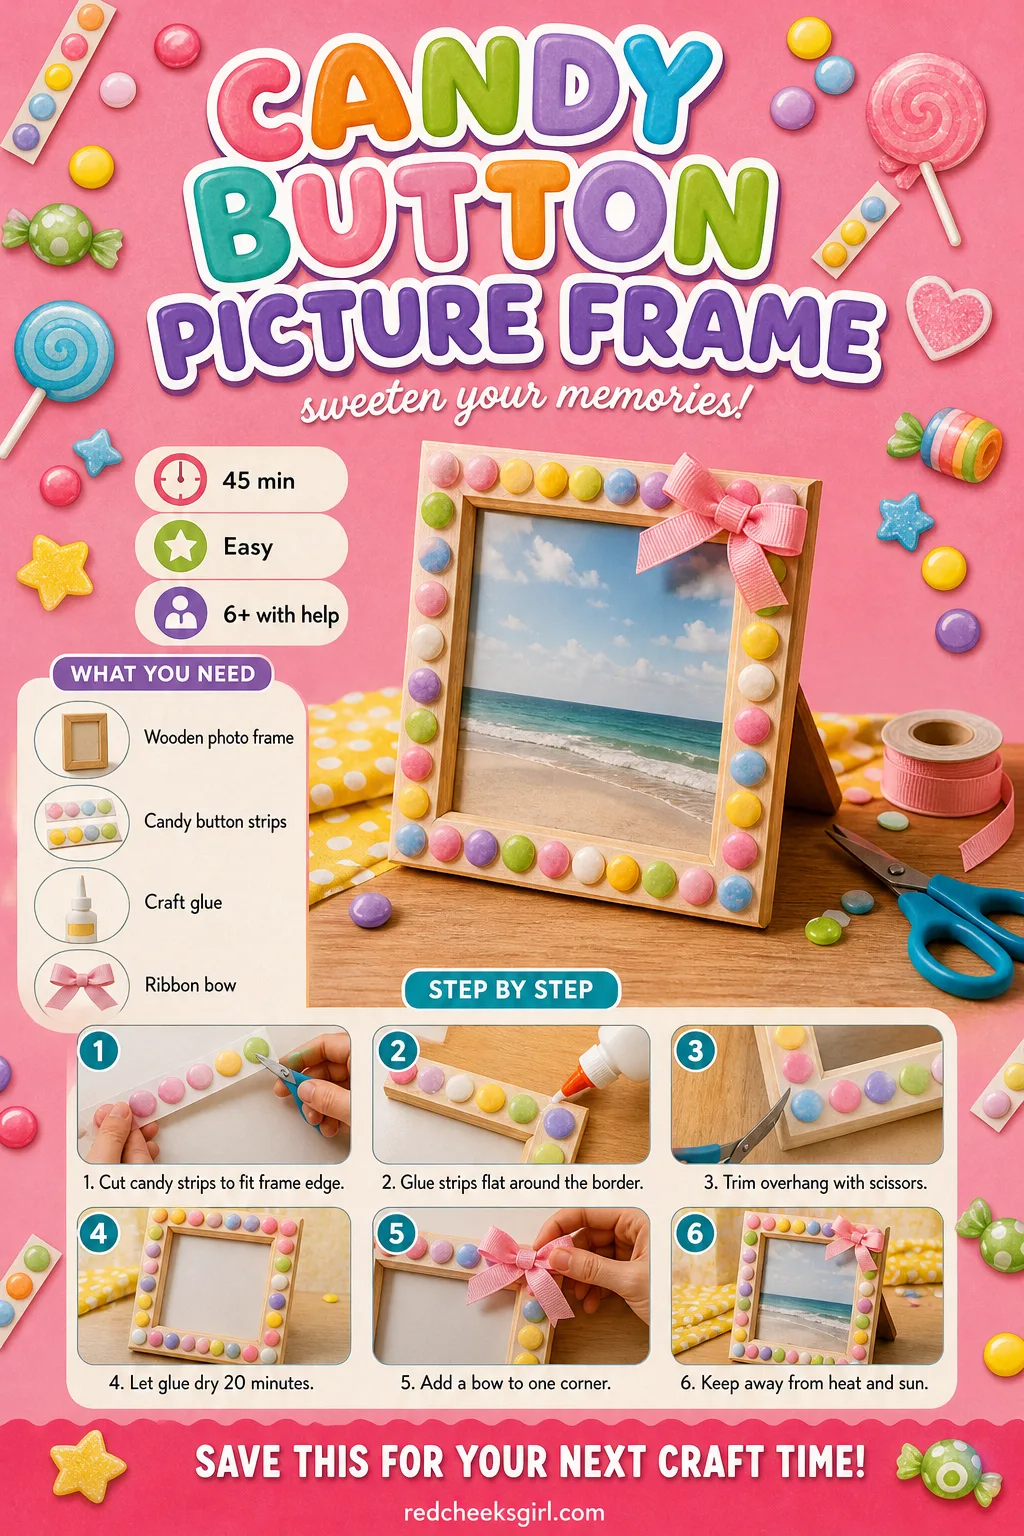
Candy Button Picture Frame
Those paper strips of pastel candy buttons from the checkout aisle turn into a frame edge that looks like confetti under glass. It is cheap, it is fast, and it gives you something for a classroom gift exchange that nobody else will be bringing.
What You Need
- 1 wooden photo frame, 4×6 inches, flat front edge
- 4 strips candy buttons on paper
- Craft glue or hot glue gun
- 1 small ribbon bow, for a corner accent (optional)
How to Make It
- Cut the candy button strips to length so they fit the front edge of the frame.
- Glue the strips flat around the frame’s border, overlapping the corners so no wood shows through.
- An adult trims any overhanging paper with scissors for a clean edge.
- Let the glue dry fully, about 20 minutes, before inserting a photo.
- Add the small bow to one corner if you want it.
- Keep the finished frame away from heat vents and direct sun, which soften the candy over time.
🛍 Shopping guide
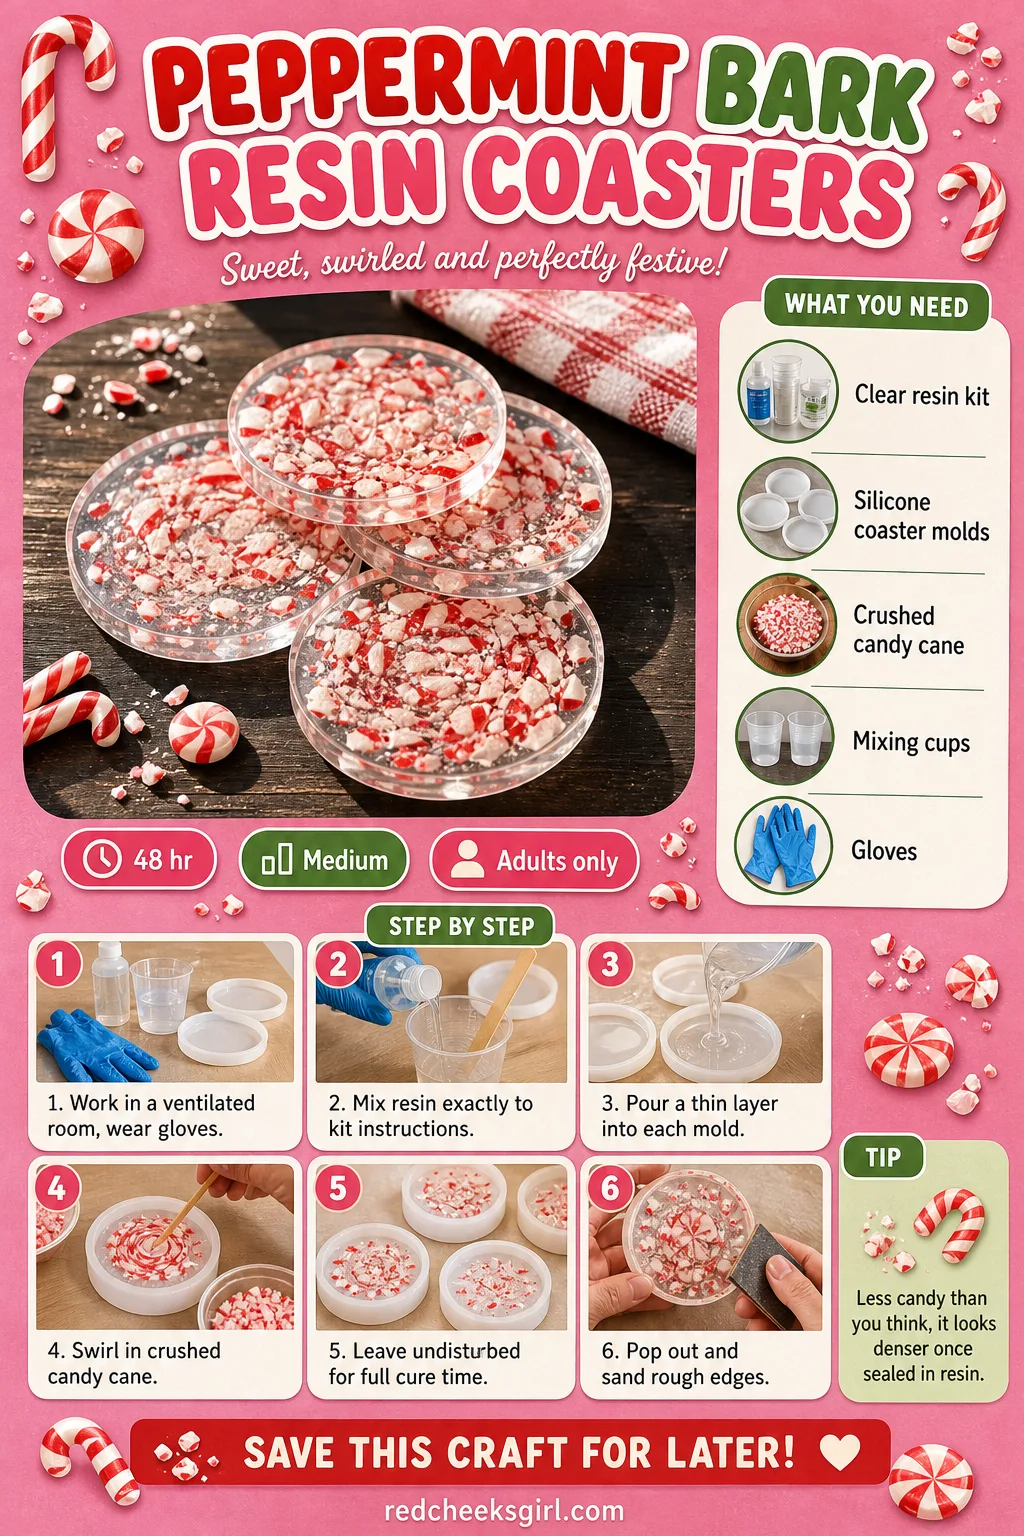
Peppermint Bark Resin Coasters
If your bar cart needs one thing that looks bought rather than made, it’s this: crushed candy cane swirled into clear resin, so the colour reads like real peppermint bark under glass. This one is adult territory, between the chemicals and the two-day cure, so pair it with the Christmas crafts for adults for a grown-up crafting evening.
What You Need
- 1 clear casting resin kit, enough for four 4 inch coasters
- 1 set silicone coaster molds, 4 inch round, 4 cavities
- Crushed candy cane pieces, about 1/2 cup, crushed small
- Mixing cups and stir sticks
- Disposable gloves
How to Make It
- Work in a well-ventilated room and put on gloves.
- Mix the resin and hardener exactly to the kit instructions, no shortcuts on timing or ratio.
- Pour a thin layer into each mold.
- Sprinkle crushed candy cane into the wet resin and swirl gently with a stir stick for a marbled peppermint-bark look.
- Leave the molds completely undisturbed and dust-free for the full cure time on the kit, usually 24 to 48 hours.
- Once fully hard, pop the coasters out and sand any rough edges lightly. The candy is sealed under resin, so admire it rather than eat it.
🛍 Shopping guide
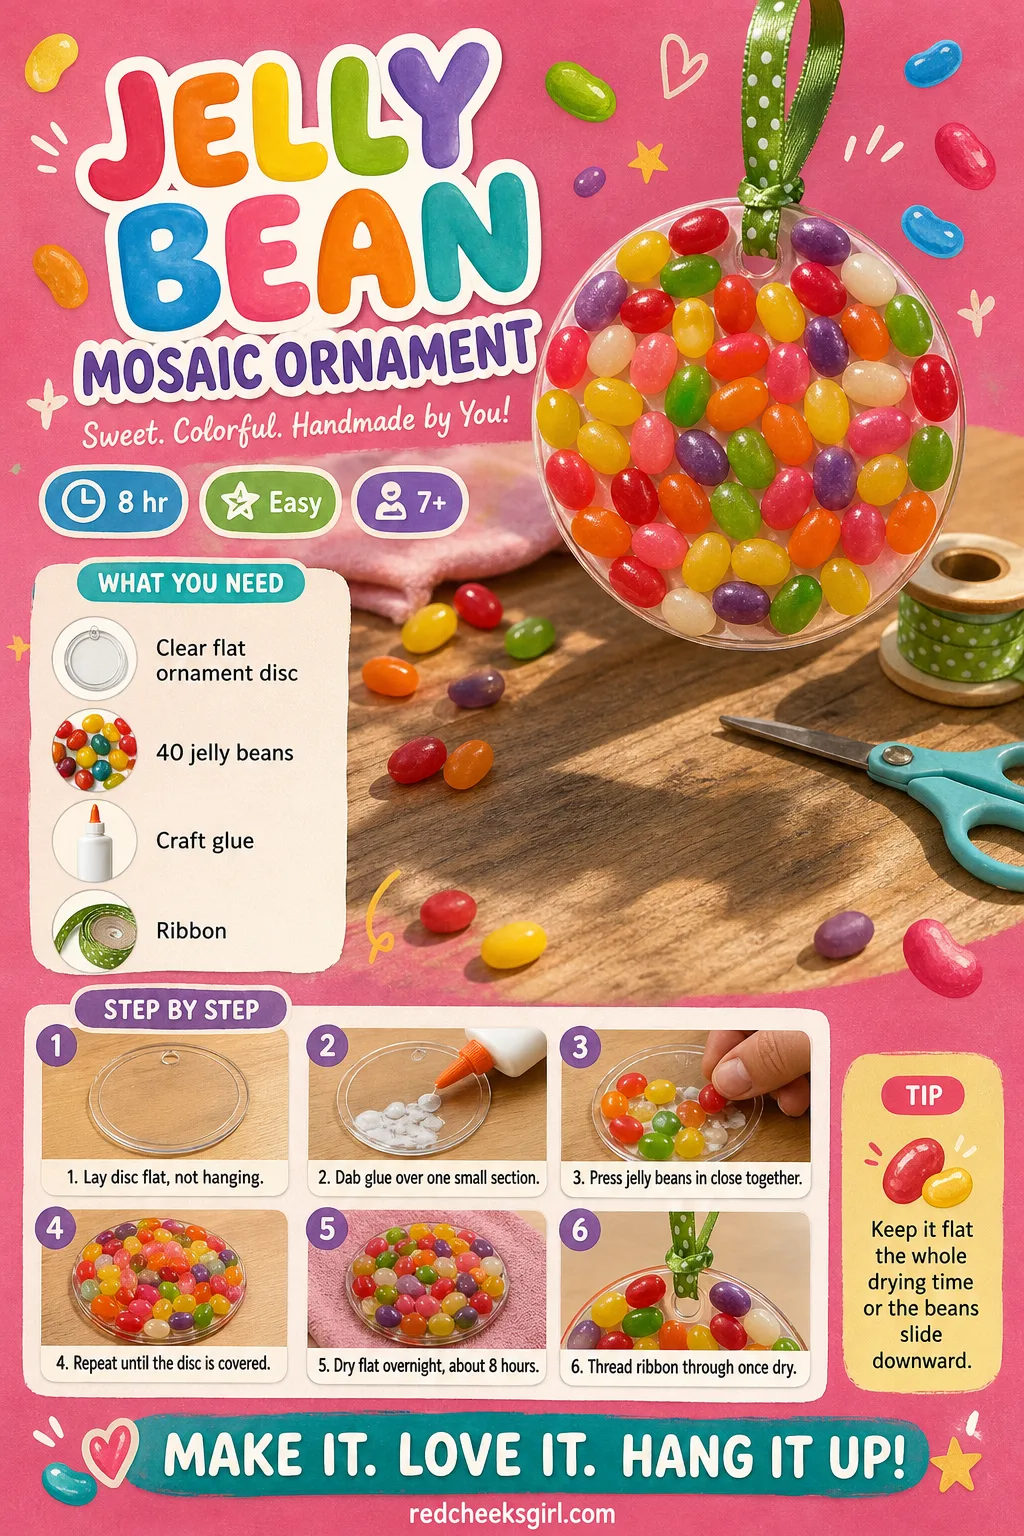
Jelly Bean Mosaic Ornament
Jelly beans glued edge to edge on a clear disc catch the light exactly like stained glass tiles, and the colour mix is entirely up to whoever is sorting the bag. It is a slow, fiddly little project, good for a quiet evening rather than a rushed one.
What You Need
- 2 clear flat plastic ornament discs, 3 inches
- About 40 jelly beans per ornament, assorted colors
- Craft glue or Mod Podge
- Ribbon, 8 inches, for a hanger
How to Make It
- Lay the ornament disc flat on your work surface, not hanging.
- Dab glue over a small section and press jelly beans in close together, like mosaic tiles.
- Work section by section around the disc until the whole front is covered with no gaps.
- Let it dry completely flat, about 8 hours or overnight, so the beans don’t slide before the glue sets.
- Once dry, loop ribbon through the top hole.
- Hang where light passes through to show the colors, and treat it as a one or two season ornament since jelly beans fade.
🛍 Shopping guide
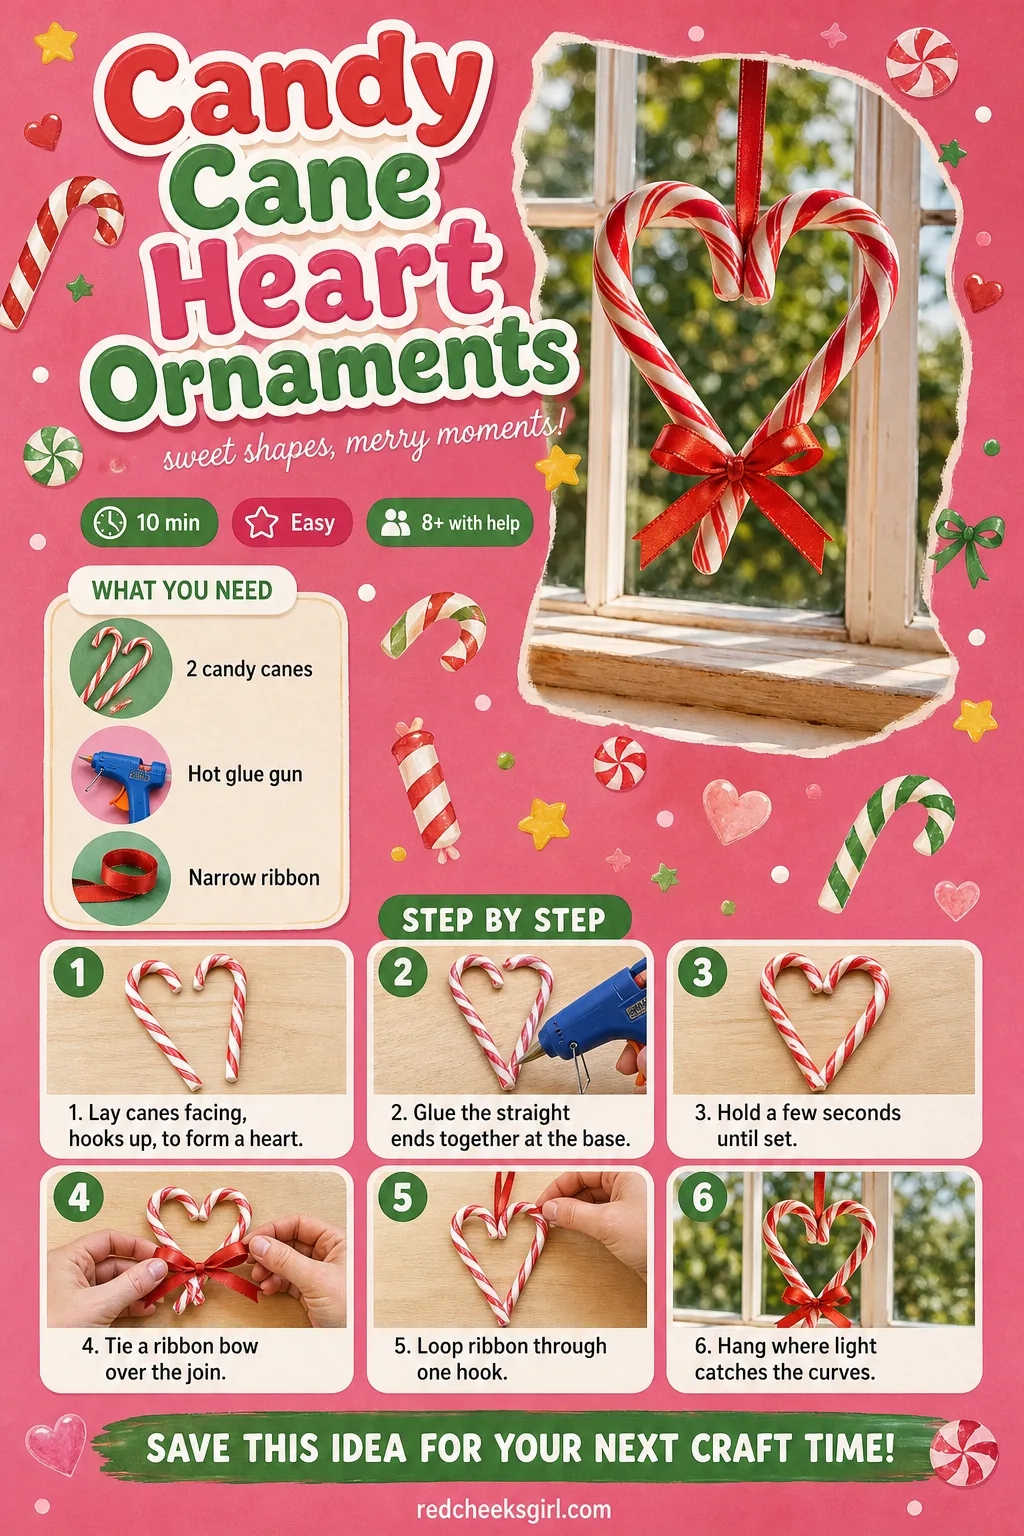
Candy Cane Heart Ornaments
Two candy canes, warmed and pressed together, bend into a heart with almost no effort, and the whole thing takes ten minutes.
What You Need
- 2 candy canes per heart, standard size
- Hot glue gun
- Narrow ribbon, 8 inches, for a hanging bow
How to Make It
- Lay the two candy canes facing each other with the curved hooks up, so the hooks form the dip at the top of a heart.
- An adult warms a dot of hot glue and presses the two straight ends together at the point where they cross at the bottom.
- Hold for a few seconds until the glue grabs.
- Tie a small ribbon bow over the joined point at the bottom.
- Loop a short piece of ribbon through one hook for hanging.
- Hang on the tree or prop in a window where the curves catch light.
🛍 Shopping guide
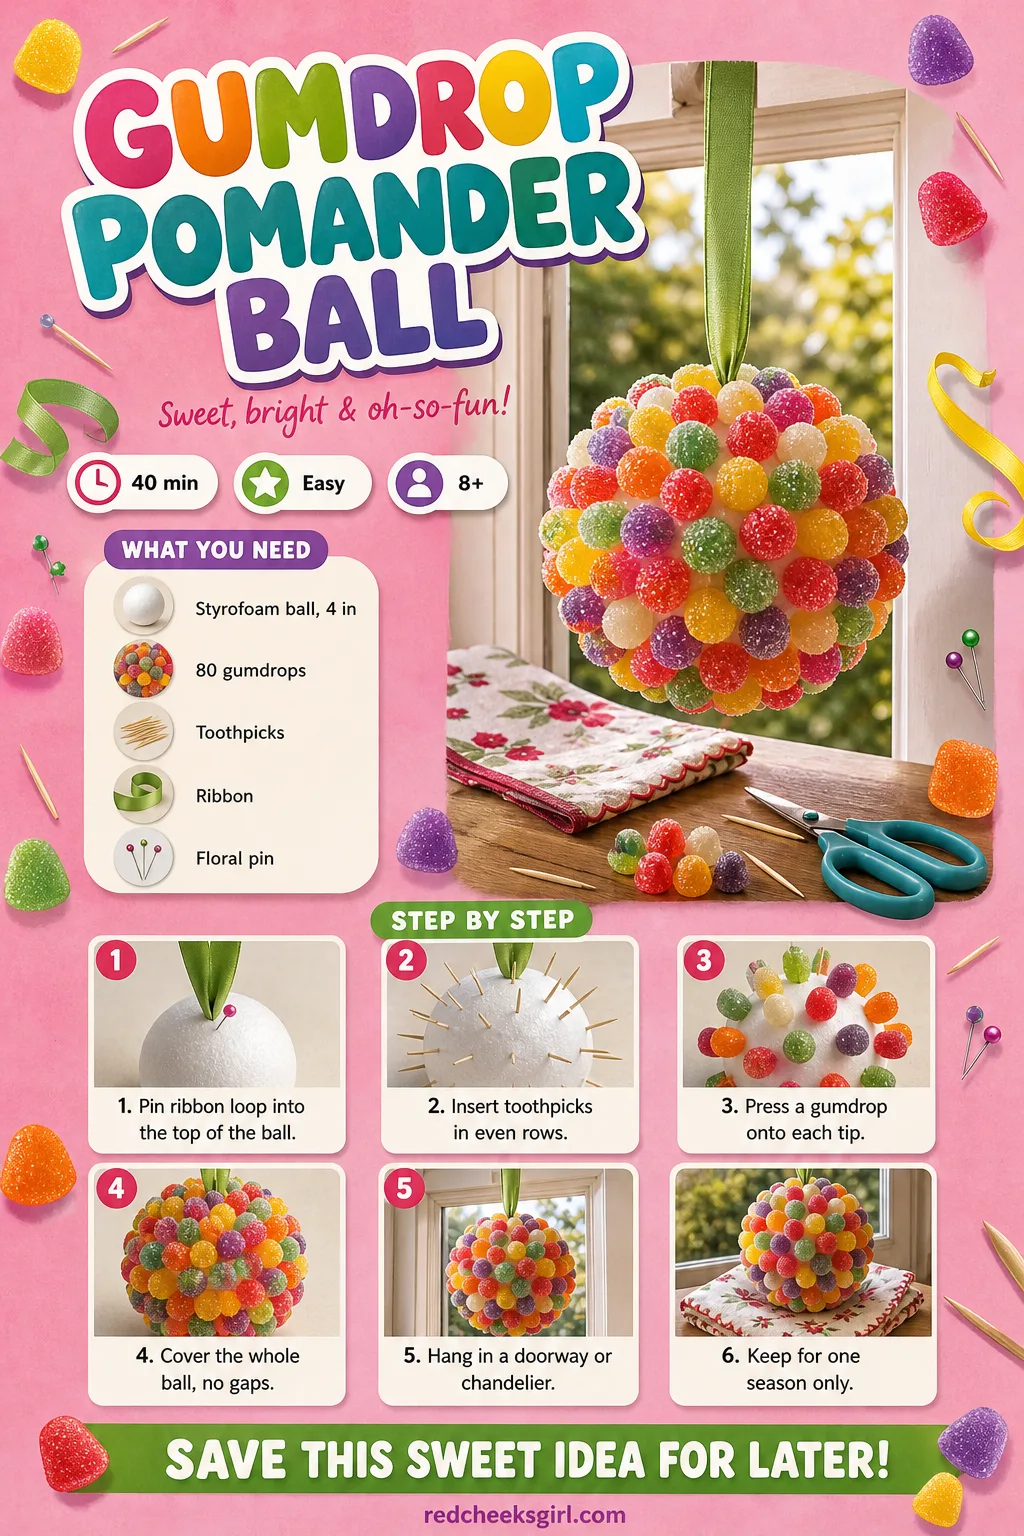
Gumdrop Pomander Ball
This is the kissing-ball shape from an old-fashioned entryway, built entirely from spice drops. Hung at eye level in a doorway or off a chandelier, it does more for the room than most things that cost ten times as much.
What You Need
- 1 styrofoam ball, 4 inches
- About 80 small gumdrops or spice drops
- 1 box wooden toothpicks, 3 inches
- Ribbon, 18 inches, for the hanging loop
- 1 floral pin, to anchor the ribbon into the foam
How to Make It
- Push the floral pin with the ribbon loop into the top of the ball first and add a dab of glue to secure it.
- Insert toothpicks around the ball in even rows, leaving the pin area clear.
- Press a gumdrop onto the tip of every toothpick.
- Keep adding rings until the whole ball is covered with no foam showing.
- Hang from a doorway, chandelier, or stair rail like a traditional kissing ball.
- Treat it as a single-season build: pulling candy off to reuse the foam usually tears the wrappers.
🛍 Shopping guide
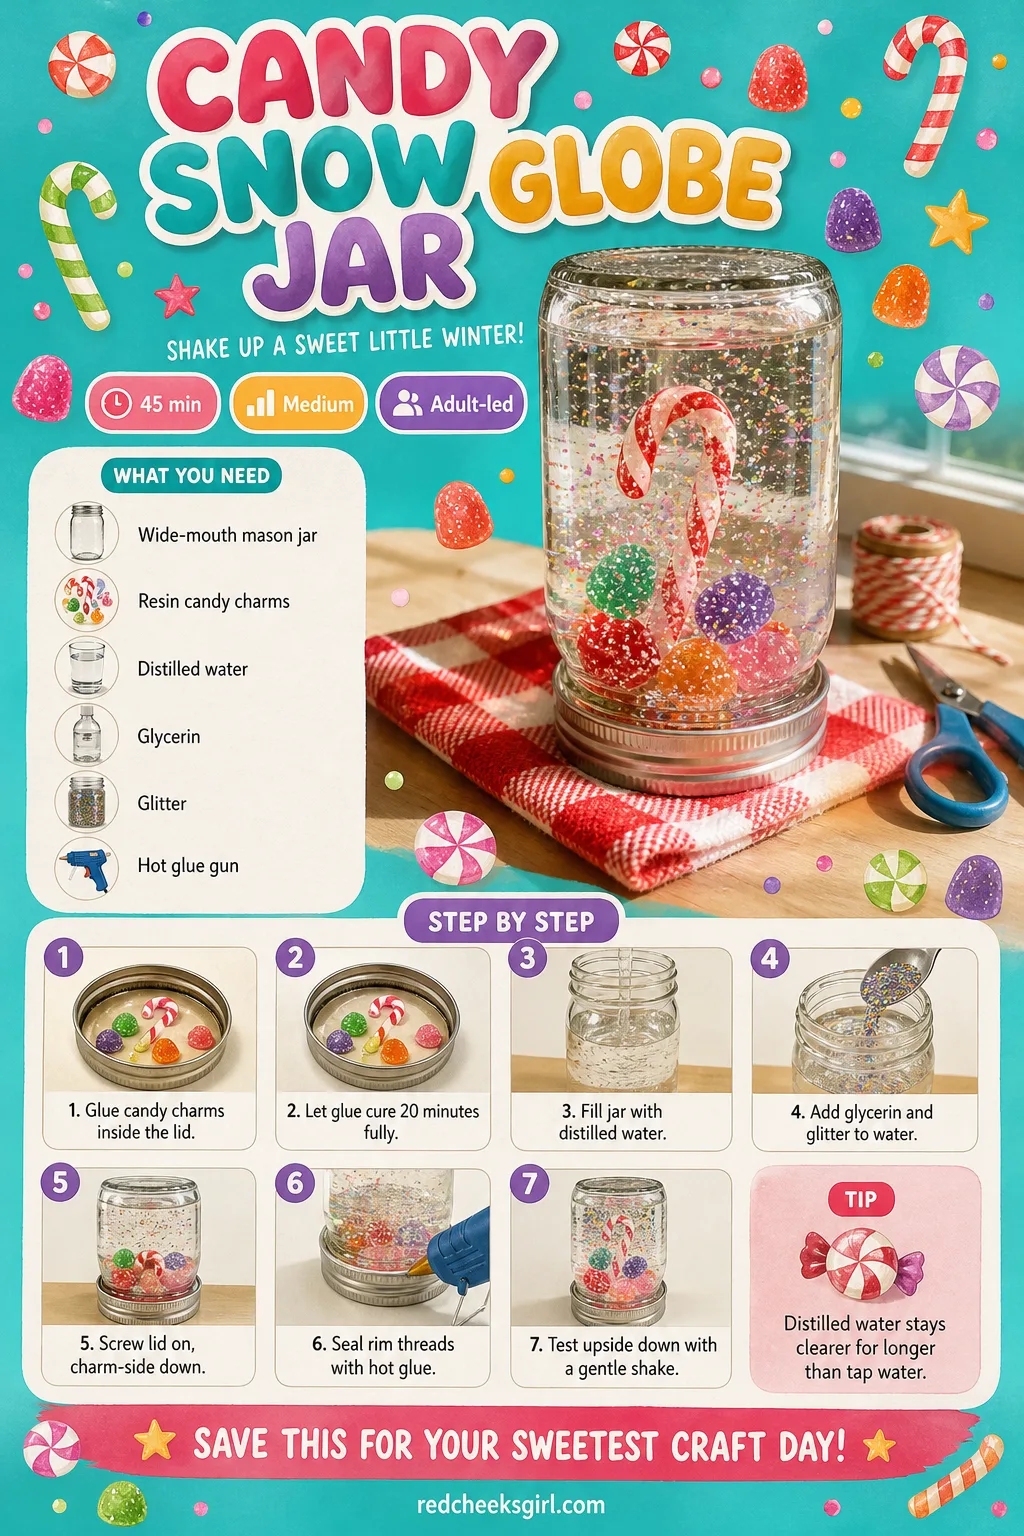
Candy Snow Globe Jar
Real candy dissolves the second it touches water, so this one uses tiny resin candy charms instead, the kind sold for jewelry and slime. The glitter settles slowly over them when you shake it, which is the entire point of a snow globe and the reason this is worth the extra fiddly step of sealing the lid.
What You Need
- 1 wide-mouth mason jar, 16 oz, with lid
- 3 to 4 miniature resin candy charms, about 1 inch (gumdrop or candy cane shapes)
- Distilled water, enough to fill the jar
- Glycerin, 1 teaspoon
- Fine iridescent glitter, 1 teaspoon
- Hot glue gun
How to Make It
- An adult glues the candy charms onto the inside of the lid in a small cluster.
- Let the glue cure fully, about 20 minutes, so nothing floats loose later.
- Fill the jar almost to the top with distilled water, leaving a small gap of air.
- Add the glycerin and glitter to the water.
- Screw the glued lid on tightly, charm-side down into the jar.
- Run a bead of hot glue around the rim threads before the final tightening to stop leaks, then turn it upside down to test and give it a gentle shake.
Starlight Mint Place Card Holders
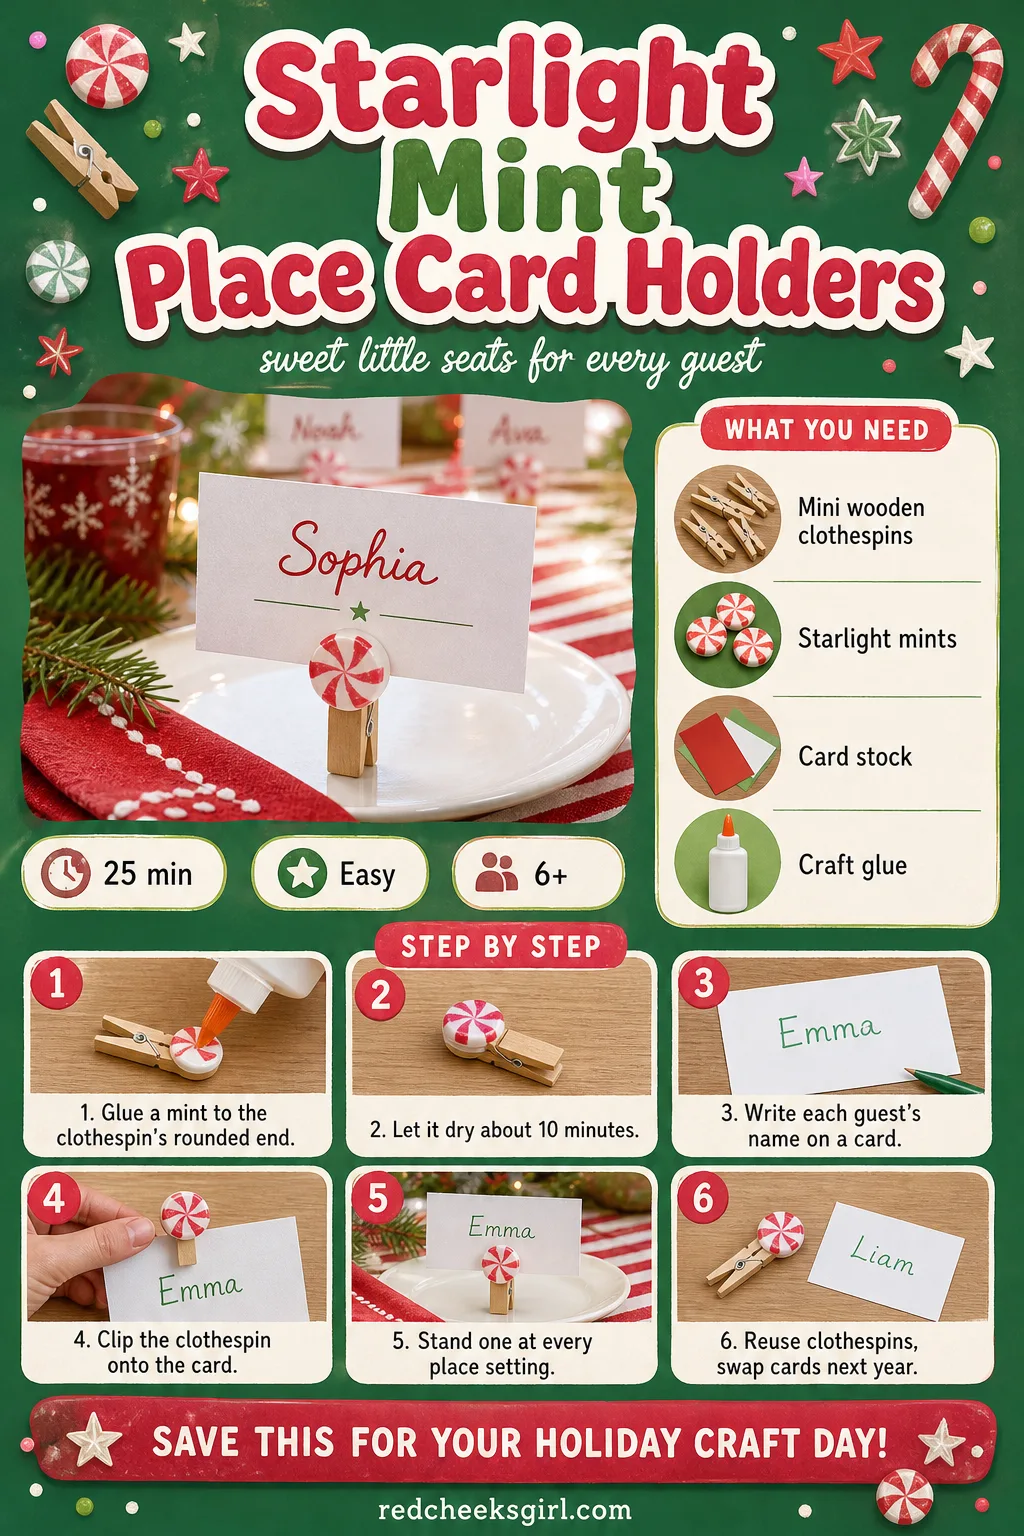
Every place at the table needs a name tag that says somebody thought about it, and a peppermint glued to a clothespin does that job for less than a dollar a guest. Clip it to the tablecloth hem if you’d rather not stand it free, and keep the clothespins for next year, just the mints get replaced. They sit well next to anything from the easy Christmas party games list if the table is doubling as game night.
What You Need
- 1 mini wooden clothespin per guest, 2 inches
- 1 starlight peppermint mint per clothespin
- Card stock, cut into 2×3 inch place-card rectangles
- Hot glue gun or craft glue
How to Make It
- Glue the flat side of a starlight mint to the rounded end of the clothespin so it peeks over like a little lollipop head.
- Let it dry about 10 minutes before handling.
- Write or print each guest’s name on a place-card rectangle.
- Clip the clothespin onto the card so it stands upright on the table.
- Set one at every place setting.
- Keep the clothespins after the party and swap in a new name card next time.
🛍 Shopping guide
Candy Cane Mouse Ornament
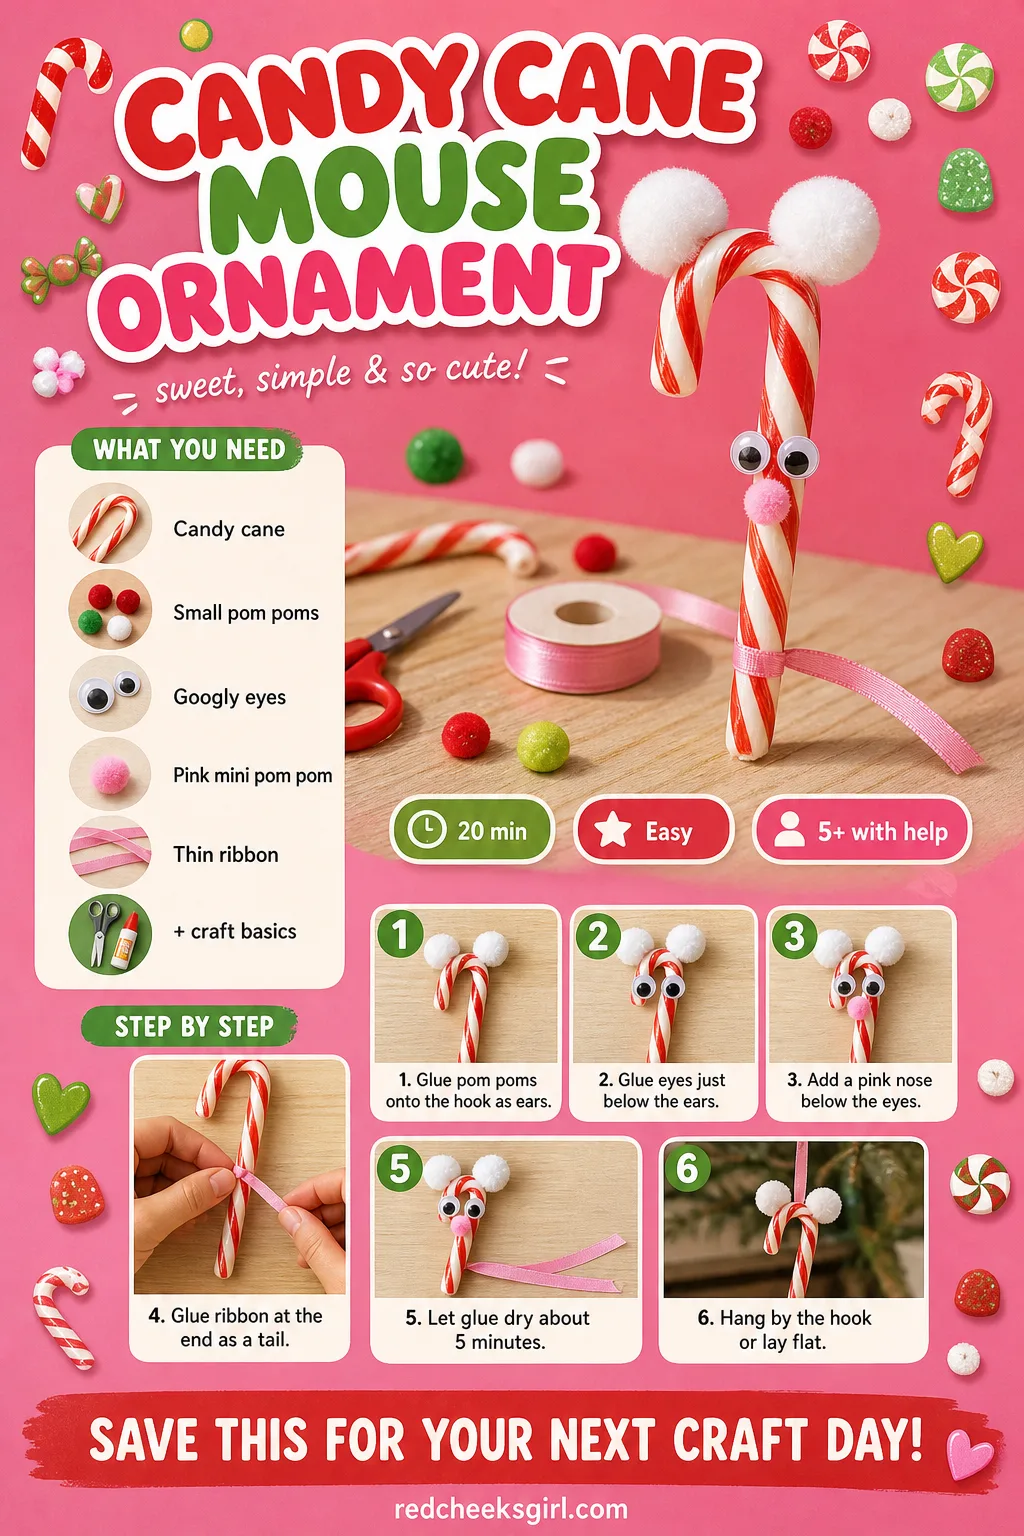
The last one on the list and the fastest: two pom poms, two eyes, a dab of pink felt, and the candy cane’s own curve becomes a mouse’s ears and face. Scatter a few across the dessert table as favors or hang them by the hook on the tree.
What You Need
- 1 candy cane per mouse
- 2 small brown or grey pom poms, 10mm, for ears
- 2 googly eyes, 6mm
- 1 pink mini pom pom or felt circle, 8mm, for the nose
- Thin ribbon or embroidery floss, 6 inches, for the tail
- Hot glue gun
How to Make It
- Glue the two small pom poms onto the curved hook of the candy cane, one on each side, to sit like ears.
- Glue the googly eyes just below the ears on the front of the hook.
- Add the small pink pom pom or felt circle below the eyes for a nose.
- Tie or glue the ribbon at the straight end of the cane as a curly tail.
- Let all the glue dry fully, about 5 minutes, before handling.
- Hang by the hook on the tree, or lay flat at each place setting as a table favor.
🛍 Shopping guide
Frequently Asked Questions
What can you make with candy canes besides hanging them on the tree?
Candy canes bend and glue into reindeer, hearts, sleigh runners and mouse faces with nothing more than a hot glue gun and small trims like pom poms or pipe cleaners. Because they’re already shaped and wrapped, they’re some of the fastest candy crafts on this list, most take ten to fifteen minutes.
How do you make a candy wreath?
Glue wrapped candies, peppermints work especially well, onto a foam wreath form in tight concentric rows until no foam shows, then finish with a ribbon hanger. It takes about an hour start to finish and holds up for several seasons if stored indoors away from heat.
How do you make Christmas ornaments out of candy?
The easiest route is a clear fillable plastic ornament ball: twist it open, pour in mini candies like M&Ms, and snap it shut, no glue or drying time needed. For something sturdier, melted Life Savers set in a cookie cutter make a stained-glass style ornament, though that one needs an oven and an adult.
Will candy crafts melt or go bad if you keep them?
Wrapped candy, like peppermints or chocolate kisses still in foil, holds up for more than one season if stored indoors away from heat and damp. Unwrapped candy such as gumdrops, melted hard candy, or anything glued raw dries out, softens, or attracts ants within a week or two, so build those as single-event pieces.
Are Christmas candy crafts safe for kids to make?
Most of them are, once an adult handles the hot glue gun, oven, scissors on small parts, or resin, which is exactly where this list flags each craft’s age range and adult step. Twisting pipe cleaners, pouring candy, and tying ribbon are all fine for kids to do themselves from about age five or six.
What is the cheapest Christmas candy craft to make?
Candy cane hearts and the M&M fillable ornaments both cost close to nothing if you already have ribbon and a glue gun, and take ten minutes each. Bulk bags of gumdrops or peppermints go further than they look, one bag easily covers a wreath or a cone-shaped tree centerpiece.
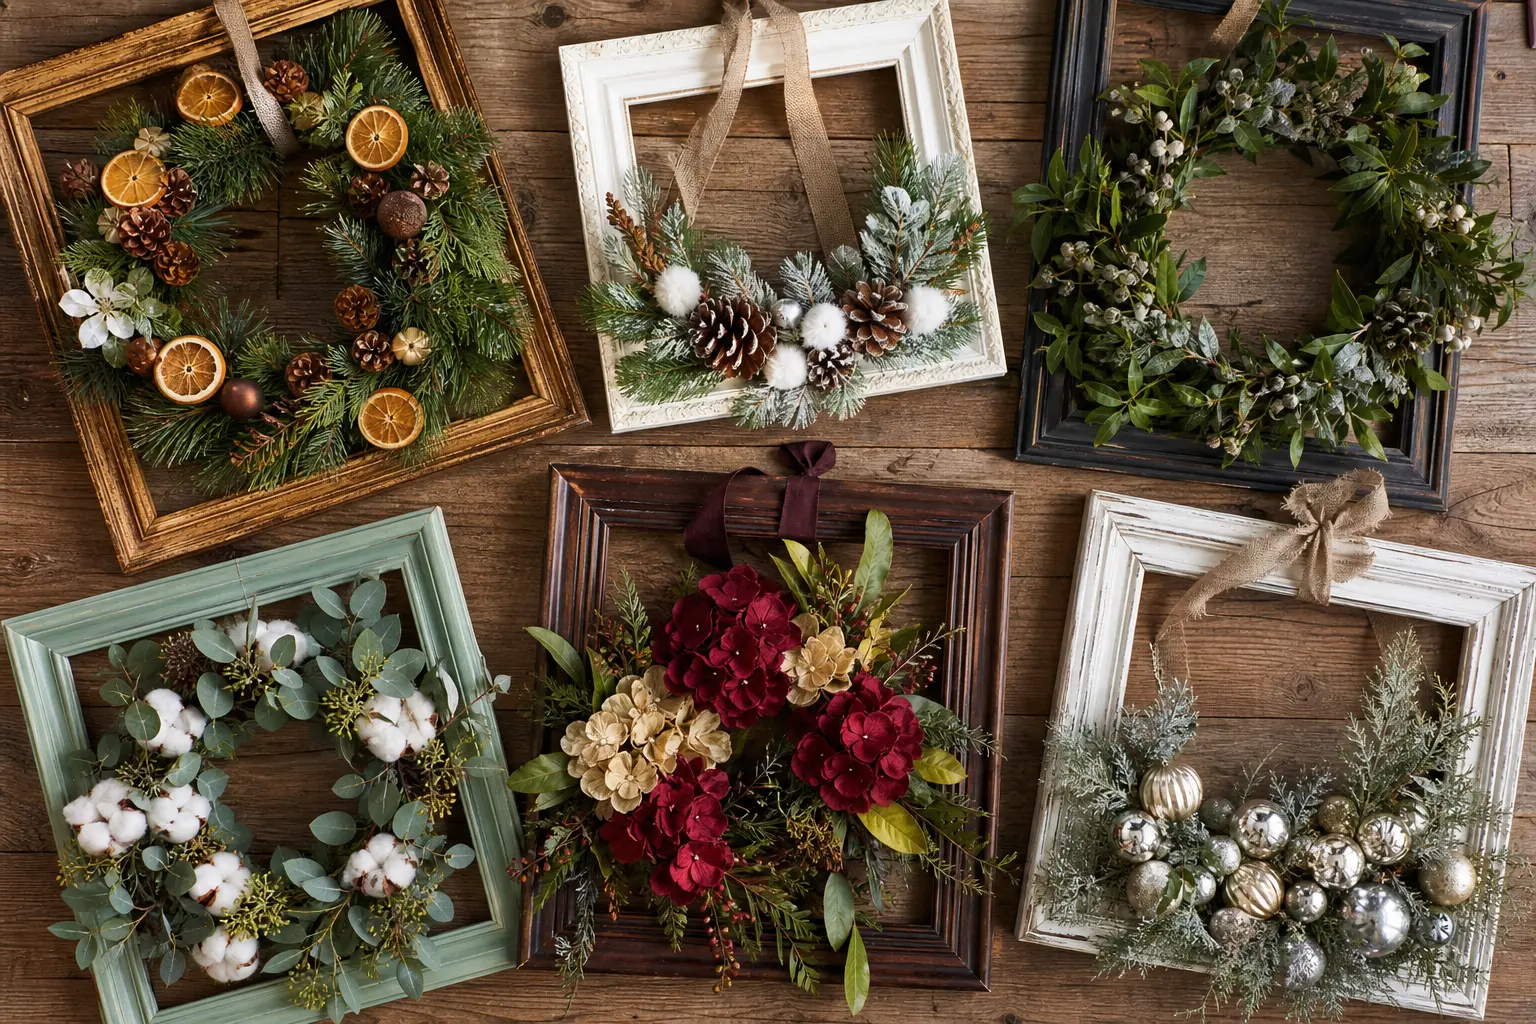
11 picture frame wreath ideas for the holidays, from lacquered finishes to multi-frame starbursts, e
18 printable paper christmas garland designs, chains and cut shapes, each with a free sheet to print

31 christmas table decorations that work down the length of a too-long table, hide every seam, and u
Leave a Reply