

22 Preschool Christmas Crafts That Build Tiny Fine-Motor Skills and Big Holiday Smiles
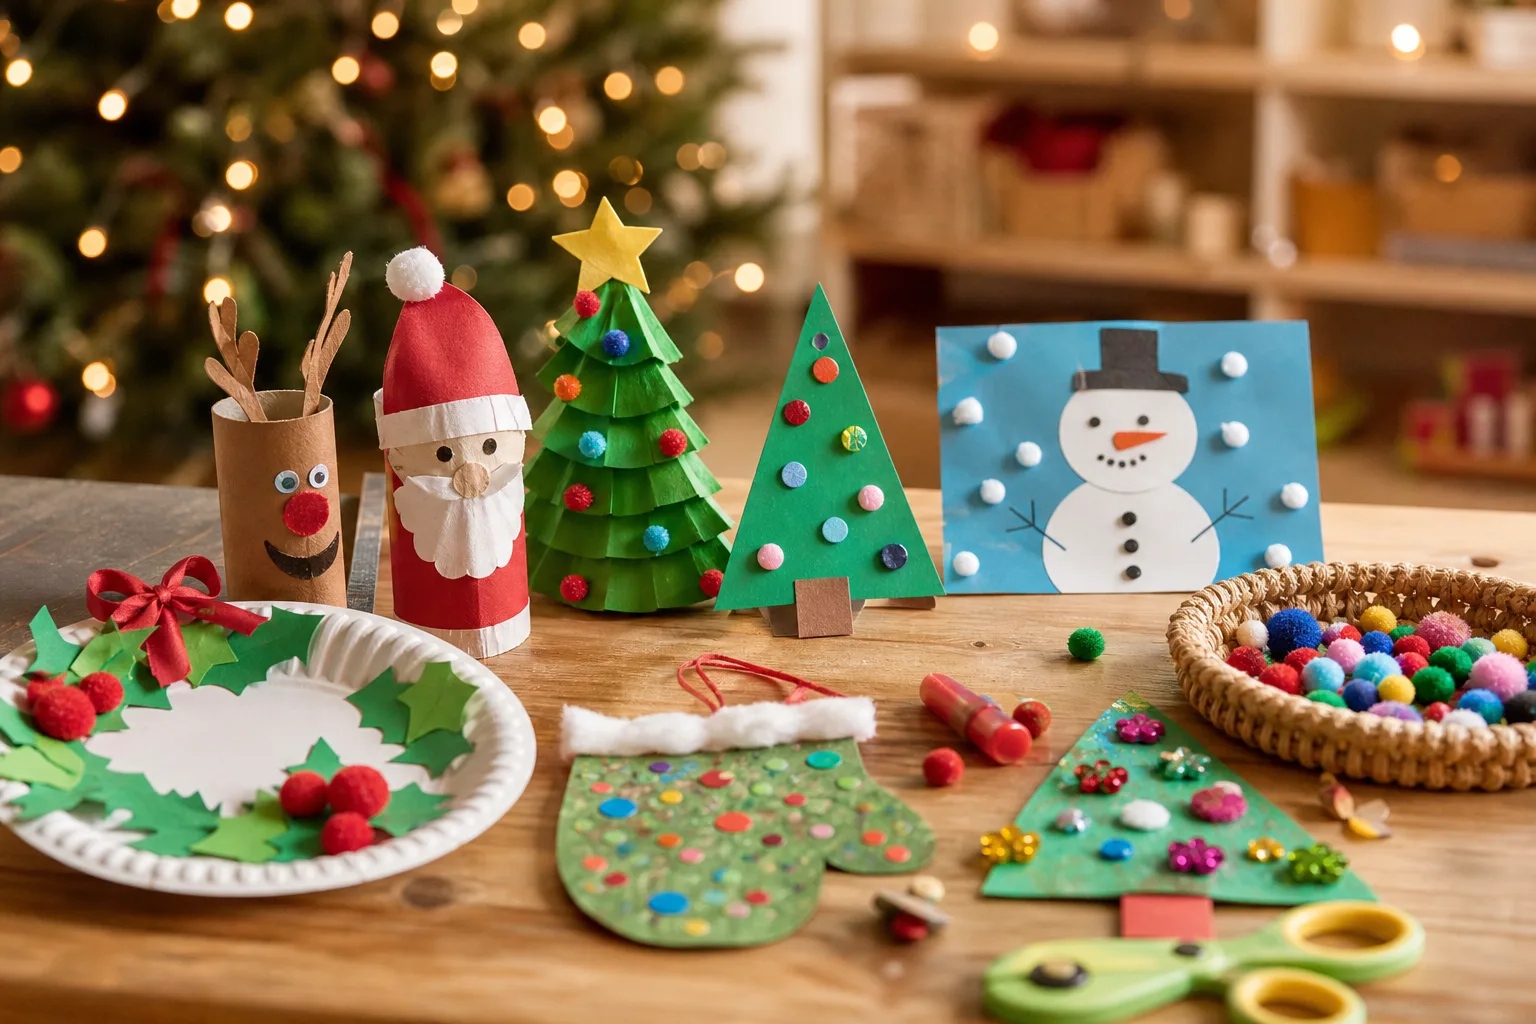
A four-year-old does not care that the tree is lopsided. She cares that her handprint is on it. These 22 preschool Christmas crafts are built around small hands: thick materials, short steps, nothing that needs a steady line or a long attention span. Some hang on the tree, some sit on a windowsill, one or two get eaten.
Every craft names exactly what an adult must do, because hot glue and oven trays are not a toddler’s job. If you want the grown-up version of this same season, the Christmas crafts round-up covers the table and the mantel, and the preschool Christmas party games fill the twenty minutes after the glue dries.
This post contains affiliate links. If you buy through them, I may earn a small commission at no extra cost to you.
- Salt Dough Handprint Ornament
- Tissue Paper Christmas Wreath
- Pinecone Christmas Trees
- Cotton Ball Snowman Card
- Toilet Paper Roll Reindeer
- Handprint Reindeer Gift Tags
- Footprint Penguin Keepsake
- Clothespin Snowflake Ornament
- Craft Stick Star Ornament
- Yarn-Wrapped Christmas Tree Cone
- Paper Cup Santa
- Thumbprint Christmas Lights Card
- Coffee Filter Snowflake
- Painted Rock Santas
- Christmas Countdown Paper Chain
- Marshmallow Snowman Pops
- Bubble Wrap Stamped Wreath Print
- Pom-Pom Wreath
- Wooden Spoon Angel
- Paper Plate Santa Mask
- Egg Carton Holly Garland
- Recycled Lid Glitter Suncatcher
- Frequently Asked Questions
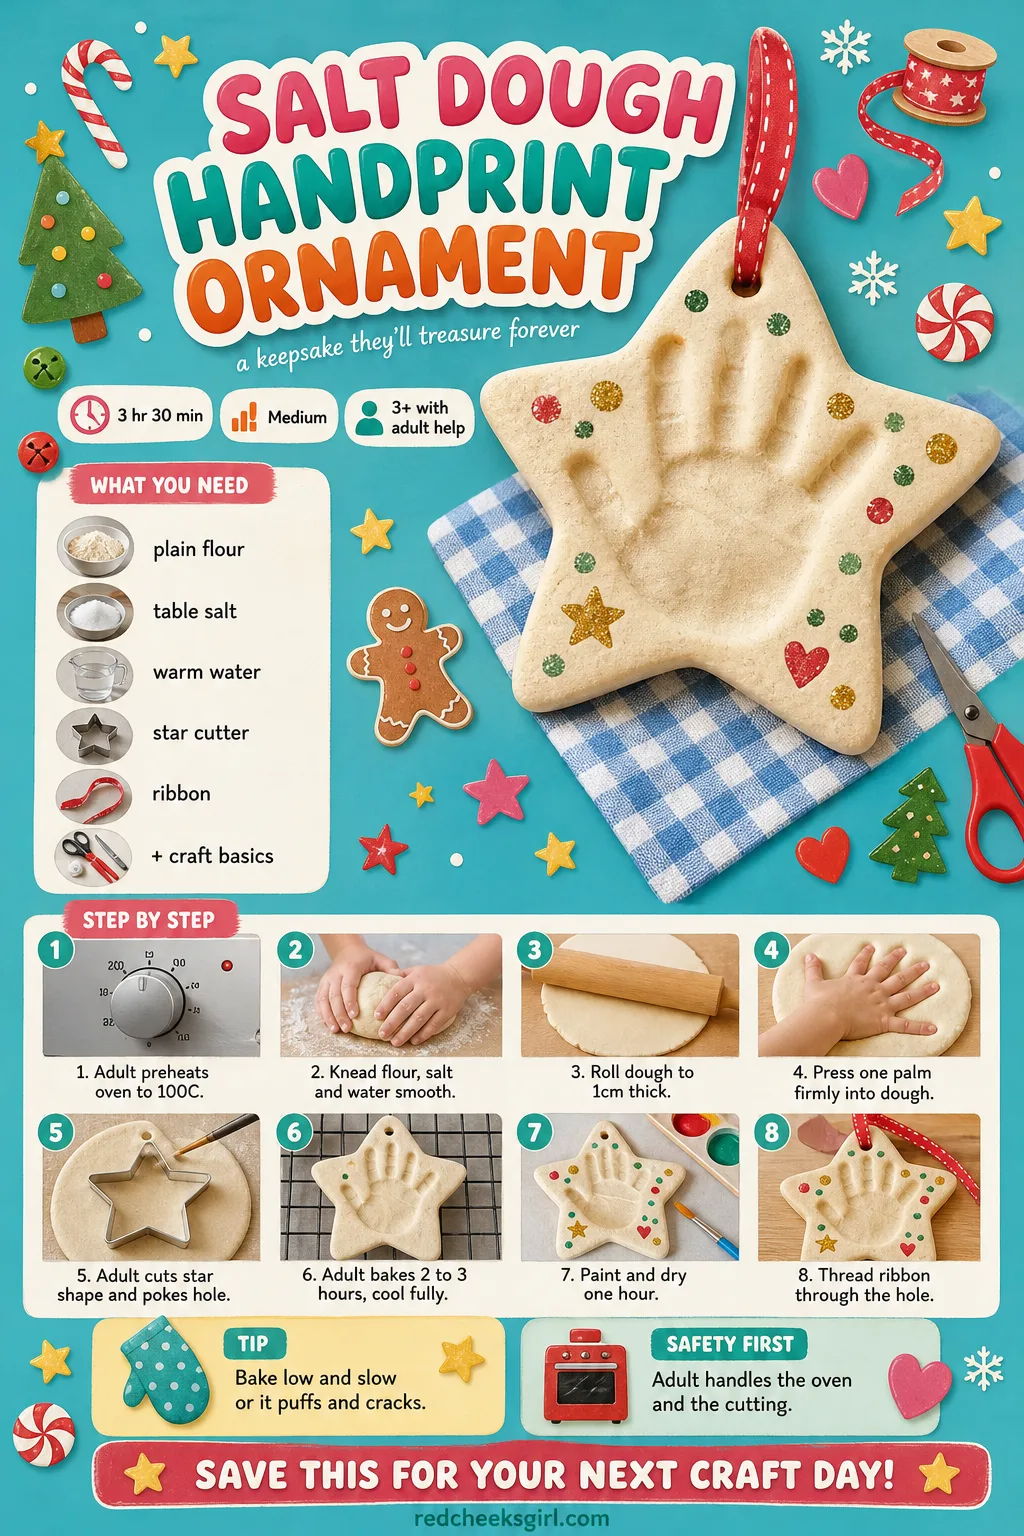
Salt Dough Handprint Ornament
This is the one that still gets unwrapped from tissue paper in ten years, so it earns the extra step of baking it properly instead of air-drying it soft. The finished ornament is pale, slightly rustic, a small palm pressed into a star or a plain disc. Hang it near eye level on the tree so the maker can point it out to everyone.
What You Need
- 1 cup plain flour
- 1/2 cup table salt
- 1/2 cup warm water
- a rolling pin
- a star cookie cutter, 8cm
- a drinking straw
- acrylic paint and a 20cm ribbon
How to Make It
- Adult preheats the oven to 100C (fan 90C) before mixing anything.
- Mix the flour, salt and water and knead until the dough feels smooth, not sticky.
- Roll the dough to about 1cm thick on a floured surface.
- Child presses one palm firmly into the dough and holds still for a slow count of three.
- Adult cuts around the print with the star cutter and pokes a hanging hole near the top with the straw.
- Adult bakes the shape for 2 to 3 hours until it feels hard all the way through, then lets it cool fully.
- Child paints the cooled shape and leaves it to dry for an hour before threading the ribbon.
🛍 Shopping guide
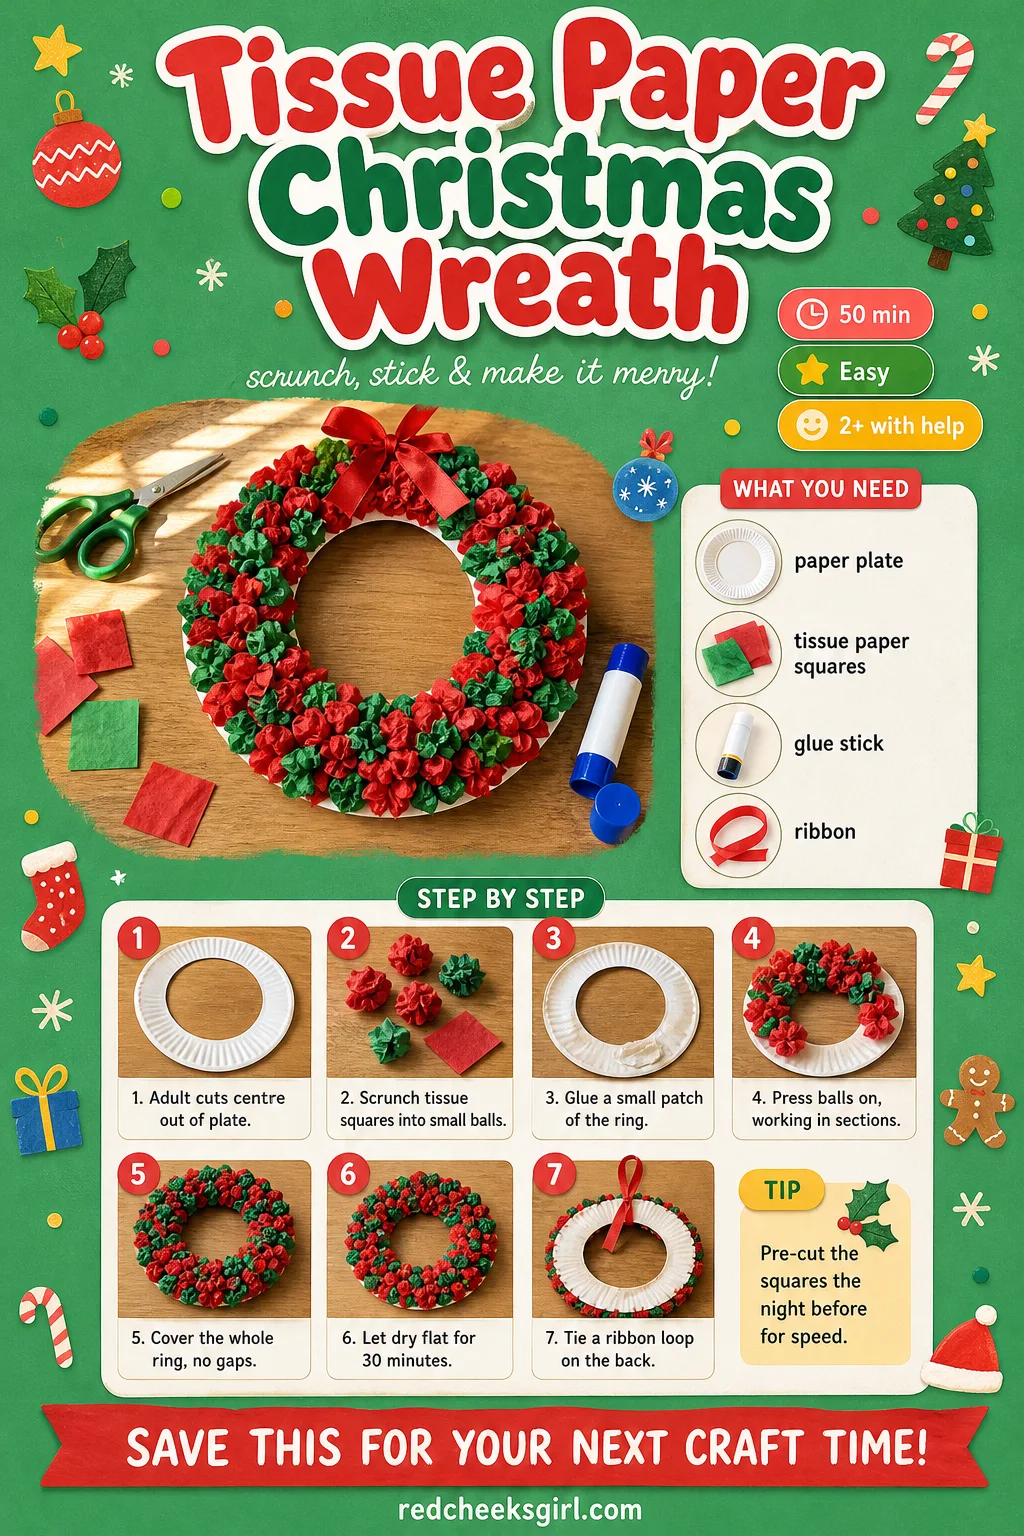
Tissue Paper Christmas Wreath
A paper plate wreath looks like nothing in the packet and like something worth hanging in twenty minutes. The finished ring is textured and bright, closer to a pom-pom than flat paper, and it survives being handled by small fingers because there is nothing fragile about it. Pin it to the inside of the front door so it takes the first bump instead of the good one.
What You Need
- 1 paper plate, 23cm
- tissue paper, cut into 5cm squares (about 60)
- a glue stick
- a 30cm ribbon
How to Make It
- Adult cuts the centre out of the plate, leaving a wide ring.
- Child scrunches each tissue square into a loose ball between finger and thumb.
- Child rubs glue stick onto a small patch of the ring and presses a tissue ball on, working in sections.
- Keep gluing balls close together until the whole ring is covered and no white shows through.
- Leave flat to dry for 30 minutes before moving it.
- Tape or tie a ribbon loop to the back for hanging.
🛍 Shopping guide
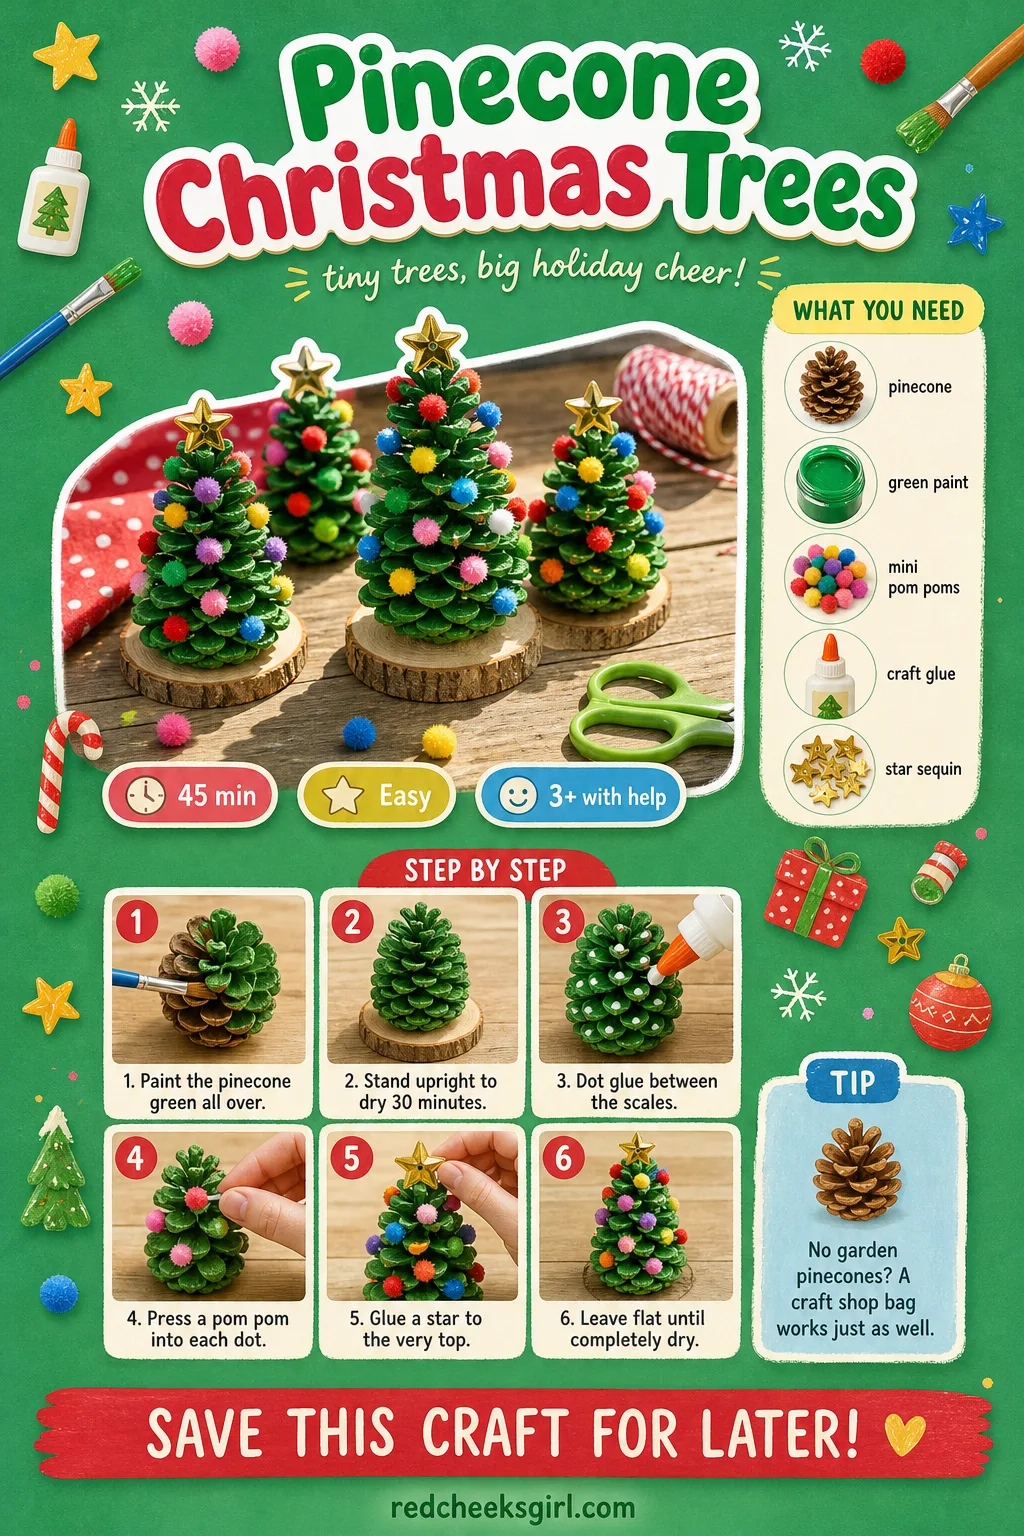
Pinecone Christmas Trees
If the garden has a pine tree, this one costs nothing but a tube of green paint. The finished tree looks properly woodland, scaly and real, standing about 10cm tall on a shelf or down the middle of the table as a mini forest. It needs no water and no watching, which after the wreath is a relief.
What You Need
- 1 pinecone, about 10cm, per child
- green acrylic paint
- mini pom poms, 1cm, assorted colours (about 8 per tree)
- craft glue
- 1 small star sequin or bead per tree
How to Make It
- Paint the pinecone green, working the brush into the gaps between scales.
- Stand it upright to dry for 30 minutes.
- Dot small amounts of glue between the scales and press a pom pom into each dot.
- Glue a star sequin or bead to the very top as a topper.
- Leave flat until fully dry before moving to a shelf.
🛍 Shopping guide
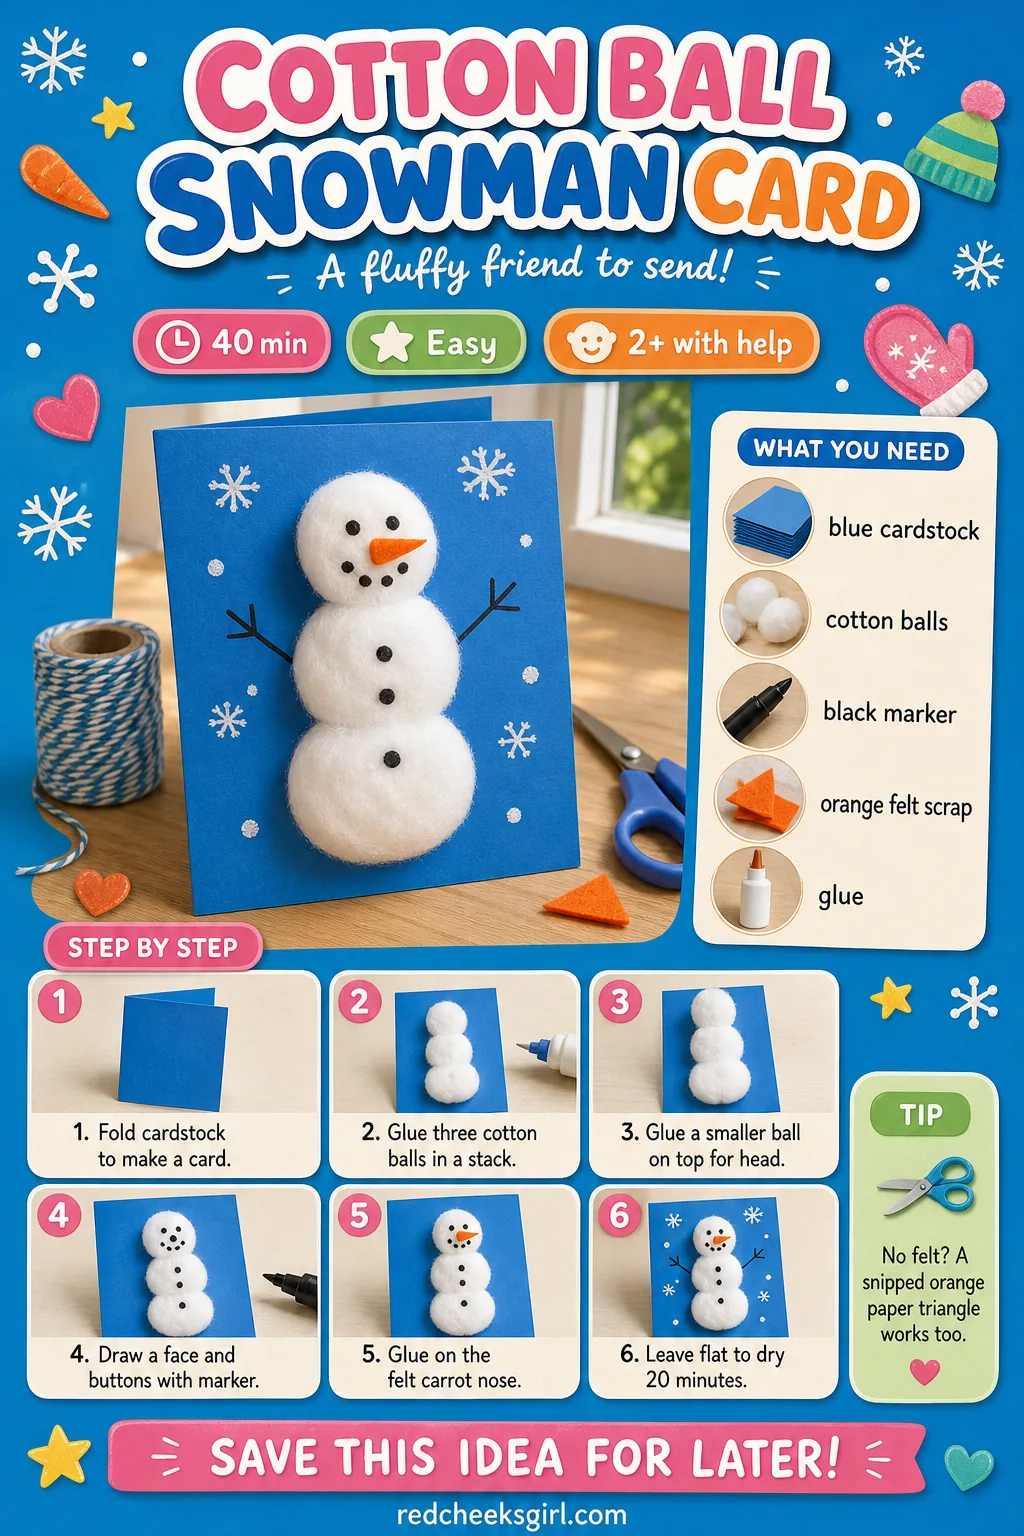
Cotton Ball Snowman Card
A flat card that turns into something soft under the fingers, which matters more to a toddler than anything drawn. The snowman sits a little lumpy and a little crooked, three stacked clouds on blue card, and that is exactly right. It posts flat in an envelope to a grandparent, or stands folded on a windowsill.
What You Need
- 1 sheet blue A5 cardstock, folded in half
- 6 cotton balls
- a black fine marker
- 1 small orange felt triangle, 2cm (for the nose)
- craft glue
How to Make It
- Fold the cardstock in half to make the card shape.
- Glue three cotton balls in a stack near the bottom for the body.
- Glue one smaller cotton ball on top for the head.
- Draw a simple face and three buttons with the marker once the glue has tacked.
- Glue the felt triangle in place as the carrot nose.
- Leave flat to dry for 20 minutes before closing the card.
🛍 Shopping guide
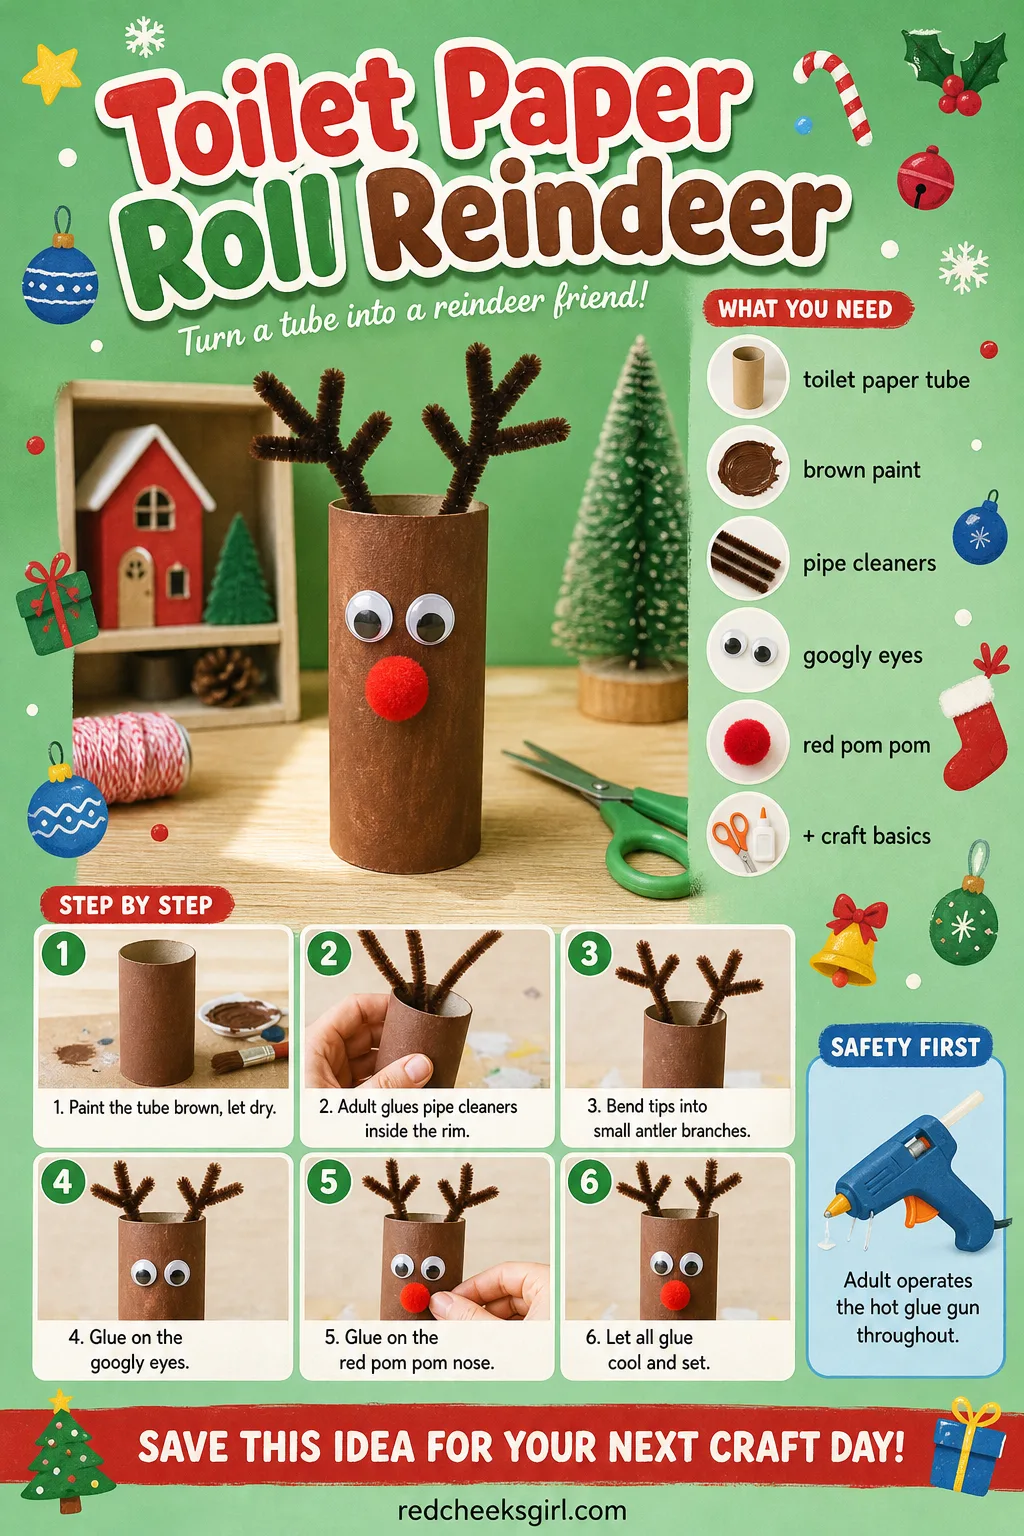
Toilet Paper Roll Reindeer
The cardboard tube that was headed for the recycling becomes a reindeer that actually stands up on its own, which is the whole appeal. Finished, it is brown and a little scruffy, antlers askew, and it belongs on a shelf where small hands can line up a whole herd. The hot glue step is the only one an adult should do alone.
What You Need
- 1 toilet paper tube
- brown acrylic paint
- 2 brown pipe cleaners, 15cm
- 2 googly eyes, 10mm
- 1 red pom pom, 1.5cm (for the nose)
- a hot glue gun
How to Make It
- Paint the tube brown, inside the rim too, and leave to dry for 20 minutes.
- Adult hot-glues the two pipe cleaners inside the top rim, spaced apart, then bends the tips into small branches for antlers.
- Child glues the googly eyes onto the front of the tube.
- Child glues the red pom pom just below the eyes for the nose.
- Leave the tube to stand until all glue has cooled and set.
🛍 Shopping guide
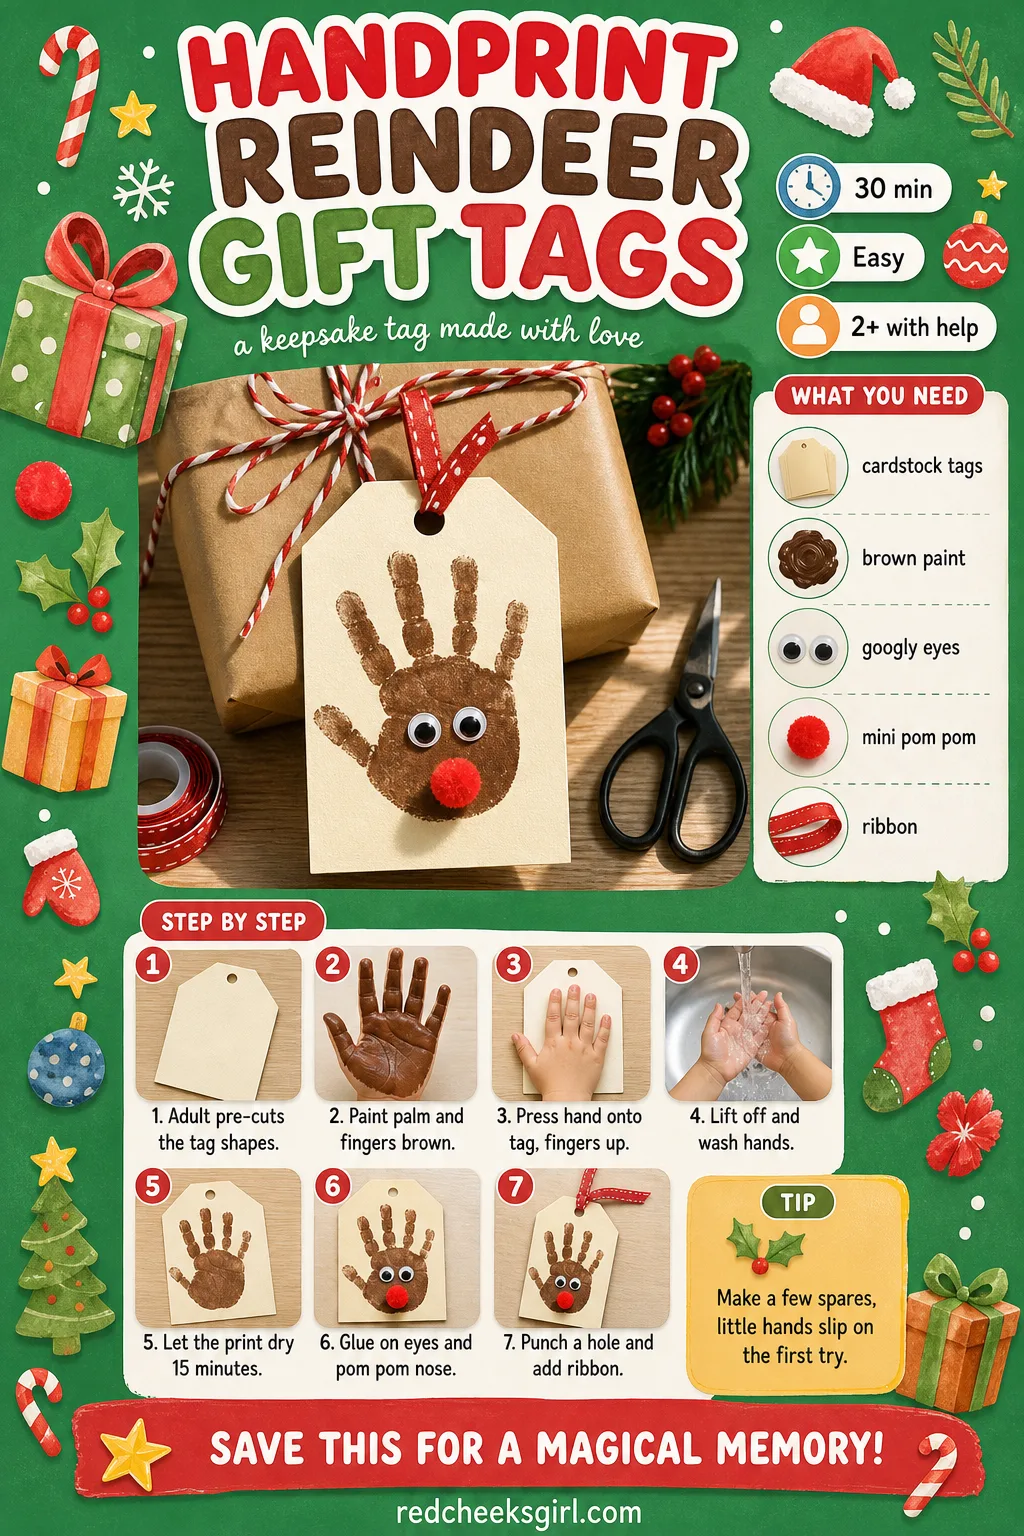
Handprint Reindeer Gift Tags
One painted palm, fingers spread, turns into a reindeer face so reliably that this is the craft to hand a nervous beginner first. Finished, the tag is unmistakably a reindeer: fingers for antlers, a pom pom nose, and a child’s actual handprint underneath. Punch a hole and it ties straight onto a wrapped present.
What You Need
- cream cardstock tags, 8cm, pre-cut by an adult
- brown washable paint
- 2 small googly eyes
- 1 mini red pom pom (for the nose)
- a hole punch and 15cm of ribbon
How to Make It
- Adult cuts the tag shapes in advance, or buys ready-cut blank tags.
- Paint one child’s palm and fingers brown with a brush, keeping the fingers spread.
- Press the hand firmly onto the tag with fingers pointing up, then lift straight off and wash the hand.
- Leave the print to dry for 15 minutes.
- Glue on the googly eyes and the pom pom nose where the heel of the palm sits.
- Punch a hole in the top corner and thread the ribbon through.
🛍 Shopping guide
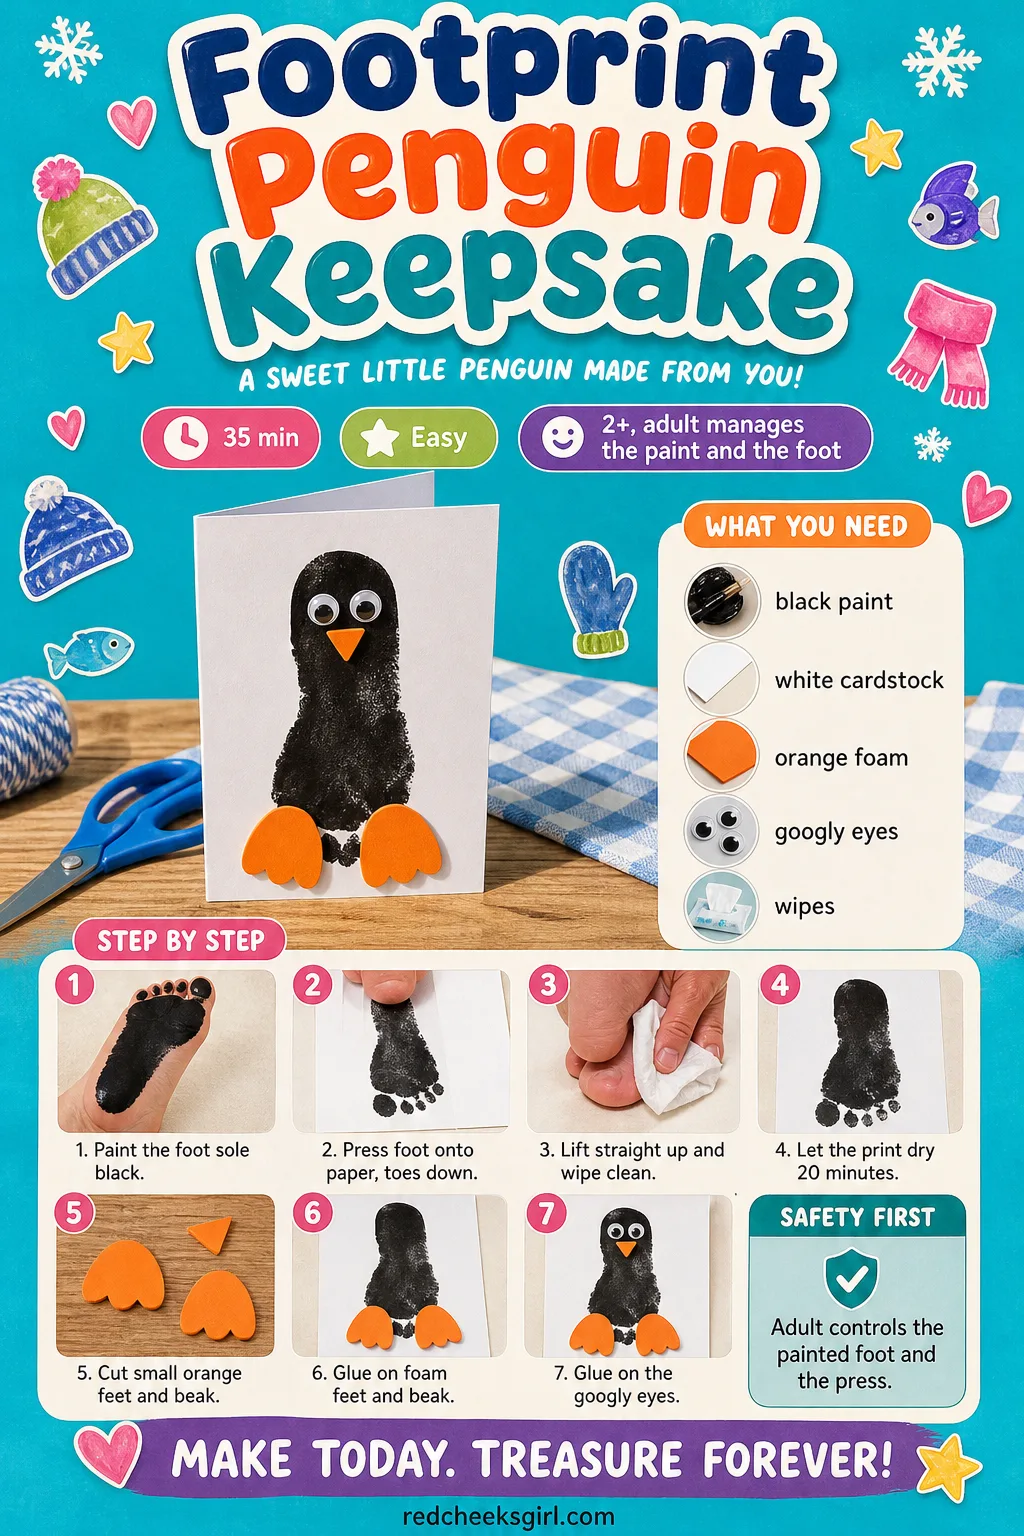
Footprint Penguin Keepsake
This one asks for a bit of patience because a wriggling foot is harder to manage than a flat hand, but the result is worth the mess: a heel-shaped penguin body standing on white card. Frame it or keep it flat in a memory box, it looks nothing like a craft and everything like a small achievement.
What You Need
- black washable paint
- 1 sheet white cardstock or canvas, A4
- orange craft foam scraps (for feet and beak)
- 2 small googly eyes
- baby wipes for quick cleanup
How to Make It
- Adult paints the sole of the child’s foot black from heel to toes, keeping an even layer.
- Adult presses the foot firmly onto the paper, toes pointing down, so the heel sits at the top as the penguin’s head.
- Lift the foot straight up and wipe clean immediately.
- Leave the print to dry for 20 minutes.
- Cut small triangles from orange foam for the feet and beak and glue them on.
- Glue the googly eyes near the top of the print.
🛍 Shopping guide
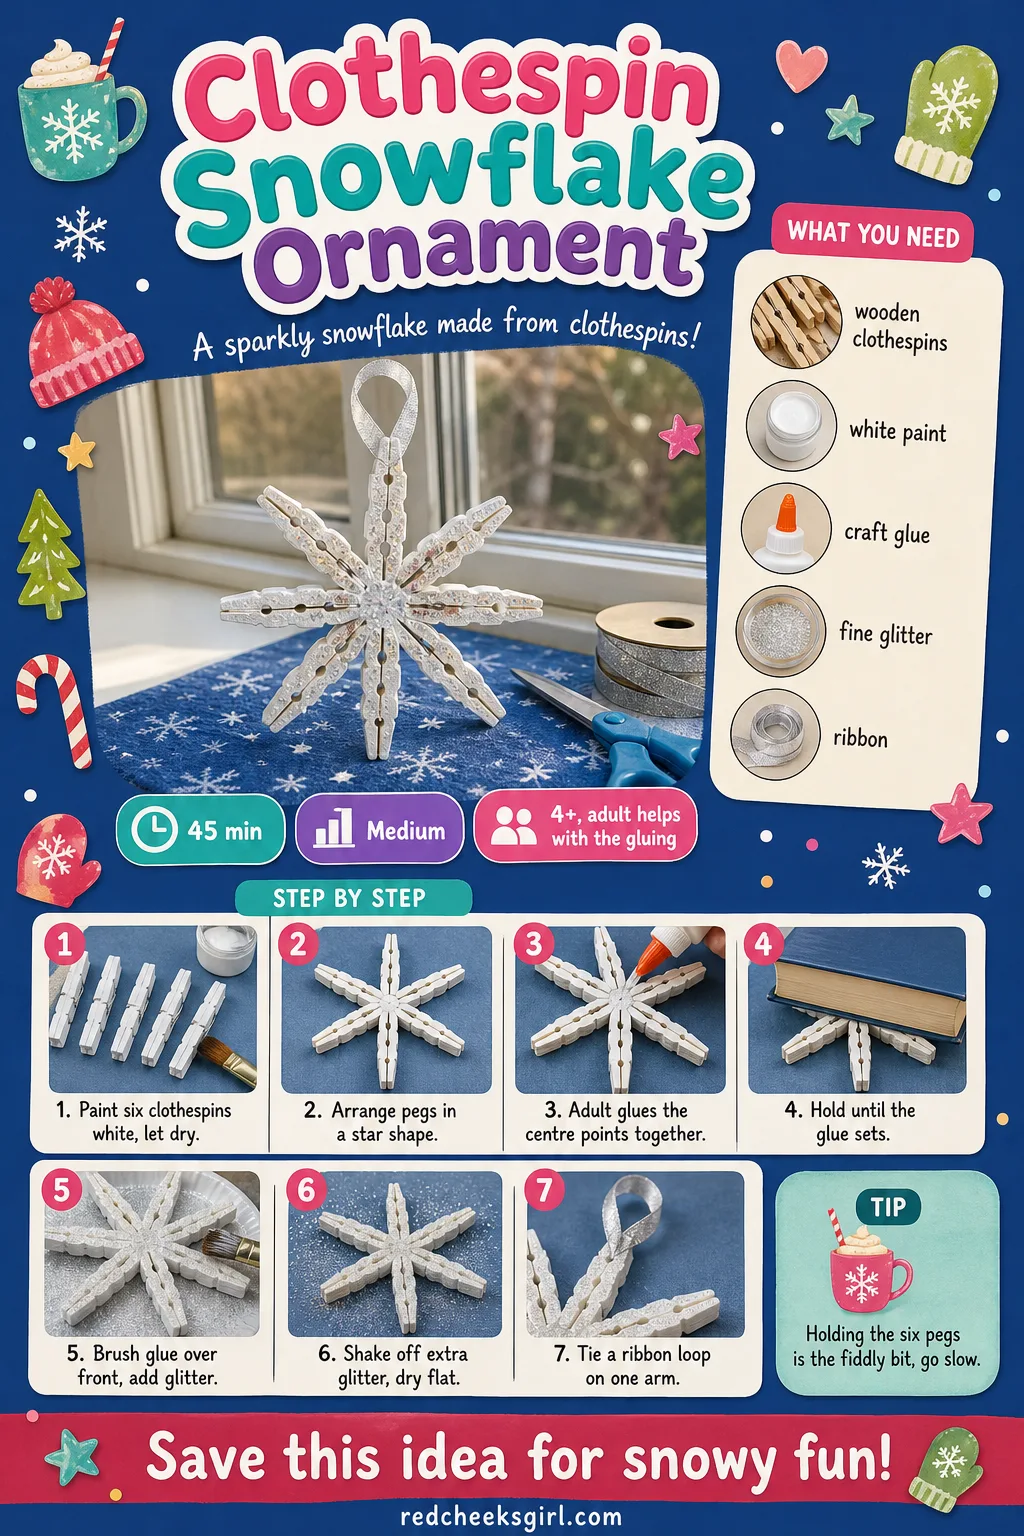
Clothespin Snowflake Ornament
Six plain wooden pegs, glued end to end, make a snowflake with a surprising amount of sparkle for the effort involved. It is a little fiddly holding six pieces together while the glue grabs, so plan on a steady adult hand for that one step. Hung in a window, the light catches the glitter properly.
What You Need
- 6 mini wooden clothespins
- white or silver acrylic paint
- craft glue
- fine glitter
- a 15cm ribbon loop
How to Make It
- Paint all six clothespins white and leave to dry for 15 minutes.
- Arrange the pegs in a star shape on wax paper, pinched ends meeting in the centre.
- Adult glues the centre points together and holds for a slow count of twenty until set.
- Brush a thin layer of glue over the front and sprinkle on glitter, shaking off the excess.
- Leave flat to dry fully before touching again.
- Tie a ribbon loop to one arm for hanging.
🛍 Shopping guide
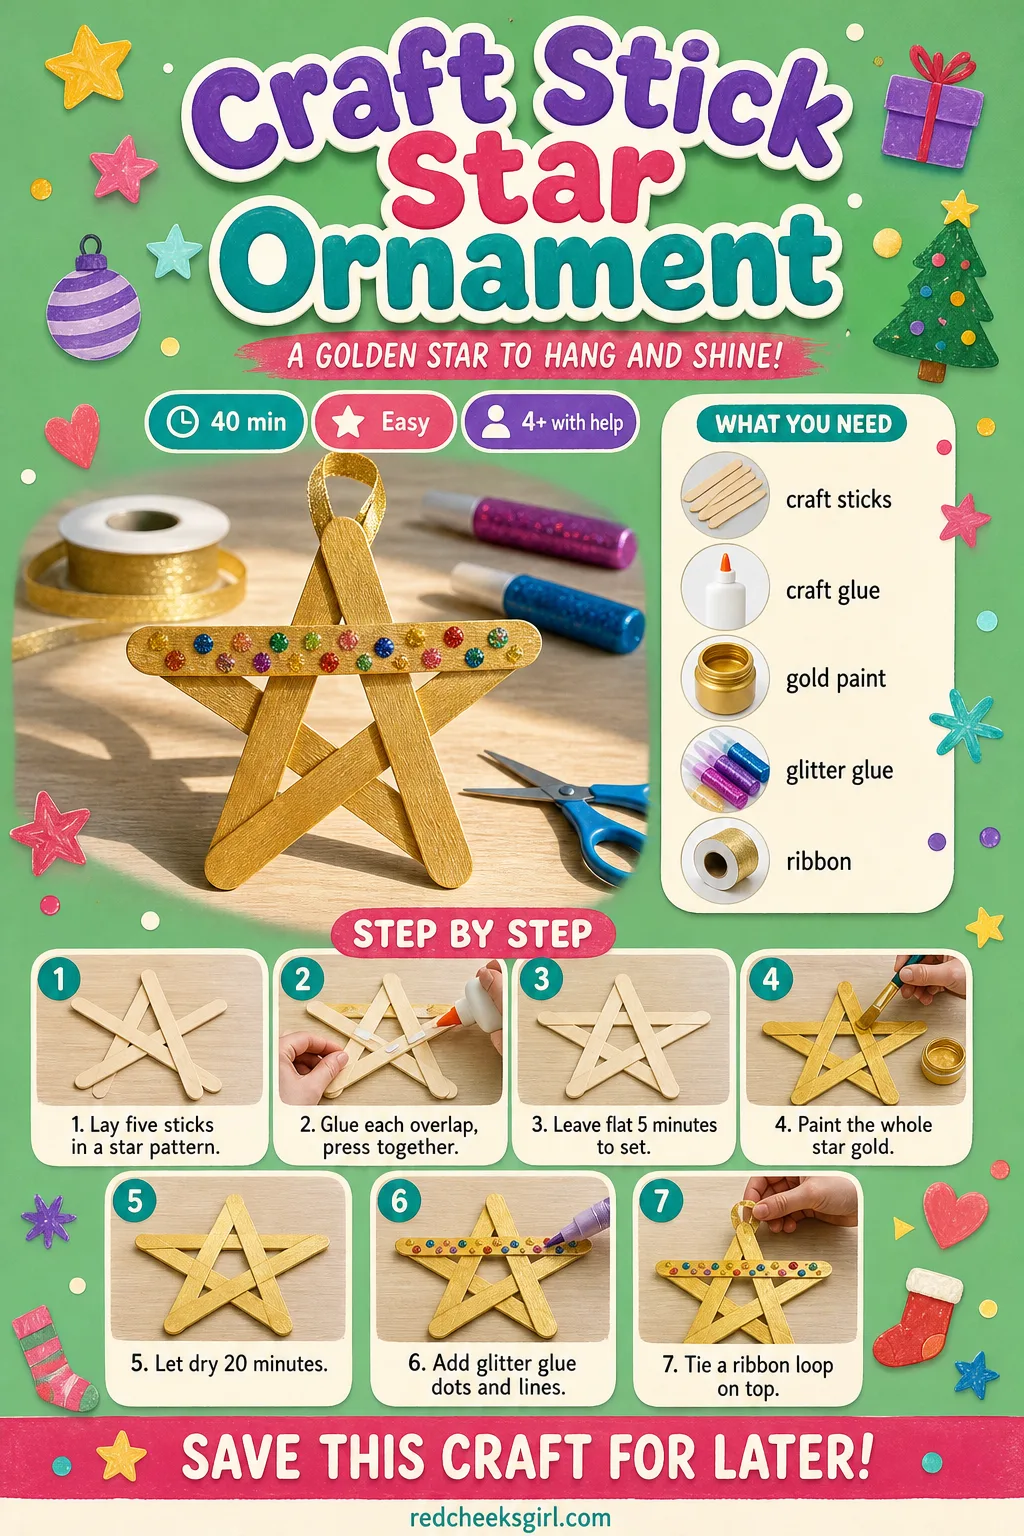
Craft Stick Star Ornament
Five sticks overlapped and glued make a star shape almost by accident, which is satisfying for a child who has never quite managed scissors. Gold paint and a scribble of glitter glue turn plain wood into something that looks bought. It hangs flat and light, good for a small or crowded tree.
What You Need
- 5 jumbo craft sticks, 15cm
- craft glue
- gold acrylic paint
- glitter glue pens
- a 15cm ribbon
How to Make It
- Lay five sticks on top of each other in a star pattern, overlapping the ends.
- Dab glue at each overlap and press together, holding briefly until it grips.
- Leave flat for 5 minutes so the joints are fully stuck before moving it.
- Paint the whole star gold and leave to dry for 20 minutes.
- Decorate with dots and lines of glitter glue, then leave flat to dry fully.
- Tie a ribbon loop to the top point.
🛍 Shopping guide
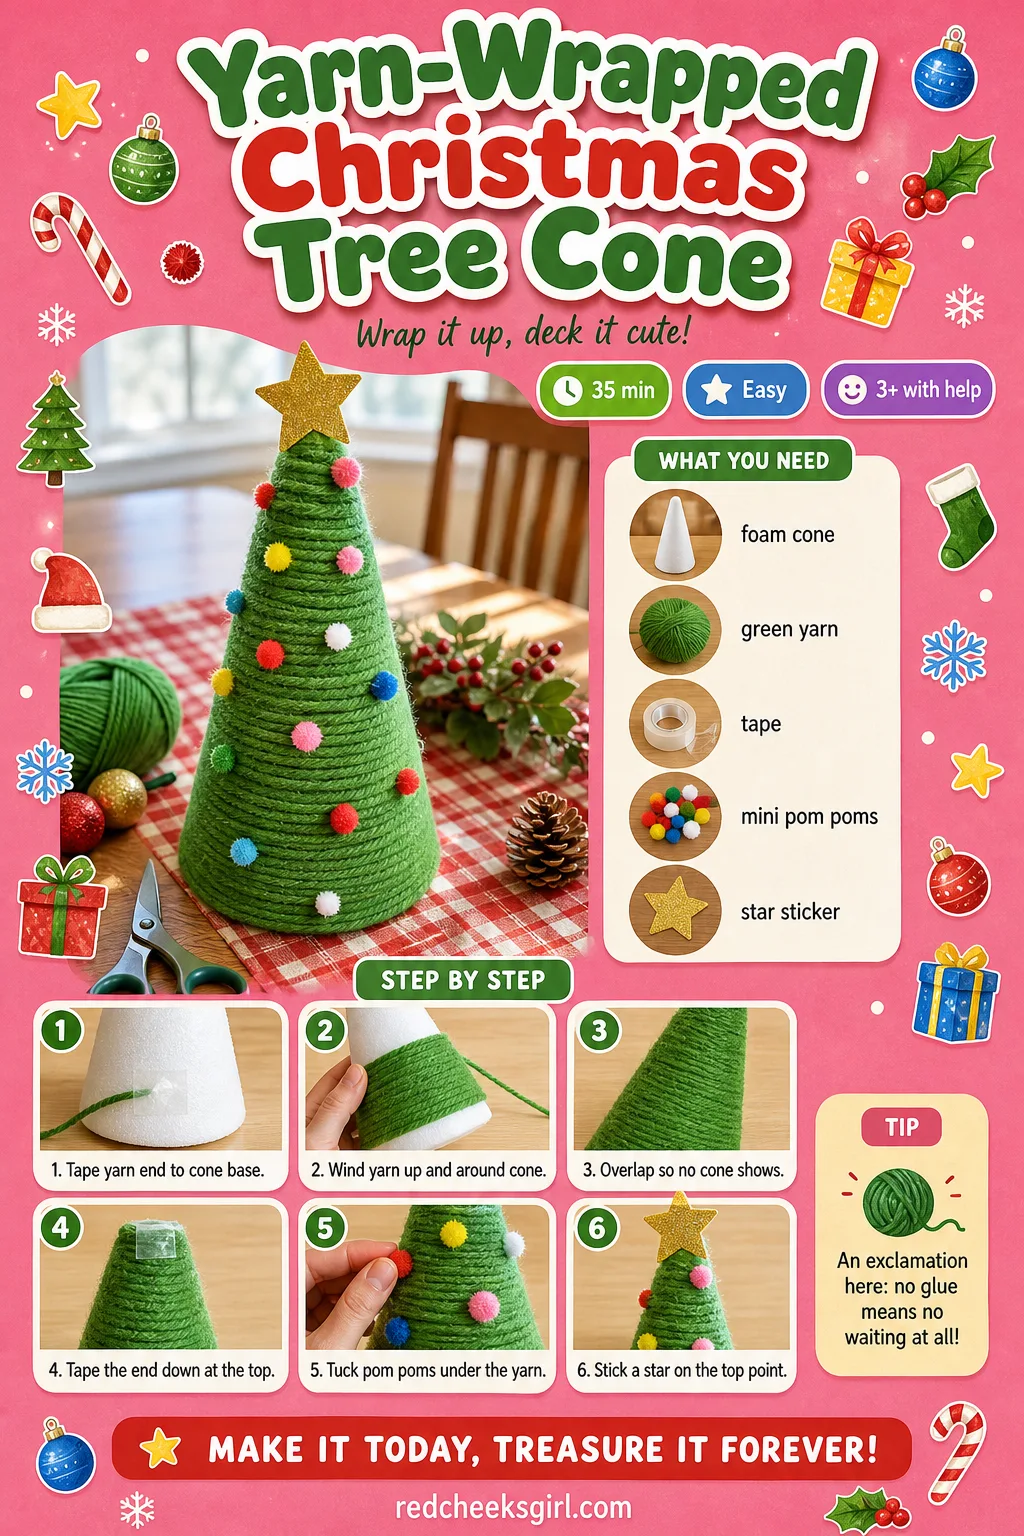
Yarn-Wrapped Christmas Tree Cone
Winding yarn round and round a cone is the kind of repetitive job a preschooler can actually finish, unlike anything that needs precision. The finished tree is soft, fully green, slightly wonky where the wrap got thin, and it stands on its own on a table without tipping. No glue mess at all, which is its own small holiday miracle.
What You Need
- 1 foam or card cone, 15cm tall
- green yarn, one full ball
- tape
- mini pom poms (for ornaments)
- 1 small star sticker
How to Make It
- Tape the end of the yarn to the base of the cone.
- Wind the yarn around and up the cone, overlapping as you go so no cone shows through.
- Keep winding to the top, then tape the end down firmly.
- Tuck mini pom poms under the wrapped yarn here and there as ornaments.
- Stick the star sticker to the very top point.
🛍 Shopping guide
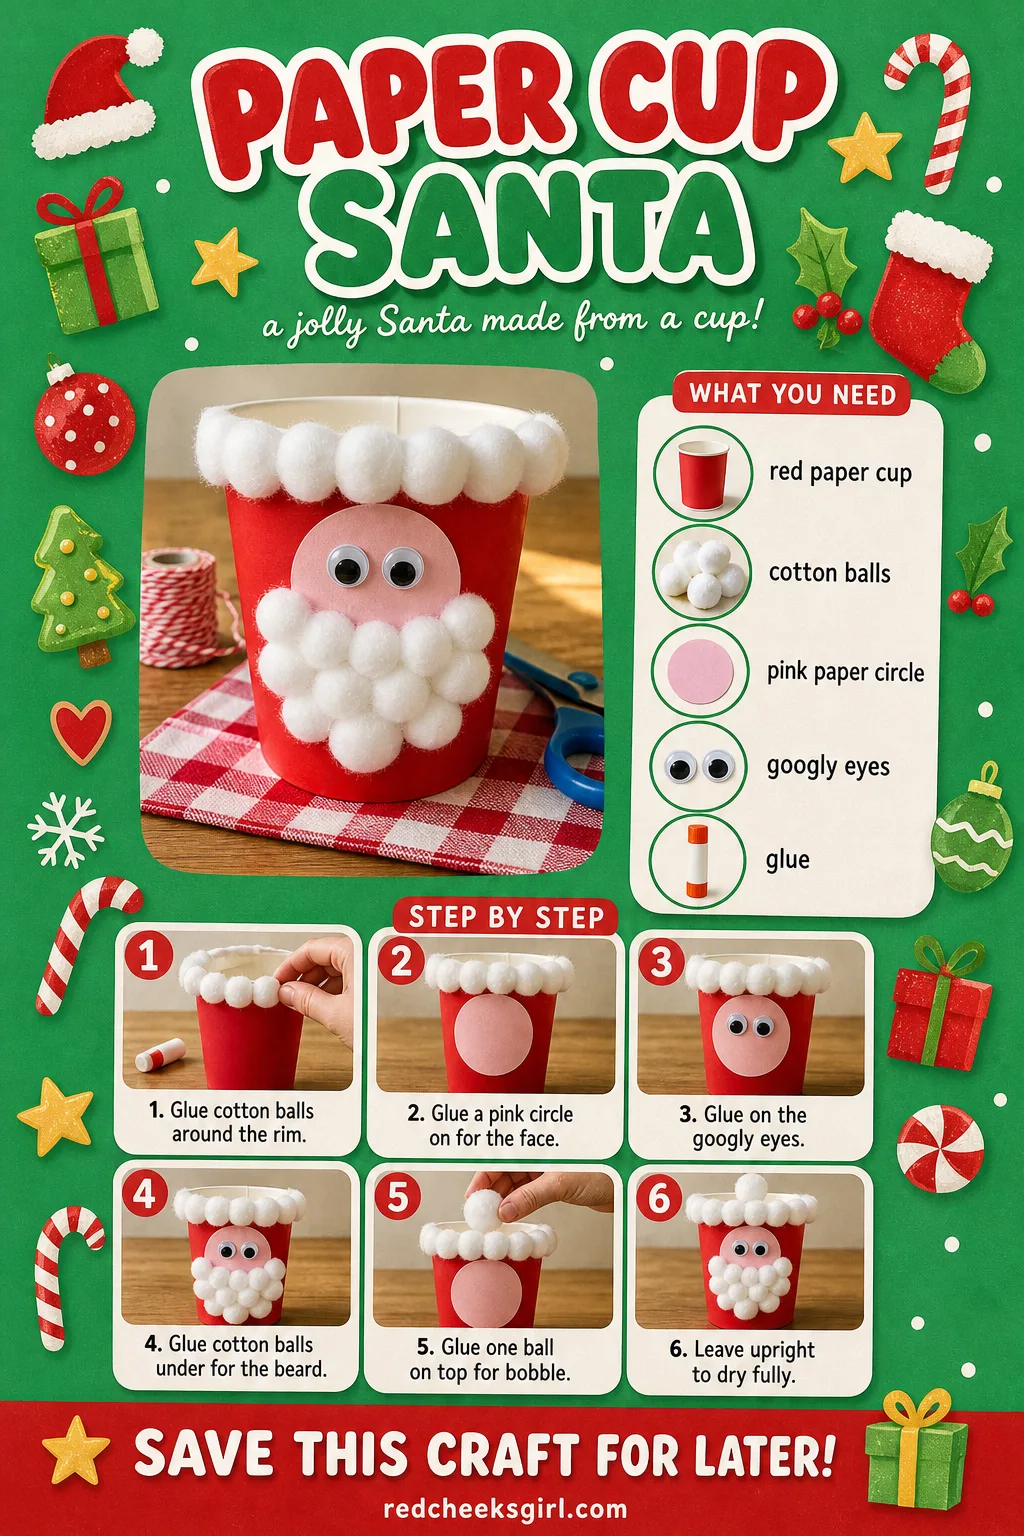
Paper Cup Santa
A plain cup turns into a round, cheerful Santa face in a handful of glued pieces, no painting required if you buy a red cup already. It stands on its own on a windowsill or a party table, and it packs flat if you skip the cotton ball beard until you unpack it next year.
What You Need
- 1 red paper cup
- cotton balls (about 8)
- 1 pink paper circle, 6cm (for the face)
- 2 small googly eyes
- craft glue
How to Make It
- Glue a row of cotton balls around the rim of the cup for the hat trim.
- Glue the pink circle onto the cup front, just below the trim, for the face.
- Glue the googly eyes onto the pink circle.
- Glue several cotton balls under the face for the beard, letting them overlap for texture.
- Glue one small cotton ball at the very top of the cup for the hat bobble.
- Leave standing upright until fully dry.
🛍 Shopping guide
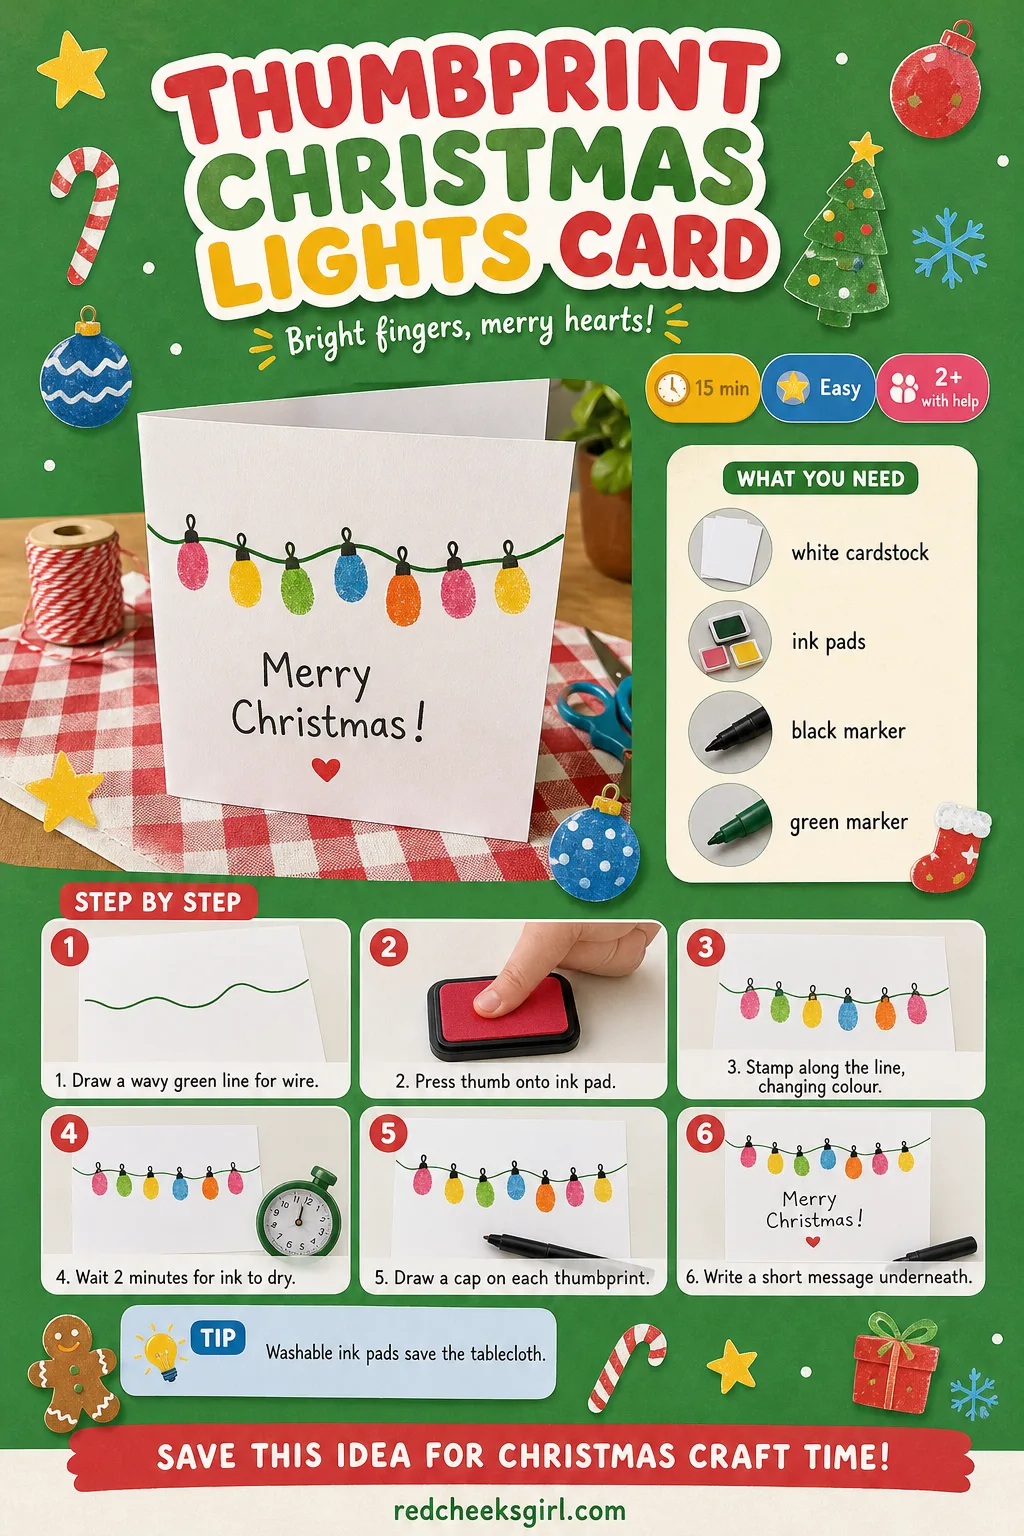
Thumbprint Christmas Lights Card
One squiggly wire drawn across a card, then a row of inked thumbs pressed along it, and suddenly it looks like a string of fairy lights. It takes two minutes of actual work and dries almost as fast, which makes it the one to reach for when patience has already run out that afternoon.
What You Need
- 1 sheet white cardstock, A5
- ink pads in red, yellow, green and blue
- a black fine marker
- a green marker (for the wire)
How to Make It
- Draw a loose wavy line across the card with the green marker for the wire.
- Press a thumb onto an ink pad and stamp it along the line, changing colour every two or three prints.
- Wait about 2 minutes for the ink to dry before touching the card again.
- Draw a small cap line at the top of each thumbprint so it reads as a bulb.
- Write a short message underneath.
🛍 Shopping guide
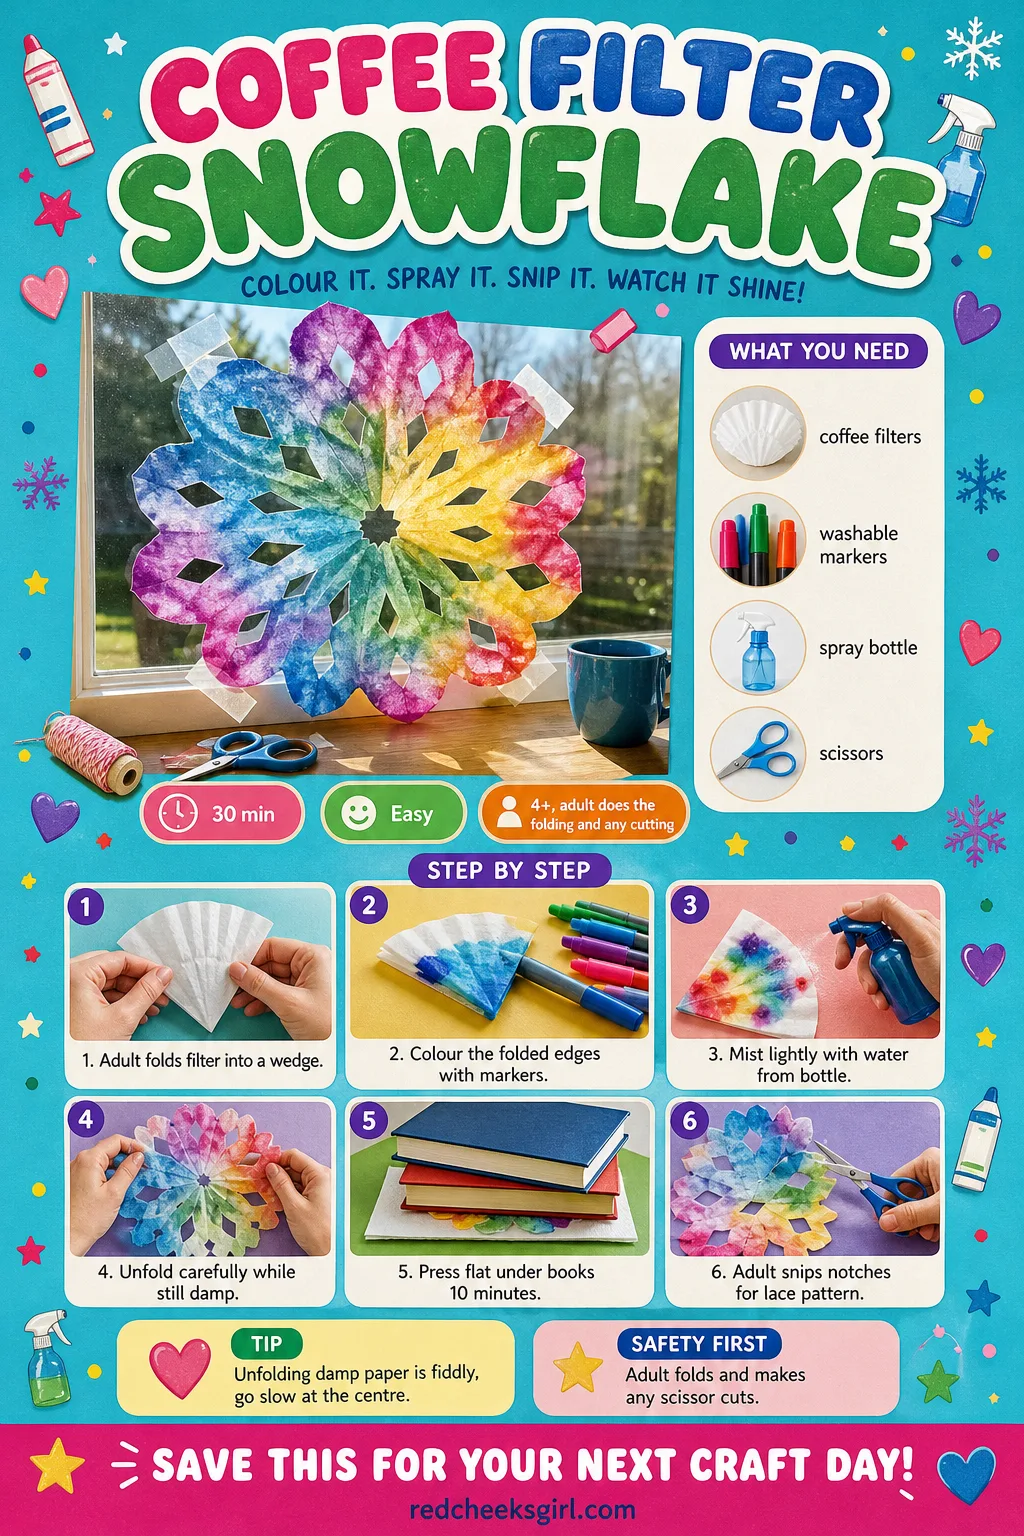
Coffee Filter Snowflake
Flat white filters turn into something with actual lace-like pattern once they are folded, coloured and misted with water, and the colour bleed is the part that reliably gets a gasp. Press it flat under a stack of books while it dries or it curls at the edges. Tape a few to a window and the light does the rest.
What You Need
- 2 round coffee filters, 11cm
- washable markers
- a spray bottle of water
- scissors
How to Make It
- Adult folds the filter in half, then in half again into a wedge shape.
- Child colours the folded edges and tip with markers, using two or three colours.
- Mist lightly with water from the spray bottle to let the colours blend and spread.
- Unfold carefully while still damp, laying it flat.
- Press flat under a few heavy books for 10 minutes to dry without curling.
- Adult snips a few small triangle notches along the folded edges before unfolding, if a lacier pattern is wanted.
🛍 Shopping guide
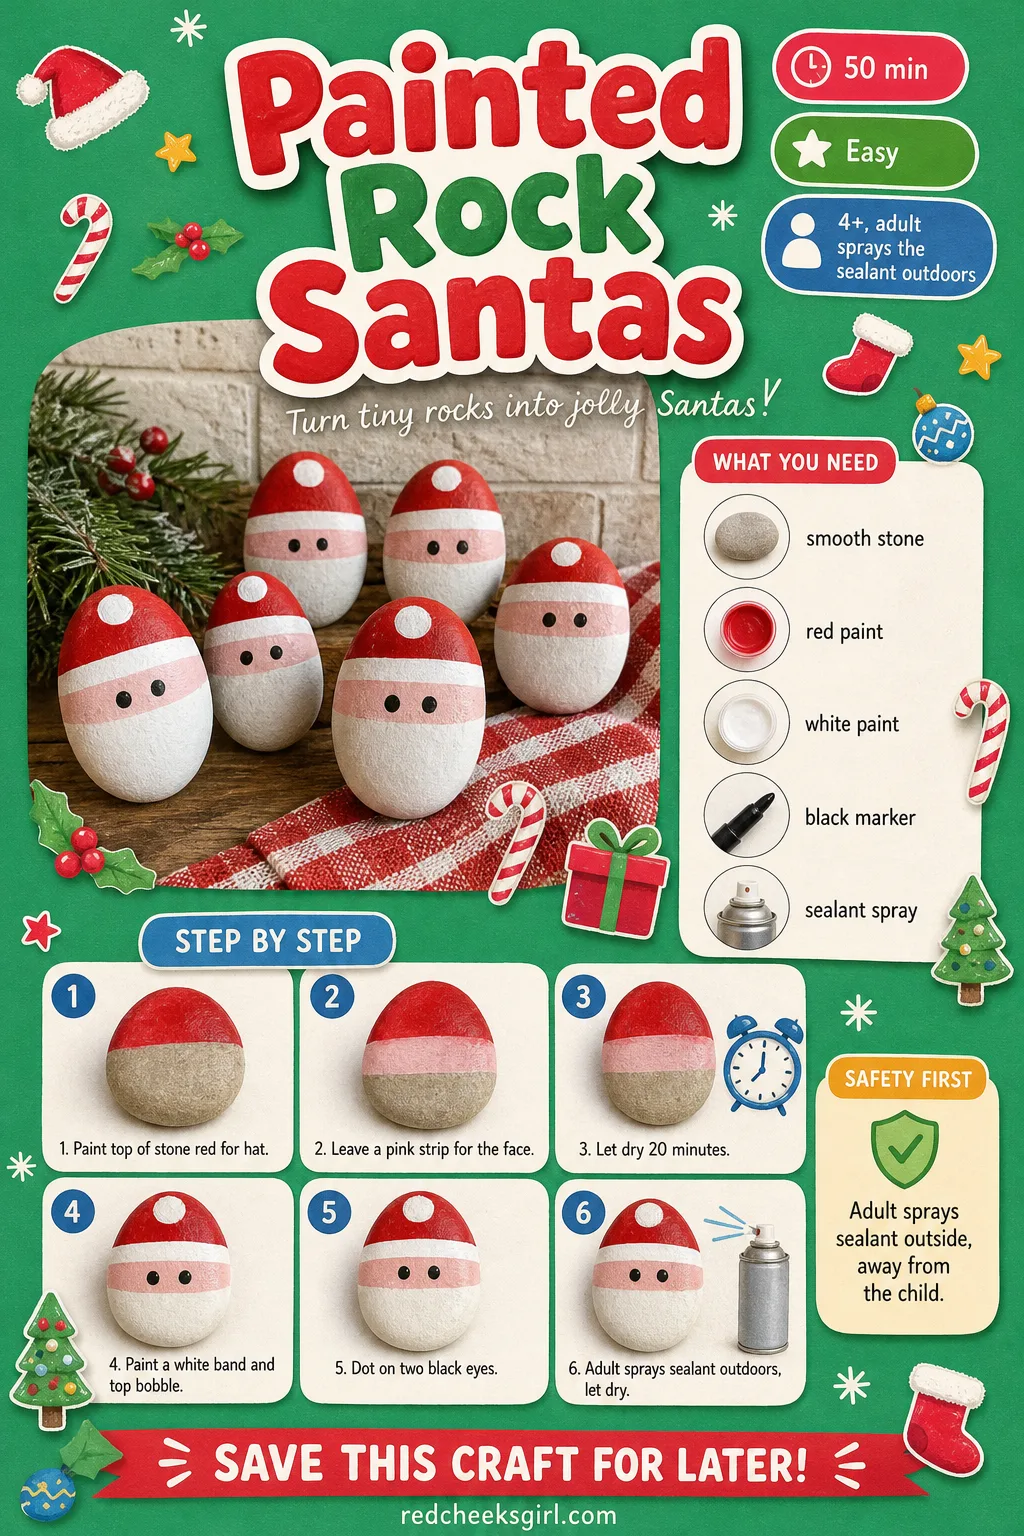
Painted Rock Santas
A smooth stone from the garden, painted red and white, becomes a Santa face that sits happily on a mantel or weighs down a stack of Christmas cards. It costs almost nothing and the sealant coat means it survives being handled, dropped and picked up again all season. Keep a basket of them by the door for anyone who visits.
What You Need
- 1 smooth stone, about 5cm, per child
- red, white and pink acrylic paint
- a black fine marker
- clear sealant spray
How to Make It
- Paint the top two thirds of the stone red for the hat and leave a pink strip for the face.
- Leave to dry for 20 minutes.
- Paint a white band where the hat meets the face, and a white bobble at the top.
- Once dry, dot on two black eyes with the fine marker.
- Adult takes the finished stones outside and sprays with sealant, away from the child, then leaves to dry for 15 minutes.
🛍 Shopping guide
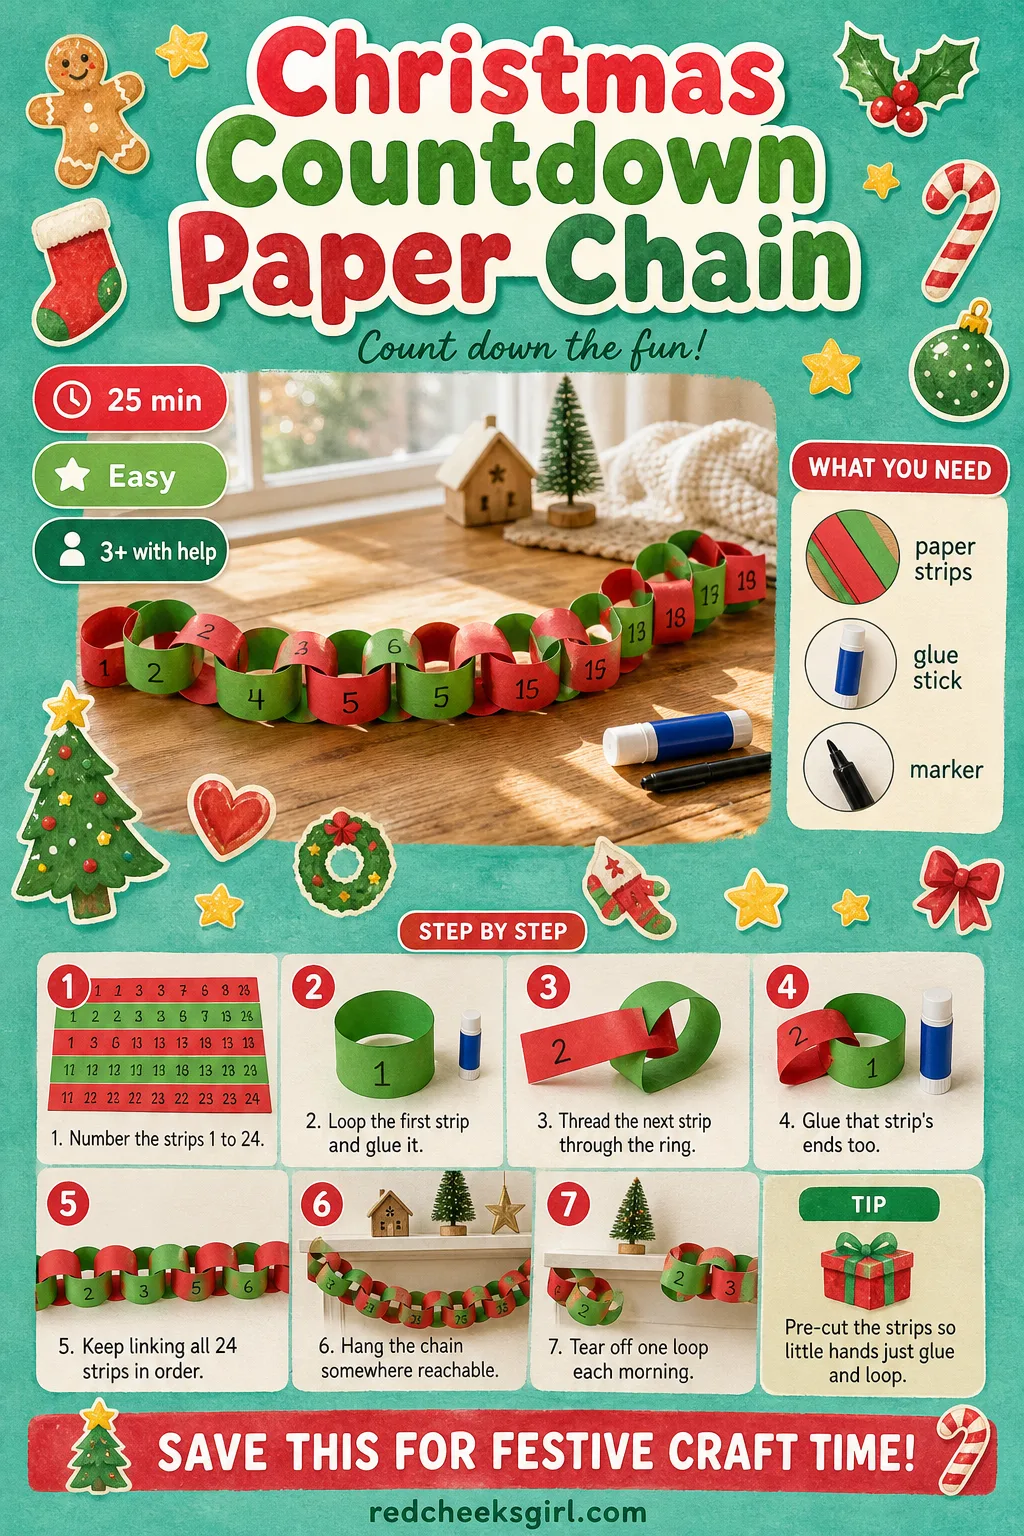
Christmas Countdown Paper Chain
Nothing teaches patience like a chain that gets one link shorter every morning. Strung mantel to mantel or door to door, it is simple coloured paper, nothing more, and it folds flat into an envelope for storage the moment December ends. Let the child tear off the loop each day rather than you, that is the whole point of it.
What You Need
- 24 strips of construction paper, 2cm x 18cm, mixed red and green
- a glue stick or tape
- a marker for numbering
How to Make It
- Number the strips 1 to 24 along one end.
- Loop the first strip into a ring and glue the ends together with a small overlap.
- Thread the second strip through that ring before gluing its own ends, so the two links lock together.
- Keep threading and gluing one strip at a time in number order until all 24 are linked.
- Hang the finished chain somewhere easy to reach.
- Tear off one loop each morning, starting from number one.
🛍 Shopping guide
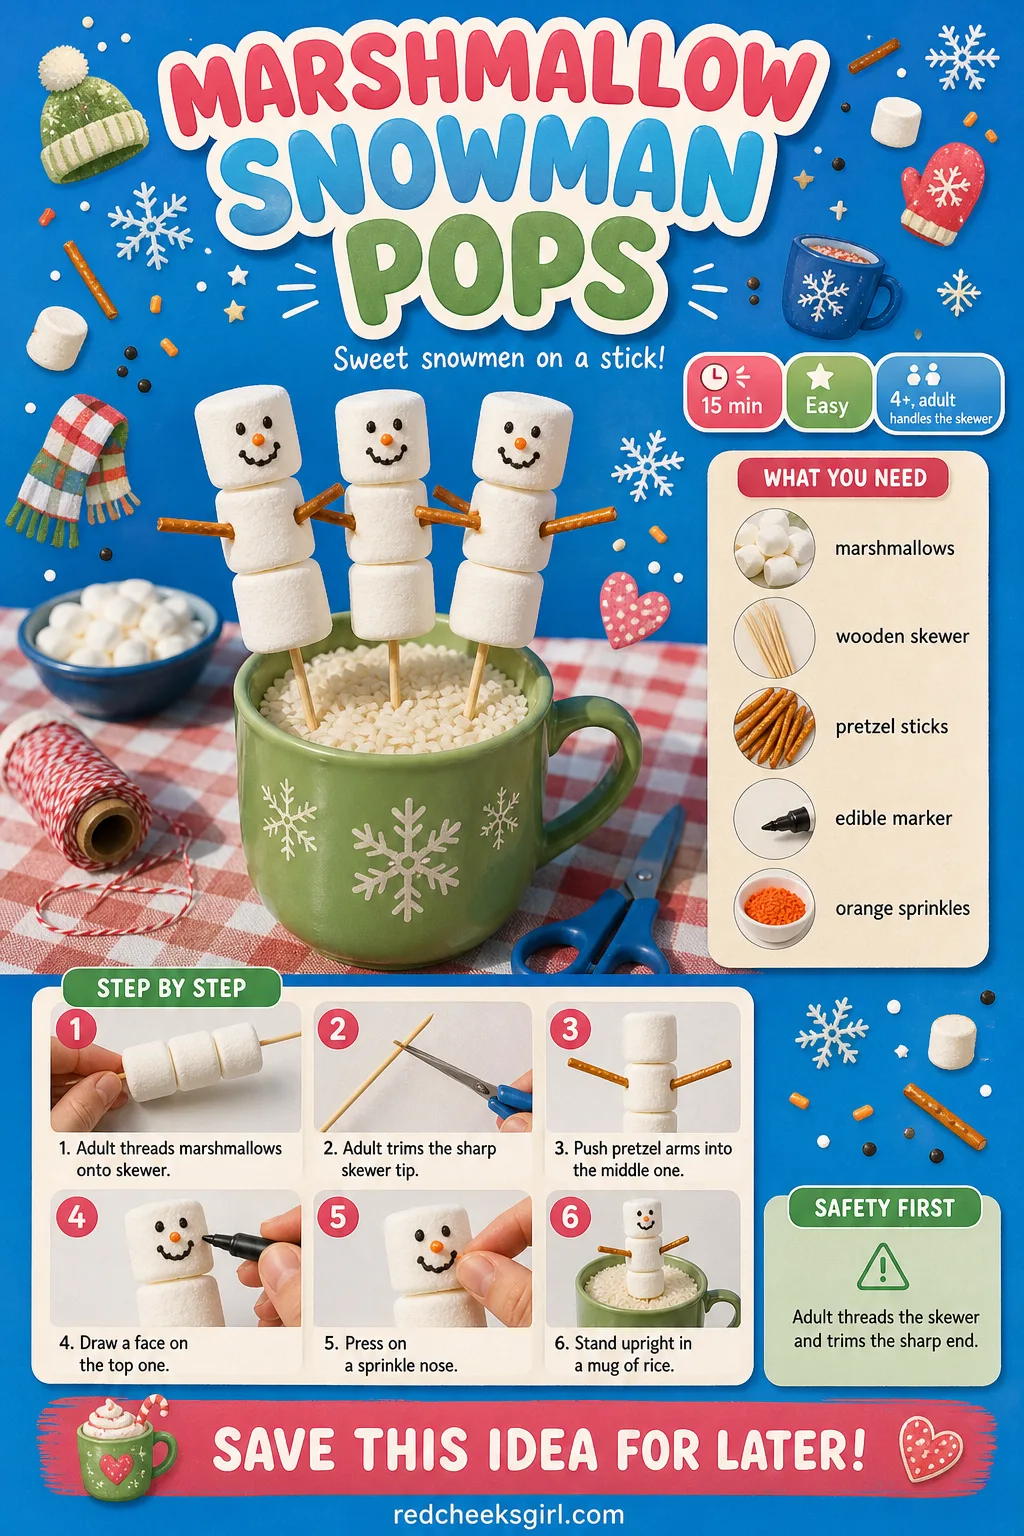
Marshmallow Snowman Pops
This is the craft that is also the treat, three marshmallows stacked on a stick with a face drawn on top, and it buys you a full ten minutes of quiet concentration before anyone eats the result. Stand the finished pops in a mug filled with rice so they stay upright on the table until it is time to hand them out.
What You Need
- 3 large marshmallows per pop
- 1 wooden skewer, 15cm, per pop
- 2 mini pretzel sticks per pop (for arms)
- edible marker and orange sprinkles (for the face)
How to Make It
- Adult threads three marshmallows onto the skewer and trims off the sharp point at the end.
- Child pushes a pretzel stick into each side of the middle marshmallow for arms.
- Child draws a simple face on the top marshmallow with the edible marker.
- Press a tiny orange sprinkle into the face for the carrot nose.
- Stand the finished pop upright in a mug of rice to hold it steady until serving.
🛍 Shopping guide
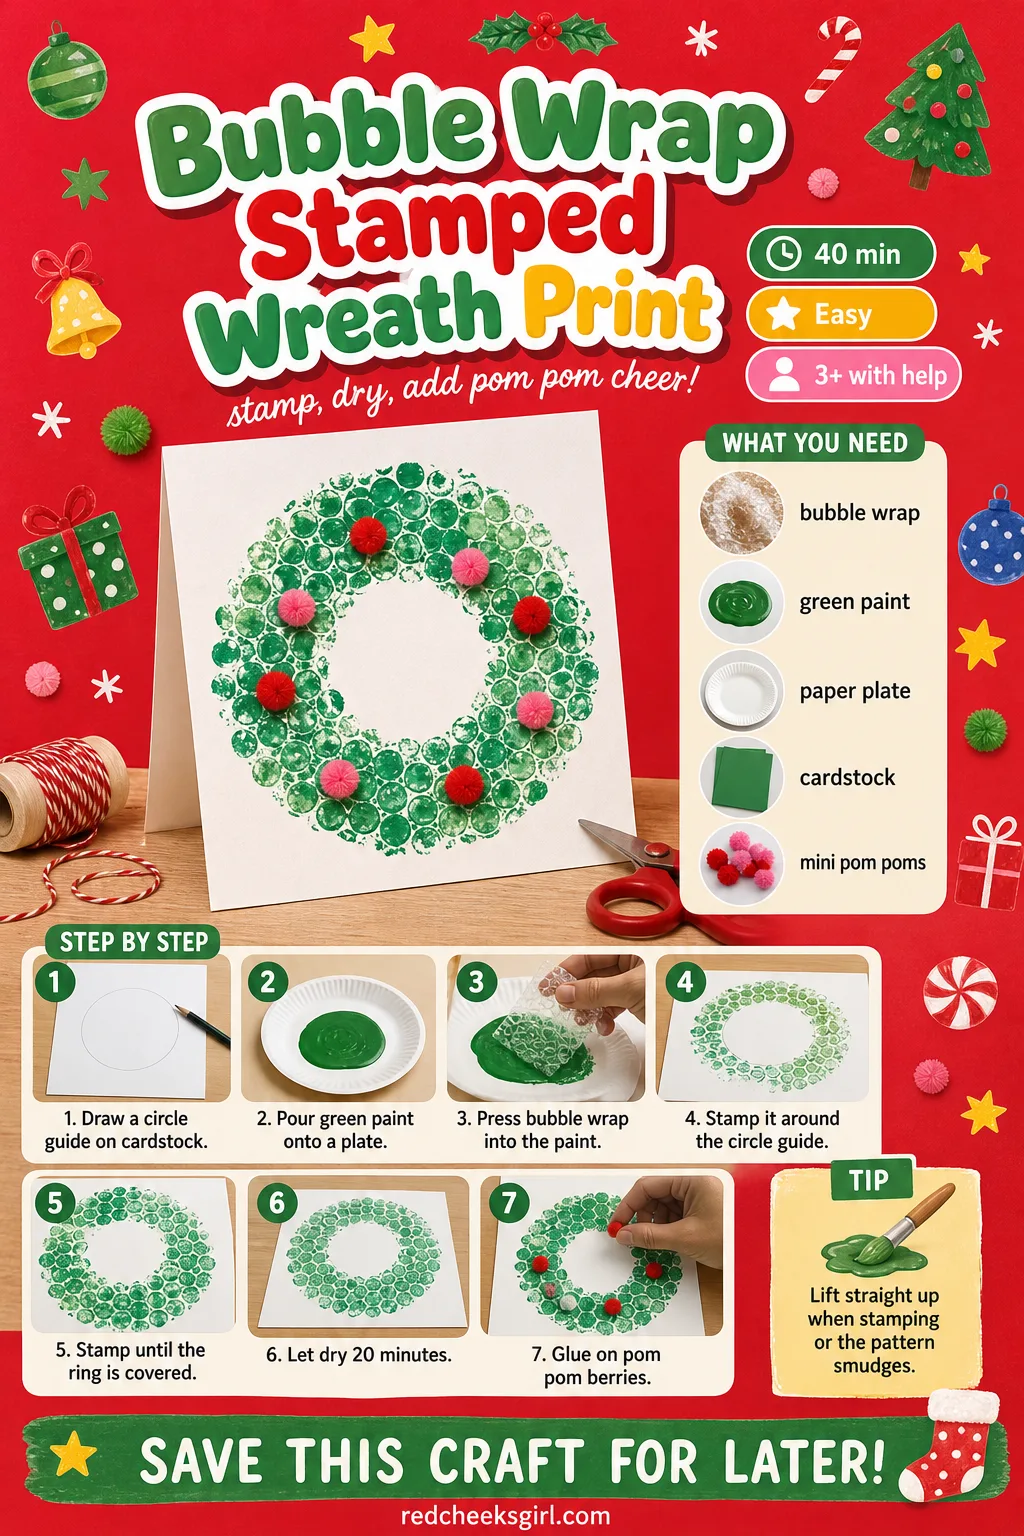
Bubble Wrap Stamped Wreath Print
Bubble wrap dipped in paint and pressed in a circle makes a textured, almost woven-looking wreath print, which is a step up from a flat painted ring for very little extra effort. It dries flat, so it posts well as a card front or frames nicely as a small piece of wall art by the front door.
What You Need
- 1 piece of large-bubble bubble wrap, 15cm x 15cm
- green paint
- 1 paper plate (for the paint)
- 1 sheet white cardstock
- mini red pom poms (for berries)
How to Make It
- Adult draws a circle guide on the cardstock, or presses a plate lightly for an outline.
- Pour a little green paint onto the paper plate.
- Press the bubble wrap into the paint, then stamp it around the circle guide, lifting cleanly between prints.
- Keep stamping until the whole ring is covered, then leave to dry for 20 minutes.
- Glue mini red pom poms around the ring as berries once dry.
- Add a ribbon bow at the base if you like.
🛍 Shopping guide
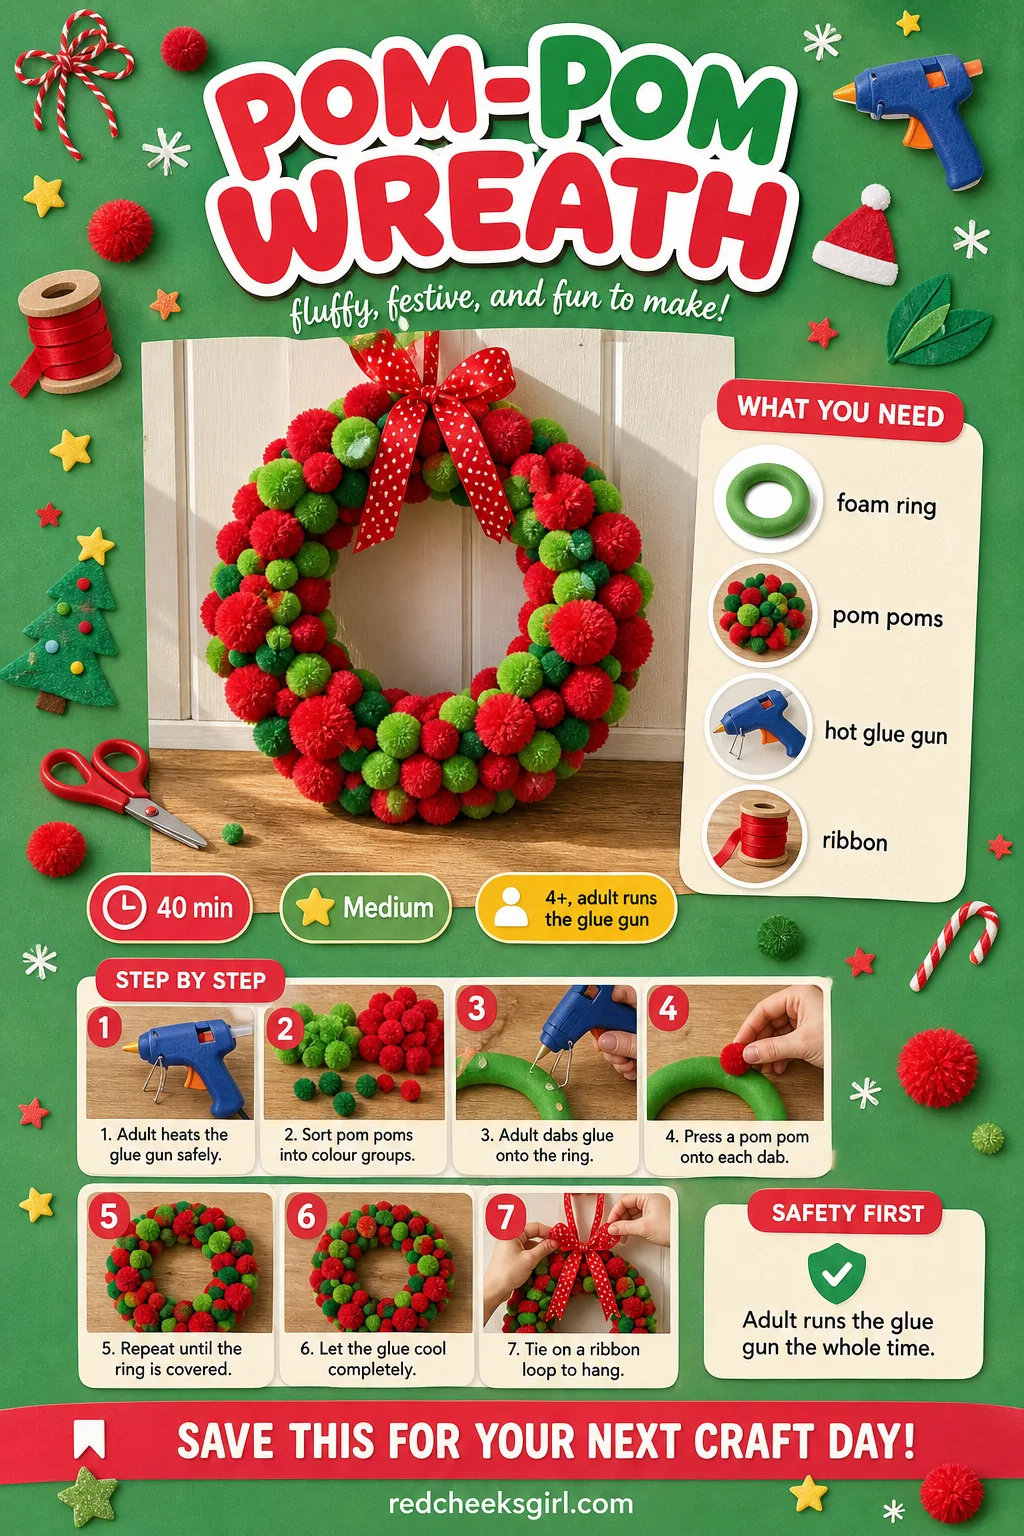
Pom-Pom Wreath
Where the tissue paper wreath is soft and loose, this one is dense and plush, a solid ring of colour that reads as a proper door decoration rather than a craft table project. It takes the longest of any wreath here because every single pom pom needs its own dab of glue, but there is no drying wait once it is done.
What You Need
- 1 foam or cardboard ring, 15cm diameter
- pom poms, 2cm, mixed red and green (about 60)
- a hot glue gun
- a 30cm ribbon
How to Make It
- Adult plugs in and heats the glue gun well away from the child’s reach.
- Child sorts pom poms into colour groups to speed up the next step.
- Adult dabs a small amount of glue onto the ring, and child presses a pom pom straight onto it.
- Repeat around the whole ring, alternating colours, until no base shows through.
- Let the glue cool completely before moving the wreath.
- Tie a ribbon loop at the top to hang.
🛍 Shopping guide
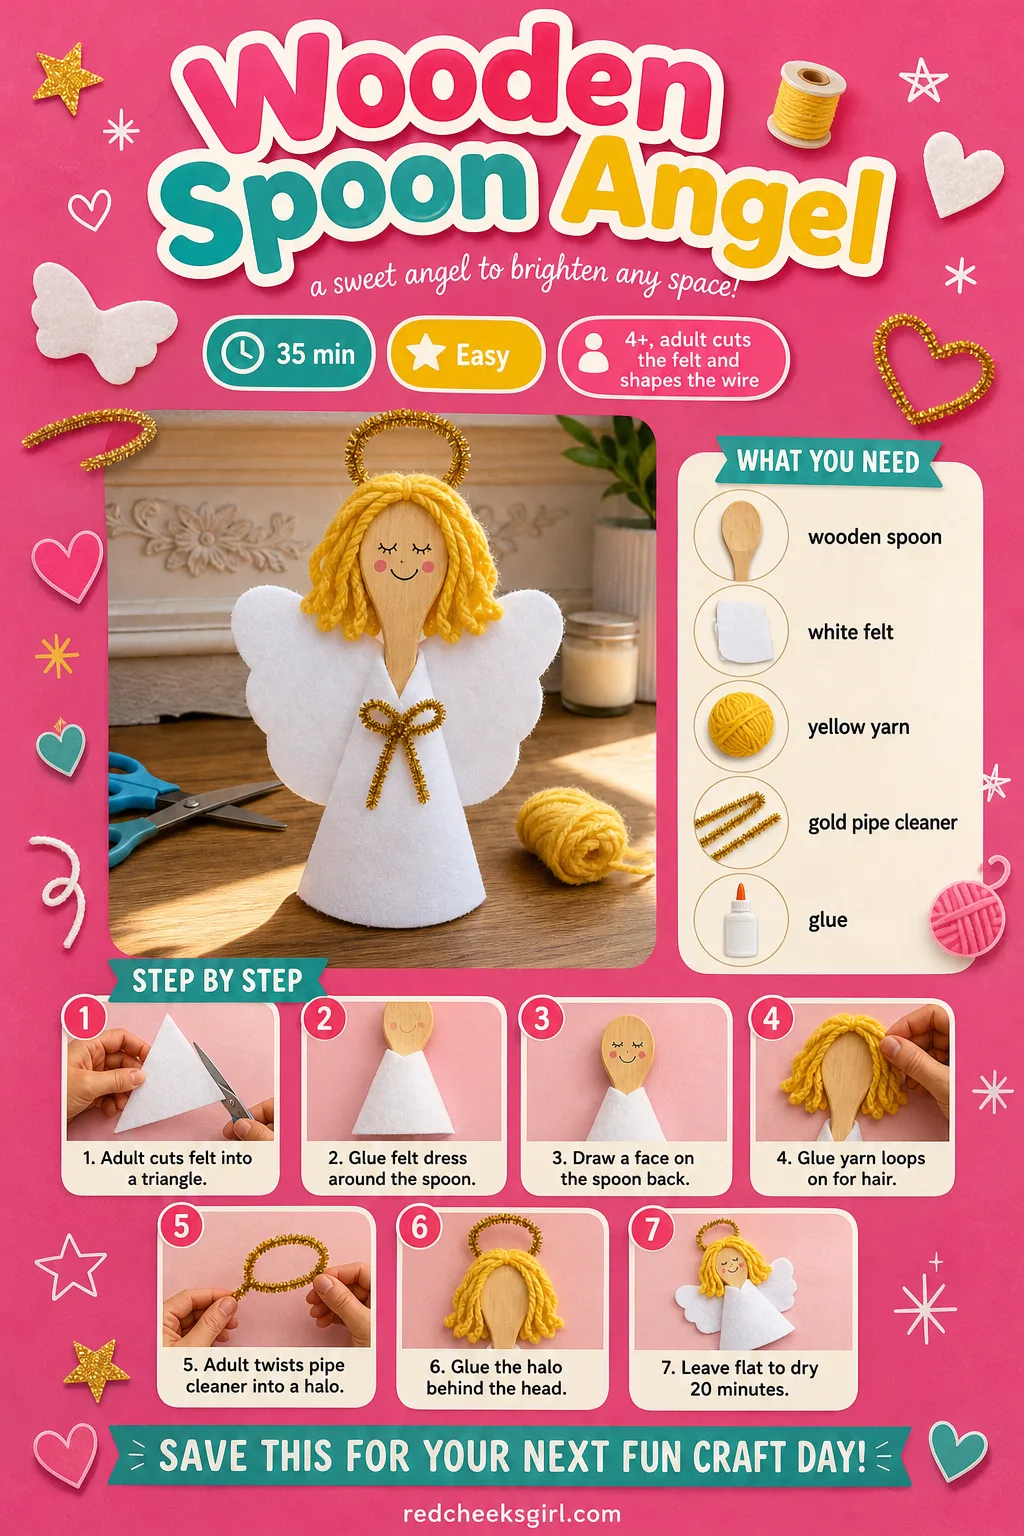
Wooden Spoon Angel
A plain wooden spoon, dressed in a scrap of felt with yarn hair and a twisted halo, makes an angel with real weight and presence, not just a flat cutout. Stand her against a vase on the mantel or tuck her among the tree branches as a topper substitute if the actual topper is lost again this year.
What You Need
- 1 wooden spoon
- white or cream felt, one 10cm triangle
- yellow yarn (for hair)
- 1 gold pipe cleaner, 15cm (for the halo)
- a fine marker and craft glue
How to Make It
- Adult cuts the felt into a wide triangle to wrap as a dress around the spoon’s bowl.
- Glue the felt dress around the spoon, overlapping the edge at the back.
- Draw a simple face on the back of the spoon’s bowl with the fine marker.
- Glue short loops of yellow yarn above the face for hair.
- Adult twists the pipe cleaner into a small loop for the halo and glues it behind the head.
- Leave flat to dry for 20 minutes before standing it up.
🛍 Shopping guide
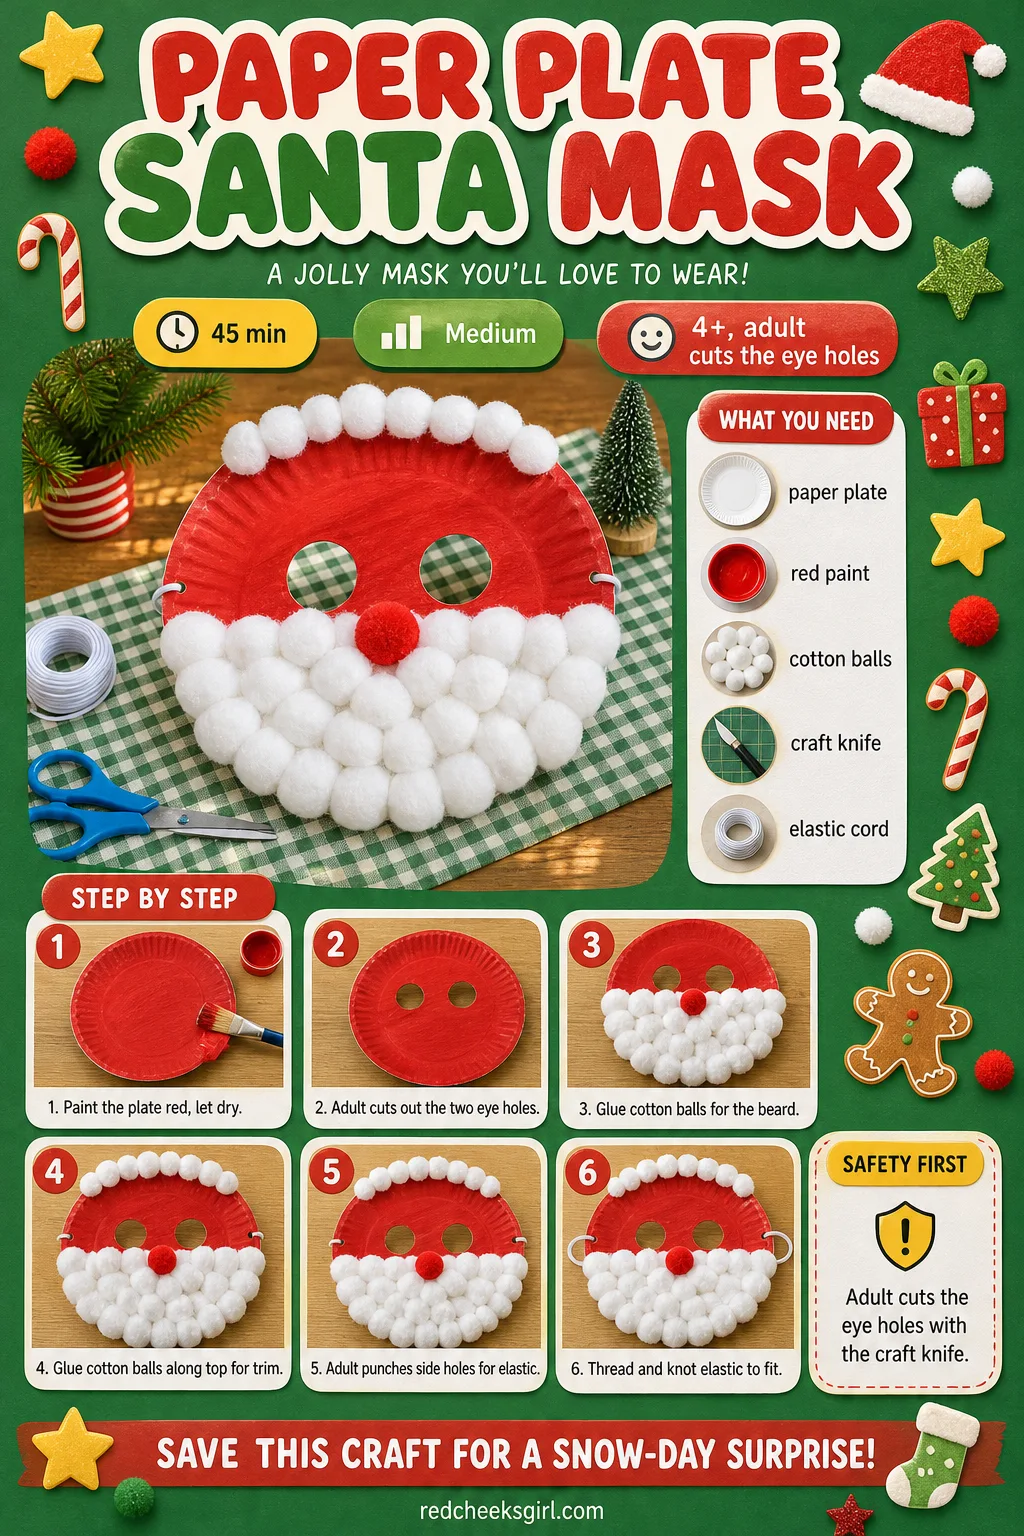
Paper Plate Santa Mask
Half the fun of a mask is wearing it, and this one turns a plain plate into Santa’s whole face in under an hour, cotton ball beard and all. The craft knife step for the eye holes is the only part that genuinely needs an adult alone in the room. Store it flat in a drawer between wears so the elastic does not stretch out.
What You Need
- 1 paper plate, 23cm
- red acrylic paint
- cotton balls (about 15)
- a craft knife
- 60cm elastic cord
How to Make It
- Paint the whole plate red and leave to dry for 20 minutes.
- Adult marks two eye positions and cuts them out carefully with the craft knife.
- Glue cotton balls across the bottom half of the plate for the beard.
- Glue a line of cotton balls along the top edge for the hat trim.
- Adult punches a small hole on each side and threads the elastic through, knotting to fit the child’s head.
🛍 Shopping guide
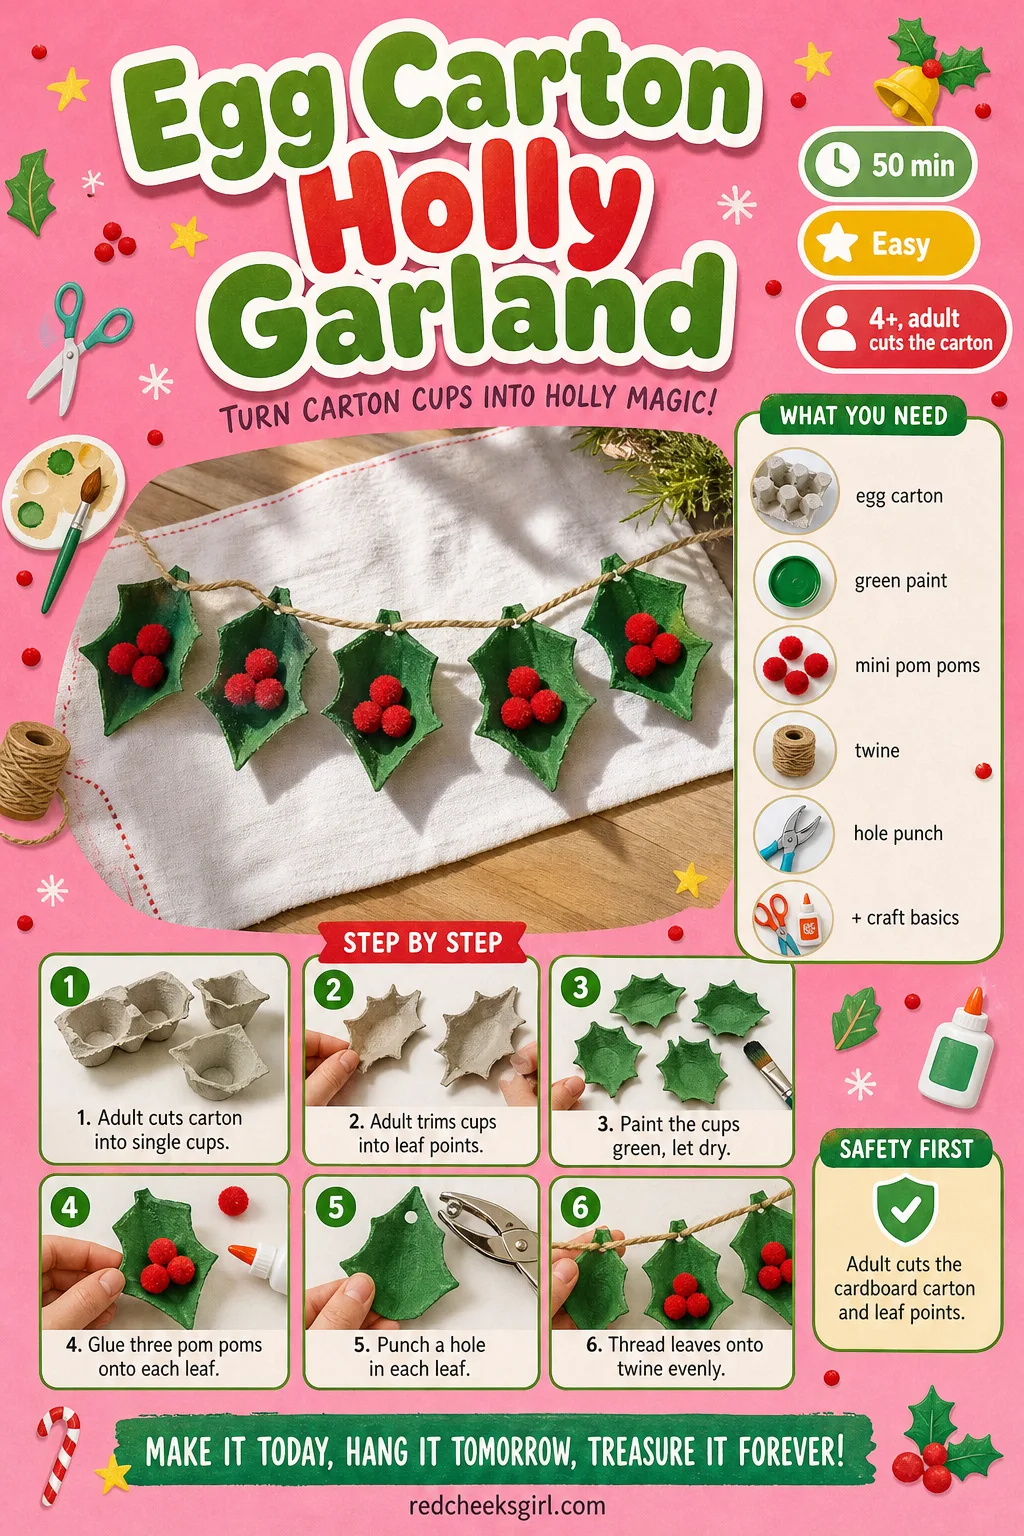
Egg Carton Holly Garland
The bumpy cups from an egg carton, snipped into leaf shapes and painted green, make a holly garland that looks far more deliberate than its scrap-bin origins. String it along a mantel or a classroom shelf, and when the season ends it packs flat as a coil of twine with a handful of cardboard leaves clipped off.
What You Need
- 1 cardboard egg carton (makes about 12 leaves)
- green acrylic paint
- mini red pom poms (3 per holly leaf)
- craft glue
- 1.5m twine or string
- a hole punch
How to Make It
- Adult cuts the egg carton apart into individual peaked cups.
- Adult trims each cup’s edge into rough leaf points with scissors.
- Paint all the cups green and leave to dry for 20 minutes.
- Glue three red pom poms into the centre of each leaf as berries.
- Punch a small hole near the edge of each leaf.
- Thread the leaves onto the twine, spacing them evenly along the length.
🛍 Shopping guide
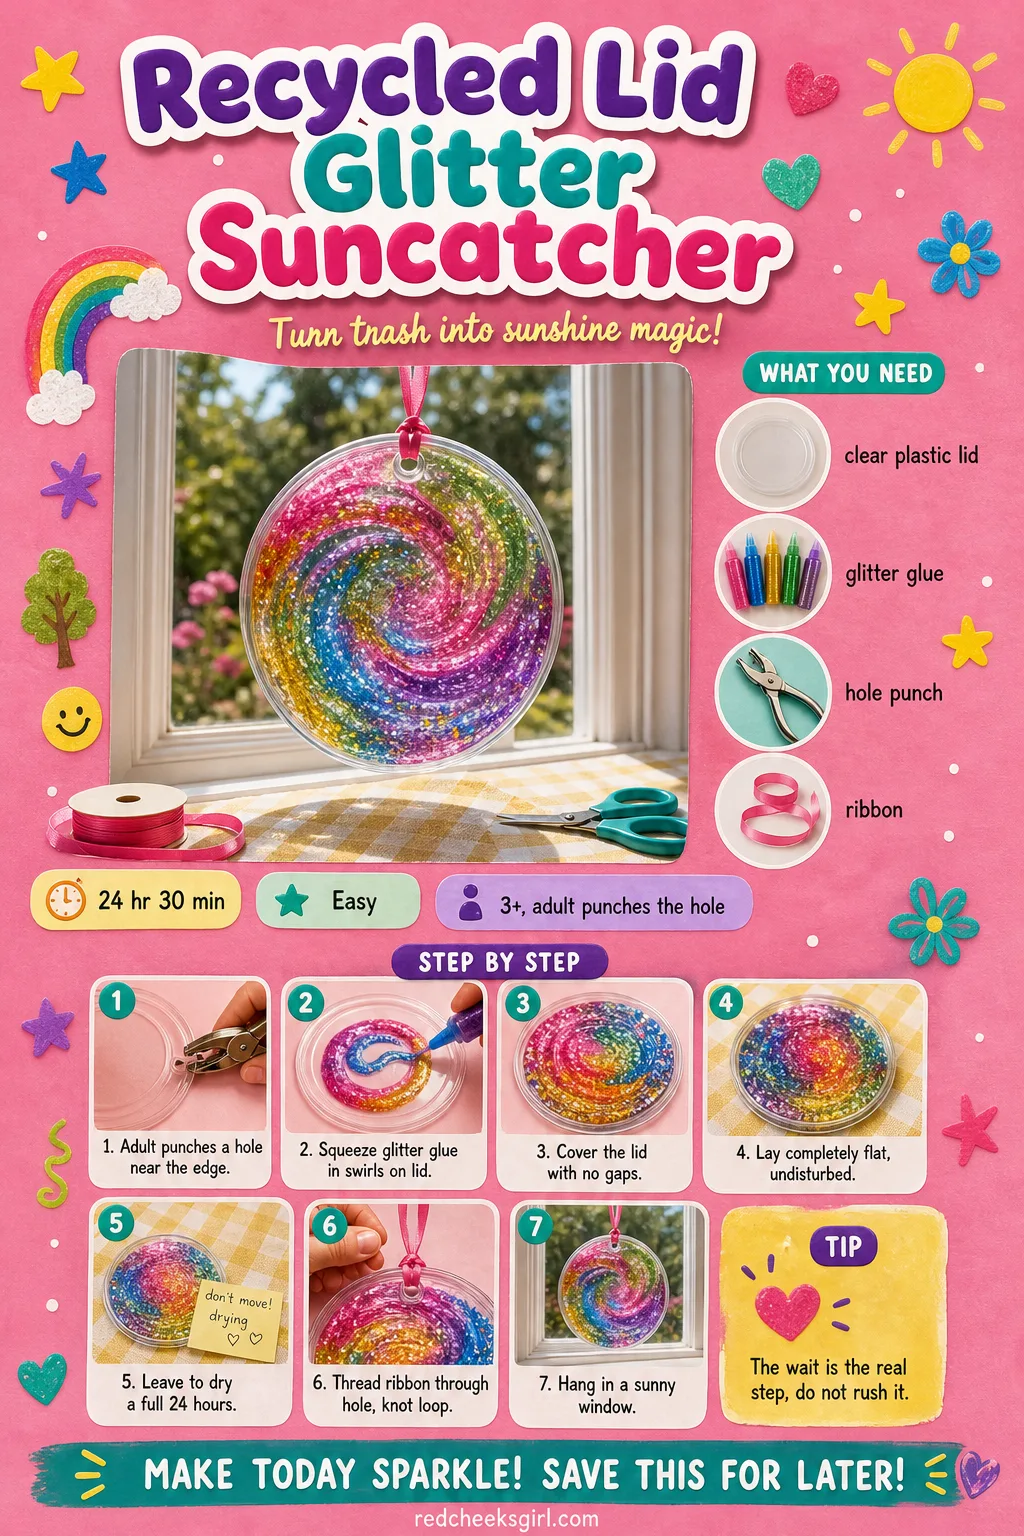
Recycled Lid Glitter Suncatcher
A clear yogurt lid, filled with swirls of coloured glitter glue, is about as close to stained glass as a toddler gets, and the long drying wait is genuinely the hardest part of the whole craft. Tape it to a window the next morning and it throws small coloured flecks of light across the floor, which is the payoff for waiting.
What You Need
- 1 clear plastic lid, about 8cm, washed
- glitter glue in 3 to 4 colours
- a hole punch
- 20cm ribbon
How to Make It
- Adult punches a small hole near the edge of the lid.
- Squeeze glitter glue onto the lid in swirls and dots, covering the clear plastic without leaving gaps.
- Lay the lid completely flat somewhere undisturbed.
- Leave to dry for a full 24 hours, since thick glitter glue needs time to set clear.
- Thread the ribbon through the punched hole and knot it into a loop.
- Hang in a window where light passes through.
🛍 Shopping guide
Frequently Asked Questions
What age is appropriate for preschool Christmas crafts?
Most of the crafts here suit children from about 2 to 5 years old, with an adult handling anything sharp, hot or small enough to swallow. These resources are ideal from about 2yrs to 5yrs old, so pick ones that match the specific child rather than the whole age range at once.
What are the easiest Christmas crafts for preschoolers to start with?
Start with anything that only needs gluing or pressing a hand or foot onto paper. Simple activities like paper strip trees, fingerprint cards, and salt dough ornaments are perfect for beginners. The thumbprint lights card and the cotton ball snowman above both fit that same low-skill, high-payoff category.
How do I keep preschool Christmas crafts from making a huge mess?
Cover the table, keep paint in small amounts on a plate rather than open pots, and have wipes within arm’s reach before you start. Crafts using dabbed glue and pre-cut shapes, like the handprint tags or the pinecone trees, stay far tidier than anything with loose glitter or spray paint.
Can preschool Christmas crafts be made with things already at home?
Yes, most of this list uses a toilet paper tube, a paper plate, cotton balls or a cardboard egg carton rather than anything bought specially. Only a handful, like the hot glue wreath or the salt dough ornament, call for a tool worth picking up before you start.
How long does a typical preschool Christmas craft take?
Active hands-on time runs from about 10 to 30 minutes for almost everything on this list, with drying or baking adding the rest. The salt dough ornament and the glitter lid suncatcher take the longest overall, simply because they need hours to set properly rather than minutes of active work.
How do you store preschool Christmas crafts after the holidays?
Flat paper crafts like the cards and the paper chain pack into an envelope or a slim folder for next year. Ornaments with any weight, like the salt dough shape or the clothespin snowflake, do better wrapped in tissue inside a shoebox so nothing chips in storage.

Christmas party games for groups of 30 that keep everyone playing at once. 10 free printables plus 1

12 water candles DIY recipes with exact wax, wick and scent amounts, built around cranberries, pine
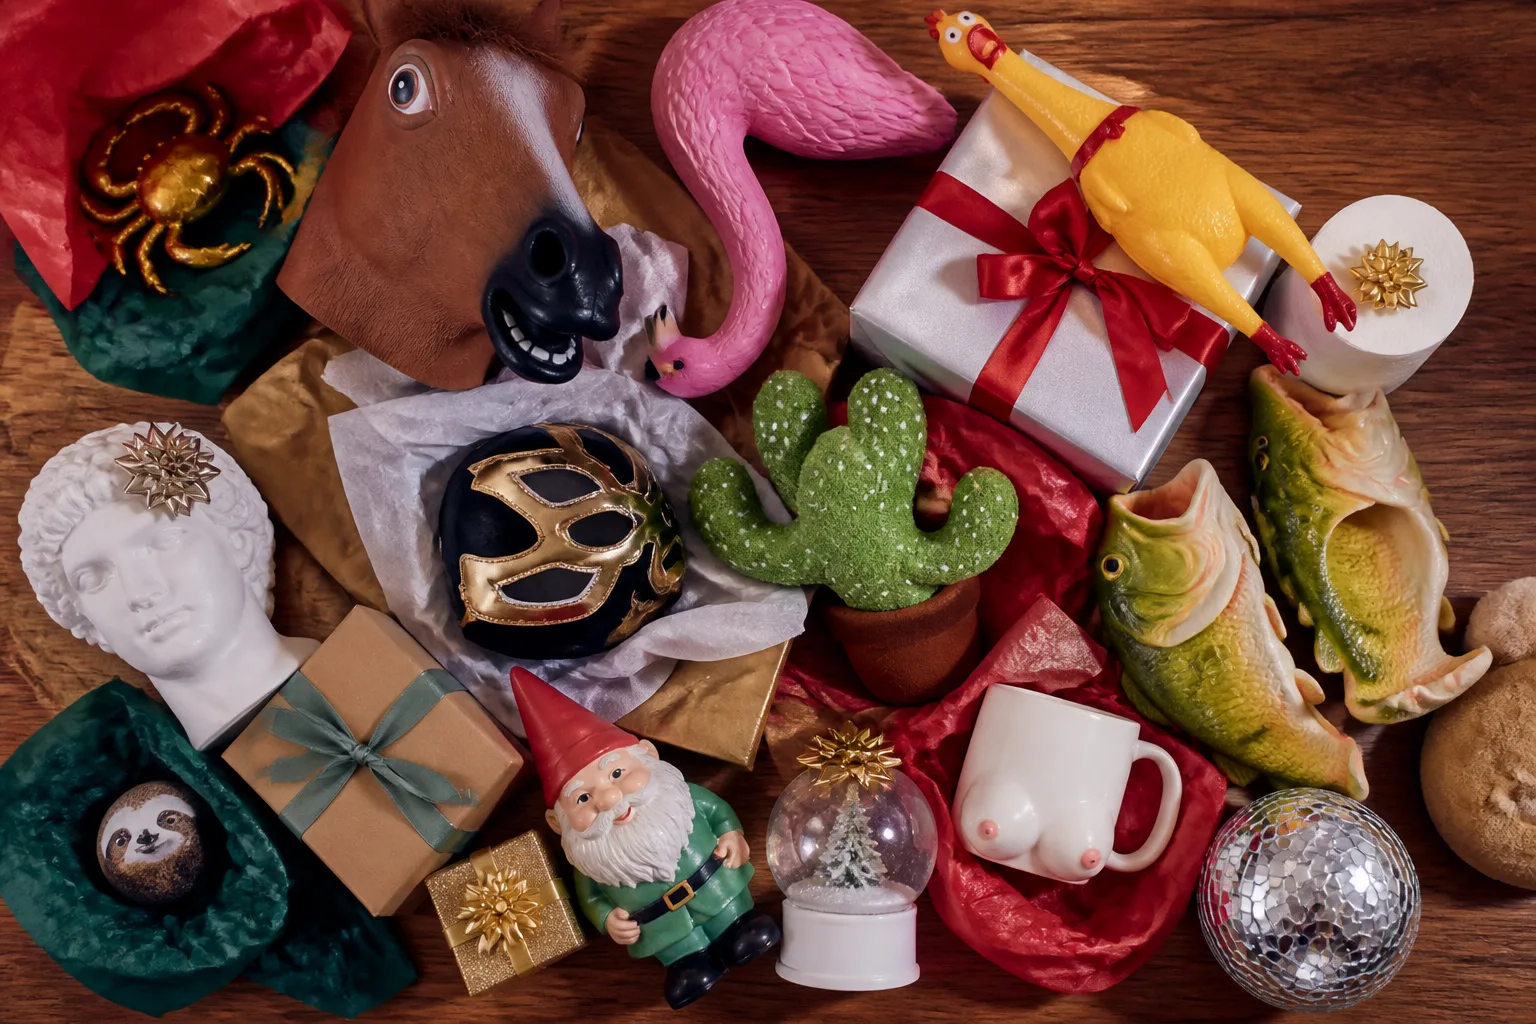
40 funny white elephant gifts worth fighting over, sorted by office, gag, steal-power, food and nost
Leave a Reply