


The building system that inspired this party look is Lego, and the aesthetic it produces is unmistakable: primary red (#DC143C), chrome yellow (#FFD700), strong blue (#0051BA) and black (#000000) stacked in hard rectangular forms against glossy surfaces, with accent hits of white and lime green (#32CD32). Every visual below is built from that colour logic alone. No licensed product required.
What makes this palette so useful for party design is its geometry. Stacked bricks, interlocking dot grids and bold rectangular silhouettes translate directly into balloons, painted cardboard, cut foam core and paper garland. The look reads as construction-zone graphic: high contrast, zero fuss, zero ambiguity about what party this is.
The 28 ideas below cover entry moments, table styling, lighting, signage and photo opportunities. Pair any of them with the official building sets, minifigures and licensed party ware available through the Lego online shop if you want licensed pieces alongside the DIY look, or run the whole party on the visual language alone. Both choices work.
This post contains affiliate links. If you buy through them, I may earn a small commission at no extra cost to you.
Entry and First Impressions
The entry moment sets the palette before a single guest walks through the door. Balloon towers, painted archways and construction-zone tape all read fast and scale to any doorway or porch. Spend here and keep the interior simpler if the budget is tight.
These ideas are designed to photograph well from ten feet away. They also pack down fast when the party ends, which matters more than most party guides admit. For games and activities to keep the energy up once guests arrive, the roundup at 25 Birthday Party Games for Kids That Burn Off the Sugar slots in perfectly alongside this look.
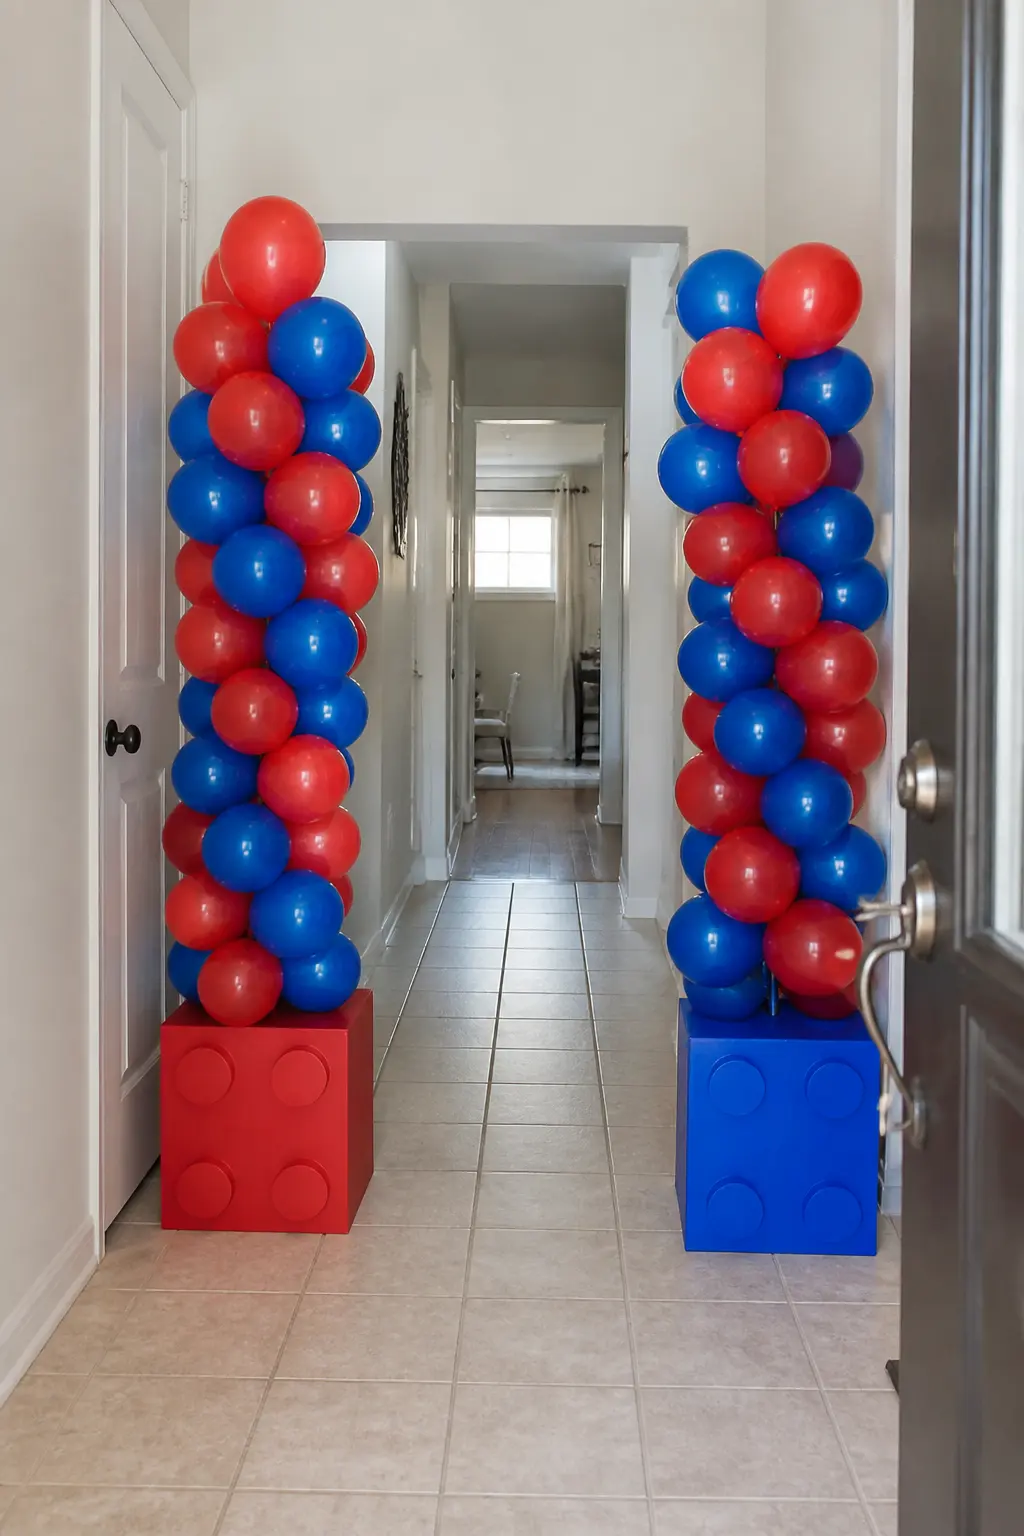
Brick-Red and Primary-Blue Balloon Towers at Entry
Two columns of balloons, one in brick red (#DC143C) and one in primary blue (#0051BA), flanking a front door or venue entrance signal the palette before anyone steps inside. Stack them vertically on a weighted base using balloon tape or a vertical pole.
Alternate colours within each column rather than keeping them solid: the dot pattern reads as interlocking even in a balloon format.
For outdoor entries, add a black balloon at the top of each column to anchor the silhouette against the sky. Weight the bases inside a cardboard box painted to match. No helium needed: these towers use inflated balloons on a frame and stay put for hours.
🛍 Shopping guide
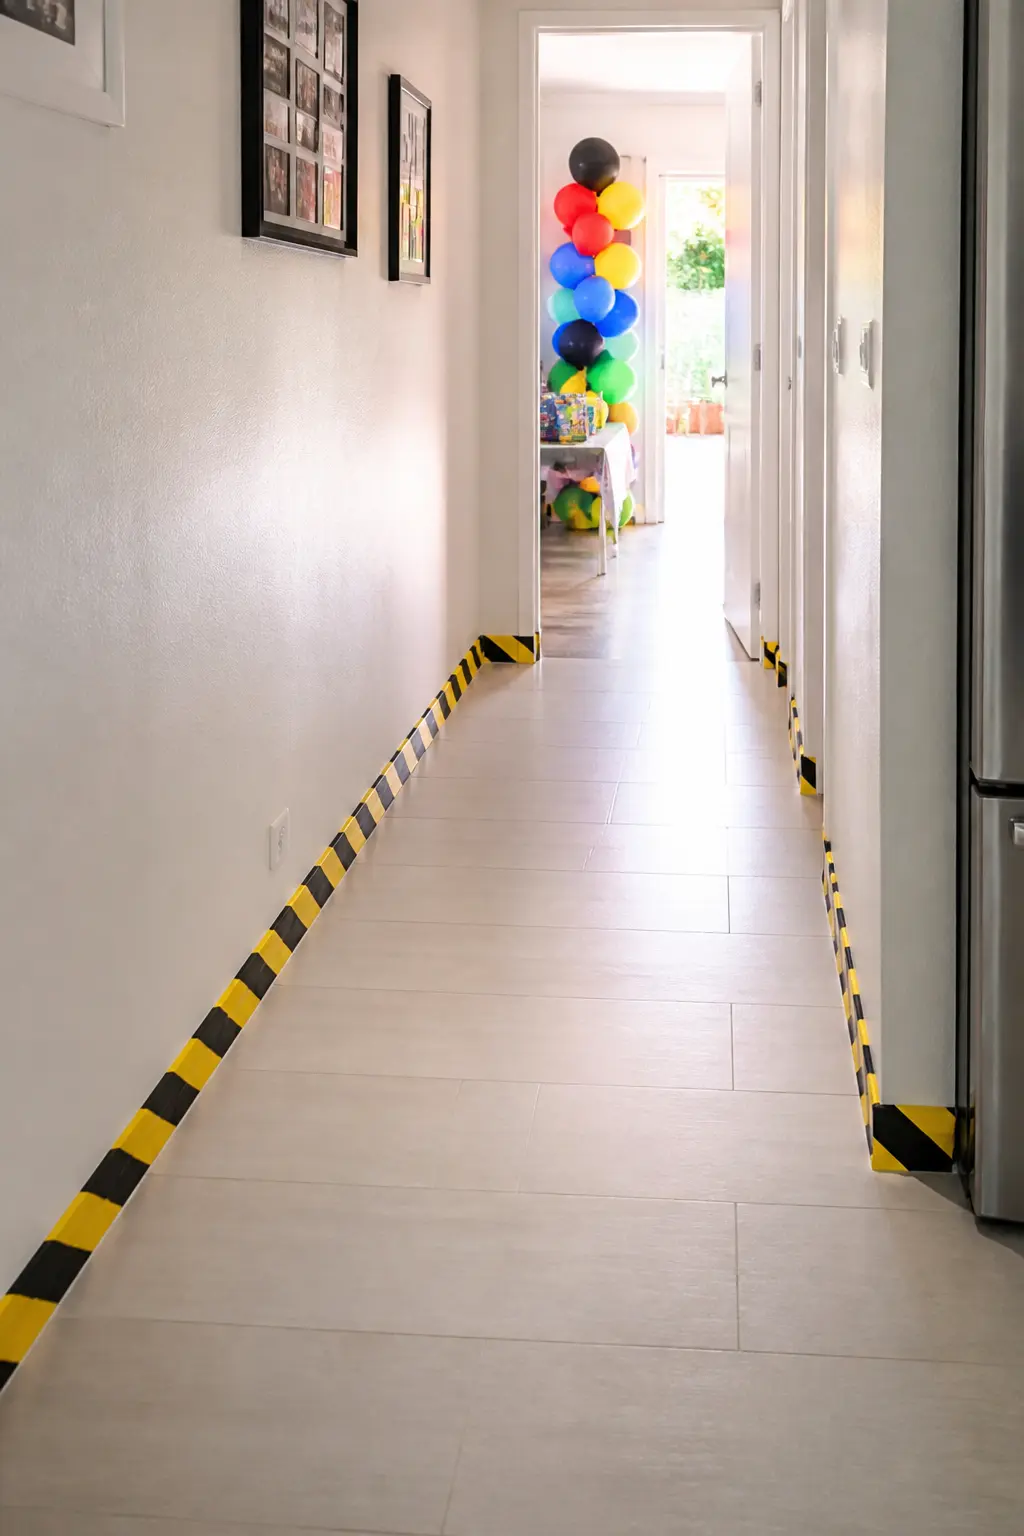
Construction-Zone Tape Bordering the Party Space
Black-and-yellow hazard tape, or a DIY version using alternating strips of black and yellow card, run along the base of walls or the perimeter of a party zone.
It marks the edges of the party space clearly and adds the construction-zone graphic language that sits underneath this whole aesthetic. Cost for actual hazard tape: under two dollars for a full roll.
Use it to border a buffet table, to outline the photo booth area or to frame a doorway. Keep it at baseboard level or lower so it reads as an architectural detail rather than something stapled to the wall. It also works as a runner along a pathway leading guests from entry to the main party area.
🛍 Shopping guide
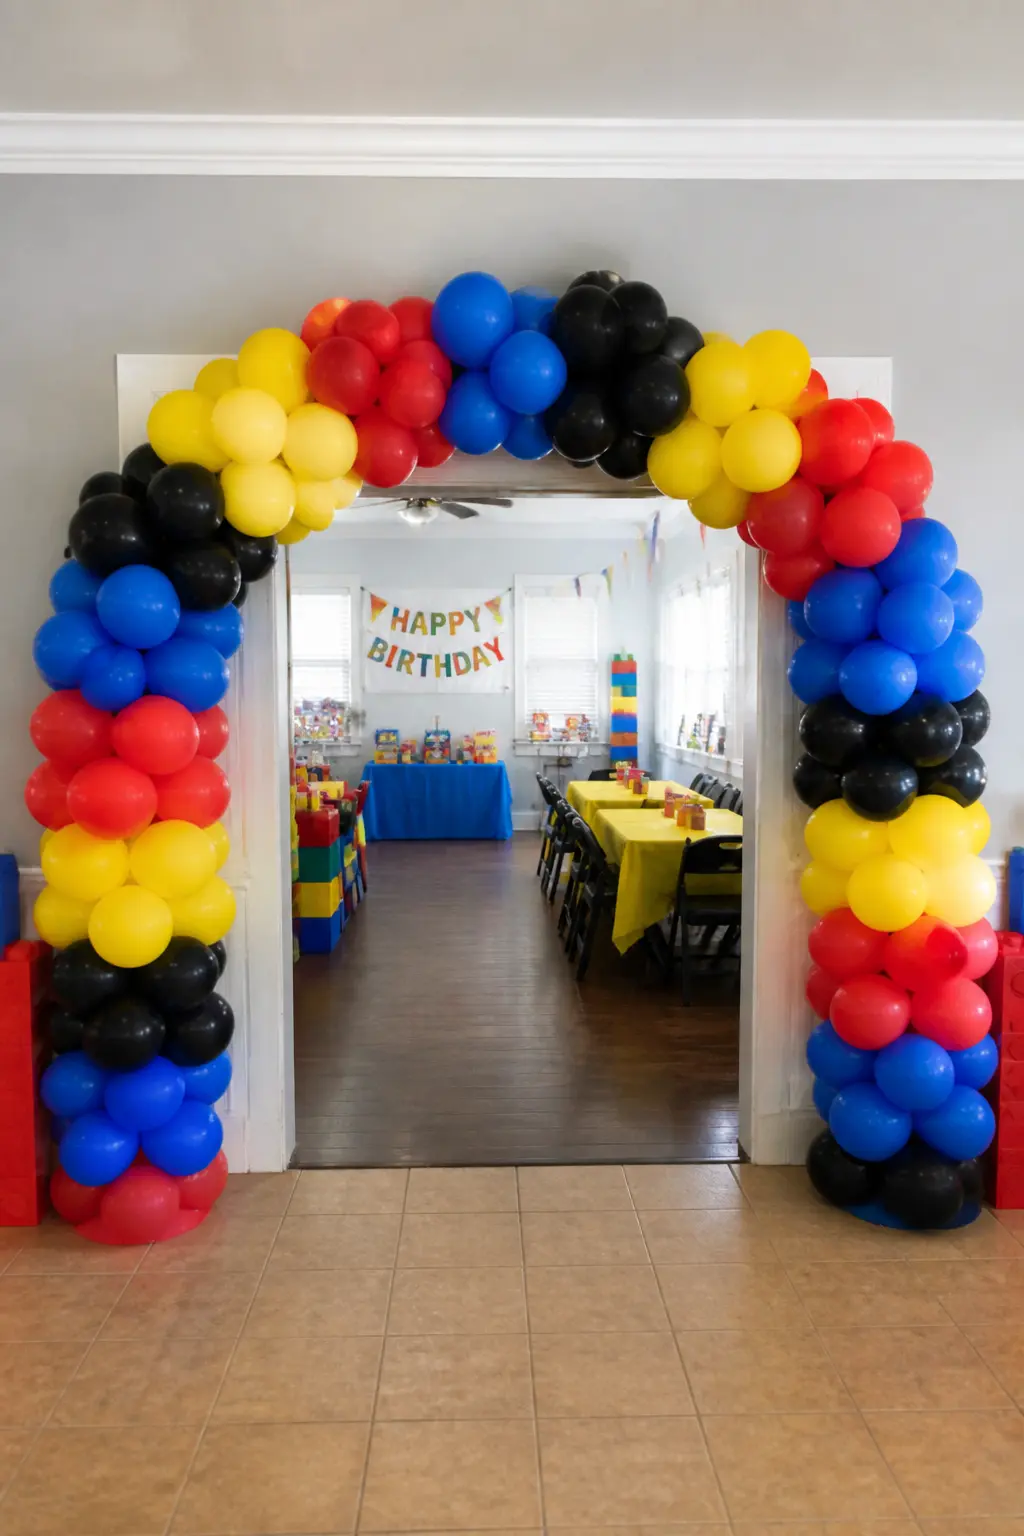
Primary-Bright Balloon Arch with Geometric Spacing
A balloon arch built on an armature strip, using red, yellow, blue, black and white balloons in a deliberate repeating sequence, reads as a colour-coded grid when the sequence is precise.
Group balloons in clusters of four of the same colour, then switch to the next colour, so each section of the arch reads as a solid block. The result is a graphic stripe across the arch rather than a confetti-mix gradient.
Keep the arch low enough that it frames a doorway rather than soaring over it: an arch that sits at 2 m reads better on camera and does not require scaffolding to construct.
Add lime green (#32CD32) balloons at the two base points as accent notes that anchor the arch to the floor or wall bracket without competing with the primary sequence above.
🛍 Shopping guide
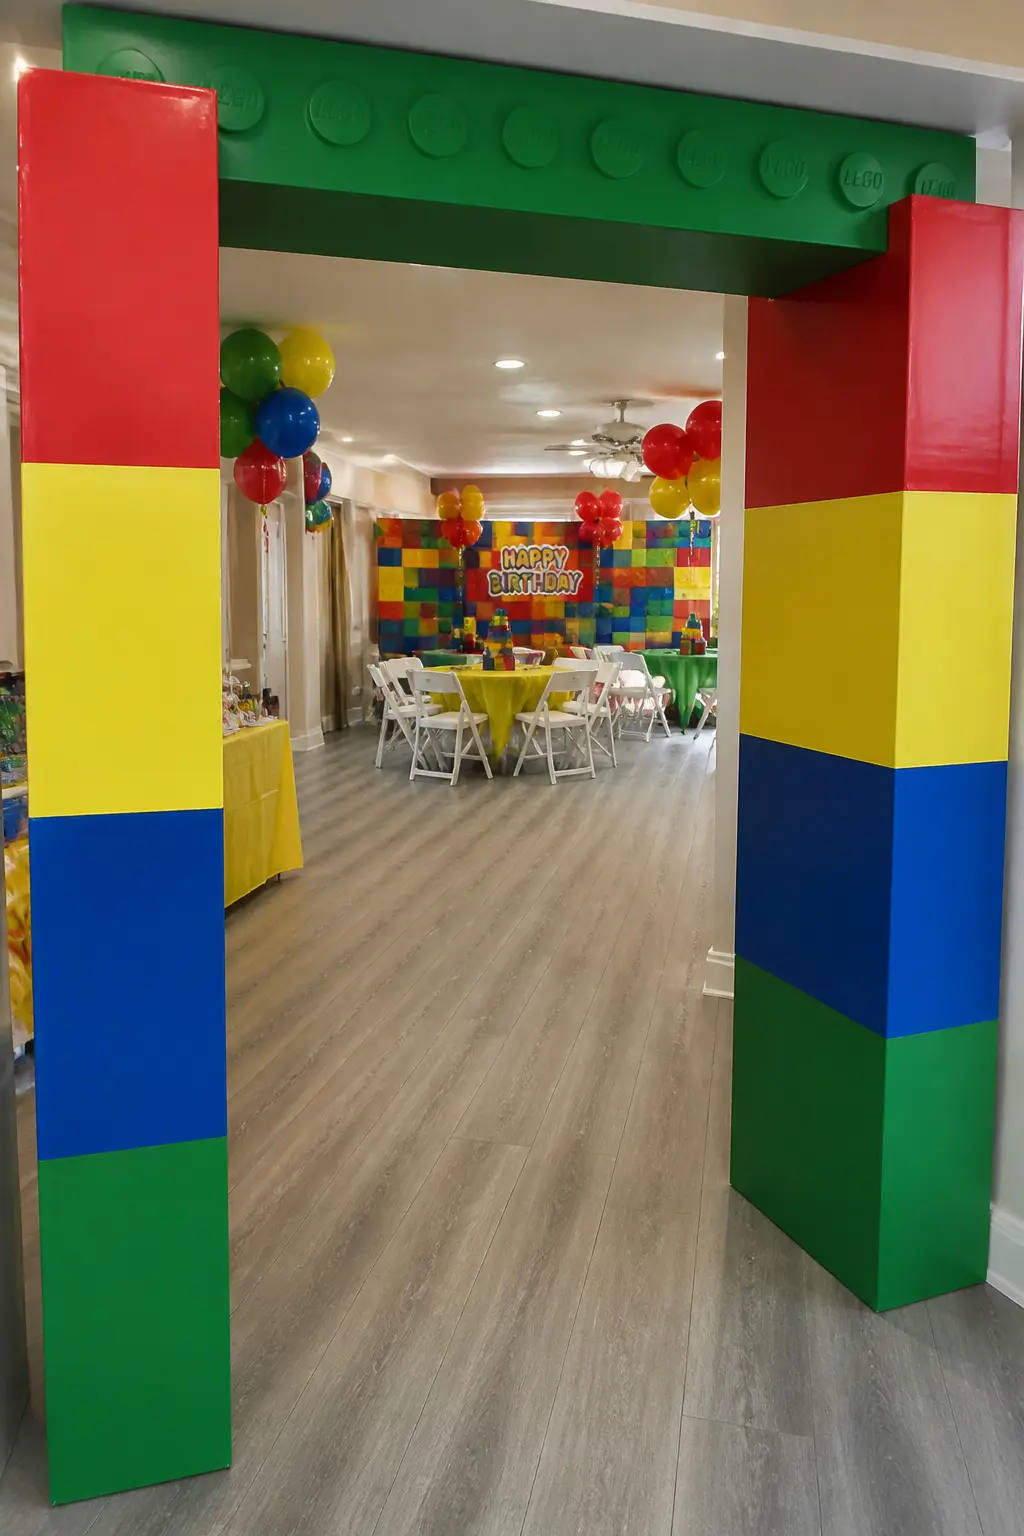
Building-Zone Entrance Archway in Stacked-Block Style
Construct a freestanding archway from painted cardboard tubes or foam-core panels arranged to suggest a stacked-block wall on either side with an open top. Paint the panels in alternating primary colours so each rectangular section reads as a separate block.
The arch does not need a physical span across the top: two painted columns either side of a walkway are enough to frame an entrance convincingly.
Secure each column with a weighted base (a box filled with books or sand, covered in black paper) and keep the height to around 1.8 m so it does not require ceiling anchoring. This archway reads as architectural, not decorative, and sets the tone for the whole party space before guests reach the main room.
🛍 Shopping guide
Table and Surface Styling
Tables are where guests spend most of the party, so the grid-and-stud motif needs to land here with some conviction. Tablecloths, runners, centrepieces and place cards all work as a layered system: choose two or three from this section rather than all of them, or the table tips into chaos.
Napkin folds, drink stirrers and geometric place cards cost almost nothing and contribute a surprising amount of finish. They are also where a colour-coordination plan either holds together or falls apart, so pick your dominant colour for each table surface and let the accents punch against it.
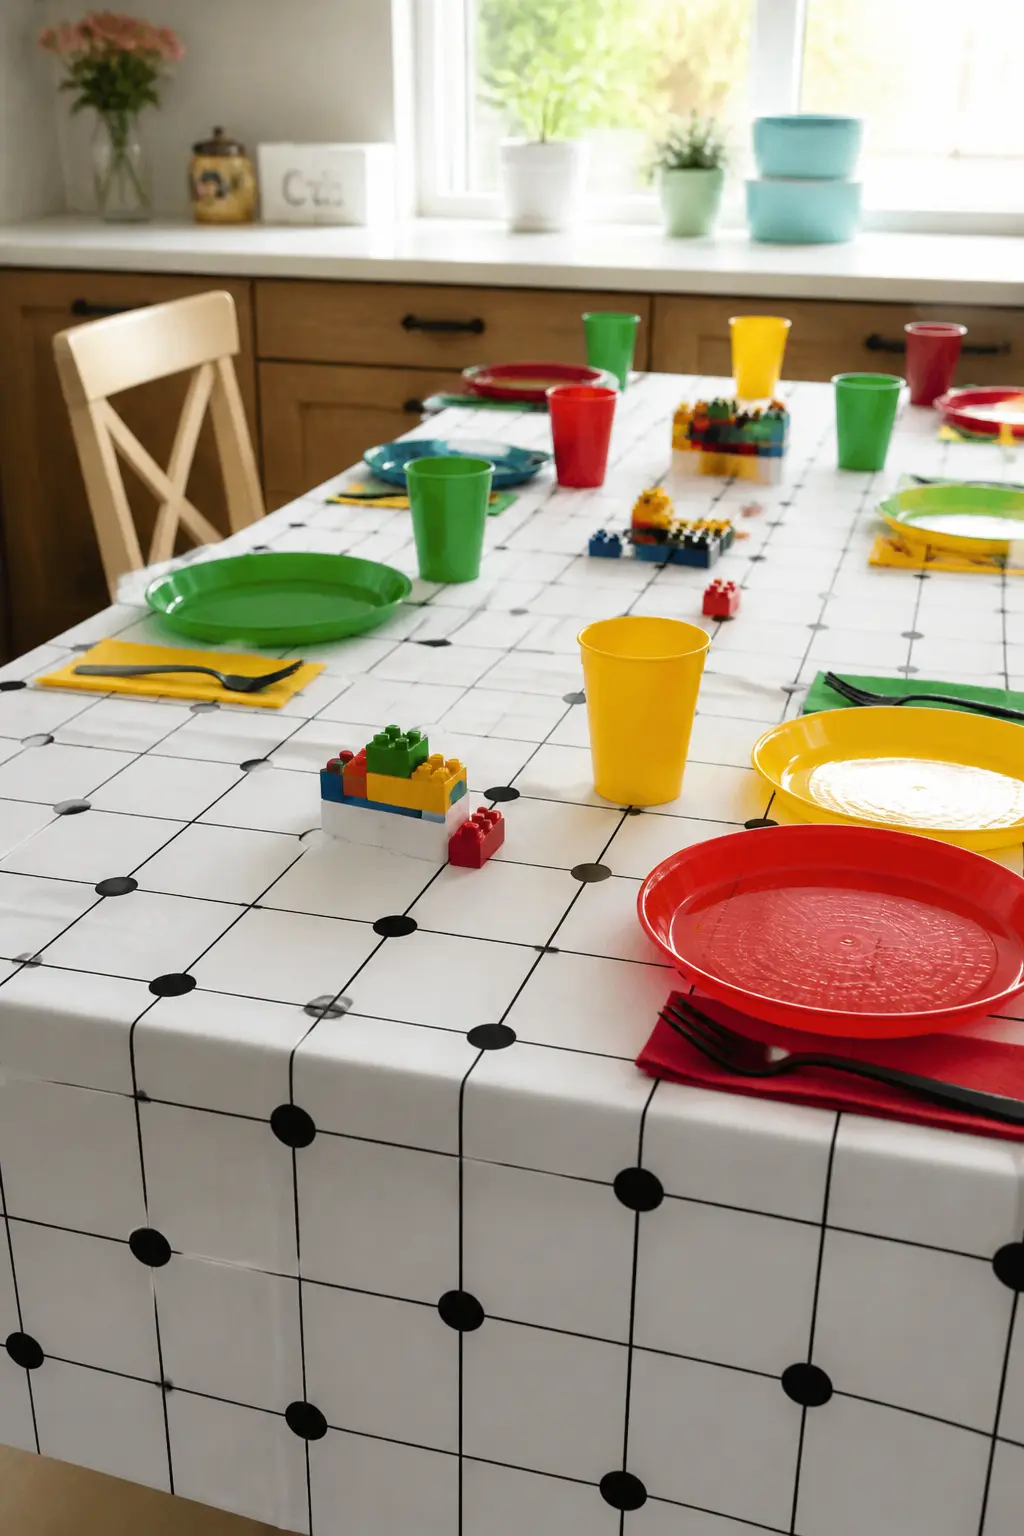
Grid-Patterned Tablecloth with Stud Motifs
A white tablecloth becomes a grid-patterned surface with a black marker or paint pen and a ruler. Mark a 10 cm grid across the whole cloth, then add a circle at each intersection to suggest an interlocking dot. The result reads as a top-down view of a building plate: graphic, clear, exactly on theme.
For a reusable version, use a white plastic tablecloth from a party supply store and black permanent marker. Wipe the surface clean with a damp cloth after the party and roll it for next time. The grid does not need to be perfectly measured: a slightly hand-drawn quality adds warmth without looking accidental.
🛍 Shopping guide
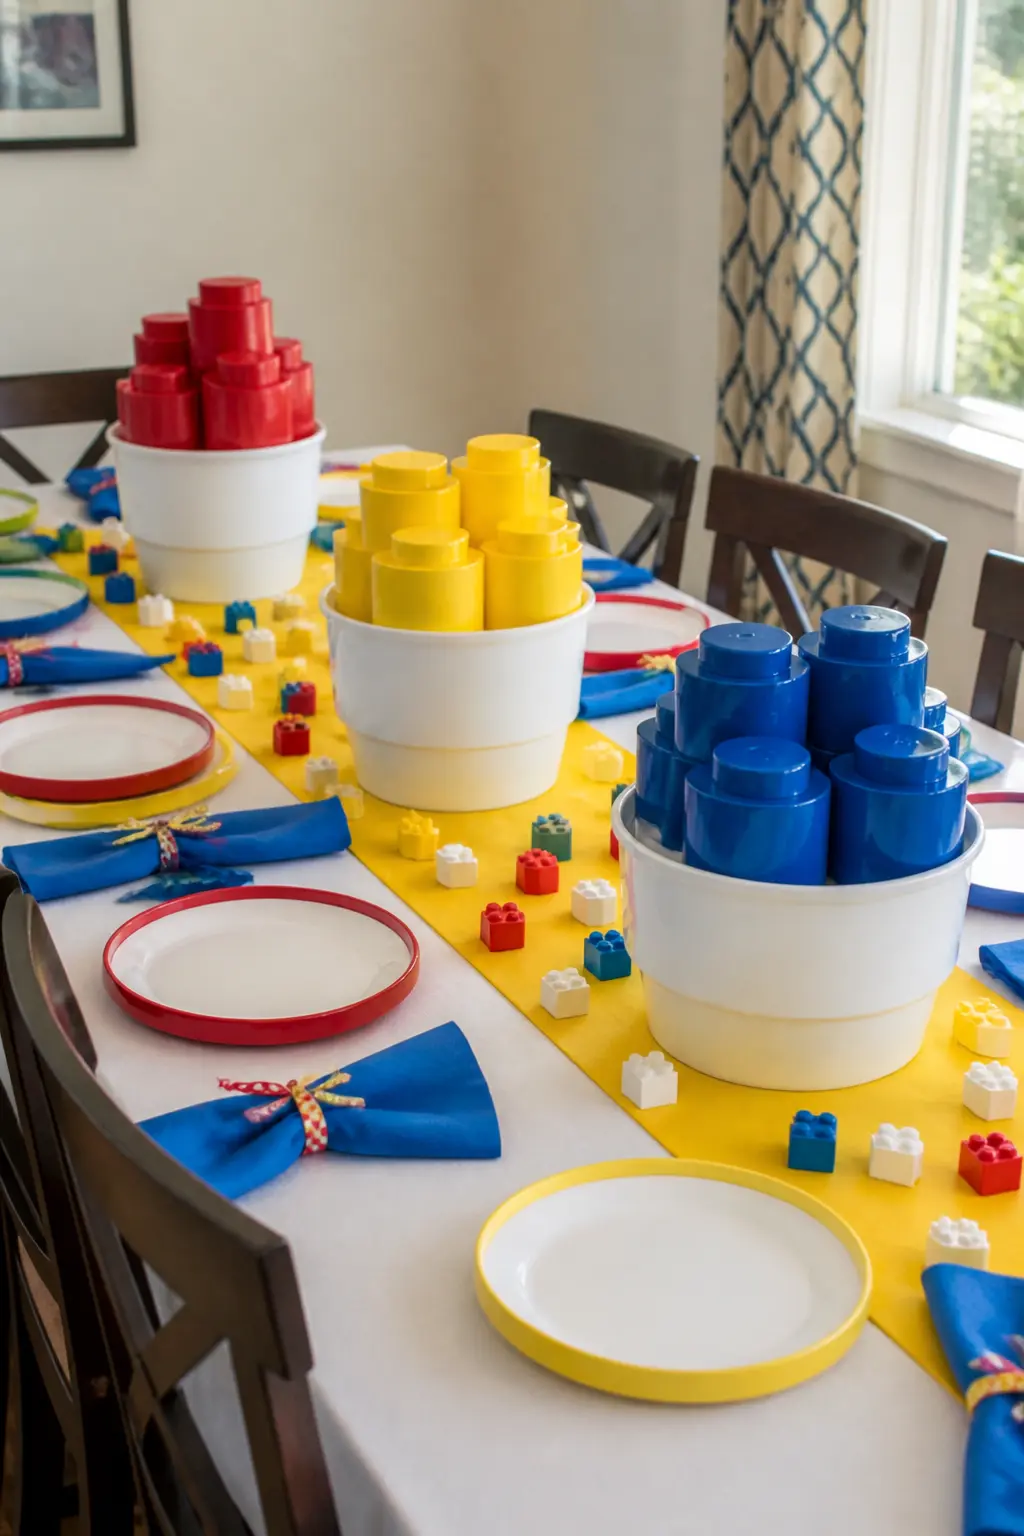
Oversized Plastic Stud Centerpieces in White and Primary Shades
A cluster of upturned plastic cups or bowls, painted in white and primary shades, stacked in a two-tier arrangement mimics an oversized stud formation at the centre of each table.
Use a large bowl as the base and a smaller cup glued on top, both painted in matching flat colour. Add a ring of dots around the rim of the base with a contrasting paint colour to reinforce the interlocking-dot motif.
Three centrepieces per table, in red, blue and yellow, give a full primary palette without competing with the food. Space them evenly down the centre so nothing blocks sight lines across the table. Guests will move them aside without a thought, and they are light enough to do so.
🛍 Shopping guide
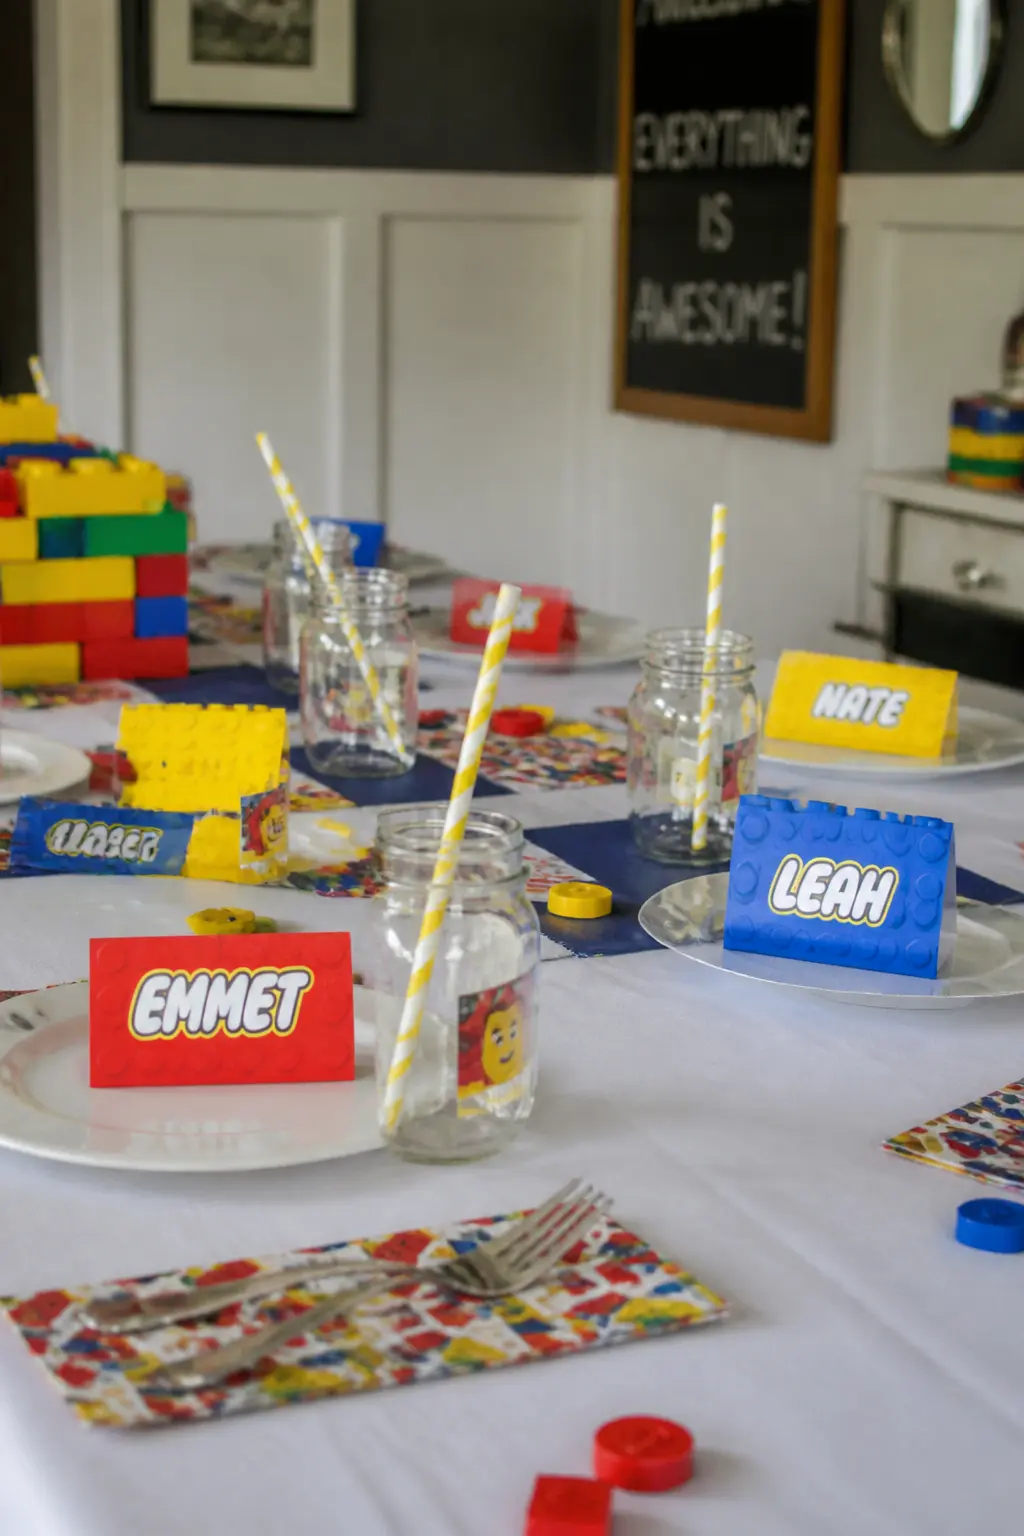
Geometric Place Cards in Stacked-Block Shapes
Cut thick card into rectangles twice the width of a standard place card, score and fold them at the halfway point, and write or print the guest name in bold block lettering on one face.
Paint or print the outside face in a solid primary colour so the card reads as a small building block standing at the place setting. Black ink on a coloured card punches cleanest.
If you want to add a stud detail, glue a small circle of card in a contrasting colour to the coloured face. It takes under a minute per card and makes the block silhouette complete. Stack a few spare ones on a small tray at the entry as a table-map display.
🛍 Shopping guide
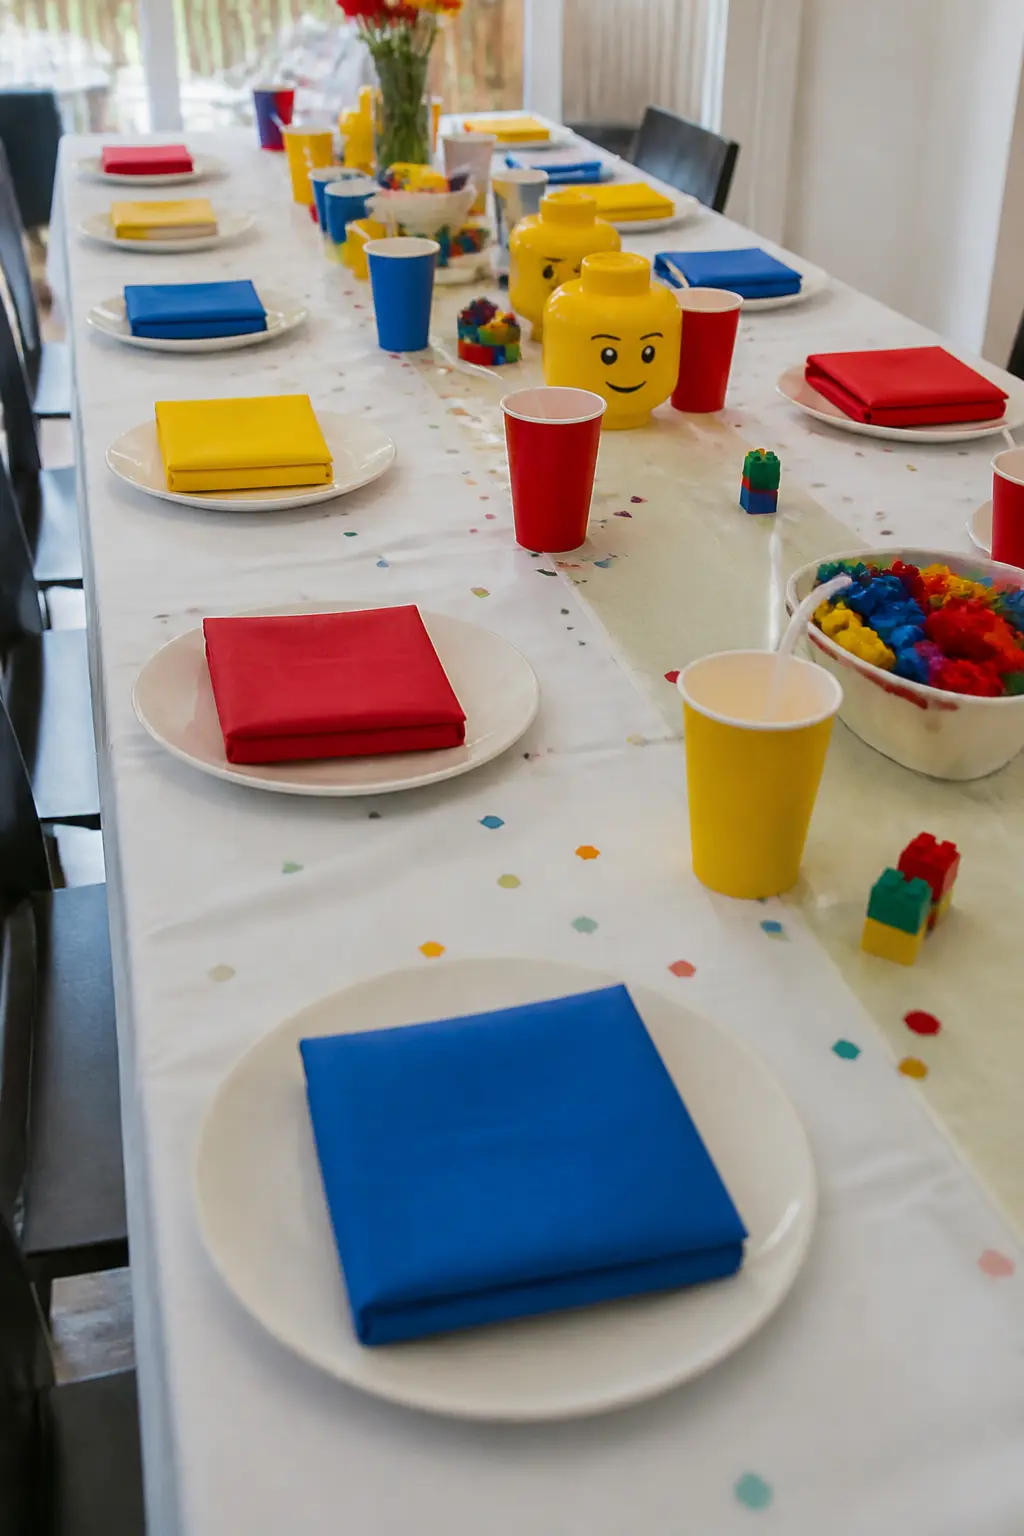
Bright Solid-Colour Napkins Folded into Block Shapes
Fold paper napkins into tight rectangular forms, stack two of different primary colours at each place setting with the edges offset slightly, and set the stack flat on the plate.
It takes five seconds per place and produces a layered block silhouette that references the stacked-brick motif without any craft prep at all. Choose napkins in red, yellow and blue and rotate the colour at alternating places.
For a sharper finish, use cocktail napkins folded into a narrow strip and then into thirds to make a small flat square. Lay these horizontally across the top of a dinner plate in a primary accent colour. The geometry is minimal and clean, exactly the aesthetic this party needs.
🛍 Shopping guide
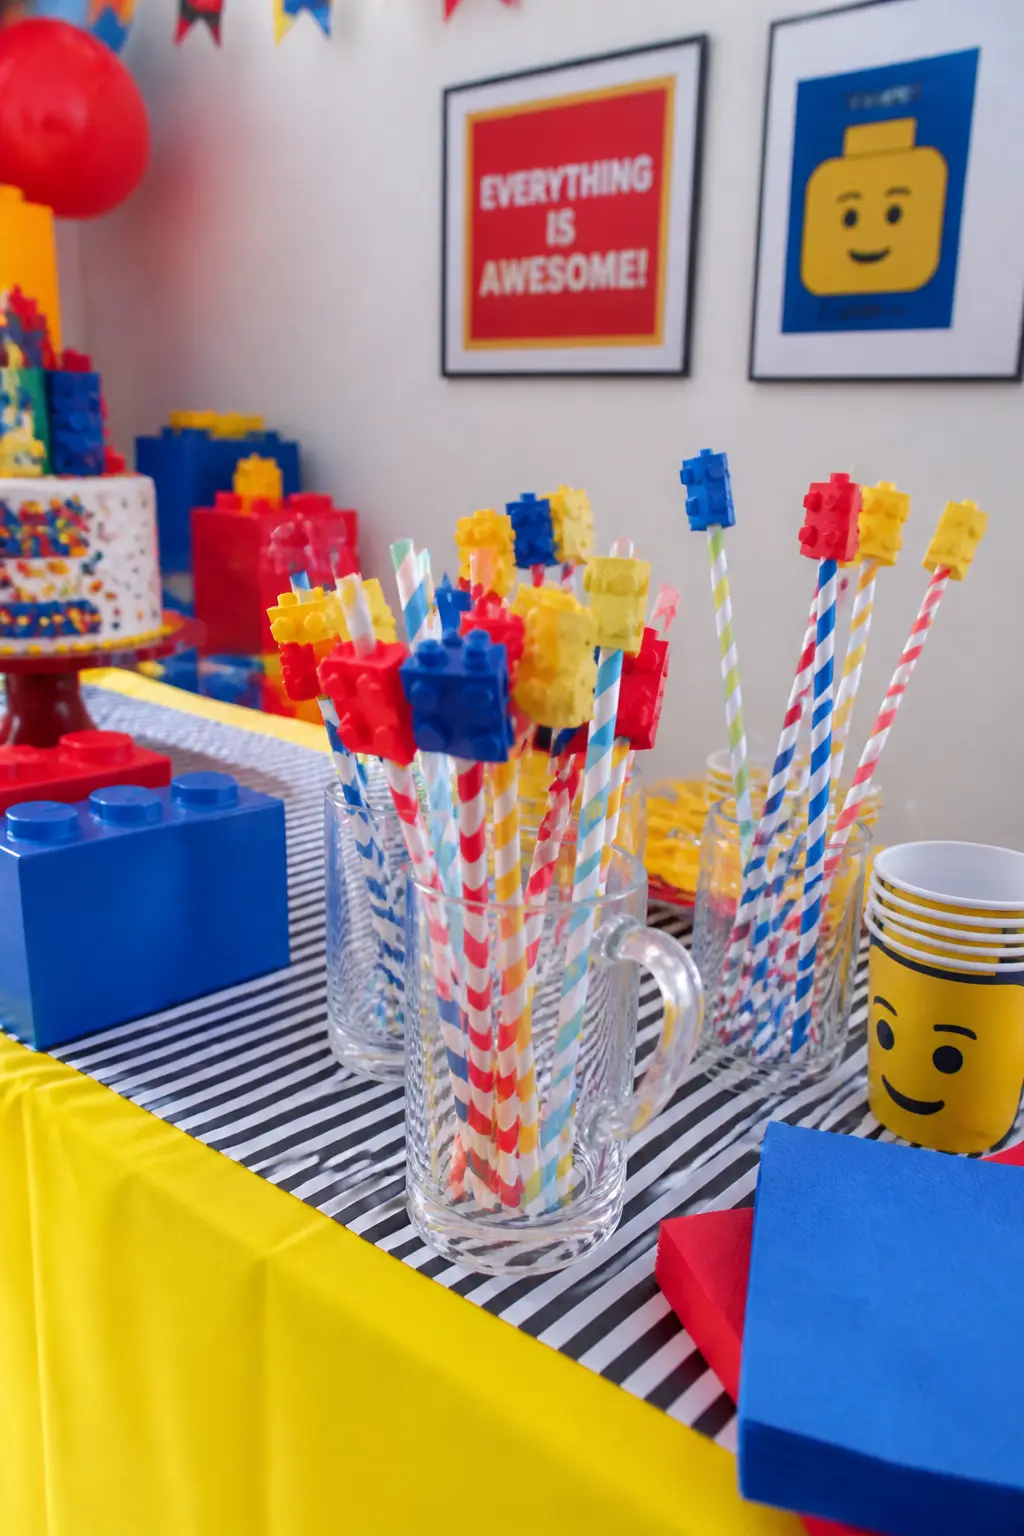
Plastic Building-Brick Drink Stirrers and Straws
Red, yellow and blue paper straws, topped with small plastic building-brick clips in matching colours, go into every drink vessel on the table. The brick clips are widely available as party accessories and slot onto a standard paper straw without adhesive.
They add the stud silhouette at exactly the level where guests interact with the table most: reaching for a drink.
Place them in a tall painted tin or glass jar on the table so guests pick them up themselves. Mix the colours in the jar so the selection is visible from across the table. For still water jugs and punch bowls, use brick-topped swizzle sticks instead of straws: same detail, different application.
🛍 Shopping guide
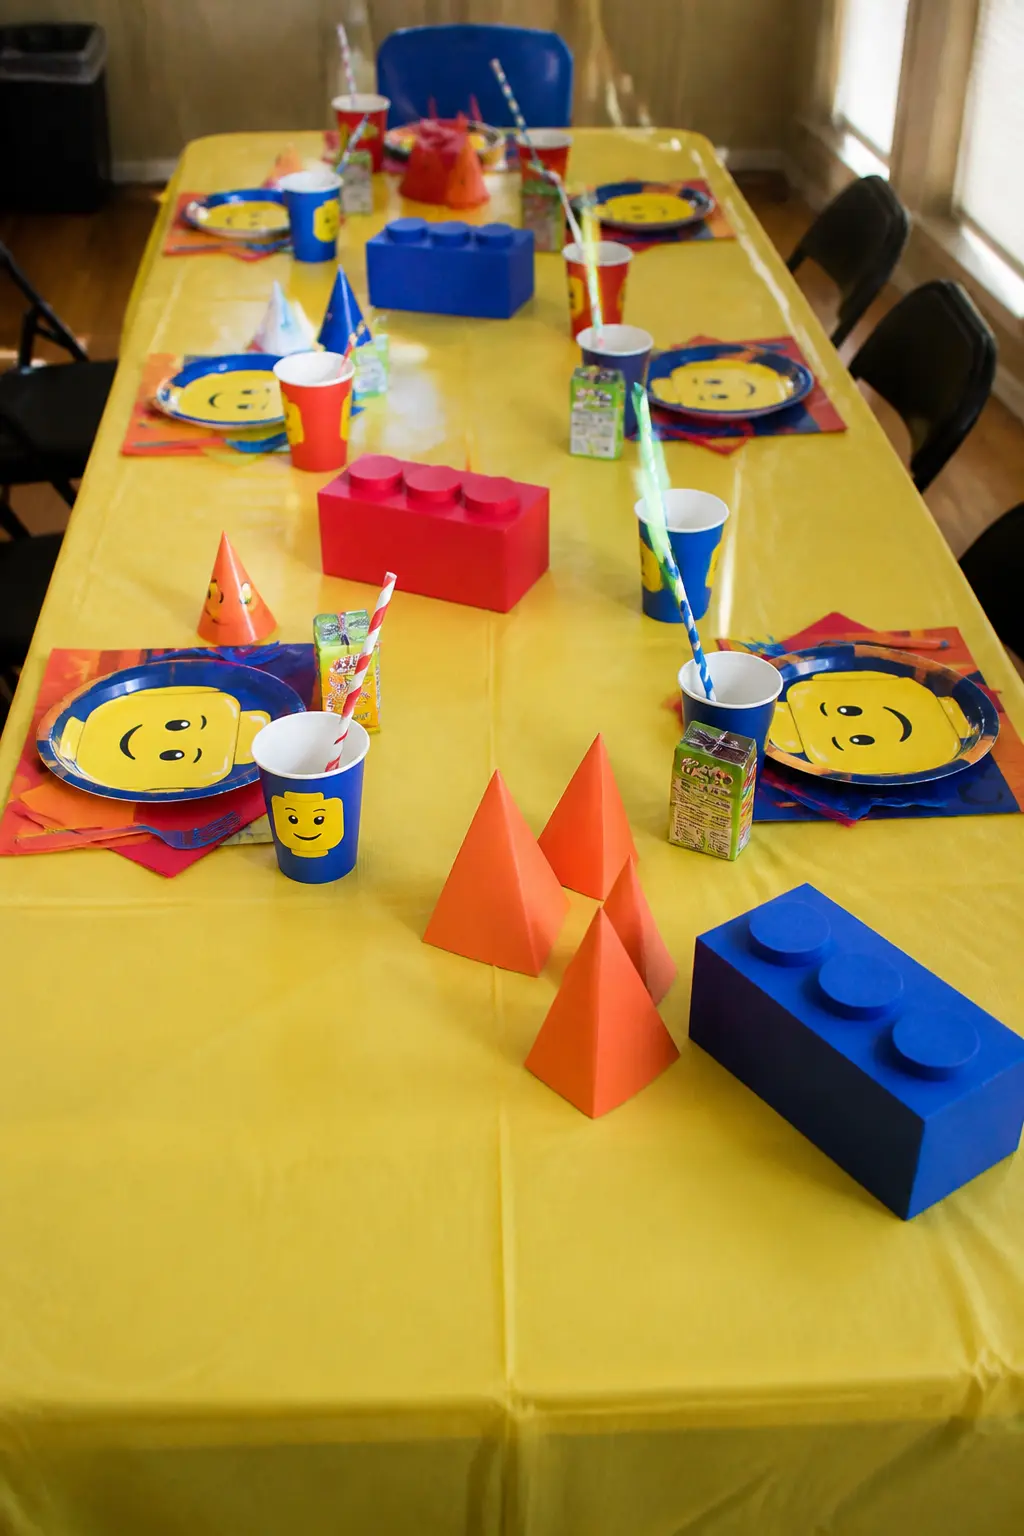
Construction Cone Shapes as Table Scatter or Decor
Mini traffic cone shapes, made from rolled orange or yellow card with a circular base, scatter across tables as three-dimensional decor objects.
Roll a semicircle of card into a cone, tape the seam, and glue a circle of black card to the base as a weight.
Alternate with small flat rectangles painted primary red to create a surface that looks like a construction site scaled down to table height.
Orange sits just outside the core palette here, but construction cones are a strong enough motif to earn the exception. Keep them small (around 8 cm tall) so they do not block sight lines across the table. Cluster three cones together at one end of the table and leave the rest of the surface clear rather than scattering them evenly.
🛍 Shopping guide
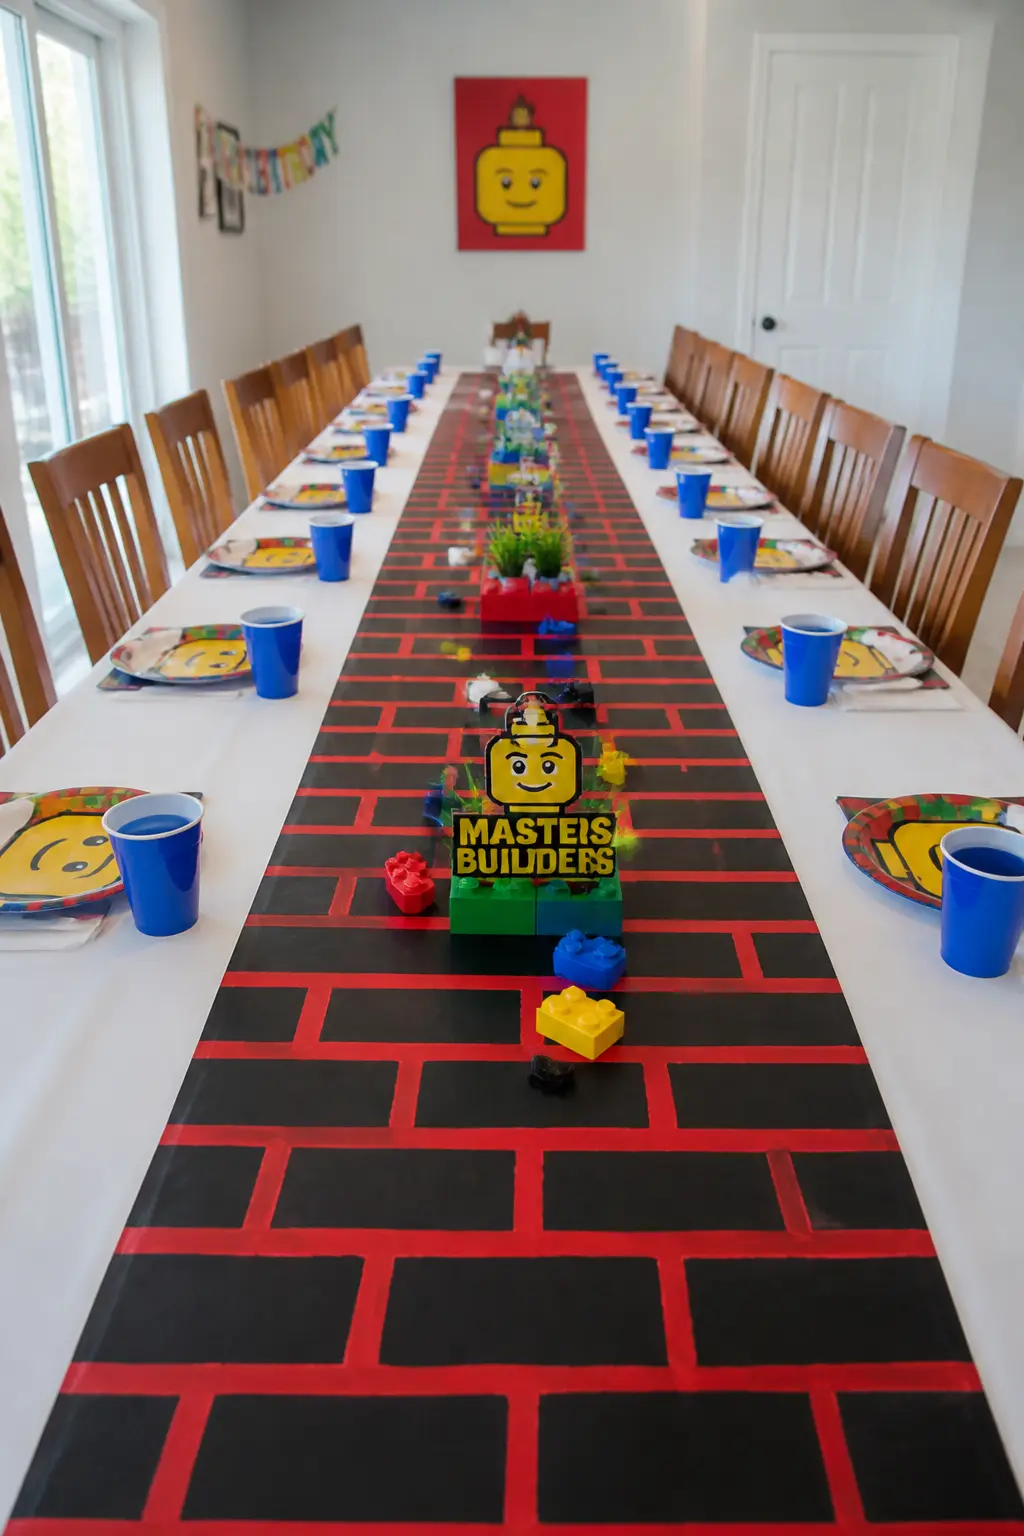
Brick-Patterned Runner Down the Centre of Tables
A table runner painted or printed with a brick-course pattern in primary red on a black ground runs down the centre of each table and does the heaviest thematic lifting of any single table element.
Paint it yourself: roll out black kraft paper to table length, cut it to 30 cm width, and use a wide flat brush and red paint to draw horizontal courses of rectangles in staggered rows. The staggered offset is the brick pattern.
The spacing between courses is the mortar line.
Seal it with a coat of matte medium so it survives the party without smudging. Add yellow dots along the top edge of each row of bricks to suggest studs from the side. The runner can run underneath the centrepieces and right to both ends of the table, anchoring the whole table composition.
🛍 Shopping guide
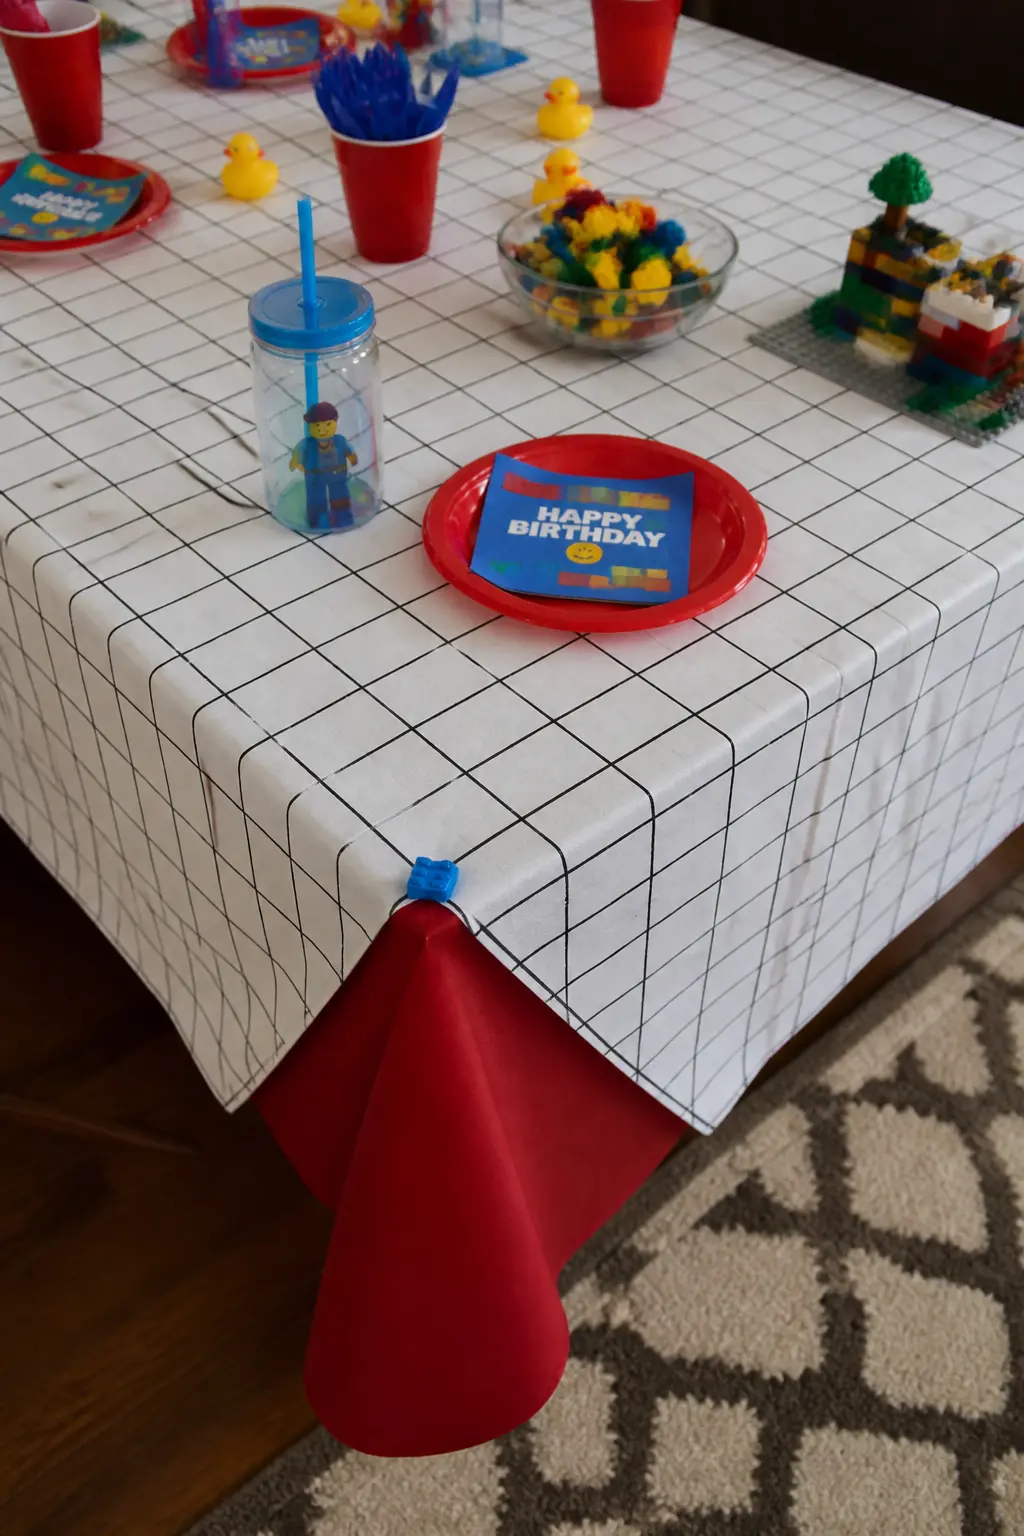
Interlocking-Grid Tablecloth Corner Folds
Take the grid tablecloth from idea 3 and fold the corners back to expose a contrasting coloured cloth underneath: blue over yellow, or red over black. Pin the folded corner in place with a small piece of tape underneath.
The visible fold creates a layered geometric corner detail that looks deliberate and styled rather than like a tablecloth that has shifted. It costs nothing to execute and takes ten seconds per corner.
This detail works best when the under-cloth is a solid primary that contrasts hard with the top cloth. Black under red is the boldest combination. White under blue is cleaner and works for a more restrained table. The fold itself echoes the staggered-brick offset that runs throughout the aesthetic.
🛍 Shopping guide
Lighting and Overhead Decor
Overhead decor shifts the entire feel of a room without touching the floor plan. String lights in grid formation, tissue tassels in rows and interlocking-dot garlands all hang flat and fast. They also photograph from below, which means the party pictures look intentional rather than accidental.
Keep the ceiling layer in one or two colours so it contrasts with the table layer beneath it rather than competing. Black and yellow overhead against a red table surface is the boldest read. White and lime green softens the palette for younger birthday guests without losing the graphic quality.
Interlocking-Dot Garland in Bright Primary Ribbon
Cut circles from primary-coloured card or foam sheets, punch a hole at the top of each and thread them onto a length of black ribbon so each circle overlaps the next by one third.
The overlap reads as interlocking dots when the garland is strung across a wall or window. Alternate red, yellow and blue circles, keeping a consistent size (around 8 cm diameter) for a clean grid-like rhythm.
String the garland at eye level across a feature wall rather than up near the ceiling so it registers in photos and conversation. Weight the ends with a small painted wooden block to keep it taut. This garland takes under an hour to assemble and costs almost nothing in materials.
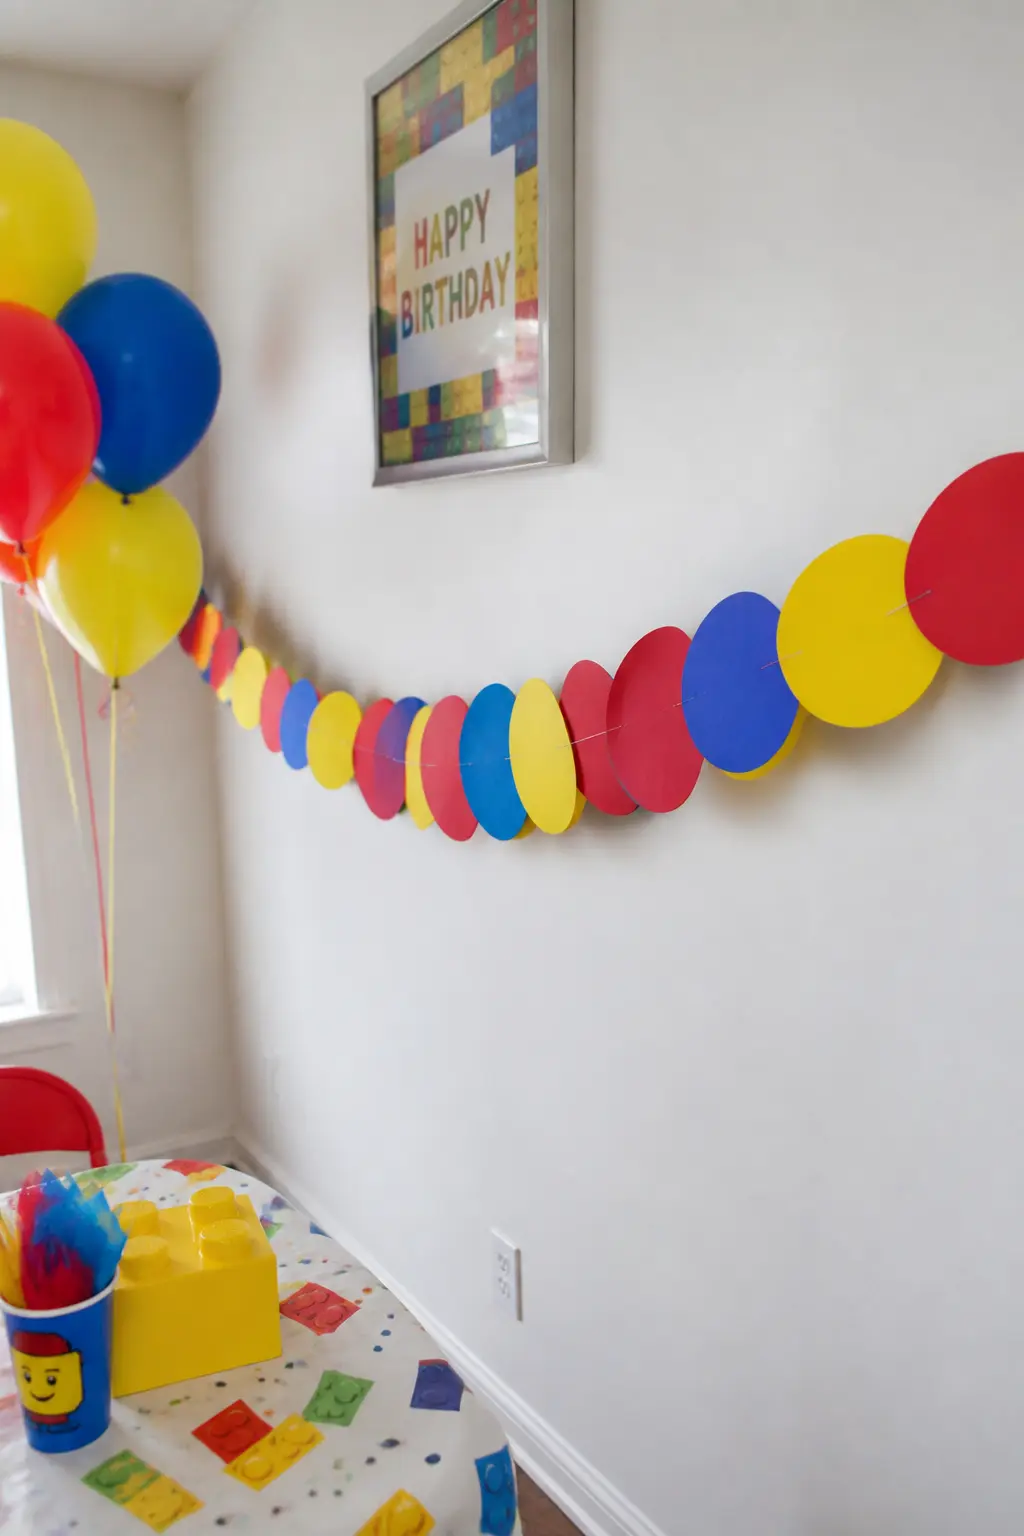
🛍 Shopping guide
Primary-Coloured String Lights in Grid Formation
String battery-powered fairy lights across the ceiling in parallel horizontal lines spaced 30 cm apart, then run a perpendicular line across all of them to create a visible grid when seen from below. Use lights with primary-coloured bulb covers in red, blue and yellow if available, or white bulbs with small squares of coloured cellophane slipped over each one.
The grid formation is the point. Random twinkle lights look pretty but they do not read as a motif. Measured rows do. Fix the horizontal lines to the ceiling with removable hooks and keep the spacing even. The effect from below, at night with the room lights dimmed slightly, is dramatic without being difficult.
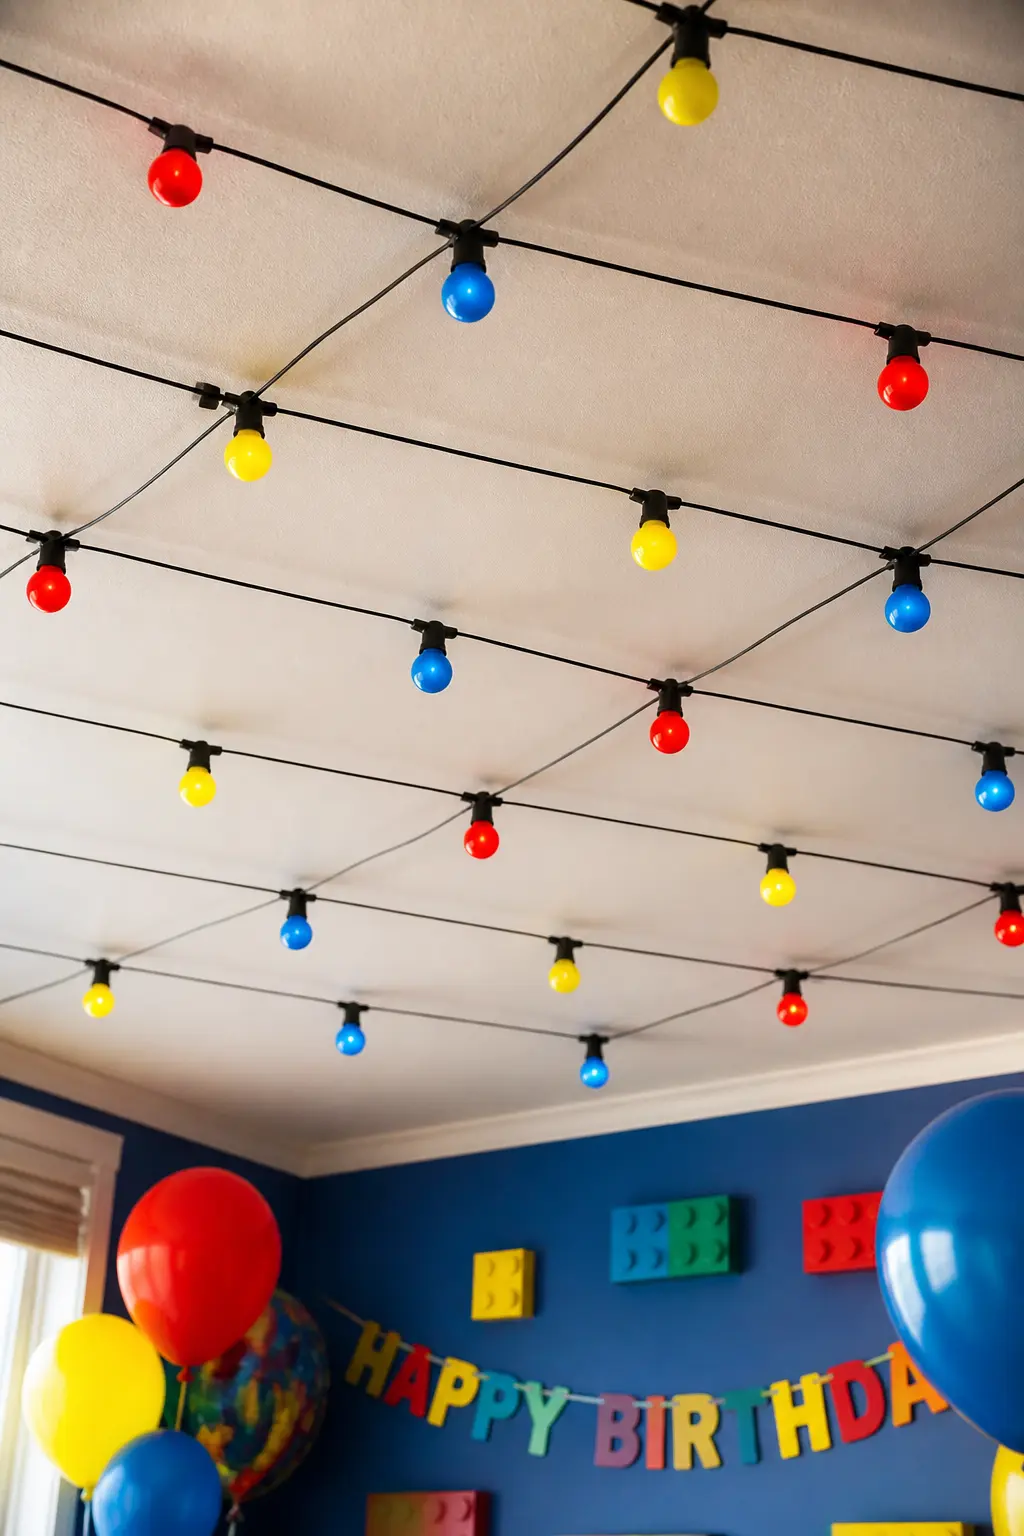
🛍 Shopping guide
Primary-Bright Tissue Tassels Hung in Rows
Tissue paper tassels in red, yellow and blue, hung in three parallel rows from the ceiling at different heights, create a curtain of colour that frames any party area from above.
Make them by folding a sheet of tissue in half, cutting fringe along the open edge, rolling the folded edge into a tube and fluffing the fringe outward. Knot a length of string through the rolled end and hang. Each tassel takes about ninety seconds.
Hang the rows in a repeating colour order: red, yellow, blue, red, yellow, blue. Stagger the lengths of individual tassels within each row by 5 cm so the row has movement. Combine with the grid string lights for an overhead layer that photographs from below as a full ceiling installation.
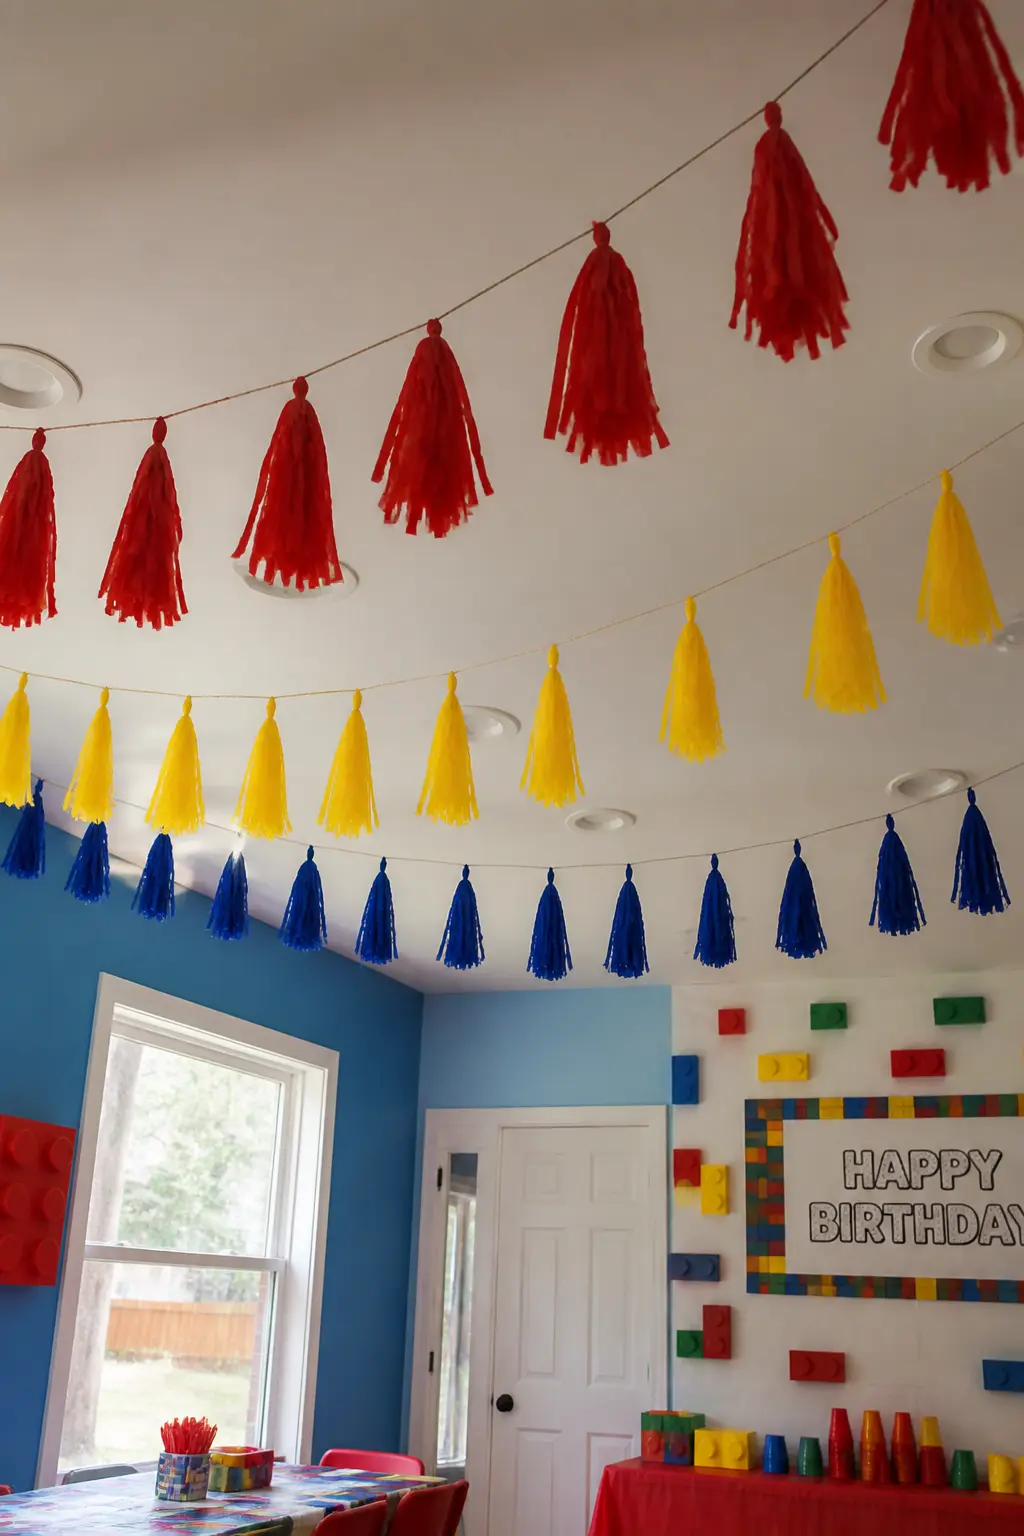
🛍 Shopping guide
Geometric Paper Garland in Interlocking Patterns
Cut rectangles and squares from primary card, then punch circles from contrasting colours and glue one circle to the centre of each rectangle. Thread them onto black twine in alternating orientations, landscape then portrait, so the shapes interlock visually as they hang. The sequence of rectangles with centred circles reads as a simplified stud pattern in flat graphic form.
Hang the garland in a gentle arc from two fixed points rather than pulled taut across a wall. The natural sag creates a visual reference to classical bunting while keeping the geometry legible. Run two garlands in parallel, offset by half a unit, to build a denser pattern across a large wall without adding more material.
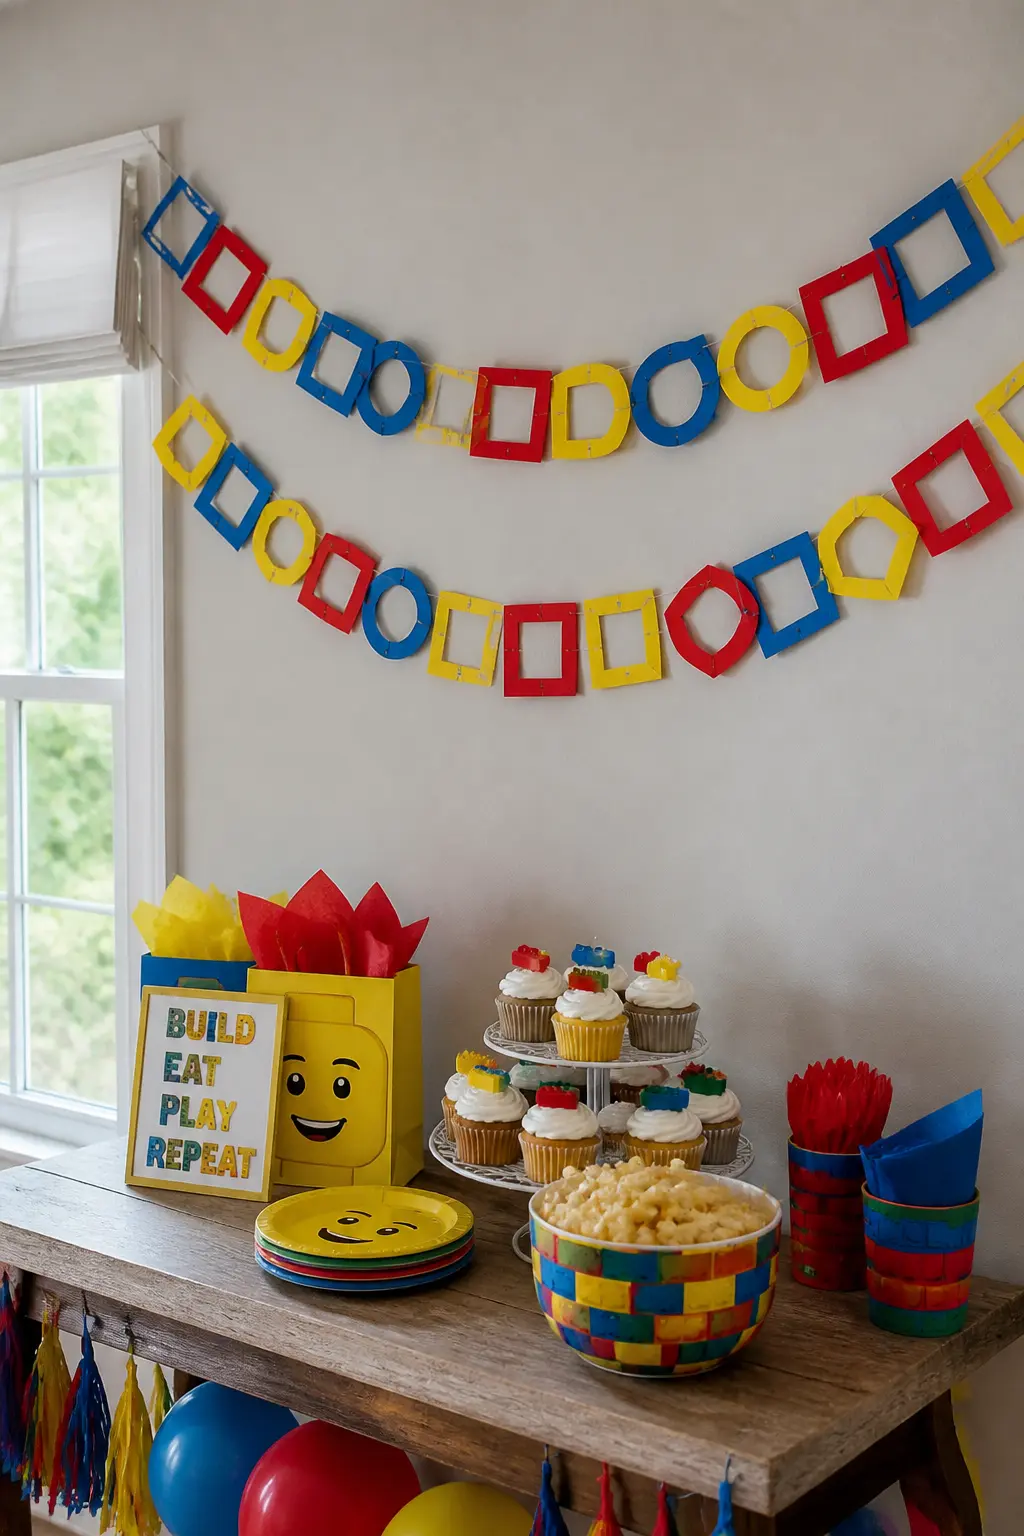
🛍 Shopping guide
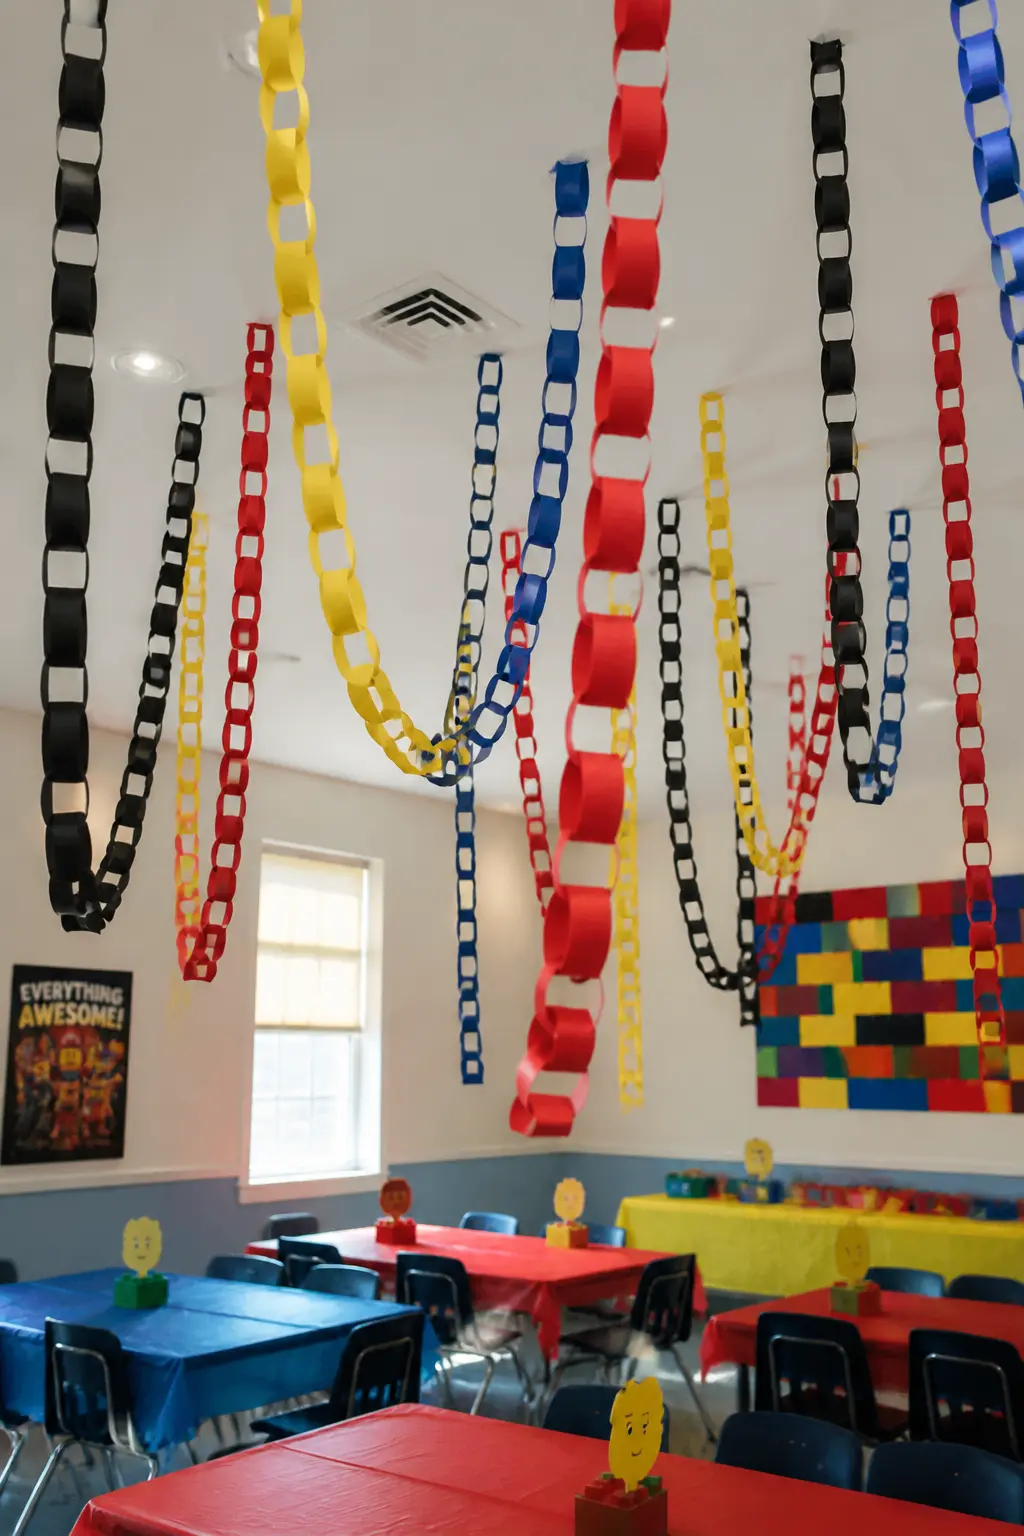
Bold-Coloured Paperchain in Primary Brights
A paperchain in red, yellow, blue and black links is the most straightforward garland available and it reads correctly in this palette: each link is a rectangular loop, which references the block form without requiring any cutting beyond a straight strip.
Cut strips to the same width (around 2.5 cm) and loop them in a fixed colour sequence so the pattern repeats exactly. The visual regularity is the point.
A chain of one hundred links takes around twenty minutes with an assembly line approach: cut all strips first, then loop and seal. Hang it from the ceiling in swooping vertical drops rather than horizontal lines for a different use of the overhead space.
🛍 Shopping guide
Backdrop and Wall Moments
A painted or papered wall backdrop gives the party a focal point and a built-in photo location. The brick-dot pattern is the one to reach for: it reads as the theme from across the room without any text or licensed imagery.
Paint it directly onto lining paper, hang it, and discard it after. Under two hours of prep, reusable for the right occasion.
Wall moments also double as display shelves and signage backdrops. Stack a chalkboard sign in front of the brick wall and you have a menu display, a welcome sign and a photo backdrop all in the same square metre of party space.
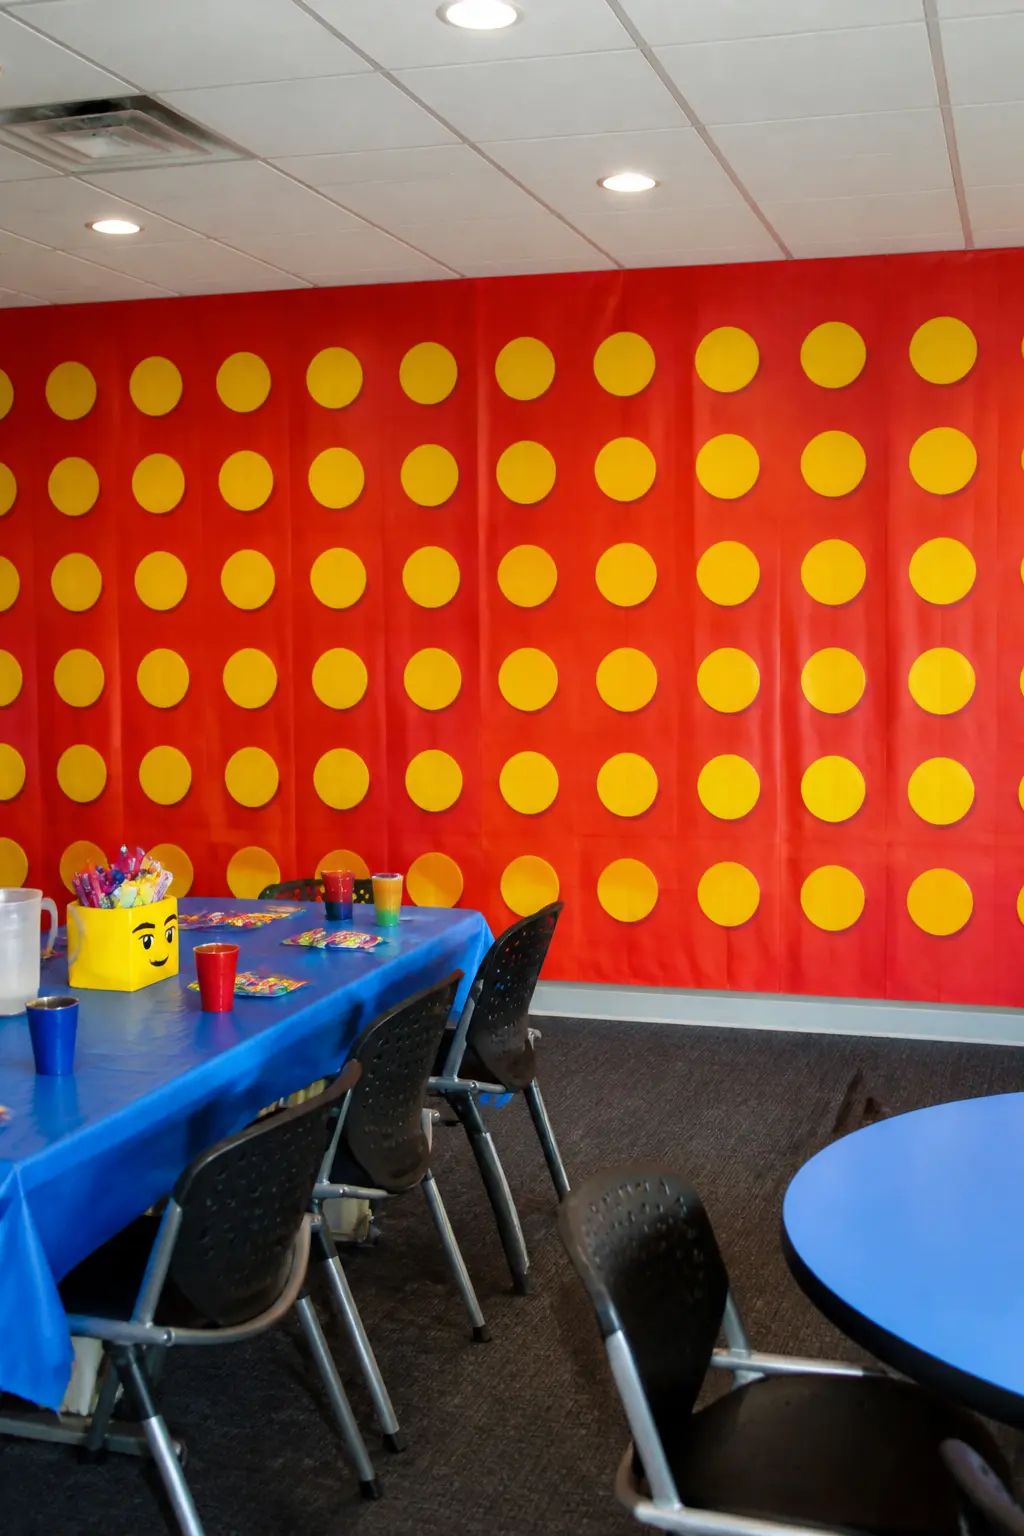
Plastic Brick-Textured Wall Backdrop with Painted Dots
Hang a length of red or blue lining paper across one wall and paint a grid of evenly spaced circles on it in a contrasting primary colour. Each circle represents an interlocking stud.
The circles do not need to be perfect: use a round sponge or the base of a cup to stamp them. Space them in a regular grid and the pattern reads clearly even if individual circles vary slightly.
The resulting backdrop is usable as a photo wall and as a general room feature. Back it with a second layer of black paper for extra depth if the primary colour alone feels flat against pale walls. Fix the whole thing with removable strips and take it down cleanly at the end of the party.
🛍 Shopping guide
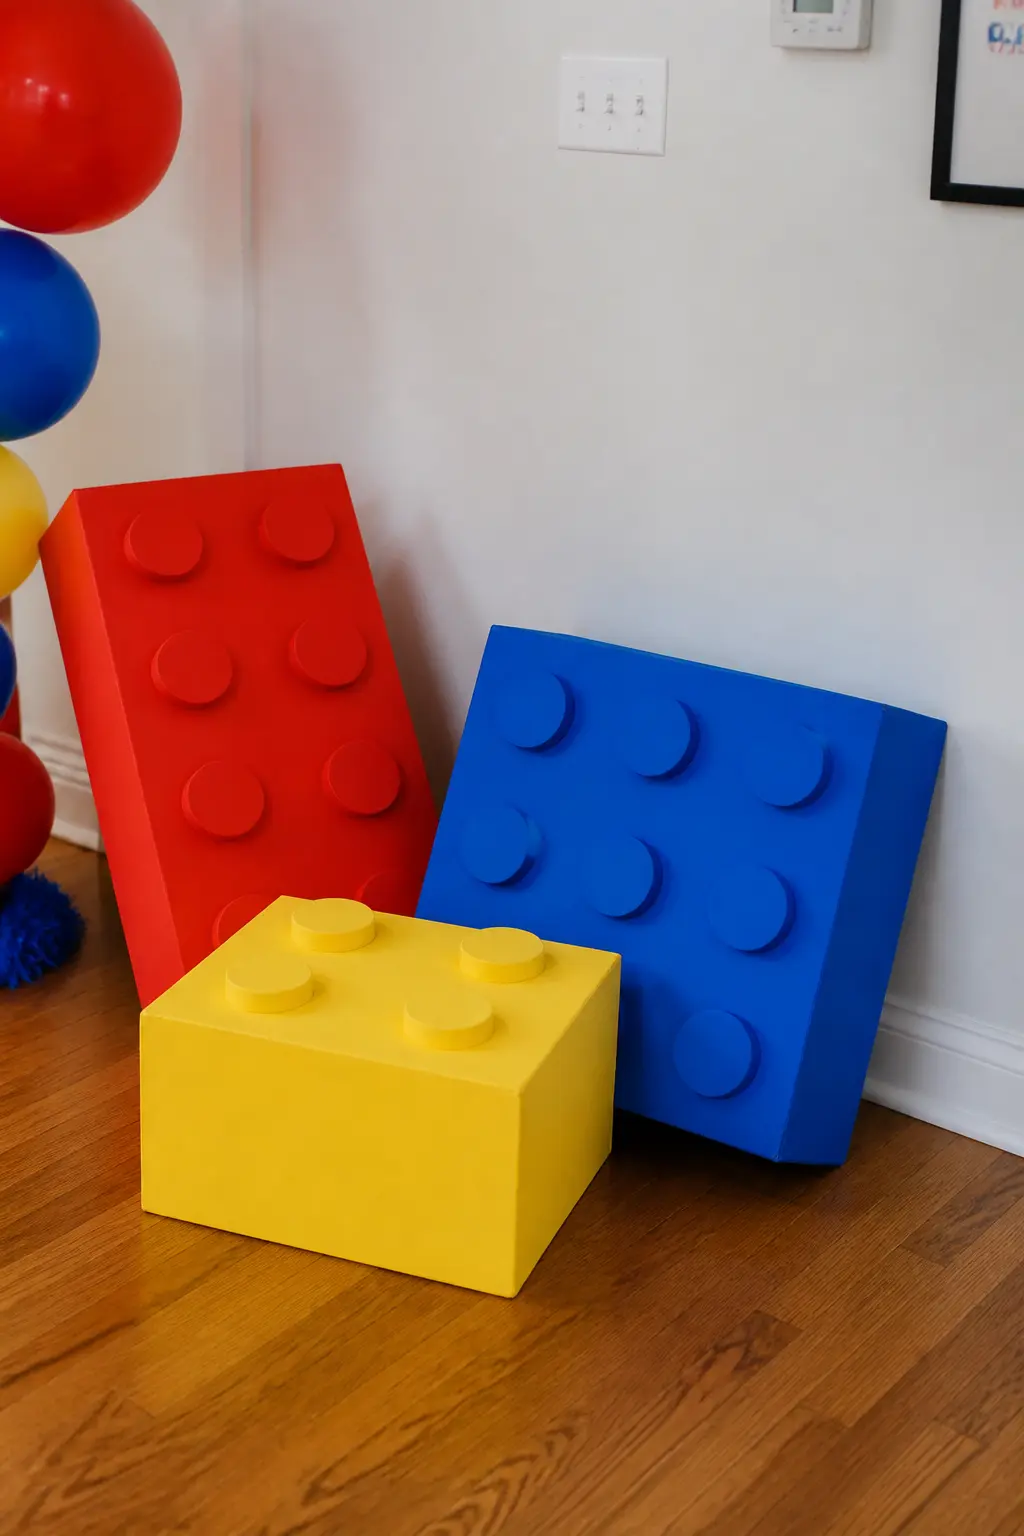
Oversized Block Silhouettes Cut from Foam Core
Large rectangular block shapes cut from foam core, painted in flat primary colours and leaned against a wall or propped on shelves, give the room three-dimensional graphic elements without requiring carpentry.
Cut the basic rectangle with a craft knife and metal ruler, then add two or four raised-circle studs on the top face by gluing on painted cardboard circles. The stud detail at this size reads clearly from across the room.
A set of three blocks in red, blue and yellow, varying in scale from 30 cm to 60 cm wide, forms a corner installation that photographs as a room feature. Lean them in a casual stack rather than arranging them precisely: slight disorder at scale looks intentional rather than careless.
🛍 Shopping guide
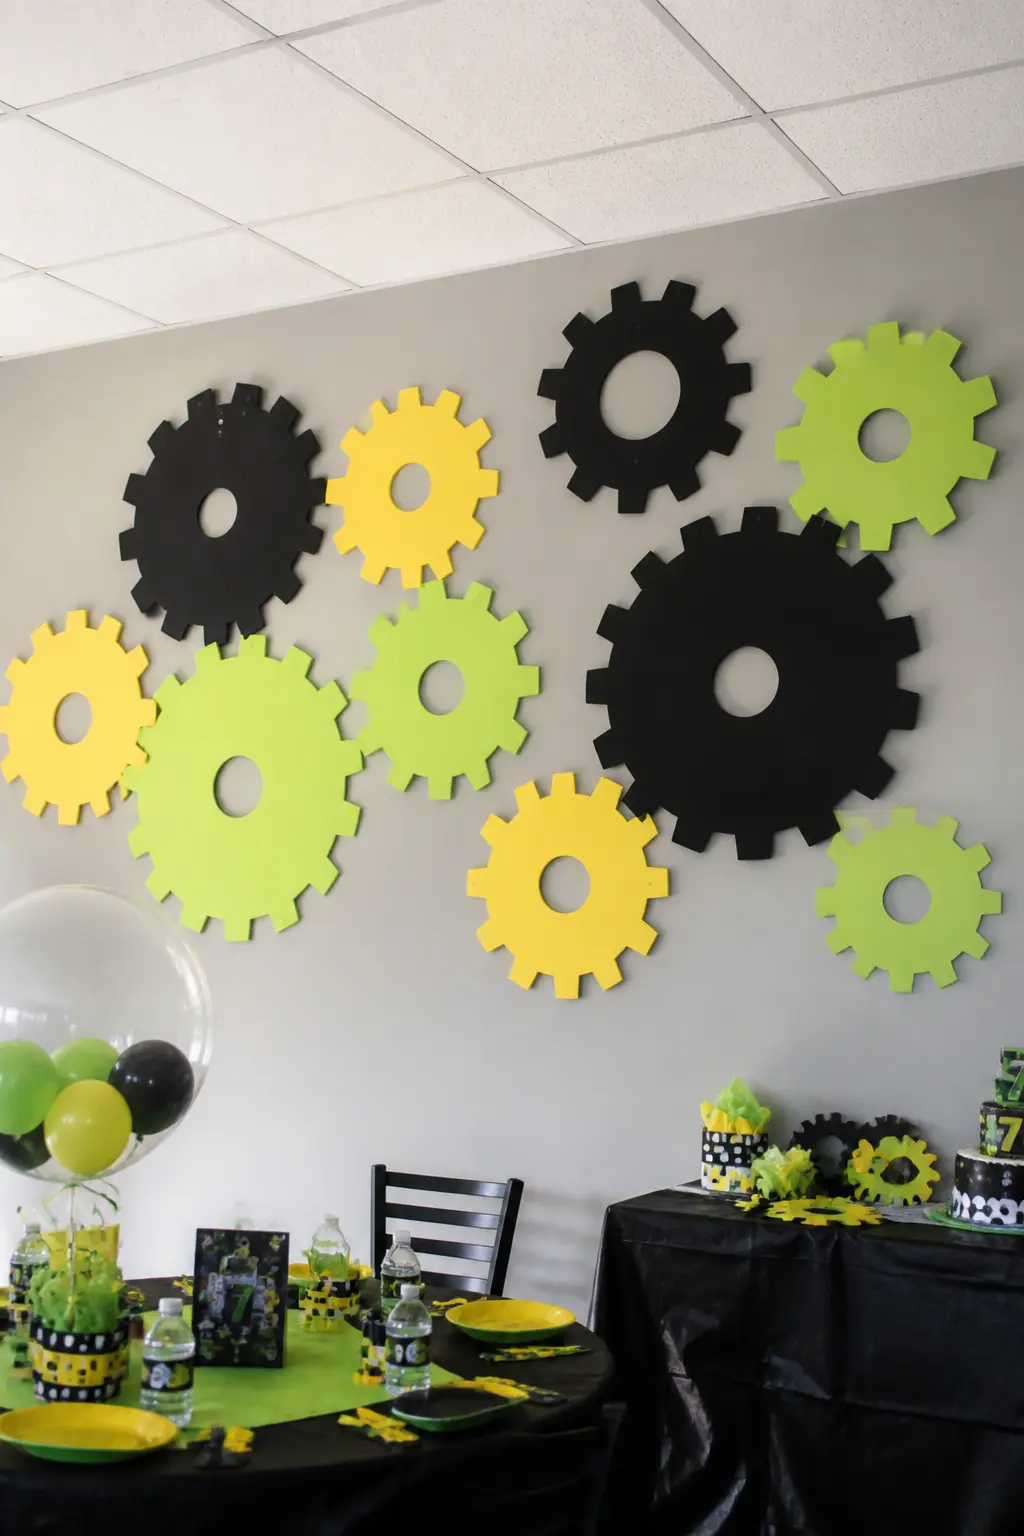
Mechanical Gear Shapes as Wall or Ceiling Hangers
Cut gear shapes from foam core or thick card using a template: a circle with evenly spaced rectangular teeth around the perimeter.
Paint them in flat black, yellow or lime green and hang them at different heights from the ceiling or pin them to a feature wall.
The gear silhouette is a construction-and-mechanics motif that fits the industrial edge of this aesthetic without referencing any specific intellectual property.
Three or five gears of varying size clustered together on a wall read as a graphic panel. Alternate black and yellow for maximum contrast, or use lime green as an accent against a red or blue backdrop wall.
Thread a dowel through the centre of two overlapping gears to suggest they are interlocked: a small detail that reads well in a close-up photograph.
🛍 Shopping guide
Seating and Structural Props
Giant painted cardboard blocks and wooden crates earn their place because they do two jobs: they look like the theme and they function as furniture or shelving. That dual purpose is what separates a prop that earns its footprint from one that just clutters the room.
Scale matters here. A block that is knee-height on an adult reads as an oversized stud to a child. Paint it in a single flat primary colour, add no detail, and it becomes part of the room rather than a craft project sitting inside one.
For an adult party that leans into the aesthetic, the same blocks become cocktail-height side tables with a sheet of perspex on top.
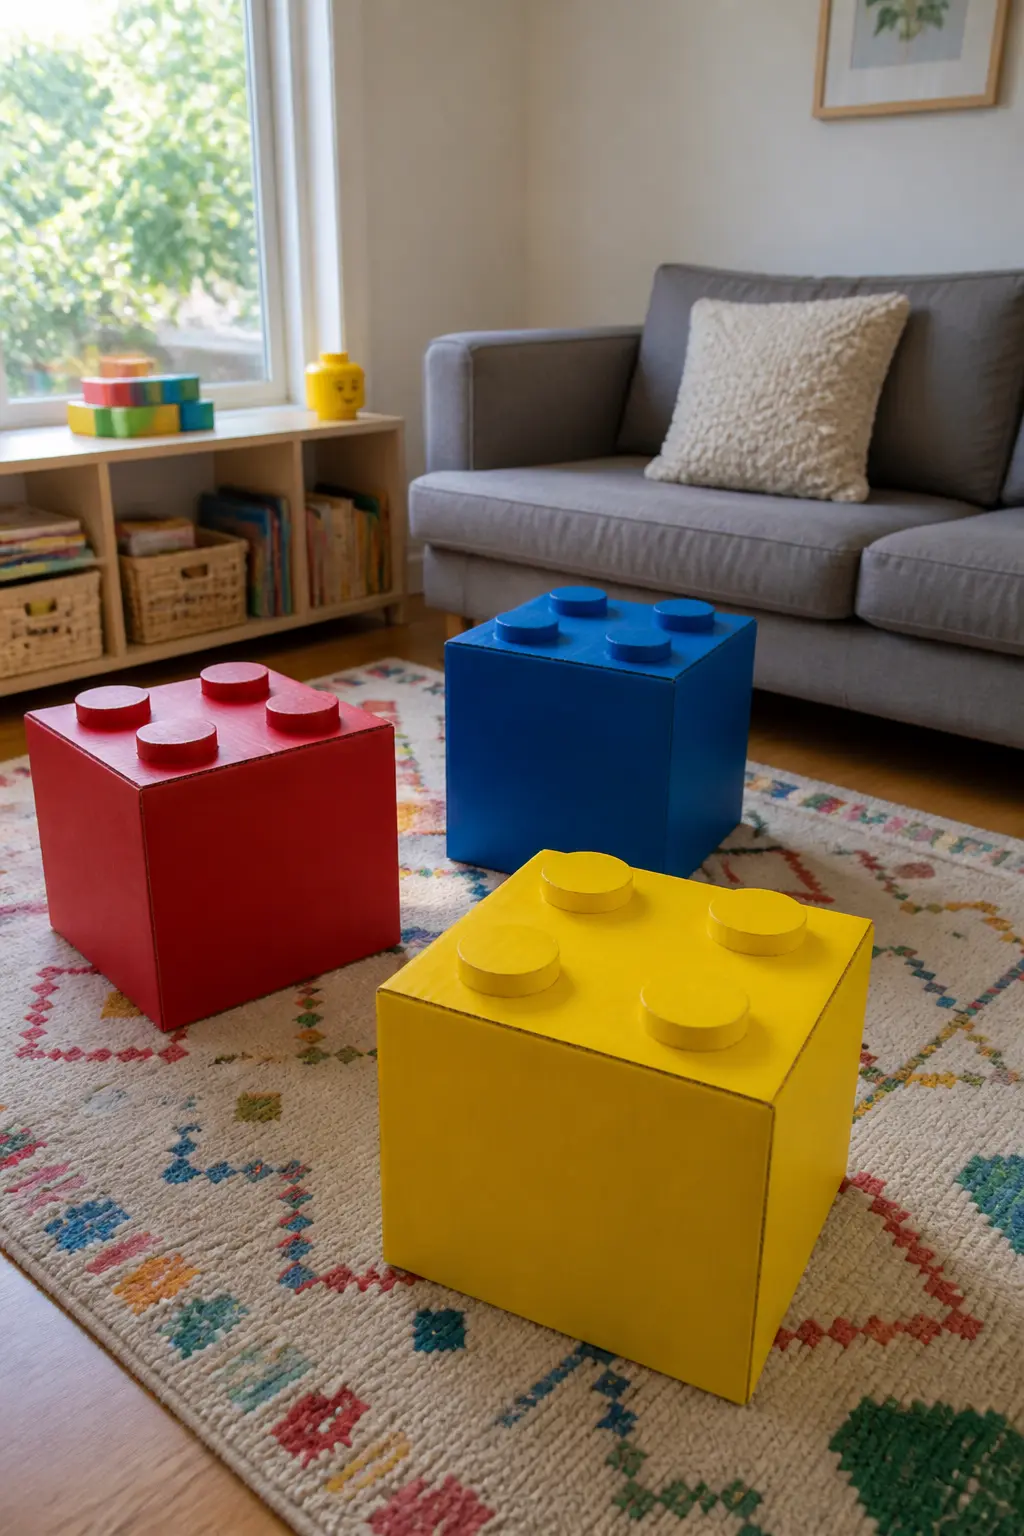
Giant Cardboard Blocks Painted in Primary Colours as Seating
Large cardboard boxes, the kind appliances ship in, become structural seating when reinforced with packing tape at every edge and painted in flat primary red, yellow or blue.
Cut a low-profile cube to seat-height (around 45 cm), tape the lid shut, and paint two coats of craft paint in the chosen solid. No detail, no lettering: the flat colour does the work.
Stack two smaller painted boxes to create a different height and give the room some visual rhythm. Top the stack with a circle of foam cut to fit as a cushion if the party has small children. They read instantly as oversized building blocks and hold up to a full party’s worth of use if the cardboard is double-walled.
🛍 Shopping guide
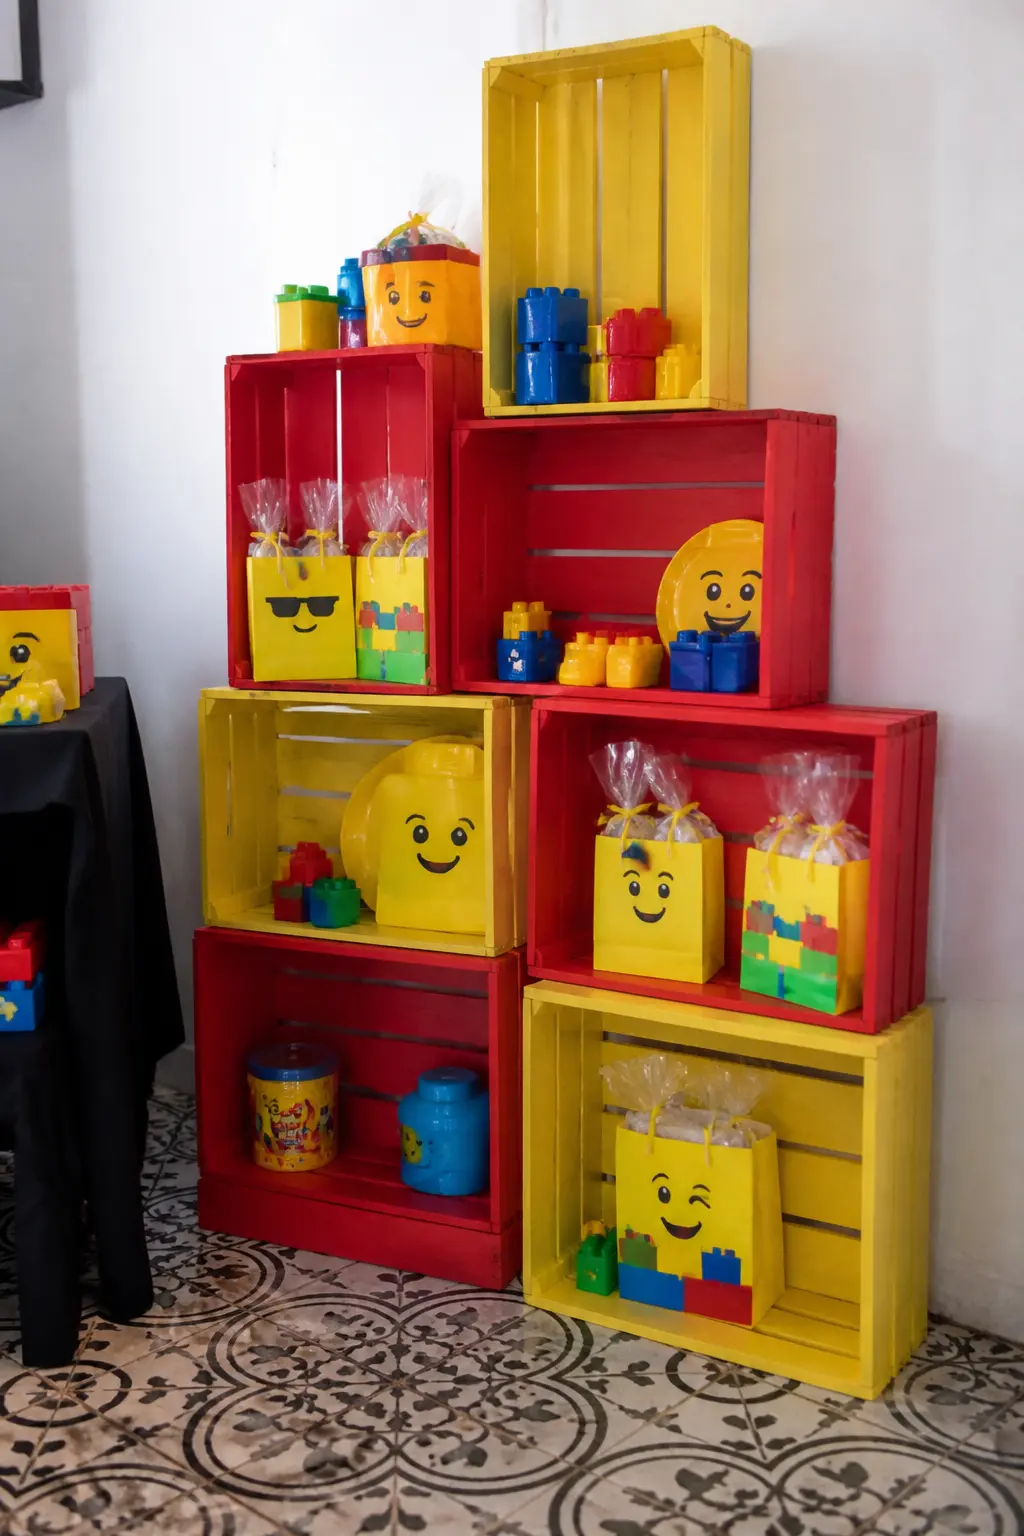
Yellow and Red Painted Wooden Crates as Display Shelves
Wooden crates painted in flat yellow or red become instant display shelving when stacked in an offset formation against a wall.
Stack three or four crates: two on the base, one on the left of the next row, one on the right of the row above. The offset pattern echoes a stacked-brick wall.
Fill each crate with themed items: favours, food, a small centrepiece, or a potted lime-green plant for the accent colour.
The wood grain underneath the paint adds texture that flat plastic or card cannot give, and the construction reads as intentional rather than improvised. Paint the inside of each crate in black to increase depth and contrast. Sand the edges lightly after painting for a slightly worn surface that photographs well.
🛍 Shopping guide
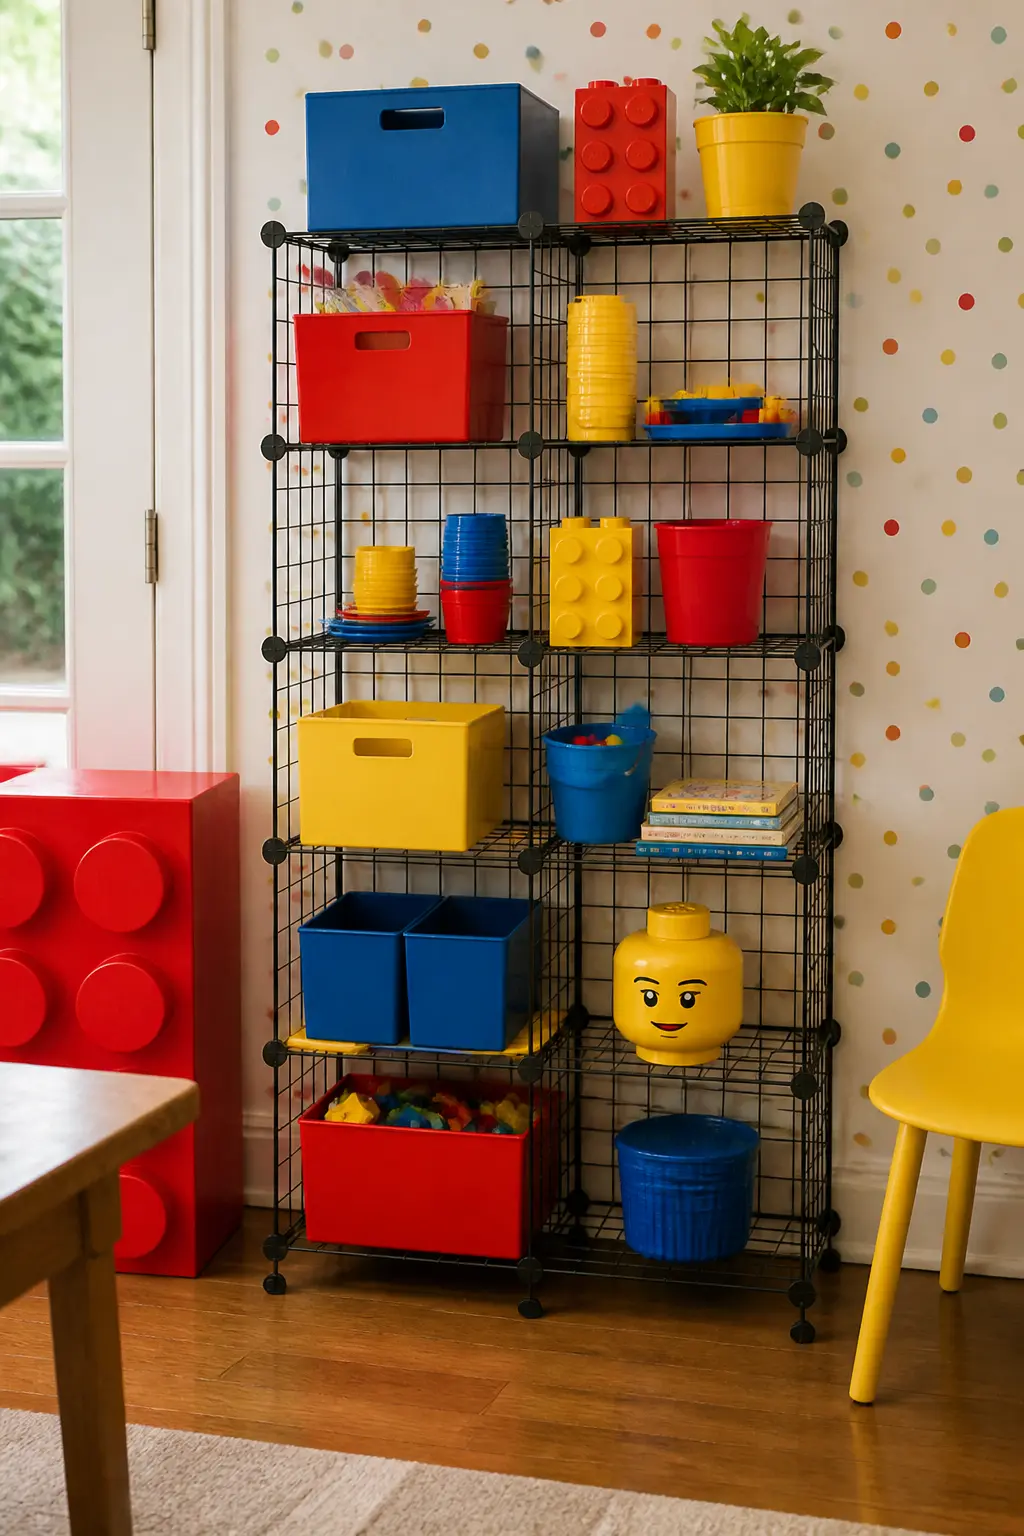
Plastic Grid Shelving Styled with Colour Coordination
A modular wire or plastic grid shelving unit (the kind sold as a closet organiser) becomes a display wall when styled with objects in a strict primary-colour sequence.
Place red items on one shelf, yellow on the next, blue on the one below: solid-coloured favour bags, painted boxes, balloons tucked behind the shelf front. The grid structure of the shelving itself is already part of the visual language.
Position the unit against the backdrop wall so the painted dots behind it peek through the grid squares. The layering of the flat dot pattern behind the three-dimensional shelf reads as depth in photographs. Style the top surface with the stacked foam-core block forms from idea 21 so the display has a focal point at eye height.
🛍 Shopping guide
Signage and Printed Moments
Signage in this palette uses black as the dominant background so that primary colours pop off it like paint. Grid lines, block lettering and numbered sections all read as construction-zone graphics rather than party-store clip art. That distinction is the difference between a look that feels designed and one that feels assembled from a party kit.
A chalkboard is the easiest surface to work with because it absorbs mistakes and resets cleanly. If chalkboard is not available, black card with white paint marker gives the same contrast. Neither requires a printer, a laminator or a trip to a copy shop.
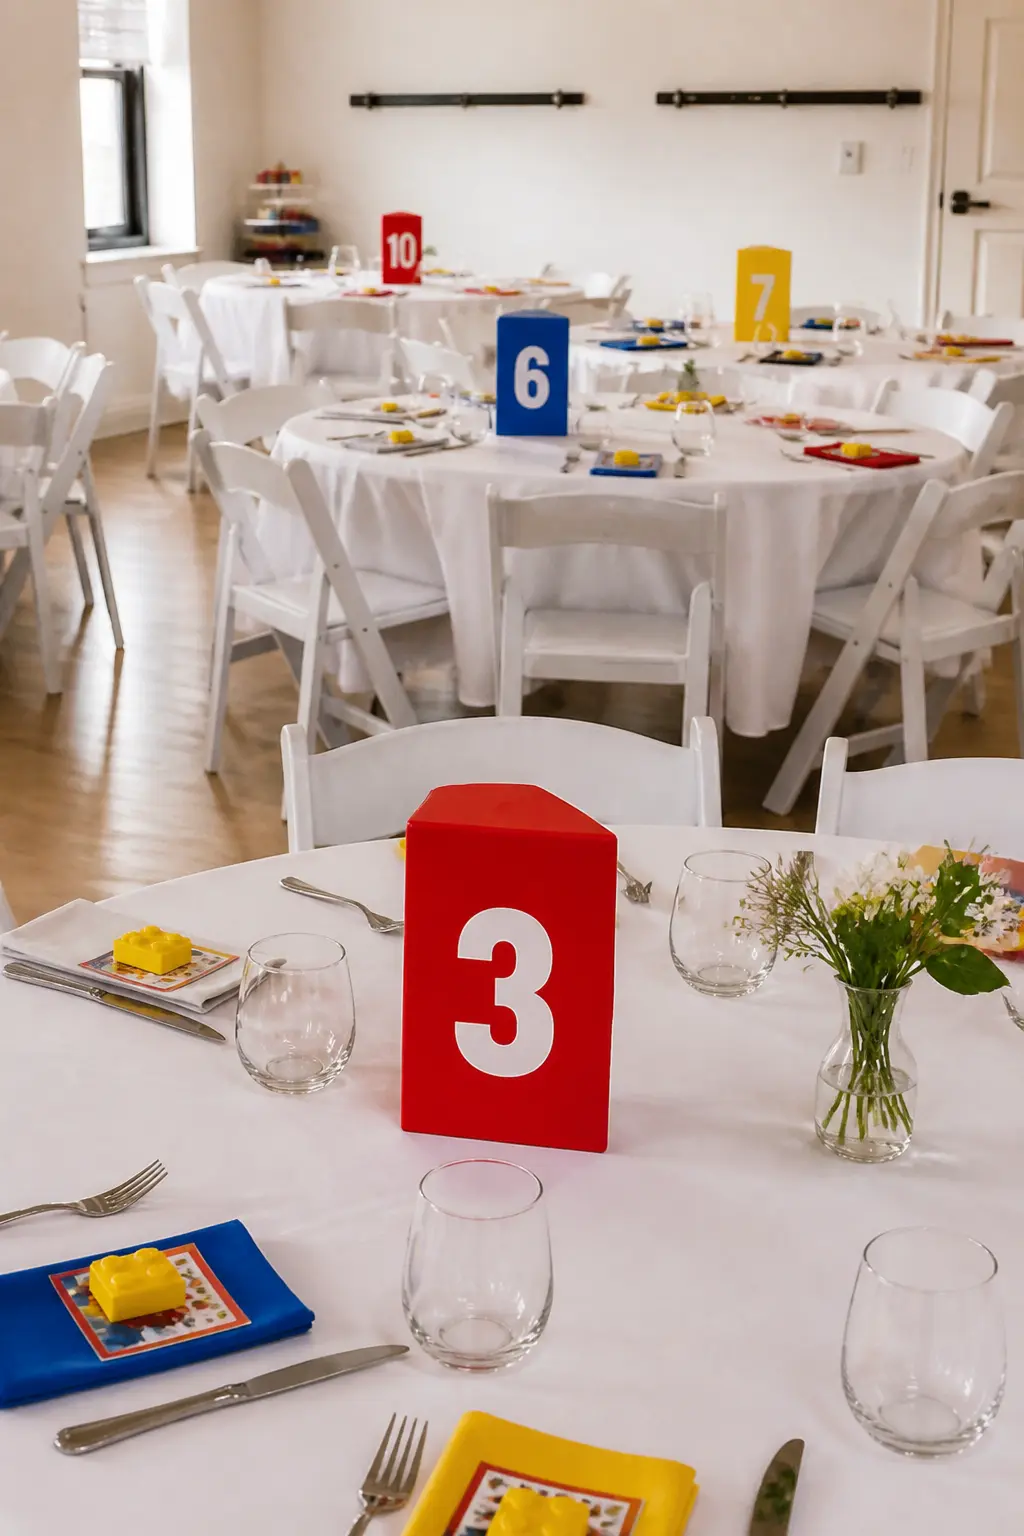
Numbered Seating or Table Markers in Block Form
Cut thick foam core into rectangles, paint each one in a solid primary colour, and stencil or hand-paint a large black number on the face. Stand each marker upright in a painted wooden base or a small pot of sand.
The number reads as a block element, the painted surface reads as a plastic finish, and the whole system takes under thirty minutes to make for a party of any size.
Use contrasting colours for alternating tables: red marker on a blue table, yellow marker on a red table. Guests find their seats fast, the room looks designed, and the markers are light enough to pick up and photograph as a souvenir.
🛍 Shopping guide
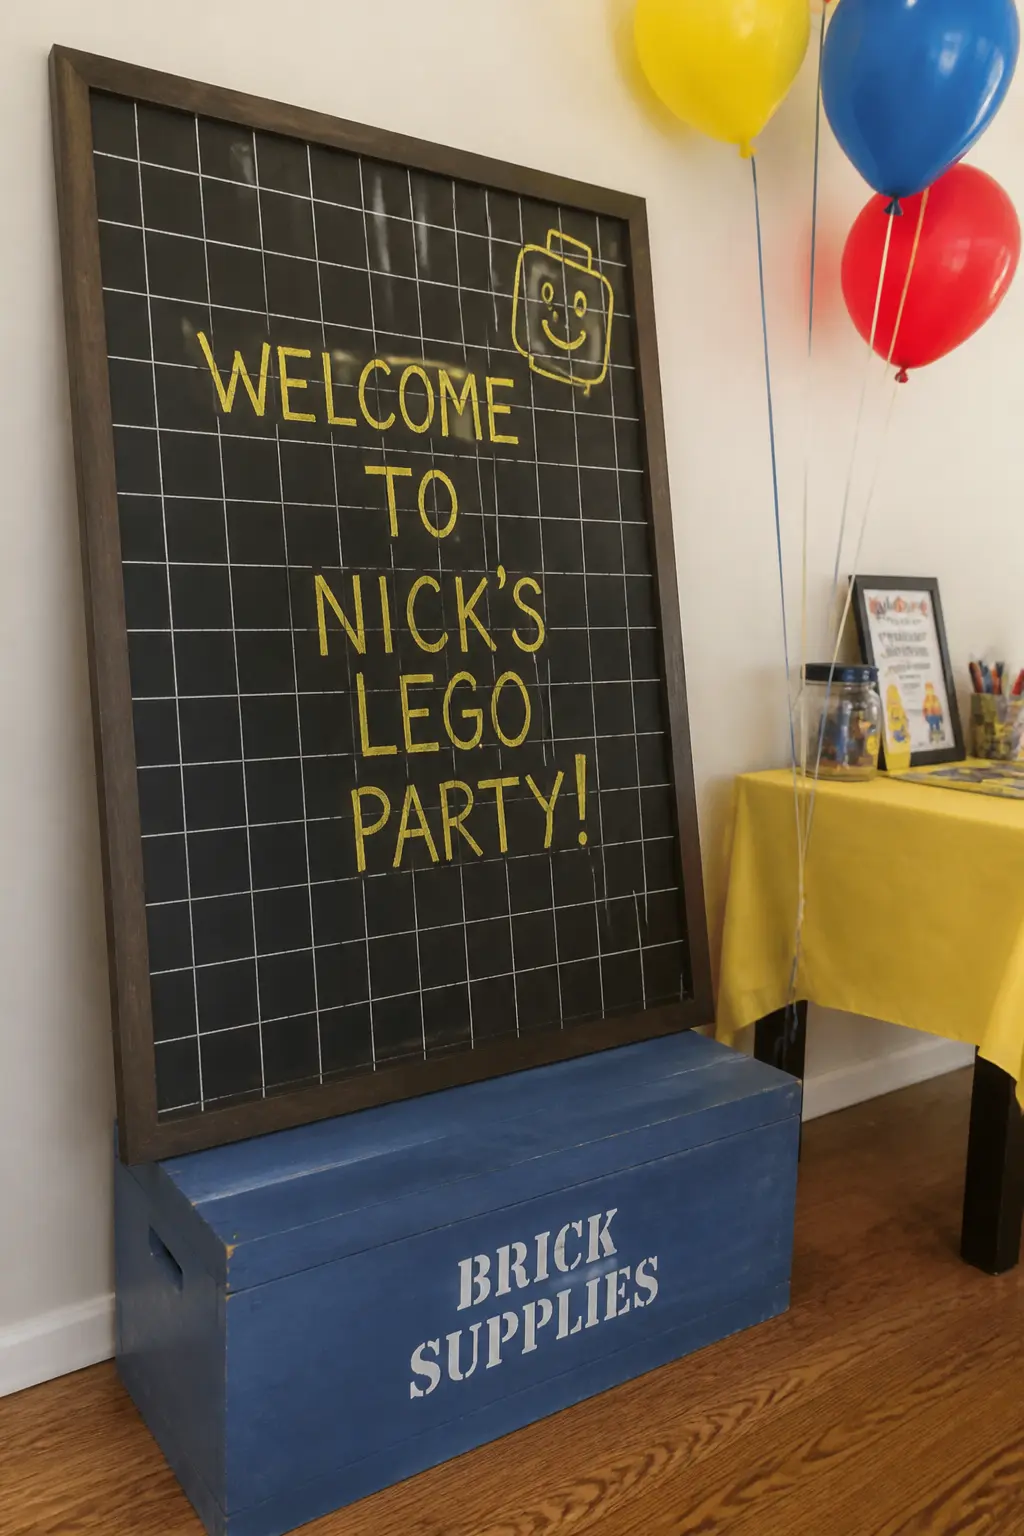
Grid-Lined Chalkboard Menu or Welcome Sign
A chalkboard surface, painted or bought, with a white grid drawn over it in chalk pen before the lettering goes on reads as a construction plan rather than a standard party sign.
Write the menu or welcome message inside the grid cells using a yellow chalk marker, with black background showing through the grid lines. The colour combination is stark and on-theme without a single reference to the source material.
An A2 chalkboard propped on a painted crate works better than one hung on a wall: it can be moved, repositioned and angled for photography. Use a thick chalk marker for the grid lines and a fine one for the text so the hierarchy of information is immediately readable from across a room.
🛍 Shopping guide
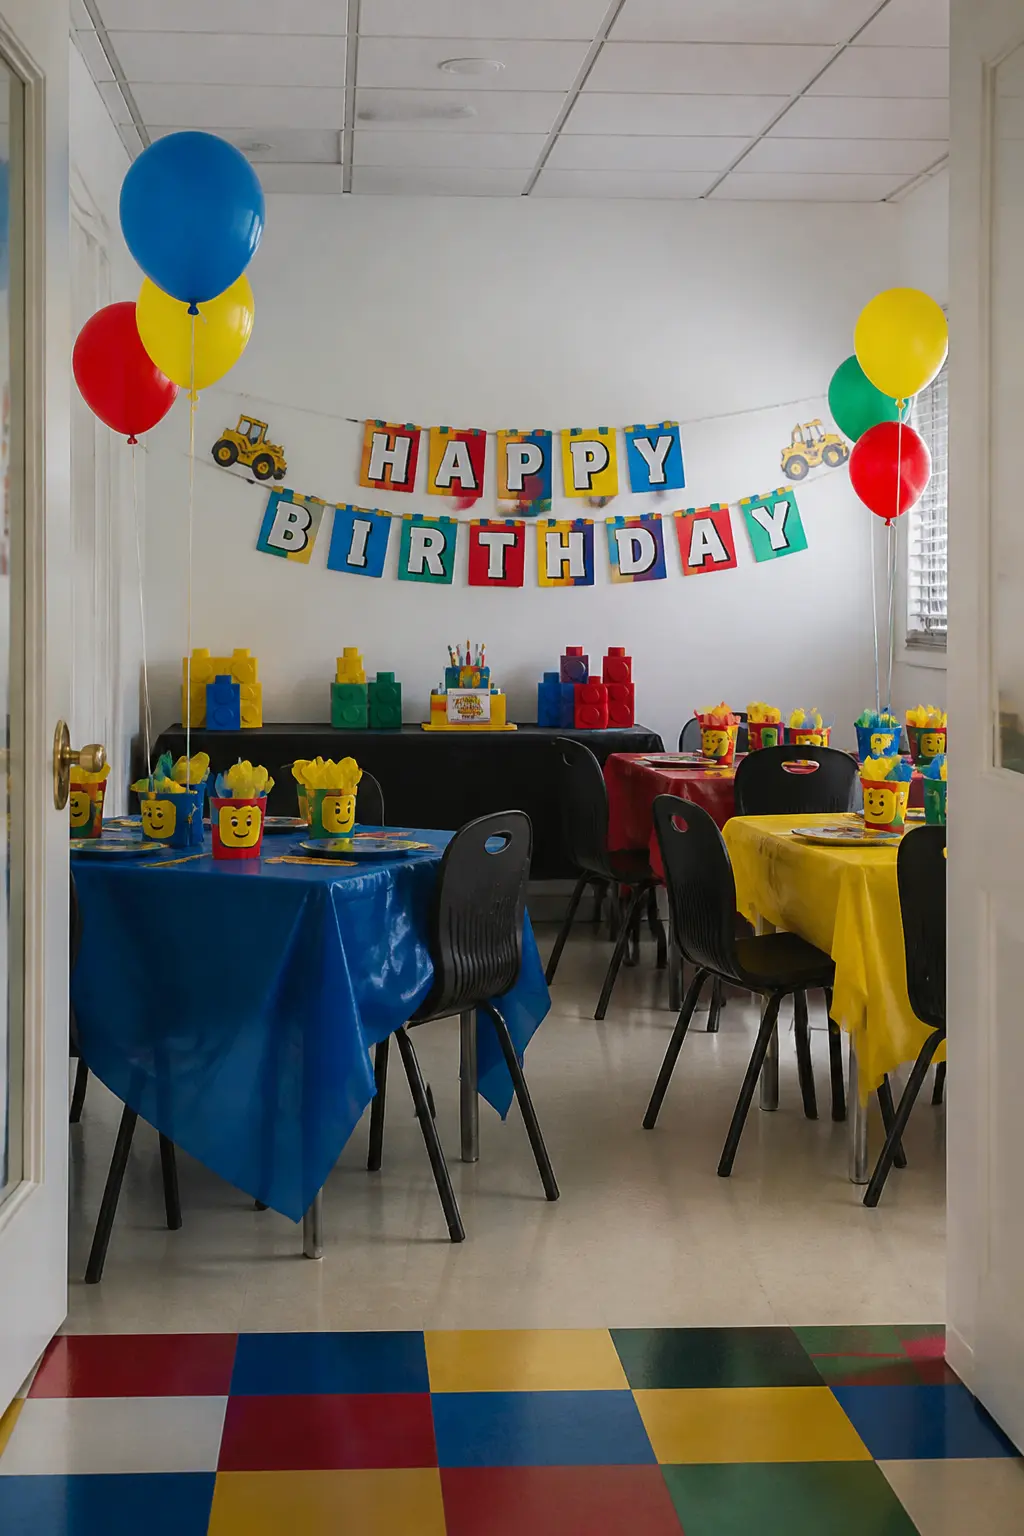
Bold-Lined Banner with Construction or Building Theme
A banner made from rectangles of primary-coloured card strung on black twine, each card holding one bold letter of the birthday message, gives the party its central verbal statement without requiring a printer or a graphic designer.
Cut each card to the same size, paint the face in alternating primary colours, and use white or black paint marker for the lettering. Block capitals, vertically centred, no serifs.
Keep the message short: a name plus a number works best. Longer messages lose the graphical punch because the letter cards reduce in size.
Hang the banner as the first thing guests see when they enter the main party room, at a height where the lettering is readable from 3 m away.
Reinforce the card with a second layer if the banner will be used outdoors or in a breezy space.
🛍 Shopping guide
Photo Moments and Exit Display
A dedicated photo moment earns its space at any party. A stacked-block frame or a painted brick-wall backdrop gives guests a location they will actually use, which means the party photos come back looking cohesive rather than random. Position it near the exit so guests hit it on their way out when the energy is still high.
The exit display serves a different function: it is the last visual impression, and it should feel finished. A painted primary-colour brick wall with a small display of the party’s colour objects in front of it lands that final note cleanly. If the party has a first birthday milestone built into it, that display is also where the number goes.
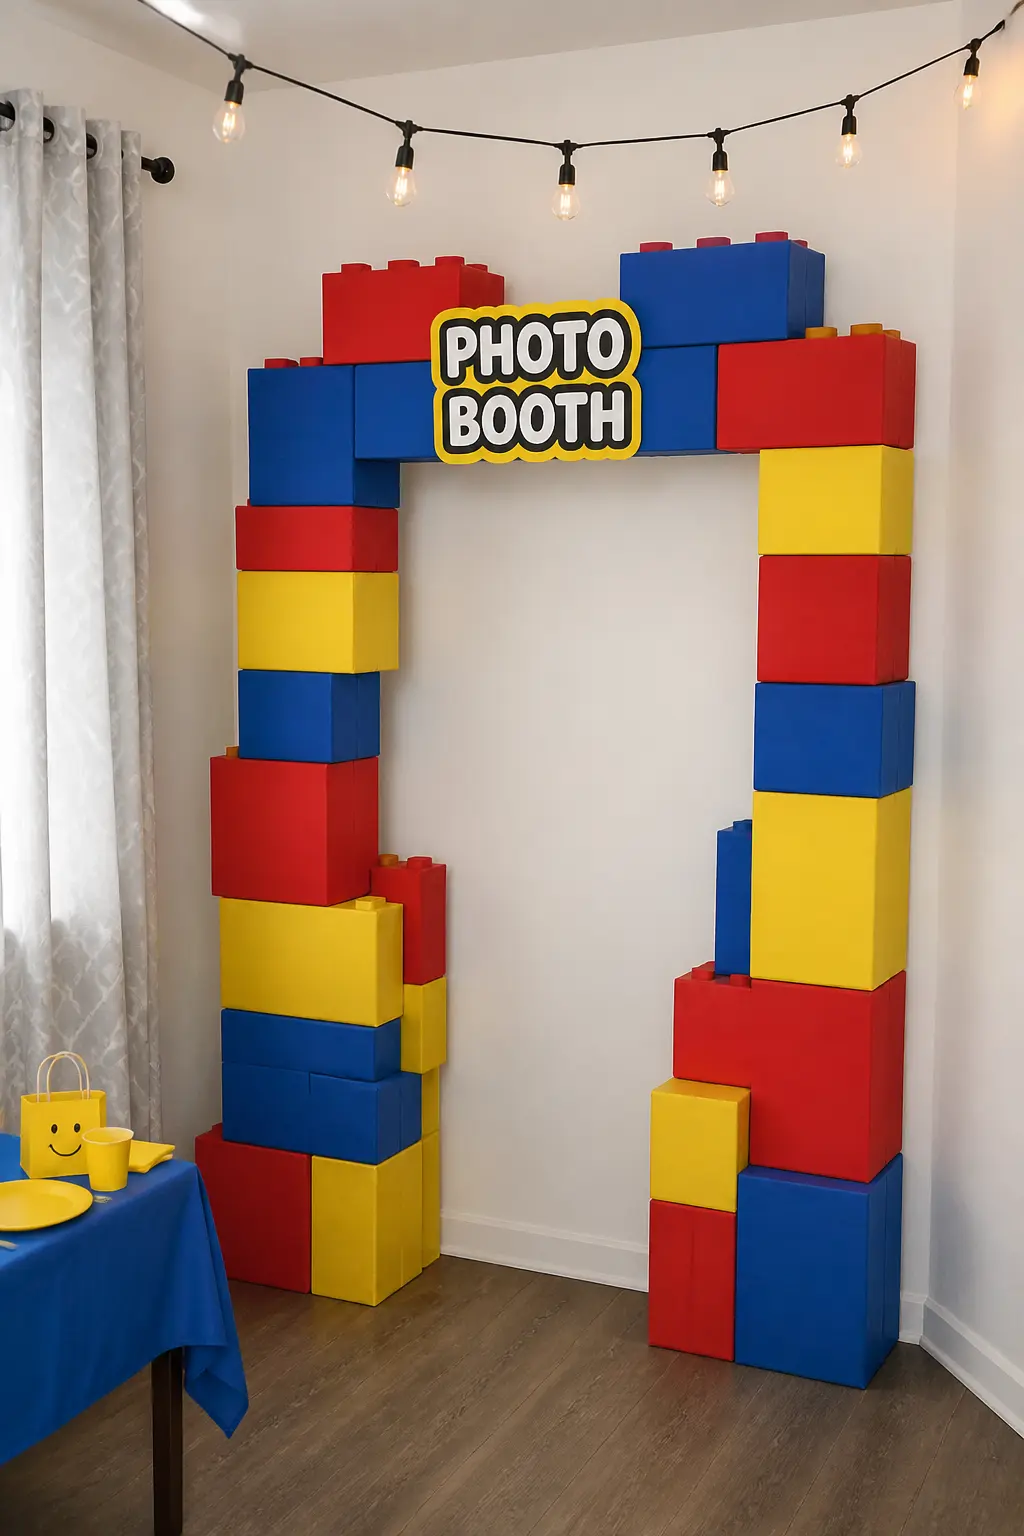
Stacked-Block Photo Booth Frame in Construction Colours
Build a photo frame from foam core or cardboard cut into rectangular block shapes, painted in primary colours and glued into a stacked-brick pattern around the inner rectangle of the frame opening.
The outer silhouette reads as a wall of blocks; the opening frames the guest. Prop it upright on a painted crate or hang it from two hooks at the correct height for a standing adult.
For a sturdier frame, score and fold double-wall cardboard rather than foam core. A coat of glossy spray paint in primary colours gives the surface a plastic sheen that reinforces the aesthetic convincingly.
Add a dot motif to the top and bottom edges using a round sponge and contrasting paint. The whole frame takes under two hours to construct and lasts the full party without any structural drama.
🛍 Shopping guide
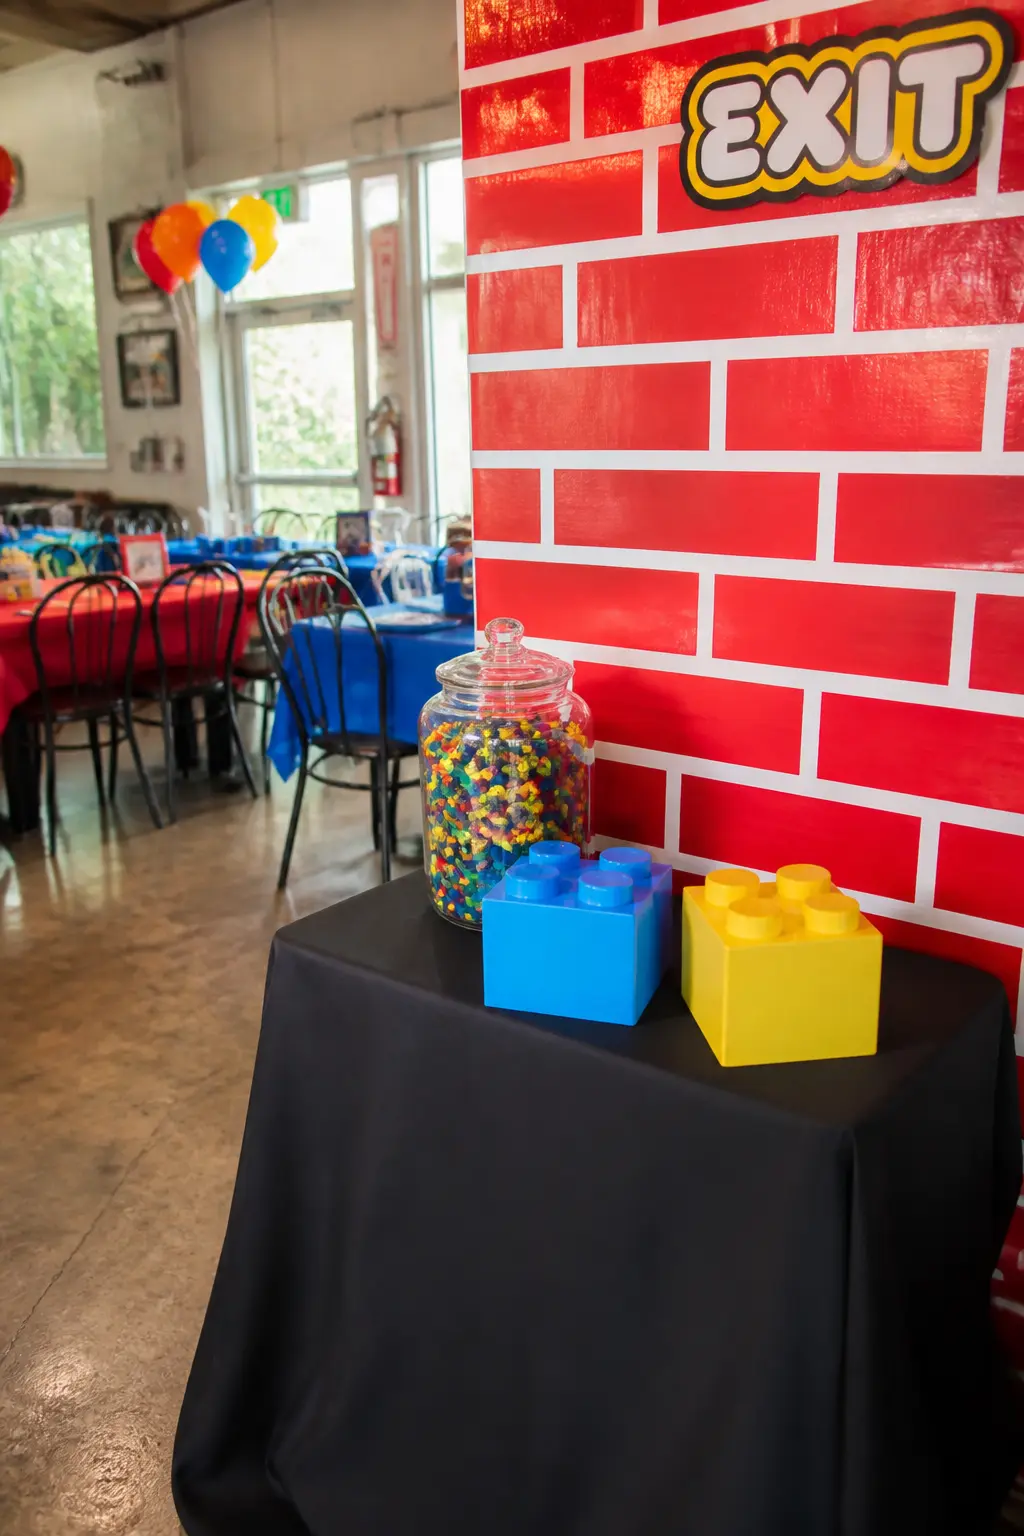
Exit Display with Primary-Coloured Brick Wall Painted Backdrop
The final party moment is a painted backdrop at the exit: a full sheet of lining paper in bright red, painted with a black grid of mortar lines to create a convincing brick-wall pattern.
Set a small table in front of it with a curated display: a favour jar, a small painted block or two, a card in the party’s typography.
Guests stop here on the way out, pick up their favour and take a photo in front of the most graphic wall in the room.
The display on the table should be minimal: three items maximum. A clutter of objects in front of a patterned backdrop cancels the effect.
Keep the table cloth in a solid dark colour, black or deep primary, so the backdrop above it reads as the dominant feature. This is the last image guests will carry from the party, and it should feel finished.
🛍 Shopping guide
Frequently Asked Questions
What are some fun LEGO games and activities to keep kids busy at a birthday party?
Building challenges are the most reliable option. Give each child an identical bag of assorted bricks and set a timer: whoever builds the tallest freestanding tower, the most convincing vehicle or the most original creature wins a small prize. Keep the challenge short (5 to 8 minutes) so attention stays high. A relay race where each child adds one brick to a communal build before tagging the next player works well for larger groups and keeps every age involved. For a list of structured games that complement this kind of party, 25 Birthday Party Games for Kids That Burn Off the Sugar has solid options that slot in alongside building activities.
How do you make a LEGO birthday cake at home?
The easiest method uses a rectangular sheet cake as the base and adds dome-shaped fondant or ganache circles on top to represent studs. Bake the cake in a standard rectangular tin, frost it in a flat primary colour (red and yellow are the most recognisable), then press rows of evenly spaced dome shapes across the top surface. The domes can be made from fondant rolled into balls and flattened slightly, or from large marshmallows painted with food colouring. Space them in an even grid and the read is instant. For a two-colour cake, frost the sides in black and the top surface in red, keeping the stud domes in yellow.
What is the best LEGO theme for a kids’ birthday party?
The most versatile choice is the general building aesthetic rather than any specific licensed theme: primary red, blue and yellow with the brick-and-stud motif works for every age from 4 to 12 without requiring a single purchased licensed item. If the birthday child has a specific passion (space, city, racing) the theme adapts easily by adding one dominant accent colour to the base palette. The core visual language of rectangular blocks and interlocking dots is strong enough to carry any event on its own.
What are good LEGO party favor ideas for goody bags?
Small official building sets, available in the Lego online shop in a range of price points, are the most straightforward choice and are almost universally appreciated. For a budget-friendlier alternative, fill a solid-coloured bag with brick-shaped candy, a mini building challenge card and a brick-top straw or pencil. Keep the bag itself in a primary colour with a simple stud sticker on the front: the packaging is part of the favour rather than an afterthought. Bags displayed on the grid shelving unit or the wooden crate display (ideas 26 and 13 above) look intentional right up until the last guest leaves.
How do you decorate for a LEGO birthday party on a budget?
Start with the three cheapest elements that do the most visual work: a red-and-black brick-patterned paper backdrop (lining paper and paint), a primary-colour paperchain hung overhead and solid-colour napkins folded into blocks at each place setting. Those three items together cost under ten dollars in materials and cover the ceiling, the walls and the table simultaneously. Add balloon towers from a bulk latex pack and construction-zone tape along the baseboards to complete the entry. Everything else in this list of 28 ideas is optional and additive: build from the cheapest items out and stop when the budget is spent.
What LEGO building challenges or competitions work well for a group of kids?
Blind-bag builds work well: give each child a small sealed bag of identical bricks and reveal a challenge word (bridge, rocket, monster) at the start. Judge on creativity rather than precision so every child has a real chance. Speed builds (who can connect ten bricks into a tower fastest) work for competitive groups. For a cooperative challenge, split guests into teams and give each team a section of a large communal base plate: their builds must connect seamlessly to the neighbouring team’s build by the time the timer ends. Birthday party games for adults has additional competition formats that adapt easily to a building theme for older guests.
How do you make LEGO-themed food and snacks for a birthday party?
Focus on rectangular and circular shapes in primary colours. Stack square sandwiches in pairs with a toothpick to suggest a two-stud block. Use a round cookie cutter on square brownies to cut circles from the surface so the remaining shape reads as a stud pattern. Serve fruit skewers with red strawberries, yellow pineapple and blueberries to carry the palette into the food display. For drinks, use primary-coloured cups with brick-top straw clips (idea 16 above) so even a plain juice reads as part of the theme. Cheese and crackers arranged in a grid pattern on a black slate board is another fast, legible food display that costs nothing extra.
Can you have a LEGO birthday party at a LEGO store or LEGOLAND?
Many Lego stores offer in-store party experiences that include a dedicated party area, building activities and access to a brick selection. Availability and booking windows vary by location, so check the Lego website for the nearest store’s event offerings and book well in advance as slots fill quickly. Legoland parks offer structured birthday packages that include park access, dedicated dining areas and character elements. Both options remove the decorating work entirely and replace it with a managed experience, which is worth the premium if setup time is the constraint rather than budget.
What are good LEGO birthday party ideas for a 6- or 7-year-old?
At this age, the building activity is the party rather than a component of it. Structure the event around a 20-minute free build followed by a short timed challenge, then food, then cake. Keep the decor bold and simple: balloon towers, a brick-patterned backdrop and primary-colour napkins are enough for a child who will not notice subtlety but will notice the big red balloons immediately. Favour bags with a small official building set inside land well at this age group. The colorful first birthday ideas roundup has useful notes on scaling bold colour schemes for younger children, and birthday party games for kids covers the activity side in detail.
How do you make DIY LEGO party decorations like invitations and centerpieces?
For invitations, cut card into a rectangle, paint it in a primary colour and add a grid of circles to the top half using a round sponge and contrasting paint. Write the party details on the lower half in black marker. The card reads as a top-down view of a building brick: no text or licensed imagery needed. For centrepieces, stack two painted plastic bowls of different sizes (large base, small top) and paint both in the same flat primary colour with a circle of dots around the rim of the lower bowl. The complete unit reads as an oversized stud at table height and costs under two dollars per centrepiece in materials. Both projects are described in full in ideas 4 and 5 above.
26 squishy birthday party ideas in the softest pastels, from the dessert table to the favour bags. R
13 practical decoration decisions for an eightieth birthday in a village hall or front room: where e
Find adult birthday party ideas for every decade, season, budget, and guest list, from low-key 40ths
Leave a Reply