

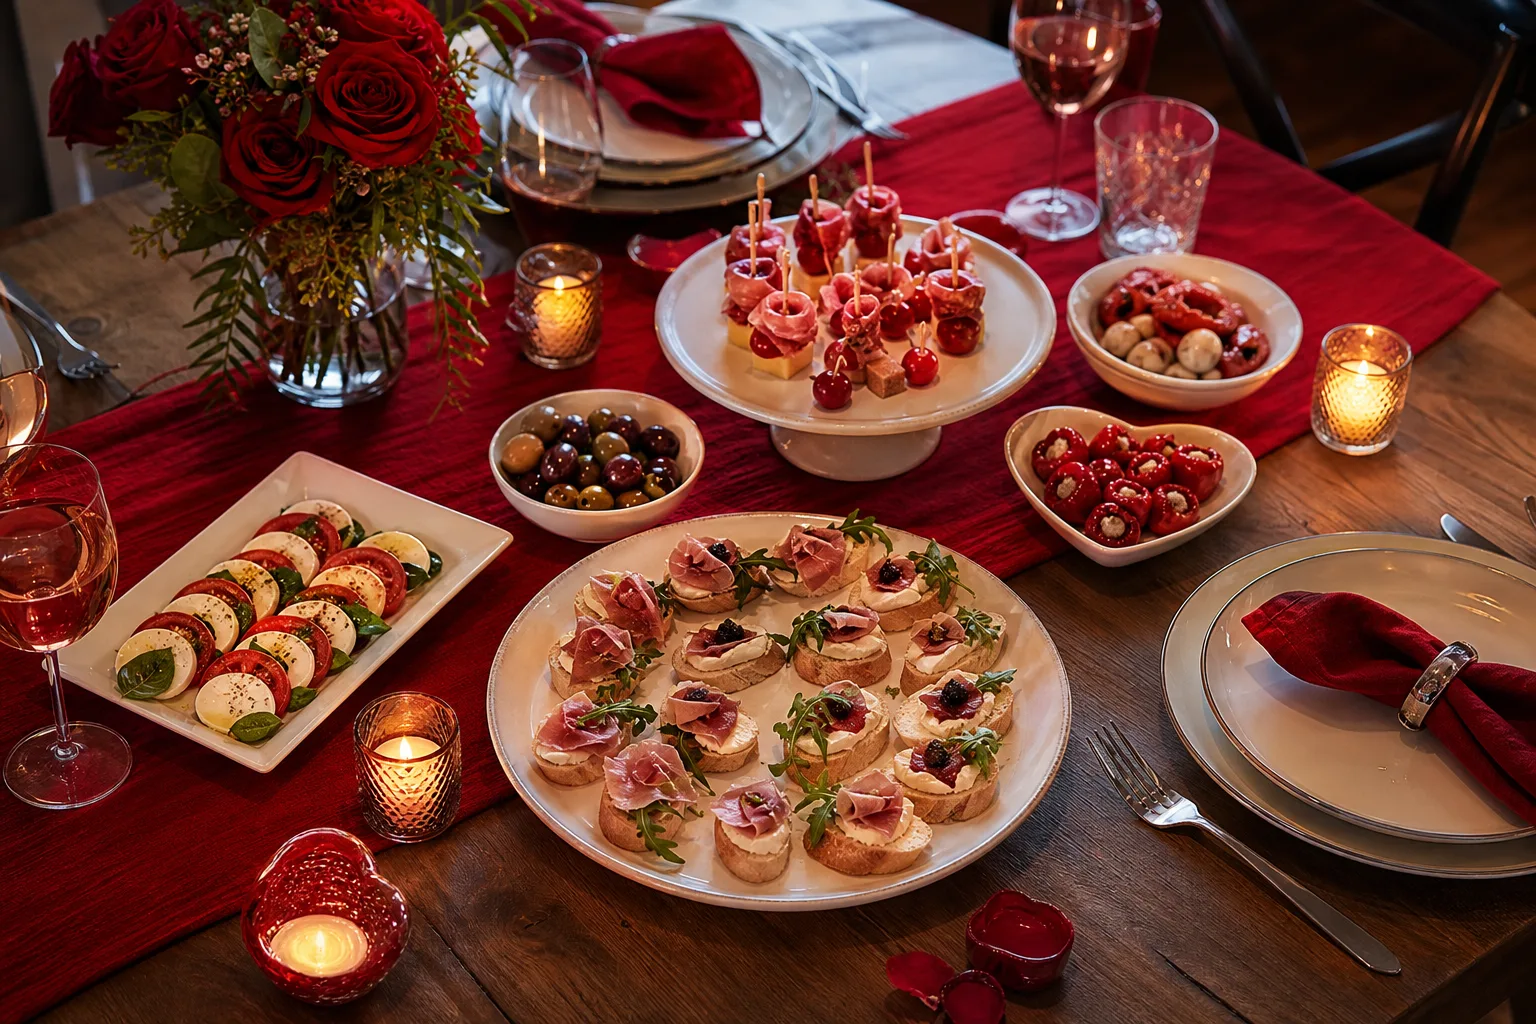
Dinner for two does not need a seated first course. It needs something to pick up with your fingers while the oven finishes the real work, something that makes the table look considered without making you miss the start of the movie.
These seventeen bites are built for the stretch between the candles going on and the main course landing: small, mostly make-ahead, and plated to look like you tried harder than you did.
A few of these are raw or lightly cooked, the oysters, the tuna tartare, the deviled eggs. Buy from a source you trust and serve them the day you make them.
Several lean on dairy, egg, gluten, shellfish or raw fish, so swap or skip whatever does not suit your table. One recipe simmers risotto in real champagne: pour the rest of the bottle for yourselves and drink it slowly, this is a dinner for two, not a toast for twelve.
If the conversation needs a nudge once the plates are empty, keep 16 Table Games Perfect for Your Romantic Valentine’s Evening on hand for after dinner, and look at 19 Valentine’s Day Ideas for Every Kind of Celebration if the appetizers are only the start of the night you’re planning.
This post contains affiliate links. If you buy through them, I may earn a small commission at no extra cost to you.
Table of Contents
- Heart-Shaped Caprese Bites
- Baked Brie With Raspberry Jam
- Beet Hummus With Pink Pita Chips
- Shrimp Cocktail Cups
- Heart Crostini With Whipped Feta
- Salami Roses on a Small Board
- Bacon-Wrapped Dates With Goat Cheese
- Smoked Salmon Deviled Eggs
- Prosciutto-Wrapped Melon Skewers
- Pomegranate Guacamole With Pink Tortilla Chips
- Champagne Risotto Bites
- Oysters on the Half Shell With Mignonette
- Strawberry Balsamic Bruschetta
- Spicy Tuna Tartare Cups
- Red Velvet Cheese Ball
- Chocolate-Dipped Strawberries
- Fig and Prosciutto Crostini With Honey
- Frequently Asked Questions
Heart-Shaped Caprese Bites
A big caprese salad looks right at a party and wrong at a table for two, too much lettuce-adjacent effort for a night that only needs a little.
Cut it down to the size of a bite and it turns into something you’d actually set between two plates. No stove required, this is done in the time it takes to open the wine.
The tomato has to taste like something on its own, a dull one in January will need an extra pinch of salt. No heart cutter in the drawer: a sharp paring knife and a steady hand get you close enough, nobody is grading the symmetry.
Ingredients
- 4 large beefsteak tomatoes
- 450 g fresh mozzarella, sliced into rounds
- 24 fresh basil leaves
- 3 tablespoons balsamic glaze
- 2 tablespoons extra virgin olive oil
- 1/2 teaspoon flaky sea salt
- 1/4 teaspoon cracked black pepper
Instructions
- Slice the tomatoes crosswise into rounds about 1 cm thick, keeping only the firm middle slices where a heart cutter has full coverage.
- Press a 5 cm heart-shaped cutter into each round, twisting gently until it cuts clean through, then set the hearts on a paper towel to blot for 5 minutes.
- Slice the mozzarella to the same thickness and cut matching hearts, pairing tomato to cheese.
- Pat the mozzarella hearts dry too, excess moisture is what makes the glaze slide off later.
- Lay a tomato heart on a board, top with a folded basil leaf, then set a mozzarella heart on top, offset slightly so both colours show.
- Repeat with the remaining tomato, basil and mozzarella hearts until the board is full.
- Drizzle balsamic glaze over the bites in a zigzag, not a puddle, it should cling rather than run.
- Finish with olive oil, flaky salt and cracked pepper, and serve within the hour while the mozzarella is still cool and firm.

🛍 Shopping guide
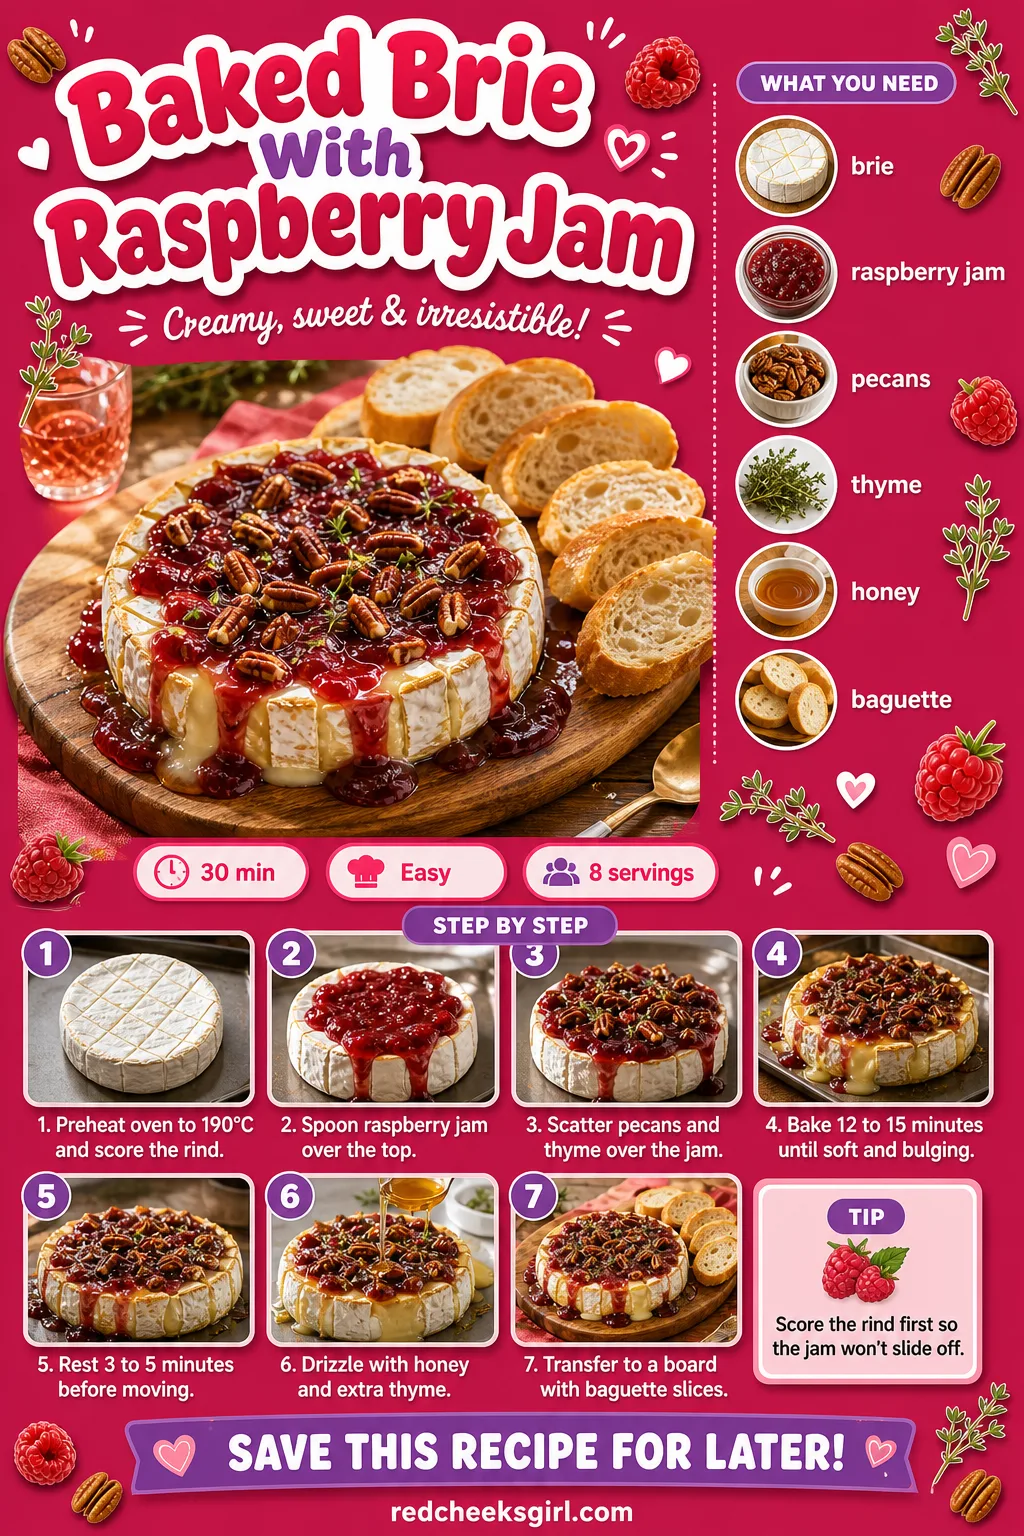
Baked Brie With Raspberry Jam
Say the words ‘baked brie’ and most people stop arguing about what to serve first. It takes fifteen minutes of hands-on time and looks like you called in a favour. If raspberry isn’t in the cupboard, fig or cherry jam does the same job of cutting through the richness.
The one thing to get right is the rind: score it before the jam goes on, or the jam slides straight off a melting wheel and pools around the edges instead of soaking in.
Ingredients
- 1 wheel (200-250 g) brie cheese
- 1/3 cup raspberry jam
- 2 tablespoons chopped toasted pecans
- 1 teaspoon fresh thyme leaves, plus extra for garnish
- 1 tablespoon honey
- 1 baguette, sliced, for serving
Instructions
- Preheat the oven to 190°C and line a small baking dish or sheet pan with parchment.
- Unwrap the brie and set it in the centre of the dish, rind on, the rind is what holds the cheese together as it melts.
- Score a shallow crosshatch across the top rind with a sharp knife, this lets the jam soak in instead of sliding off.
- Spoon the raspberry jam over the top, letting it pool slightly in the score marks.
- Scatter the pecans and thyme over the jam.
- Bake on the middle rack for 12 to 15 minutes, until the sides feel soft when pressed and the centre bulges like a water balloon, not collapses.
- Watch the last two minutes closely, once the rind splits the cheese can run straight off the board.
- Remove from the oven and rest for 3 to 5 minutes, brie straight from the oven is too thin to hold a slice.
- Drizzle with honey and a few extra thyme leaves.
- Transfer to a board (a thin spatula under the parchment helps) and surround with baguette slices.
- Serve immediately while the centre is still soft enough to spoon.
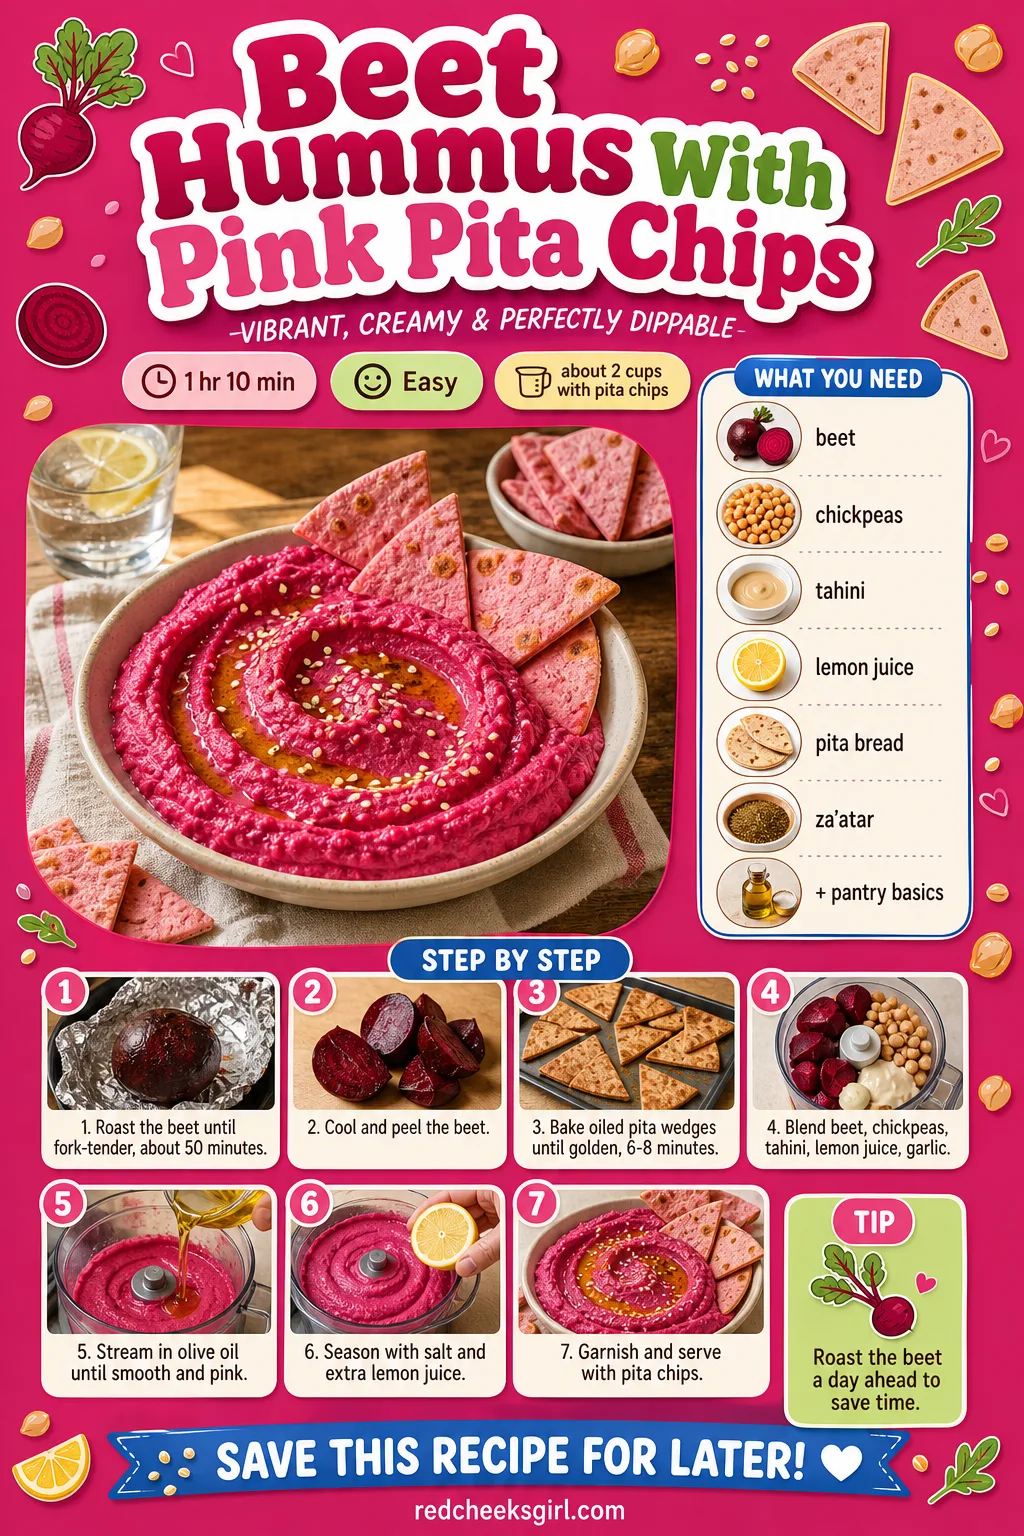
Beet Hummus With Pink Pita Chips
Plain hummus never made anyone’s heart race. Blend a roasted beet into it and the same chickpeas turn a shade of pink that does half the decorating for you. It’s cheap, it’s mostly hands-off while the beet roasts, and it keeps in the fridge for days if the night runs long before anyone gets to it.
Roast the beet the day before if today is already full, the hummus itself takes ten minutes once the beet is soft.
Ingredients
- 1 medium beet (about 150 g)
- 1 can (400 g) chickpeas, drained and rinsed
- 2 tablespoons tahini
- 2 tablespoons fresh lemon juice
- 1 small garlic clove
- 2 tablespoons olive oil, plus extra for serving
- 1/2 teaspoon salt
- 4 pita breads, cut into wedges
- 1 teaspoon za’atar or sesame seeds, for garnish
Instructions
- Wrap the beet in foil and roast at 200°C for 45 to 55 minutes, until a knife slides in with no resistance, then cool and slip off the skin with a paper towel.
- While the beet roasts, cut each pita into 8 wedges, toss with a little olive oil, and spread on a sheet pan.
- Bake the pita wedges at 190°C for 6 to 8 minutes, until the edges curl and turn golden, not brown, then let them crisp further as they cool.
- Chop the roasted beet into chunks and add to a food processor with the chickpeas, tahini, lemon juice and garlic.
- Blend for 1 to 2 minutes, scraping down the sides halfway, until mostly smooth.
- With the motor running, stream in the olive oil until the hummus turns pale magenta and ribbons off a spoon rather than clumping.
- Season with salt, taste, and add more lemon juice if it tastes flat, beet needs more acid than you expect.
- Spoon into a shallow bowl, swirl the back of a spoon through the top, and drizzle with olive oil.
- Scatter za’atar or sesame seeds over the top and serve with the warm pink pita chips.
Shrimp Cocktail Cups
Shrimp cocktail in a bowl on a buffet is for a crowd. Hooked over the rim of two small glasses, it becomes a plated first course that takes almost no cooking and chills while you get dressed. If shot glasses feel too bar-night, small juice glasses or even wine glasses work just as well.
The shrimp itself is the one place to pay attention: two to three minutes in simmering water, then straight into ice, is the difference between snappy and rubbery.
Ingredients
- 450 g large shrimp, peeled and deveined, tails on
- 1 lemon, halved
- 2 bay leaves
- 1/2 cup ketchup
- 1 tablespoon prepared horseradish
- 1 teaspoon Worcestershire sauce
- 1 teaspoon fresh lemon juice
- a few dashes hot sauce
- 1 small cucumber, diced
Instructions
- Bring a large pot of water to a boil with the lemon halves and bay leaves, this perfumes the shrimp while they cook.
- Drop in the shrimp and cook for 2 to 3 minutes, just until they turn pink and curl into a loose C shape, not a tight circle, a tight curl means overcooked.
- Drain immediately and plunge the shrimp into ice water to stop the cooking, this is what keeps them snappy instead of rubbery.
- Pat the shrimp dry once cooled and chill for at least 30 minutes.
- Stir together the ketchup, horseradish, Worcestershire sauce, lemon juice and hot sauce; taste and add more horseradish for a stronger bite.
- Spoon a little diced cucumber into the bottom of small glasses, then add a spoonful of cocktail sauce.
- Hook 3 to 4 chilled shrimp over the rim of each glass, tails pointing outward.
- Serve cold, within an hour of assembling, with small forks or cocktail picks on the side.

🛍 Shopping guide
Heart Crostini With Whipped Feta
Regular crostini is fine. Cut into hearts and topped with feta whipped until it’s closer to frosting than cheese, it stops being fine and starts being the thing she photographs before eating. Trim the bread into hearts while it’s still raw and cold, warm toasted bread crumbles under a cutter instead of cutting clean.
Whipping the feta with cream cheese softens its sharp edge, so even someone who claims not to like feta usually finishes two.
Ingredients
- 1 baguette, sliced on the diagonal into 16 ovals
- 3 tablespoons olive oil, divided
- 200 g feta cheese, crumbled
- 85 g cream cheese, softened
- 1 tablespoon honey, plus extra for drizzling
- 1 teaspoon lemon zest
- 1/4 teaspoon cracked pepper
- fresh thyme or pomegranate seeds, for garnish
Instructions
- Preheat the oven to 200°C.
- Brush the baguette ovals with 2 tablespoons of olive oil on both sides.
- Trim each oval into a heart shape with a small cutter before toasting, cold bread holds the shape better than toasted.
- Arrange the hearts on a sheet pan in a single layer.
- Toast for 6 to 8 minutes, flipping once, until both sides are golden and the centre still gives slightly when pressed, that softness disappears once it cools, so don’t wait for fully crisp.
- While the crostini toast, blend the feta, cream cheese, remaining olive oil, honey and lemon zest in a food processor for 1 to 2 minutes, until pale and fluffy like soft frosting.
- Scrape the whipped feta into a piping bag fitted with a star tip, or a zip-top bag with the corner snipped.
- Let the crostini cool for 5 minutes once out of the oven, piping onto hot bread melts the feta into a puddle.
- Pipe a generous swirl onto each heart, covering the toast to the edges.
- Drizzle lightly with honey and finish with cracked pepper and thyme or pomegranate seeds.
- Serve within 2 hours, the feta softens and the crostini loses its crunch if it sits much longer.

🛍 Shopping guide
Salami Roses on a Small Board
A full charcuterie board is a lot of counter space for two people. Shrink it down and fold the salami into roses and suddenly a handful of ingredients looks like a florist got involved.
It looks fussier than it is: the fold comes from a wine glass, not from any skill with your hands, so the first one you make will probably be the worst one on the board.
If you don’t have a small board, a dinner plate with raised edges works, just keep the pile a little tighter.
Ingredients
- 20 thin slices salami
- 200 g marinated bocconcini
- 1 small bunch red grapes
- 50 g almonds or walnuts
- 2-3 crackers or breadsticks
- 1 small bunch rosemary, for garnish
Instructions
- Drape a slice of salami halfway over the rim of a small wine glass, then overlap a second slice half over the first, continuing around the rim until you have 5 to 6 slices forming a ring.
- Gently push down on the centre of the salami ring with your fingers, easing the slices to curl inward into a spiral.
- Hold the glass upside down over the board and slide the rose off slowly, it should hold its shape with the folds facing up, like petals.
- Repeat to make 3 to 4 roses total, re-chilling the salami between batches if it gets too soft to hold a curl.
- Set the roses on the board spaced apart, then fill the gaps with bocconcini, grape clusters and nuts.
- Tuck breadsticks or crackers between the cheese and fruit so the board reads as full rather than scattered.
- Finish with rosemary sprigs tucked near the roses and serve at room temperature.

🛍 Shopping guide
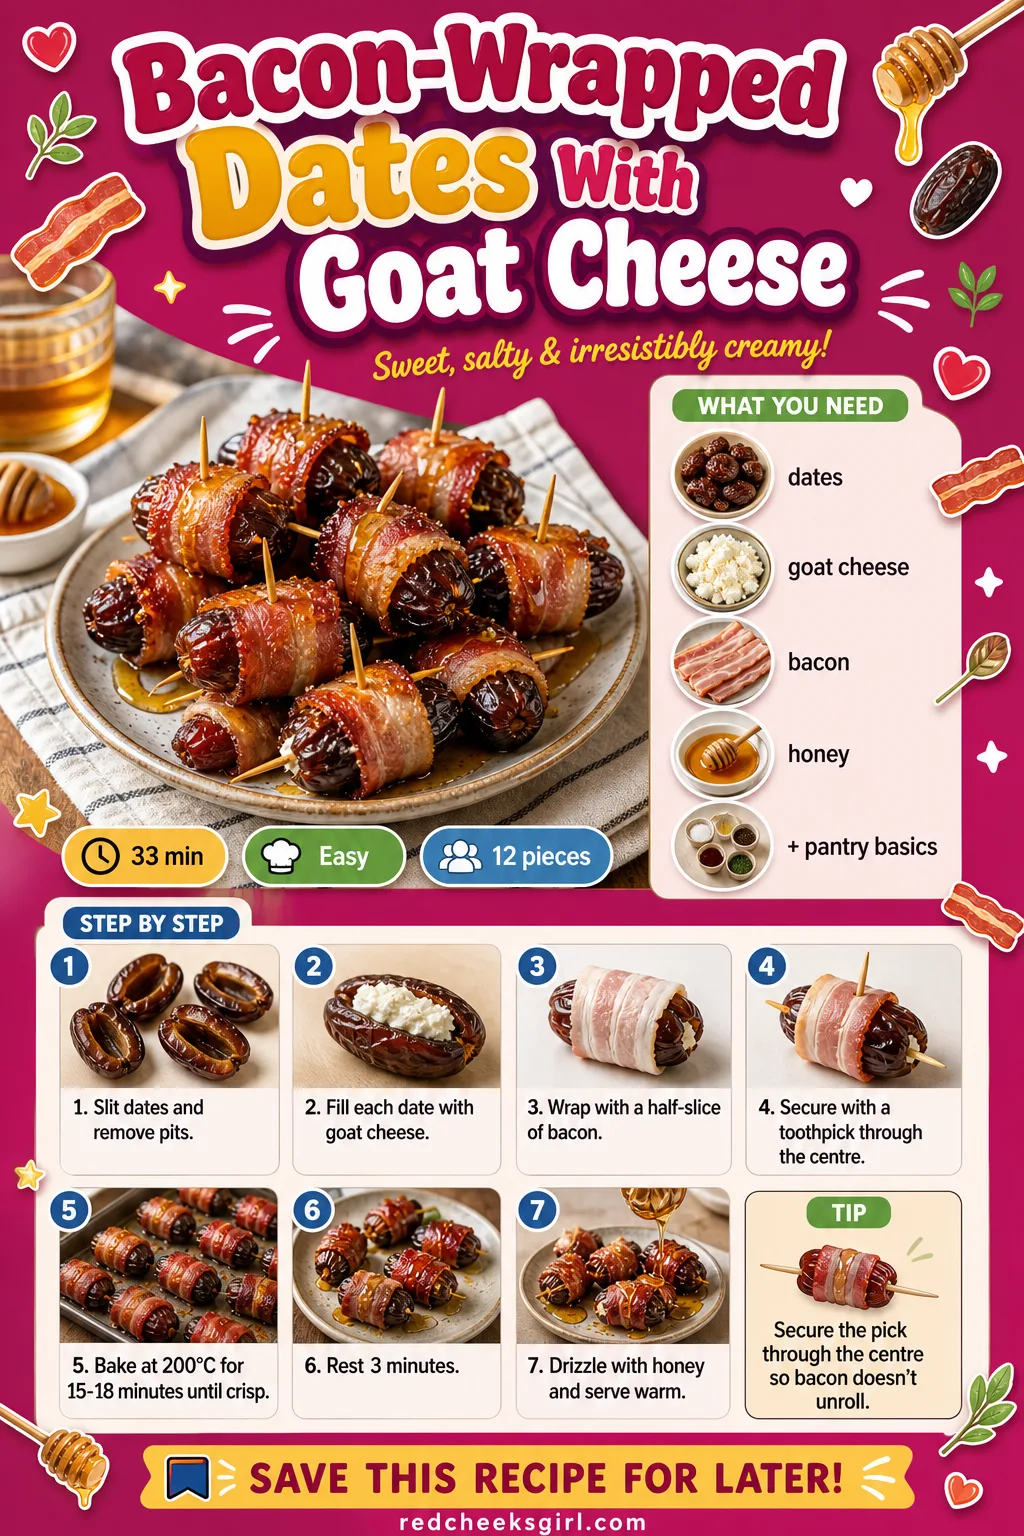
Bacon-Wrapped Dates With Goat Cheese
Sweet, salty, and warm from the oven, these disappear off the tray faster than almost anything else on this list, which is really the only argument you need for making a double batch. The dates do the dessert work and the bacon does the savoury work, so there’s no third flavour fighting for attention.
Secure the toothpick through the centre, not the end, or the bacon unrolls itself halfway through baking and you lose the crisp.
Ingredients
- 12 Medjool dates, pitted
- 85 g soft goat cheese
- 6 slices bacon, cut in half
- 2 tablespoons honey
- toothpicks
Instructions
- Preheat the oven to 200°C and line a sheet pan with foil for easy cleanup.
- Slit each date lengthwise without cutting all the way through, so it opens like a little boat.
- Press about a teaspoon of goat cheese into the centre of each date, enough to fill the slit without oozing out the sides.
- Wrap a half-slice of bacon around each stuffed date, overlapping the ends, and secure with a toothpick through the centre.
- Arrange the dates seam-side down on the pan, spaced apart so the bacon crisps on all sides rather than steaming.
- Bake for 15 to 18 minutes, turning once halfway, until the bacon is deep golden and crisp at the edges, pale bacon means a few more minutes.
- Let the dates rest for 3 minutes on the pan, the filling is molten straight out of the oven.
- Drizzle with honey and serve warm, while the cheese is still soft.
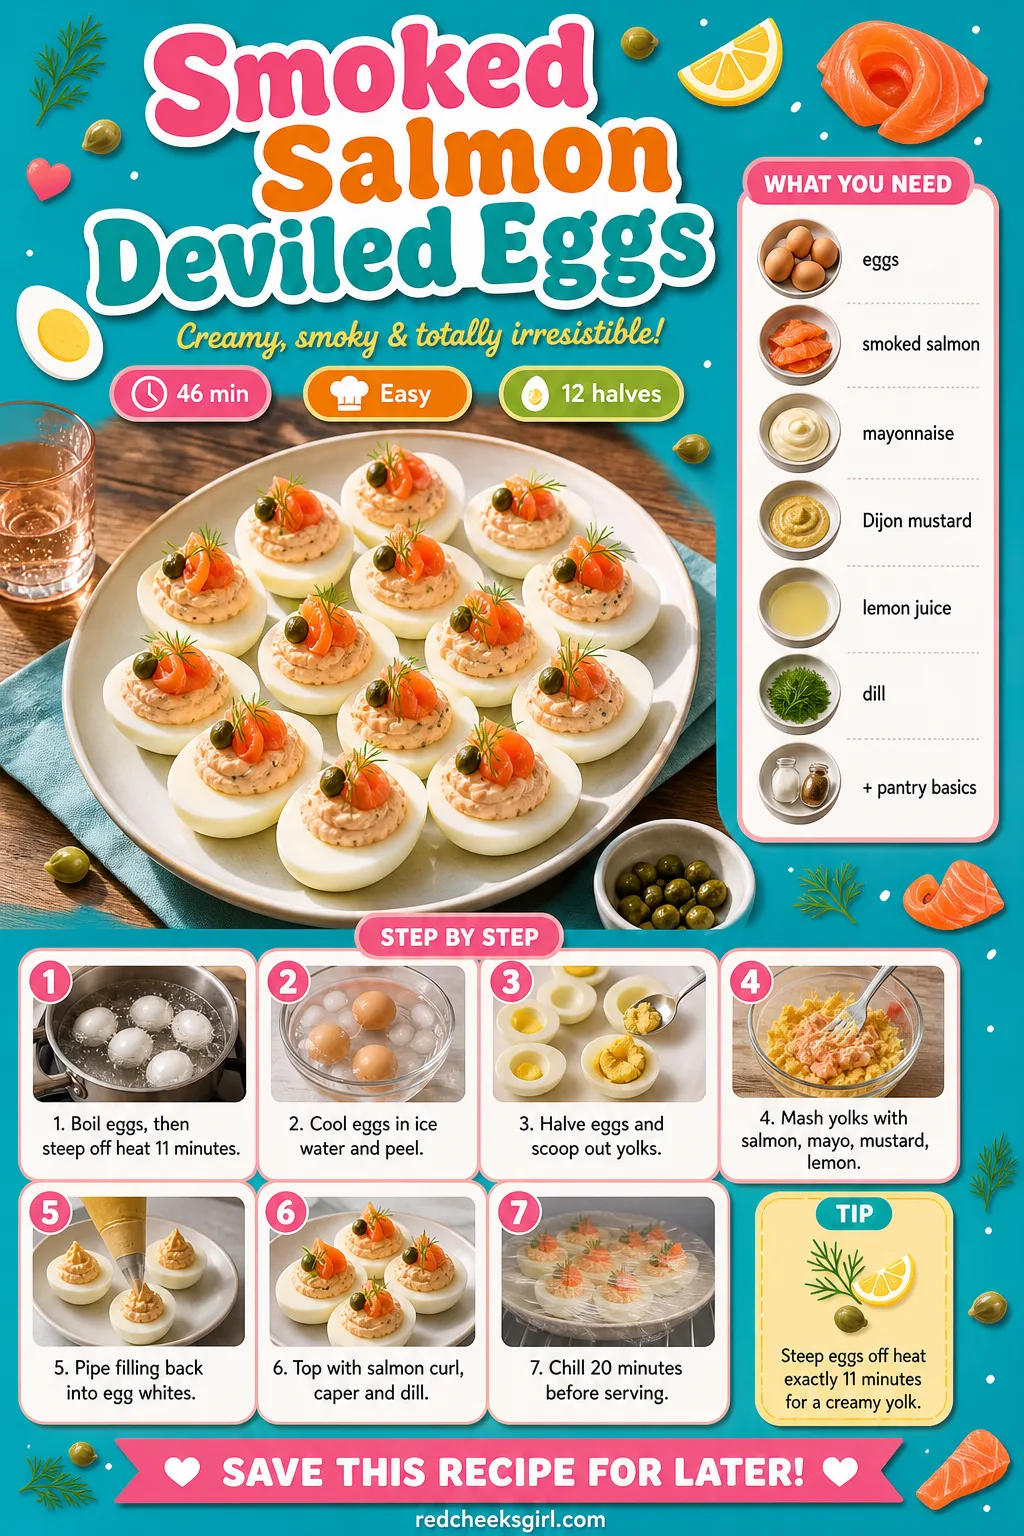
Smoked Salmon Deviled Eggs
Deviled eggs feel like a backyard potluck until smoked salmon and dill walk in and give them a reason to sit on a Valentine’s table. The timing on the eggs matters more than people think: eleven minutes, off the heat, gets a yolk that’s fully set but never chalky or grey-ringed.
Boil and peel them the night before if mornings are tight, just hold off on filling them until a few hours before serving.
Ingredients
- 6 large eggs
- 60 g smoked salmon, finely chopped, plus extra strips for garnish
- 3 tablespoons mayonnaise
- 1 teaspoon Dijon mustard
- 1 teaspoon fresh lemon juice
- 1 tablespoon finely chopped fresh dill, plus extra for garnish
- 1/4 teaspoon black pepper
- capers, for garnish
Instructions
- Place eggs in a saucepan, cover with cold water by 2.5 cm, and bring to a boil.
- Once boiling, cover, remove from heat, and let sit for 11 minutes, this timing keeps the yolk fully set without a grey ring.
- Drain and transfer the eggs straight into ice water for 5 minutes to stop cooking and loosen the shells.
- Peel the eggs under cool running water, then slice each in half lengthwise.
- Scoop the yolks into a bowl, keeping the whites intact on a tray, and mash the yolks with a fork until no lumps remain.
- Mix in the smoked salmon, mayonnaise, mustard, lemon juice, dill and pepper until the filling turns pale pink and holds a soft peak on the fork.
- Spoon or pipe the filling back into the egg white halves, mounding it slightly above the rim.
- Top each egg with a small curl of smoked salmon, a caper and a pinch of dill.
- Chill for at least 20 minutes before serving so the filling firms up.
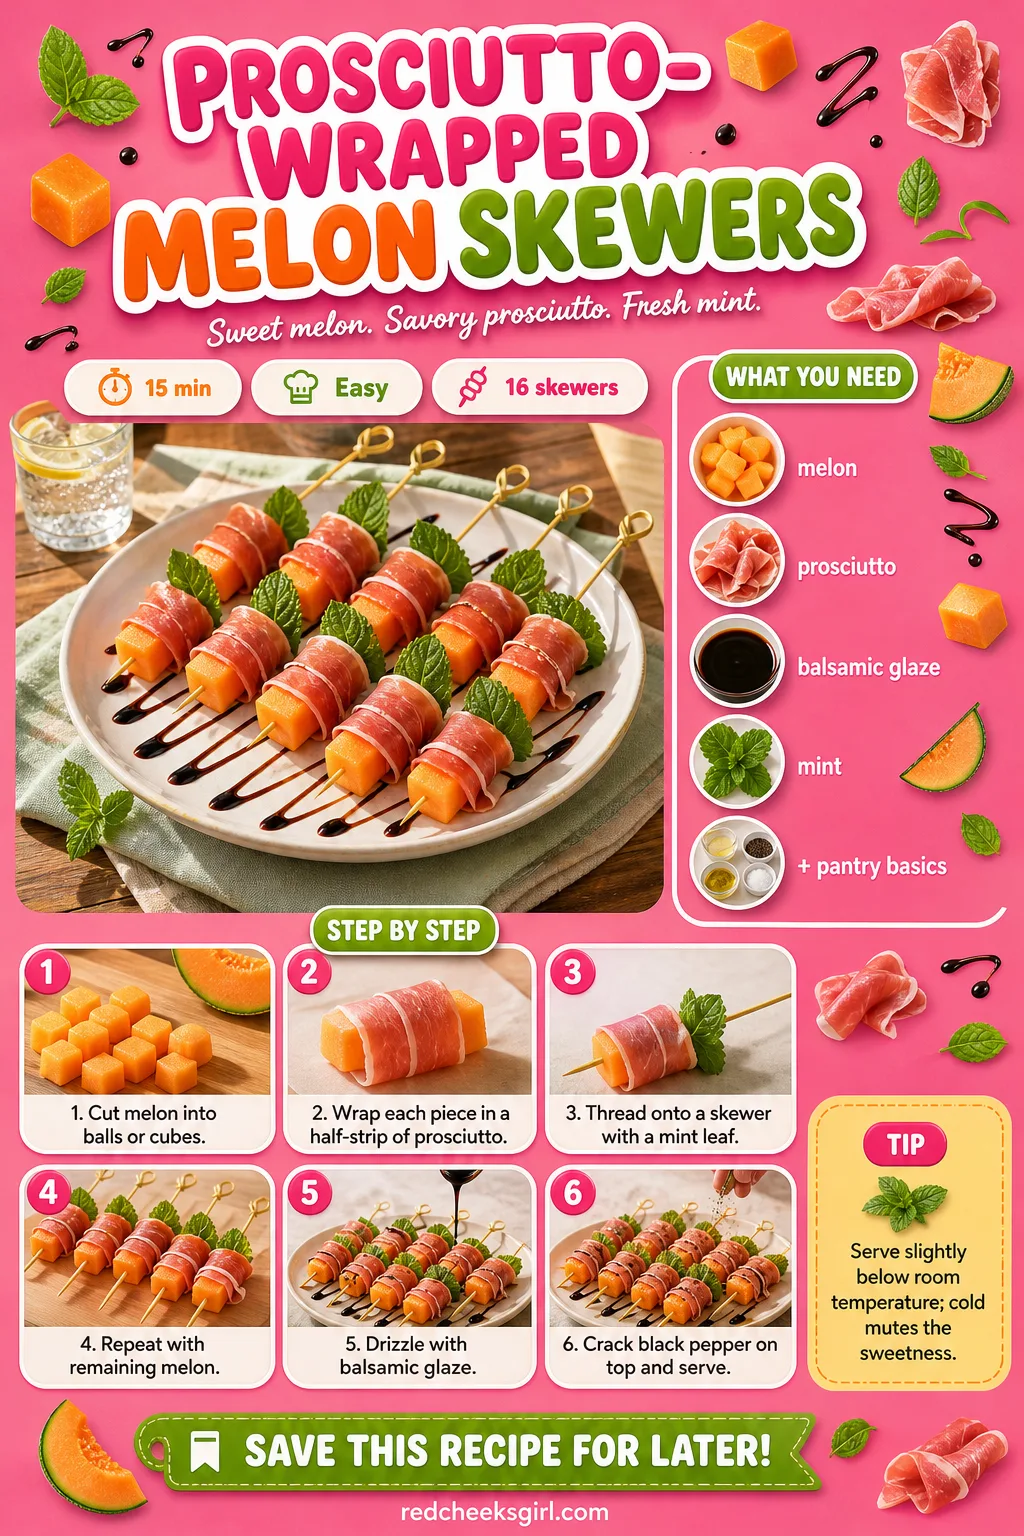
Prosciutto-Wrapped Melon Skewers
This is the one you make with your coat still on, no stove, no bowl to wash beyond the one the melon came from. The salt of the prosciutto against sweet, cold melon is an old trick for a reason: it wakes up the appetite rather than filling it.
If cantaloupe isn’t in season where you are, ripe pear does almost the same job and takes the wrap just as well.
Ingredients
- 1/2 small cantaloupe or honeydew melon
- 8 slices prosciutto, halved lengthwise
- 16 small cocktail skewers
- 2 tablespoons balsamic glaze
- fresh mint leaves, for garnish
- cracked black pepper
Instructions
- Scoop the melon into balls with a melon baller, or cut into 2.5 cm cubes, pieces small enough to wrap in one strip.
- Wrap each melon piece in a half-strip of prosciutto, pleating it slightly rather than pulling tight, so the ham doesn’t tear.
- Thread the wrapped melon onto a small skewer, adding a mint leaf folded in half right behind it.
- Repeat with the remaining melon and prosciutto.
- Arrange the skewers on a plate and drizzle with balsamic glaze in thin lines, not pooled, so the sweetness doesn’t drown the salt.
- Finish with a crack of black pepper and serve at cool room temperature, cold melon mutes its own sweetness.
Pomegranate Guacamole With Pink Tortilla Chips
Guacamole does not usually get an invitation to a romantic dinner, it reads as a side for nachos, not a starter for two. Fold in pomegranate seeds and brush the chips with a little beet juice before baking, and the same bowl suddenly fits the table. It’s quick, and it costs almost nothing beyond the avocados themselves.
Make it as close to serving as you can manage, cut avocado starts to brown within the hour, no amount of lime juice stops it indefinitely.
Ingredients
- 3 ripe avocados
- 1/4 cup pomegranate seeds, plus extra for garnish
- 2 tablespoons red onion, finely diced
- 1 tablespoon fresh lime juice
- 1 small jalapeño, seeded and minced
- 2 tablespoons chopped cilantro
- 1/2 teaspoon salt
- 6 small flour tortillas
- 2 tablespoons beet juice
Instructions
- Preheat the oven to 190°C.
- Brush each tortilla lightly with beet juice mixed with a touch of oil, this is what turns the chips rosy pink without changing the flavour.
- Cut the tortillas into wedges, spread on a sheet pan in a single layer, and bake for 8 to 10 minutes, flipping once, until crisp and curled at the edges.
- While the chips bake, halve and pit the avocados, then scoop the flesh into a bowl.
- Mash the avocado with a fork, leaving some chunks, it should look rough, not pureed.
- Fold in the pomegranate seeds, red onion, lime juice, jalapeño, cilantro and salt.
- Taste and adjust the lime and salt, guacamole always needs more acid than feels right straight from the bowl.
- Spoon into a serving bowl, scatter extra pomegranate seeds over the top, and serve immediately with the warm pink chips.

Champagne Risotto Bites
Leftover risotto was always too good to just reheat, and this is the appetizer that proves it: cold risotto, rolled, breaded, and fried until the outside shatters and the inside stays creamy. Cooking the rice in real champagne instead of white wine keeps the whole plate on theme.
This one has the most steps on the list, almost none of them hard, just patient. Chill the rice fully before you try to roll it, or the balls won’t hold their shape in the fryer.
Ingredients
- 1 cup arborio rice
- 2 cups chicken or vegetable stock, warm
- 1/2 cup champagne or dry sparkling wine
- 1/2 small shallot, finely chopped
- 1 tablespoon butter
- 30 g grated Parmesan
- 2 eggs, beaten
- 1 cup breadcrumbs
- oil, for frying
- small cubes of mozzarella, optional
Instructions
- Melt the butter in a saucepan over medium heat and soften the shallot for 2 minutes, until translucent, not browned.
- Add the arborio rice and stir for 1 minute, until the edges turn slightly glassy.
- Pour in the champagne and stir until it’s mostly absorbed, the bubbles will hiss down to a simmer.
- Add the warm stock a ladle at a time, stirring often and waiting until each addition is absorbed before adding the next, this takes 18 to 20 minutes total.
- The risotto is ready when it falls in a slow ribbon off the spoon and tastes tender with a faint bite in the centre.
- Stir in the Parmesan, spread the risotto onto a tray in a thin layer, and chill, uncovered, for at least 1 hour, it needs to be cold and firm to roll.
- Scoop tablespoons of the chilled risotto and roll into balls, tucking a cube of mozzarella into the centre of each if using.
- Set up two bowls, one with beaten egg, one with breadcrumbs.
- Roll each ball in egg, then breadcrumbs, pressing gently so the crumbs stick in an even coat.
- Heat 5 cm of oil in a deep pan to 175°C, test with a pinch of breadcrumb, it should sizzle instantly.
- Fry the balls in batches of 4 to 5 for 2 to 3 minutes, turning once, until deep golden all over.
- Drain on paper towels for a minute before serving, the centre stays molten for a few minutes after frying.
- Serve warm, they lose their crisp shell within about 20 minutes.

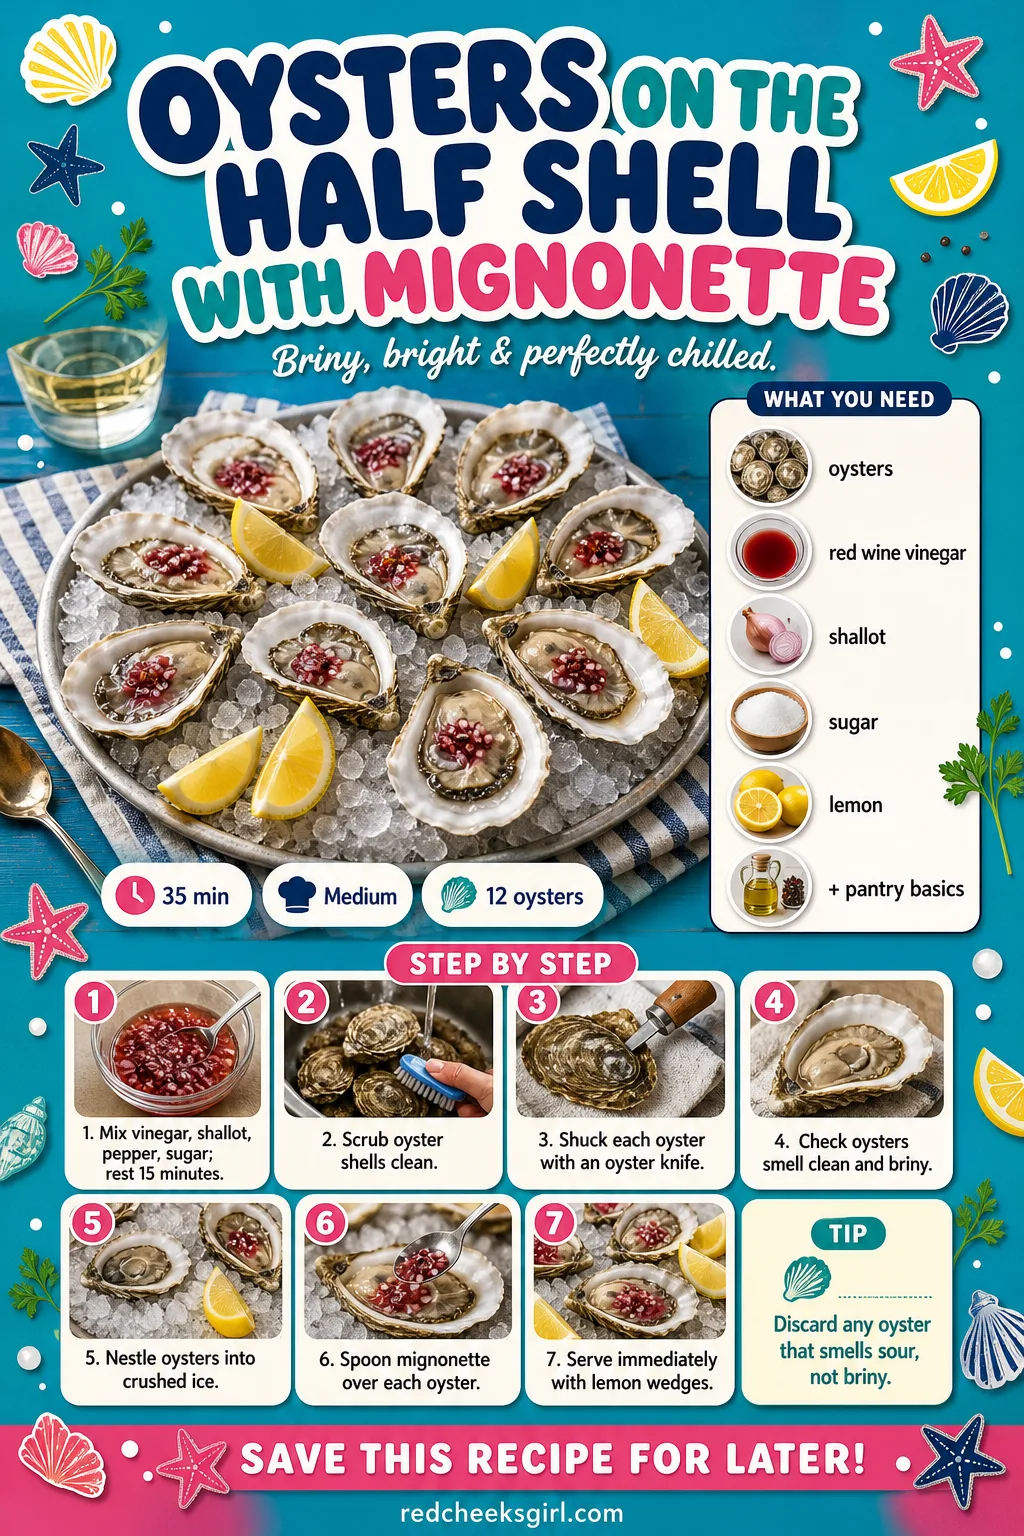
Oysters on the Half Shell With Mignonette
Oysters are either exactly what one of you wanted or exactly what the other one is dreading, there’s rarely a middle position. Buy them the day you plan to serve them from somewhere you trust, and open them close to serving rather than hours ahead, they lose their chill and their texture sitting in liquor too long.
No oyster knife at home: ask the fishmonger to shuck them for you, most will if you’re buying there.
Ingredients
- 12 fresh oysters, scrubbed
- crushed ice, for serving
- 3 tablespoons red wine vinegar
- 1 small shallot, very finely minced
- 1/2 teaspoon cracked black pepper
- 1 teaspoon sugar
- lemon wedges, for serving
Instructions
- Stir together the vinegar, shallot, pepper and sugar in a small bowl and let it sit for at least 15 minutes so the shallot softens and mellows.
- Scrub the oyster shells under cold water to remove any grit.
- Hold an oyster flat-side up in a folded kitchen towel, and work an oyster knife into the hinge at the pointed end, twisting until you feel it pop open.
- Slide the knife along the top shell to release it, then run it under the oyster to free it from the bottom shell without spilling the liquor inside.
- Discard the top shell and check the oyster smells clean and briny, never sour or like ammonia, discard it if it does.
- Repeat with the remaining oysters, nestling each opened shell into a bed of crushed ice as you go.
- Spoon a small amount of mignonette over each oyster just before serving.
- Serve immediately with lemon wedges on the side, oysters sitting in liquor over ice for more than 30 minutes lose their chill and their texture.
🛍 Shopping guide
Strawberry Balsamic Bruschetta
Strawberries on bread sound like a dessert that wandered onto the wrong course, until you taste what balsamic vinegar and a little salt do to them. Macerate the berries for ten minutes before anything else, that resting time is what turns them glossy and syrupy instead of just wet.
Goat cheese gives more tang than ricotta, swap freely depending on what’s already open in the fridge.
Ingredients
- 1 baguette, sliced into 16 rounds
- 2 tablespoons olive oil, divided
- 2 cups strawberries, diced
- 1 tablespoon balsamic vinegar
- 1 teaspoon honey
- 115 g ricotta or soft goat cheese
- fresh basil, torn, for garnish
- flaky salt
Instructions
- Preheat the oven to 200°C.
- Brush the baguette rounds with 1 tablespoon of olive oil and arrange on a sheet pan.
- Toast for 6 to 8 minutes, until golden at the edges and firm enough to hold toppings without bending.
- While the bread toasts, toss the diced strawberries with the balsamic vinegar, honey and remaining olive oil in a bowl.
- Let the strawberries sit for 10 minutes, they’ll release juice and turn glossy, that juice is part of the topping, not a problem to drain away.
- Spread a thin layer of ricotta or goat cheese onto each cooled crostini.
- Spoon the macerated strawberries over the cheese, letting a little juice soak into the edges.
- Scatter torn basil and a pinch of flaky salt over the top, then serve within the hour before the bread softens.

Spicy Tuna Tartare Cups
This is the one that tastes like a restaurant starter and costs a fraction of one, as long as you buy tuna actually labelled for raw eating, not whatever’s cheapest at the fish counter.
The wonton cups hold their crunch for about twenty minutes once filled, so dice everything and keep it cold until the two of you are actually sitting down.
No mini muffin tin: lightly oiled shot glasses or spoons work as a stand-in, the crunch matters more than the shape.
Ingredients
- 200 g sushi-grade tuna, finely diced
- 1 tablespoon mayonnaise
- 1 teaspoon sriracha
- 1 teaspoon soy sauce
- 1/2 teaspoon sesame oil
- 1 teaspoon toasted sesame seeds
- 1/2 small avocado, diced
- 12 wonton wrappers
- 1 green onion, thinly sliced
Instructions
- Preheat the oven to 180°C.
- Press each wonton wrapper into the cup of a mini muffin tin, pleating the edges so it sits like a little bowl.
- Bake for 6 to 8 minutes, until deep golden and crisp all the way through, let cool completely in the tin before removing, they’re fragile while warm.
- While the cups bake and cool, pat the tuna dry and dice it into small, even cubes, uneven pieces make some bites mushy and others chewy.
- Whisk together the mayonnaise, sriracha, soy sauce and sesame oil in a bowl.
- Fold in the diced tuna gently, just until coated, overmixing breaks the fish down into paste.
- Fold in the diced avocado at the last minute so it doesn’t turn mushy.
- Spoon the tuna mixture into the cooled wonton cups just before serving, they turn soggy within about 20 minutes.
- Top each cup with sesame seeds and a scattering of green onion, and serve right away, cold.

Red Velvet Cheese Ball
A cheese ball shaped into a heart and rolled in white chocolate and crushed raspberries reads more like a dessert table centrepiece than a starter, and nobody will mind the confusion. It holds in the fridge for up to two days before the coating goes on, so most of the work happens well before anyone’s hungry.
Shape it by hand rather than reaching for a mold, the slight imperfection is what makes it look homemade instead of mass-produced.
Ingredients
- 230 g cream cheese, softened
- 1/2 cup shredded cheddar cheese
- 1 tablespoon cocoa powder, plus red food colouring
- 1 teaspoon vanilla extract
- 1/4 teaspoon salt
- 100 g white chocolate, finely chopped
- crushed freeze-dried raspberries
- crackers, for serving
Instructions
- Beat the cream cheese in a bowl until smooth and no lumps remain.
- Mix in the cheddar, cocoa, a few drops of red food colouring, vanilla and salt until the mixture turns an even deep red and holds together when pressed.
- Lay a large piece of plastic wrap over a bowl and scrape the mixture onto it.
- Gather the wrap around the cheese mixture and shape it roughly into a heart by hand, pinching a point at the bottom and pressing a dip at the top.
- Twist the wrap tightly and chill for at least 2 hours, until firm enough to hold the heart shape on its own once unwrapped.
- Just before serving, finely chop the white chocolate and crush the freeze-dried raspberries, then mix them together on a plate.
- Unwrap the chilled cheese ball and roll it gently in the white chocolate and raspberry mixture, pressing lightly so it sticks in an even coat.
- Reshape the point and dip with your hands if the rolling softened the edges.
- Set on a board with crackers and serve cold, it softens quickly at room temperature.

Chocolate-Dipped Strawberries
Of course it’s on the list, it would be strange if it weren’t. The only real skill involved is drying the berries completely before they go anywhere near melted chocolate, a wet strawberry makes the chocolate seize into grainy lumps instead of setting glossy. Get that right and the rest takes care of itself!
No double boiler, a heatproof bowl set over a pan of barely simmering water does the same job without scorching anything.
Ingredients
- 450 g fresh strawberries, with stems, dried completely
- 200 g dark or semisweet chocolate, chopped
- 50 g white chocolate, chopped
- pinch of salt
- sprinkles or crushed freeze-dried raspberries, optional
Instructions
- Line a baking sheet with parchment paper.
- Wash the strawberries and pat them completely dry, any water left on the skin makes the chocolate seize or slide off.
- Melt the dark chocolate in a heatproof bowl set over a pan of barely simmering water, stirring often, until smooth and glossy with no lumps.
- Remove from the heat and stir in the pinch of salt.
- Hold each strawberry by the stem and dip it two-thirds of the way into the melted chocolate, twisting gently as you lift it out so the excess drips back into the bowl.
- Set the dipped strawberries on the parchment, stem up, spacing them apart so they don’t touch.
- Let the chocolate set at room temperature for 15 to 20 minutes, until it looks matte and firm to a light touch.
- Melt the white chocolate the same way, then drizzle it over the set strawberries using a spoon or a piping bag with a tiny snipped corner.
- Scatter sprinkles or crushed freeze-dried raspberries over the wet white chocolate before it sets.
- Chill for 10 minutes to fully set the drizzle, then serve the same day, strawberries weep juice once cut or kept too long.
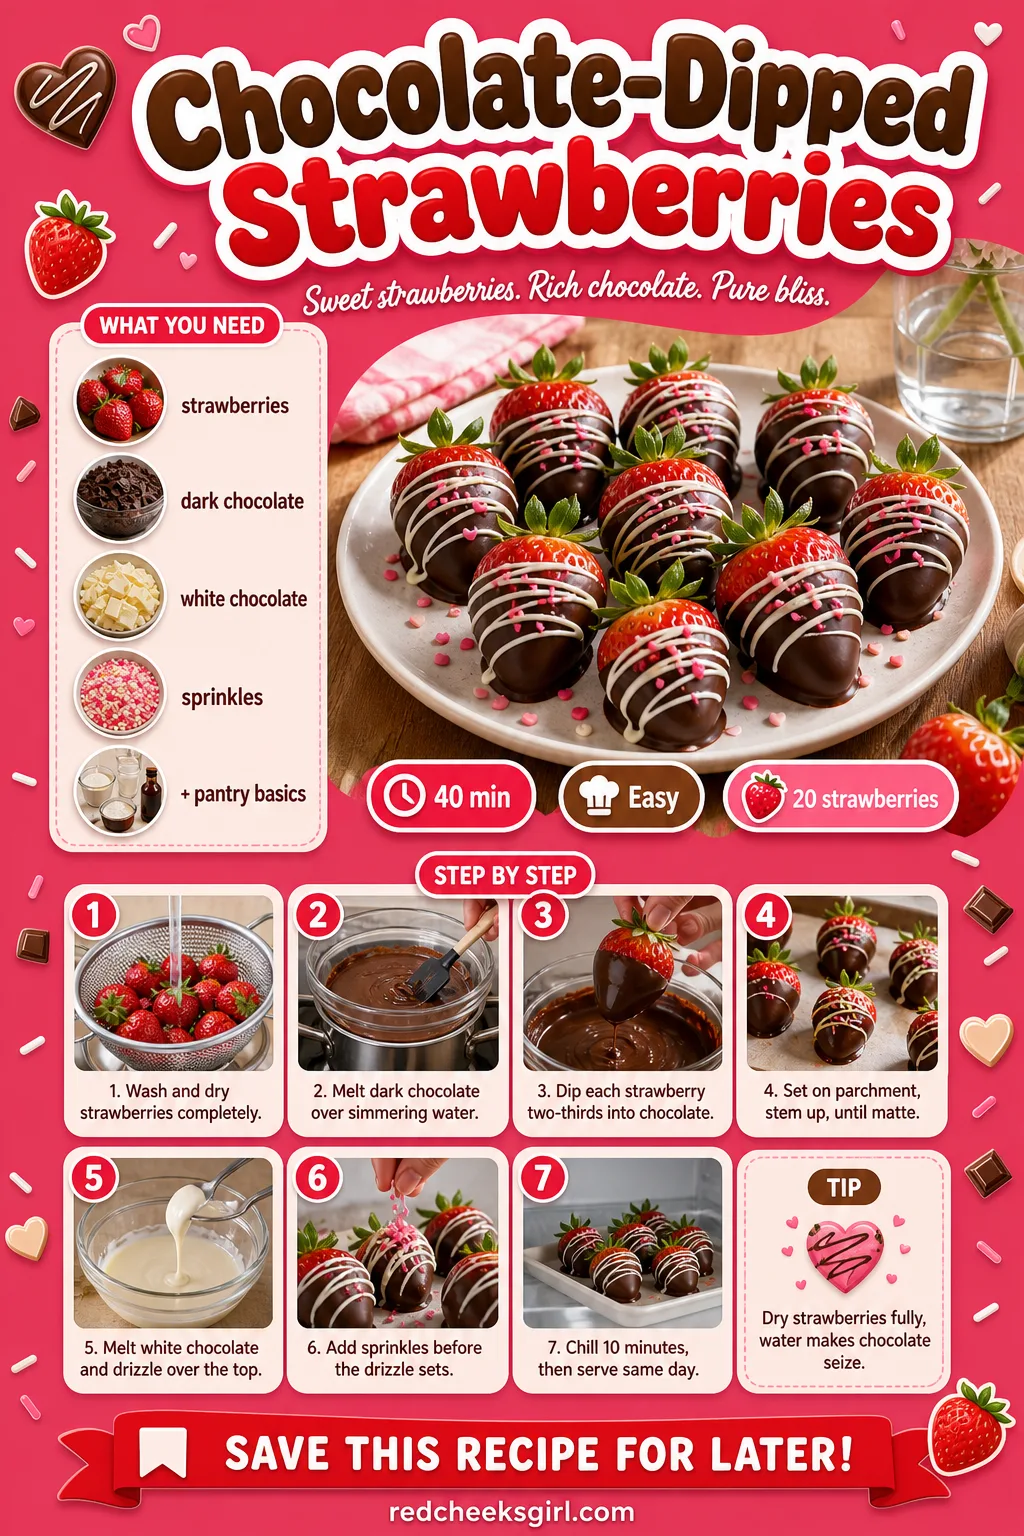
Fig and Prosciutto Crostini With Honey
When figs aren’t in season, this still works with dried figs softened in a little warm water, so don’t skip it just because the produce section let you down. The combination of salty prosciutto, sweet fig and honey against goat cheese is the kind of thing that tastes expensive while using maybe six dollars of actual ingredients.
Let the toast cool before spreading the cheese, warm bread turns goat cheese into a melted smear instead of a clean layer.
Ingredients
- 1 baguette, sliced into 16 rounds
- 2 tablespoons olive oil
- 115 g whipped or soft goat cheese
- 6 fresh figs, sliced
- 8 slices prosciutto, torn into pieces
- 2 tablespoons honey
- cracked black pepper and fresh thyme, for garnish
Instructions
- Preheat the oven to 200°C.
- Brush the baguette rounds with olive oil and arrange on a sheet pan.
- Toast for 6 to 8 minutes, until golden at the edges and sturdy enough to hold toppings without snapping.
- Let the crostini cool for 5 minutes, warm bread melts the goat cheese into a puddle instead of a spreadable layer.
- Spread each crostini with a layer of goat cheese.
- Lay a slice of fig over the cheese, then drape a torn piece of prosciutto loosely on top, letting it ruffle rather than lie flat.
- Arrange the crostini on a board and drizzle with honey in thin threads.
- Finish with cracked pepper and a few thyme leaves, then serve within 2 hours while the bread still has crunch.

Frequently Asked Questions
What Valentine’s Day appetizers can I make ahead of time?
Caprese skewers, deviled eggs, smoked salmon bites and cheese balls all hold well in the fridge for a few hours or even a day. Dips and crostini toppings can also be mixed early, just assemble crostini and chips closer to serving so they stay crisp.
What appetizers go with a romantic Valentine’s dinner?
Small, shareable bites that don’t need a fork work best, think a caprese or crostini board, a warm baked brie, or a dip you both reach into. Keep portions light since a main course and dessert are still coming.
How many appetizers do I need for Valentine’s dinner for two?
Plan on two or three different bites and roughly four to six pieces total per person when a full dinner follows. That’s enough to take the edge off hunger without filling anyone up before the main course arrives.
What’s a good vegetarian Valentine’s appetizer?
Beet hummus with pita chips, baked brie with jam, and heart-shaped caprese bites are all meat-free and still look intentionally romantic. Swap the prosciutto or salami on a board for extra cheese and roasted vegetables instead.
Can Valentine’s Day appetizers be made without special equipment?
Yes, a sharp paring knife substitutes for a heart cutter, and a small glass shapes salami roses without a mold. Most of these recipes use pans, bowls and knives that are already in a standard kitchen.
What wine pairs with Valentine’s Day appetizers?
A chilled dry sparkling wine or a light rosé works across nearly the whole spread, from shrimp cocktail to baked brie, because the acidity cuts through rich or salty bites. Save a bolder red for the main course instead.

24 valentine cookies for beginners: conversation hearts, red velvet crinkles, linzer jam hearts, thu
19 galentines brunch ideas in blush, cherry red, cream and rose gold, from the long table to the fav

22 gifts for corporate girlies, from desk fixes to coffee rituals, picked for what she'll actually r
Leave a Reply