

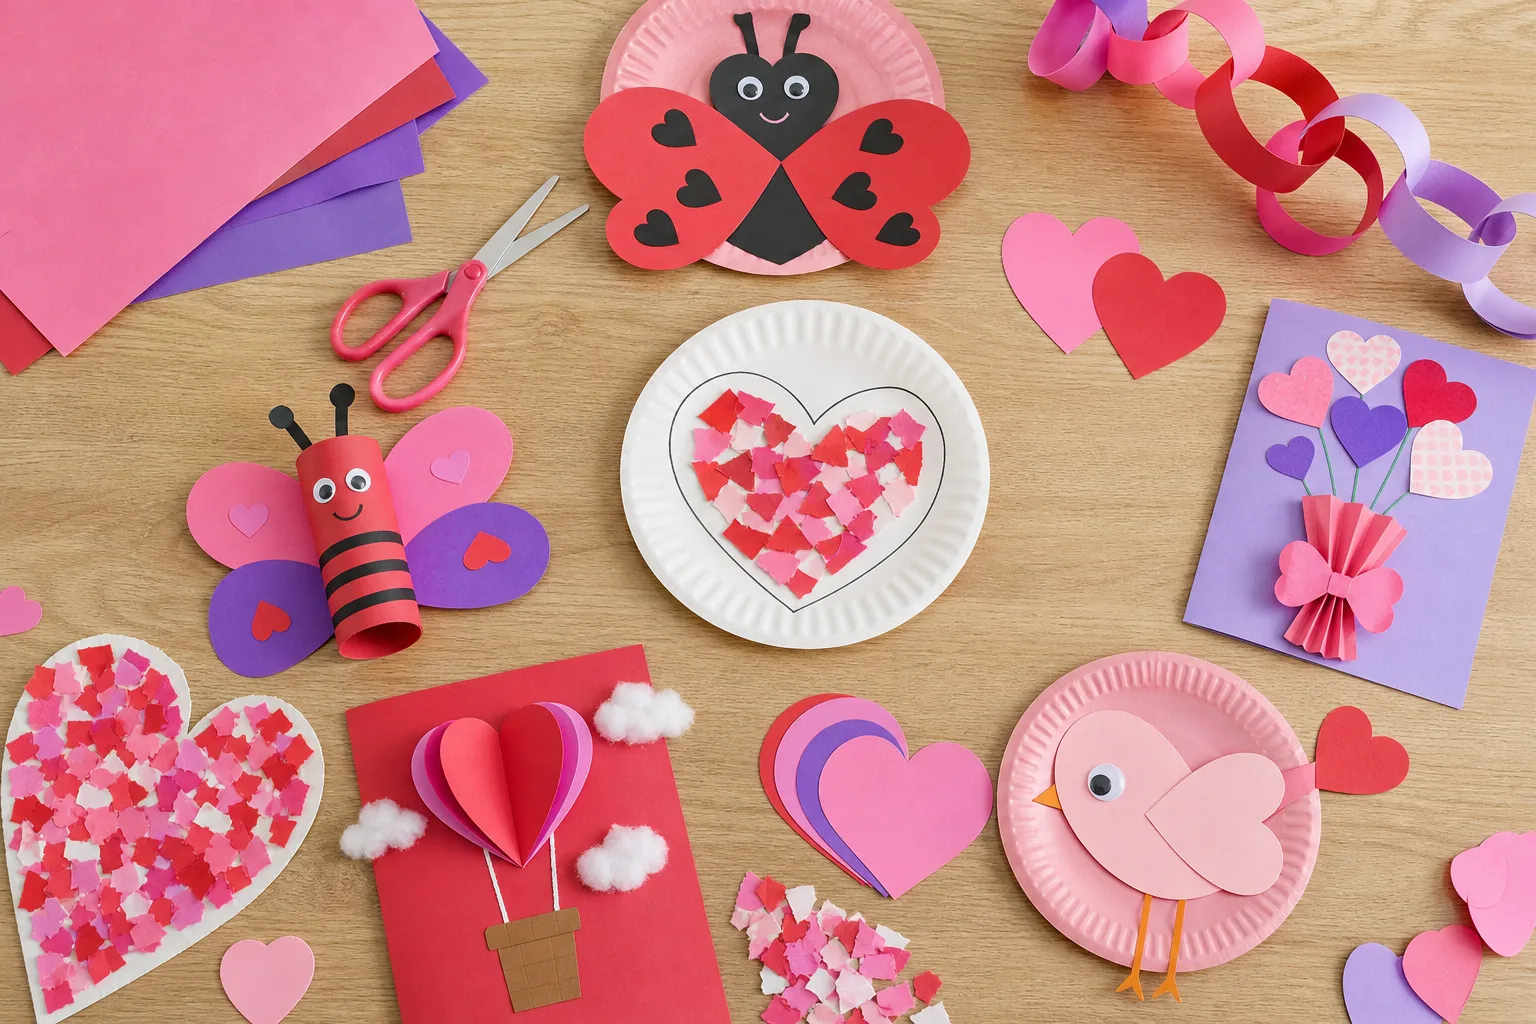
Hand a three year old a red paper heart and watch her decide, on her own, that today is a big day.
Preschool valentine crafts work on exactly that feeling: small projects built from paper, glue sticks and whatever is already sitting in the craft drawer, finished in one sitting and sturdy enough to survive a backpack on the walk home.
None of the twenty one below needs a trip to the craft store or a skill nobody in a three year old class actually has yet.
Each one leans on scissors a four year old can hold and a glue stick instead of anything wet and sticky, with four to six steps a preschooler can mostly manage solo while an adult stands by for the one tricky bit. Clear the table, set out trays, and let the mess be the whole point for an afternoon.
This post contains affiliate links. If you buy through them, I may earn a small commission at no extra cost to you.
Table of Contents
- Paper Heart Owl
- Paper Heart Bear
- Heart Love Bug Clothespin
- Coffee Filter Heart with Markers and a Water Spray
- Paper Square Heart Mosaic
- Q-tip Dot Painted Heart
- Doily Heart Card
- Cookie Cutter Heart Stamping
- Heart Wand on a Craft Stick
- Pipe Cleaner Beaded Heart with Pony Beads
- Yarn Wrapped Cardboard Heart
- Handprint Heart Flower Bouquet
- Paper Plate Heart Weaving with Yarn
- Heart Crown with Paper Hearts
- Tissue Paper Heart Suncatcher
- Painted Heart Rock
- Popsicle Stick Heart Frame
- Fingerprint Heart Bookmark
- Cereal Heart Bird Feeder on a Pipe Cleaner
- Salt Dough Heart Ornament
- Heart Garland the Class Strings Together
- Frequently Asked Questions
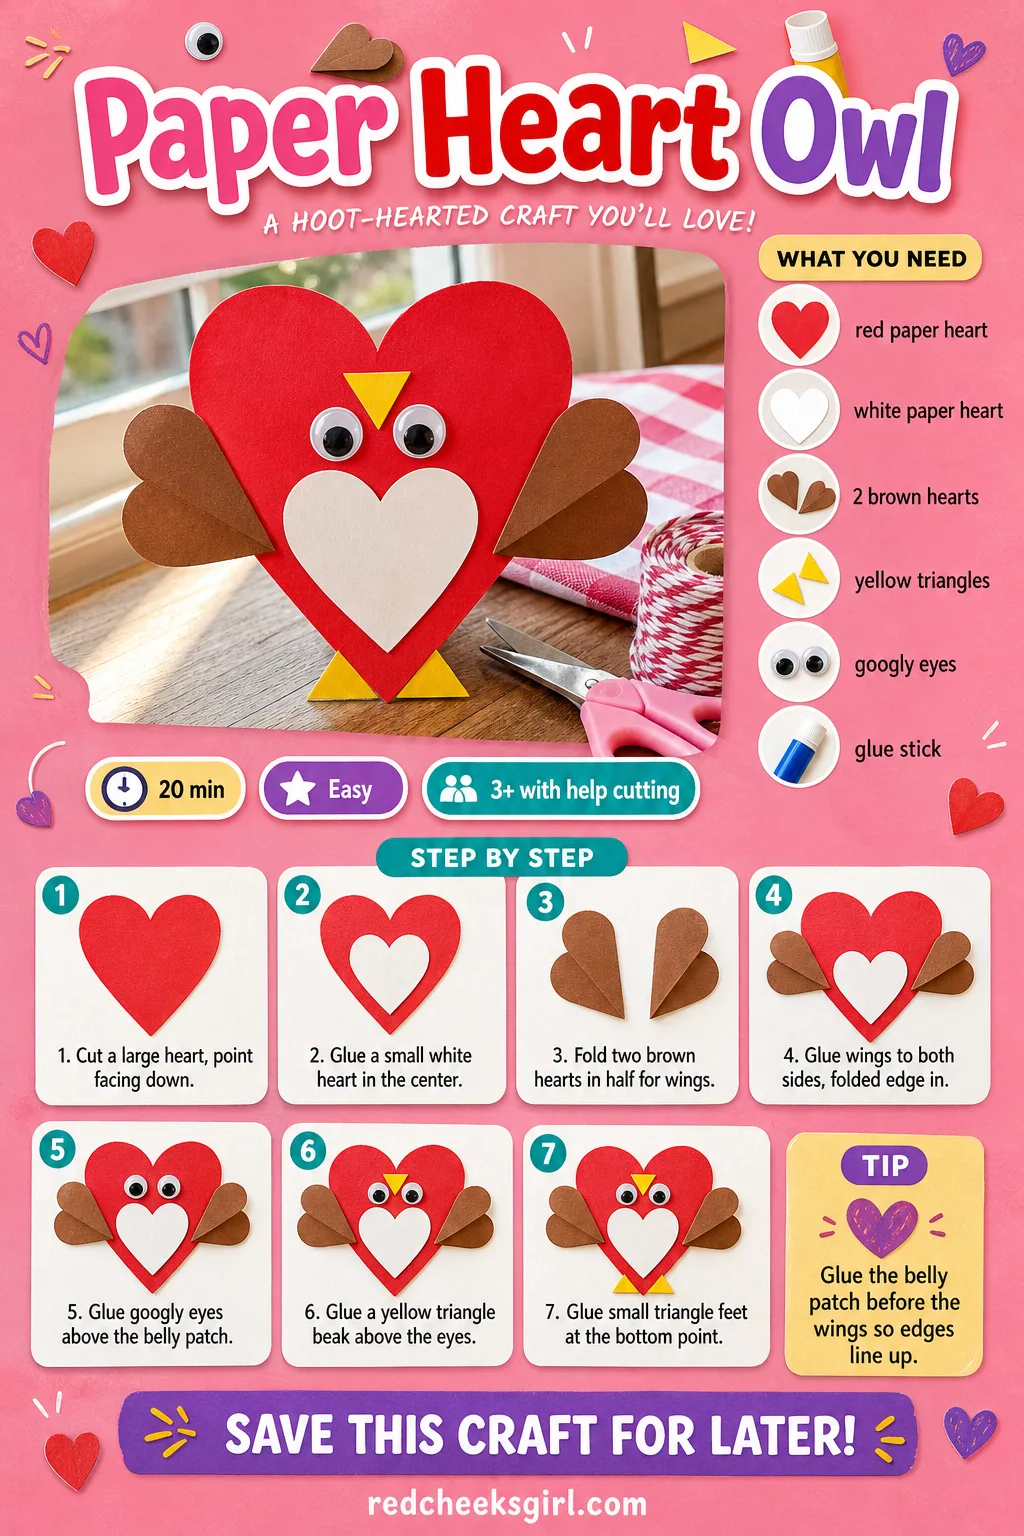
Paper Heart Owl
An owl built entirely from hearts looks like it should be harder than it is, which is exactly why it works as a first Valentine project.
Three or four shapes and a pair of googly eyes and the whole thing reads instantly as a bird, not just a stack of paper. It sits nicely as a card front or a window decoration, and it costs almost nothing if construction paper is already in the house.
What You Need
- 1 large red or pink paper heart, 10cm, for the body
- 1 small white paper heart, 6cm, for the belly
- 2 medium brown paper hearts, 5cm, folded in half for wings
- 2 small yellow paper triangles, 2cm, for beak and feet
- 2 googly eyes, 10mm
- 1 glue stick
How to Make It
- Cut the large heart with its point facing down, this becomes the owl’s body and head in one piece.
- Glue the small white heart in the centre, point down, as the belly patch.
- Fold the two brown hearts in half and glue them to either side, folded edge in, so the rounded tops stick out like wings.
- Glue the two googly eyes near the top curves of the body, above the belly patch.
- Cut one yellow triangle in half for two small feet and glue them along the bottom point, then glue the remaining triangle above the eyes as a beak.
- Leave it flat for five minutes so the glue grabs before picking it up.
🛍 Shopping guide
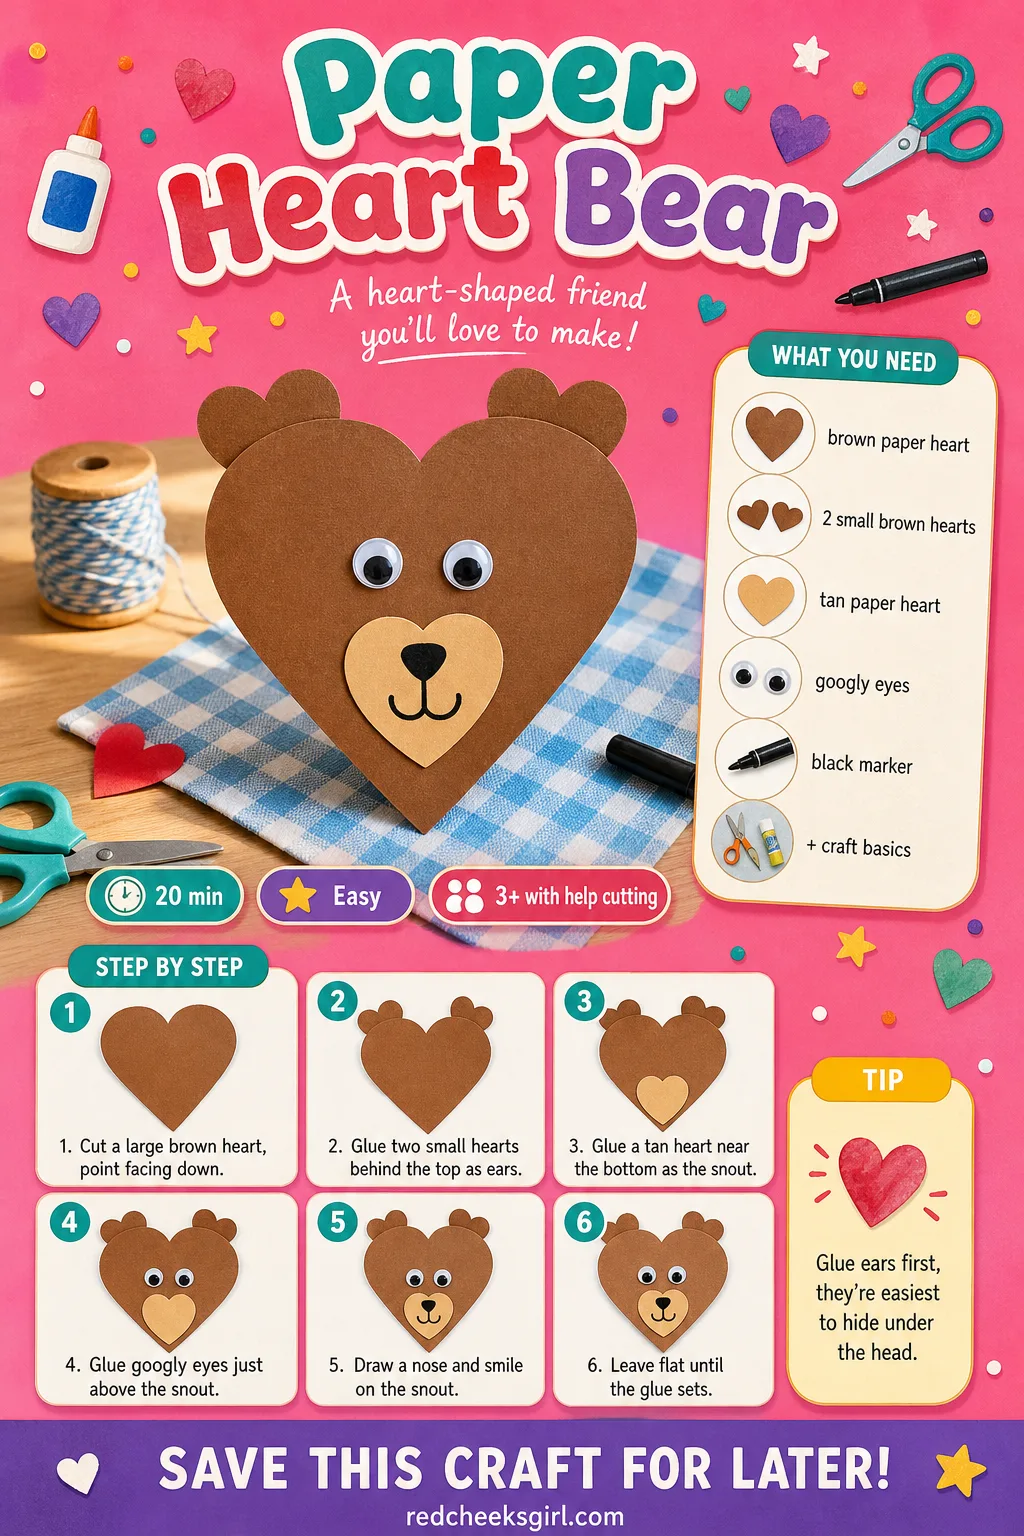
Paper Heart Bear
Swap the colours on the owl formula and a bear shows up instead, proof that one heart shape can carry a whole barnyard of Valentine characters.
The giveaway is the round snout sitting low on the face and two ears peeking over the top edge. It works equally well as a card for a grandparent or a cubby tag with a name written across the body.
What You Need
- 1 large brown paper heart, 10cm, for the head
- 2 small brown paper hearts, 4cm, for the ears
- 1 small tan or white paper heart, 5cm, for the snout
- 2 googly eyes, 10mm
- 1 black marker
- 1 glue stick
How to Make It
- Cut the large brown heart point down, this is the bear’s head.
- Glue the two small brown hearts behind the top curves so just the rounded tips peek out as ears.
- Glue the tan heart near the bottom point as the snout.
- Glue the googly eyes just above the snout.
- Use the black marker to draw a small triangle nose and a curved smile on the snout.
- Let the glue set flat for five minutes before moving it.
🛍 Shopping guide
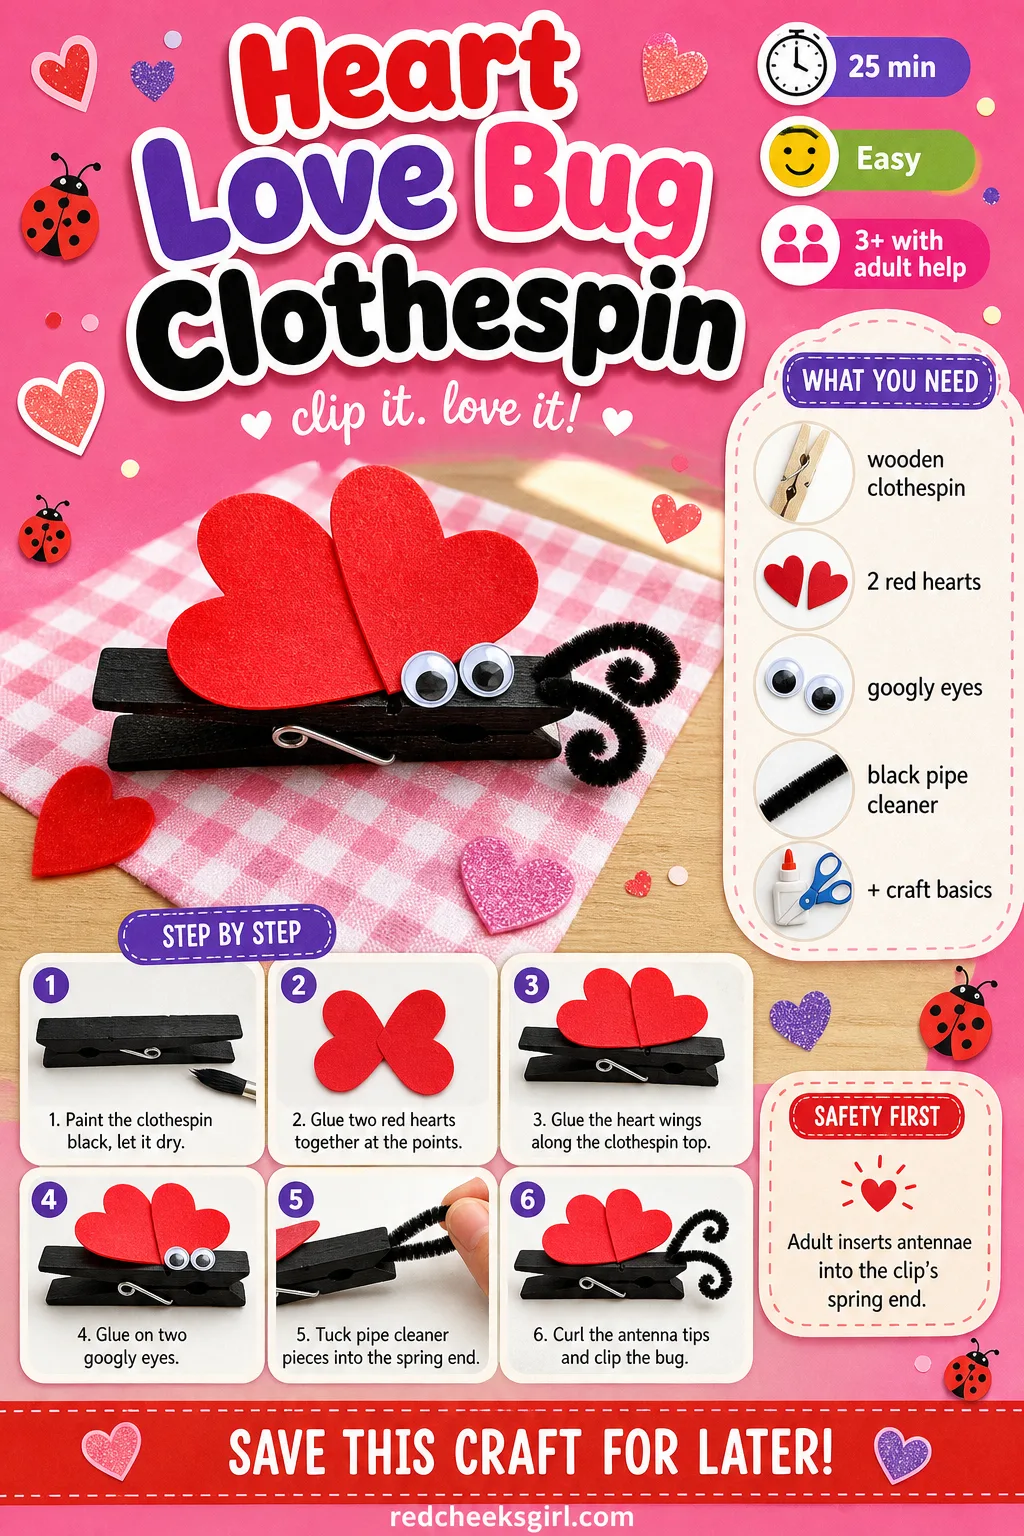
Heart Love Bug Clothespin
A clip on bug is the one craft here that doubles as a toy, which buys another twenty minutes of quiet once the glue is dry.
It clips onto a coat, a curtain or a card, wings up and ready to pinch, and kids tend to name theirs before they’ve even finished making it. Keep the paint step to an adult, the clip mechanism has small gaps that catch little fingers.
What You Need
- 1 wooden clothespin
- 2 small red paper or felt hearts, 4cm
- 2 googly eyes, 8mm
- 1 black pipe cleaner, cut into two 5cm pieces, for antennae
- black paint or marker
- glue
How to Make It
- An adult paints or colours the clothespin black and sets it aside to dry for ten minutes.
- Glue the two small red hearts together at their points so they form a pair of wings.
- Glue the wing pair along the top of the dried clothespin.
- Glue on the two googly eyes near the front of the wings.
- An adult tucks the two short pipe cleaner pieces into the spring end of the clothespin to form antennae, curling the tips.
- Clip the finished bug onto a jacket, bag or card.
🛍 Shopping guide
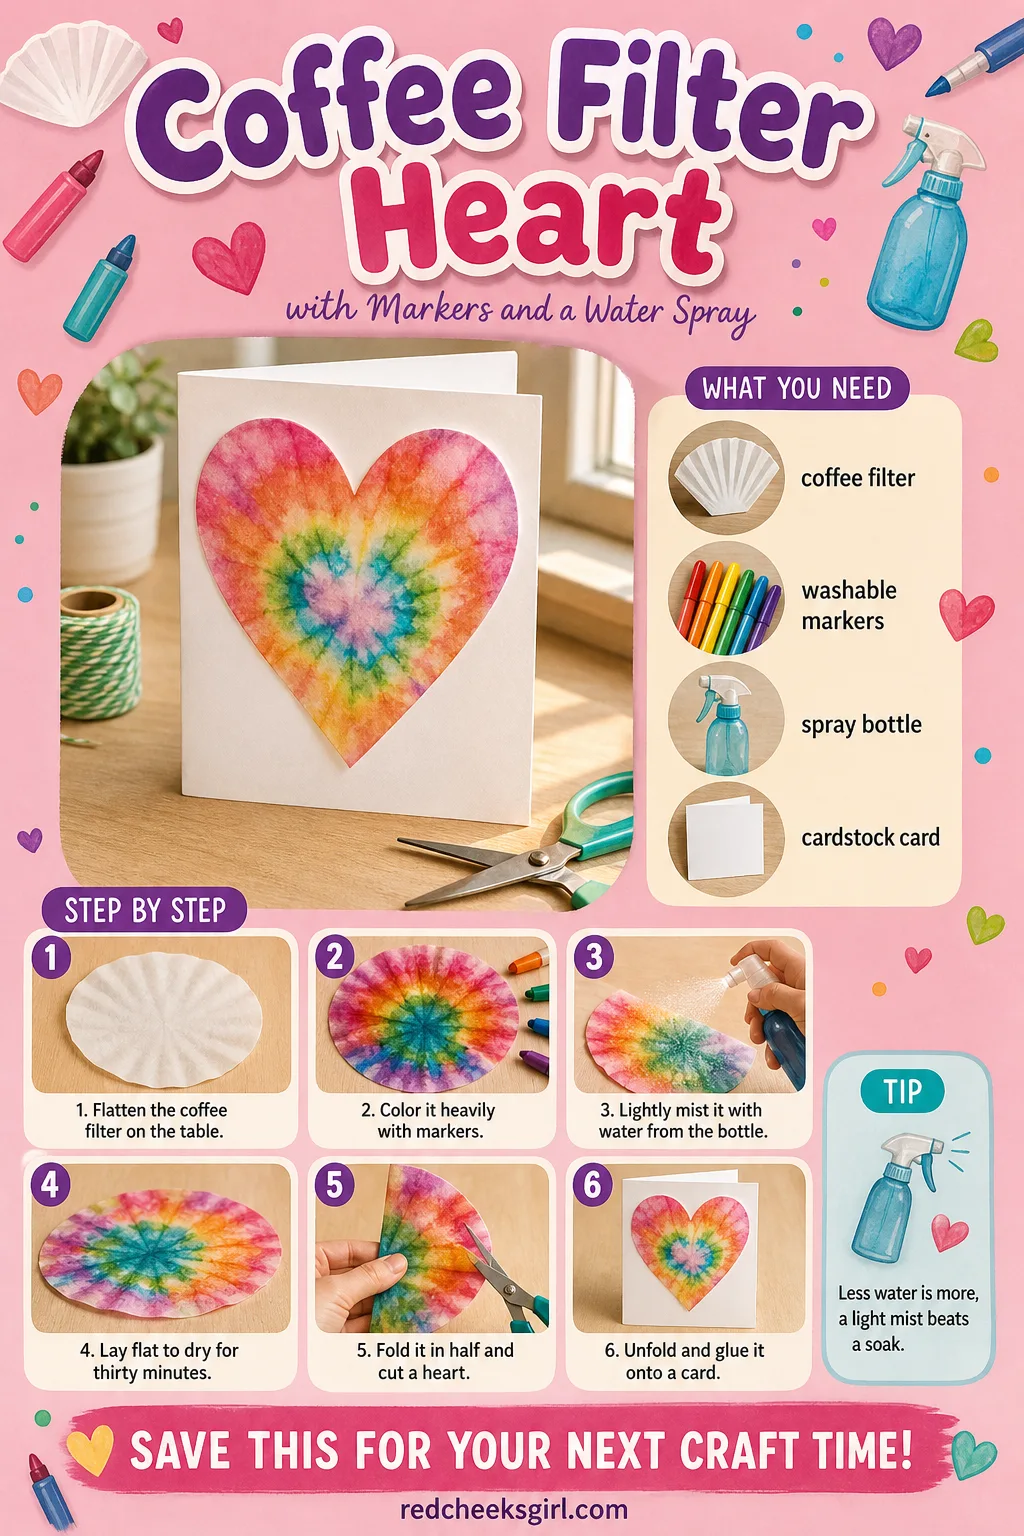
Coffee Filter Heart with Markers and a Water Spray
This one looks like tie dye and costs about four cents a filter, the kind of thing that buys fifteen minutes of genuine quiet while everyone watches colour bleed outward. Markers go on dry in bold rings or scribbles, then a light mist of water pulls the ink into soft watercolour blooms.
Let it dry flat before cutting, wet paper tears if you rush it. If mess tolerance is really what decides your afternoon, the same sorting logic runs through 14 Preschool Halloween Crafts Sorted by How Much Mess You Can Handle.
What You Need
- 1 round coffee filter (basket style), flattened
- washable markers, 4-5 colours
- 1 spray bottle filled with water
- 1 sheet cardstock, A5, for the card
How to Make It
- Flatten the coffee filter on a covered table.
- Colour it with heavy marker strokes, circles or scribbles work best, covering most of the white.
- An adult mists the filter lightly with water, two or three pumps is plenty, and watches the colours spread and blend.
- Lay it flat to dry completely, this takes about thirty minutes.
- Once bone dry, fold the filter in half and cut a heart shape through both layers with child-safe scissors, then unfold.
- Glue the finished heart onto the folded cardstock to make a card.
Paper Square Heart Mosaic
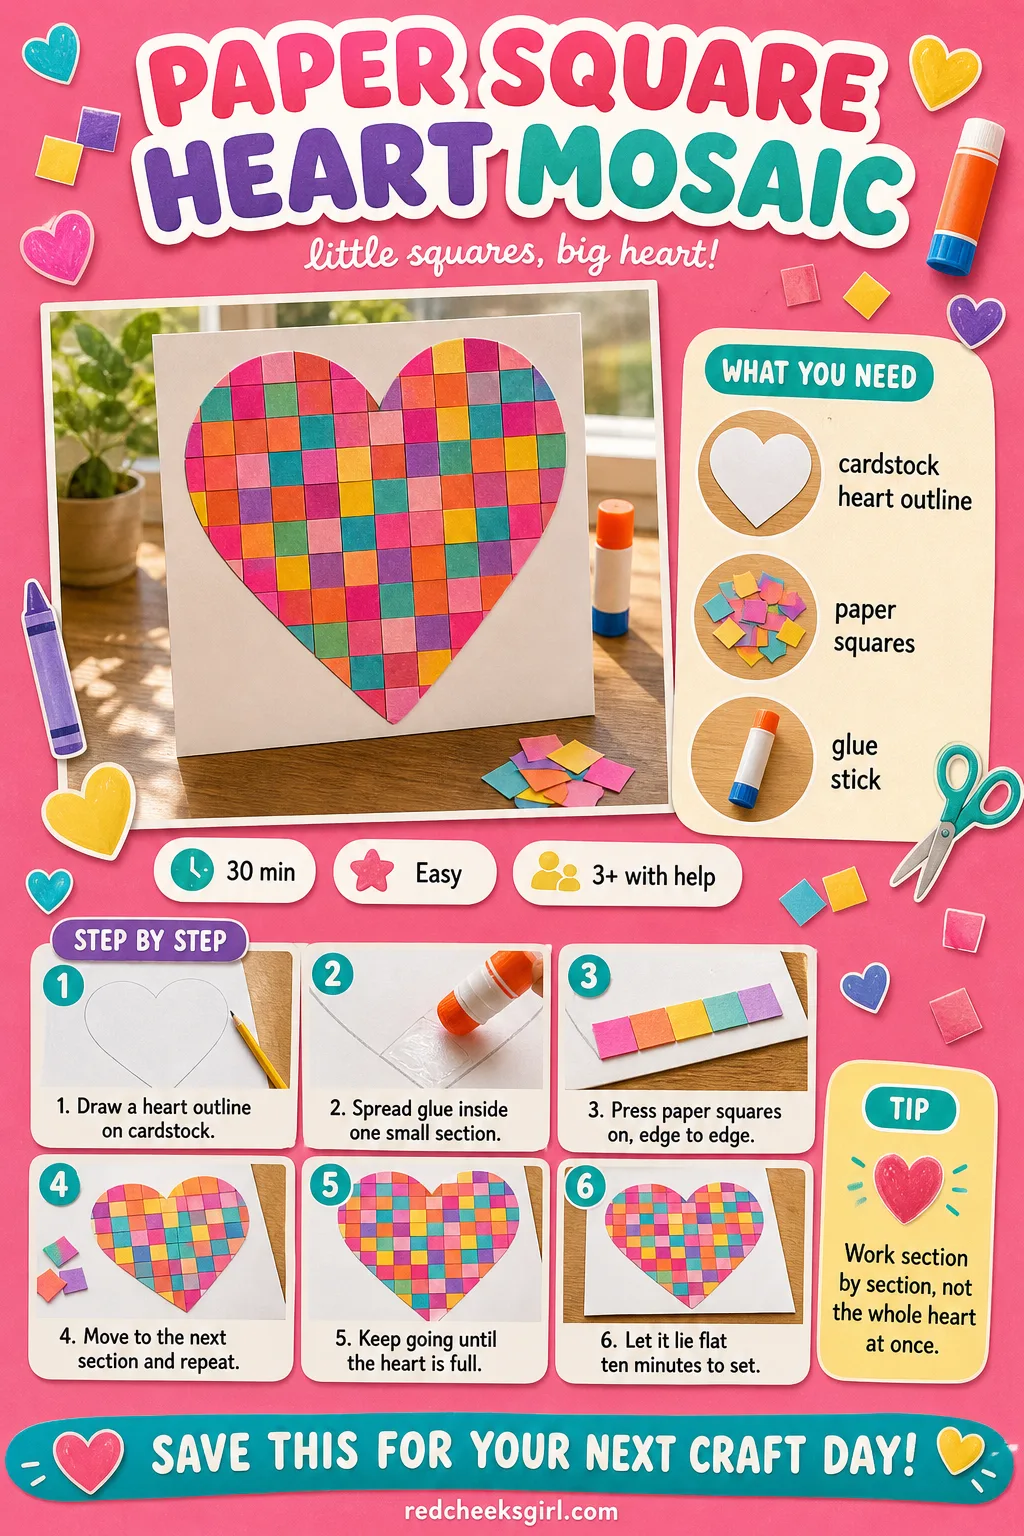
Mosaic work is really just advanced gluing, and preschoolers are surprisingly good at it once the pieces are small enough to feel like a puzzle.
A heart outline drawn on cardstock gets filled square by square until the shape disappears under colour, which is oddly satisfying to watch from across the room. It’s a quiet, sit down craft, good for the stretch of party time right after the sugar wears off.
What You Need
- 1 heart outline drawn or printed on A4 cardstock
- 40-50 small paper squares, 1.5cm, assorted colours
- 1 glue stick
How to Make It
- Draw or print a large heart outline on the cardstock.
- Spread a layer of glue stick inside one small section of the heart.
- Press paper squares onto the glued area, edge to edge, leaving as few gaps as possible.
- Repeat section by section until the whole heart is covered in squares.
- Let it lie flat for ten minutes so every square stays stuck down.
🛍 Shopping guide
Q-tip Dot Painted Heart
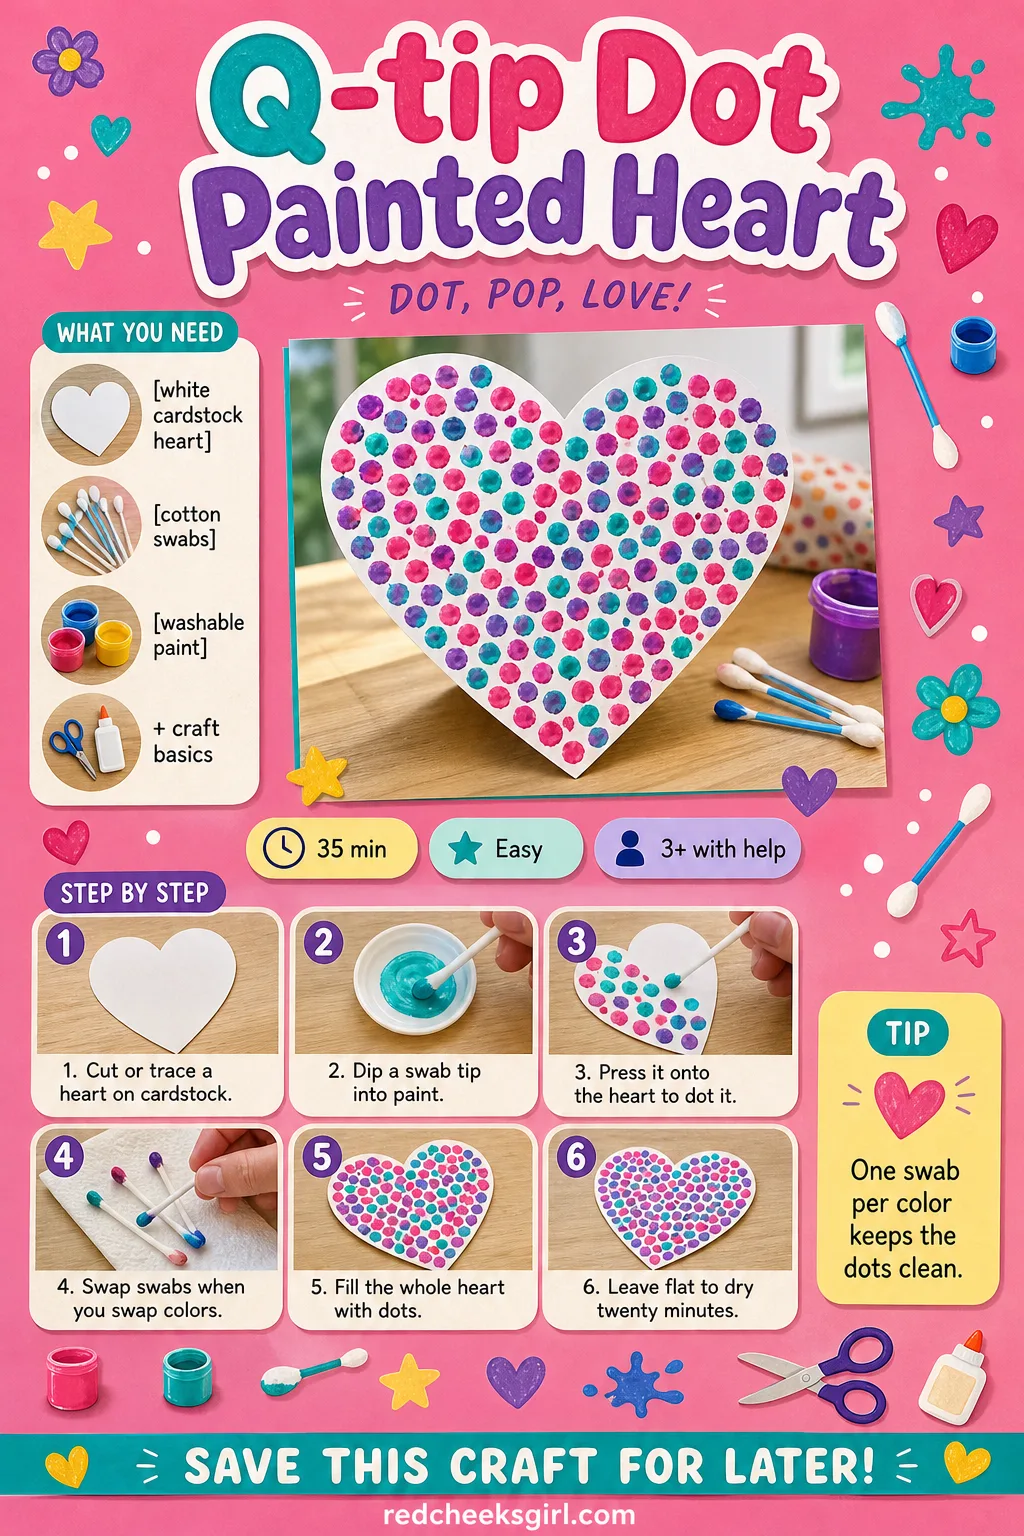
Dot painting solves the one problem every other paint craft has: nobody can smear it.
The swab goes in, the swab comes out, the dot lands roughly where it should, and a heart filled entirely in dots looks far more deliberate than the process actually was. It’s the one on this list worth doing somewhere a paintbrush would be a liability.
What You Need
- 1 heart cut from white cardstock or a paper plate, about 15cm
- 4-5 cotton swabs
- washable paint, 2-3 colours, in small bowls
- paper towel for blotting
How to Make It
- Cut or trace a large heart shape onto white cardstock.
- Dip the tip of a cotton swab into one colour of paint.
- Press it onto the heart to make a dot, then dip again and repeat.
- Fill the whole heart outline with dots, swapping swabs when you swap colours.
- Leave it flat to dry for about twenty minutes before handling.
🛍 Shopping guide
Doily Heart Card
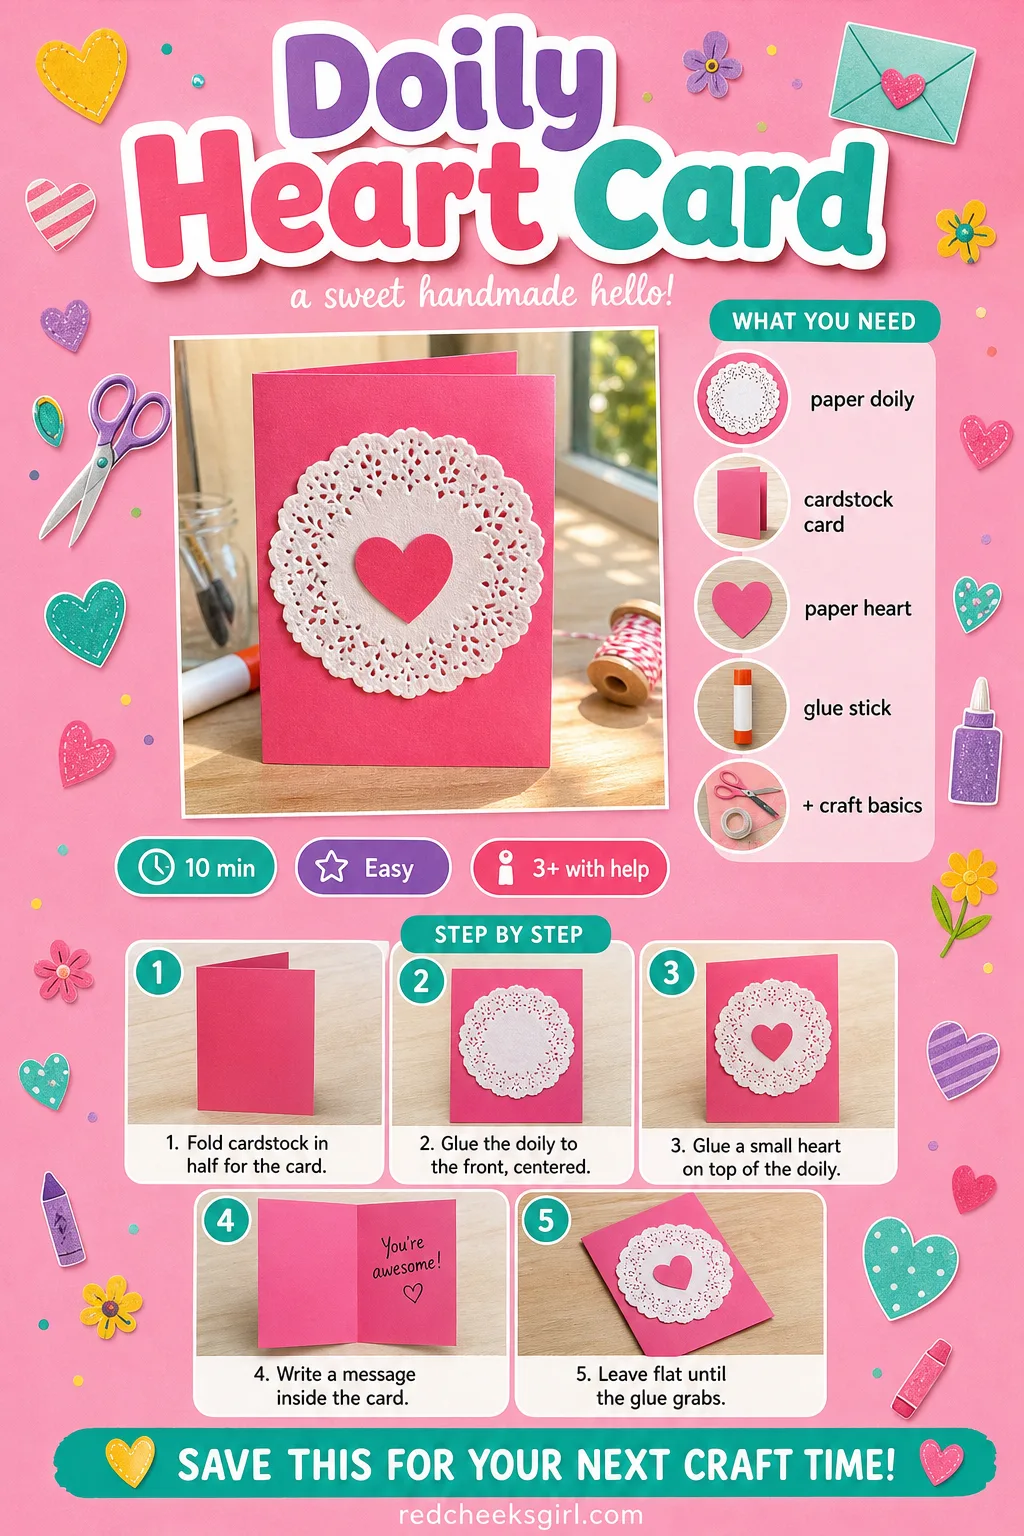
A paper doily turns a plain folded card into something that looks like it took an hour, when really it took about eight minutes and one extra piece of paper.
Lace pattern against a solid heart reads as lace and heart both, no explaining required. Send it home flat in a backpack, it survives better than anything with a 3D element glued on top.
What You Need
- 1 paper doily, 15cm round
- 1 sheet cardstock, folded to 10x15cm, for the card base
- 1 small paper heart, 7cm, contrasting colour
- 1 glue stick
- crayons or markers for the inside message
How to Make It
- Fold the cardstock in half to make the card base.
- Glue the round doily to the front, centred.
- Glue the small paper heart on top of the doily, centred again.
- Write or scribble a message on the inside with crayons or markers.
- Leave it flat for a few minutes for the glue to grab.
🛍 Shopping guide
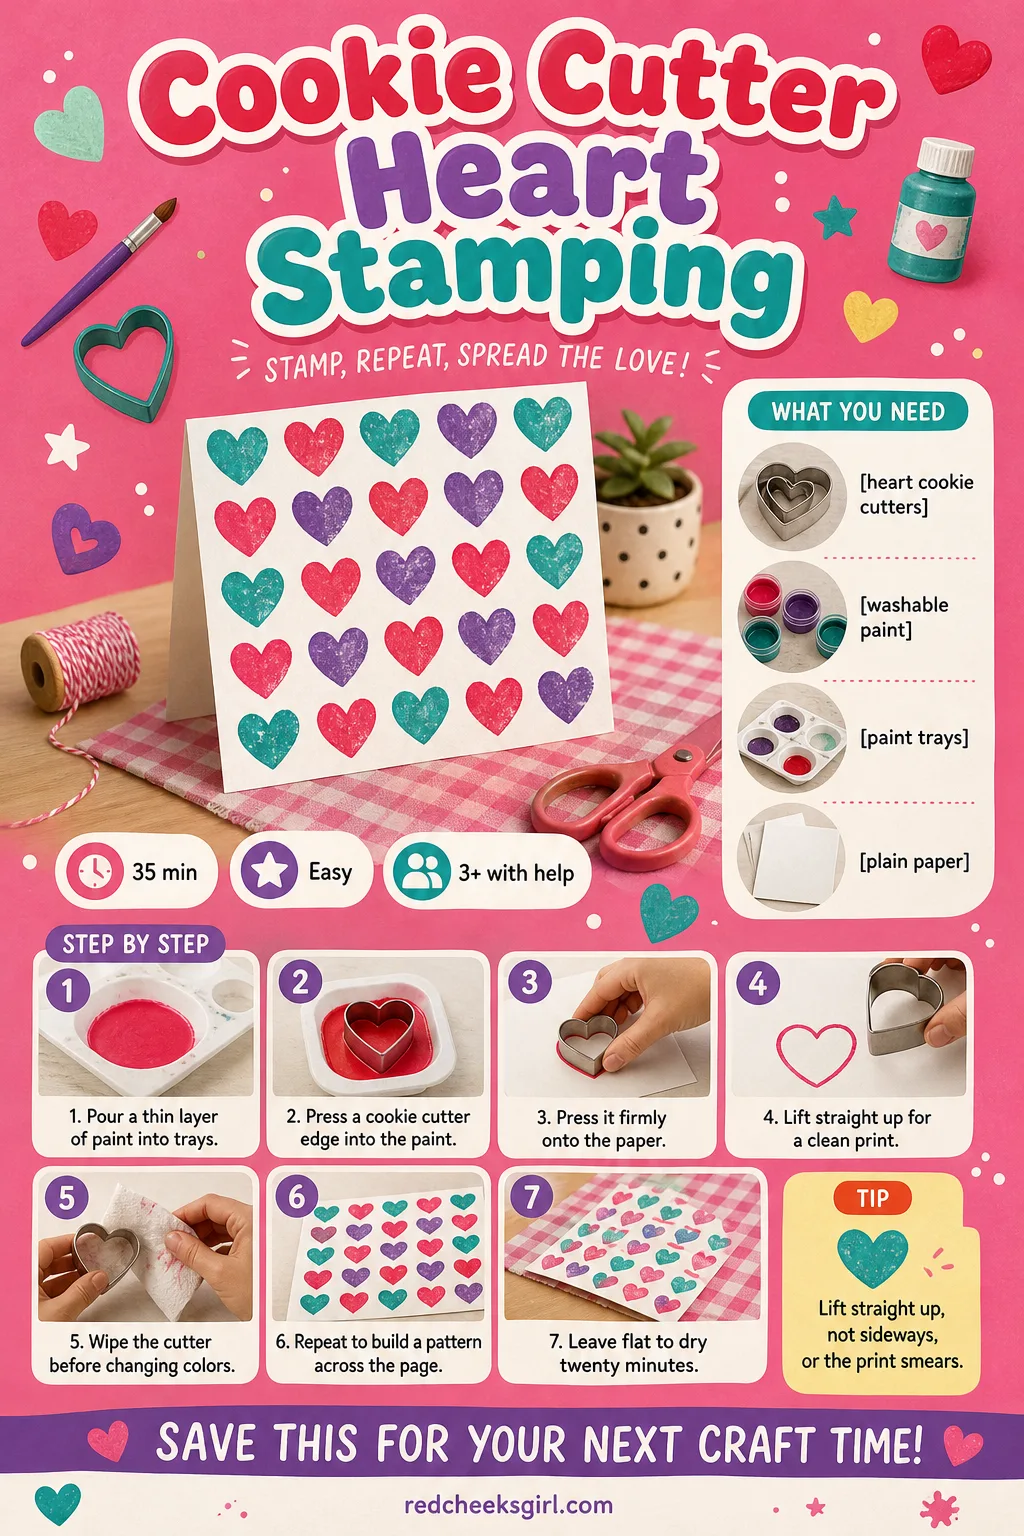
Cookie Cutter Heart Stamping
Nobody needs to cut a heart freehand when a cookie cutter will do it for them, over and over, in whatever size the kitchen drawer provides.
Press, lift, press again, and a sheet of plain paper turns into a repeat pattern good enough to wrap a small gift or hang as a banner. Wipe the cutters between colours or the second stamp comes out muddy.
What You Need
- 2-3 metal or plastic heart cookie cutters, assorted sizes
- washable paint, 2-3 colours, in shallow trays
- plain paper or cardstock, A3 or A4
How to Make It
- An adult pours a thin layer of paint into each shallow tray.
- Press the open edge of a cookie cutter flat into the paint.
- Press it firmly onto the paper, then lift straight up to leave a clean heart print.
- Rinse or wipe the cutter before switching to a different colour.
- Repeat across the page to build a pattern.
- Leave it flat to dry for about twenty minutes.
Heart Wand on a Craft Stick
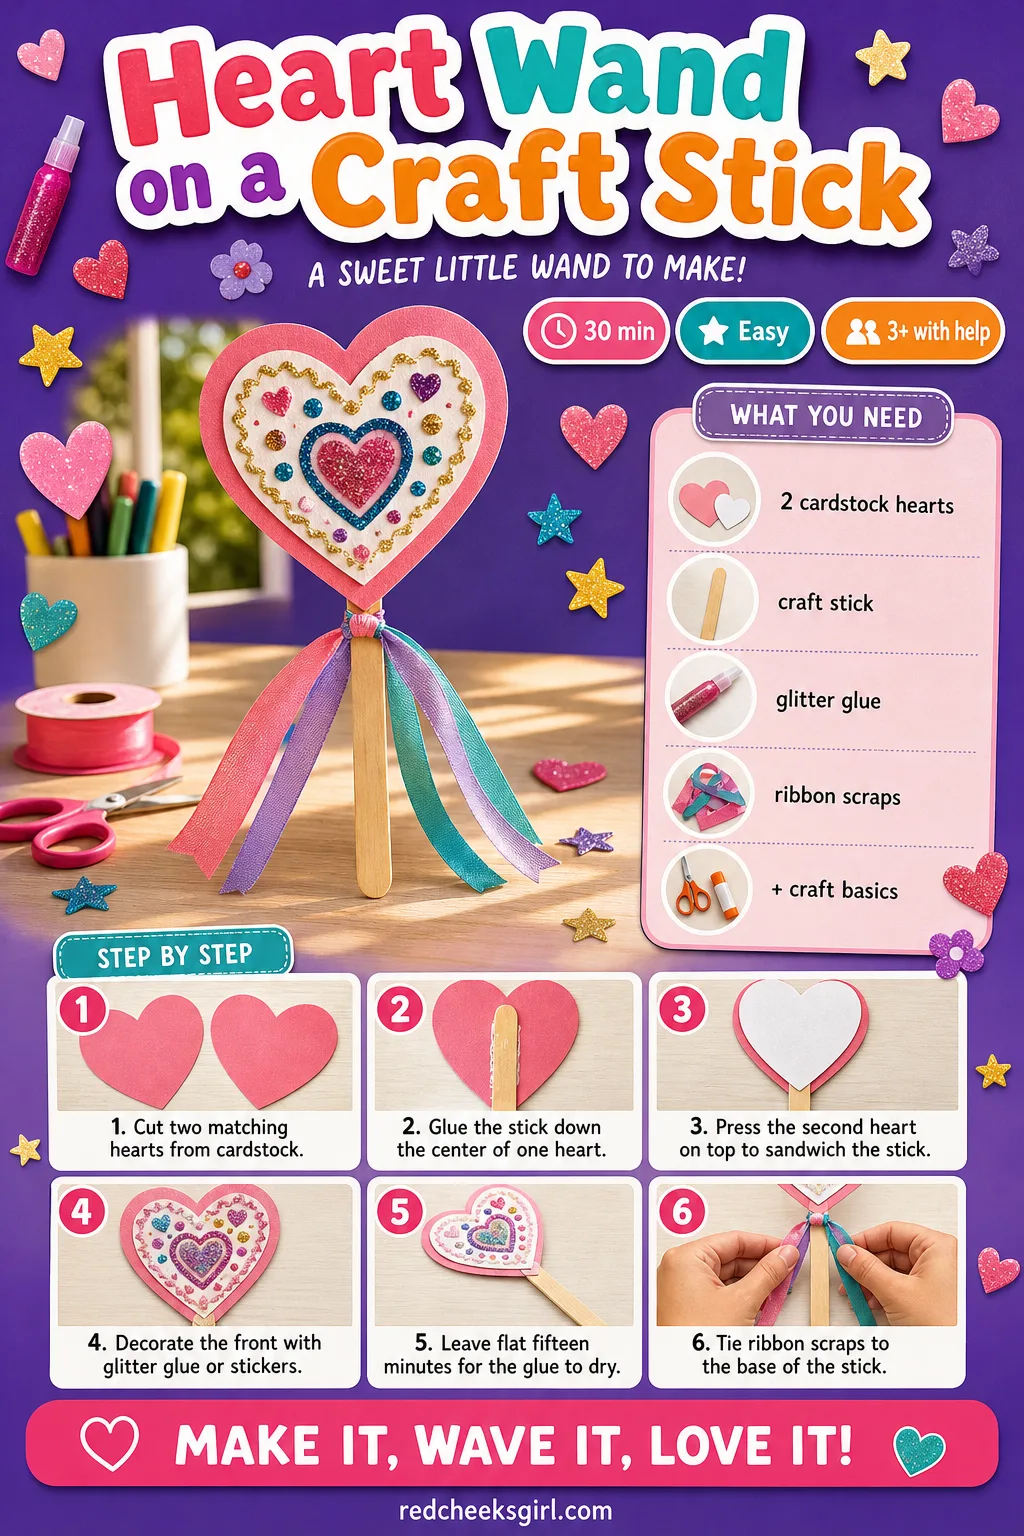
Every classroom party needs one prop that turns into a game on its own, and a heart on a stick fills that job without any extra rules.
Two hearts glued around a craft stick stand up stiff enough to wave, and ribbon streamers off the bottom make it look finished rather than homemade. Store a batch upright in a jar, they take up almost no room.
What You Need
- 2 matching cardstock hearts, 8cm
- 1 craft stick (popsicle stick)
- glitter glue or stickers for decorating
- ribbon scraps, 2-3 pieces, 20cm each
- 1 glue stick
How to Make It
- Cut two matching hearts from cardstock.
- Glue the craft stick down the centre of one heart, with about half the stick sticking out below the point.
- Spread glue over the back of the second heart and press it on top, sandwiching the stick between the two.
- Decorate the front with glitter glue dots or stickers.
- Leave it flat for fifteen minutes to dry.
- Tie the ribbon scraps to the base of the stick, just below the heart.
🛍 Shopping guide
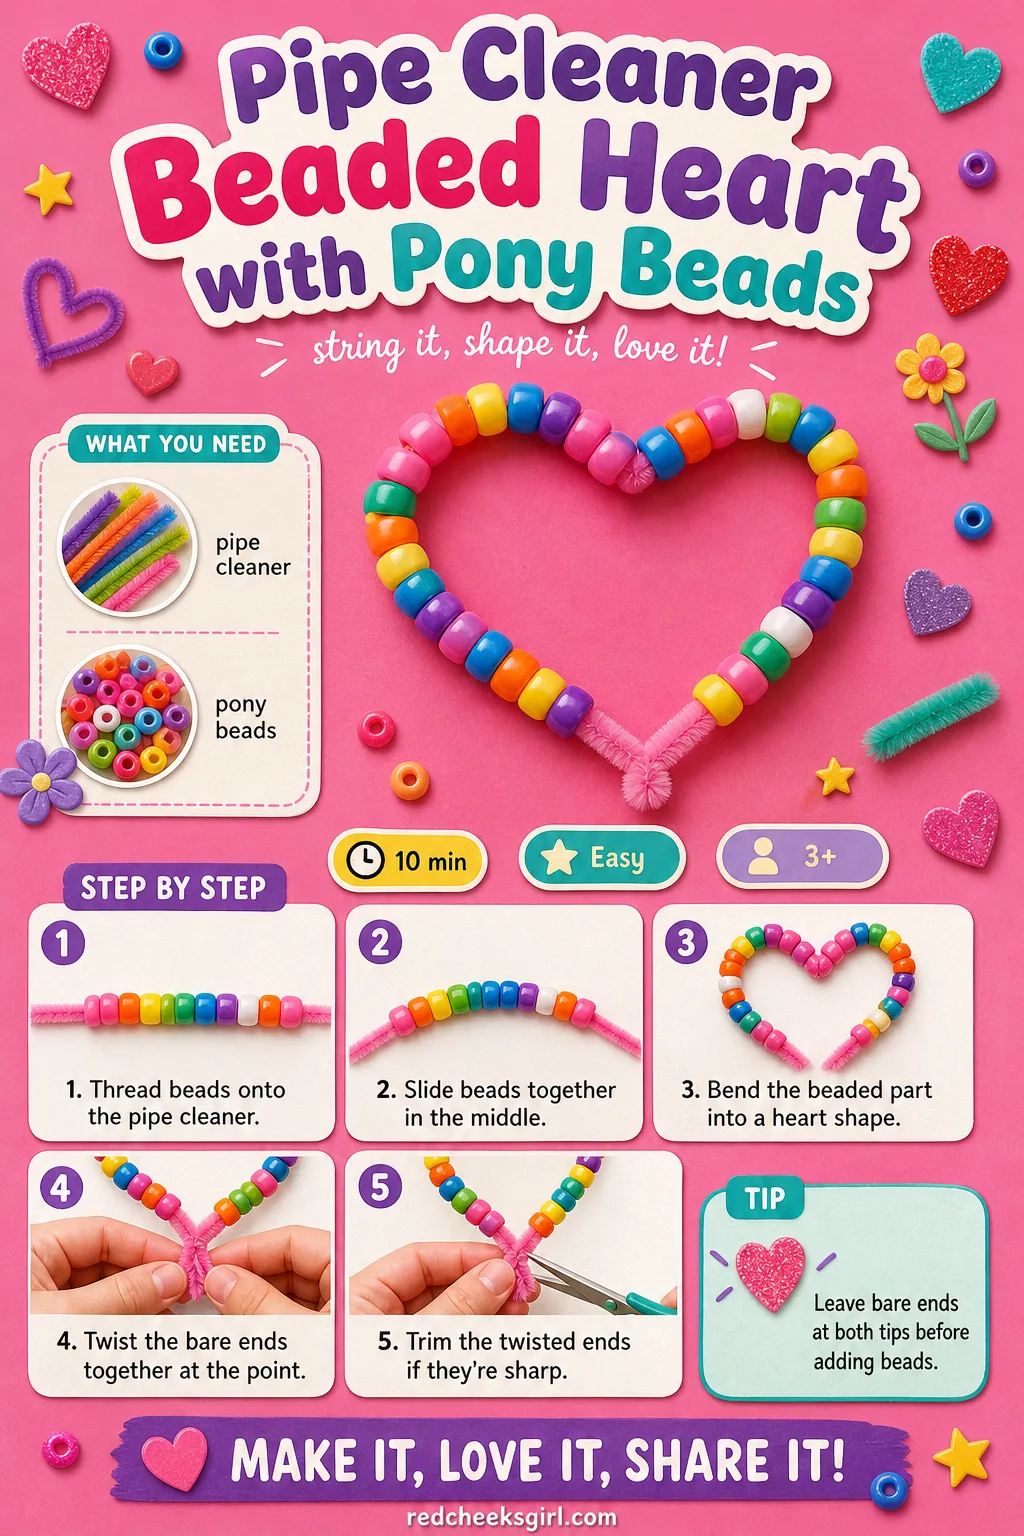
Pipe Cleaner Beaded Heart with Pony Beads
Threading beads is the fine motor skill preschool teachers quietly love, and this one dresses it up as jewellery instead of a worksheet. Beads slide onto one pipe cleaner, the two ends twist together, and the whole thing bends into a heart in about ninety seconds once the beads are on.
The same patient threading shows up again at Christmas, in 22 Preschool Christmas Crafts That Build Tiny Fine-Motor Skills and Big Holiday Smiles.
What You Need
- 1 pipe cleaner, 30cm
- 8-10 pony beads, assorted colours
How to Make It
- Thread the pony beads onto the pipe cleaner one at a time, leaving about 4cm bare at each end.
- Slide the beads along so they sit snugly together in the middle.
- Bend the beaded section into a heart shape, rounded top, point at the bottom.
- Twist the two bare ends together at the bottom point to lock the heart closed.
- Trim the twisted ends short if they feel sharp, or tuck them under.
🛍 Shopping guide
Yarn Wrapped Cardboard Heart
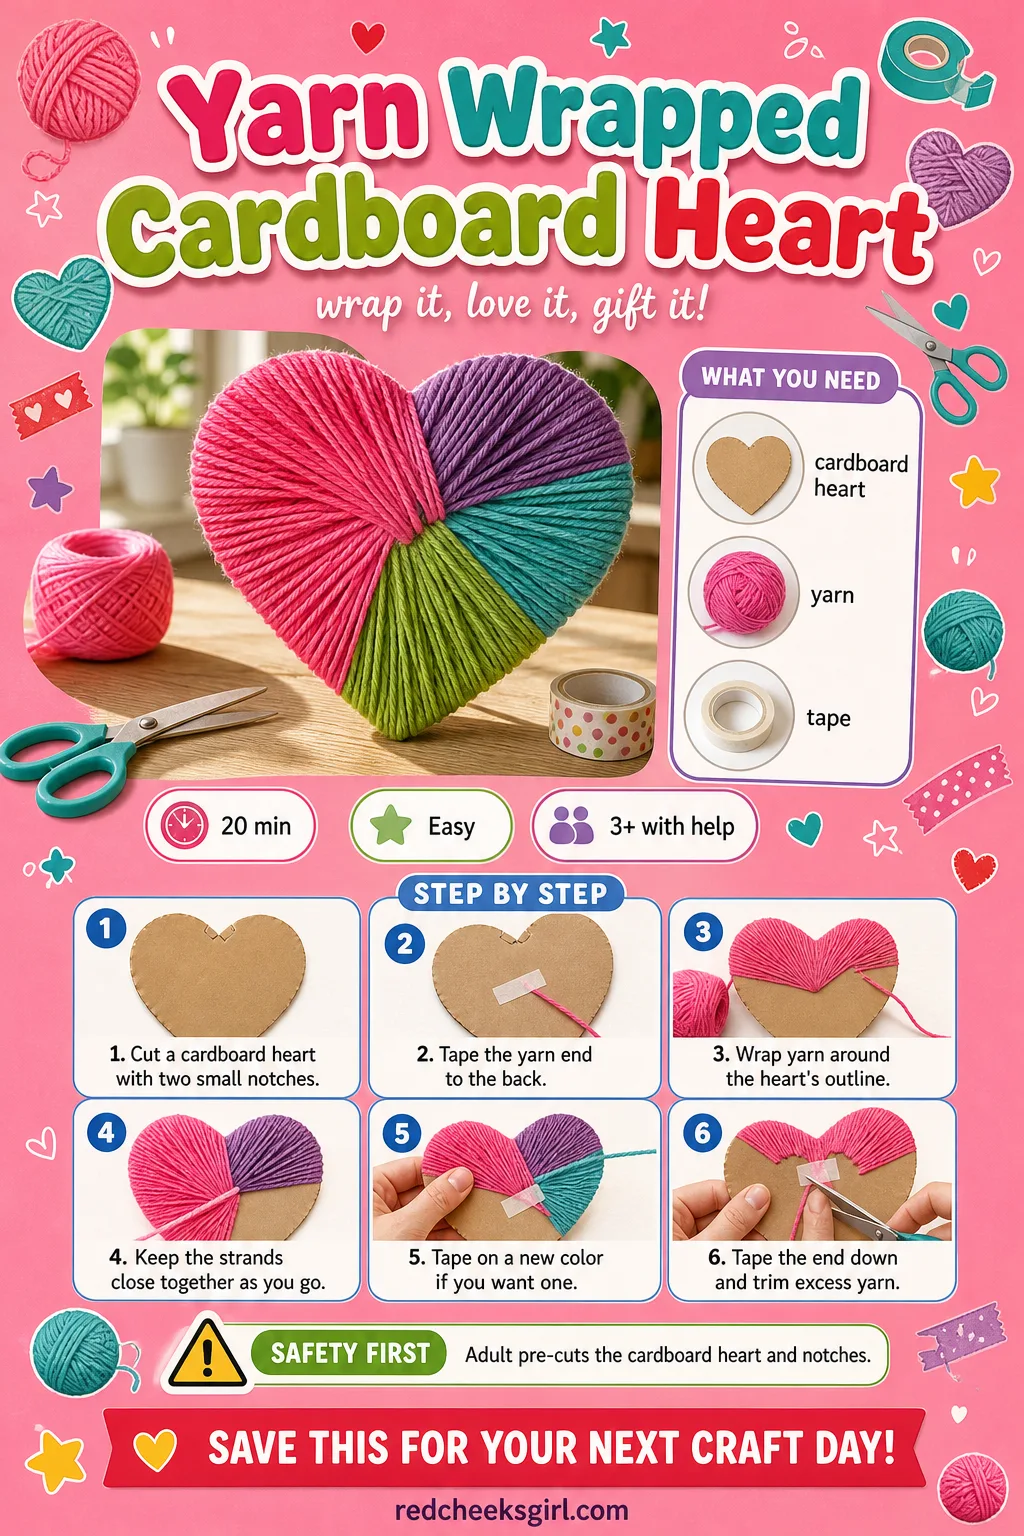
Winding yarn around a shape is one of those repetitive jobs a preschooler can actually sustain for twenty straight minutes, which on its own makes this worth doing.
The cardboard underneath disappears completely once it’s wrapped, leaving a heart with real texture and weight to it. Cut the cardboard heart ahead of time, a cereal box works fine, so the only job left is the satisfying part.
What You Need
- 1 cardboard heart, cut from a cereal box, about 12cm, with two small notches at top and bottom (adult pre-cuts)
- yarn, 3-4 metres, one or two colours
- tape
How to Make It
- An adult pre-cuts the cardboard heart and two small notches, one at the top dip and one at the bottom point, to anchor the yarn.
- Tape the end of the yarn to the back of the cardboard.
- Wrap the yarn around and around the heart, following its outline, keeping the strands close together.
- To change colours, tape the new piece to the old one on the back and keep wrapping.
- Once the cardboard is fully covered, tape the end down on the back and trim any excess.
🛍 Shopping guide
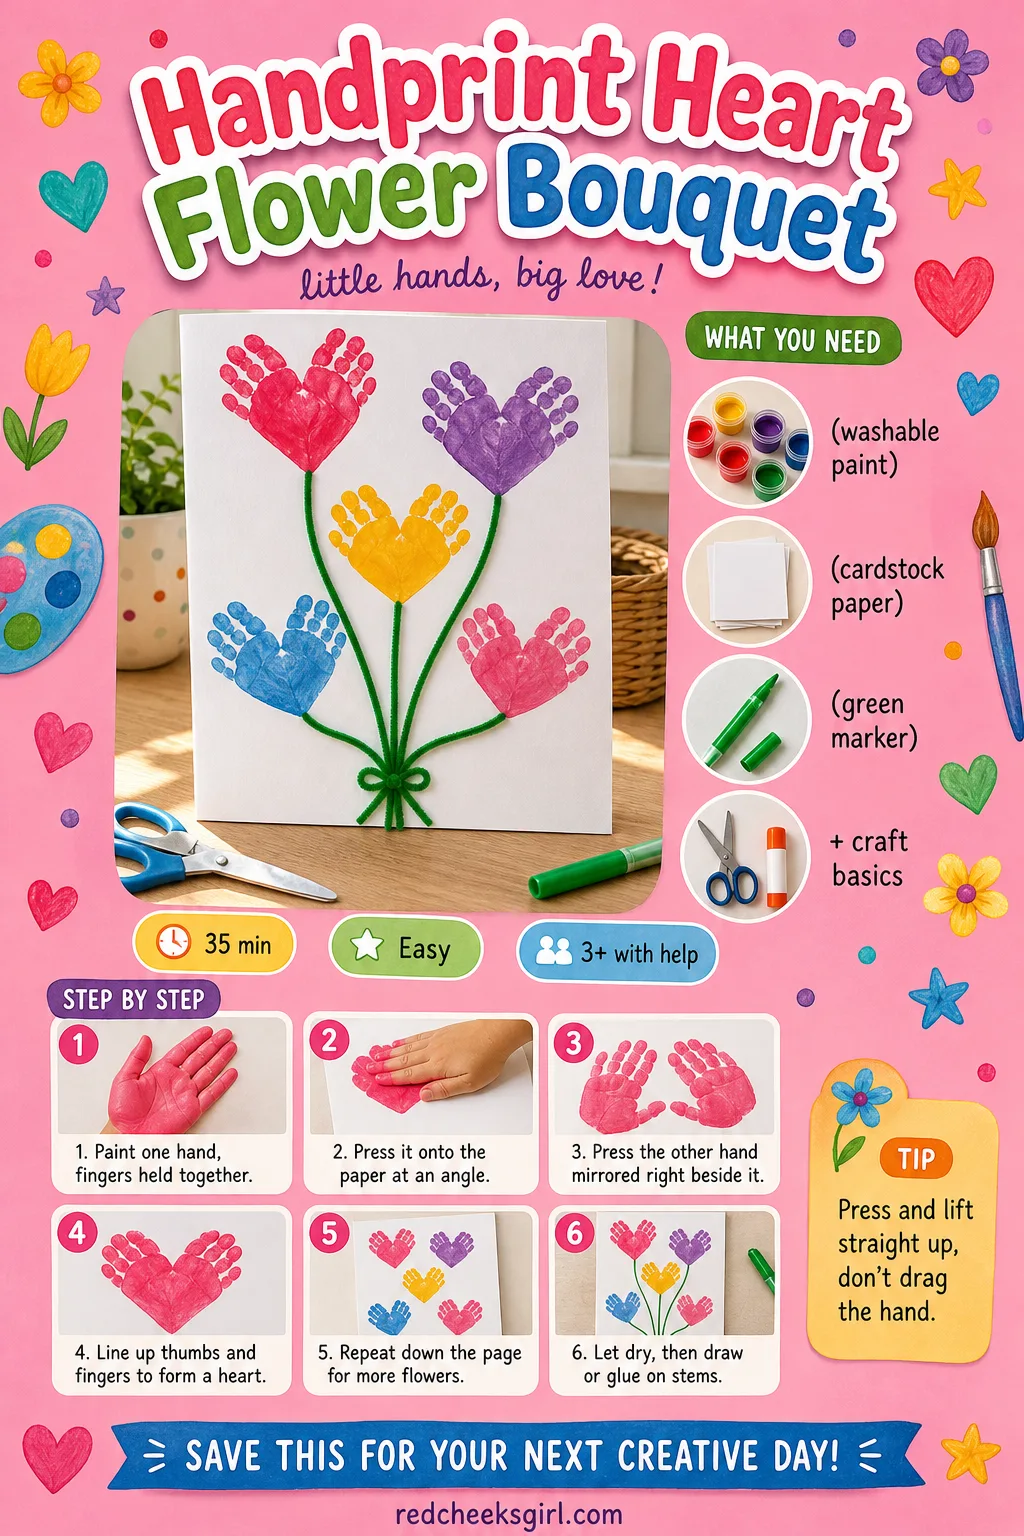
Handprint Heart Flower Bouquet
Handprints age faster than anyone wants to admit, which is the real reason this one keeps showing up every February.
Two prints pressed together at the thumbs make each flower’s petals, and a row of them down the page turns into a bouquet nobody will throw away. Keep a damp cloth nearby, paint on small hands goes everywhere it isn’t supposed to.
What You Need
- washable paint, 2 colours
- 1 sheet cardstock or heavy paper, A4
- green marker or thin green pipe cleaners, for stems
- paper towel or wipes
How to Make It
- An adult paints one of the child’s hands, fingers held together.
- Press the hand onto the paper at a slight angle, then lift straight up.
- Press the other hand right next to it, mirrored, so the fingers meet at the top and the thumbs meet at the bottom to form a heart-shaped flower.
- Repeat further down the page for more flowers, washing and repainting the hand between colours.
- Once fully dry, about twenty minutes, draw or glue on stems leading down from each flower.
🛍 Shopping guide
Paper Plate Heart Weaving with Yarn
Weaving looks complicated until you realise it’s just yarn going over, then under, then over again, and a preschooler who can count to two can manage that rhythm with a little patience.
A paper plate cut into a heart and notched around the edge becomes the loom, and the finished piece has a woven texture that paper and glue can’t fake. It makes a genuinely good placemat-sized decoration for a party table.
What You Need
- 1 paper plate, cut into a heart shape with 8-10 small notches around the edge (adult pre-cuts)
- yarn, 3 metres, one or two colours
How to Make It
- An adult cuts the plate into a heart outline and snips small notches evenly around the edge.
- Tie one end of the yarn around one of the notches to anchor it.
- Weave the yarn across the heart, catching it in the next notch, then looping back the other way.
- Keep going notch by notch until the whole heart is covered in crossing lines of yarn.
- Tie off the loose end at the back and trim it.

🛍 Shopping guide
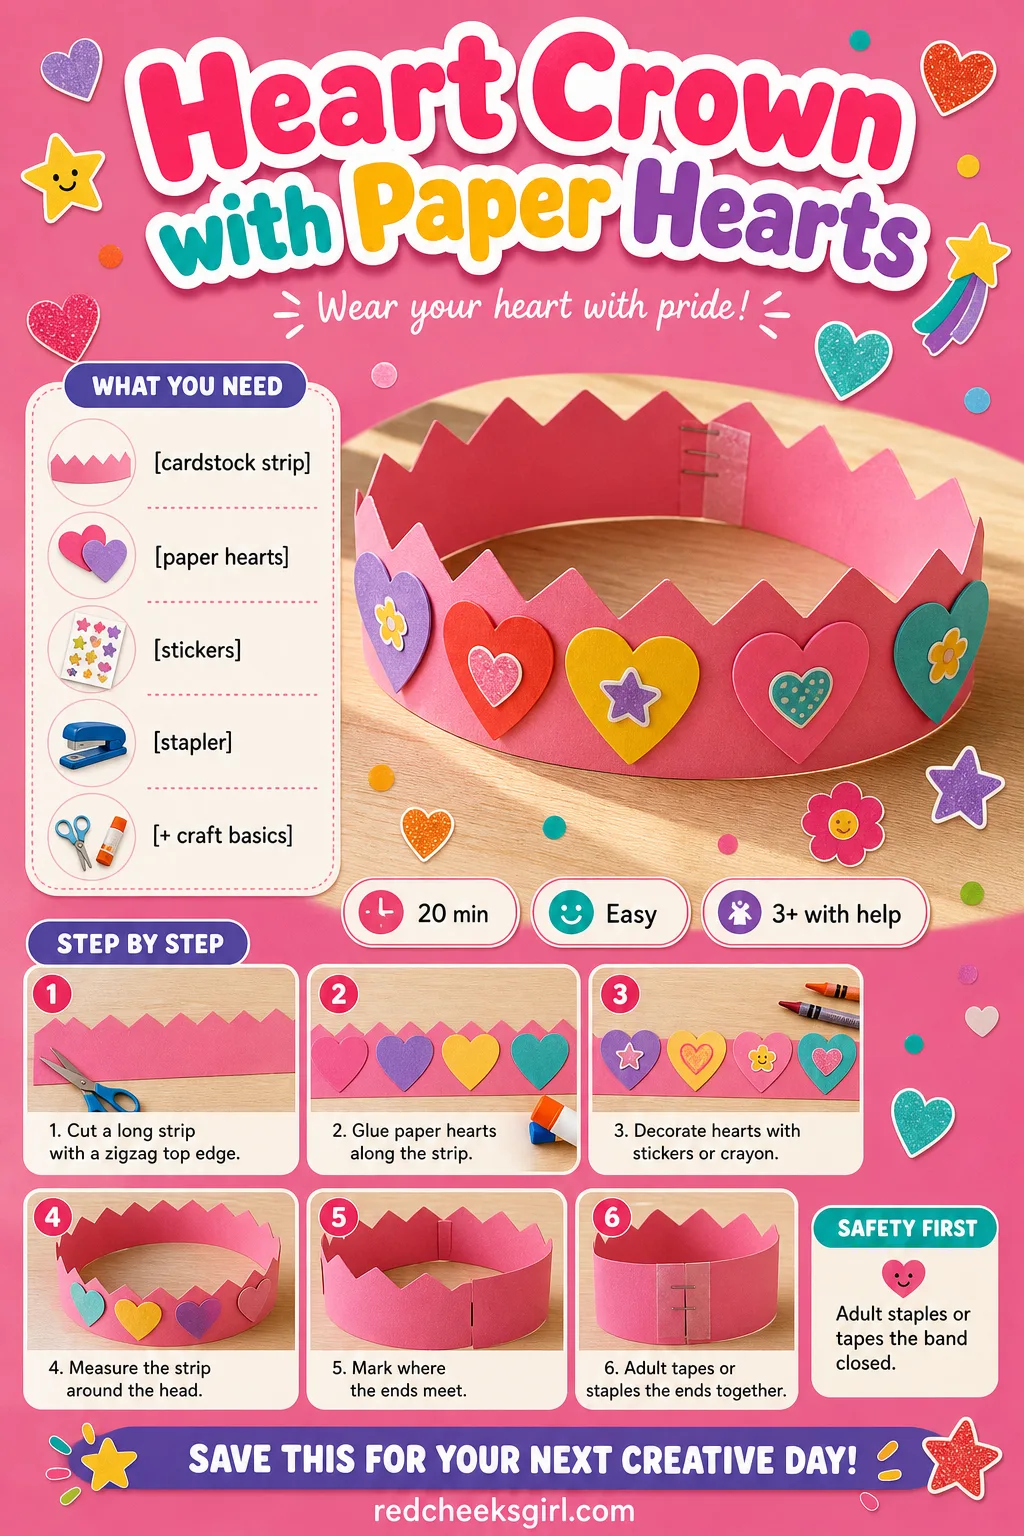
Heart Crown with Paper Hearts
A crown turns any craft table into a coronation, and this one needs nothing more exotic than a strip of cardstock and a fistful of paper hearts.
Glue them on in a row, biggest in the middle if you want it to look deliberate, and the band fits over the head like a party hat that actually stays put. Keep the stapling to an adult, it’s the one step that needs real pressure.
What You Need
- 1 cardstock strip, 6cm x 60cm, zigzag cut along one long edge
- 5-6 paper hearts, assorted colours and sizes
- stickers or crayons for decorating
- 1 glue stick
- tape or a stapler to close the band
How to Make It
- Cut a long cardstock strip and trim one edge into a zigzag or scalloped top.
- Glue the paper hearts along the strip, spacing them evenly.
- Decorate the hearts further with stickers or crayon if you like.
- Measure the strip around the child’s head and mark where it meets.
- An adult tapes or staples the two ends together at that mark to close the crown.
🛍 Shopping guide
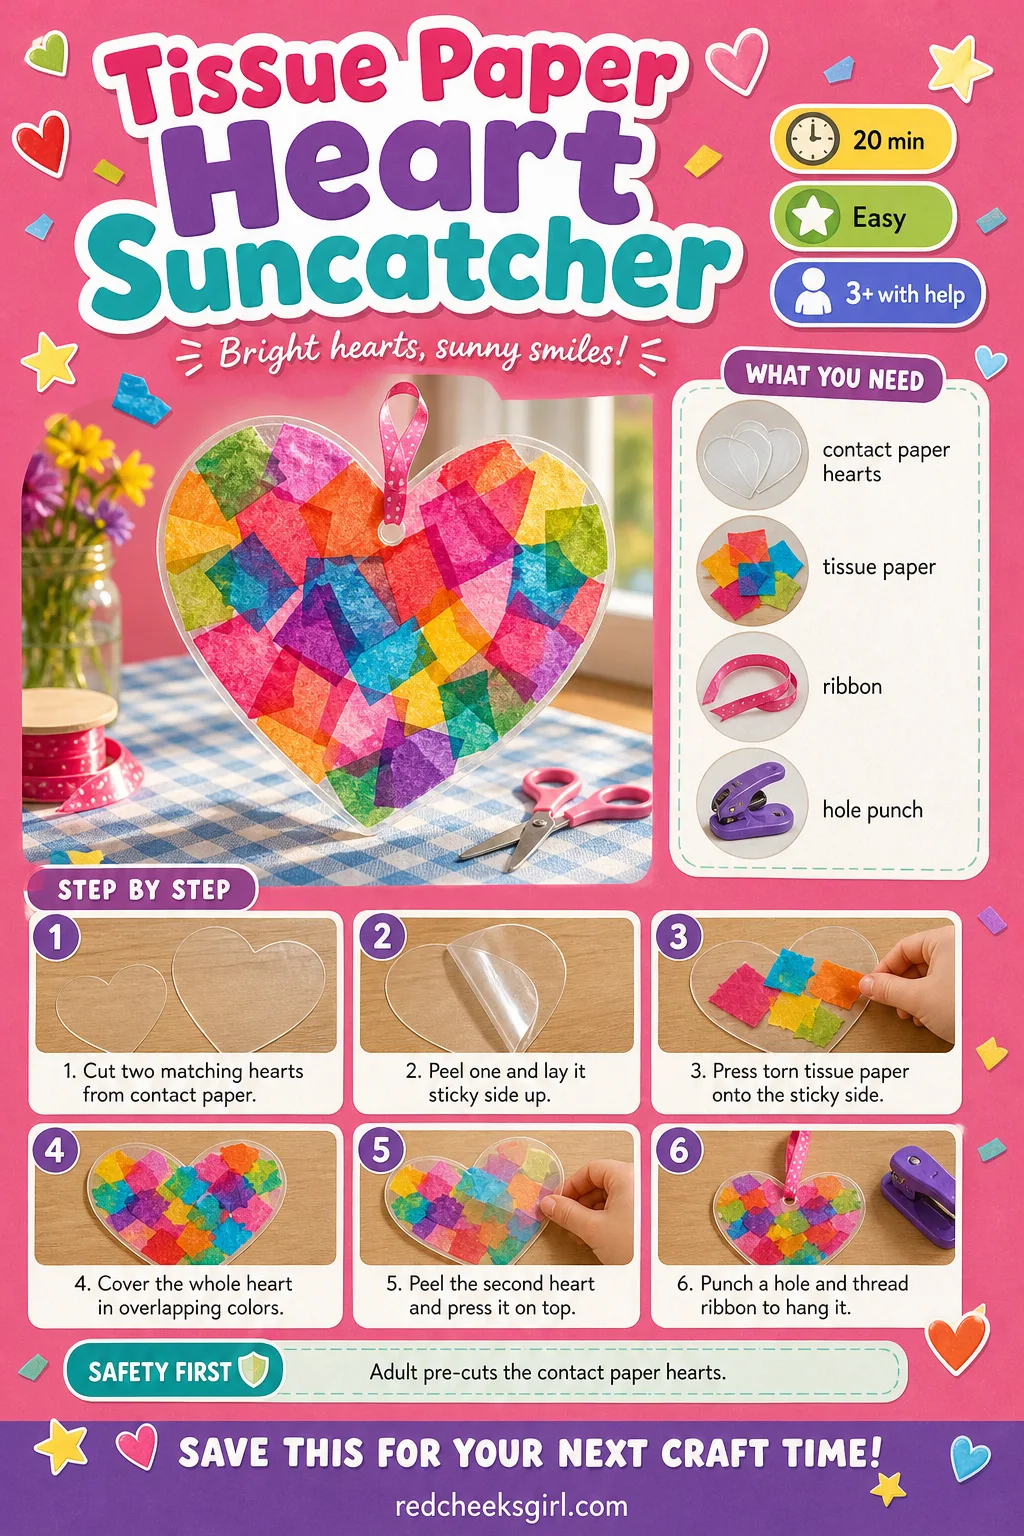
Tissue Paper Heart Suncatcher
Hold this one up to a window on a grey February afternoon and the whole room gets a little better.
Torn tissue paper sealed between two layers of contact paper glows like stained glass once the light comes through it, no paint, no drying time, no mess beyond a few stray scraps on the floor. If the window ledge is already crowded, a ribbon through the top hangs it from a curtain rod instead.
What You Need
- 2 heart shapes cut from clear contact paper, about 15cm (adult pre-cuts)
- tissue paper, several colours, torn into 2-3cm pieces
- ribbon, 20cm, for hanging
- a hole punch
How to Make It
- An adult cuts two matching heart shapes from contact paper.
- Peel the backing off one heart and lay it sticky side up on the table.
- Press torn tissue paper pieces onto the sticky surface, overlapping colours until the whole heart is covered.
- Peel the backing off the second heart and press it on top, sticky side down, to seal everything in between.
- Trim the edges neat, punch a hole near the top point, and thread the ribbon through to hang it in a window.
🛍 Shopping guide
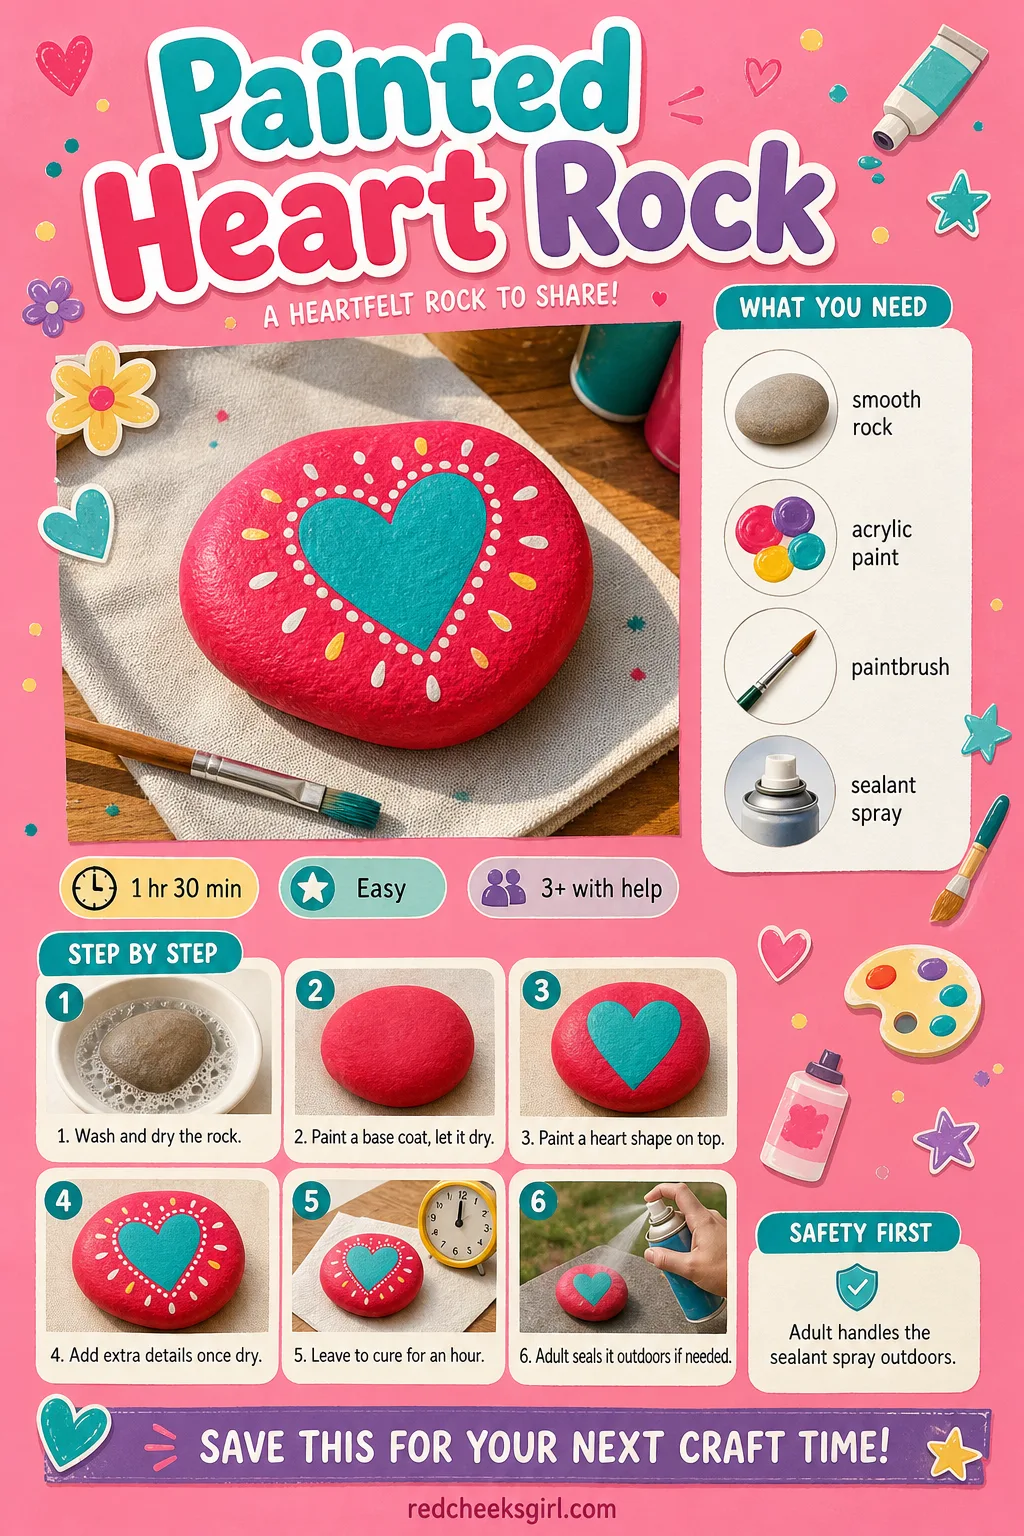
Painted Heart Rock
A painted rock survives everything a paper craft can’t: rain, a toy box, a dog. Find a smooth, flat one on a walk beforehand and the whole project costs nothing but a bit of paint and an hour of drying time, most of it unsupervised.
Line a row of them along a windowsill or garden edge and they hold their colour for months outdoors if sealed.
What You Need
- 1 smooth, flat rock, palm-sized
- acrylic or washable paint, red and pink
- 1 paintbrush
- clear sealant spray (optional, adult only, used outdoors)
How to Make It
- Wash and dry the rock so the paint has a clean surface to grip.
- Paint the whole rock a base coat of red or pink and leave it to dry for about twenty minutes.
- Once dry, paint or draw a heart shape on top in a contrasting colour.
- Add any extra details, dots, initials, a date, once the heart shape has dried.
- Leave the finished rock to cure fully for at least an hour before handling it much.
- If it will live outdoors, an adult seals it with a clear spray, outside and away from faces.
🛍 Shopping guide
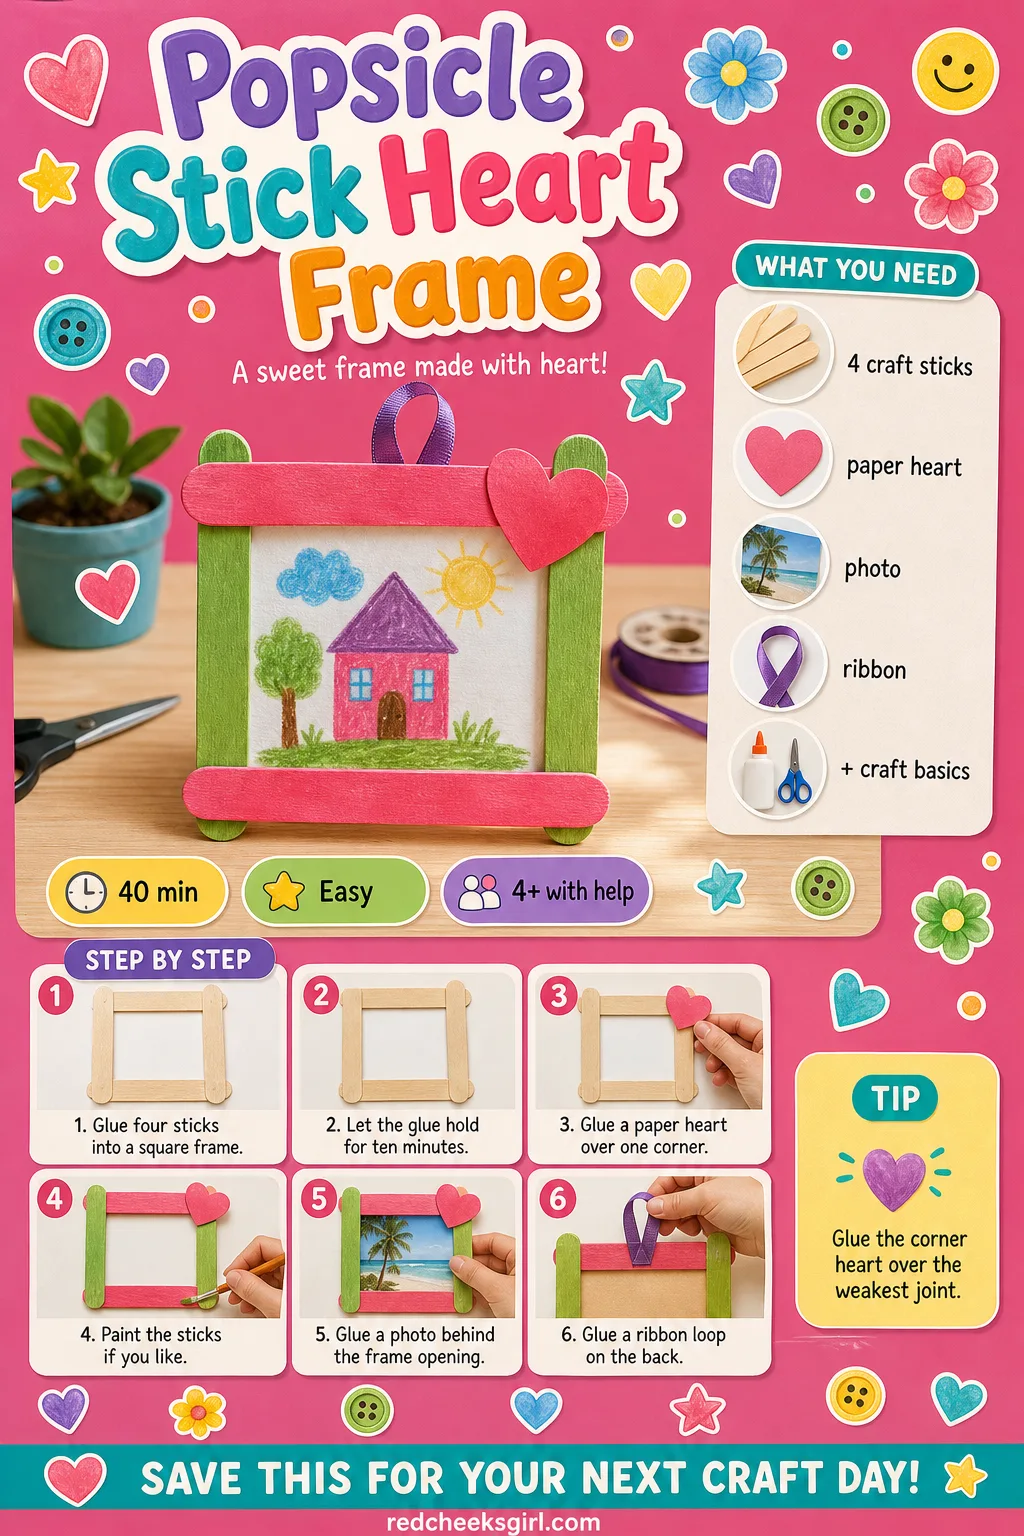
Popsicle Stick Heart Frame
A frame built from craft sticks turns a child’s own drawing into something that looks intentionally displayed rather than magnetted to the fridge for the fortieth time.
Four sticks glued into a square, a small paper heart tucked in one corner, and a loop of ribbon on the back, and suddenly it’s a gift instead of a pile of homework. Swap the drawing for a photo and grandparents will actually keep it.
What You Need
- 4 craft sticks (popsicle sticks)
- 1 small paper heart, 4cm, for the corner
- a small drawing or photo, trimmed to fit
- ribbon loop, 15cm
- glue
How to Make It
- Lay four craft sticks into a square, overlapping the ends, and glue each overlap to form a simple frame.
- Leave it flat for ten minutes until the glue holds.
- Glue the small paper heart over one corner to cover the joint.
- Paint or colour the sticks if you like, and let that dry too.
- Glue the drawing or photo to the back of the frame opening so it shows through.
- Glue a ribbon loop to the top back for hanging.
🛍 Shopping guide
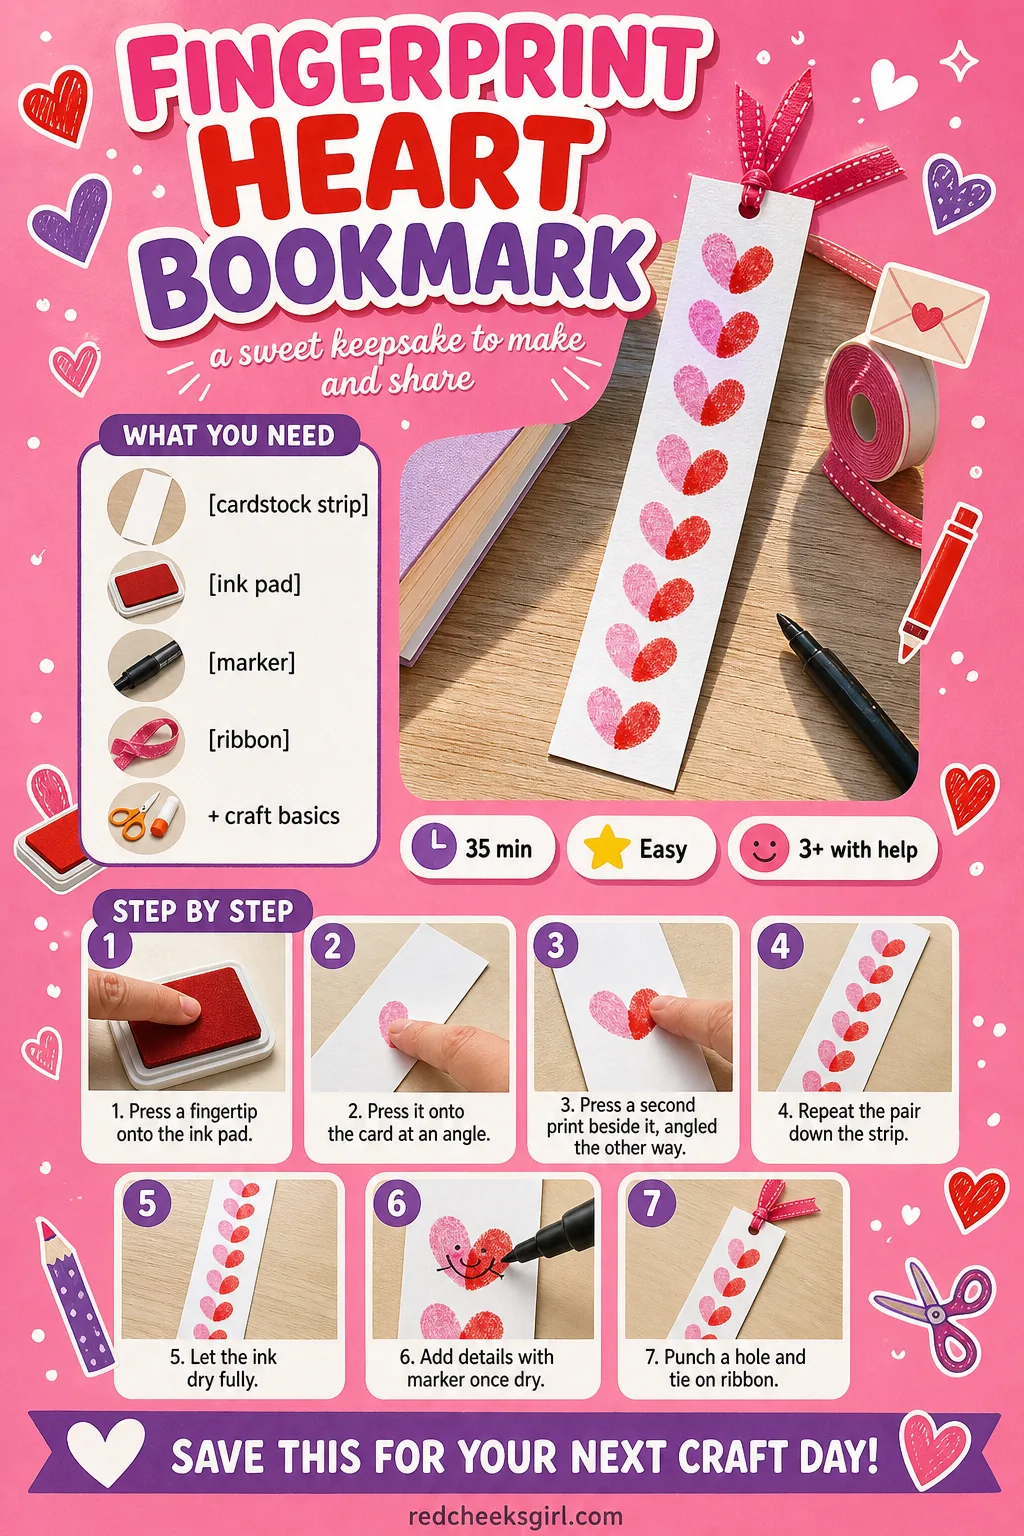
Fingerprint Heart Bookmark
Two fingerprints, pressed just right, make a heart shape almost by accident, which is the closest thing to a magic trick a bookmark craft offers.
Run a row of them down a cardstock strip and the result looks printed, not stamped by a three year old thumb. It slides into a picture book that night, so the ink has to be properly dry before it goes anywhere near pages.
What You Need
- 1 cardstock strip, 5cm x 15cm
- washable ink pad, red or pink
- fine-tip marker
- a hole punch
- ribbon or tassel, 15cm
How to Make It
- Press one fingertip onto the ink pad, then press it onto the cardstock at an angle.
- Press a second fingerprint right next to the first, angled the other way, so the two together form a rough heart shape.
- Repeat the pair down the length of the strip, spacing them evenly.
- Let the ink dry fully, about twenty minutes, before touching the prints.
- Use the fine marker to add any extra details once dry.
- Punch a hole at the top and tie on a ribbon or tassel.
🛍 Shopping guide
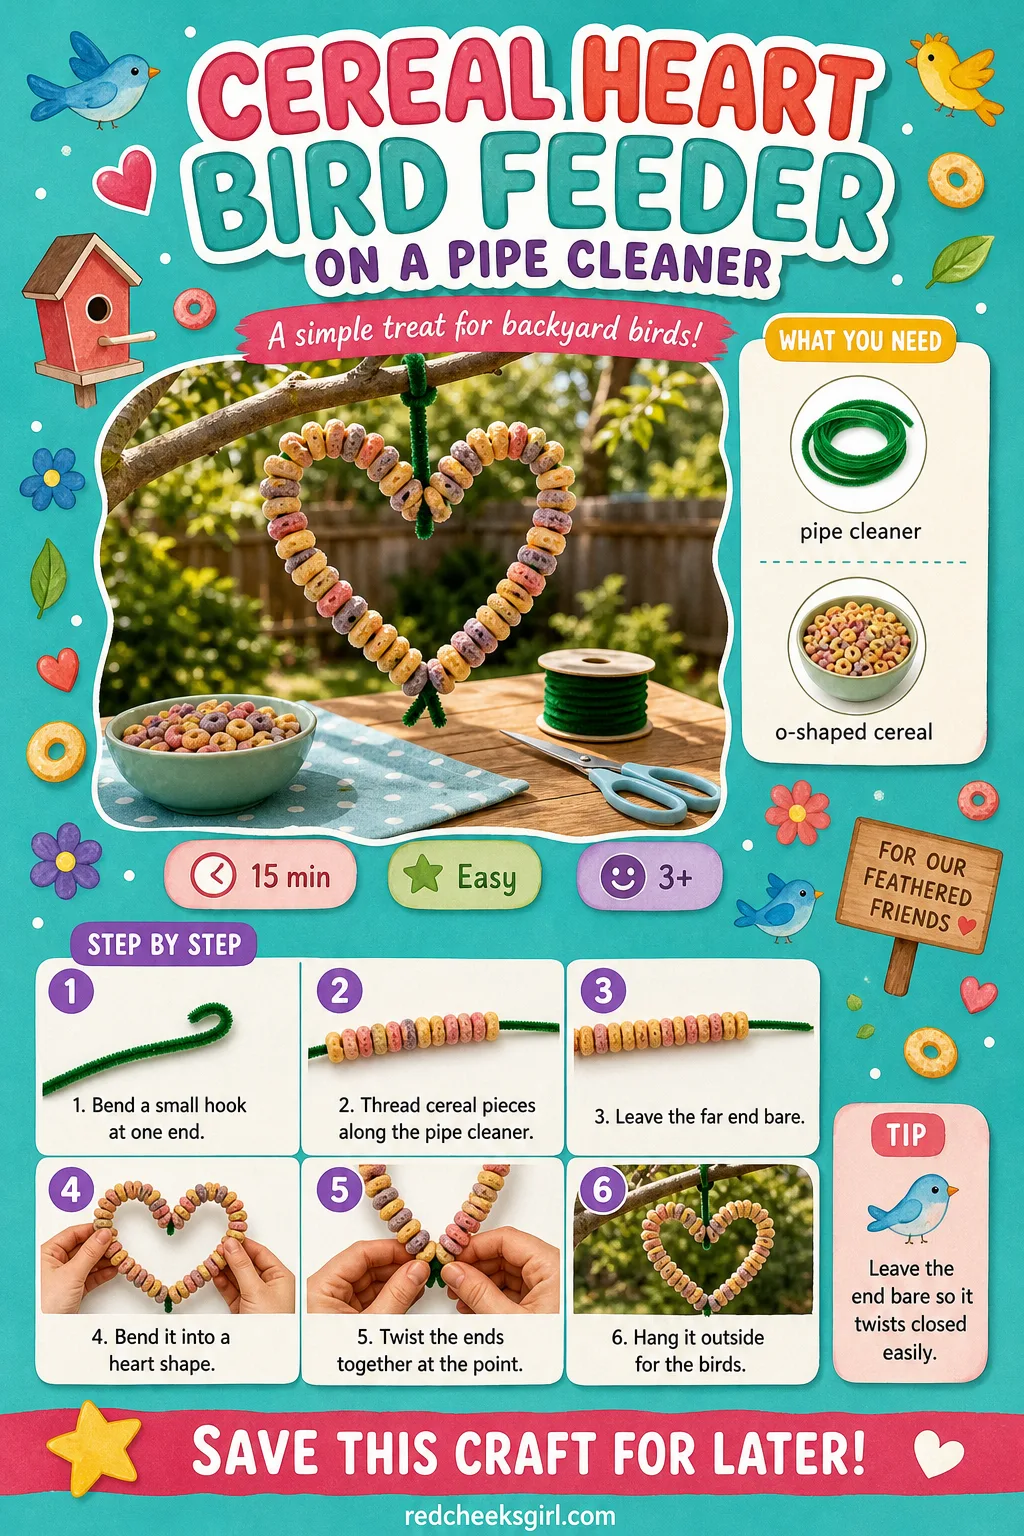
Cereal Heart Bird Feeder on a Pipe Cleaner
This is the craft that keeps giving after Valentine’s Day ends, because it goes straight outside to actual birds instead of into a drawer.
O-shaped cereal threaded onto a bent pipe cleaner makes a heart feeder light enough to hang from almost any branch. It’s cheap, it uses up the stale end of the cereal box, and it gets a preschooler outside checking on it daily.
What You Need
- 1 pipe cleaner, 30cm
- 15-20 pieces of O-shaped cereal
How to Make It
- Bend one end of the pipe cleaner into a small hook, this is for hanging later.
- Thread the cereal pieces onto the pipe cleaner one at a time until most of the length is covered.
- Leave about 3cm bare at the far end.
- Bend the threaded pipe cleaner into a heart shape, rounded top, point at the bottom.
- Twist the two ends together at the point to close the heart and lock the cereal in place.
- Hang it outside on a tree branch or hook where birds can reach it.
🛍 Shopping guide
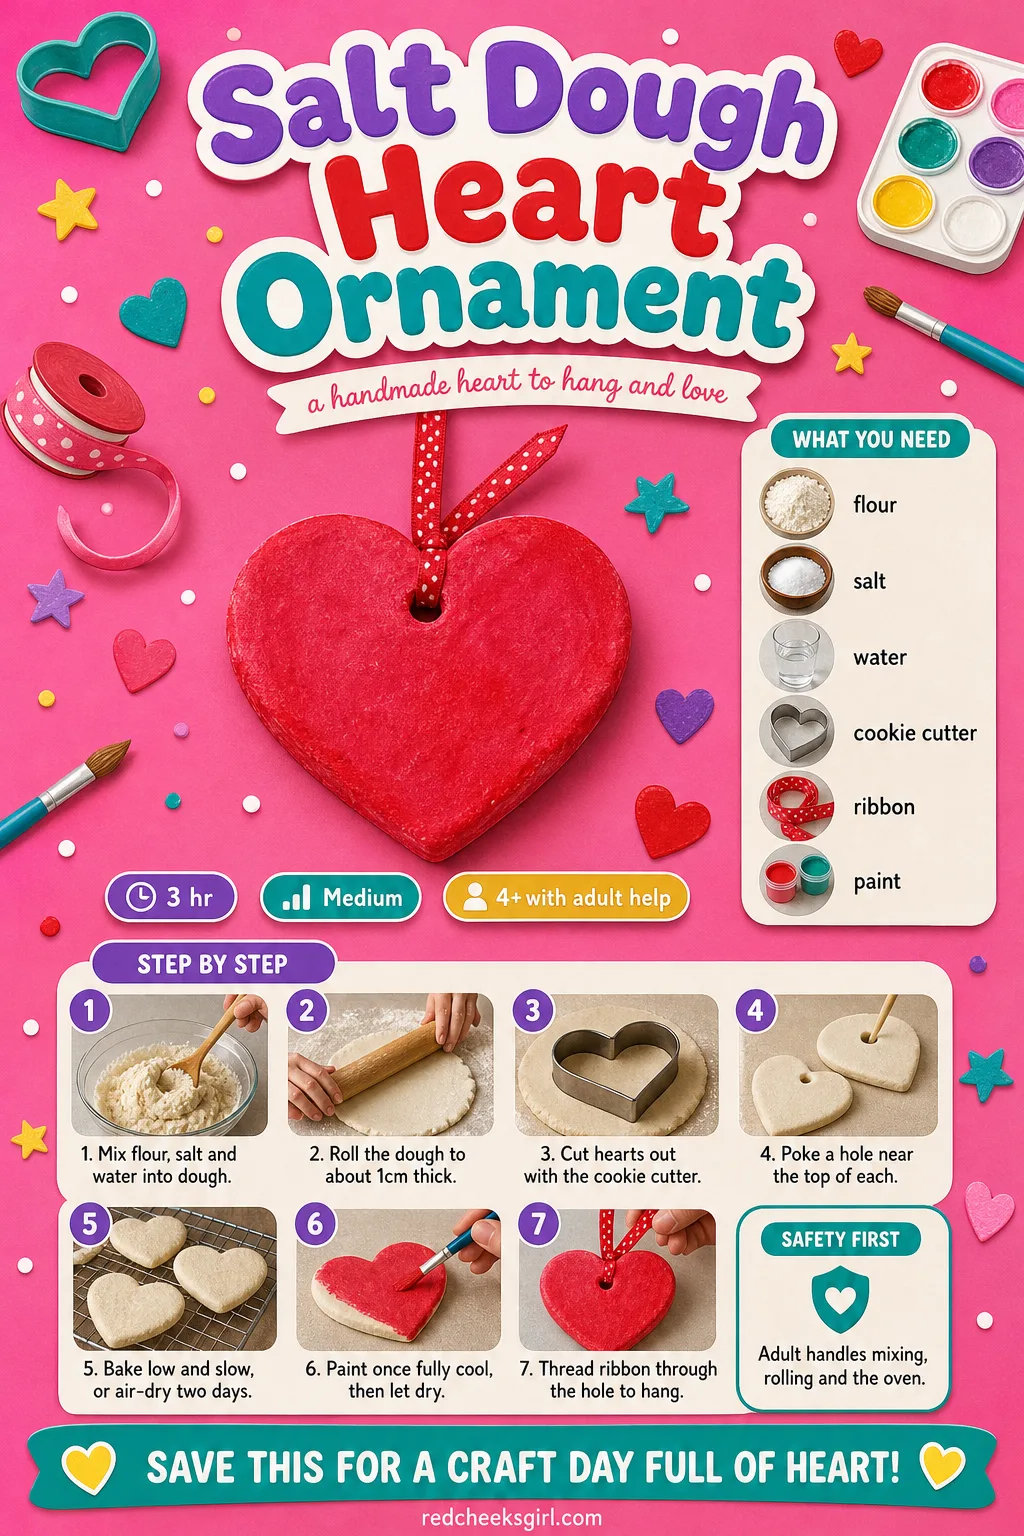
Salt Dough Heart Ornament
Salt dough is the one craft here that needs the oven, which makes it the one worth doing on a slow Saturday rather than squeezed before a party starts.
A cookie cutter does the shaping, so the hard part is entirely adult: mixing, rolling and baking low and slow until the hearts go hard enough to paint and hang for good. If the oven feels like one step too many, the same dough air-dries flat in about two days instead.
What You Need
- 1 cup plain flour
- 1/2 cup table salt
- 1/2 cup water
- 1-2 heart cookie cutters
- ribbon, 15cm, for hanging
- paint, once baked and cooled
How to Make It
- An adult mixes the flour, salt and water into a firm dough and rolls it out to about 1cm thick.
- The child cuts hearts from the dough with the cookie cutter.
- An adult pokes a small hole near the top of each heart with a straw, for the ribbon later.
- An adult bakes the hearts on a lined tray at a low oven temperature for around two hours, until hard and pale, or leaves them to air-dry flat for about two days instead.
- Once fully cool, the child paints the hearts and leaves them to dry for another hour.
- Thread ribbon through the hole once the paint is dry, and tie it into a loop for hanging.
🛍 Shopping guide
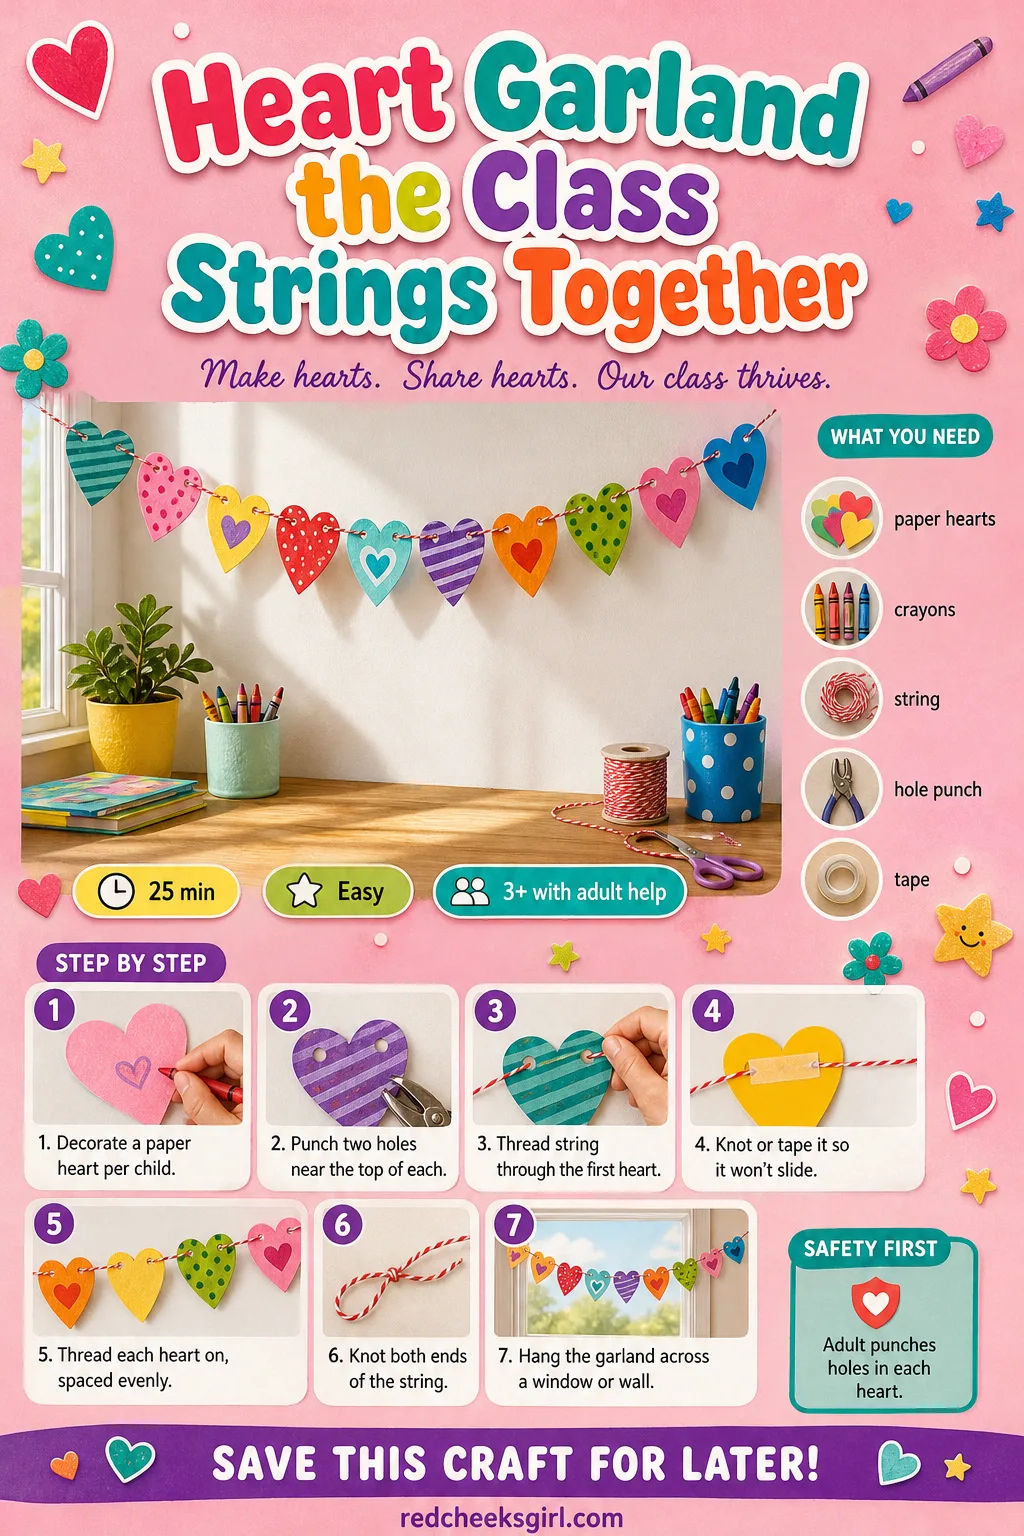
Heart Garland the Class Strings Together
One heart from every child in the class, strung onto a single length of string, turns twenty small individual crafts into one decoration nobody could have made alone. Each child decorates their own heart first, so the garland ends up a real mix of styles and colours rather than twenty identical copies.
Hang it across a window or along the top of the whiteboard and it reads as a whole-class project, which it genuinely is.
If the party itself needs more than a craft table, pair it with 15 Classroom Valentine Games With Free Printables and Nothing to Buy or the bigger 22 Valentine Class Party Games for a Classroom Full of Sugar.
What You Need
- 1 paper heart per child, about 10cm, cut ahead by an adult or with child-safe scissors
- crayons, markers or stickers for decorating
- 1 long piece of string or ribbon, about 3 metres for a class of 20
- a hole punch
- tape
How to Make It
- Each child decorates their own paper heart with crayons, markers or stickers.
- An adult punches two holes near the top edge of every heart, spaced a few centimetres apart.
- Thread the string through both holes of the first heart, then knot or tape it in place so it won’t slide.
- Thread the next heart on a little further along, spacing them evenly, and keep going until every heart is on the string.
- Knot the ends of the string so the hearts can’t slip off.
- Hang the finished garland across a window, a wall or above the party table.
🛍 Shopping guide
Frequently Asked Questions
What are the best low-mess Valentine crafts for preschoolers?
Low-mess favorites skip wet paint and loose glitter for glue sticks and pre-cut shapes. The best low-mess Valentine crafts for preschoolers include heart-shaped sticker art, self-adhesive foam kits, and contact paper suncatchers. A tissue paper suncatcher sealed in contact paper gives that same glow without a drop of paint.
How long should a Valentine craft activity take for a group of preschoolers?
Most preschool Valentine crafts work best at fifteen to twenty minutes of active time, plus any drying. Anything longer tends to lose a three or four year old’s attention before the glue even sets.
Which Valentine crafts help develop fine motor skills for three-year-olds?
Simple fine motor Valentine crafts for three-year-olds include threading cereal hoops onto pipe cleaners to make heart bracelets or using tongs to place pom-poms onto sticky paper hearts. Dotting paint onto a heart outline with a cotton swab works the same small-muscle grip.
What age are preschool Valentine crafts suitable for?
Preschool Valentine crafts generally suit three to five year olds, with an adult handling scissors work, hot glue, ovens or small parts like pony beads. Most of the cutting, folding and gluing is well within a preschooler’s own hands once the shapes are simple.
What are good non-candy Valentine ideas for a class party?
A finished craft works better as a non-candy Valentine for a class party, since it survives the day instead of melting in a backpack. A heart wand or a painted rock doubles as the gift itself, no extra wrapping needed.
How do you store or send home the finished crafts?
Flat crafts like the mosaic or doily card pack into a folder for the trip home. Anything 3D, like the salt dough ornament or popsicle stick frame, travels safer in a small box so it doesn’t crush.
16 valentines day games for kids that burn sugar and keep hands busy. Free printables, zero prep cha
20 stocking stuffers for women grouped by budget and recipient, from beauty minis to travel fixes, w
22 valentine box ideas for school, from a monster mailbox to five-minute wraps, with what to build e
Leave a Reply