

16 Woodland Baby Shower Food Ideas Shaped Like Mushrooms and Pinecones
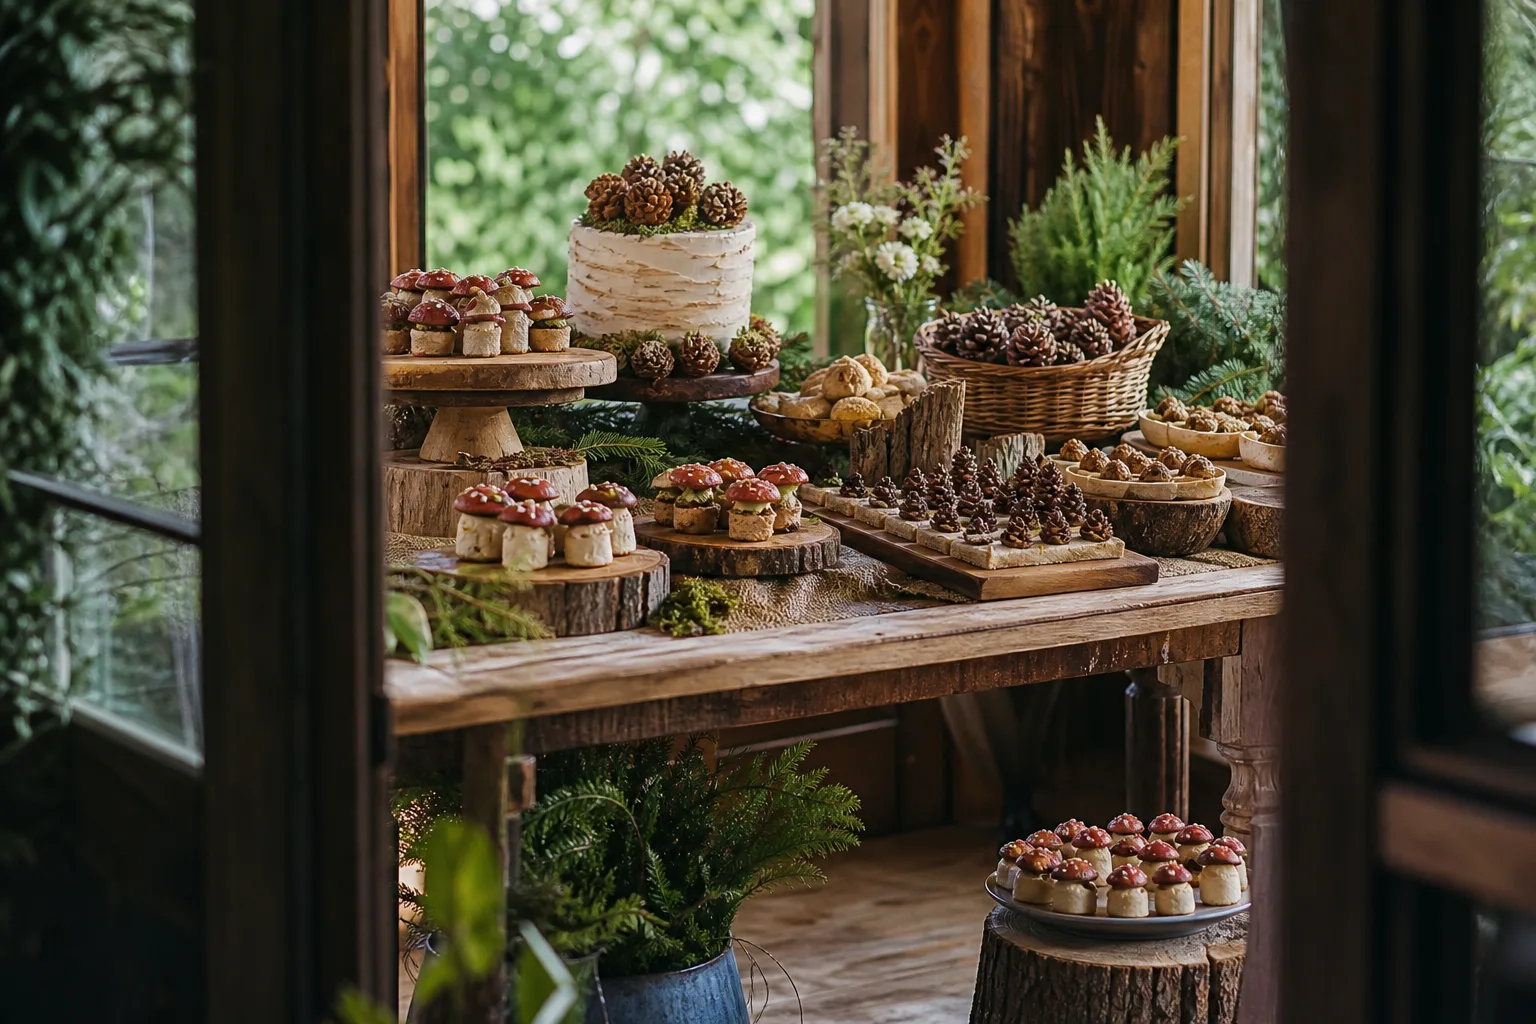
A woodland shower can tip into twee fast: too much moss, too many bows, and the dessert table starts to look like a craft fair instead of a party. Food fixes that faster than any garland does, because a mushroom built from a tomato and a mozzarella ball reads as clever, not cute. Almost nothing below needs an oven for longer than it takes to boil a pot of water or melt chocolate in the microwave, so the stove stays free for whatever else is cooking that day. Expect dairy, gluten, nuts and eggs across the list, so check the ingredient lines against the guest list before you shop.
Sixteen ideas sit below, from a pinecone built out of almonds and cream cheese to a dirt cup nobody over the age of four should enjoy quite this much. Round out the table with 15 Woodland Baby Shower Decorations Built on the Cottagecore Mushroom Trend if the surface it sits on still needs work, or start further back with 22 Woodland Baby Shower Theme Ideas With Storybook Magic for the rest of the room. Everything here is alcohol-free and adult-friendly, built for an afternoon of unwrapped onesies rather than a dinner party, and nearly all of it can be built ahead and chilled until the first guest arrives.
This post contains affiliate links. If you buy through them, I may earn a small commission at no extra cost to you.
- Woodland Animal Sugar Cookies
- Forest Critter Snack Picks
- No-Bake S’mores Bars
- Build-Your-Own S’mores Board
- Forest Floor Trail Mix Bar
- Mushroom Caprese Bites
- Pinecone Cheese Ball
- Chocolate Dirt Cups
- Acorn Truffle Bites
- Log Cabin Charcuterie Board
- Mushroom Deviled Eggs
- Owl Cheese Pops
- Chocolate-Dipped Pretzel Twigs
- Mushroom Popcorn Snack Mix
- Forest Berry Yogurt Bark
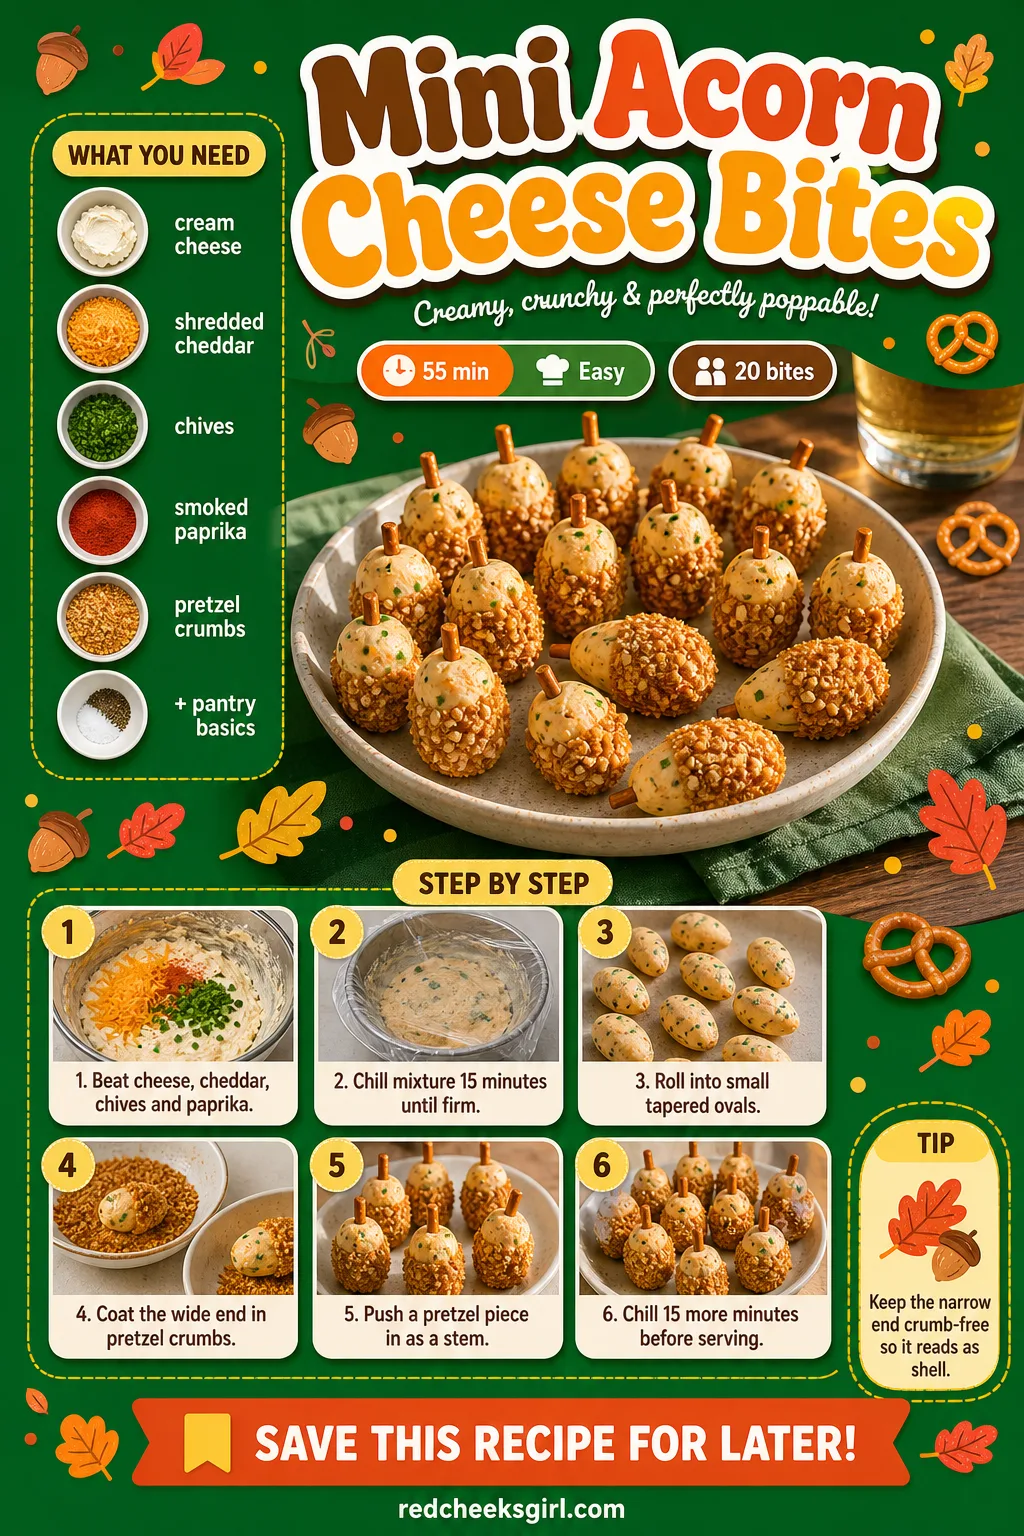
- Mini Acorn Cheese Bites
- Frequently Asked Questions
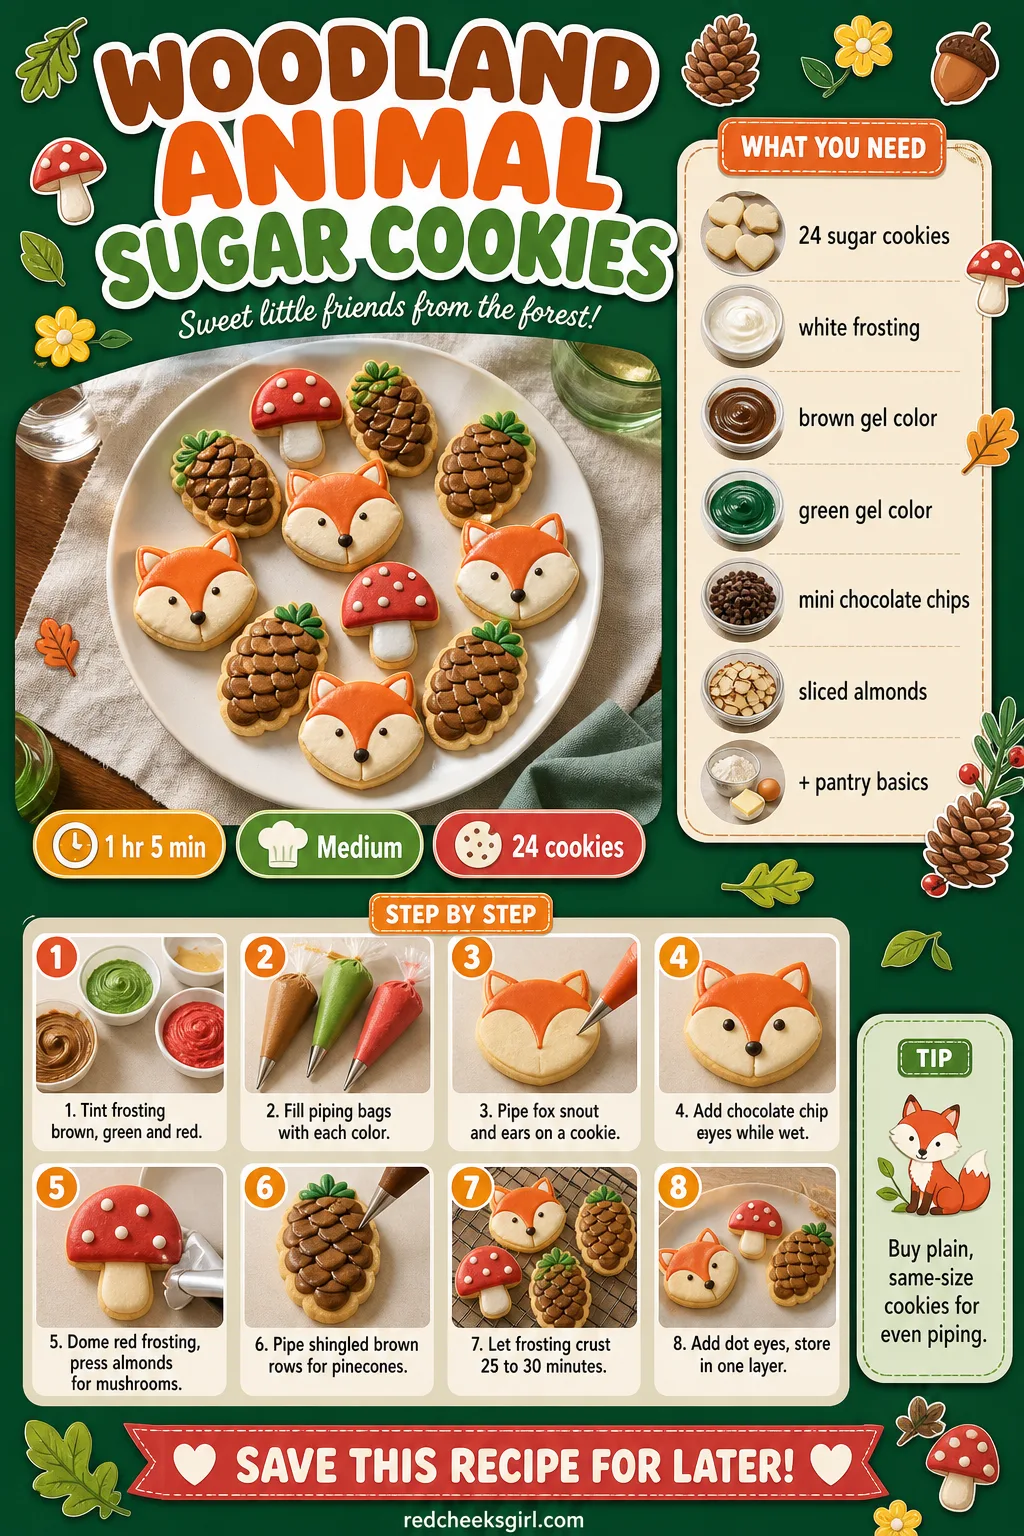
Woodland Animal Sugar Cookies
A plate of plain round cookies says nothing. Ten minutes with a piping bag turns the same plate into foxes, mushrooms and stacked pinecones, and nobody needs to know they came from a bakery box an hour earlier.
The frosting sits soft against the tongue rather than crunchy, so even guests who skip the cheese board usually take one. If a piping bag feels fussy, a zip-top bag with one corner snipped off does the same job for nothing.
Ingredients
- 24 plain round sugar or shortbread cookies, about 2.5 inches wide
- 1 1/2 cups white buttercream frosting, stiff enough to pipe
- Brown gel food coloring
- Forest green gel food coloring
- Deep red gel food coloring
- 1/4 cup mini chocolate chips
- 2 tablespoons sliced almonds
- Black edible marker or black gel icing, fine tip
Instructions
- Divide the frosting into three bowls and tint one brown, one green and one deep red, stirring until the color runs even with no streaks.
- Spoon each tinted frosting into a piping bag fitted with a small round tip and twist the top closed so color doesn’t push out the back.
- For fox faces, pipe an upside-down brown triangle for the snout, leaving the top bare, and smooth it flat with the back of a spoon.
- Pipe two small brown ear triangles at the top, fill the center with a dot of white frosting, then press two mini chocolate chips in for eyes while it’s still wet so they hold.
- For mushroom cookies, cover the top third of a cookie with a dome of red frosting and press sliced almonds halfway in for spots while the frosting is still glossy.
- For pinecone cookies, pipe short brown lines in overlapping rows from the bottom up, like shingles, each row covering the piping marks of the one beneath it.
- Set finished cookies on a tray without touching and let the frosting crust at room temperature for 25 to 30 minutes: it’s ready when the surface feels dry but still gives slightly underneath.
- Add tiny dot eyes to the mushrooms and pinecones with the edible marker once the frosting has set, then store in a single layer in an airtight container.
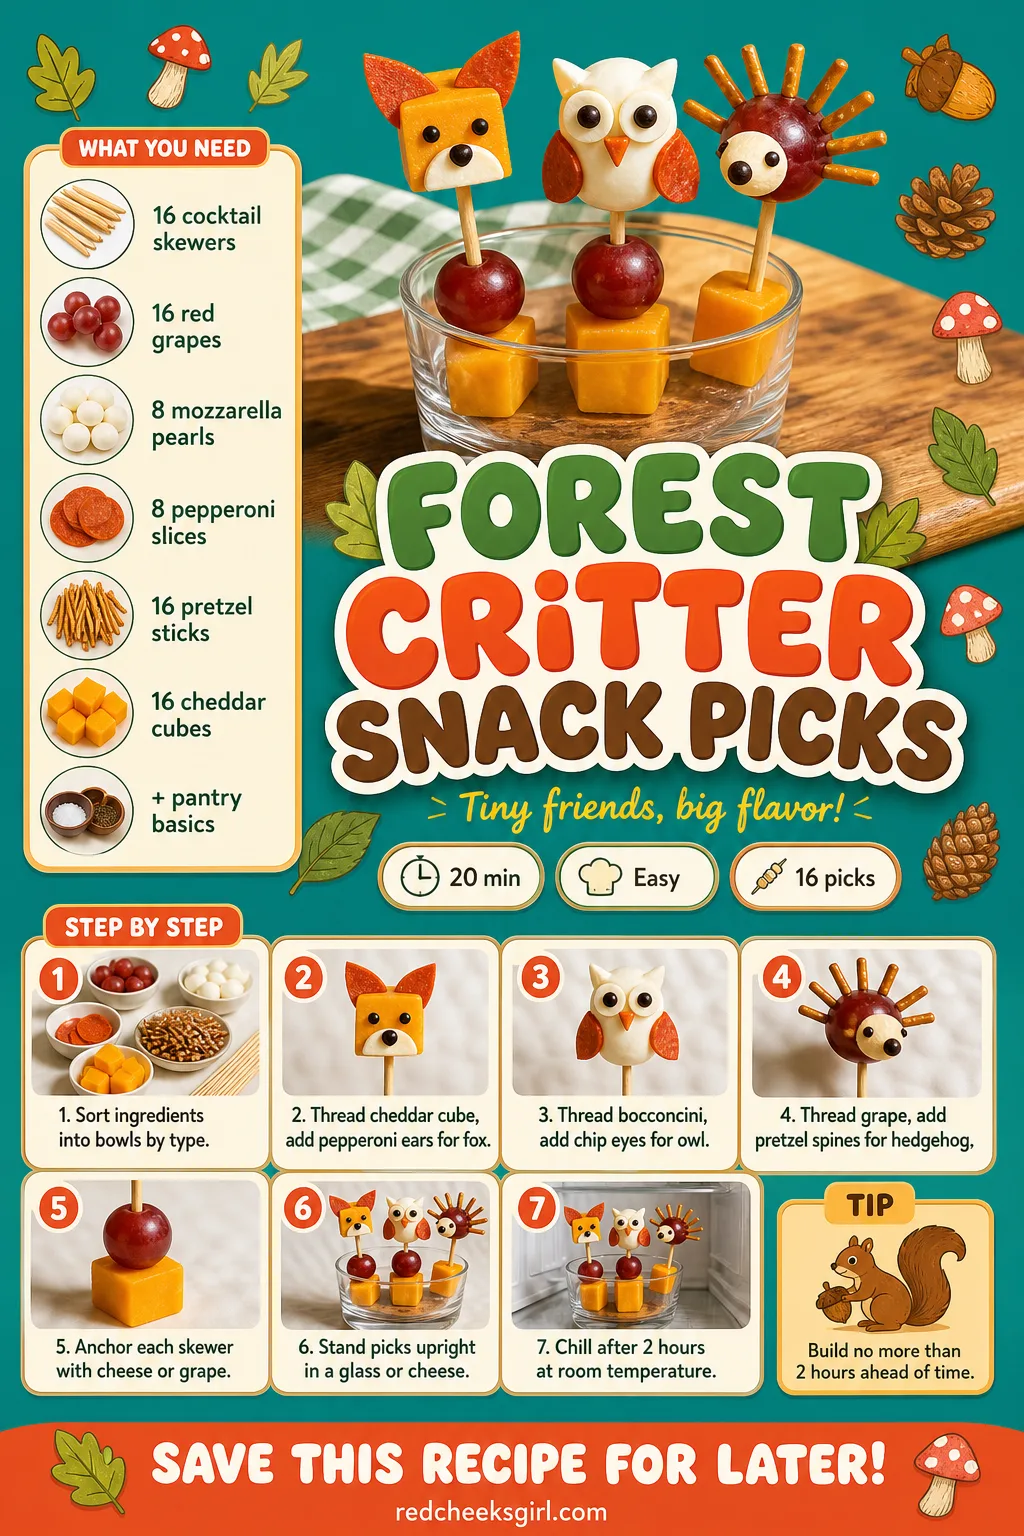
Forest Critter Snack Picks
Something about food on a stick still gets eaten first at any party. These picks turn pepperoni, cheese and fruit already on the table into a fox, an owl and a hedgehog, no new ingredients required.
Each one takes under a minute once the pieces are sorted, so a dozen come together fast. If the shower runs over lunch, round out the table with heartier plates from 14 Baby Shower Brunch Ideas That Do Not Need a Chef.
Ingredients
- 16 wooden cocktail skewers, 4 inch
- 16 seedless red grapes
- 8 mozzarella pearls (bocconcini), halved
- 8 thin pepperoni slices, folded into quarters
- 16 small pretzel sticks, broken in half
- 2 tablespoons mini chocolate chips
- 16 small cheddar cheese cubes
Instructions
- Sort every ingredient into its own small bowl so you can build each pick without searching mid-assembly.
- For the fox pick, thread a cheddar cube first, then stand a folded pepperoni quarter behind it like pointed ears peeking over the cheese.
- For the owl pick, thread a bocconcini half cut side down so the round top shows, pressing two mini chocolate chips into the top for eyes before it goes on the skewer.
- For the hedgehog pick, slide a grape on first, then push two or three broken pretzel halves into one side at an angle so they fan out like spines.
- Finish every skewer with a cheddar cube or grape at the blunt end so the pick balances flat on a platter instead of rolling.
- Stand the finished picks upright in a shallow glass or a block of firm cheese so the critter ends face the room, not the table.
- Picks hold at room temperature for up to 2 hours; after that, move any with cheese or meat back to the fridge so nothing sweats.
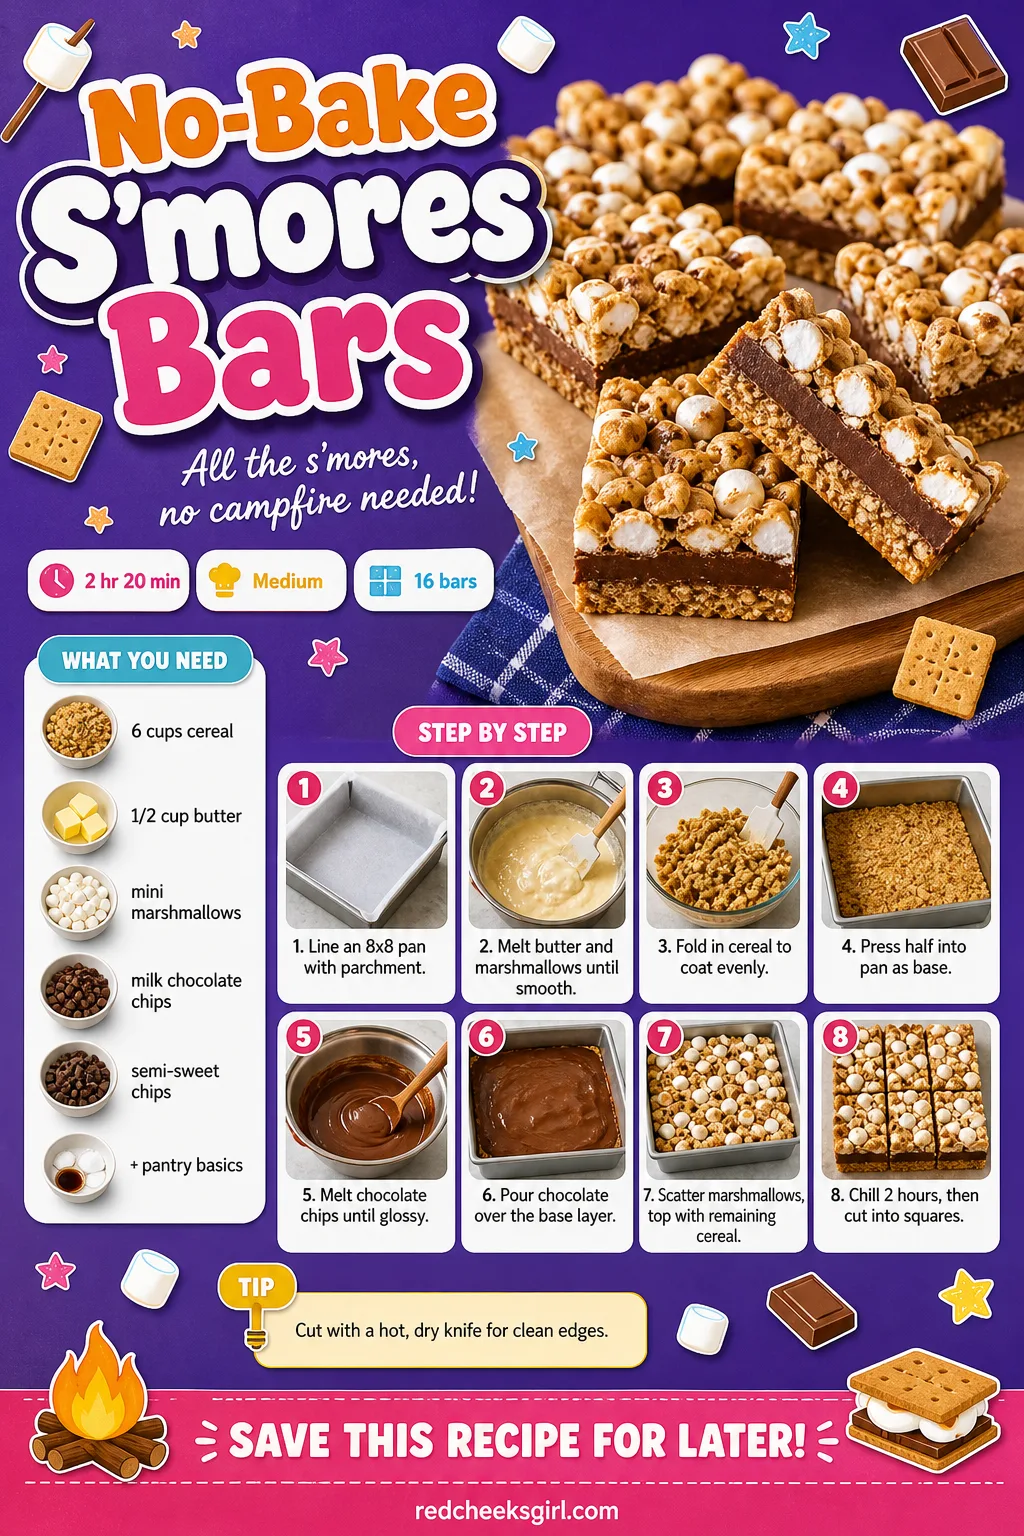
No-Bake S’mores Bars
The oven usually has somewhere else to be at a baby shower, holding a casserole or warming rolls, so a dessert that never goes near it earns its spot twice over. These bars layer the gooey pull of a real campfire s’more without a flame or a rack in sight.
They set up in the fridge while everything else gets finished, and cut into neat squares instead of crumbling the way a baked bar can. Swap the golden grahams for crushed graham crackers if the cereal aisle comes up empty.
Ingredients
- 6 cups golden graham cereal (or crushed graham crackers)
- 1/2 cup unsalted butter
- 1 (10 oz) bag mini marshmallows, divided
- 1 1/2 cups milk chocolate chips
- 1/2 cup semi-sweet chocolate chips
- 1 cup mini marshmallows, for topping
Instructions
- Line an 8×8 inch pan with parchment, leaving overhang on two sides so you can lift the whole slab out later.
- Melt the butter in a large microwave-safe bowl in 30 second bursts, then stir in 3 cups of mini marshmallows and microwave in 20 second bursts, stirring between each, until it pours in a smooth ribbon with no lumps.
- Fold the cereal into the warm marshmallow mixture quickly, before it starts to set, until every piece is coated.
- Press half the cereal mixture firmly into the pan with the back of a greased spoon, pushing into the corners for a flat, even base.
- Melt the chocolate chips together in 20 second microwave bursts, stirring between each, until glossy: stop while a few lumps remain, since residual heat finishes them.
- Pour the melted chocolate over the base and tilt the pan so it reaches every edge in one even layer.
- Scatter the remaining marshmallows over the wet chocolate so they sink in slightly and hold once set.
- Warm the remaining cereal mixture if it has stiffened, then pat it gently over the marshmallow layer as a top crust, patting rather than pushing so the marshmallows stay whole.
- Chill uncovered for at least 2 hours, until the chocolate snaps rather than smears when pressed at a corner, then lift out by the parchment and cut into 16 squares with a hot, dry knife.
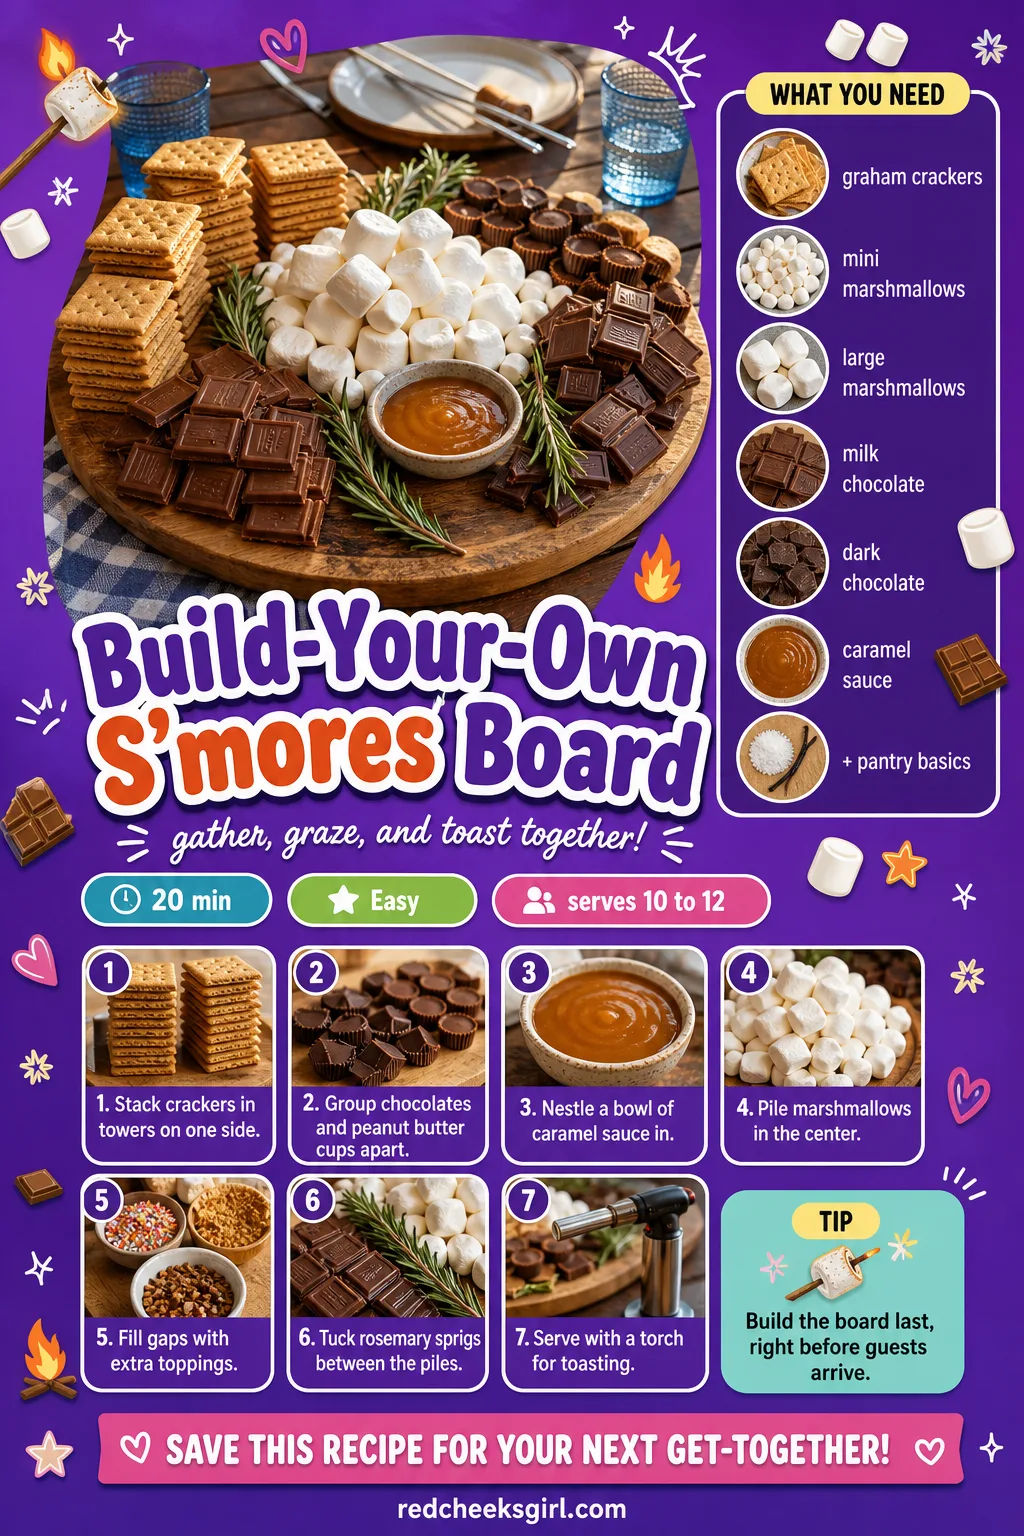
Build-Your-Own S’mores Board
One cake looks lonely by the time the gifts come out, and a s’mores board fills that gap without another trip to the oven. Guests build their own, which means less serving for the host and a reason for people to linger at the table.
It’s the kind of build-your-own moment that turns up in 16 Viral Baby Shower Food Ideas People Will Film Before They Eat, and for good reason. A small torch toasts marshmallows table side with a satisfying soft give, but a lighter and a steady hand do the job for free.
Ingredients
- 2 sleeves graham crackers, broken into squares
- 2 cups mini marshmallows
- 12 large marshmallows
- 2 cups milk chocolate pieces
- 1 cup dark chocolate pieces
- 1/2 cup peanut butter cups, halved
- 1/4 cup caramel sauce, in a small bowl
- A few fresh rosemary sprigs, for garnish
Instructions
- Set a large wooden board on the table and decide which corner holds the crackers, since that’s the base every guest reaches for first.
- Stack the cracker squares in two or three loose towers along one side so they stay crisp instead of lying flat and softening.
- Group the milk chocolate, dark chocolate and peanut butter cups into separate small piles, keeping colors apart so the board reads clearly from across the room.
- Nestle the caramel sauce, in its bowl with a short spoon, into a gap on the board so it can’t tip when someone reaches past it.
- Pile the mini and large marshmallows together in the center in a loose mound, which becomes the visual peak of the board.
- Tuck a few small bowls of extra toppings, like crushed pretzels, into any empty corners so no bare board shows.
- Stand short rosemary sprigs between the piles at the very end so the board reads as a forest floor rather than a dessert table.
- Serve with a small kitchen torch or a tabletop fire pit for toasting marshmallows table side, and keep a damp cloth nearby for sticky fingers.
Forest Floor Trail Mix Bar
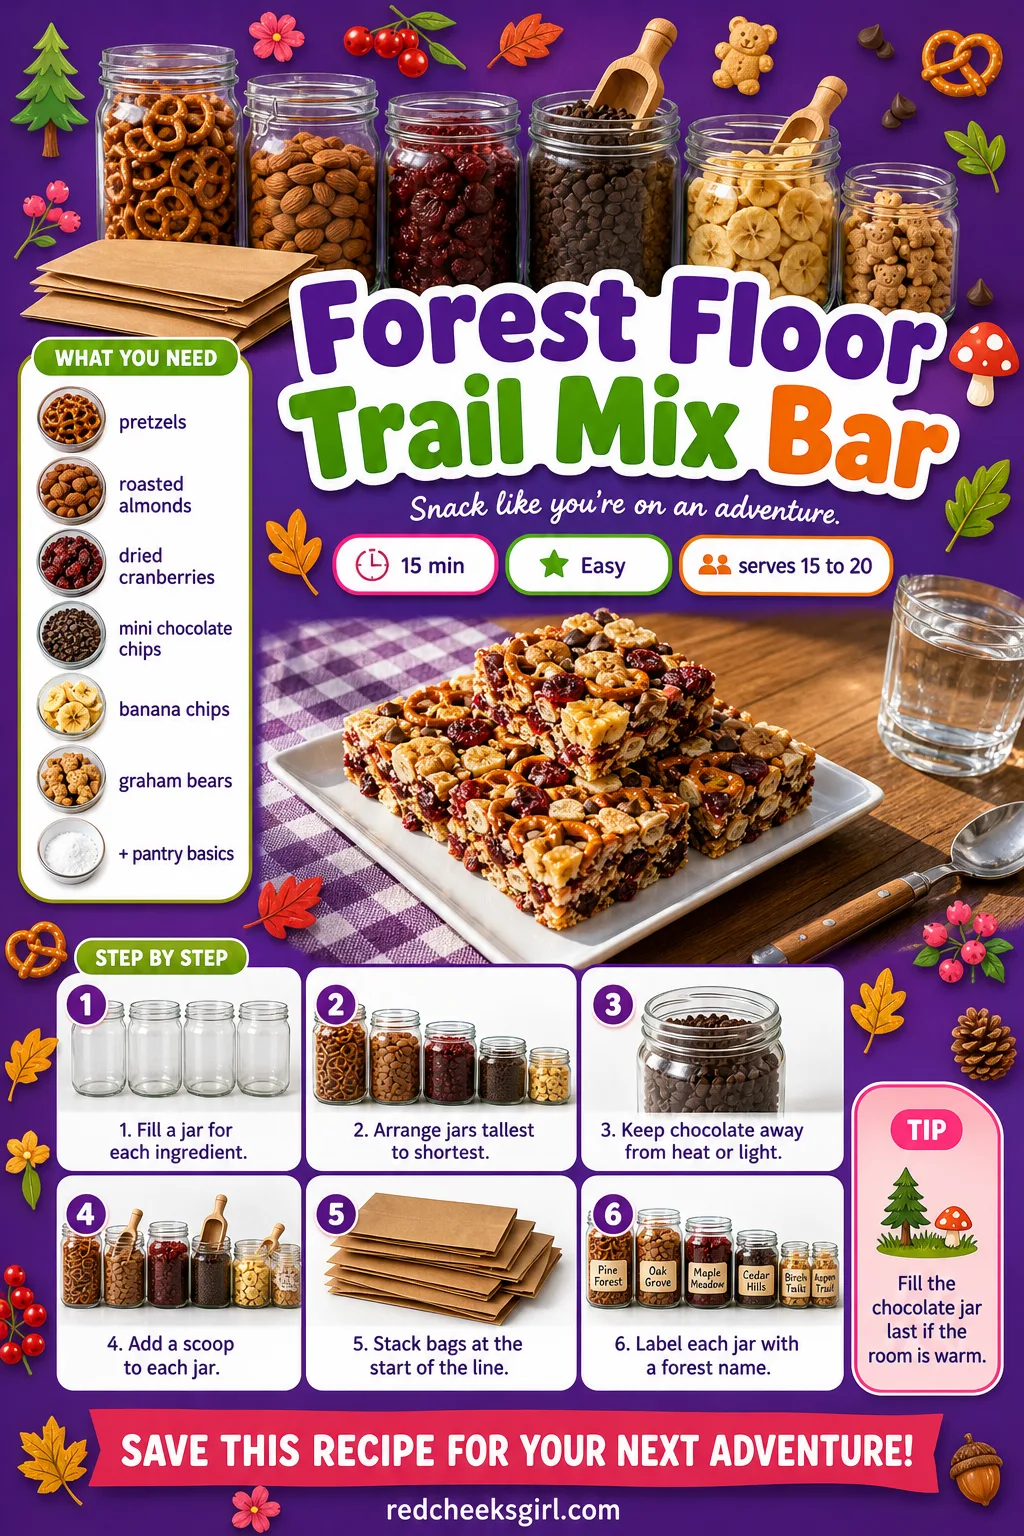
Not every guest wants chocolate, and not every guest can eat nuts, so a bar where people build their own bag solves half the catering stress before it starts. Jars of almonds, cranberries and tiny graham bears line up like something gathered for winter.
It costs less than almost anything else on this list, since bulk bins do the heavy lifting. Leave the nuts out entirely and double the pretzels and dried fruit if anyone in the room has an allergy.
Ingredients
- 3 cups pretzel twists or sticks
- 2 cups roasted almonds
- 2 cups dried cranberries
- 2 cups mini chocolate chips
- 2 cups banana chips
- 2 cups bear-shaped graham crackers
- Small kraft paper bags or cups, for serving
Instructions
- Set out one wide, shallow jar or bowl per ingredient so guests see each mix-in clearly instead of digging through a deep container.
- Arrange the jars tallest to shortest along the back of the table, so a short jar never hides behind a tall one.
- Keep anything that could melt, like chocolate chips, at the shaded end of the table, away from direct light or a heater vent.
- Set a small wooden scoop into each jar, angled so the handle stays out of the mix and easy to grab.
- Stack the kraft bags beside the first jar so the line naturally starts there and moves down the table in one direction.
- Label each ingredient with a forest name, like “forest nuts” for almonds or “acorn crumble” for the graham bears, and prop it against the jar.
- Fill the bar a few hours ahead if needed, but hold off filling the chocolate jar until closer to serving if the room runs warm.
🛍 Shopping guide
Mushroom Caprese Bites
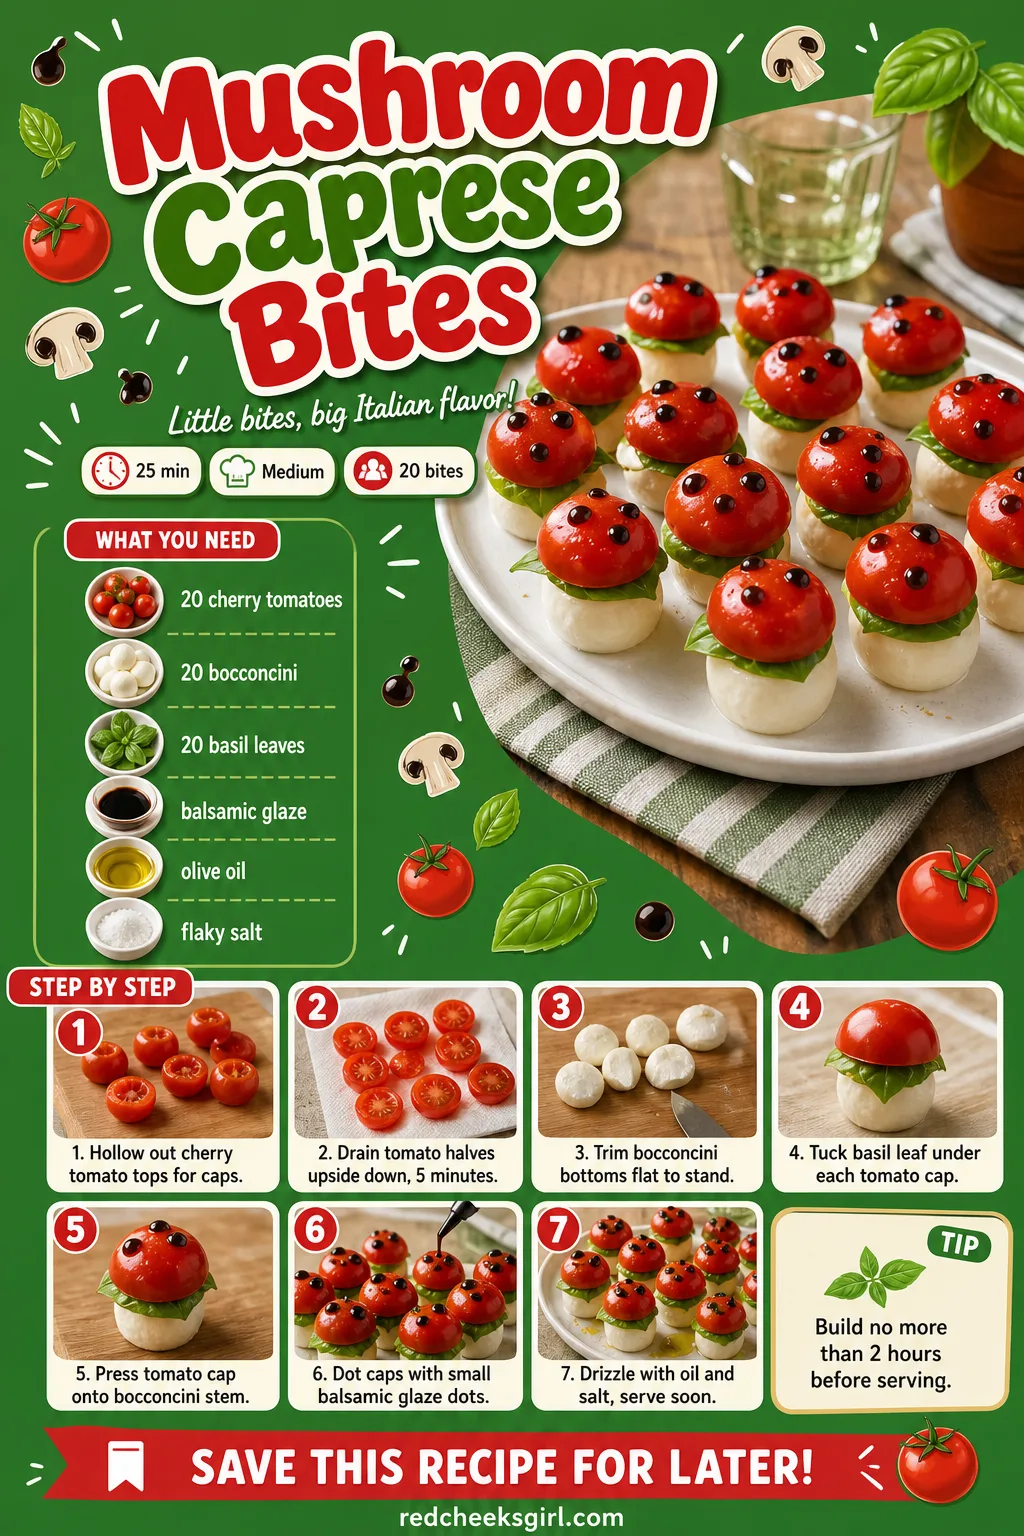
A caprese salad eaten standing up rarely survives the trip from table to sofa. These bites shrink the whole thing onto a toothpick, tomato cap balanced on a mozzarella stem, so the fork problem disappears completely.
Basil tucked underneath adds a cool, slightly peppery snap against the soft cheese, which is most of why people reach for a second one. Build them close to serving time, since a tomato that sits too long starts to weep onto the plate.
Ingredients
- 20 cherry tomatoes
- 20 small bocconcini (mini mozzarella balls)
- 20 fresh basil leaves
- 2 tablespoons balsamic glaze
- 1 tablespoon olive oil
- Flaky salt, for finishing
Instructions
- Slice a thin cap off the top of each cherry tomato and set caps aside, then scoop seeds and pulp from the base half with a small spoon so only the shell remains.
- Turn the hollowed tomato halves upside down on a paper towel for 5 minutes to drain, since a wet tomato won’t sit flat on the bocconcini stem.
- Trim a thin slice off the bottom of each bocconcini so it stands upright without rolling; this becomes the mushroom stem.
- Press a basil leaf onto the cut top of the bocconcini, folding it slightly so it peeks out from under the tomato like gills.
- Set the drained tomato cap on top, round side up, and press gently so the pieces stay together without a pick.
- Dot the top of each tomato with tiny drops of balsamic glaze using a toothpick, to mimic the pale flecks on a toadstool.
- Stand finished mushrooms upright on a platter, nudging each one straight rather than leaning, and finish with a light drizzle of olive oil and a pinch of flaky salt.
- These hold their shape for about 1 hour at room temperature; keep covered and chilled until just before serving if building more than 2 hours ahead.
🛍 Shopping guide
Pinecone Cheese Ball
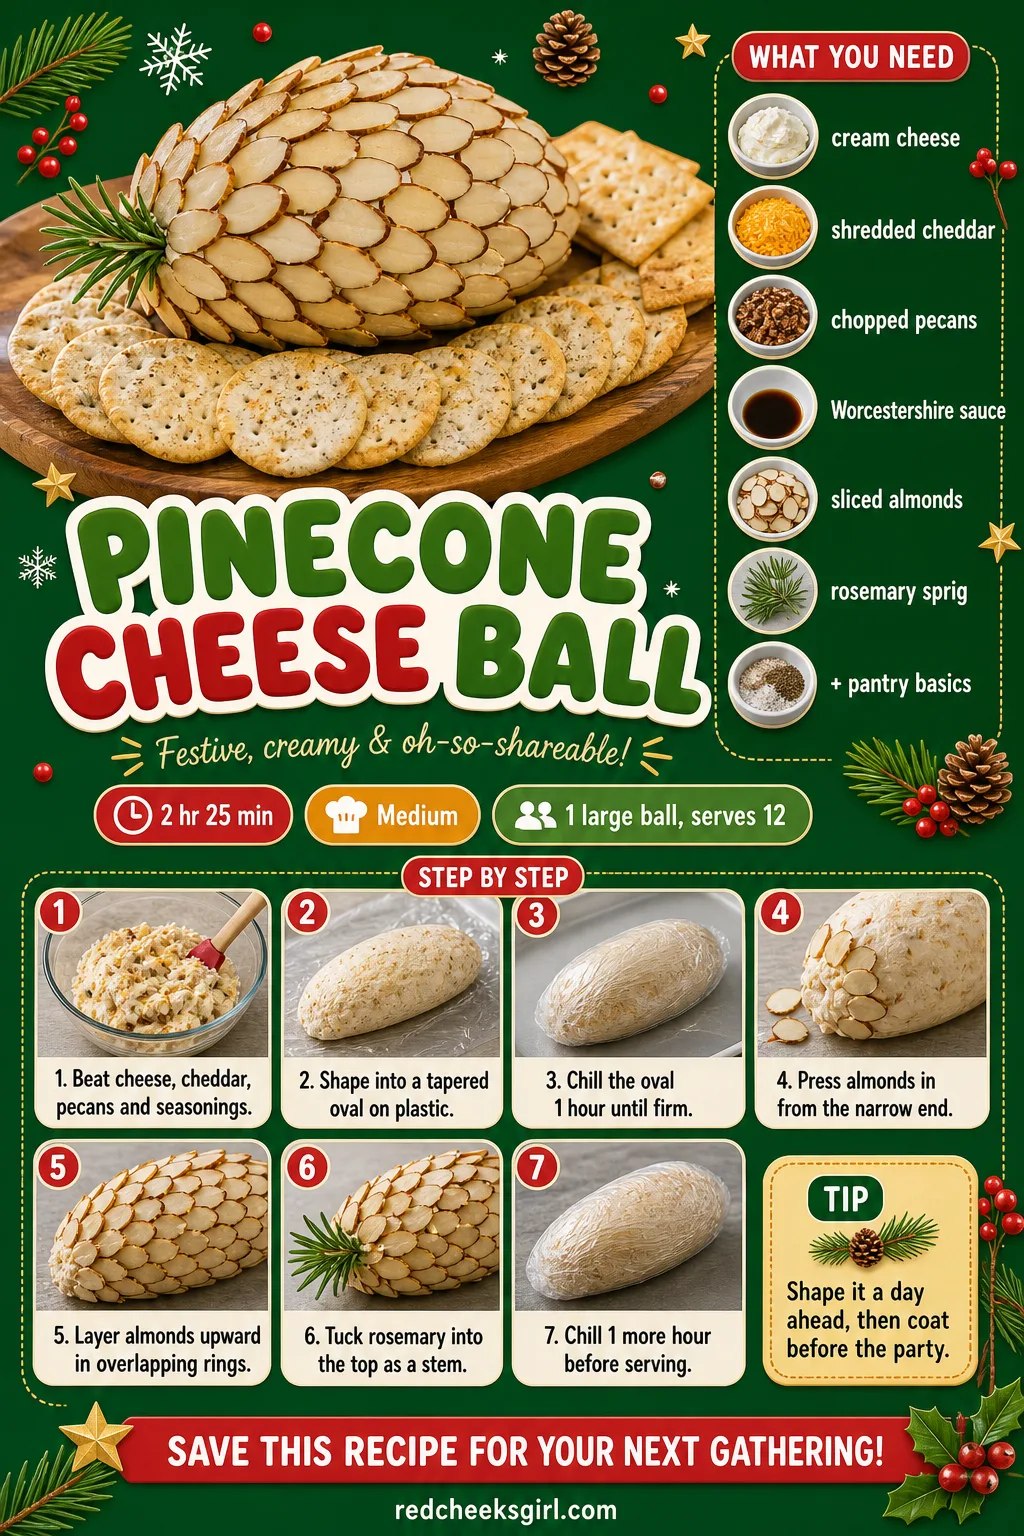
A plain cheese ball rolled in nuts has sat on every party table since someone’s mother first made one, so the trick is giving it a shape nobody has seen before. Shingled almonds turn the same mixture into something that looks like it fell off a tree.
It spreads soft against a cracker, with sharp cheddar cutting through the cream cheese so it never tastes one-note. Shape it the day before and add the almonds that morning, since they lose their crunch sitting against the cheese overnight.
Ingredients
- 16 oz cream cheese, softened
- 1 cup shredded sharp cheddar
- 1/4 cup finely chopped pecans
- 2 tablespoons Worcestershire sauce
- 1 teaspoon garlic powder
- 2 cups sliced almonds
- 1 small rosemary sprig, for the stem
- Crackers, for serving
Instructions
- Beat the cream cheese, cheddar, pecans, Worcestershire sauce and garlic powder together until no white streaks remain and the mixture holds its shape when pressed with a spoon.
- Scrape the mixture onto plastic wrap and shape it into an oval, tapering one end slightly narrower than the other, like a real pinecone.
- Wrap tightly and chill for at least 1 hour, until firm enough to hold an almond without collapsing.
- Unwrap onto a serving board and, starting at the narrow end, press sliced almonds in, pointed end out, in a tight overlapping row.
- Work up the oval in rings, each new row overlapping the base of the row below, the way real pinecone scales stack.
- Keep the almonds angled slightly upward as you go, since flat almonds read as scales and sideways ones just look stuck on.
- Tuck the rosemary sprig into the narrow top end once the last ring is pressed in, to stand in as the stem.
- Chill the finished ball another hour, uncovered, so the almond coating sets against the cheese and doesn’t shed when sliced into.
- Serve on its side on a wooden board, nestled against greenery, with crackers fanned around the base.
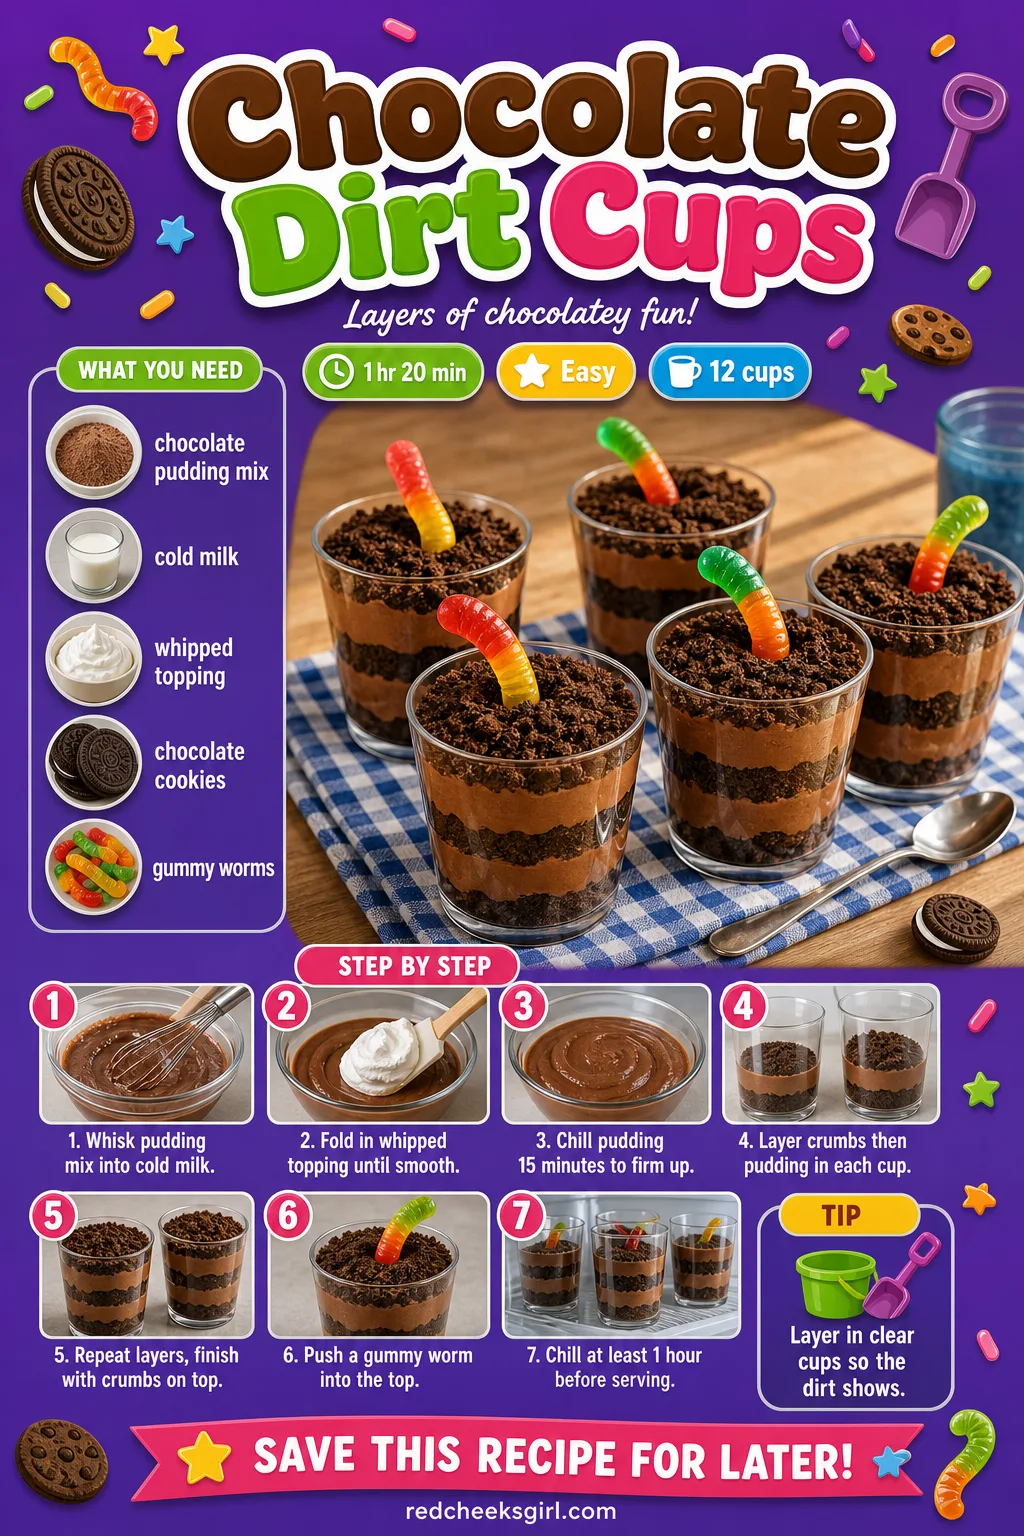
Chocolate Dirt Cups
Dirt cups read like a children’s party trick, crushed cookies and a gummy worm, except the chocolate pudding underneath is rich enough that adults keep reaching for a second one anyway.
Built in a clear cup, the layers show through the side so nobody has to guess what’s inside before the first spoonful. Swap in a coconut milk pudding if anyone avoids dairy; the layers still show just as well.
Ingredients
- 2 (3.9 oz) boxes instant chocolate pudding mix
- 4 cups cold milk
- 1 cup whipped topping, thawed
- 24 chocolate sandwich cookies, crushed
- 12 gummy worms
Instructions
- Whisk the pudding mix into the cold milk for 2 minutes, until a spoon dragged through leaves a clear trail that doesn’t fill back in right away.
- Fold the whipped topping gently into the pudding until no white streaks remain, which lightens the texture so it’s easy to spoon.
- Chill the pudding for 15 minutes before building, so it firms up enough to hold a cookie crumb layer without sinking.
- Set out 12 small clear cups so the layers show through the side, since the look is half the point of a dirt cup.
- Spoon a thin layer of crushed cookie crumbs into the bottom of each cup, pressing lightly so it sits flat.
- Add a layer of pudding on top, filling each cup about halfway, then smooth the surface with the back of a spoon.
- Repeat with another layer of crumbs, then pudding, finishing just short of the rim so there’s room for the top layer.
- Cover the top of each cup with a generous layer of crumbs, patting flat so it looks like loose soil.
- Push a gummy worm halfway into the top crumb layer so it curls above the surface, then chill at least 1 hour before serving so the layers set.
🛍 Shopping guide
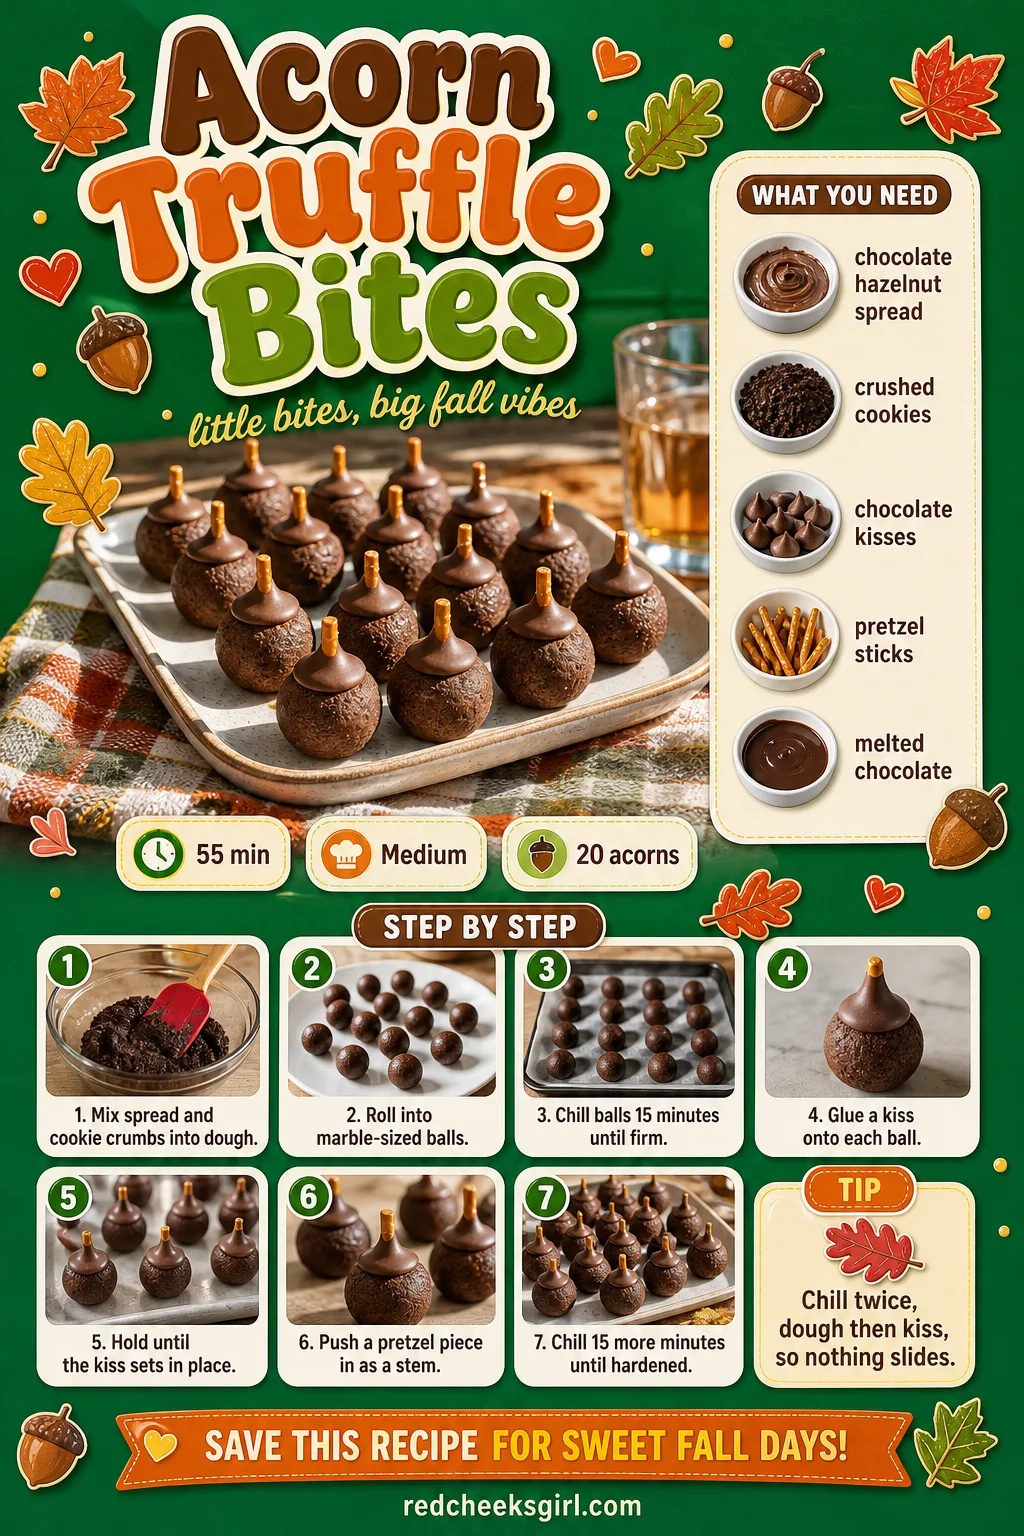
Acorn Truffle Bites
Truffles usually mean tempering chocolate and a candy thermometer, neither of which belongs at a baby shower. These skip all of it, built instead from a cookie dough base with a chocolate kiss glued on top.
The inside stays soft and a little chewy against a shell that snaps cleanly, which is the contrast that makes people ask what’s in them. Keep a few spare kisses on hand, since the glue step occasionally pops one loose before it sets.
Ingredients
- 1 cup chocolate hazelnut spread
- 1 cup crushed chocolate sandwich cookies
- 20 chocolate kisses, unwrapped
- 20 small pretzel stick pieces, 1/2 inch each
- 2 tablespoons melted chocolate, for gluing
Instructions
- Mix the chocolate hazelnut spread with the crushed cookie crumbs until it forms a thick, fudgy dough that holds together when squeezed in your palm.
- Scoop level tablespoons of dough and roll each between your palms into a smooth ball, about the size of a large marble.
- Chill the rolled balls for 15 minutes on a tray, until firm enough to hold a shape when you press a kiss against them.
- Dip the flat bottom of a chocolate kiss into the melted chocolate and press it onto the top of a dough ball, flat side down, pointed tip facing up.
- Hold each one for a few seconds until the kiss stays put on its own, which tells you the melted chocolate has started to grip.
- Push a small pretzel piece into the top of the kiss, right where the point meets the dough ball, to look like an acorn stem.
- Stand the acorns upright on a parchment-lined tray and chill for 15 more minutes, until the chocolate glue has fully hardened.
- Serve on a small dish; they hold at room temperature for about 2 hours before the chocolate starts to soften.
Log Cabin Charcuterie Board
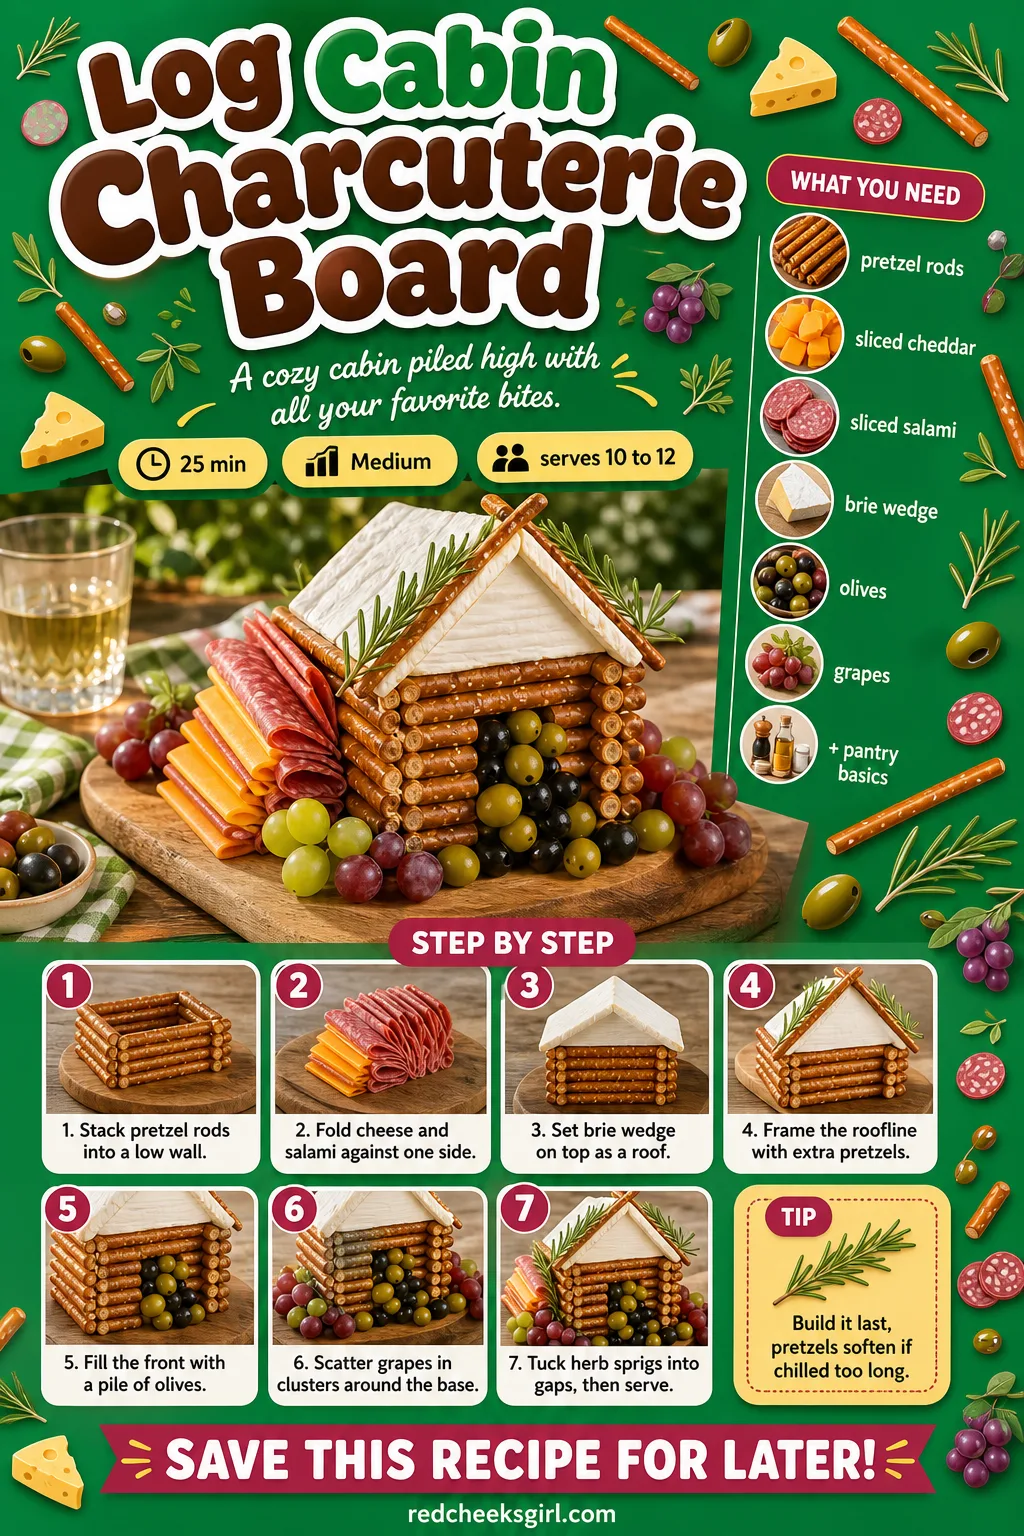
A charcuterie board with no shape to it reads as “snacks”, not as a party. Stack the same meat and cheese into walls and a peaked roof and the exact same ingredients suddenly look built, not just scattered.
Salty cured meat against a wedge of soft brie keeps people moving around the board rather than parking at one corner. Build this one last, closer to serving, since pretzel logs left stacked too long in a warm room start to slump.
Ingredients
- 12 pretzel rods
- 8 oz sliced cheddar cheese
- 8 oz sliced salami
- 1 small wedge brie, for the roof
- 1 cup mixed olives
- 1 cup red and green grapes
- Fresh thyme or rosemary sprigs, for garnish
Instructions
- Lay the first pretzel rod flat on the board as the base log, then set a second rod right beside it, touching, to start the cabin’s front wall.
- Keep stacking pretzel rods, two or three logs high, until you have a low rectangle about the size of your palm: this is the cabin wall.
- Fold cheddar and salami slices into quarters and lean them against one side of the wall like a stack of firewood, slightly overlapping.
- Set the brie wedge on its side on top of the wall, pointed end up, so it reads as a peaked roof.
- Tuck a few extra pretzel rods along both slanted edges of the brie to frame the roofline, pressing gently so they stay put.
- Fill the open space in front of the wall with a loose pile of olives, to look like stones scattered on the ground.
- Scatter the grapes in small clusters around the base, leaving the front clear so the shape still reads from above.
- Tuck herb sprigs upright into gaps along the roofline and base, standing a few taller than others for a less uniform look.
- Face the peaked roof toward the center of the table so it reads correctly from the direction most guests approach, and serve with crackers on the side.
Mushroom Deviled Eggs
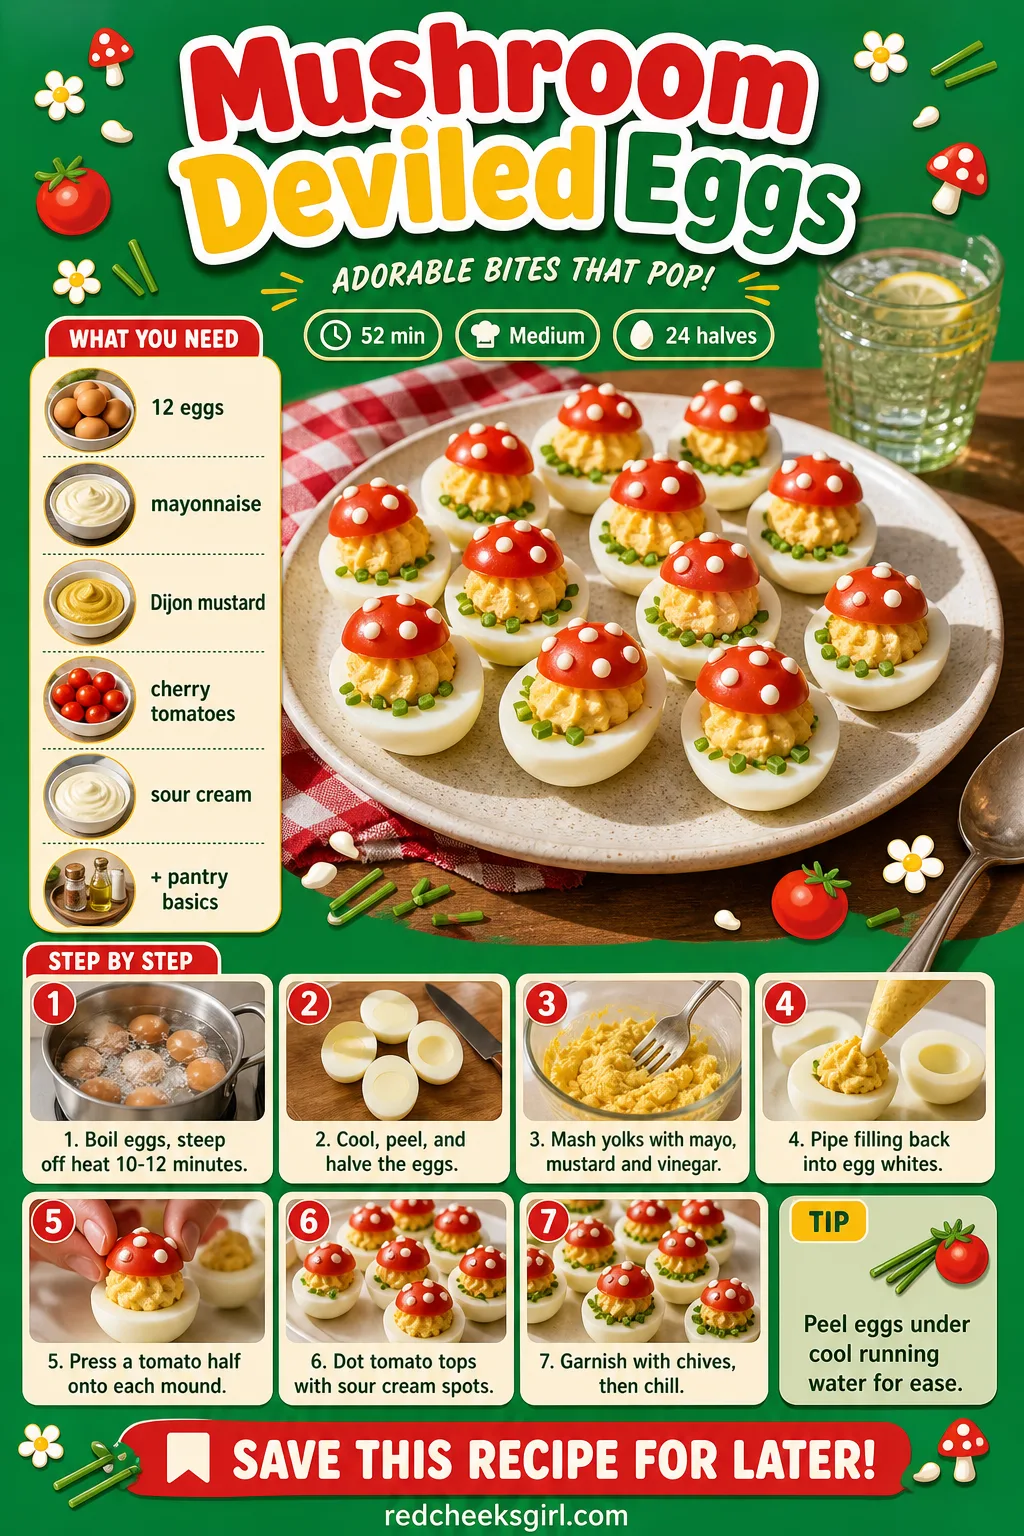
Deviled eggs vanish from every buffet within the first twenty minutes, so the only real decision is whether to let them look plain or give them five extra minutes of styling. A cherry tomato cap pressed onto the yolk filling turns the egg into a toadstool.
The filling stays rich and a little tangy from the mustard and vinegar, cool against the slightly warm give of the tomato. Hard boil the eggs up to two days ahead and fill them the morning of, since a filled egg dries out faster than an unfilled one.
Ingredients
- 12 large eggs
- 1/3 cup mayonnaise
- 1 teaspoon Dijon mustard
- 1 teaspoon white vinegar
- 1/4 teaspoon salt, plus more to taste
- 1/8 teaspoon black pepper
- 12 cherry tomatoes, halved
- 2 tablespoons sour cream, for the spots
- Fresh chives, snipped, for garnish
Instructions
- Place the eggs in a single layer in a saucepan, cover with cold water by 1 inch, and bring to a full boil over medium-high heat.
- As soon as the water boils, cover the pan, remove from heat, and let the eggs sit for 10 to 12 minutes: the yolks should come out fully set with no grey ring and no soft center.
- Drain and run the eggs under cold water for a few minutes, then peel once cool enough to handle; the shell should slip off in large pieces, not stick to the white.
- Halve each egg lengthwise and scoop the yolks into a bowl, setting the whites aside cut side up; this cut side becomes the mushroom stem once filled.
- Mash the yolks with mayonnaise, mustard, vinegar, salt and pepper until completely smooth, with no lumps left when pressed with the back of a fork.
- Pipe the yolk filling back into each white, mounding it slightly higher in the center than at the edges, so the finished stem has a gentle dome.
- Press a cherry tomato half, cut side down, onto the mound of filling on each egg, pressing just enough that it holds without squeezing filling out the sides.
- Dot the rounded top of each tomato with tiny dabs of sour cream using a toothpick, spacing them unevenly the way real mushroom caps are spotted.
- Snip a few short chive pieces and tuck them at the base of each egg on the platter, then chill until ready to serve.
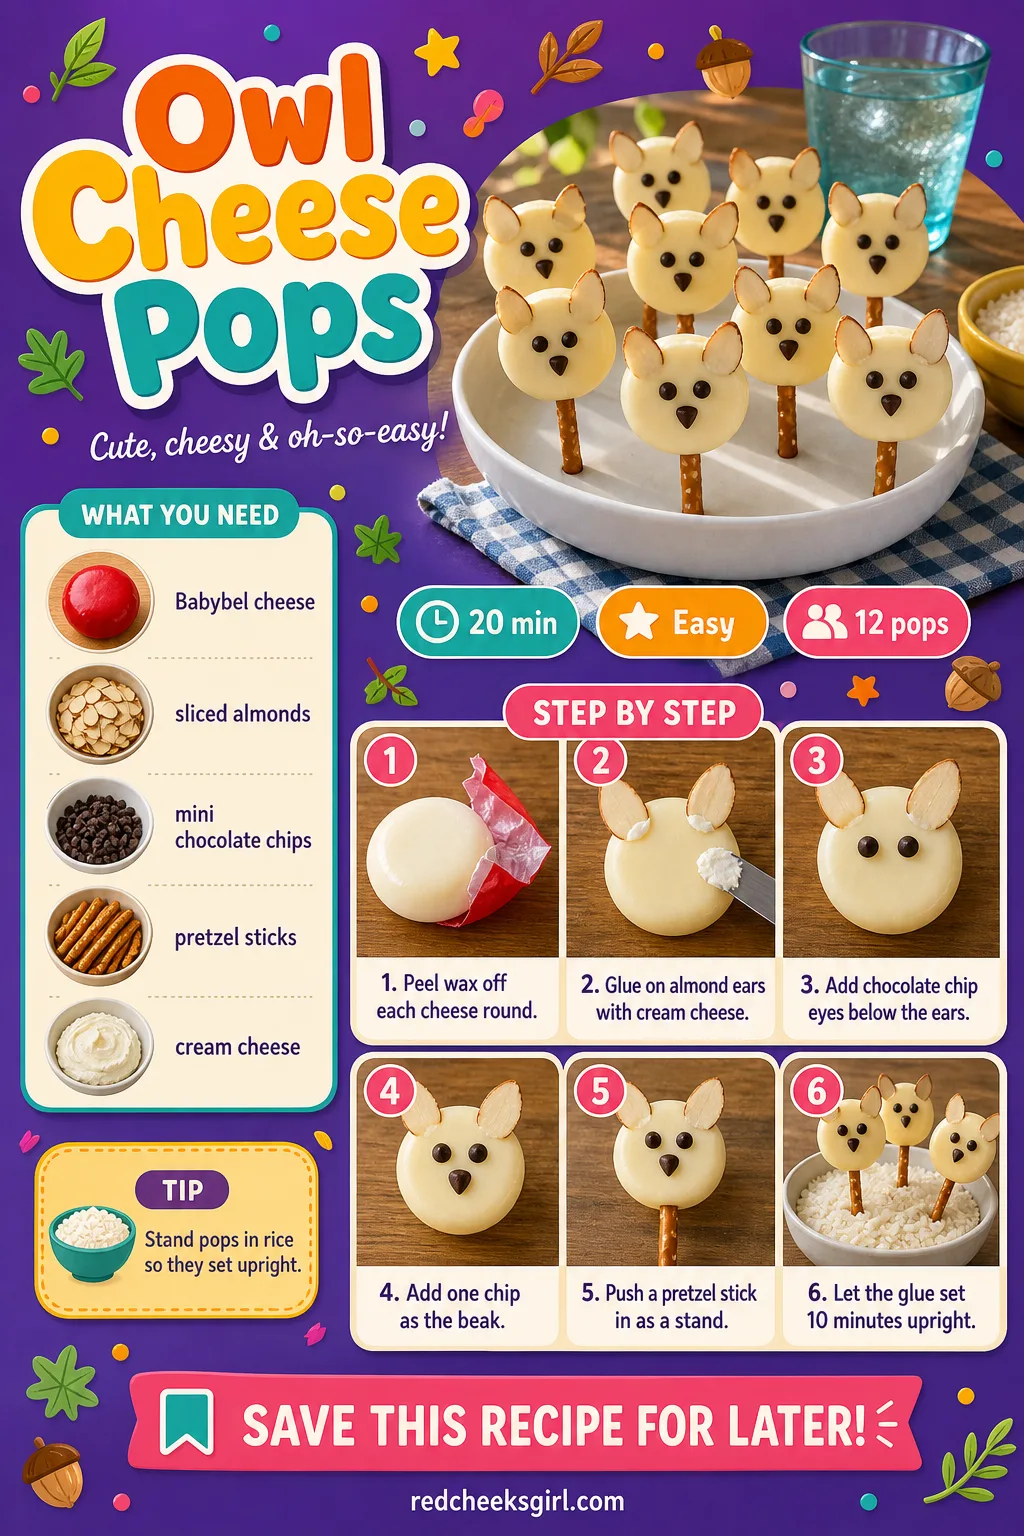
Owl Cheese Pops
Some items on a party table need an hour and a steady hand; this one needs ten minutes and a bag of mini cheese rounds. Almond ears and chocolate chip eyes turn a fridge staple into something instantly recognizable.
The cheese itself stays mild and a little salty, an easy counterpoint to all the sweet things stacked nearby. Stand them in a shallow dish of rice while the glue sets if the counter has nowhere flat and steady.
Ingredients
- 12 mini Babybel cheese rounds, wax removed
- 24 sliced almonds
- 24 mini chocolate chips
- 12 small pretzel sticks
- 2 tablespoons cream cheese, softened, for gluing
Instructions
- Peel the wax coating off each cheese round completely, since any leftover wax keeps the almonds from sticking later.
- Dab softened cream cheese onto the back of two sliced almonds and press onto the top of the round, pointed ends up and slightly angled outward, for ears.
- Dab two more small dots of cream cheese below the ears and press on two mini chocolate chips, flat side out, for the eyes.
- Add one more chocolate chip, point down, just under and between the eyes for the beak.
- Push a pretzel stick into the bottom of the round at a slight angle, so the finished pop can stand upright on its own.
- Stand the pops in a shallow dish of dried rice or florist foam so they hold upright while the glue sets for 10 minutes.
- Keep chilled until serving and arrange upright on a platter so each owl faces forward.
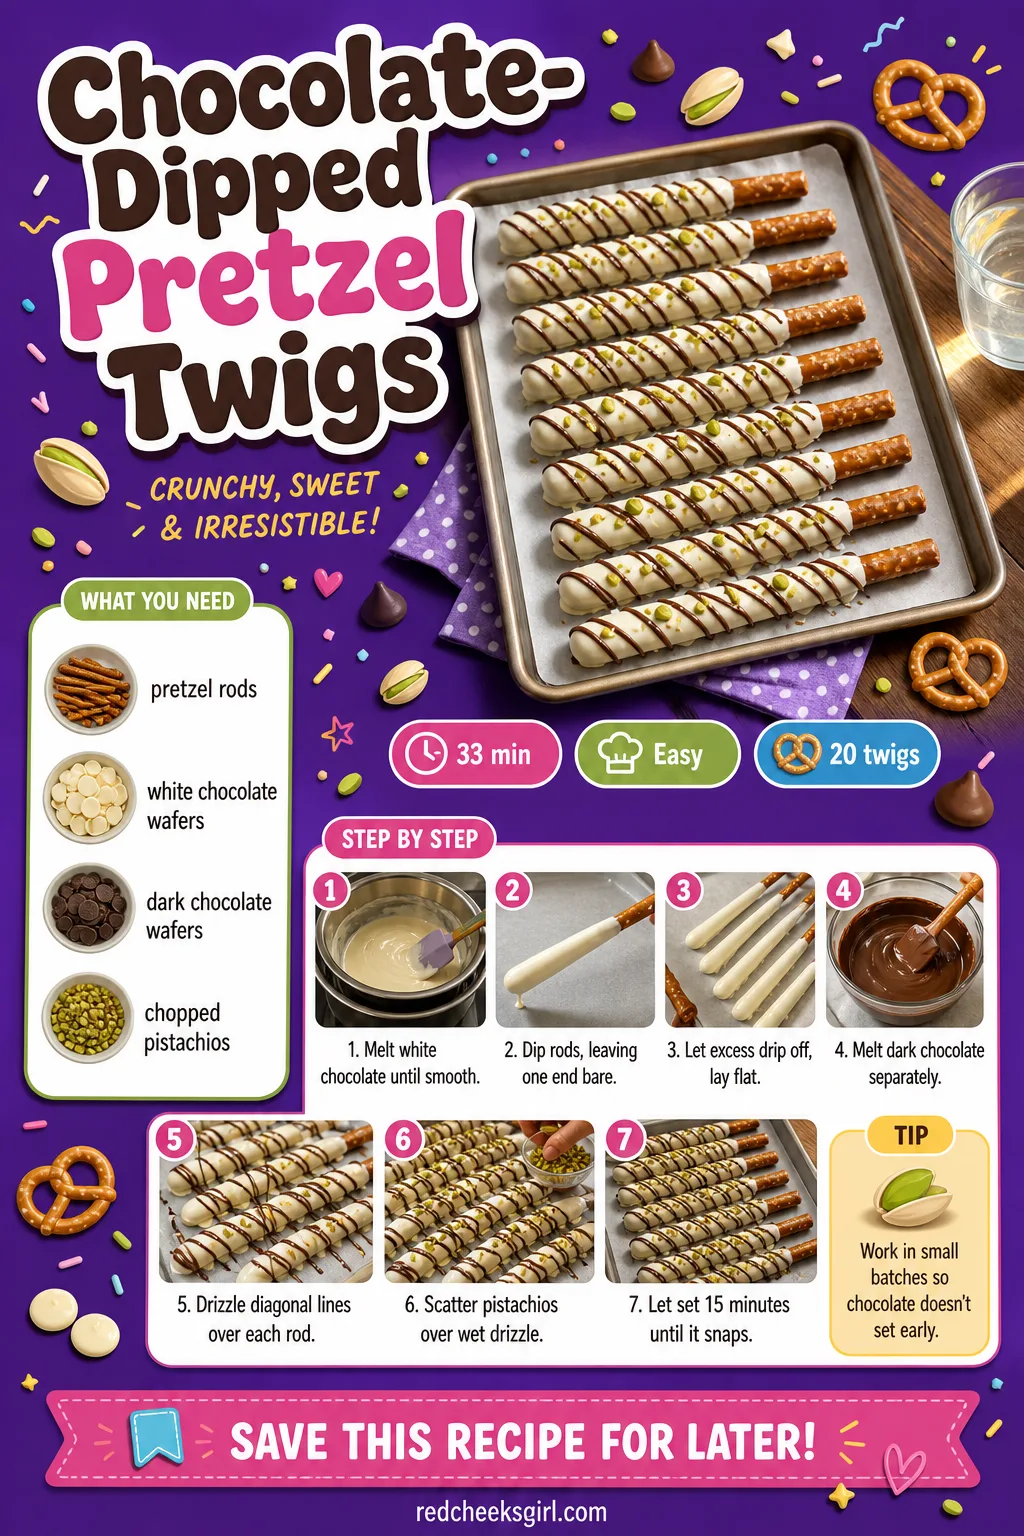
Chocolate-Dipped Pretzel Twigs
A chocolate covered pretzel rod on its own looks like a chocolate covered pretzel rod, nothing more. Drizzled dark chocolate lines across a white chocolate coating turn the same rod into a birch twig, the kind of detail guests notice and mention out loud.
The snap of the shell gives way to a soft, salty pretzel underneath, which is why people keep picking at the bowl. Melt the chocolate in small batches, since a full bag firms up before all twenty rods get dipped.
Ingredients
- 20 pretzel rods
- 1 1/2 cups white chocolate melting wafers
- 1/2 cup dark chocolate melting wafers
- 2 tablespoons chopped pistachios, optional
Instructions
- Melt the white chocolate wafers in a tall narrow glass in the microwave in 20 second bursts, stirring between each, until it pours smoothly off the spoon with no lumps.
- Dip each pretzel rod into the melted white chocolate, turning it so the coating covers about three quarters of the rod and leaves one end bare as a handle.
- Let any extra chocolate drip back into the glass for a few seconds, then lay the rod flat on a parchment-lined tray.
- Once all the rods are dipped, melt the dark chocolate the same way in a separate glass, in 20 second bursts, until smooth.
- Dip a small spoon into the dark chocolate and drizzle it back and forth across each white-coated rod in thin diagonal lines, to mimic birch bark markings.
- Scatter chopped pistachios over the wet drizzle while it’s still tacky, if using, so they stick without extra glue.
- Let the rods set at room temperature for 15 minutes, or chill for 5 minutes, until the chocolate snaps cleanly when broken in half.
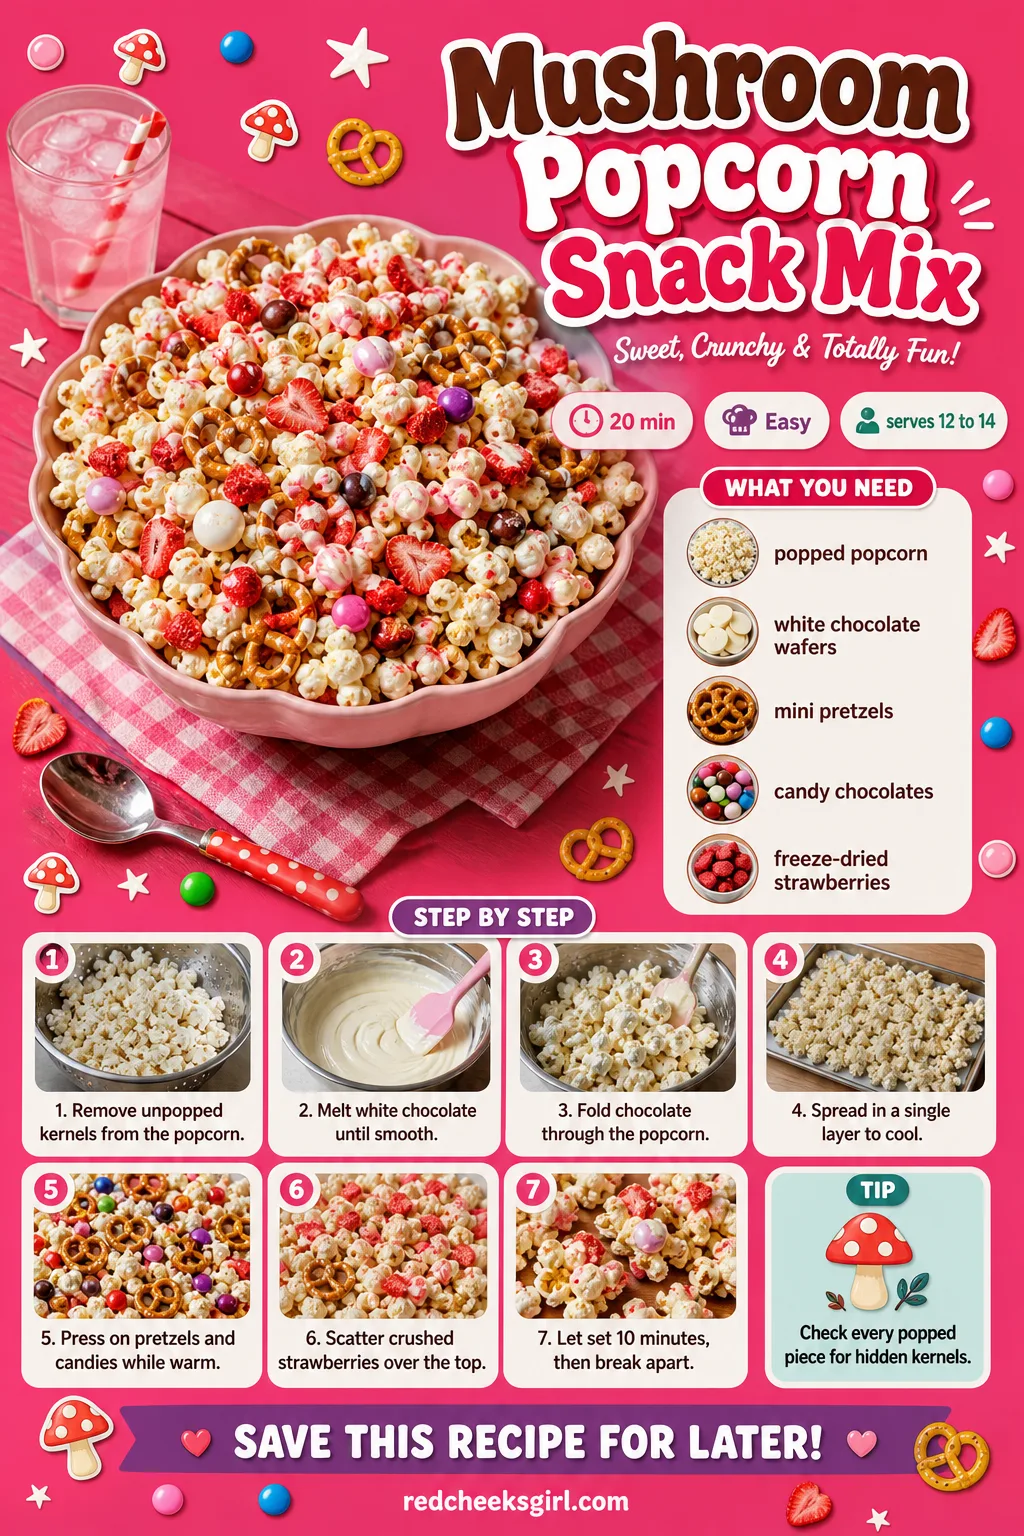
Mushroom Popcorn Snack Mix
Plain popcorn at a themed party looks like an afterthought, something grabbed on the way out the door. A white chocolate coating and crushed freeze-dried strawberries turn the same bowl into something that looks gathered from a forest floor.
It stays light and a little sweet rather than heavy, so it doesn’t compete with the richer desserts on the table. Store it airtight the same day it’s made, since popcorn softens fast once the chocolate coating is exposed to air.
Ingredients
- 10 cups popped plain popcorn
- 1 1/2 cups white chocolate melting wafers
- 1/2 cup mini pretzel twists
- 1/2 cup red and white candy-coated chocolates
- 1/4 cup freeze-dried strawberry pieces, crushed
Instructions
- Pick through the popped popcorn and remove any unpopped kernels, since those are the only thing in this mix that could actually hurt someone.
- Melt the white chocolate wafers in a large microwave-safe bowl in 30 second bursts, stirring between each, until smooth and pourable with no stiff lumps.
- Pour the melted chocolate over the popcorn and fold gently with a spatula until every piece is lightly coated, working quickly before it firms up.
- Spread the coated popcorn in a single layer on a parchment-lined tray so it doesn’t clump into one solid mass as it cools.
- Scatter the mini pretzels and candy-coated chocolates over the warm popcorn right away, pressing lightly so they stick to the setting chocolate.
- Sprinkle the crushed freeze-dried strawberries over the top in small clusters to look like scattered mushroom caps across the popcorn.
- Let the mix cool at room temperature for 10 minutes, until the chocolate hardens and no longer feels tacky, then break into clusters and store airtight.
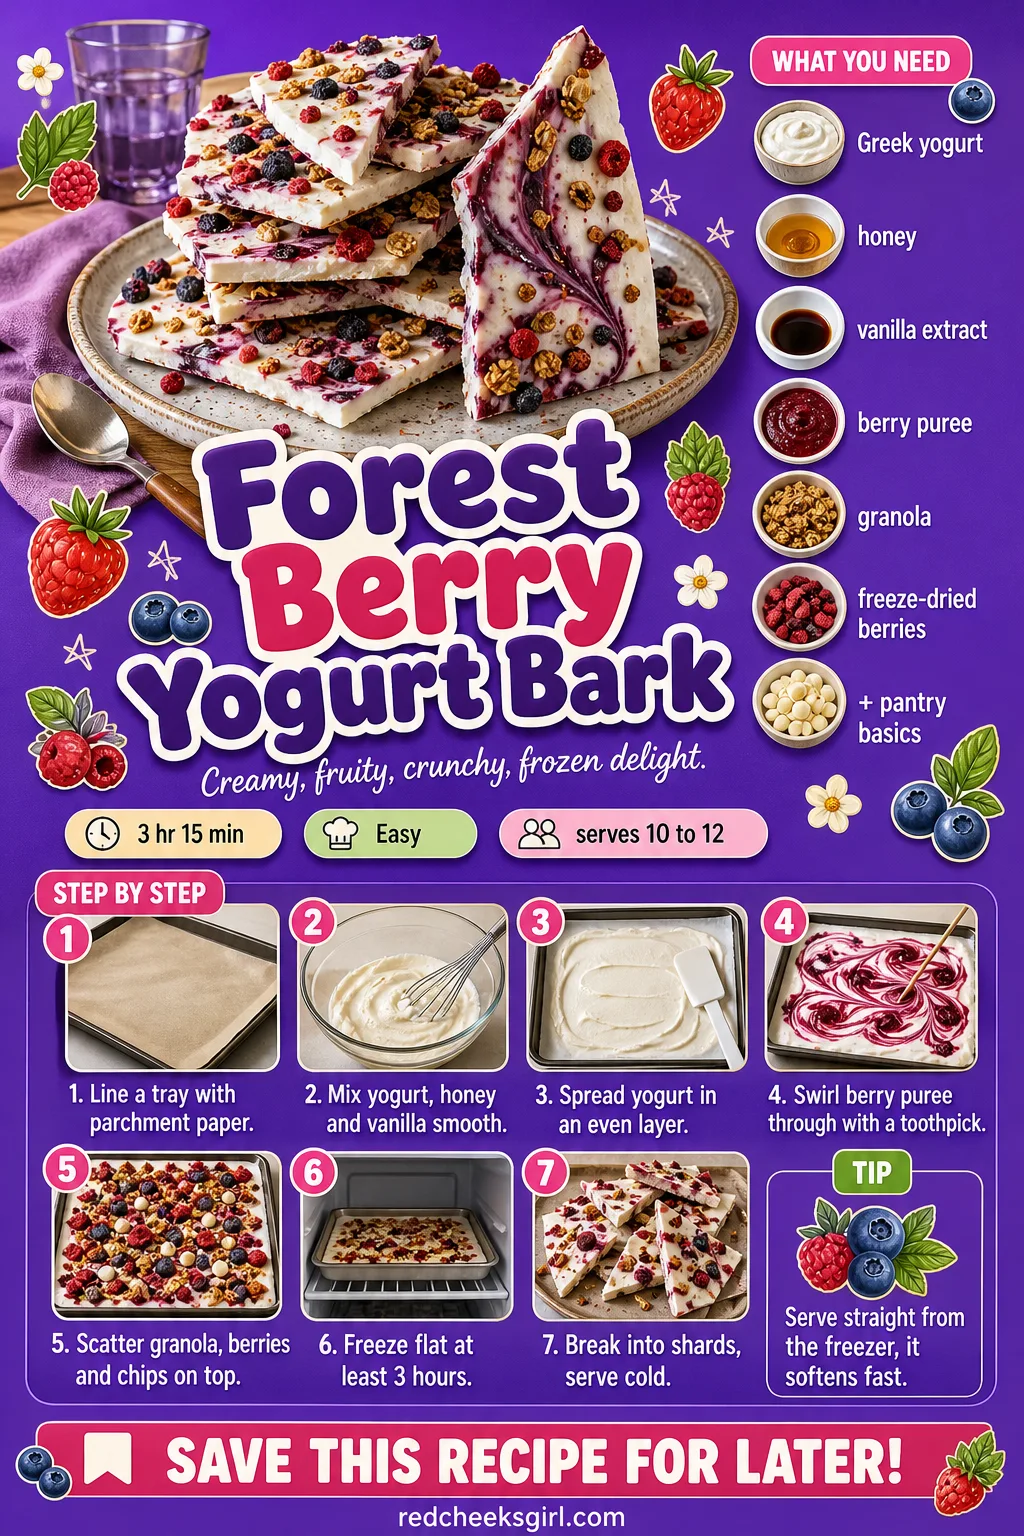
Forest Berry Yogurt Bark
After a table full of chocolate and cheese, something cold and a little tart gives the whole spread some balance. This bark stays icy and faintly sweet, with the berry swirl cutting through the plain yogurt base so it never tastes like frozen yogurt from a tub.
It shatters into pieces the way bark actually splits, rough edges and all, rather than slicing clean. Keep it in the freezer until the very last minute; it starts to soften within ten minutes at room temperature.
Ingredients
- 3 cups plain Greek yogurt
- 1/4 cup honey
- 1 teaspoon vanilla extract
- 1/2 cup mixed berry puree, blended fresh or thawed berries
- 1/2 cup granola
- 1/3 cup freeze-dried raspberries and blueberries, crushed
- 2 tablespoons mini chocolate chips
Instructions
- Line a rimmed baking sheet with parchment paper, pressing it flat into the corners so the yogurt has nowhere to pool thick.
- Stir the yogurt, honey and vanilla together until smooth, with no streaks of honey left at the bottom of the bowl.
- Pour the yogurt mixture onto the tray and spread into an even layer about 1/4 inch thick with an offset spatula, working from the center outward.
- Drop small spoonfuls of berry puree over the surface and drag a toothpick through each in a loose swirl, without overmixing, so distinct streaks of color stay visible.
- Scatter the granola, crushed freeze-dried berries and chocolate chips evenly over the top, pressing down very lightly so nothing rolls off once frozen.
- Freeze the tray flat for at least 3 hours, until the yogurt is solid all the way through and doesn’t give when the center is pressed.
- Lift the frozen slab out by the parchment and break it into irregular shards with your hands, the way bark splits off a tree.
- Serve straight from the freezer on a cold platter, since the bark softens within 10 minutes at room temperature and is easiest to eat while still firm.
Mini Acorn Cheese Bites
A whole cheese ball asks for a knife and a steady hand with the crackers; these ask for nothing but a hand. Each one is a single bite, shaped like a tiny acorn with a pretzel stem, so it works for a seated shower as easily as a standing one.
Smoked paprika keeps the filling from tasting flat against the sharper cheddar, with a faint smoky note underneath the cream. Make the filling a day ahead and roll just before serving, since the crumb coating softens if it sits too long.
Ingredients
- 8 oz cream cheese, softened
- 1/2 cup shredded cheddar
- 1 tablespoon chopped chives
- 1/2 teaspoon smoked paprika
- 3/4 cup finely crushed pretzel crumbs
- 20 small pretzel stick pieces, 1/2 inch each
Instructions
- Beat the cream cheese, cheddar, chives and paprika together until fully blended and streak free, soft enough to scoop but firm enough to hold a shape.
- Chill the mixture for 15 minutes, until cool and firm enough to scoop without sticking heavily to the spoon.
- Scoop level teaspoons of the mixture and roll each between your palms into a small oval, slightly narrower at one end, about the size of a large grape.
- Roll the wider end of each oval in the crushed pretzel crumbs, pressing gently so the crumbs coat about two thirds of the shape like an acorn’s rough cap.
- Leave the narrow end bare and smooth, so the cheese shows through as the acorn’s shell.
- Push a small pretzel piece into the narrow end of each oval to form the stem.
- Set the finished acorns on a parchment-lined tray and chill for 15 more minutes, until firm enough to hold their shape when picked up.
- Arrange on a bed of crackers or in a shallow dish, stem ends up, so each one reads clearly as an acorn.
Frequently Asked Questions
What food should you serve at a woodland baby shower?
Serve small, shareable bites that lean into mushrooms, acorns and pinecones rather than a formal sit-down meal, since the theme reads best in snack form. A cheese board, a trail mix bar and a few shaped sweets usually cover a two-hour window comfortably.
What goes on a s’mores board?
A s’mores board holds graham crackers, two or three kinds of chocolate, marshmallows in two sizes, and one extra topping like caramel sauce or peanut butter cups for variety. Guests build their own, which keeps the hosting work down to arranging rather than serving.
Can woodland baby shower food be made ahead of time?
Most of it can, since nearly everything here is assembled rather than baked. Cheese balls, truffle bites and dirt cup pudding hold well in the fridge a day ahead; wait to add pretzel pieces or crumb toppings until closer to serving so nothing softens.
How do you make mushroom caprese bites?
Mushroom caprese bites stack a hollowed cherry tomato half on top of a trimmed bocconcini ball with a basil leaf tucked between the two, so the finished piece looks like a tiny toadstool. A toothpick holds the layers together if the cheese is sliced flat.
What is in a dirt cup?
A dirt cup layers crushed chocolate cookie crumbs with chocolate pudding in a clear cup, topped with a final crumb layer and a gummy worm pushed halfway in. The crumbs stand in for soil and the worm is the whole joke.
How do you make a pinecone cheese ball?
A pinecone cheese ball shapes a cream cheese and cheddar mixture into a tapered oval, then covers it in sliced almonds pressed in overlapping rows from the narrow end up, like real pinecone scales. A sprig of rosemary at the top finishes the stem.

24 tutu baby shower theme ideas: ballet pose photo spot, pointe shoe cookies, music box details, tul
15 bear baby shower games for a 'We Can Bearly Wait' theme — printable, active & quiet ideas your
Choose a stylish we can bearly wait baby shower theme with 12 playful, vintage, cosy cabin and soft
Leave a Reply